Aug 092019
 
IIS Logo Image

You may find yourself unable to download attachments on an e-mail message you received on your Android or Apple iPhone from your Microsoft Exchange Server. In my case, this presented a “Unable to download.” with a retry option. Retrying would not work.

If the attachment is larger (over 10MB), this is most likely due to a limit enforced on the Activesync site in IIS on your Exchange Server. In this post I’m going to tell you why this happens, and how to fix it!

The Problem

Microsoft Exchange uses IIS (Internet Information Server) for numerous services including ActiveSync. ActiveSync provides the connectivity to your mobile device for your Exchange access.

IIS has numerous limits configured to stop massive bogus requests, reduce DDOS attacks, and other reasons.

The Fix

To resolve this and allow the attachment to download, we need to modify two configuration values inside of the web.config file on IIS.

Below are the values we will be modifying:

  • MaxDocumentDataSize – Maximum file (message) data size for transfer. “Sets the maximum data size that we will fetch (range or othewise)”
  • maxRequestLength – “Specifies the limit for the input stream buffering threshold, in KB. This limit can be used to prevent denial of service attacks that are caused, for example, by users posting large files to the server. The default is 4096 KB.” (as per here)

These settings are configured in the following file:

C:\Program Files\Microsoft\Exchange Server\V15\ClientAccess\Sync\web.config

Before modifying the variables, please make a copy or backup of the web.config file so you can restore.

After you make a backup, open the file in notepad (right click -> run as administrator), and open the web.config file.

Simply search for the two values listed above, and change them. In my case, I tripled the “MaxDocumentDataSize”, and the “maxRequestLength” values. Examples from my “web.config” file are below:

add key="MaxDocumentDataSize" value="30720000"
httpRuntime maxRequestLength="30720" fcnMode="Disabled"

After changing these, run the following command from an elevated (as administrator) command prompt to restart IIS:

iisreset

And bam, you’re good to go!

Feb 192019
 

Upgrading to Exchange 2016 CU12 may fail when using Let’s Encrypt SSL Certificates

On a Microsoft Exchange 2016 Server, utilizing Let’s Encrypt SSL Certificates, an upgrade to Cumulative Update 12 may fail. This is due to security permissions on the SSL certificate.

I later noticed that this occurs on all cumulative updates when using the Let’s Encrypt SSL certificates. This includes Exchange 2016 CU13 and CU14.

The CU install will fail, some services may function, but the server will not accept e-mail, or allow connections from Microsoft Outlook, or ActiveSync devices. PowerShell and EAC will not function.

The issue can be identified on this failure log:

[02/18/2019 19:24:28.0862] [2] Beginning processing Install-AuthCertificate
[02/18/2019 19:24:28.0867] [2] Ending processing Install-AuthCertificate
[02/18/2019 19:24:28.0868] [1] The following 1 error(s) occurred during task execution:
[02/18/2019 19:24:28.0868] [1] 0. ErrorRecord: Could not grant Network Service access to the certificate with thumbprint XXXXXXXXXXXXXXXXXXXXXXXXXXXXXXXXXXXX because a cryptographic exception was thrown.
[02/18/2019 19:24:28.0868] [1] 0. ErrorRecord: Microsoft.Exchange.Management.SystemConfigurationTasks.AddAccessRuleCryptographicException: Could not grant Network Service access to the certificate with thumbprint XXXXXXXXXXXXXXXXXXXXXXXXXXXXXXXXXXXX because a cryptographic exception was thrown. ---> System.Security.Cryptography.CryptographicException: Access is denied.
at Microsoft.Exchange.Security.Cryptography.X509Certificates.TlsCertificateInfo.CAPIAddAccessRule(X509Certificate2 certificate, AccessRule rule)
at Microsoft.Exchange.Security.Cryptography.X509Certificates.TlsCertificateInfo.AddAccessRule(X509Certificate2 certificate, AccessRule rule)
at Microsoft.Exchange.Management.SystemConfigurationTasks.ManageExchangeCertificate.EnableForServices(X509Certificate2 cert, AllowedServices services, String websiteName, Boolean requireSsl, ITopologyConfigurationSession dataSession, Server server, List`1 warningList, Boolean allowConfirmation, Boolean forceNetworkService)
--- End of inner exception stack trace ---
at Microsoft.Exchange.Configuration.Tasks.Task.ThrowError(Exception exception, ErrorCategory errorCategory, Object target, String helpUrl)
at Microsoft.Exchange.Configuration.Tasks.Task.WriteError(Exception exception, ErrorCategory category, Object target)
at Microsoft.Exchange.Management.SystemConfigurationTasks.InstallExchangeCertificate.EnableForServices(X509Certificate2 cert, AllowedServices services)
at Microsoft.Exchange.Management.SystemConfigurationTasks.InstallExchangeCertificate.InternalProcessRecord()
at Microsoft.Exchange.Configuration.Tasks.Task.b__91_1()
at Microsoft.Exchange.Configuration.Tasks.Task.InvokeRetryableFunc(String funcName, Action func, Boolean terminatePipelineIfFailed)
[02/18/2019 19:24:28.0883] [1] [ERROR] The following error was generated when "$error.Clear();
Install-ExchangeCertificate -services "IIS, POP, IMAP" -DomainController $RoleDomainController
if ($RoleIsDatacenter -ne $true -And $RoleIsPartnerHosted -ne $true)
{
Install-AuthCertificate -DomainController $RoleDomainController
}
" was run: "Microsoft.Exchange.Management.SystemConfigurationTasks.AddAccessRuleCryptographicException: Could not grant Network Service access to the certificate with thumbprint XXXXXXXXXXXXXXXXXXXXXXXXXXXXXXXXXXXX because a cryptographic exception was thrown. ---> System.Security.Cryptography.CryptographicException: Access is denied.
at Microsoft.Exchange.Security.Cryptography.X509Certificates.TlsCertificateInfo.CAPIAddAccessRule(X509Certificate2 certificate, AccessRule rule)
at Microsoft.Exchange.Security.Cryptography.X509Certificates.TlsCertificateInfo.AddAccessRule(X509Certificate2 certificate, AccessRule rule)
at Microsoft.Exchange.Management.SystemConfigurationTasks.ManageExchangeCertificate.EnableForServices(X509Certificate2 cert, AllowedServices services, String websiteName, Boolean requireSsl, ITopologyConfigurationSession dataSession, Server server, List`1 warningList, Boolean allowConfirmation, Boolean forceNetworkService)
--- End of inner exception stack trace ---
at Microsoft.Exchange.Configuration.Tasks.Task.ThrowError(Exception exception, ErrorCategory errorCategory, Object target, String helpUrl)
at Microsoft.Exchange.Configuration.Tasks.Task.WriteError(Exception exception, ErrorCategory category, Object target)
at Microsoft.Exchange.Management.SystemConfigurationTasks.InstallExchangeCertificate.EnableForServices(X509Certificate2 cert, AllowedServices services)
at Microsoft.Exchange.Management.SystemConfigurationTasks.InstallExchangeCertificate.InternalProcessRecord()
at Microsoft.Exchange.Configuration.Tasks.Task.b__91_1()
at Microsoft.Exchange.Configuration.Tasks.Task.InvokeRetryableFunc(String funcName, Action func, Boolean terminatePipelineIfFailed)".
[02/18/2019 19:24:28.0883] [1] [ERROR] Could not grant Network Service access to the certificate with thumbprint XXXXXXXXXXXXXXXXXXXXXXXXXXXXXXXXXXXX because a cryptographic exception was thrown.
[02/18/2019 19:24:28.0883] [1] [ERROR] Access is denied.
[02/18/2019 19:24:28.0883] [1] [ERROR-REFERENCE] Id=CafeComponent___ece23aa8c6744163B617570021d78090 Component=EXCHANGE14:\Current\Release\Shared\Datacenter\Setup
[02/18/2019 19:24:28.0895] [1] Setup is stopping now because of one or more critical errors.
[02/18/2019 19:24:28.0895] [1] Finished executing component tasks.
[02/18/2019 19:24:28.0925] [1] Ending processing Install-CafeRole
[02/18/2019 19:35:09.0688] [0] CurrentResult setupbase.maincore:396: 0
[02/18/2019 19:35:09.0689] [0] End of Setup

The Fix

Unfortunately because Exchange is not working, you won’t be able to use Powershell or the EAC to configure SSL certs.

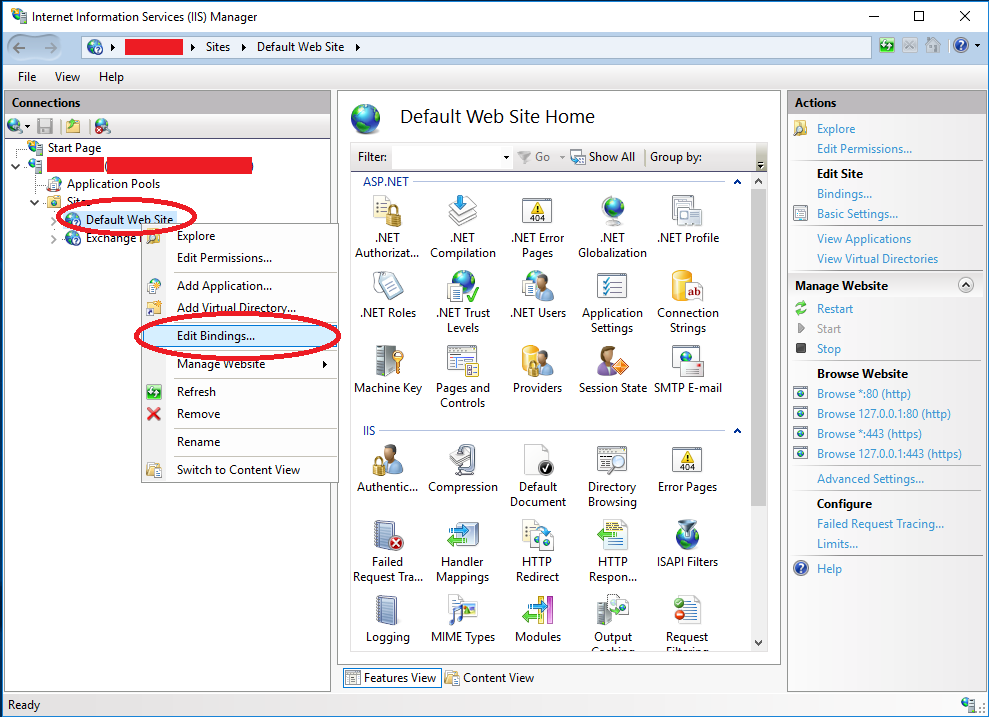
To resolve this, open up the IIS Manager, right click on the Exchange Web Site, click “Edit Bindings”

IIS Exchange Edit Bindings

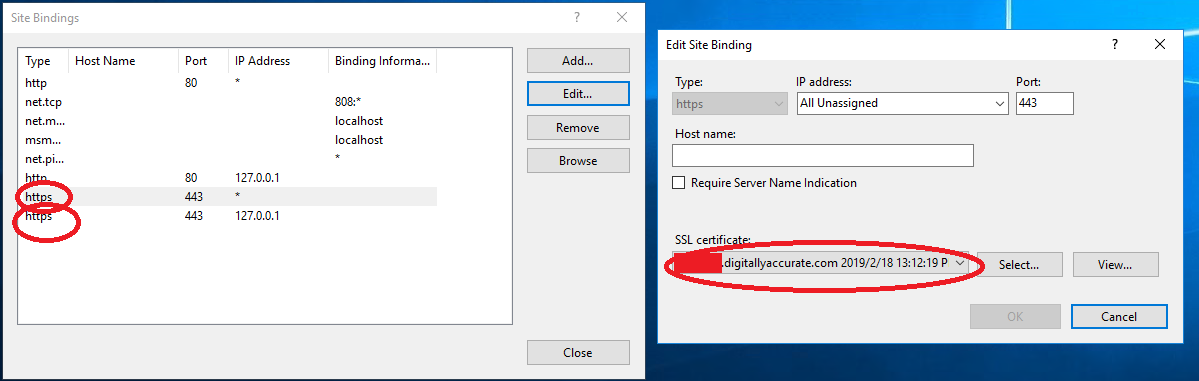
Once the “Edit Bindings” windows is open, you’ll want to open BOTH https bindings, and click “Edit”, and then change the SSL Certificate from the Let’s Encrypt SSL cert, to the self-signed Exchange certificate that ships on the brand new install. The self-signed certification most likely will be labelled as the computer name.

Exchange SSL Bindings

If you configured the Let’s Encrypt SSL certificate on the “Exchange Backend” IIS site, you’ll also need to repeat these steps on that as well.

You can now restart the server, run the “setup.exe” on CU12 again, and it will attempt to continue and repair Exchange 2016 Cumulative Update 12.

Final Note

After the update is complete, you’ll want to restart the server. You’ll notice that the acme script, whether run automatically or manually, will not set the Let’s Encrypt certificate up again (because it’s not due for renewal). You’ll need to run the letsencrypt.exe file, and force an auto renewal which will kick off the Exchange configuration scripts (or you can manually set the certificate if you’re comfortable applying Exchange SSL certificates via PowerShell.

Additional Resources

Aug 202018
 

An all too common problem is when users report e-mail delays ranging from 5 to 15 minutes. When troubleshing these types of issues, you’ll notice this commonly occurs when receiving e-mails from organizations that use Office 365. Specifically this occurs due to greylisting.

Why does this happen

You’re organization is using greylisting on your e-mail proxy/SMTP relay to reduce spam. Greylisting temporarily rejects the first send of an e-mail and waits for the sending server to re-transmit the message. This process usually takes around 5-15 minutes to complete. Greylisting is used because spammers won’t re-transmit the message, which leads to a massive reduction of spam messages coming through.

Once the sending server retransmits, the sending server IP address is added to your firewalls “safe senders” whitelist. From this point on the IP address (or server) will not be subject to greylisting (and any subsequent e-mails).

Office 365 has hundreds, if not thousands (possibly 10’s of thousands) of servers they use to transmit e-mail. The chance of multiple e-mails being sent from a single server is very slim, therefor greylisting is applied to every IP (server) that is sending e-mail because it’s different. Each e-mail from an Office 365 user can take 5-15 minutes, since a new server is used every time.

How to resolve

You’ll need to configure and add an exception to your e-mail proxy/SMTP relay/firewall. This exception can be based off domain, DNS name of sending server, or IP address ranges.

Scroll down for instructions on how to create an exception on a Sophos UTM.

Domain Exception

If you use domain based exceptions, you’ll need to configure these manually for each sending domain that you want your firewall to skip greylist checking. This is a very manual process, which requires lots of human intervention to continuously update your greylist exception.

DNS FQDN of MX Server

This method is the easiest, however most firewall or UTM’s will now allow these types of exceptions since a number of DNS queries will be needed everytime an e-mail comes in. One DNS query on the MX record, and then another DNS query on the DNS host contained in the MX record. If you can configure this type of exception, you’ll want to configure it as below:

*-com.mail.protection.outlook.com

IP Address Range

This is the best method. To create an IP address range exception, we’ll need a copy of all the IP address ranges or IP address spaces that Office 365 uses to send mail. This list can be found at: https://docs.microsoft.com/en-us/microsoft-365/enterprise/urls-and-ip-address-ranges?view=o365-worldwide.

We’ll need to create an exception that skips greylist checking on the IP addresses outlined in the above link. This will stop any greylist checking on e-mails from Office 365 servers.

In my case, I use a Sophos UTM firewall, and to create an exception I had to do the following:

  1. Log on to the Webmin interface.
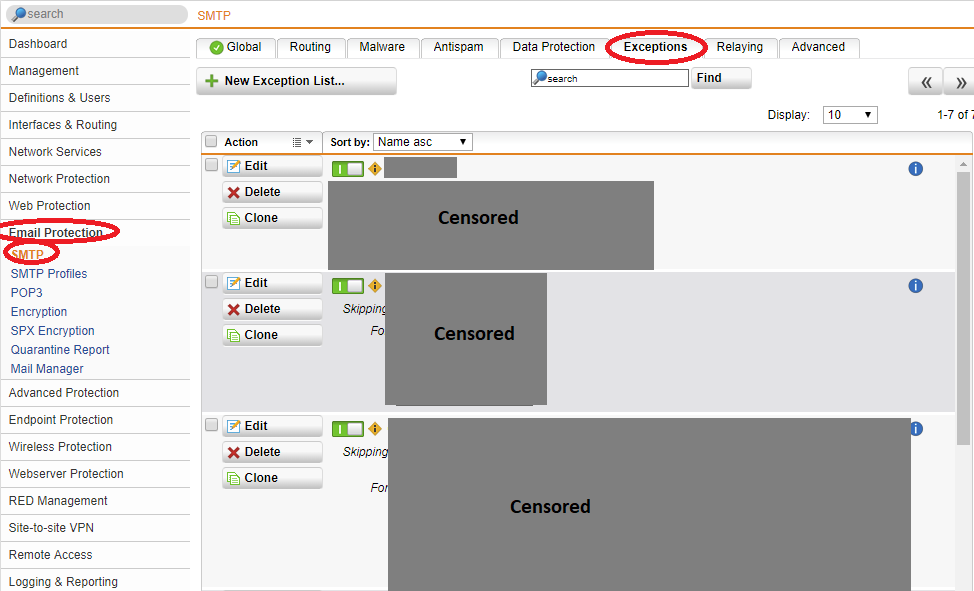
  2. Select “Email Protection”, then “STMP” on the left hand side, then “Exceptions” tab at the top.

    Sophos UTM E-Mail and SMTP Exception List

    Sophos UTM E-Mail and SMTP Exception List

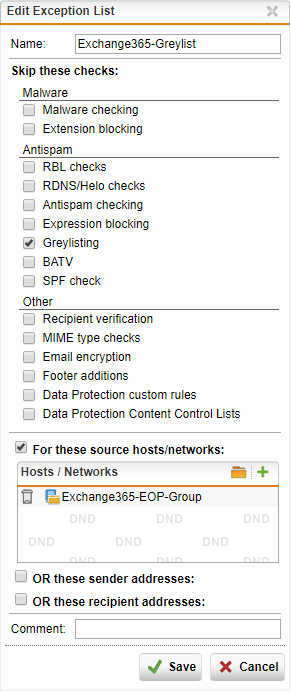
  3. Create a “New Exception List” and call it “Office 365 GreylistWhitelist”.
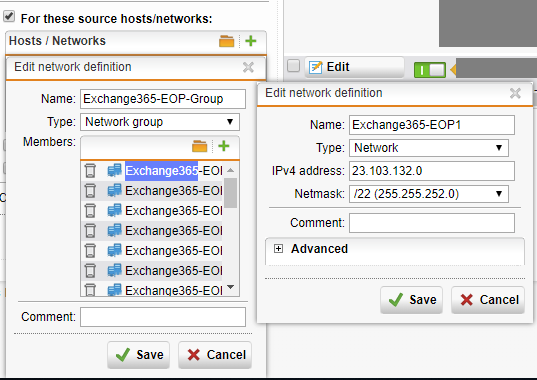
  4. Check the “Greylisting” box under “Antispam”, and then check the “For these source hosts/networks”.

    Sophos UTM SMTP Create Exception

    Sophos UTM SMTP Create Exception

  5. Click the “+” button, and call the Network Definition “Exchange365-EOP-Group”. Change the type to “Network Group”.
  6. Click the “+” button in the members section, and start adding the IP spaces. Repeat this for each IP space (in total I added 23). Each network name (IP address space) requires a unique name, I named mine “Exchange365-EOP1” through “Exchange365-EOP23”.

    Sophos UTM SMTP Configure Exception

    Sophos UTM SMTP Configure Exception

  7. Click Save on the Network Group, and click Save on the exception.
  8. Enable the Exception

    Sophos UTM SMTP Exception Rule

    Sophos UTM SMTP Exception Rule

  9. Completed! You’ve now made the exception and delays should no longer occur.
Nov 062017
 

Something that has bothered me for a very long time has been the fact that mobile devices (using Microsoft Exchange ActiveSync), automatically send read receipts if the sender has requested it without prompting the user. This means that if someone sends you an e-mail, requests and read receipt, and you open it on your mobile device; it will send a read receipt without prompting you or giving you a choice in the matter.

This is bad for a number of reasons such as spam (this is a big one, where they try to validate e-mail addresses), legal reasons, you don’t have the time to respond and don’t want a read receipt sent yet, or you simply don’t send read receipts…

Now, with Microsoft Exchange 2016 you can disable this so that mobile devices don’t automatically send these read receipts out. It’s a simple procedure using Outlook on the web (previously known as Outlook Web Access, a.k.a OWA).

To disable automatic read-receipts:

  1. Log on to your OWA (Outlook on the web) server.
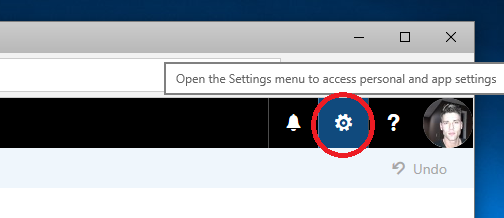
  2. Click on settings (the gear) on the top rightOutlook on the Web (OWA) Settings
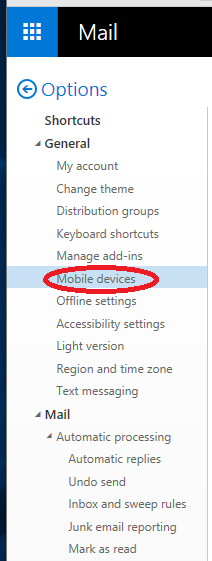
  3. Expand the “General” settings menu, and select “Mobile Devices” (as shown below)
    Outlook on the Web (OWA) Settings Pane
  4. Check the checkbox for “Don’t send read receipts for messages read on devices that use Exchange ActiveSync”.
    Don't send read receipts for messages read on devices that use Exchange ActiveSync

You’re done!

Nov 062017
 

After doing a migration from Microsoft Exchange 2013 to Exchange 2016 I noticed that my Offline Address Book (OAB) wasn’t being made available to Outlook clients.

When trying to perform a manual download (Send and Receive -> Download Address Book), it wasn’t in the list. Also when using the “Test EMail AutoConfiguration..” (by holding CTRL and right click on Outlook System Tray icon) to examine the AutoDiscover information, there was no OAB URL (OABUrl in XML) being sent to the clients.

I spent 3 hours trying to find out why this was happening (I assumed it was configuration and/or IIS authentication related). All my virtual directories and URLs were fine, and the OAB was being generated fine without any issues. It simply wasn’t being passed to Outlook clients. I couldn’t find any references of this occurring to other users.

I finally discovered that the “WebDistributionEnabled” configuration flag was marked to False, when it needs to be marked as True. This flag when set to true, allows it to be distributed (Note/Fun Fact: There’s a separate and different flag for older Exchange versions where the OAB is inside of the Public Folder Store). There’s also a different flag “GlobalWebDistributionEnabled”, which is recommended to be enabled as well on Exchange 2016. When setting this second flag to True, it also sets the first one above to True as well.

To fix it we’ll use Exchange PowerShell:

Let’s find the name of your Offline Address Book by running the command below:

Get-OfflineAddressBook

Exchange Offline Address Book Get-OfflineAddressBook

Now let’s set the “GlobalWebDistributionEnabled” flag to True using this next command:

Set-OfflineAddressBook -Identity “Default Offline Address Book (Ex2016)” -GlobalWebDistributionEnabled $true

Set Offline Address Book Microsoft Exchange 2016 Default Set-OfflineAddressBook

And finally let’s confirm to make sure the changes take effect and look for the values of “GlobalWebDistributionEnabled” and “WebDistributionEnabled” using the command:

Get-OfflineAddressBook | fl

Get-OfflineAddressBook WebDistributionEnabled GlobalDistributionEnabled


After making the above changes I recommend issuing an “iisreset” or restarting your Exchange Server. There will also be a delay where you’ll need to wait for your Outlook clients to refresh their autodiscover configuration. You can run the “Test Email AutoConfiguration…” to see if the OAB is now being passed to your clients.

Oct 192017
 

In the past few days, I’ve noticed that some Sophos UTM firewalls I manage for clients haven’t been sending their daily reports (or other notification e-mails). When I first noticed this, checking my own SMTP proxy, I noticed that the e-mails were being sent from the firewalls, but were being dropped due to an SPF check failure.

Originally I thought this may have just been an overnight glitch with the DNS providers, however I later noticed that it’s stopped all e-mails coming from all the UTMs.

Further investigation, I realized that by default, the Sophos UTMs send their firewall notifications (and configuration backups) from the domain “fw-notify.net”, specifically, the e-mail address “[email protected]”. That’s when I had a brainfart and realized the e-mails weren’t being sent from my clients owned domains, but this fw-notify.net domain.

It appears that recently some SPF records have been created for the domain “fw-notify.net”, which is what is causing this issue. Also, I’m not quite sure if the domain underwent ownership change, or it his was overlooked by someone at Sophos.

I’m assuming numerous other longtime UTM users will be experiencing this as well.

To fix this, just log in to the problem UTMs, and change the notification Sender address as shown below to a domain you own. I changed mine to [email protected] (which has valid SPF since it’s my domains relay).

Sep 232016
 

There’s quite a few of us that started off deploying Small Business Server (SBS2008, SBS2011) environments back in the day, loving the handy all-in-one package taking care of everything from Active Directory and Exchange, to disaster recovery and business continuity. However, some of these old environments are starting to catch up with us. I wanted to open a discussion on a big issue I had a couple years ago in one of my first migrations from SBS 2008, to Windows Server 2012 R2 with the Essentials Experience role installed, with Exchange Server 2013.

As most of you know, SBS comes packaged to push “.local” domains on initial domain configuration. This used to be considered best practice, and most of us even configured .local’s on non-SBS environments. This has never really posed any problems for us I.T. guys, except for a few configuration considerations when setting up Outlook clients, DNS, etc…

Now if you’re like me, another thing I always configured, was user accounts that didn’t match e-mail addresses. An example would be “John Doe”, with the username of “JohnD”, and the e-mail address of “[email protected]”. Also, our buddy John Doe would have a AD UPN [email protected] (this was automatically populated on user setup)

User’s Name: John Doe

SAM Account Name: INTERNALDOMAIN\JohnD

Username: JohnD

AD UPN: [email protected]

E-mail Address: [email protected]


I always liked this as it provided some protection if the users password ever got compromised (in a phishing attack, fake e-mail logon page, etc…), as the password could not actually authenticate when using the e-mail address as a username (the username was never actually provided in the attack, only e-mail).

Now let’s flash forward to this migration from SBS 2008, to Windows Server 2012 R2 with Essentials Experience, and throw Exchange 2013 in to the mix. Right off the bat, everything is working fine, Outlook 2010 is working great, Outlook 2013 is working great. Then BAM, Outlook 2016 comes out!

Outlook 2016 does not allow manual or custom configuration of Exchange accounts. They do this for “reliability” and ease of configuration. This means that you HAVE to have autodiscover setup, and working fluidly. No more manual configuration. Internally inside of the LAN this is all automatic if you configured Exchange properly, but you will have to configure autodiscover externally.

Internally on the LAN, Outlook 2016 clients have absolutely no issues, and authentication is working fine (no password prompts). However, when configuring external users, while you can eventually get it configured, the user is constantly prompted for credentials on every Outlook start.

On these password prompts, you’ll notice it’s authenticating for the users e-mail address. In this example, it’s asking for “[email protected]” and you enter: “INTERNALDOMAIN\JohnD” and their password, it work for the session, but keeps prompting on every fresh Outlook start.

I did massive amounts of research and seriously I could not come across one article that actually provided all the information I needed, it almost seemed as if this problem was specific to this single environment. Of course, this makes me think I have something configured incorrectly, and I literally spend forever searching for information, checking my VirtualDirectories on my Exchange server, checking logs, wasting tons and tons of time.

Finally after checking my configurations 6-10 times each and spending weeks, I realized it had nothing to do with anything configured incorrectly.

Outlook 2016 does all the configuration automatically, and expects to find everything it needs via auto discover. Putting it simple, the user’s UPN must match their e-mail address.

This means we have to change John Doe’s Active Directory UPN to match his e-mail address. The SAMAccountName still remains the same, so his login to his computer will not change, however after the change he will now be able to log in both with INTERNALDOMAIN\JohnD and [email protected].

First we have to add the UPN suffix (which is the actual e-mail address domain name) to the Active Directory Domain and Trusts. Instructions are available here: https://support.microsoft.com/en-us/kb/243629. Please note Microsoft has since deleted the original knowledge base article so I created a blog post to outline the instructions here: https://www.stephenwagner.com/2018/10/16/how-to-add-an-alternative-upn-suffix-to-an-active-directory-domain/.

After adding your e-mail domain to the UPN suffix list. When you go in to “Active Directory Users and Computers”, and view a user’s properties, you’ll notice in the UPN section, you can drop it down and change it from internaldomain.local, to contoso.com (using my example domains). You can also change the username inside of the UPN.


Essentially for Johny boy, his AD properties window now looks like:

User Logon Name:

[email protected] (we changed the name, and chose the external domain in the drop down to the right)

User logon name (pre-Windows 2000):

INTERNALDOMAIN\ JohnD (we left this the way it was)


John can now login either using “INTERNALDOMAIN\JohnD” or “[email protected]”. As far as John is concerned we haven’t changed anything and he still logs in using the same format he always has, totally unaware of any changes.

Surprise surprise, autodiscover is now fully functioning for this user. Not only for easy configuration on mobile devices (iPhones, Windows Phones, etc…), but he can now load up Outlook 2016 away from the LAN on the Internet, type in his e-mail address, password, and BAM he’s good to go!

I am a little bit unsettled in the fact that the e-mail address now becomes a fully accepted username on the domain (for security reasons), but I guess we’re stuck with that!


In short, our problem is:

  1. Username doesn’t match e-mail (JohnD username, [email protected] email)
  2. Running Outlook 2016 and forced to use auto-discover, repeated password prompts
  3. Running .local domain internally, while using different domain externally

In Short, to fix this:

  1. Add UPN Suffix to Active Directory
  2. Change users properties so that UPN matches e-mail address, DO NOT CHANGE the old DOMAIN\Username setting

Other Considerations:

  1. Password prompts on Outlook clients can mean a whole bunch of different problems totally unrelated to this configuration and issue. Always fully diagnose the issue and confirm the issue before applying fixes. Password prompts can mean authentication problems, problems with Exchange’s virtualdirectories, issues with autodiscover, issues with certificate configuration, etc…
  2. If this is your specific issue, you can write a script to run through and update the UPNs on all the accounts. I generally don’t like scripts touching user accounts, so I’m slowly rolling out these changes per user when upgrading them to Outlook 2016. Doing this one by one as we upgrade, allows us to make sure that none of their mobile devices are affected by the UPN change.
  3. Since we are changing UPNs, this could have a major effect on any 3rd party applications that integrate with Active Directory that use UPNs. Always test, and make sure you don’t break any integration points to your 3rd party applications or line of business systems.


Sep 082016
 

If you’re like me, you probably have your Microsoft account configured the same as your e-mail address. While many people use @live.com or @hotmail.com addresses, some of us prefer to use our actual real e-mail addresses as Microsoft account logins.

Recently, I did a fresh install of Windows 10 on my Microsoft Surface Pro. After joining the Surface to my domain, and attached my Microsoft account, I went to add my Exchange account (which is the same e-mail address I use for my Microsoft account). When trying to add, I was presented with:

There’s already an account set up to use <e-mail address>. (Account Name)

This message stopped me from configuring my Exchange account with the Windows 10 Mail, Calendar, and People apps. Researching this, I noticed numerous other people reporting this problem on multiple forums, however no one had a fix.

It appears there is a conflict with the Microsoft Account (which of course has it’s own mail, calendar, and contacts), and a separate account with the same e-mail address.

To resolve this, I restarted the machine, and logged in using a different account. I then went to “System” under control panel, “Advanced System Settings”, “Advanced” tab, then “Settings” under “User Profiles”. I then proceeded to delete the user profile and restart the system. I confirmed the user profile was fully deleted and then logged back in. Now at this point, the key is to create the Exchange (or any other mail account) before you actually attach your Microsoft account to your system login account. By configuring the e-mail account first, it will avoid this issue.

PLEASE NOTE: By deleting your user profile, you delete all of the contents of the Desktop, My Documents, Music, Pictures, settings, etc… I’d only recommend this if you have either backed up, or are performing this on a fresh install where you currently don’t have any files.

May 312013
 

Back in February, I was approached by a company that had multiple offices. They wanted my company to come in and implement a system that allowed them to share information, share files, communicate, use their line of business applications, and be easily manageable.

Just an FYI, I provide Microsoft Small Business Server consulting services, including migrations! For more information, please visit https://www.stephenwagner.com/2020/02/28/microsoft-small-business-server-migration-upgrade/.

The Solution – Microsoft Small Business Server 2011

The first thing that always comes to mind is Microsoft Small Business Server 2011. However, what made this environment interesting is that they had two branch offices in addition to their headquarters all in different cities. One of their branch offices had 8+ users working out of it, and one only had a couple, with their main headquarters having 5+ users.

Usually when administrators think of SBS, they think of a single server (two server with the premium add-on) solution that provides a small business with up to 75 users with a stable, enterprise feature packed, IT infrastructure.

SBS 2011 Includes:

  • Windows Server 2008 R2 Standard
  • Exchange Server 2010
  • Microsoft SharePoint Foundation 2010
  • Microsoft SQL Server 2008 R2 Express
  • Windows Server Update Services
  • (And an additional Server 2008 R2 license with Microsoft SQL Server 2008 R2 Standard if the premium add-on is purchased)

Essentially this is all a small business typically needs, even if they have powerful line of business applications.

Additional Domain Controller on SBS

One misconception about Windows Small Business Server is the limitation of having a single domain controller. IT professionals often think that you cannot have any more domain controllers in an SBS environment. This actually isn’t true. SBS does allow multiple domain controllers, as long as there is a single forest, and not multiple domains. You can have a backup domain controller, and you can have multiple RODCs (Read Only Domain Controller), as long as the primary Active Directory roles stay with the SBS primary domain controller. You can have as many global catalogs as you’d like! As long as you pay for the proper licenses of all the additional servers 🙂

This is where this came in handy. While I’ve known about this for some time, this was the first time I was attempting at putting something like this in to production.

The Plan

The plan was to setup SBS 2011 Premium at the HQ along with a second server at the HQ hosting their SQL, line of business applications, and Remote desktop Services (formerly Terminal Services) applications. Their HQ would be sitting behind an Astaro Security Gateway 220 (Sophos UTM).

The SBS 2011 Premium (2 Servers) setup at the HQ office will provide:

  • Active Directory services
  • DHCP and DNS Services
  • Printing and file services (to the HQ and all branch offices)
  • Microsoft Exchange
  • “My Document” and “Desktop” redirection for client computers/users
  • SQL DB services for LoB’s
  • Remote Desktop Services (Terminal Services) to push applications out in to the field

The first branch office, will have a Windows Server 2008 R2 server, promoted to a Read Only Domain Controller (RODC), sitting behind an Astaro Security Gateway 110. The Astaro Security Gateway’s would establish a site-to-site branch VPN between the two offices and route the appropriate subnets. At the first branch office, there is issues with connectivity (they’re in the middle of nowhere), so they will have two internet connections with two separate ISPs (1 line of sight long range wireless backhaul, and one simple ADSL connection) which the ASG 110 will provide load balancing and fault tolerance.

The RODC at the first branch office will provide:

  • Active Directory services for (cached) user logon and authentication
  • Printing and file services (for both HQ and branch offices)
  • DHCP and DNS services
  • “My Documents” and “Desktop” redirection for client computers/users.
  • WSUS replica server (replicates approvals and updates from WSUS on the SBS server at the main office).
  • Exchange access (via the VPN connection)

Users at the first branch office will be accessing file shares located both on their local RODC, along with file shares located on the HQ server in Calgary. The main wireless backhaul has more then enough bandwidth to support SMB (Samba) shares over the VPN connection. After testing, it turns out the backup ADSL connection also handles this fairly well for the types of files they will be accessing.

The second branch office, will have an Astaro RED device (Remote Ethernet Device). The Astaro/Sophos RED devices, act as a remote ethernet port for your Astaro Security Gateways. Once configured, it’s as if the ASG at the HQ has an ethernet cable running to the branch office. It’s similar to a VPN, however (I could be wrong) I think it uses EoIP (Ethernet over IP). The second branch doesn’t require a domain controller due to the small number of users. As far as this branch office goes, this is the last we’ll talk about it as there’s no special configuration required for these guys.

The second branch office will have the following services:

  • DHCP (via the ASG 220 in Calgary)
  • DNS (via the main HQ SBS server)
  • File and print services (via the HQ SBS server and other branch server)
  • “My Document” and “Desktop” redirection (over the WAN via the HQ SBS server)
  • Exchange access (via the Astaro RED device)

Hardware

For all the servers, we chose HP hardware as always! The main SBS server, along with the RODC were brand new HP Proliant ML350p Gen8s. The second server at the HQ (running the premium add-on) is a re-purposed HP ML110 G7. I always configure iLo on all servers (especially remote servers) just so I can troubleshoot issues in the event of an emergency if the OS is down.

Implemenation

I’ll explain how this was all implemented.

  1. Configure and setup a typical SBS 2011 environment. I’m going to assume you already know how to do this. You’ll need to install the OS. Run through the SBS configuration wizards, enable all the proper firewall rules, configure users, install applicable server applications, etc…
  2. Configure the premium add-on. Install the Remote Desktop Services role (please note that you’ll need to purchase RDS CAL’s as they aren’t included with SBS). You can skip this step if you don’t plan on using RDS or the premium server at the main site.
  3. Configure all the Astaro devices. Configure a Router to Router VPN connection. Create the applicable firewall rules to allow traffic. You probably know this, but make sure both networks have their own subnet and are routing the separate subnets properly.
  4. Install Windows Server 2008 R2 on to the target RODC box (please note, in my case, I had to purchase an additional Server 2008 license since I was already using the premium add-on at the HQ site. (If you purchase the premium add-on, but aren’t using it at your main office, you can use this license at the remote site).
  5. Make sure the VPN is working and the servers can communicate with each other.
  6. Promote the target RODC to a read only domain controller. You can launch the famous dcpromo. Make sure you check the “Read Only domain controller” option when  you promote the server.
  7. You now have a working environment.
  8. Join computers using the SBS connect wizard. (DO NOT LOG ON AS THE REMOTE USERS UNTIL YOU READ THIS ENTIRE DOCUMENT)

I did all the above steps at my office and configured the servers before deploying them at the client site.

You essentially have a working basic network. Now to get to the tricky stuff! This tricky stuff is to enable folder redirection at the branch site to their own server (instead of the SBS server), and get them their own WSUS replica server.

Now to the fancy stuff!

1. Installing WSUS on the RODC using the add role feature in Windows Server: You have to remember that RODC’s are exactly what they say! !READ ONLY! (As far as Active directory goes)! Installing WSUS on a RODC will fail off the bat. It will report that access is denied when trying to create certain security groups. You’ll have to manually create these two groups in Active Directory on your primary SBS server to get it to work:

  • SQLServer2005MSFTEUser$RODCSERVERNAME$Microsoft##SSEE
  • SQLServer2005MSSQLUser$RODCSERVERNAME$Microsoft##SSEE

Replace RODCSERVERNAME with the computer name of your RODC Server. You’ll actually notice that two similiar groups already exist (with the server name different) for the existing Windows SBS WSUS install, this existing groups are for the main WSUS server. After creating these groups, this will allow it to install. After this is complete, follow through the WSUS configuration wizard to configure it as a replica for your primary SBS WSUS server.

2. One BIG thing to keep in mind is that with RODC’s you need to configure what accounts (both user and computer) are allowed to be “cached”. Cached credentials allow the RODC to authenticate computers and users in the event the primary domain controller is down. If you do not configure this, if the internet goes down, or the primary domain controller isn’t available, no one will be able to log in to their computers or access network resources at the branch site. When you promoted the server to a RODC, two groups were created in Active Directory: Allow RODC Cached Logins, and Deny RODC Cached Logins (I could be wrong on the exact name since I’m going off memory). You can’t just select and add users to these groups, you need to also select and add the computers they use as well since computers have their own “computer account” in Active Directory.

To overcome this, create two security groups under their respective existing groups. One group will be for users of the branch office, the other group will be for computers of the branch office. Make sure to add applicable users and groups as members of the security groups. Now go to the “Allow RODC Cached Logins” group created by the dc promotion, and add those two new security groups to that group. This will allow remote users and remote computers to authenticate using cached security credentials. PLEASE NOTE: DO NOT CACHE YOUR ADMINISTRATIVE ACCOUNT!!! Instead, create a separate administrative account for that remote office and cache that.

3. One of the sweet things about SBS is all the pre-configured Group policy objects that enable the automatic configuration of the WSUS server, folder redirection, and a bunch of other great stuff. You have to keep in mind that off of the above config, if left alone up to this point, the computers in the branch office will use the folder redirection settings and WSUS settings from the main office. Remote users folder redirection (whatever you have selected, in my case My Documents and Desktop redirection) locations will be stored on the main HQ server. If you’re alright with this and not concerned about the size of the user folders, you can leave this. What I needed to do (for reasons of simple disaster recovery purposes) is have the folder re-directions for the branch office users store the redirection on their own local branch server. Also, we need to have the computers connect to the local branch WSUS server as well (we don’t want each computer pulling updates over the VPN connection as this will use up tons of bandwidth). What’s really neat is when users open applications via RemoteApp (over RDS), if they export files to their desktop inside of RemoteApp, it’ll actually be immediately available on their computer desktop since the RDS server is using these GPOs.

To do this, we’ll need to duplicate and modify a couple of the default GPOs, and also create some OU (Organizational Unit) containers inside of Active Directory so we can apply the new GPOs to them.

First, under “SBSComputers” create an OU called “Branch01Comps” (or call it whatever you want). Then under “SBSUsers” create an OU called “Branch01Users”. Now keep in mind you want to have this fully configured before any users log on for the first time. All of this configuration should be done AFTER the computer is joined (using the SBS connect) to the domain and AFTER the users are configured, but BEFORE the user logs in for the first time. Move the branch office computer accounts to the new Branch office computers OU, and move the Branch office user accounts to the Branch office users OU.

Now open up the Group policy Management Management Console. You want to duplicate 2 GPOs: Update Services Common Settings Policy (rename the duplicate to “Branch Update Services Common Settings Policy” or something), and Small Business Server Folder Redirection Policy (rename the duplicate to “Branch Folder Redirection” or something).

Link the new duplicated Update Services policy to the Branch Computers OU we just created, and link the new duplicated folder redirection to the new users policy we just created.

Modify the duplicated server update policy to reflect the address of the new branch WSUS replica server. Computers at the branch office will now pull updates from that server.

As for Folder redirection, it’s a bit tricky. You’ll need to create a share (with full share access to all users), and then set special file permissions on the folder that you shared (info available at http://technet.microsoft.com/en-us/library/cc736916%28v=ws.10%29.aspx). On top of that, you’ll need to find a way to actually create the child users folders under that share/folder in which you created. I did this by going in to active directory, opening each remote user, and setting their profile variable to the file share. When I hit apply this would create a folder with their username with the applicable permissions under that share, after this was done, I would undo that variable setting and the directory created would stay. Repeat this for each remote user at that specific branch office. You’ll also need to do this each time you add a new user if they bring on more staff, you’ll also need to add all new computers and new users to the appropriate OUs, and security groups we’ve created above.

FINALLY you can now go in to the GPO you duplicated for Branch Folder redirection. Modify the GPO to reflect the new storage path for the redirection objects you want (just a matter of changing the server name).

4. Configure Active Directory Sites and Services. You’ll need to go in to Active Directory Sites and Services and configure sites for each subnet you have (you main HQ subnet, branch 1 subent, and branch 2 subnet), and set the applicable domain controller to those sites. In my case, I created 3 sites, and configured the HQ subnet and second branch to authenticate off the main SBS PDC, and configured the first branch (with their own RODC) to authenticate off their own RODC. Essentially, this tells the computers which domain controller they should be authenticating against.

And you’re done!

A few things to remember, whenever adding new users and/or computers to the branch, ALWAYS join using SBS wizard, add computer to the branch OU, add user to the branch OU, create the users master redirection folder using the profile var in the AD user object, and separately add both user and computer accounts as members of the security group we created to cache credentials.

And remember, always always always test your configuration before throwing it out in to production. In my case, I got it running first try without any problems, but I let it run as a test environment for over a month before deploying to production!

We’ve had this environment running for months now and it’s working great. What’s even cooler is how well the Astaro Security Gateway (Sophos UTM) is handling the multiple WAN connections during failures, it’s super slick!