Windows 11 Logo
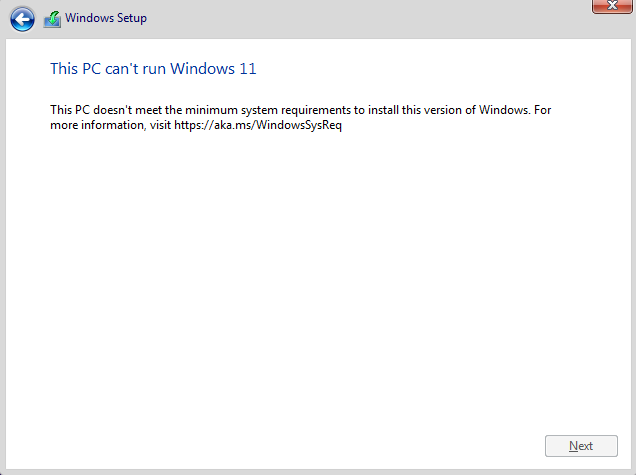
When attempting to do a fresh install of Windows 11 using the ISO, you may receive the message “This PC can’t run Windows 11”. Additionally, “This PC doesn’t meet the minimum system requirements to install this version of Windows.”
Windows 11 has a new set of minimum system requirements and these include certain CPUs as well as a TPM 2.0 (Trusted Platform Module Version 2.0) chip, Secure Boot, and 8GB of RAM.
If you’re trying to do an upgrade instead of a fresh install, please see Windows 11 Upgrade – This PC doesn’t currently meet Windows 11 system requirements.
Below you’ll find an explanation of the problem, and two different methods to workaround it.
You’ll see this message while performing a fresh install if your system does not meet the minimum requirements.
Just like my previous post on upgrading to Windows 11, you’ll encounter this when attempting a fresh install because some pre-requisite checks are failing:
One thing to note is that you may see these messages even if your system has a TPM 2.0 chip.
Most computers purchased in the last 6 years probably have a TPM 2 chip that just needs to be enabled via the system UEFI/EFI. If you boot to your UEFI, you can attempt to enable the TPM 2.0 chip.
It may already be enabled, however it may be configured to run at version 1.2. If this is the case, change it to version 2.0. You’ll also need to make sure you have “Secure boot” enabled.
If this doesn’t work, please see below for multiple workarounds.
At this point in time, there are two different methods to workaround the minimum system requirements:
You can either either method, depending on which one you may find easier or more convenient.
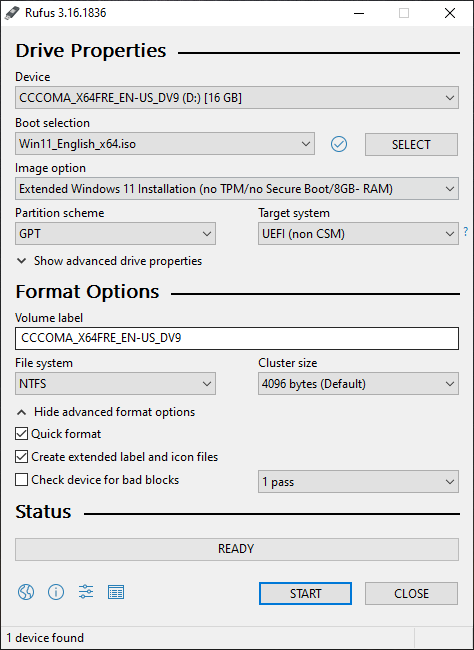
You can use a utility called “Rufus” (Reliable USB Formatting Utility, with Source) to convert the Windows 11 ISO in to a bottable USB key to install Windows.
Using the latest version of Rufus, you can modify the Windows 11 Setup installer to bypass the requirements for TPM 2.0, Secure Boot, and 8GB of RAM.
To use this method, you’ll need the following files:
Please enjoy this video demonstrating the process:
To use this method as a workaround:
Now simply wait for the USB key to be created. It can take 30-90 minutes depending on the speed of your USB drive.
Once you have created the USB key, make sure your computer is configured to use UEFI and make sure you disable Secure Boot in the UEFI.
Simply boot from the USB Key your created above, and install Windows 11.
If you don’t have TPM 2.0 or it’s not working, you can disable the TPM 2.0 check on the Windows 11 installer. Please note, you still require TPM 1.2 for this bypass to function. This workaround only disables the requiremnt for TPM 2.0. You still need to have Secure Boot enabled, and you must have a TPM 1.2 chip.
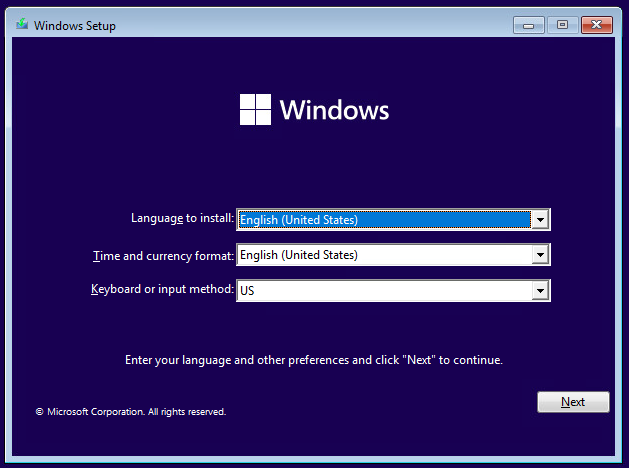
To do this, boot from the Windows 10 ISO:
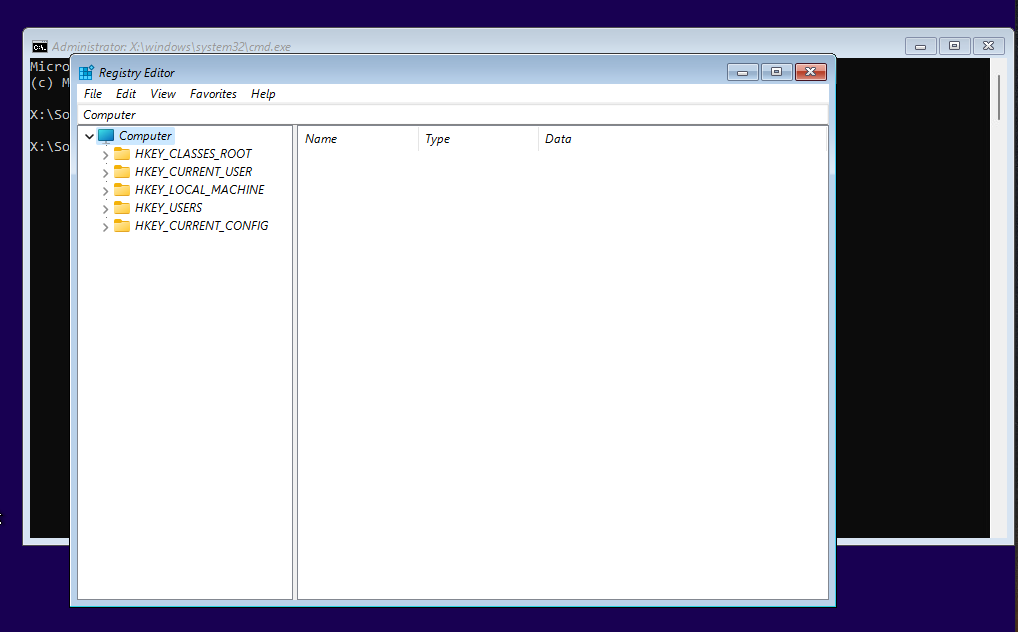
When you see the above screen, press “SHIFT + F10” and a Windows Command Prompt should open.
From the command prompt, type “regedit” and press enter.
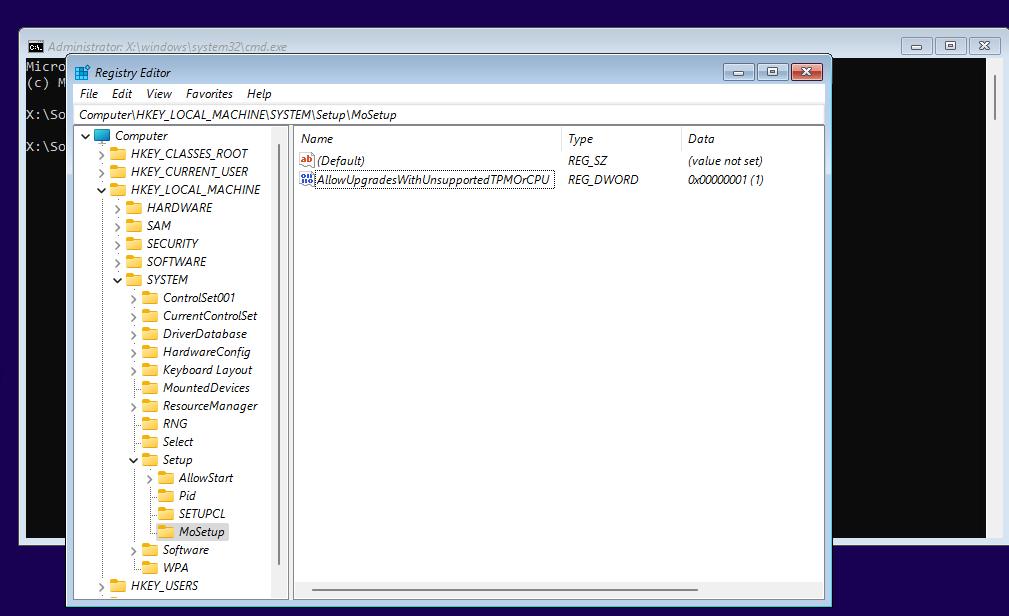
Now we must create a registry key called “MoSetup” and a DWORD Value to disable the TPM and CPU check.
After performing the above, it should look like this.
Now simply close the Registry Editor, type “exit” to close out of the command prompt and continue with the Windows 11 Installer.
After performing the above, you should now be able to successfully perform a fresh install of Windows 11 with the TPM and CPU check disabled.
While most of us frequently deploy new ESXi hosts, a question and task not oftenly discussed is how to properly decommission a VMware ESXi host. Some might be surprised to… Read More
This guide will outline the instructions to Disable the VMware Horizon Session Bar. These instructions can be used to disable the Horizon Session Bar (also known as the Horizon Client… Read More
Normally, any VMs that are NVIDIA vGPU enabled have to be manually migrated with manual vMotion if a host is placed in to maintenance mode, to evacuate the host. While… Read More
You may experience GPU issues with the VMware Horizon Indirect Display Driver in your environment when using 3rd party applications which incorrectly utilize the incorrect display adapter. This results with… Read More
Today we're going to cover a powerful little NAS being used with VMware; the Synology DS923+ VMware vSphere Use case and Configuration. This little (but powerful) NAS is perfect for… Read More
Today we'll go over how to install the vSphere vCenter Root Certificate on your client system. Certificates are designed to verify the identity of the systems, software, and/or resources we… Read More
View Comments
I followed the instructions in step 1 using the Rufus bypass, which would not boot. I had to redo the media creation changing GPT to MBR and it worked.
Paul Martin, you are right, I did what you said and it worked.
thanks you all
Very cool blog!
The Rufus method worked for me. I didn't knew that Feature inside of Rufus before...
The second method with the registry editor didn't works for me (latest Win11 installer as of 04/12/2021).
I know that this method worked some time ago, but it seems like MS came behind.
Best regards from Austria :)
I had to enable the Intel Platform Trust Technology (PTT) in the bios configuration.
I want to use Method 2, but I recently bought a TPM module which is now recognized. Is there a way just to use the registry to bypass only the CPU check? Or would it still be fine to use what method 2 has, despite having TPM 2 installed?