Oct 092021
 
Windows 11 Logo

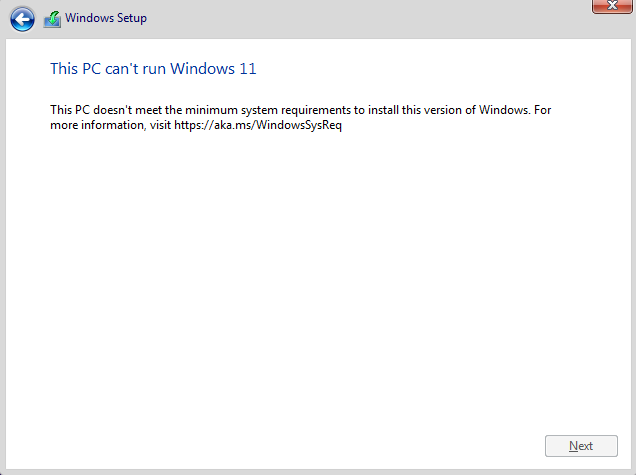
When attempting to do a fresh install of Windows 11 using the ISO, you may receive the message “This PC can’t run Windows 11”. Additionally, “This PC doesn’t meet the minimum system requirements to install this version of Windows.”

Windows 11 has a new set of minimum system requirements and these include certain CPUs as well as a TPM 2.0 (Trusted Platform Module Version 2.0) chip, Secure Boot, and 8GB of RAM.

If you’re trying to do an upgrade instead of a fresh install, please see Windows 11 Upgrade – This PC doesn’t currently meet Windows 11 system requirements.

Below you’ll find an explanation of the problem, and two different methods to workaround it.

The Problem

You’ll see this message while performing a fresh install if your system does not meet the minimum requirements.

Windows 11 Fresh Install - This PC can't run Windows 11
Windows 11 Fresh Install – This PC can’t run Windows 11

Just like my previous post on upgrading to Windows 11, you’ll encounter this when attempting a fresh install because some pre-requisite checks are failing:

  • CPU is not supported
  • Windows 11 Installer cannot find a TPM 2.0 chip
  • Secure Boot is not enabled
  • EFI or UEFI is Required

One thing to note is that you may see these messages even if your system has a TPM 2.0 chip.

Most computers purchased in the last 6 years probably have a TPM 2 chip that just needs to be enabled via the system UEFI/EFI. If you boot to your UEFI, you can attempt to enable the TPM 2.0 chip.

It may already be enabled, however it may be configured to run at version 1.2. If this is the case, change it to version 2.0. You’ll also need to make sure you have “Secure boot” enabled.

If this doesn’t work, please see below for multiple workarounds.

The Fix

At this point in time, there are two different methods to workaround the minimum system requirements:

  1. Method 1 – Use Rufus to create a modified Windows 11 Installer from ISO and disable the TPM 2.0, Secure Boot, and 8GB of RAM requirement.
  2. Method 2 – Use native Windows 11 installer and ISO to modify registry during Windows Setup.

You can either either method, depending on which one you may find easier or more convenient.

Method 1 – Use Rufus to create a modified Windows 11 Installer from ISO and disable the TPM 2.0, Secure Boot, and 8GB of RAM requirement.

You can use a utility called “Rufus” (Reliable USB Formatting Utility, with Source) to convert the Windows 11 ISO in to a bottable USB key to install Windows.

Using the latest version of Rufus, you can modify the Windows 11 Setup installer to bypass the requirements for TPM 2.0, Secure Boot, and 8GB of RAM.

To use this method, you’ll need the following files:

Please enjoy this video demonstrating the process:

Windows 11 Fresh Install – TPM and Secure Boot Bypass for “This PC can’t run Windows 11”

To use this method as a workaround:

  1. Download Rufus and place in a folder
  2. Download Windows 11 ISO and place in a folder
  3. Insert USB key that is larger than the size of the Windows 11 ISO (larger than 5.5GB)
  4. Open Rufus
  5. Select your USB key under “Device”
  6. Under “Boot Selection”, click on “SELECT”
  7. Navigate to and select the Windows 11 ISO file
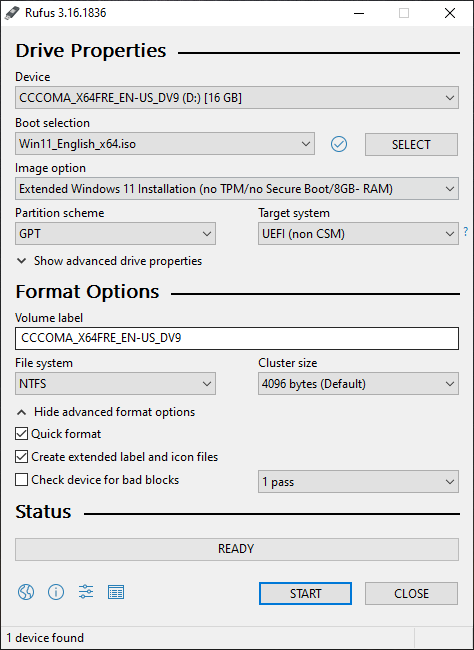
  8. Under “Image option”, choose “Extended Windows 11 Installation (no TPM/no Secure Boot/8GB- RAM”
  9. Click “Start”.
    PLEASE NOTE: This will erase and repartition your USB drive. All existing data on the USB drive will be deleted.
Rufus – Windows 11 Fresh Install TPM, Secure Boot, and RAM bypass

Now simply wait for the USB key to be created. It can take 30-90 minutes depending on the speed of your USB drive.

Once you have created the USB key, make sure your computer is configured to use UEFI and make sure you disable Secure Boot in the UEFI.

Simply boot from the USB Key your created above, and install Windows 11.

Method 2 – Use native Windows 11 installer and ISO to modify registry during Windows Setup.

Bypass the check for TPM 2.0

If you don’t have TPM 2.0 or it’s not working, you can disable the TPM 2.0 check on the Windows 11 installer. Please note, you still require TPM 1.2 for this bypass to function. This workaround only disables the requiremnt for TPM 2.0. You still need to have Secure Boot enabled, and you must have a TPM 1.2 chip.

To do this, boot from the Windows 10 ISO:

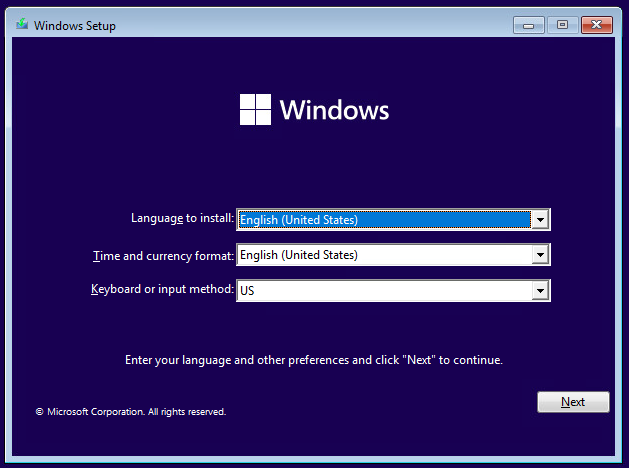
Windows 11 Installer
Windows 11 – Installer

When you see the above screen, press “SHIFT + F10” and a Windows Command Prompt should open.

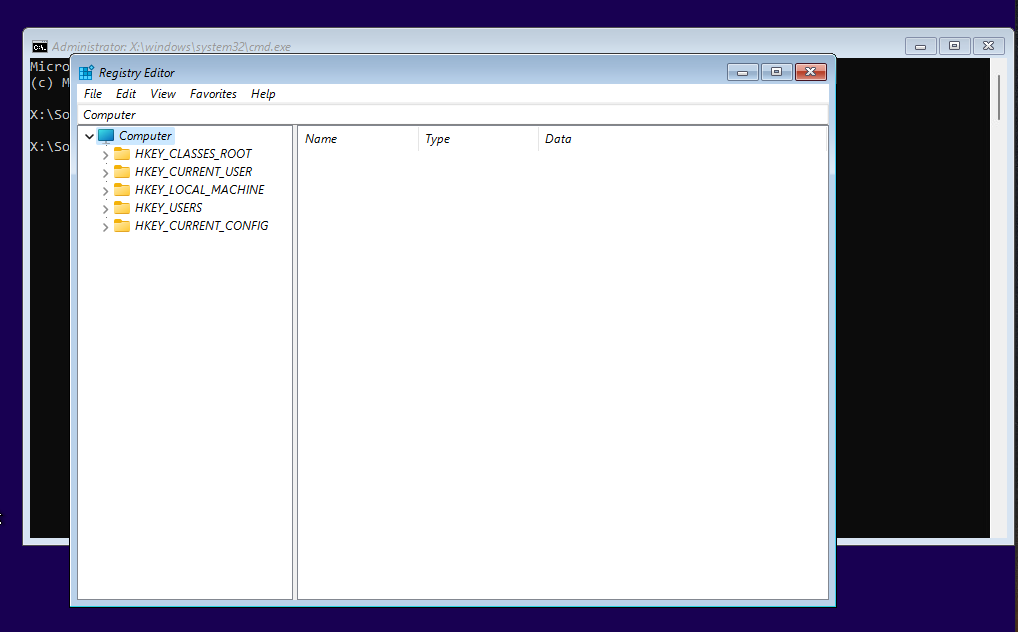
From the command prompt, type “regedit” and press enter.

Windows 11 Installer with command prompt and Registry Editor "regedit"
Windows 11 Installer – Registry Editor “regedit”

Now we must create a registry key called “MoSetup” and a DWORD Value to disable the TPM and CPU check.

  1. Navigate to “HKEY_LOCAL_MACHINE\SYSTEM\Setup”
  2. Right click on “Setup”, select “New”, and choose “Key”, name it “MoSetup”
  3. Navigate to “MoSetup”
  4. On the right pane, right-click an empty space, select “New”, and select “DWORD (32-bit) Value”
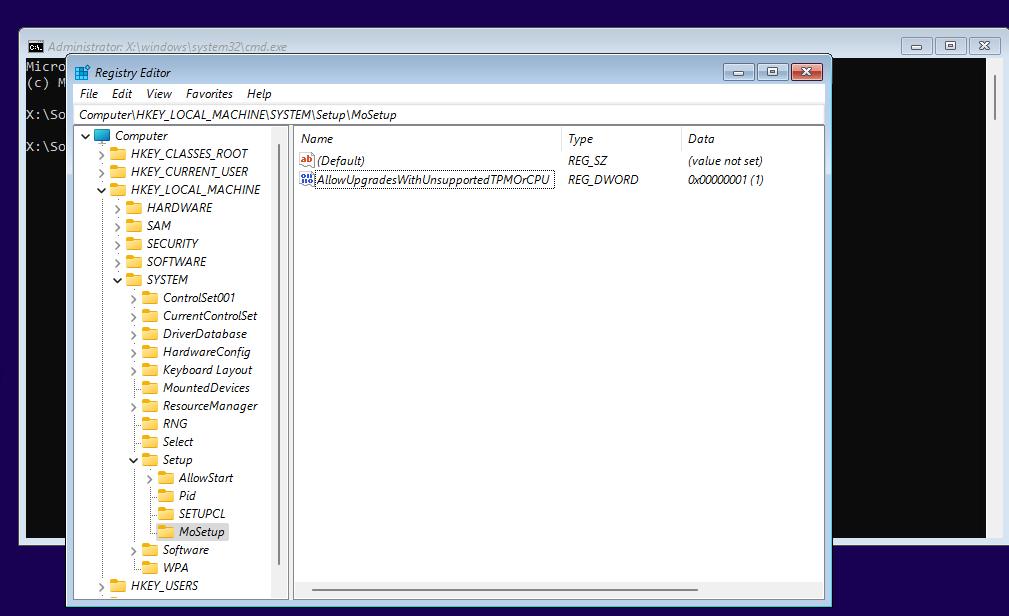
  5. Name it: “AllowUpgradesWithUnsupportedTPMOrCPU” (without quotations)
  6. Set it to “1” (without quotations)

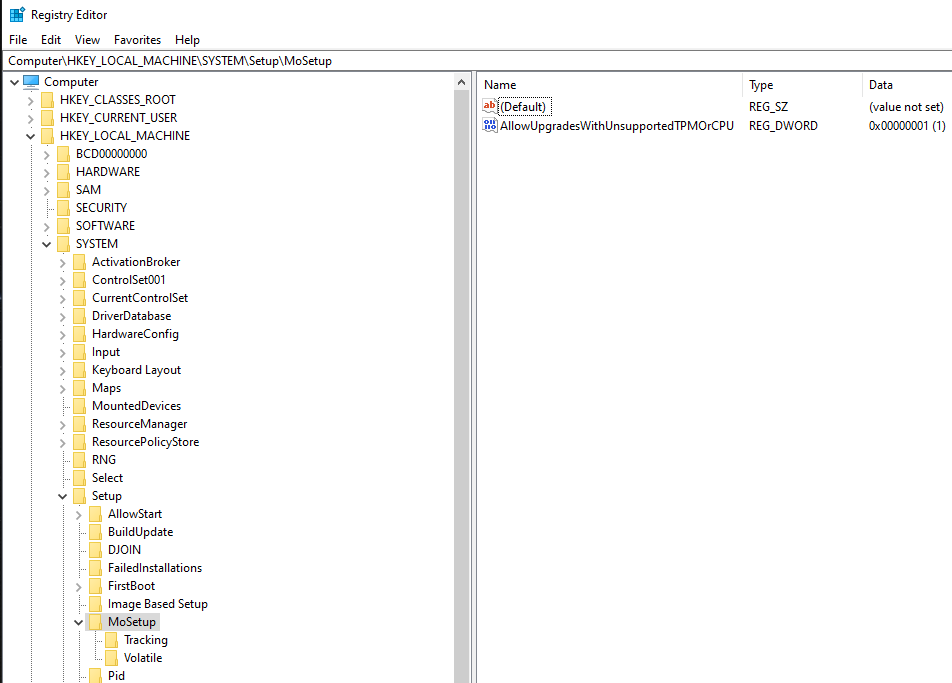
After performing the above, it should look like this.

Windows 11 Installer - MoSetup and AllowUpgradesWithUnsupportedTPMOrCPU
Windows 11 Installer – MoSetup and AllowUpgradesWithUnsupportedTPMOrCPU

Now simply close the Registry Editor, type “exit” to close out of the command prompt and continue with the Windows 11 Installer.

After performing the above, you should now be able to successfully perform a fresh install of Windows 11 with the TPM and CPU check disabled.

Oct 072021
 
Windows 11 Logo

When attempting to upgrade to Windows 11, you may receive the message “This PC doesn’t currently meet Windows 11 system requirements”.

Windows 11 has a new set of minimum system requirements and these include certain CPUs as well as a TPM 2.0 (Trusted Platform Module Version 2.0) chip.

I ran in to this issue on a Lenovo X1 Carbon as well as an HP Z240 Workstation. The Lenovo X1 Carbon does have a TPM 2 chip, however still would not install.

If you’re trying to a fresh installation instead of an upgrade, please see Windows 11 Fresh Install – This PC can’t run Windows 11 for instructions on performing a Fresh install with TPM and Secure Boot bypass.

The Problem

You’ll see this message if your system doesn’t meet the minimum requirements.

Windows 11 installer failing with "Windows 11 - This PC doesn't currently meet Windows 11 system requirements"
Windows 11 – This PC doesn’t currently meet Windows 11 system requirements

On most systems, you’ll see the following 2 prequisite checks fail:

  • “The processor isn’t supported for this version of Windows”
  • “The PC must support TPM 2.0.”

One thing to note is that you may see these messages even if your system has a TPM 2.0 chip.

You’ll also need to make sure your system has UEFI/EFI and has Secure Boot enabled.

The Fix

You have TPM 2.0 but can’t upgrade to Windows 11

Try to check and see if you have a TPM 2.0 chip. Most systems purchased in the last 6 years probably have a TPM 2 chip that just needs to be enabled via the system BIOS or UEFI.

If you boot to your BIOS/UEFI, you can attempt to enable the TPM 2.0 chip.

You may also already have it enabled, however it is configured to run at version 1.2. If this is the case, change it to version 2.0.

You’ll also need to make sure you have “Secure boot” enabled.

Bypass the check for TPM 2.0

If you don’t have TPM 2.0, you can disable the TPM 2.0 check on the Windows 11 installer. Please note, you still require TPM 1.2 for this bypass to function.

To do this, we must make a registry key.

  1. Start -> Run -> “regedit.exe” (without quotations)
  2. Navigate to “HKEY_LOCAL_MACHINE\SYSTEM\Setup\MoSetup”
  3. On the right pane, right-click an empty space, select “New”, and select “DWORD (32-bit) Value”
  4. Name it: “AllowUpgradesWithUnsupportedTPMOrCPU” (without quotations)
  5. Set it to “1” (without quotations)

After creating this, it should appear like so:

REG_DWORD: AllowUpgradesWithUnsupportedTPMOrCPU set to “1”

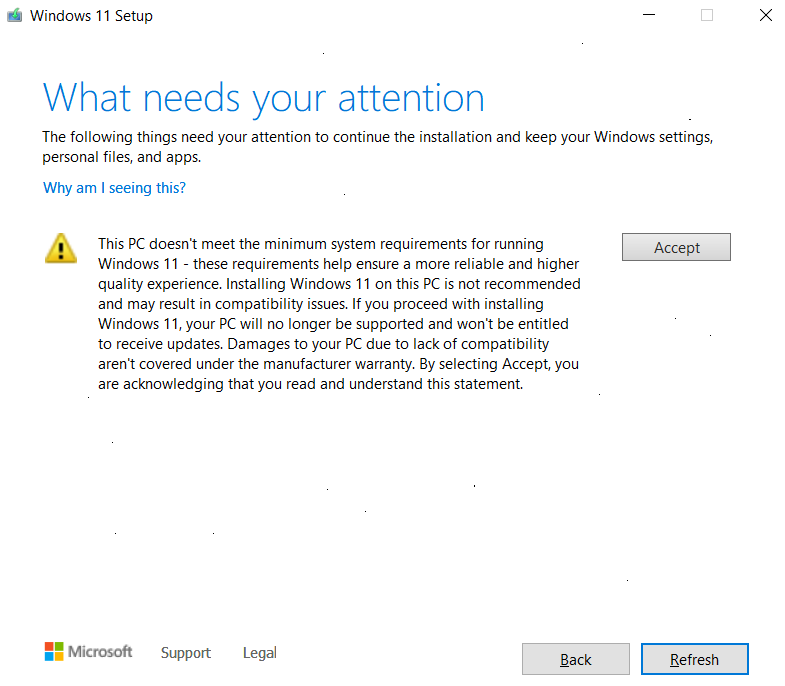
After setting this you should now be able re-launch the Windows 11 installer, and successfully install Windows 11. You’ll now notice the new message below:

Windows 11 – Bypass TPM and CPU Disclaimer

Simply “Accept” the warning and continue!

Please Note: Microsoft has warned that by using this TPM 2.0 bypass, you may run in to compatibility issues: “Your device might malfunction due to these compatibility or other issues. Devices that do not meet these system requirements will no longer be guaranteed to receive updates, including but not limited to security updates.”

You’ll see this disclaimer and warning on the Windows 11 installer after enabling the TPM 2.0 check bypass.

Additional Resources

Sep 252021
 
Windows Server 2022 Logo

Today, I will be showing you howto install, configure, and deploy Windows Server Update Services (WSUS) on Windows Server 2022. I’ll also show you how to use the WSUS MMC interface, approve/manage updates, and more!

This video will demonstrate the process of the WSUS role installation, post-installation tasks, first-time WSUS configuration wizard, and the WSUS MMC.

Check it out and feel free to leave a comment! Scroll down below for more information and details on the guide.

Who’s this guide for

This guide is perfect for a seasoned IT professional or a beginner who is looking at getting experience with Windows Server 2022.

What’s included in the video

In this guide I will walk you through the following:

  • Server Manager
    • Windows Server Update Services Role Installation
  • WSUS Considerations and Requirements
    • WID (Windows Internal Database)
    • SQL Express
    • GPO Group Policy Objects
    • WSUS Maintenance
    • Upstream and Downstream WSUS Servers
    • Bandwidth Optimization
  • WSUS Usage and Platform
    • WSUS Infrastructure Design
    • WSUS Synchronization Schedule
    • WSUS Language, Products, and Classifications selections
    • WSUS MMC Overview
    • “gpupdate /force” command usage
    • WSUS Update Approval
    • WSUS Reporting

Additional Information

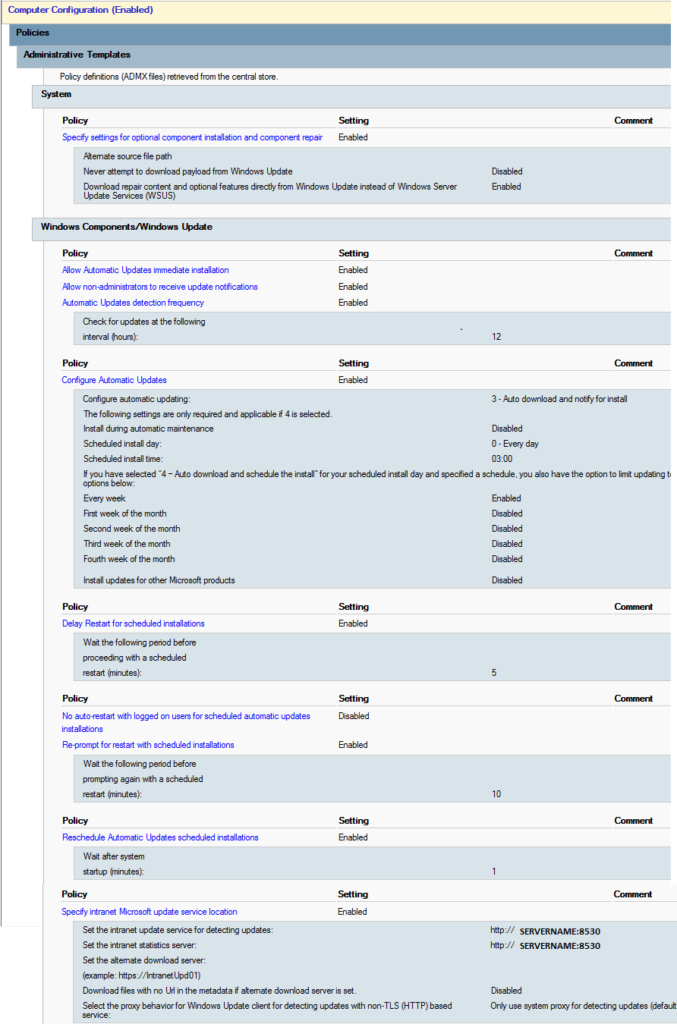
Please see below (click to enlarge) for a WSUS GPO Configuration Example.

GPO Settings for WSUS Configuration
WSUS GPO Configuration Example

Please Note: This example contains configuration to automatically install updates. This example should only be used for workstations and not servers. Please use this example as a guide for your own study.

What’s required

To get started you’ll need:

  • 1 x Server (Virtual Machine or Physical Server)
  • Microsoft Windows Server 2022 Licensing
  • A running Windows Server 2022 Instance (OSE)
  • A network router and/or firewall

Hardware/Software used in this demonstration

  • VMware vSphere
  • HPE DL360p Gen8 Server
  • Microsoft Windows Server 2022
  • pfSense Firewall

Blog Posts mentioned in this video

Sep 192021
 
Windows Server 2022 Logo

Today we’re deploying a Windows Server 2022 member server and joining it to the domain we created in previous videos. I’ll also be explaining the difference between Domain Credentials and Local Credentials on member servers.

This video will demonstrate and explain the process of deploying a Windows Server 2022 member server, network configuration, DHCP vs Static IPs, and domain credentials vs local credentials.

Check it out and feel free to leave a comment! Scroll down below for more information and details on the guide.

Who’s this guide for

This guide is perfect for a seasoned IT professional or a beginner who is looking at getting experience with Windows Server 2022.

What’s included in the video

In this guide I will walk you through the following:

  • Document a new Server deployment
  • Configure Networking
  • Join Windows Server 2022 Server to domain as member server
  • Discussion on time importance with Active Directory and Domains
  • Discussion on Domain Credentials vs Local Credentials

What’s required

To get started you’ll need:

  • 1 x Server (Virtual Machine or Physical Server)
  • Microsoft Windows Server 2022 Licensing
  • A running Windows Server 2022 Instance (OSE)
  • A network router and/or firewall

Hardware/Software used in this demonstration

  • VMware vSphere
  • HPE DL360p Gen8 Server
  • Microsoft Windows Server 2022
  • pfSense Firewall
Sep 192021
 
Windows Server 2022 Logo

Today, I will show you how to create an Active Directory Domain on Windows Server 2022.

This video will demonstrate and explain the process of configuring, and deploying a Windows Server 2022 instance as a Domain Controller, DNS Server, and DHCP Server and then setting up a standard user.

Check it out and feel free to leave a comment! Scroll down below for more information and details on the guide.

Who’s this guide for

This guide is perfect for a seasoned IT professional or a beginner who is looking at getting experience with installing Windows Server 2022.

What’s included in the video

In this guide I will walk you through the following:

  • Document a new Server Installation and domain
  • Promote a Windows Server 2022 Server to a Domain Controller with Active Directory
    • Installation and configuration of Microsoft Active Directory
    • Promote a server as a new domain controller
      • Overview of Forest Functional Level
      • Overview of Domain Functional Level
      • Overview of DSRM (Domain Services Restore Mode) and Password
    • Installation and configuration of DNS Role
    • Installation and configuration of DHCP Role
  • Setup and configuration of a new user account on domain
  • Creation of DHCP Scope for Network

What’s required

To get started you’ll need:

  • 1 x Server (Virtual Machine or Physical Server)
  • Microsoft Windows Server 2022 Licensing
  • A running Windows Server 2022 Instance (OSE)
  • A network router and/or firewall

Hardware/Software used in this demonstration

  • VMware vSphere
  • HPE DL360p Gen8 Server
  • Microsoft Windows Server 2022
  • pfSense Firewall
Sep 182021
 
Windows Server 2022 Logo

With the recent release of Microsoft Windows Server 2022, I felt I needed to give it a shot. Join me as I install Windows Server 2022.

These instructions are also valid for previous versions of Microsoft Windows Server.

This video will demonstrate and explain the process of installing, configuring, and deploying a Windows Server 2022 instance.

Check it out and feel free to leave a comment! Scroll down below for more information and details on the guide.

Who’s this guide for

This guide is perfect for a seasoned IT professional or a beginner who is looking at getting experience with installing Windows Server 2022.

What’s included in the video

In this guide I will walk you through the following:

  • Installing Windows Server 2022 (with Desktop Experience)
  • Document a new Server Installation
  • VMware Tools Installation
  • Configuring Network Settings
  • Computer Name Change
  • Windows Server 2022 Server Manager Overview
  • Windows Updates

What’s required

To get started you’ll need:

  • 1 x Server (Virtual Machine or Physical Server)
  • Microsoft Windows Server 2022 Licensing
  • A network router and/or firewall

Hardware/Software used in this demonstration

  • VMware vSphere
  • HPE DL360p Gen8 Server
  • Microsoft Windows Server 2022
  • pfSense Firewall
Aug 062021
 
Office 365 Logo

When you deploy and install Microsoft Office 365 to a VDI environment, especially with non-persistent VDI (such as VMware Horizon Instant clones), special considerations must be followed.

In this guide I will teach you how to deploy Office 365 in a VDI environment, both with persistent and non-persistent (Instant Clones) VDI Virtual Machines. This guide was built using VMware Horizon, however applies to all VDI deployments including Citrix XenServer and WVD (Windows Virtual Desktops). Additionally this works on both Windows 10, and Windows 11.

By the time you’re done reading this guide, you’ll be able to fully deploy Office 365 to your VDI environment.

I highly recommend reading Microsoft’s Overview of shared computer activation for Microsoft 365 apps.

Guide Index

What’s required

To deploy Office 365 in a VDI Environment, you’ll need:

  • VMware Horizon deployment (or equivalent other product)
  • Microsoft Office 365 ProPlus licensing (See below for specifics on licensing)
  • Microsoft Azure SSO (via PRT or Seamless SSO) for Microsoft 365 and Office 365 Single sign-on
  • Microsoft Office Deployment Tool (Available here)
  • Microsoft Office Customization Tool (Available here)
  • Microsoft Office 365 GPO ADMX Templates (Available here)
  • Roaming Profiles or Profile Management software (like FSLogix)

Licensing

In order to properly use Shared Computer Activation with Office 365 in your VDI environment you’ll need one of the following products:

  • Microsoft 365 Apps for Enterprise (formerly known as Office 365 ProPlus)
  • Office 365 E3
  • Office 365 E5
  • Microsoft 365 Business Premium

All 4 of these products include and support “Shared Computer Activation“.

Microsoft 365 Standard, Office 365 Business, Office 365 Business Premium, and Office 365 Business Essentials cannot be used as they do not include or support Shared Computer Activation.

An exception is made for Microsoft 365 Business Premium which actually includes Microsoft 365 Apps for Business, but doesn’t support enabling “Shared Computer Activation” via Group Policy Object and SCA must be enabled using the XML configuration file method.

What is Shared Computer Activation (SCA)

Shared computer activation is an optional activation method built inside of Office 365 and Microsoft 365, designed to control and manage activations on shared computers. Originally this technology was used for Office 365 on RDS (Remote Desktop Servers) to handle multiple users since Office 365 is activated and licensed per user.

Later, this technology was modified to handle Office 365 activations in non-persistent VDI environments. When utilizing SCA (Shared Computer Activation), when a user runs and activates Office 365, an activation token is generated and saved. These activation tokens are saved to a network location that the users has access to which allows the user to roam.

Due to the nature of non-persistent VDI, a user will always be logging in to a system they have never logged in to before. When Office 365 is deployed properly, it will call out to and look for the roaming activation token to automatically activate Office 365 without calling out to Microsoft’s servers.

This is also handy with persistent VDI, where you can have a roaming activation token be used on multiple desktop pools as it follows the users.

These activation tokens once generated are valid for 30 days and remove the need to activate Office during that timeframe. As expiration nears, Office will automatically reach out to Microsoft’s servers and attempt to renew the licensing activation token.

You’ll want to make sure that you have implemented Azure AD Connect and SSO (Single Sign-On) properly along with the correct GPOs (covered later in this post) for auto-activation to function without prompting users to sign-in to activate. For more information, check out my post on Understanding Microsoft Azure AD SSO with VDI.

If you have not using SCA, you’ll need to follow additional special steps to have roaming profiles include the licensing directory, however I do not recommend using that method. The licensing information (and activation) without SCA is stored in the following directory:

%localappdata%\Microsoft\Office\16.0\Licensing

You can configure Shared Computer Activation and the location of the roaming activation token using Group Policy, the local registry, or the configuration.xml file for the Office Deployment Tool.

Shared Computer Activation is ONLY required for non-persistent VDI. If you are using persistent VDI where users are assigned a desktop they are frequently using, shared computer activation is not necessary and does not need to be used.

Even though Shared Computer Activation is not required for persistent desktops, I might still recommend using it if you have users using multiple desktop pools, or you’re regularly changing your persistent desktop golden image and refreshing the environment.

Later in the document, we’ll cover configuring Share Computer Activation.

Deploying and Installing Office 365 to the VDI Environment

The steps to deploy and install Office 365 to VDI vary depending if you’re using persistent or non-persistent VDI. In both types of deployments you’ll want to make sure that you use the Office Deployment Tool which uses an XML file for configuration to deploy the application suite.

You can either modify and edit the Office 365 configuration.xml file manually or you can use the “Office Customization Tool” available at: https://config.office.com/

Office Deployment Tool and Office Customization Tool

Using the Office Deployment Tool and the Office Customization Tool, you can customize your Office 365 installation to your specific needs and requirements.

Using the tool, you can create a configuration.xml and control settings like the following:

  • Architecture (32-bit or 64-bit)
  • Products to install (Office Suites, Visio, Project, and additional products)
  • Products to exclude
  • Update Channel
  • Language Settings and Language Packs
  • Installation Options (Installation Source and configurable items)
  • Upgrade Options
  • Licensing and Activation (EULA acceptance, KMS/MAK, User based vs Shared Computer Activation vs Device Activation)
  • Application Preferences

Once you have a configuration.xml file from the Office Customization Tool, you can use the Office Deployment Tool to deploy and install Office 365 using those customizations and configuration.

The configurations you use will vary depending on your VDI deployment type which I will get in to below.

Installing Office 365 with Persistent VDI

To deploy Office 365 with persistent VDI, Shared Computer Activation is not required.

You will however, want to use the Office Deployment Tool to prepare the base image for automated pools, or manually install Office 365 in to the VDI Virtual Machine.

See below for the instructions on Installing Office 365 on Persistent VDI:

  1. First you’ll need to download the Office Deployment Tool from this link: https://go.microsoft.com/fwlink/p/?LinkID=626065. You save this wherever.
  2. Create a directory that you can work in and store the Office 365 installation files.
  3. Open the file you downloaded from the Microsoft Download site, extract the files in to the working directory you created in step 2.
  4. Open a Command Prompt, and change in to that working directory.
  5. You can either use the included XML files as is (for default settings), modify them manually, or use the Office ustomization Tool.
  6. If you want to use SCA (Shared Computer Activation) make sure the following lines are added to the file right above the final line (right above):
    <Display Level="None" AcceptEULA="True" />
    <Property Name="SharedComputerLicensing" Value="1" />
    These variables enable Shared Computer Activation and disable automatic activation. Save the XML file.
  7. We’re now going to run the tool and download the Office installation files using the xml from above by running the following command (if you modified the XML file and/or changed the filename, use the filename you saved it as):
    setup.exe /download configuration.xml
  8. There will be no output and it will take a while so be patient.
  9. We can now install Office 365 using your XML configuration by running the following command (if you modified the XML file and/or changed the filename, use the filename you saved it as):
    setup.exe /configure configuration.xml

Office 365 should now install silently, and then afterwards you should be good to go!

If you did not use SCA, the product will need to be activated manually or automatically via GPO.

If you did use SCA, you’ll want to use the GPOs to configure first-run activation, as well as the location of the roaming activation tokens.

In both scenarios above, after installation is successful you’ll want to configure Office 365 for VDI.

Please note: With persistent VDI, you’ll want to make sure that you leave the Office 365 updating mechanism enabled as these VMs will not be destroyed on logoff. The behavior will match that of a typical workstation as far as software updates are concerned.

Even if you are using persistent VDI, I highly recommend you read the notes below on installing Office 365 on non-persistent VDI as you may want to incorporate that configuration in to your deployment.

Installing Office 365 with Non-Persistent (Instant Clones) VDI

To deploy Office 365 with non-persistent VDI, things are a little different than with persistent. Shared Computer Activation is recommended and required if you’re not using profile capture software like FSLogix. You can however still use SCA with FSLogix.

We’ll use the Office Deployment Tool to prepare the base image. Using the tool, we’ll want to make sure we exclude the following applications from the XML file:

  • Microsoft Teams
  • OneDrive

Using the Office 365 installer for the above products will cause issues as the software gets installed in the user profile instead of the operating system itself.

These applications have their own separate special “All User” installation MSI files that we need to use to install to the base image.

We’ll use the Office Customization Tool (OCT) at https://config.office.com/ to create a configuration XML file for our Non-Persistent Office 365 deployment.

Below is an example of the XML file generated from the Office Customization Tool for Instant Clones (Non-Persistent VDI) Virtual Machines:

<Configuration ID="XXXXXXXX-XXXX-XXXX-XXXX-XXXXXXXXXXXX">
  <Add OfficeClientEdition="64" Channel="Current">
    <Product ID="O365ProPlusRetail">
      <Language ID="en-us" />
      <ExcludeApp ID="Groove" />
      <ExcludeApp ID="Lync" />
      <ExcludeApp ID="OneDrive" />
      <ExcludeApp ID="Publisher" />
      <ExcludeApp ID="Teams" />
      <ExcludeApp ID="Bing" />
    </Product>
  </Add>
  <Property Name="SharedComputerLicensing" Value="1" />
  <Property Name="SCLCacheOverride" Value="0" />
  <Property Name="FORCEAPPSHUTDOWN" Value="FALSE" />
  <Property Name="DeviceBasedLicensing" Value="0" />
  <Updates Enabled="FALSE" />
  <Display Level="None" AcceptEULA="TRUE" />
</Configuration>

You’ll notice I chose not to include Groove, Lync, Publisher, and Bing Search. This is because these are not used in my environment. I’d recommend excluding applications you don’t require in your base image.

You’ll also notice that I chose to disable Office 365 updates as these get managed and handled inside of the base image and we don’t want the instant clones attempting to update Office as the VMs are deleted on logoff. We also choose to accept the EULA for users so they are not prompted.

After we have our configuration XML file, we’ll proceed to installing Office 365 on the non-persistent base image:

  1. Create a directory that you can work in and store the Office 365 installation files.
  2. Open the file you downloaded from the Office Deployment Tool on the Microsoft Download site, extract the files in to the working directory you created in step 2.
  3. Copy the XML file created above from the Office Customization Tool in to this directory.
  4. Open a Command Prompt, and change in to that working directory.
  5. Confirm that SCA (Shared Computer Activation) is enabled by viewing the XML configuration file. You should see the following text:
    <Display Level="None" AcceptEULA="True" />
    <Property Name="SharedComputerLicensing" Value="1" />
  6. We’re now going to run the tool and download the Office installation files using the xml from above by running the following command:
    setup.exe /download non-persistentVDI.xml
  7. There will be no output and it will take a while so be patient.
  8. We can now install Office 365 using your XML configuration by running the following command:
    setup.exe /configure non-persistentVDI.xml

Office 365 should now install silently.

For the skipped applications (Teams, OneDrive) we’ll install these applications separately. Go ahead and download the MSI installers from below and follow the instructions below:

Installers:

Installing Microsoft Teams on VDI

At present there is the old Classic teams client, and the new Microsoft Teams client, which both support VDI installation.

Classic Teams is going End of Support June 30th 2024. I highly recommend deploying New teams for New VDI deployments and/or desktop pools.

See below for a summary, and further down links to more details blog posts which I have created.

Installing Microsoft Classic Teams for VDI

To Install the Classic Microsoft Teams on non-persistent VDI using the MSI file above, run the following command on the base image:

msiexec /i C:\Location\Teams_windows_x64.msi ALLUSER=1 ALLUSERS=1

Using this method will install for all users in per-machine mode, and will also disable auto-updates for non-persistent environments.

Installing New Microsoft Teams for VDI

To install the new Microsoft Teams client on non-persistent VDI using the New Teams Bootstrapper, run the following command on the base image:

teamsbootstrapper.exe -p

Additionally, navigate to the following registry location:

HKEY_LOCAL_MACHINE\SOFTWARE\Microsoft\Teams

And create a new DWORD called “disableAutoUpdate” and set to a value of “1”, which will disable auto-updates for non persistent VDI images.

For more information and detailed guides, please see the following:

Installing OneDrive on VDI

Microsoft has a guide on how to install the OneDrive Sync app per machine (for use with non-persistent VDI).

To install Microsoft OneDrive on non-persistent VDI using the EXE file above, run the following command on the base image:

OneDriveSetup.exe /allusers

After installing, open the Windows Task Scheduler and disable the following OneDrive update task:

OneDrive Per-Machine Standalone Update Task

Additionally, open the Windows services and disable the OneDrive update service:

OneDrive Updater Service

Updating Office 365 in a VDI Environment

In persistent VDI environments, the auto-update mechanism will be enabled and activated (unless you chose to disable it), and Office will update as it does with normal windows instances. You can modify and/or control this behavior using the Microsoft Office ADMX Templates and Group Policy.

In non-persistent VDI environments the updating mechanism will be disabled (as per the XML configuration example above). To update the base image you’ll need to run the “setup.exe” again with the “download” and “configure” switch, so make sure you keep your configuration XML file.

Here is an example of the Office 365 Update process on a non-persistent VDI base image. We run the following commands on the base image to update Office 365:

  1. setup.exe /download non-persistentVDI.xml
  2. setup.exe /configure non-persistentVDI.xml

The commands above will download and install the most up to date version of Office 365 using the channel specified in the XML file. You then deploy the updated base image.

Configuring Microsoft Office 365 for the VDI Environment

Once Office 365 is installed in the base image (or VM), we can begin configuring Office 365 for the VDI environment.

To configure and centrally manage your O365 deployment, we’ll want to use GPOs (Group Policy Objects). This will allow us to configure everything including “first run configuration” and roll out a standardized configuration to users using both persistent and non-persistent VDI.

In order to modify GPOs, you’ll need to either launch the Group Policy Management MMC from a domain controller, or Install RSAT (Remote Server Administration Tools) on Windows 10 to use the MMC from your local computer or workstation.

You’ll probably want to create an OU (Organizational Unit) if you haven’t already for your VDI VMs (separate for persistent and non-persistent VDI) inside of Active Directory, and then create a new Group Policy Object and apply it to that OU. In that new GPO, we’ll be configuring the following:

We’ll be configuring the following “Computer Configuration” items:

  1. Microsoft Office – Licensing Configuration
  2. Microsoft Office – Update Configuration
  3. Microsoft OneDrive – Known Folders, Use OneDrive Files On-Demand
  4. Windows – Group Policy Loopback Processing Mode

We’ll also be configuring the following “User Configuration” items:

  1. Microsoft Office – First Run Configuration
  2. Microsoft Office – Block Personal Microsoft Account Sign-in
  3. Microsoft Office – Subscription/Licensing Activation
  4. Microsoft Outlook – Disable E-Mail Account Configuration
  5. Microsoft Outlook – Exchange account profile configuration
  6. Microsoft Outlook – Disable Cached Exchange Mode

Below we’ll cover the configuration

We’ll start with the Computer Configuration Items.

Microsoft Office – Licensing Configuration

If you’re using SCA (Shared Computer Activation) for licensing, we need to specify where to store the users activation tokens. You may have configured a special location for these, or may just store them with your user profiles.

First we need to enable Shared Computer Activation. Navigate to:

Computer Configuration -> Policies -> Administrative Templates -> Microsoft Office 2016 (Machine) -> Licensing Settings

And set “Use shared computer activation” to Enabled.

If you’re using FSLogix and redirecting the profile to a VHD file, you don’t need to perform the steps below. If you’re not using FSLogix and are not using a profile redirection mechanism, we’ll need to set “Specify the location to save the licensing token used by shared computer activation”. We’ll set this to the location where you’d like to store the roaming activation tokens. As an example, to store to the roaming User Profile share, I’d set it to the following:

\\PROFILE-SERVER\UserProfiles$\%USERNAME%

Microsoft Office – Update Configuration

If you’re usBecause this is a VDI environment, we want automatic updating disabled since IT will manage the updates.

We’ll want to disable updated by navigating to:

Computer Configuration -> Policies -> Administrative Templates -> Microsoft Office 2016 (Machine) -> Updates

And set “Enable Automatic Updates” to Disabled.

We’ll also set “Hide option to enable or disable updates” to Enabled to hide it from the users.

Microsoft OneDrive – Known Folders, Use OneDrive Files On-Demand

There’s some basic configuration for OneDrive that we’ll want to configure as we don’t want our users profile folders being copied or redirected to OneDrive. We also want OneDrive to be used with Files On-Demand so that users OneDrive contents aren’t cached/copied to the VDI user profiles.

This configuration is ONLY if you are using OneDrive and/or have it installed.

We’ll navigate over to:

Computer Configuration -> Policies -> Administrative Templates -> OneDrive

And set the following GPO objects:

  • “Prevent users from moving their Windows known folders to OneDrive” to Enabled
  • “Prevent users from redirecting their Windows known folders to their PC” to Enabled
  • “Prompt users to move Windows known folders to OneDrive” to Disabled
  • “Silently move Windows known folders to OneDrive” to “Disabled”
  • “Silently sign in users to the OneDrive sync app with their Windows credentials” to “Enabled”
  • “Use OneDrive Files On-Demand” to Enabled

We’ve new configured OneDrive for VDI Users.

Windows – Group Policy Loopback Processing Mode

Since we’ll be applying the above “Computer Configuration” GPO settings to users when they log on to the non-persistent Instant Clone VDI VMs, we’ll need to activate Loopback Processing of Group Policy (click the link for more information). This will allow use to have the “Computer Configuration” applied during User Logon and have higher precedence over their existing User Settings.

We’ll navigate to the following:

Computer Configuration -> Policies -> Administrative Templates -> System -> Group Policy

And set “Configure user Group Policy loopback processing mode” to Enabled, and “Mode” to Merge.

We’ve fully configured the Computer Configuration in the GPO. We will now configure the User Configuration items.

Microsoft Office – First Run Configuration

As most of you know, when running Microsoft Office 365 for the first time, there are numerous windows, movies, and wizards for the first time run. We want to disable all of this so it appears that Office is pre-configured to the user, this will allow them to just log on and start working.

We’ll head over to:

User Configuration -> Policies -> Administrative Templates -> Microsoft Office 2016 -> First Run

And set the following items:

  • “Disable First Run Movie” to Enabled
  • “Disable Office First Run on application boot” to Enabled

Microsoft Office – Block Personal Microsoft Account Sign-in

Since we’re paying for and want the user to use their Microsoft 365 account and not their personal M365/O365 accounts, we’ll stop them from being able to add personal Microsoft Accounts to Office 365.

Head over to:

User Configuration -> Policies -> Administrative Templates -> Microsoft Office 2016 -> Miscellaneous

And set “Block signing into Office” to Enabled, and then set the additional option to “Organization ID only”

Microsoft Office – Subscription/Licensing Activation

We don’t want the activation window being shown to the user, nor the requirement for it to be configured, so we’ll configure Office 365 to automatically activate using SSO (Single Sign On).

Navigate to:

User Configuration -> Policies -> Administrative Templates -> Microsoft Office 2016 -> Subscription Activation

And then set “Automatically activate Office with federated organization credentials” to Enabled.

This will automatically activate Office 365 for the VDI user.

Microsoft Outlook – Disable E-Mail Account Configuration

We’ll be configuring the e-mail profiles for the users so that no initial configuration will be needed. Again, just another step to let them log in and get to work right away.

Inside of:

User Configuration -> Policies -> Administrative Templates -> Microsoft Outlook 2016 -> Account Settings -> E-mail

And we’ll set the following:

  • “Prevent Office 365 E-mail accounts from being configured within a simplified Interface” to Disabled
  • “Prevent Outlook from interacting with the account settings detection service” to Enabled

Microsoft Outlook – Exchange account profile configuration

When using Exchange, we’ll want your users Outlook Profile to be auto-configured for their Exchange account so we’ll need to configure the following setting.

Navigate to:

User Configuration -> Policies -> Administrative Templates -> Microsoft Outlook 2016 -> Account Settings -> Exchange

And set “Automatically configure profile based on Active Directory Primary SMTP address” to Enabled.

After setting this, it will automatically add the Exchange Account when they open Outlook and they’ll be ready to go! Note, that there is an additional setting with a similar name appended with “One time Only”. Using the One time Only will not try to apply the configuration on all subsequent Outlook runs.

Microsoft Outlook – Disable Cached Exchange Mode

If you’re using persistent VDI, hosted exchange, or FSLogix, you won’t want to configure this item.

When using on-premise Exchange with VDI, we don’t want users cached Outlook mailboxes (OST files) stored on the roaming profile, or the Instant Clone. We can stop this by disabling Exchange caching.

Navigate to:

User Configuration -> Policies -> Administrative Templates -> Microsoft Outlook 2016 -> Account Settings -> Exchange -> Cached Exchange Mode

And we’ll set the two following settings:

  • “Cached Exchange Mode (File | Cached Exchange Mode)” to Disabled
  • “Use Cached Exchange Mode for new and existing Outlook profiles” to Disabled

This will configure Exchange to run in “Online Mode”.

Microsoft Office Common Identity Registry – For Roaming Profiles

If you’re using Roaming profiles and folder redirection with non-persistent VDI and instant clones, the user may be prompted repeatedly on new logins to log in to their Office 365 account (with a login prompt) even though SCA is configured and working. This setting is not required when using FSLogix.

When troubleshooting this, one may think that the issue is related to SCA, when it is actually not. This prompt is occurring because of authentication issues with Office 365.

To correct this issue, we’ll need to add a registry configuration to the GPO that will delete a key on login.

User Configuration -> Preferences -> Windows Settings -> Registry

We’ll create a new registry GPO item, that will “delete” the key path below inside of “HKEY_CURRENT_USER”:

SOFTWARE\Microsoft\Office\16.0\Common\Identity

This will delete the Identity key on login, and allow Office 365 to function. This may not be needed if using FSLogix or other profile management suites.

Deploying the Base Image

At this point you can push and deploy the base image and have users log in to the VDI environment and Office 365 should be fully functioning.

Please keep in mind there are different methods for deploying and configuring Office 365 depending on what application delivery and profile management software you may be using. This is just a guide to get you started!

May 312021
 
Office 365 Logo

After you Deploy Remote Desktop Services (RDS) for employee remote access and Install Office 365 in a Remote Desktop Services Environment, your next step will be to configure it by deploying Group Policy Objects to configure Office 365 in a Remote Desktop Services Environment.

By deploying a Group Policy Objects to configure Office 365, you’ll be able to configure Office 365 for first time use, activate the product, roll out pre-defined configuration, and even automatically configure Outlook mail profiles.

Following these steps will help you provide a zero-configuration experience for your end users so that everything is up and running for them when they connect the first time. I will also provide a number of GPO settings which will enhance the user experience.

What’s Required

To Configure Microsoft Office 365 on a Remote Desktop Services Server, you’ll need:

  • A Remote Desktop Services Server (Configured and Running)
  • Microsoft 365 Apps for Enterprise (formerly named as Office 365 ProPlus)
  • Office 365 Installed with SCA (Shared Computer Activation, as per “Install Office 365 in a Remote Desktop Services Environment“)
  • Microsoft 365 Apps for Enterprise ADMX GPO Administrative Templates (Download here)

Shared Computer Activation

In order to properly configure and activate Office 365 in a Remote Desktop Services Environment, you will need to Install Office 365 with Shared Computer Activation. You can read my guide by clicking on the link.

Configure Office 365

Once you’re ready to go, you can begin configuration.

To make things as simple as possible and centrally manage every aspect of your O365 deployment, we want to configure everything via GPO (Group Policy Objects). This will allow us to configure everything including “first run configuration” and roll out a standardized configuration to users.

In order to modify GPOs, you’ll need to either launch the Group Policy Management MMC from a domain controller, or Install RSAT (Remote Server Administration Tools) on Windows 10 to use the MMC from your local computer or workstation.

You’ll probably want to create an OU (Organizational Unit) inside of Active Directory for your RDS farm, and then create a new Group Policy Object and apply it to that OU. In that new GPO, we’ll be configuring the following:

We’ll be configuring the following “Computer Configuration” items:

  1. Microsoft Office – Licensing Configuration
  2. Microsoft Office – Update Configuration
  3. Microsoft OneDrive – Known Folders, Use OneDrive Files On-Demand
  4. Windows – Group Policy Loopback Processing Mode

We’ll also be configuring the following “User Configuration” items:

  1. Microsoft Office – First Run Configuration
  2. Microsoft Office – Block Personal Microsoft Account Sign-in
  3. Microsoft Office – Subscription/Licensing Activation
  4. Microsoft Outlook – Disable E-Mail Account Configuration
  5. Microsoft Outlook – Exchange account profile configuration
  6. Microsoft Outlook – Disable Cached Exchange Mode

Let’s start!

Microsoft Office – Licensing Configuration

Since we’re using SCA (Shared Computer Activation) for licensing, we need to specify where to store the users activation tokens. You may have configured a special location for these, or may just store them with your user profiles.

First we need to activate Shared Computer Activation. Navigate to:

Computer Configuration -> Policies -> Administrative Templates -> Microsoft Office 2016 (Machine) -> Licensing Settings

And set “Use shared computer activation” to Enabled.

Next we’ll set “Specify the location to save the licensing token used by shared computer activation” to the location where you’d like to store the activation tokens. As an example, to store to the User Profile share, I’d use the following:

\\PROFILE-SERVER\UserProfiles$\%USERNAME%

Microsoft Office – Update Configuration

Because this is a Remote Desktop Services server, we want automatic updating disabled since IT will manage the updates.

We’ll want to disable updated by navigating to:

Computer Configuration -> Policies -> Administrative Templates -> Microsoft Office 2016 (Machine) -> Updates

And set “Enable Automatic Updates” to Disabled.

We’ll also set “Hide option to enable or disable updates” to Enabled to hide it from the users.

Microsoft OneDrive – Known Folders, Use OneDrive Files On-Demand

There’s some basic configuration for OneDrive that we’ll want to configure as we don’t want our users profile folders being copied or redirected to OneDrive, and we also want OneDrive to be used with Files On-Demand so that users OneDrive contents aren’t cached/copied to the RDS Server.

We’ll navigate over to:

Computer Configuration -> Policies -> Administrative Templates -> OneDrive

And set the following GPO objects:

  • “Prevent users from moving their Windows known folders to OneDrive” to Enabled
  • “Prevent users from redirecting their Windows known folders to their PC” to Enabled
  • “Prompt users to move Windows known folders to OneDrive” to Disabled
  • “Use OneDrive Files On-Demand” to Enabled

We’ve new configured OneDrive for RDS Users.

Windows – Group Policy Loopback Processing Mode

Since we’ll be applying the above “Computer Configuration” GPO settings to users when they log on to the RDS Server, we’ll need to activate Loopback Processing of Group Policy (click the link for more information). This will allow use to have the “Computer Configuration” applied during User Logon and have higher precedence over their existing User Settings.

We’ll navigate to the following:

Computer Configuration -> Policies -> Administrative Templates -> System -> Group Policy

And set “Configure user Group Policy loopback processing mode” to Enabled, and “Mode” to Merge.

Microsoft Office – First Run Configuration

As most of you know, when running Microsoft Office 365 for the first time, there are numerous windows, movies, and wizards for the first time run. We want to disable all of this so it appears that Office is pre-configured to the user, this will allow them to just log on and start working.

We’ll head over to:

User Configuration -> Policies -> Administrative Templates -> Microsoft Office 2016 -> First Run

And set the following items:

  • “Disable First Run Movie” to Enabled
  • “Disable Office First Run on application boot” to Enabled

Microsoft Office – Block Personal Microsoft Account Sign-in

Since we’re paying for and want the user to use their Microsoft 365 account and not their personal, we’ll stop them from being able to add personal Microsoft Accounts to Office 365.

Head over to:

User Configuration -> Policies -> Administrative Templates -> Microsoft Office 2016 -> Miscellaneous

And set “Block signing into Office” to Enabled, and then set the additional option to “Organization ID only”

Microsoft Office – Subscription/Licensing Activation

Earlier in the post we configured Office 365 to use SCA, now we’ll need to configure how it’s activated. We don’t want the activation window being shown to the user, nor the requirement for it to be configured, so we’ll configure Office 365 to automatically active using SSO (Single Sign On).

Navigate to:

User Configuration -> Policies -> Administrative Templates -> Microsoft Office 2016 -> Subscription Activation

And then set “Automatically activate Office with federated organization credentials” to Enabled.

Microsoft Outlook – Disable E-Mail Account Configuration

We’ll be configuring the e-mail profiles for the users so that no initial configuration will be needed. Again, just another step to let them log in and get to work right away.

Inside of:

User Configuration -> Policies -> Administrative Templates -> Microsoft Outlook 2016 -> Account Settings -> E-mail

And we’ll set the following:

  • “Prevent Office 365 E-mail accounts from being configured within a simplified Interface” to Disabled
  • “Prevent Outlook from interacting with the account settings detection service” to Enabled

Microsoft Outlook – Exchange account profile configuration

We’ll want your users Outlook Profile to be auto-configured for their Exchange account so we’ll need to configure the following setting.

Navigate to:

User Configuration -> Policies -> Administrative Templates -> Microsoft Outlook 2016 -> Account Settings -> Exchange

And set “Automatically configure profile based on Active Directory Primary SMTP address” to Enabled.

After setting this, it will automatically add the Exchange Account when they open Outlook and they’ll be ready to go! Note, that there is an additional setting with a similar name appended with “One time Only”. Using the One time Only will not try to apply the configuration on all subsequent Outlook runs.

Microsoft Outlook – Disable Cached Exchange Mode

Since we’ll have numerous users using the RDS server or servers, we don’t want users cached Outlook mailboxes (OST files) stored on the RDS server. We can stop this by disabling Exchange caching.

Navigate to:

User Configuration -> Policies -> Administrative Templates -> Microsoft Outlook 2016 -> Account Settings -> Exchange -> Cached Exchange Mode

And we’ll set the two following settings:

  • “Cached Exchange Mode (File | Cached Exchange Mode)” to Disabled
  • “Use Cached Exchange Mode for new and existing Outlook profiles” to Disabled
May 142021
 

Welcome to Episode 02 of The Tech Journal Vlog at StephenWagner.com

In this episode

What I’ve done this week

  • 10ZiG Unboxing (10ZiG 4610q and 10ZiG 6110)
  • Thin Client Blogging and Video Creation
  • VDI Work (Instant Clones, NVME Flash Storage Server)

Fun Stuff

  • HPE Discover 2021 – June 22 to June 24 – Register for HPE Discover at https://infl.tv/jtHb
  • Firewall with 163 day uptime and no updates?!?!?
  • Microsoft Exchange Repeated Pending Reboot Issue
  • Microsoft Exchange Security Update KB5001779 (and CU18 to CU20)

Life Update

  • Earned VMware vExpert Status in February!
  • Starlink in Saskatchewan, Alberta (Canada)
    • VDI over Starlink, low latency!!!
    • Use Cases (Oil and Gas Facilities, etc)

Work Update

  • HPE Simplivity Upgrade (w/Identity Store Issues, Mellanox Firmware Issues)

New Blog Posts

Current Projects

  • 10ZiG 4610q Thin Client Content
  • 10ZiG 6110 Thin Client Content
  • VMware Horizon Instant Clones Guides and Content

Don’t forget to like and subscribe!
Leave a comment, feedback, or suggestions!

May 122021
 

When attempting to install a Microsoft Exchange Cumulative Update, the readiness checker may fail and stop you from proceeding with the upgrade and installation.

You will be presented with the following error, or one similar:

There is a pending reboot from a previous installation of a Windows Server role or feature. Please restart the computer and then run Setup again.

After restarting the server, and re-attempting to install the Exchange CU, it will continue to present this and stop you from proceeding with the installation.

The Problem

There’s a few different things that can cause this. I experienced this issue when trying to upgrade Exchange 2016 CU18 to Exchange 2016 CU20. This issue can also happen when upgrading from Microsoft Exchange 2019 CU versions, as well as earlier versions of Exchange 2013.

I found a few posts online referencing to delete two registry keys, “UpdateExeVolatile” and “PendingFileRenameOperations”, however these didn’t exist for me.

The Fix

I figured I’d try to install a feature, specifically something small that I may or may not ever use, to see if it would work and to see if it would clear whatever flag had been set for the pending restart.

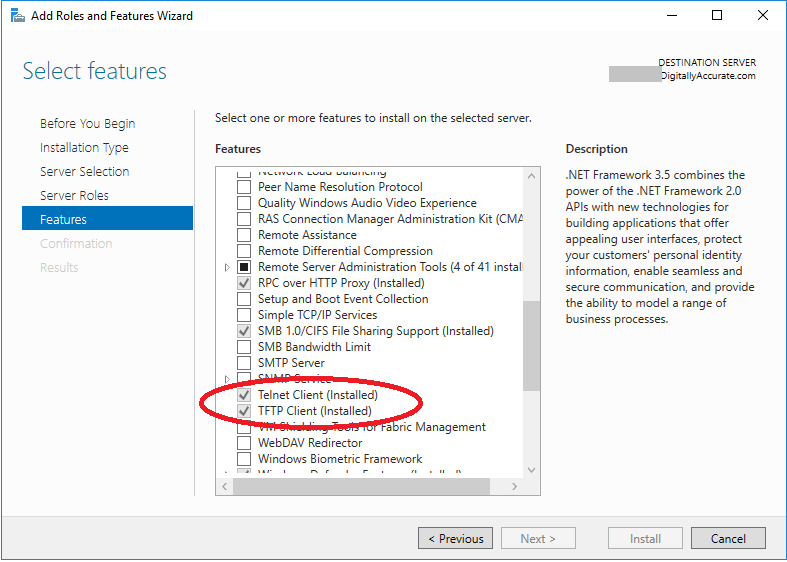
First, I left the Exchange CU installer window open on the prerequisite check, opened the Server Manager and installed the TFTP Client. After finishing, I hit retry and it continued to fail.

I restarted the server, ran the CU installer again which got stuck on the pending restart. This time I closed the Exchange CU upgrade, installed the “Telnet Client” feature, opened the CU upgrade again, and it finally worked and proceeded!

Screenshot of Exchange Pending Reboot Feature Install workaround
Exchange Pending Reboot Feature Install workaround

So with the above in mind, to bypass this issue you must:

  1. Restart Server
  2. Launch Exchange CU Installer
  3. Wait for readiness check to fail (warning of a pending reboot), close installer
  4. Install a feature with the Server Manager, such as “TFTP Client” or “Telnet Client”
  5. Open Exchange CU Installer
  6. Install Microsoft Exchange Cumulative Update successfully!

Hope this helps! Leave a comment and let me know if it worked for you!