In this post, I’m going to provide instructions and a guide on how to install the Horizon Agent for Linux on Ubuntu 20.04 LTS. This will allow you to run and connect to an Ubuntu VDI VM with VMware Horizon View.
In the past I’ve created instructions on how to do this on earlier versions of Ubuntu, as well as RedHat Linux, but it’s getting easier than ever and requires less steps than previous guides.
I decided to create the updated tutorial after purchasing an AMD S7150 x2 and wanted to get it up and running with Ubuntu 20.04 LTS and see if it works.
Create a VM on your vCenter Server, attached the Ubuntu 20.04 LTS ISO, and install Ubuntu
Install any Root CA’s or modifications you need for network access (usually not needed unless you’re on an enterprise network)
Update Ubuntu as root apt update apt upgrade
Install software needed for VMware Horizon Agent for Linux as root apt install openssh-server python python-dbus python-gobject open-vm-tools-desktop
Install your software (Chrome, etc.)
Install any vGPU or GPU Drivers you need before installing the Horizon Agent
Install the Horizon Agent For Linux as root (Enabling Audio, Disabling SSO) ./install_viewagent.sh -a yes -S no
Reboot the Ubuntu VM
Log on to your Horizon Connection Server
Create a manual pool and configure it
Add the Ubuntu 20.04 LTS VM to the manual desktop pool
Entitle the User account to the desktop pool and assign to the VM
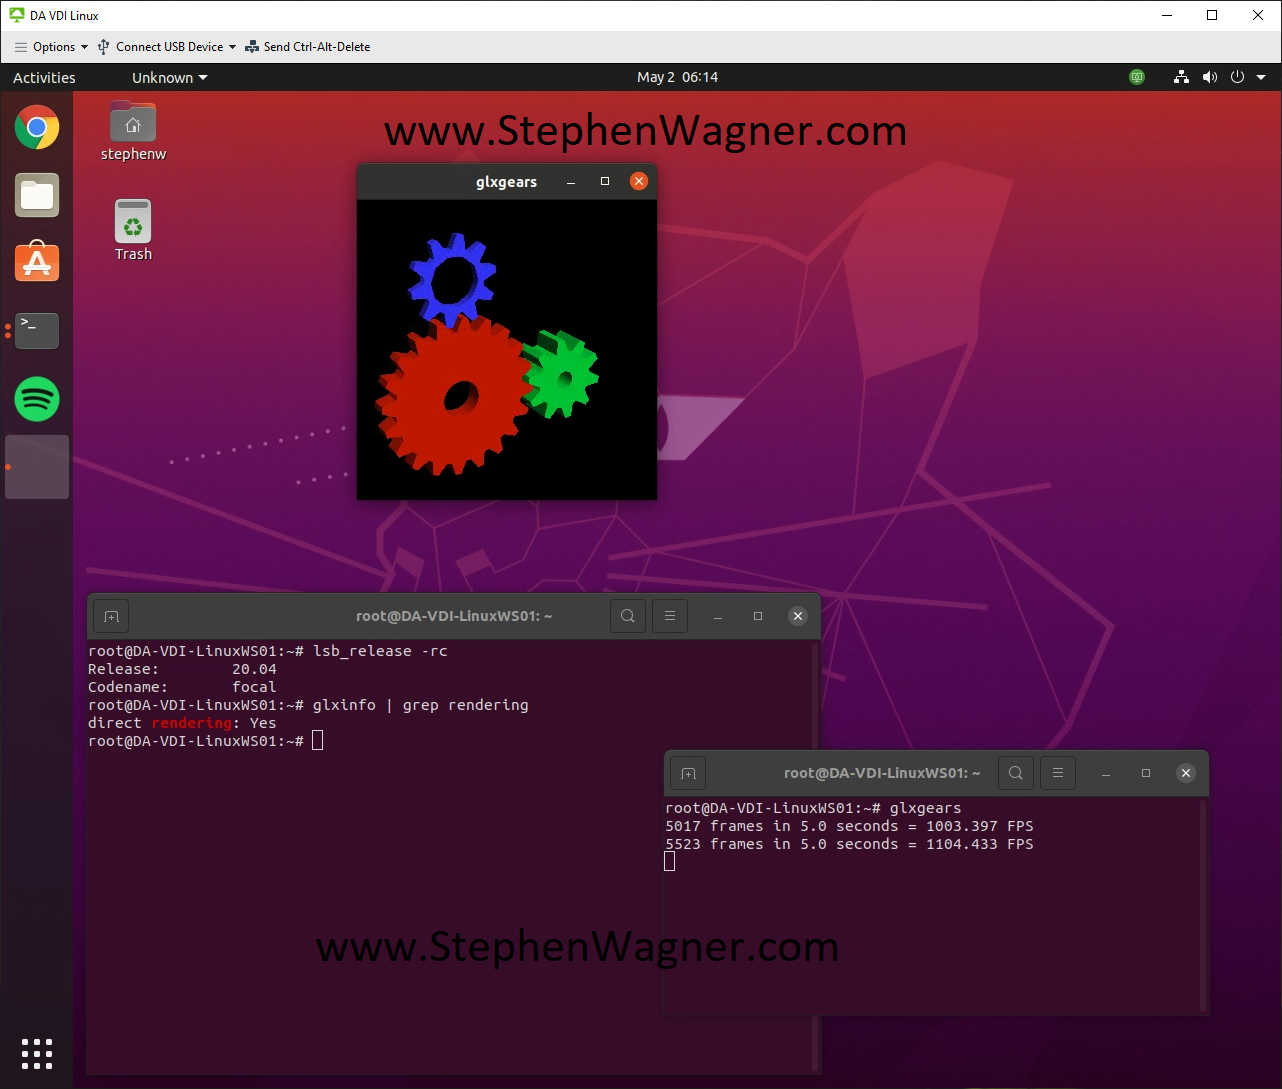
Connect to the Ubuntu 20.04 Linux VDI VM from the VMware Horizon Client
And that’s it, you should now be running.
As for the AMD S7150 x2, I noticed that Ubuntu 20.04 LTS came with the drivers for it called “amdgpu”. Please note that this driver does not work with VMware Horizon View. After installing “mesa-utils”, running “glxgears” and “glxinfo” it did appear that 3D Acceleration was working, however after further investigation it turned out this is CPU rendering and not using the S7150 x2 GPU.
You now have a VDI VM running Ubuntu Linux on VMware Horizon View.
Do you have a VMware Horizon View VDI environment and some power users you’d like to optimize? I’ve got some optimizations that you can easily apply via the VMware Horizon GPO (Group Policy Object) bundle.
These are performance optimizations and configurations that I have rolled out for my own persistent desktop to optimize the experience for myself. These optimizations may use more resources to provide a better experience for power users.
Please note that these optimizations are not meant to be deployed for large numbers of users unless you have the resources to handle it. Always test these settings before rolling out in to production.
VMware Horizon GPO Bundle
As part of any VMware Horizon View deployment, you should have installed the VMware Horizon GPO Bundle. This is a collection of ADMX GPO (Group Policy Object) templates that you can upload to your domain controllers and use to configure various aspects of your VMware Horizon deployment.
These GPOs can be used to configure both the server, VDI VMs, VMware Horizon Clients, and various configurables with the protocols (including VMware Blast) being used in your deployment such as VMware BLAST, PCoIP, and RDP.
Below, you’ll find some of my favorite customizations and optimizations that I use in my own environment to enhance my experience.
Do you have a GPU for your VDI session and extra bandwidth? If so, let’s crank that framerate up for a smoother experience! Configuring this variable will increase the default framerate to 60 fps (frames per second).
There are two values for this setting, “H. 264 Maximum QP” and “H. 264 Minimum QP”. These control how much processing and compression is used on the VMware Blast h. 264 session.
To increase the quality (and bandwidth usage) of the session, you can decrease these to reduce the amount of compression. In my case I reduced both by “5” from their default values which made a big change.
VMware Blast: Max Session Bandwidth kbit/s Megapixel Slope
This setting will increase the amount of available bandwidth for the Horizon Blast h.264 video stream.
The default is “6200” and I recommend playing with this a little to find out what suits you best depending on the other changes you made, especially with the 2 items above.
You can try doubling, tripling, or quadrupling this value depending on what’s required and how much available bandwidth you have.
Users are usually connecting from all sorts of devices, including laptops, tablets, and more. When connecting to a VDI session with a laptop or tablet that is using display scaling because it has a high native resolution, it may be extremely difficult to read any text because scaling is disabled on the VDI session.
To allow display scaling in the VDI session, we need to enable it via GPO on both the “Computer Configuration” and “User Configuration”.
And we’ll also set that “Allow Display Scaling” to “Enabled”.
Configuring this will allow you to configure display scaling on the VMware Horizon View client. After enabling this, it automatically configures scaling to match what I have configured on my connecting workstation (such as my Microsoft Surface Tablet, or my Lenovo X1 Carbon laptop). You also have the ability to manually configure the scaling on the session.
VMware Horizon Client Configuration/View USB Configuration: Allow keyboard and Mouse Devices
While you never want to use USB Redirection for keyboards and mice, you may need to use USB redirection for various HID (Human Interface Devices) that appear as keyboards or mice. You may need to enable this to make the following devices work:
2FA/MFA Security Tokens
Security Keys
One Touch Tokens
In my case, I had a Yubico Yubikey security key that I needed passed through using USB Redirection (more on that here) to authenticate 2FA sessions inside of my VDI session.
To enable the passthrough of keyboards and mice (HID) devices, change the following.
Using a webcam with VMware Horizon and RTAV (Real Time Audio Video), you may notice a slow frame rate and low resolution on your webcam going through the VDI session.
Here, we’re going to increase the fps (frames per second) and resolution of RTAV for VMware Horizon.
We’re going to “Enable” the following and set the values below:
Max frames per second = 25
Resolution - Default image resolution height in pixels = 600
Resolution - Default image resolution width in pixels = 800
Resolution - Max image height in pixels = 720
Resolution - Max image width in pixels = 1280
You’ll now notice a clearer and higher resolution webcam running at a faster framerate.
VMware View Agent Configuration/VMware HTML5 Features/Enable VMware HTML5 Features
There’s numerous HTML5 optimizations that VMware has incorporated in to the latest versions of VMware Horizon View. These include, but are not limited to:
HTML5 Multimedia Redirection
Geolocation Redirection
Browser Redirection
Media Optimization for Microsoft Teams
We want all this good stuff, so we’ll head over to the following:
So there’s this little thing called “HTML5 Multimedia Redirection”, where when configured and the plugins are installed, VMware Horizon will essentially redirect HTML5 based multimedia from the VDI session to your local system to handle.
This offload makes video extremely crisp and smooth, however comes with some concerns, security risks, and learning on your part. When you enable this, you only want to do so for trusted websites.
In this location, we need to set “Enable VMware HTML5 Multimedia Redirection” to “Enabled”. After this, we need to configure the URL list for domains and websites that we will allow HTML5 Multimedia Redirection to work with.
To do this, we’ll set “Enable URL list for VMware HTML5 Multimedia Redirection” to “Enabled”, and then add YouTube to the exception list to allow HTML5 Multimedia Redirection for YouTube. In the URL list, we will add:
https://www.youtube.com/*
And that’s it!
VMware View Agent Configuration/VMware HTML5 Features/VMware WebRTC Redirection Features
We’re all using Microsoft Teams these days, and while Microsoft Teams does have VDI optimization, you need to enable what’s needed on the VMware Horizon side of things to make it work.
We’ll set “Enable Media Optimization for Microsoft Teams” to “Enabled”.
In order for Microsoft Teams VDI optimization to function, there are steps involved with the installation which aren’t covered in this post. For these steps, make sure you check out my guide on Microsoft Teams VDI Optimization for VMware Horizon.
Conclusion
Leave a comment and let me know if these helped you, or if you have any optimizations or tweaks you’d like to share with the community!
If you’re using Azure AD, and have Hybrid Azure AD joined machines, special considerations must be made with non-persistent VDI workstations and VMs. This applies to Instant Clones on VMware Horizon.
Due to the nature of non-persistent VDI, machines are created and destroyed on the fly with a user getting an entirely new workstation on every login.
Hybrid Azure AD joined workstations not only register on the local domain Active Directory, but also register on the Azure AD (Azure Active Directory).
The Problem
If you have Hybrid Azure AD configured and machines performing the Hybrid Join, this will cause numerous machines to be created on Azure AD, in a misconfigured and/or unregistered state. When the non-persistent instant clone is destroyed and re-created, it will potentially have the same computer name as a previous machine, but will be unable to utilize the existing registration.
This conflict state could potentially make your Azure AD computer OU a mess.
VMware Horizon 8 version 2303 now supports Hybrid Azure AD joined non-persistent instant clones using Azure AD Connect. If you are using an older version, or using a different platform for non-persistent VDI, you’ll need to reference the solution below.
The Solution
Please see below for a few workarounds and/or solutions:
Utilize login/logoff scripts to Azure AD join and unjoin on user login/logoff. You may have to create a cleanup script to remove old/stale records from Azure AD as this can and will create numerous computer accounts on Azure AD.
In my environment I elected to remove the non-persistent computer OU from Azure AD Connect sync, and it’s been working great. It also keeps my Azure Active Directory nice and clean.
After upgrading from Horizon 8 2006 to Horizon 8 2012, audio stopped working. When connected to a VDI session, audio is not being passed through to the client.
The Problem
Audio simply does not work. Using the Chrome and multimedia redirection, audio will work, but this is most likely due to the fact the client is handling multimedia.
The Fix
Removing the audio drivers (forcing uninstall/deleting the audio driver) and re-installing the agent does not correct this.
Uninstalling and reinstalling the Horizon Client does not correct this.
Audio does function on the Horizon Android client so I isolated this to the Windows client.
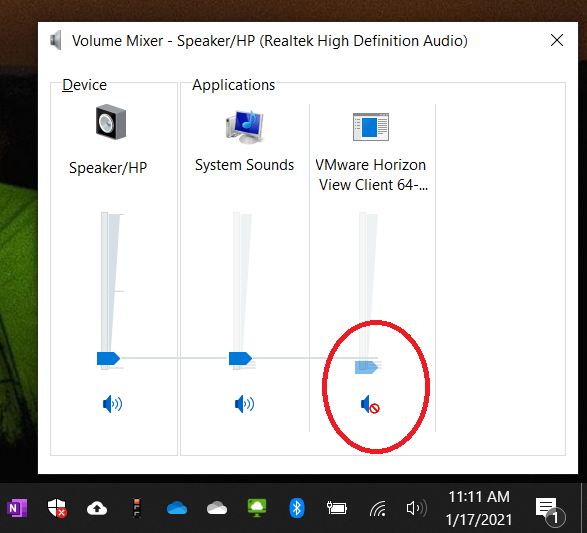
After further troubleshooting, I opened the Windows Sound mixer (Right click on the audio icon in the system tray, select “Open Volume Mixer”). I noticed that not only was the VMware Horizon client at 0, but it was also muted.
VMware Horizon View Client Audio Mixer
Unmuting this and raising the volume slider resolved the issue.
In this post I’m going to explain what VDI is in the most simplest form and how you can benefit from using virtual desktop infrastructure (virtualized desktops) in your EUC strategy.
Virtual Desktop Infrastructure (VDI)
VDI standards for Virtual Desktop Infrastructure. Think of your existing physical desktop infrastructure (your desktop computers, also called end user computing), now virtualize those desktop computers in a virtual environment much like your servers are, and you now have Virtual Desktop Infrastructure.
End User Computing (EUC)
Traditionally end user computing has been delivered by means of deploying physical (real) computers to each user in your office (and possibly remote users). This brings with it the cost of the systems, the time/cost to maintain the systems and hardware, and the management overhead of maintaining those systems.
By utilizing VDI, you can significantly reduce the cost, management, and maintenance required to maintain your EUC infrastructure.
What is VDI
When you implement a VDI solution, you virtualize your desktops and workstations on a virtualization server, much like your servers are probably already virtualized. Users will connect via software, a thin client, or a zero client to establish the session to transmit and receive the video, monitor, and keyboard of workstation that is virtualized.
This might sound familiar, like RDS (Remote Desktop Services). However, in an RDS environment numerous users share the same server and resources and access it un a multi-user fashion, whereas with VDI they are using a virtualized Windows instance dedicated to them running an OS like Windows 10.
How does VDI work
Using the software, thin client, or zero client, a user establishes a session to a connection broker, which then passes it along to the Virtual Machine running on the server. The Virtual Machine encodes and compresses the graphics and then connects the users keyboard and mouse to the VM.
What’s even cooler, is that remote devices like printers and USB devices can also be forwarded on to the VM, giving the user the feeling that the computer that’s running on the server, is actually right in front of them.
And if that isn’t cool enough, in an environment where 3D accelerated and high-performance graphics are required, you can use special graphics cards and GPUs to provide those high end graphics remotely to users. Technically you could game, do engineering work, video and graphics editing, and more.
Why use VDI
So your desktops are now virtualized. This means you no longer need to maintain numerous physical PCs and the hardware that is inside of them.
You can deploy a standardized golden image that instantly clones as users log in to give them a pre-configured and maintained environment. This means you manage 1 or few desktops which can get deployed to hundreds of users, instead of managed hundreds of desktops.
If a thin client or zero client fails you can simply re-deploy a new unit to the user, which are very inexpensive, and reduces downtime.
In the event of a disaster, your VDI EUC environment would be integrated in to your disaster recovery solution, meaning it would be very easy to get users back up and running.
One of the best parts is that the environment can be used inside of your office and externally, allowing you to provide a smooth experience for remote users. This made business continuity a breeze for organizations that need to deploy remote users or “Work from home” users on the fly.
The cost of VDI
The cost to roll out a VDI solution varies depending on the number of users, types of users, and functionality you’d like.
Typically, VDI is a no-brainer for large organizations and enterprises due to the cost savings on hardware, management, and maintaining the solution vs traditional desktops. But smaller organizations can also benefit from VDI, examples being organizations that use expensive desktops and/or laptops for uses such as engineering, software development, and other uses that require high-cost workstations.
One last thought I want to leave you with; imagine an environment with 50-100 systems, and all the wasted power and CPU cycles when users are just browsing the internet. In a virtual environment you can over-allocate resources, which means you can identify user trends and only purchase the hardware you need to based on observed workloads. This can significantly reduce the cost of hardware, especially for software development, engineering, and other high performance computing.
If you’re like me and use an older Nvidia GRID K1 or K2 vGPU video card for your VDI homelab, you may notice that when using VMware Horizon that VMware Blast h264 encoding is no longer being offloaded to the GPU and is instead being encoded via the CPU.
The Problem
Originally when an environment was configured with an Nvidia GRID K1 or K2 card, not only does the card provide 3D acceleration and rendering, but it also offloads the VMware BLAST h264 stream (the visual session) so that the CPU doesn’t have to. This results in less CPU usage and provides a streamlined experience for the user.
This functionality was handled via NVFBC (Nvidia Frame Buffer Capture) which was part of the Nvidia Capture SDK (formerly known as GRID SDK). This function allowed the video card to capture the video frame buffer and encode it using NVENC (Nvidia Encoder).
Ultimately after spending hours troubleshooting, I learned that NVFBC has been deprecated and is no longer support, hence why it’s no longer functioning. I also checked and noticed that tools (such as nvfbcenable) were no longer bundled with the VMware Horizon agent. One can assume that the agent doesn’t even attempt to check or use this function.
Symptoms
Before I was aware of this, I noticed that while 3D Acceleration and graphics were functioning, I was experiencing high CPU usage. Upon further investigation I noticed that my VMware BLAST sessions were not offloading h264 encoding to the video card.
VMware Horizon Performance Tracker with NVidia GRID K1
You’ll notice above that under the “Encoder” section, the “Encoder Name” was listed as “h264 4:2:0”. Normally this would say “NVIDIA NvEnc H264” (or “NVIDIA NvEnc HEVC” on newer cards) if it was being offloaded to the GPU.
Looking at a VMware Blast session (Blast-Worker-SessionId1.log), the following lines can be seen.
You’ll notice it tries to load the proper functions, however it fails.
The Solution
Unfortunately the only solution is to upgrade to newer or different hardware.
The GRID K1 and GRID K2 cards have reached their EOL (End of Life) and are no longer support. The drivers are not being maintained or updated so I doubt they will take advantage of the newer frame buffer capture functions of Windows 10.
Newer hardware and solutions have incorporated this change and use a different means of frame buffer capture.
To resolve this in my own homelab, I plan to migrate to an AMD FirePro S7150x2.
When you’re looking for additional or enhanced options to secure you’re business and enterprise IT systems, MFA/2FA can help you achieve this. Get away from the traditional single password, and implement additional means of authentication! MFA provides a great compliment to your cyber-security policies.
MFA is short for Multi Factor authentication, additionally 2FA is short for Two Factor Authentication. While they are somewhat the same, multi means many, and 2 means two. Additional security is provided with both, since it provides more means of authentication.
Traditionally, users authenticate with 1 (one) level of authentication: their password. In simple terms MFA/2FA in addition to a password, provides a 2nd method of authentication and identity validation. By requiring users to authentication with a 2nd mechanism, this provides enhanced security.
Why use MFA/2FA
In a large portion of security breaches, we see users passwords become compromised. This can happen during a phishing attack, virus, keylogger, or other ways. Once a malicious user or bot has a users credentials (username and password), they can access resources available to that user.
By implementing a 2nd level of authentication, even if a users password becomes compromised, the real (or malicious user) must pass a 2nd authentication check. While this is easy for the real user, in most cases it’s nearly impossible for a malicious user. If a password get’s compromised, nothing can be accessed as it requires a 2nd level of authentication. If this 2nd method is a cell phone or hardware token, a malicious user won’t be ale to access the users resources unless they steal the cell phone, or hardware token.
How does MFA/2FA work
When deploying MFA or 2FA you have the option of using an app, hardware token (fob), or phone verification to perform the additional authentication check.
After a user attempts to logs on to a computer or service with their username and password, the 2nd level of authentication will be presented, and must pass in order for the login request to succeed.
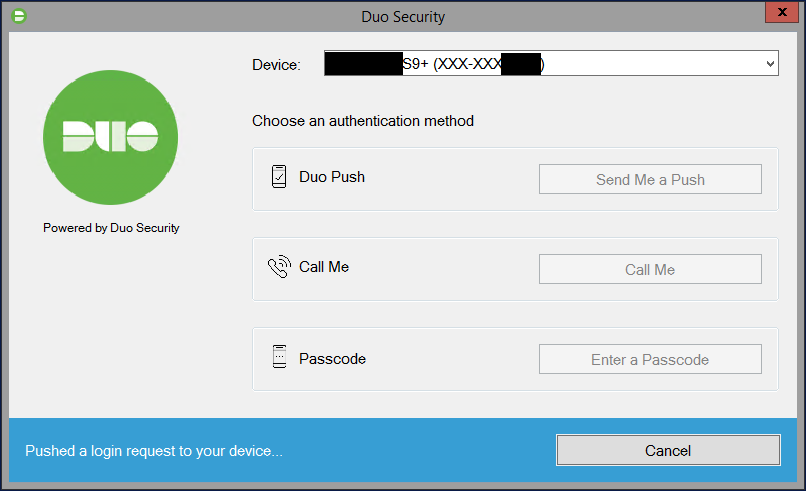
Please see below for an example of 2FA selection screen after a successful username and password:
Duo Security Windows Login MFA 2FA Prompt
After selecting an authentication method for MFA or 2FA, you can use the following
2FA with App (Duo Push)
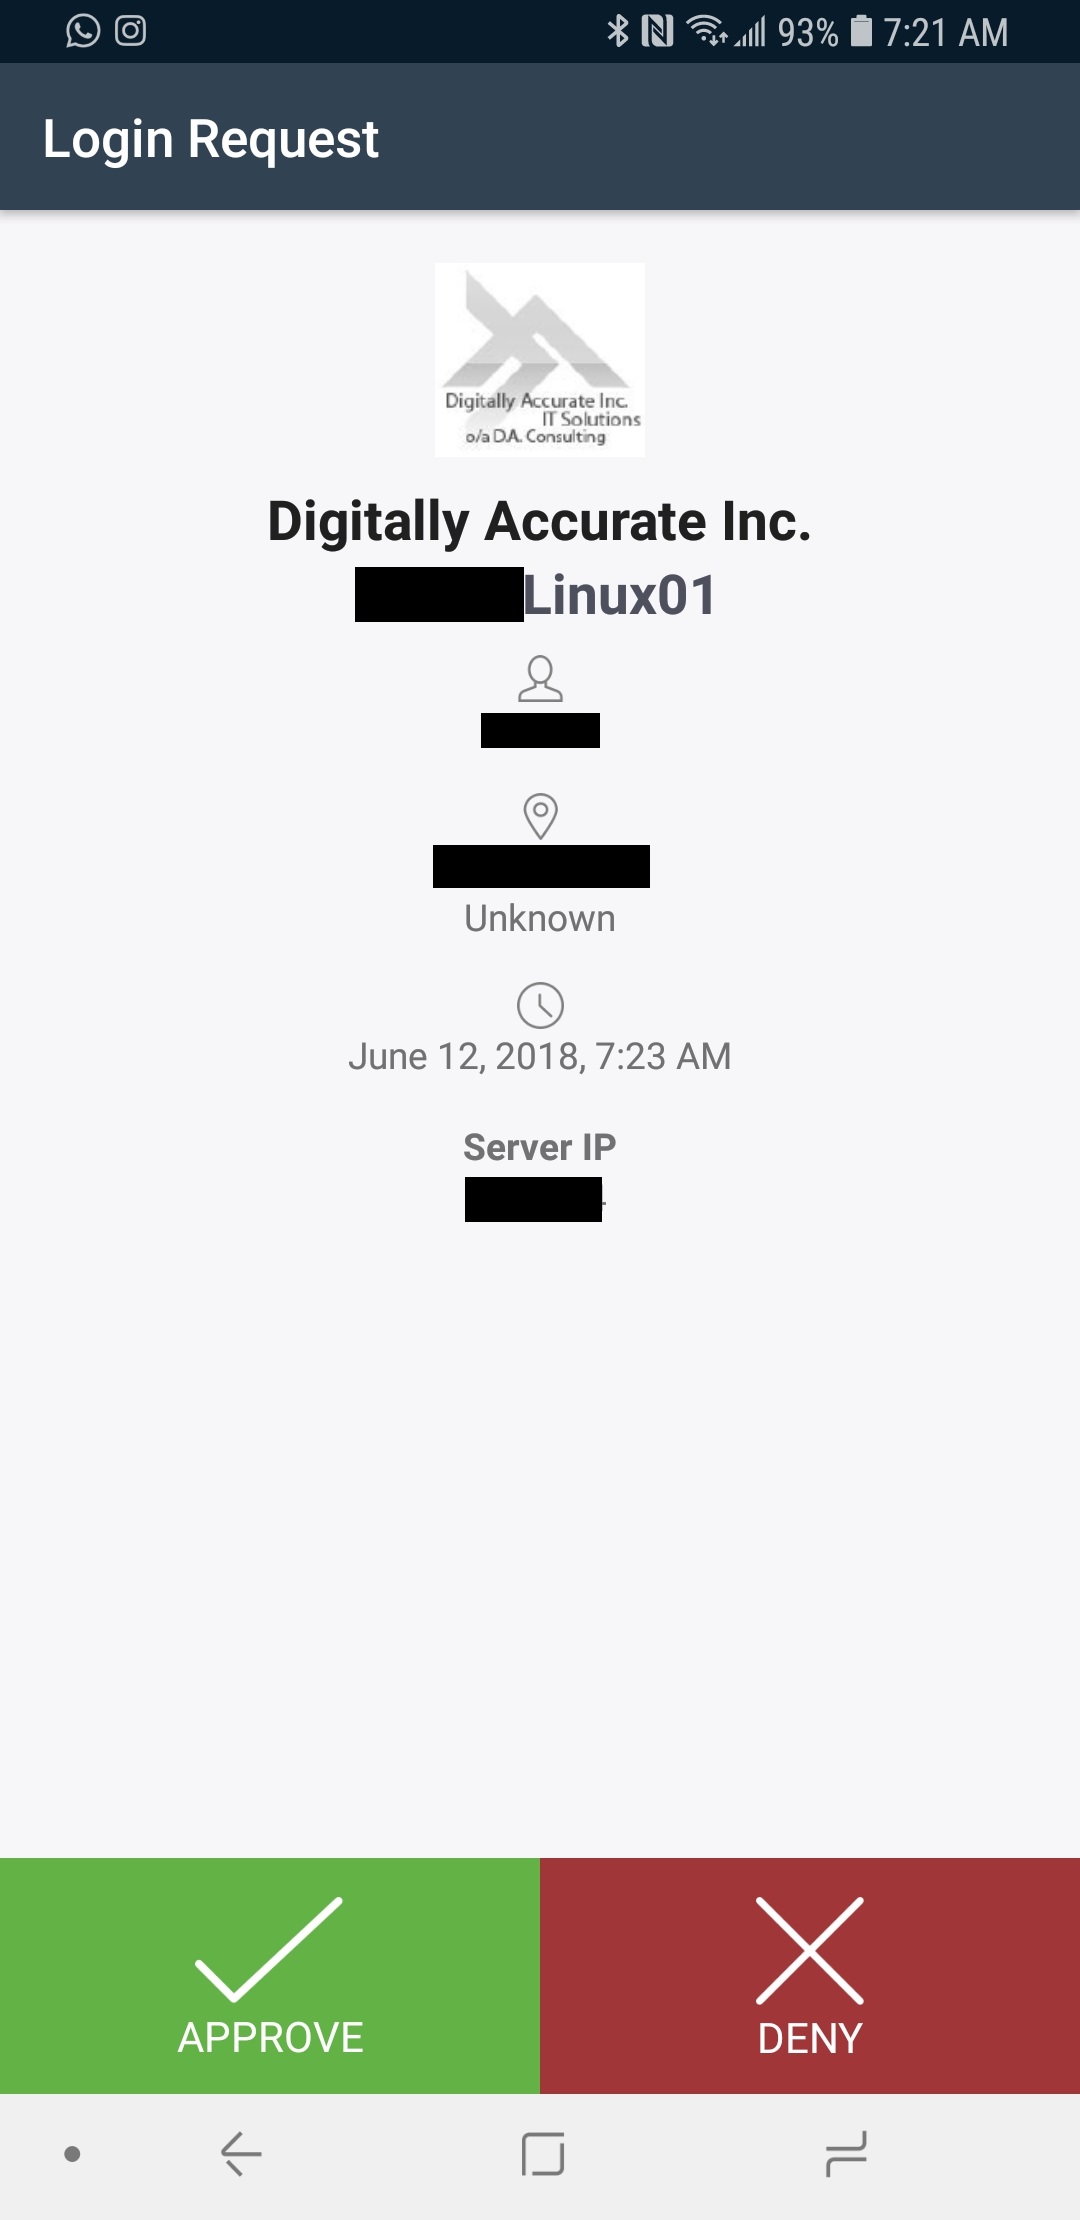
Duo Push sends an authentication challenge to your mobile device which a user can then approve or deny.
Please see below for an example of Duo Push:
Duo Push to Mobile App on Android
Once the user selects to approve or deny the login request, the original login will either be approved or denied. We often see this as being the preferred MFA/2FA method.
2FA with phone verification (Call Me)
Duo phone verification (Call Me) will call you on your phone number (pre-configured by your IT staff) and challenge you to either hangup to deny the login request, or press a button on the keypad to accept the login request.
While we rarely use this option, it is handy to have as a backup method.
2FA with Hardware Token (Passcode)
Duo Passcode challenges are handled using a hardware token (or you can generate a passcode using the Duo App). Once you select this method, you will be prompted to enter the passcode to complete the 2FA authentication challenge. If you enter the correct passcode, the login will be accepted.
Here is a Duo D-100 Token that uses HOTP (HMAC-based One Time Password):
Duo D-100 HOTP Hardware Token
When you press the green button, a passcode will be temporarily displayed on the LCD display which you can use to complete the passcode challenge.
You can purchase Hardware Token’s directly from Digitally Accurate Inc by contacting us, your existing Duo Partner, or from Duo directly. Duo is also compatible with other 3rd party hardware tokens that use HOTP and TOTP.
2FA with U2F
While you can’t visibly see the option for U2F, you can use U2F as an MFA or 2FA authentication challenge. This includes devices like a Yubikey from Yubico, which plugs in to the USB port of your computer. You can attach a Yubikey to your key chain, and bring it around with you. The Yubikey simply plugs in to your USB port and has a button that you press when you want to authenticate.
When the 2FA window pops up, simply hit the button and your Yubikey will complete the MFA/2FA challange.
What can MFA/2FA protect
Duo MFA supports numerous cloud and on-premise applications, services, protocols, and technologies. While the list is very large (full list available at https://duo.com/product/every-application), we regularly deploy and use Duo Security for the following configurations.
Windows Logins (Server and Workstation Logon)
Duo MFA can be deployed to not only protect your Windows Servers and Workstations, but also your remote access system as well.
When logging on to a Windows Server or Windows Workstation, a user will be presented with the following screen for 2FA authentication:
Duo Security Windows Login MFA 2FA Prompt
Below you can see a video demonstration of DUO on Windows Login.
DUO works with both Windows Logins and RDP (Remote Desktop Protocol) Logins.
VMWare Horizon View Clients (VMWare VDI Logon)
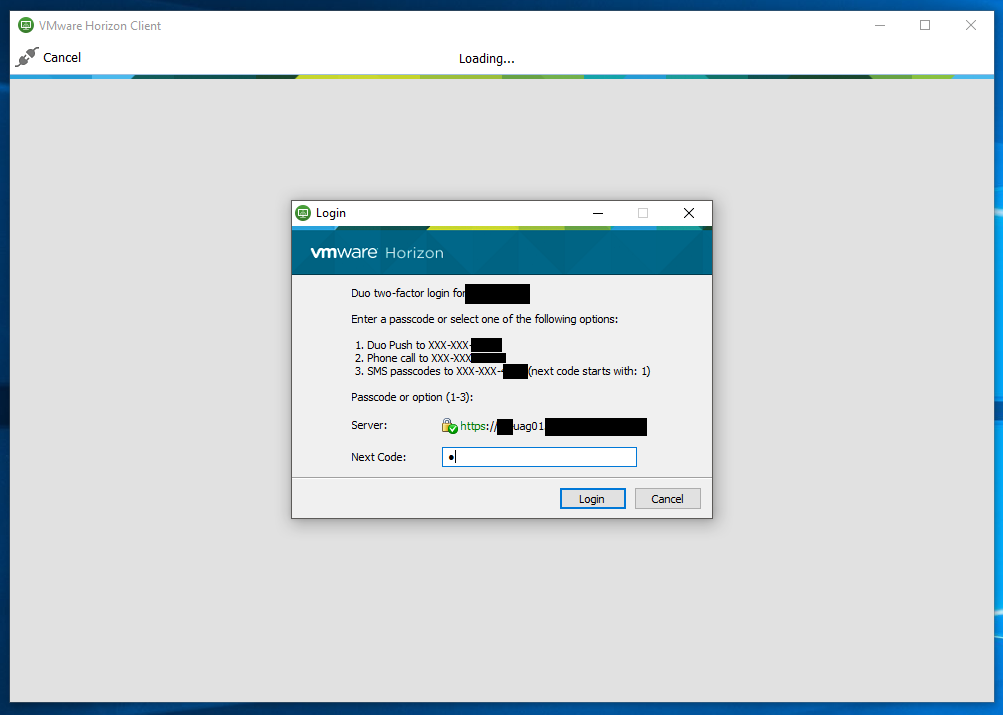
Duo MFA can be deployed to protect your VDI (Virtual Desktop Infrastructure) by requiring MFA or 2FA when users log in to access their desktops.
When logging on to the VMware Horizon Client, a user will be presented with the following screen for 2FA authentication:
Duo Security VMWare Horizon Client Login MFA 2FA Prompt
Below you can see a video demonstration of DUO on VMware Horizon View (VDI) Login.
Sophos UTM (Admin and User Portal Logon)
Duo MFA can be deployed to protect your Sophos UTM firewall. You can protect the admin account, as well as user accounts when accessing the user portal.
If you’re using the VPN functionality on the Sophos UTM, you can also protect VPN logins with Duo MFA.
Unix and Linux (Server and Workstation Logon)
Duo MFA can be deployed to protect your Unix and Linux Servers. You can protect all user accounts, including the root user.
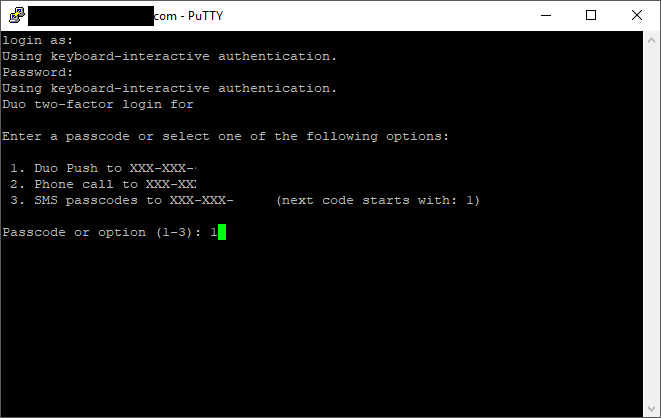
We regularly deploy this with Fedora and CentOS (even FreePBX) and you can protect both SSH and/or console logins.
When logging on to a Unix or Linux server, a user will be presented with the following screen for 2FA authentication:
Duo Security CentOS Linux login MFA 2FA Prompt
Below you can see a video demonstration of DUO on Linux.
WordPress Logon
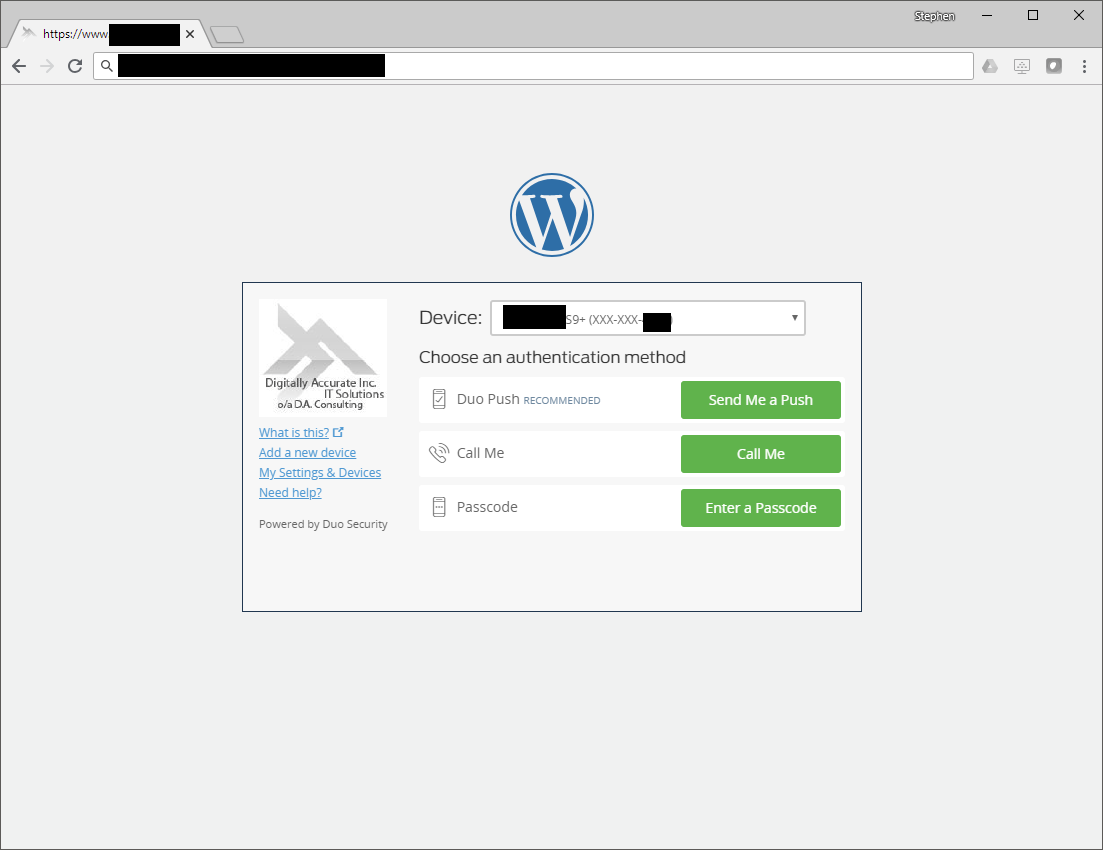
Duo MFA can be deployed to protect your WordPress blog. You can protect your admin and other user accounts.
If you have a popular blog, you know how often bots are attempting to hack and brute force your passwords. If by chance your admin password becomes compromised, using MFA or 2FA can protect your site.
When logging on to a WordPress blog admin interface, a user will be presented with the following screen for 2FA authentication:
Duo Security WordPress Login MFA 2FA Prompt
Below you can see a video demonstration of DUO on a WordPress blog.
How easy is it to implement
Implementing Duo MFA is very easy and works with your existing IT Infrastructure. It can easily be setup, configured, and maintained on your existing servers, workstations, and network devices.
Duo offers numerous plugins (for windows), as well as options for RADIUS type authentication mechanisms, and other types of authentication.
How easy is it to manage
Duo is managed through the Duo Security web portal. Your IT admins can manage users, MFA devices, tokens, and secured applications via the web interface. You can also deploy appliances that allow users to manage, provision, and add their MFA devices and settings.
Duo also integrates with Active Directory to make managing and maintaining users easy and fairly automated.
In the ever-evolving world of IT and End User Computing (EUC), new technologies and solutions are constantly being developed to decrease costs, improve functionality, and help the business’ bottom line. In this pursuit, as far as end user computing goes, two technologies have emerged: Hosted Desktop Infrastructure (HDI), and Virtual Desktop Infrastructure (VDI). In this post I hope to explain the differences and compare the technologies.
We’re at a point where due to the low cost of backend server computing, performance, and storage, it doesn’t make sense to waste end user hardware and resources. By deploying thin clients, zero clients, or software clients, we can reduce the cost per user for workstations or desktop computers, and consolidate these on the backend side of things. By moving moving EUC to the data center (or server room), we can reduce power requirements, reduce hardware and licensing costs, and take advantage of some cool technologies thanks to the use of virtualization and/or Storage (SANs), snapshots, fancy provisioning, backup and disaster recovery, and others.
See below for the video, or read on for the blog post!
And it doesn’t stop there, utilizing these technologies minimizes the resources required and spent on managing, monitoring, and supporting end user computing. For businesses this is a significant reduction in costs, as well as downtime.
What is Hosted Desktop Infrastructure (HDI) and Virtual Desktop Infrastructure (VDI)
Many IT professionals still don’t fully understand the difference between HDI and VDI, but it’s as sample as this: Hosted Desktop Infrastructure runs natively on the bare metal (whether it’s a server, or SoC) and is controlled and provided by a provisioning server or connection broker, whereas Virtual Desktop Infrastructure virtualizes (like you’re accustomed to with servers) the desktops in a virtual environment and is controlled and provided via hypervisors running on the physical hardware.
Hosted Desktop Infrastructure (HDI)
As mentioned above, Hosted Desktop Infrastructure hosts the End User Computing sessions on bare metal hardware in your datacenter (on servers). A connection broker handles the connections from the thin clients, zero clients, or software clients to the bare metal allowing the end user to see the video display, and interact with the workstation instance via keyboard and mouse.
Pros:
Remote Access capabilities
Reduction in EUC hardware and cost-savings
Simplifies IT Management and Support
Reduces downtime
Added redundancy
Runs on bare metal hardware
Resources are dedicated and not shared, the user has full access to the hardware the instance runs on (CPU, Memory, GPU, etc)
Easily provide accelerated graphics to EUC instances without additional costs
Reduction in licensing as virtualization products don’t need to be used
Cons:
Limited instance count to possible instances on hardware
Scaling out requires immediate purchase of hardware
Some virtualization features are not available since this solution doesn’t use virtualization
Additional backup strategy may need to be implemented separate from your virtualized infrastructure
Example:
If you require dedicated resources for end users and want to be as cost-effective as possible, HDI is a great candidate.
An example HDI deployment would utilize HPE Moonshot which is one of the main uses for HPE Moonshot 1500 chassis. HPE Moonshot allows you to provision up to 180 OS instances for each HPE Moonshot 1500 chassis.
Virtual Desktop Infrastructure virtualizes the end user operating system instances exactly how you virtualize your server infrastructure. In VMware environments, VMware Horizon View can provision, manage, and maintain the end user computing environments (virtual machines) to dynamically assign, distribute, manage, and broker sessions for users. The software product handles the connections and interaction between the virtualized workstation instances and the thin client, zero client, or software client.
Pros:
Remote Access capabilities
Reduction in EUC hardware and cost-savings
Simplifies IT Management and Support
Reduces downtime
Added redundancy
Runs as a virtual machine
Shared resources (you don’t waste hardware or resources as end users share the resources)
Easy to scale out (add more backend infrastructure as required, don’t need to “halt” scaling while waiting for equipment)
Can over-commit (over-provision)
Backup strategy is consistent with your virtualized infrastructure
Capabilities such as VMware DRS, VMware HA
Cons:
Resources are not dedicated and are shared, users share the server resources (CPU, Memory, GPU, etc)
Extra licensing may be required
Extra licensing required for virtual accelerated graphics (GPU)
Example:
If you want to share a pool of resources, require high availability, and/or have dynamic requirements then virtualization would be the way to go. You can over commit resources while expanding and growing your environment without any discontinuation of services. With virtualization you also have access to technologies such as DRS, HA, and special Backup and DR capabilities.
Both technologies are great and have their own use cases depending on your business requirements. Make sure you research and weigh each of the options if you’re considering either technologies. Both are amazing technologies which will compliment and enhance your IT strategy.
In response to COVID 19, VMware has extended their VMware Horizon 7 trial offering up to 90 days and includes 100 users. This includes both VMware Horizon 7 On-Premise, as well as VMware Cloud on AWS.
This is great if you’re planning or about to implement and deploy VMware Horizon 7.
In it’s simplest form, Horizon 7 allows an organization to virtualize their end user computing. No more computers, no more desktops, only Zero clients and software clients. Not only does this streamline the end user computing experience, but it enables a beautiful remote access solution as well.
And Horizon isn’t limited to VDI… You can install the VMware Horizon Agent on a Physical PC so you can use VDI technologies like Blast Extreme to remote in to physical desktops at your office. It makes the perfect remote access solution. Give it a try today with an evaluation license!
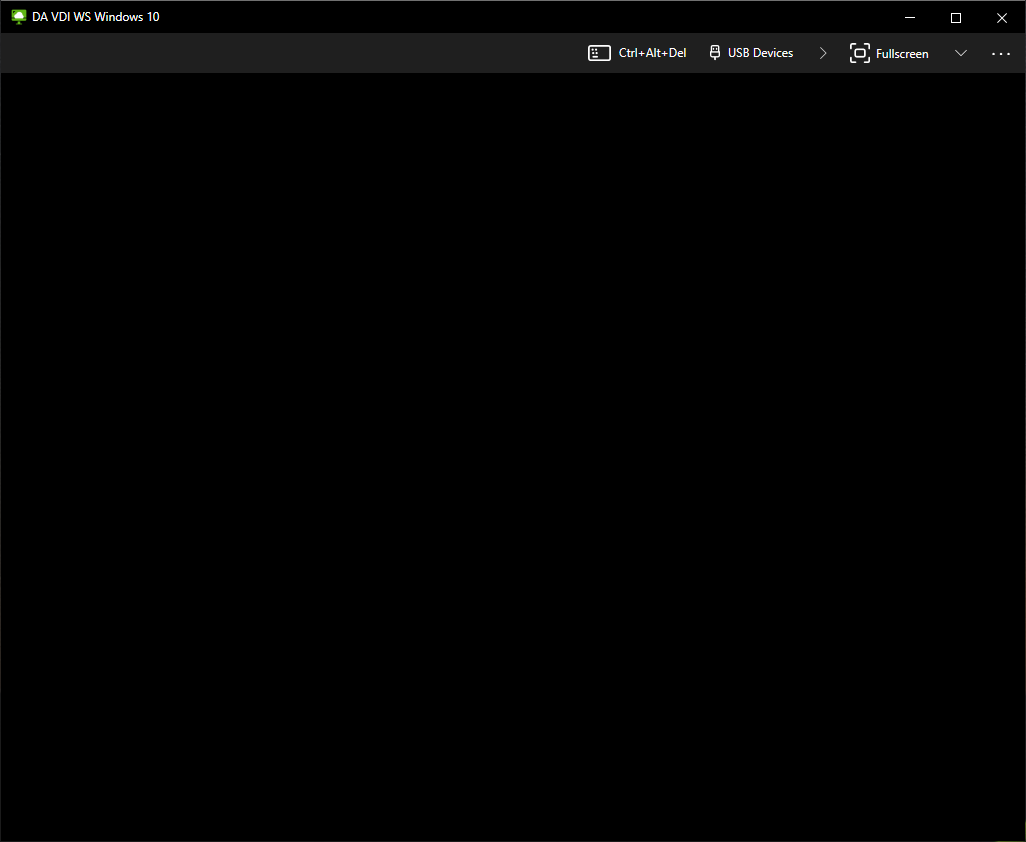
In all my years assisting and providing support with VMware Horizon, one of the most common problems that customers report with their VDI implementations, is the VMware Horizon Blank Screen.
When a user is presented with a blank or black screen when using the VMware Horizon Client, the problem can be caused by a number of different things. In this post, I will address and provide solutions for some of the common issues that cause the VMware Horizon blank screen.
VMware Horizon Blank screen issue
This troubleshooting guide applies to VMware Horizon 8, VMware Horizon 7, as well as earlier versions of VMware Horizon.
VMware Horizon Blank Screen Causes
There’s a number of different causes of a blank or black screen when connecting and establishing a VDI session to Horizon View. Click on the item below to jump to that section of the post:
Now that we have a list, let’s dive in to each of these individually. Some of these will require you to do your own research and will only guide you, while other sections will include the full fix for the issue.
VMware Tools and Horizon Agent Installation Order
When deploying the VMware Horizon View agent, you are required to install the agent, along with VMware tools in a specific order. Failing to do so can cause problems, including a blank screen screen.
The installation order:
Install GPU/vGPU drivers (if needed)
Install VMware Tools Agent
Install the VMware Horizon Agent
Install the VMware User Environment Manager Agent (if needed)
Install the VMware App Volumes Agent (if needed)
It is important to also consider this when upgrading the agents as well. When upgrading VMware Tools, it is recommended to re-install the Horizon agent in versions up to and including Horizon 8 2103. As of Horizon 2106 and later, you no longer need to re-install the Horizon Agent when performing a VMware Tools upgrade.
Network ports are blocked (Computer Firewall, Network Firewall)
For the VMware Horizon agent to function properly, ports must be accessible through your firewall, whether it’s the firewall on the VM guest, client computer, or network firewall.
The following ports are required for the VMware Horizon Agent when connecting directly to a View Connection Server.
Destination
Network Protocol
Destination Port
Details
Horizon Connection Server
TCP
443
Login, authentication, and connection to the VMware Connection Server.
Horizon Agent
TCP
22443
Blast Extreme
UDP
22443
Blast Extreme
TCP
4172
PCoIP
UDP
4172
PCoIP
TCP
3389
RDP (Remote Desktop Protocol)
TCP
9427
Client Shared Drive redirection (CDR) and Multi-media redirection (MMR).
TCP
32111
USB Redirection (Optional), can be incorporated in to the Blast Extreme connection.
Network Ports Required for VMware Horizon View to View Connection Server
The following ports are required for the VMware Horizon Agent when connecting through a VMware Unified Access Gateway (UAG).
Destination
Network Protocol
Destination Port
Details
Unified Access Gateway
TCP
443
Login, authentication, and connection to the Unified Access Gateway. This port/connection can also carry tunneled RDP, client drive redirection, and USB redirection traffic.
TCP
4172
PCoIP via PCoIP Secure Gateway
UDP
4172
PCoIP via PCoIP Secure Gateway
UDP
443
Optional for Login traffic. Blast Extreme will attempt a UDP login if there are issues establishing a TCP connection.
TCP
8443
Blast Extreme via Blast Secure Gateway (High Performance connection)
UDP
8443
Blast Extreme via Blast Secure Gateway (Adaptive performance connection)
TCP
443
Blast Extreme via UAG port sharing.
Network Ports Required for VMware Horizon View to VMware Unified Access Gateway (UAG)
You’ll notice the ports that are required for Blast Extreme and PCoIP. If these are not open you can experience a blank screen when connecting to the VMware Horizon VDI Guest VM.
Certain types of IPS (Intrusion Prevention Service) can also intercept and block traffic. IPS may cause intermittent issues.
DNS Issues
While VMware Horizon View usually uses IP address for connectivity between the View Connection Server, guest VM, and client, I have seen times where DNS issues have stopped certain components from functioning properly.
It’s always a good idea to verify that DNS is functioning both internally and externally. DNS (forward and reverse) is required for VMware Horizon Linux guests VMs.
XDR, EDR, and AV Platform causing momentary blank screen at logon
When using an XDR (Extended Detection and Response), EDR (Endpoint Detection and Response), or special AV solution with non-persistent desktops, one may experience a momentary blank screen on user session logon. I have observed this with Sophos XDR as well as Cortex XDR, with blank screens varying from 10-30 seconds on user login.
Removal of the platform can reduce the momentary blank screen down to 1-5 seconds.
I highly recommend configuring and tweaking policies as much as possible to enhance and optimize your environment. There will always be a trade off of performance for security, and the decisions should be made by those in the organization who make cyber security related decisions.
Incorrectly configured Unified Access Gateway
A big offender when it comes to blank screens is an incorrectly configured VMWare Unified Access Gateway for VMware Horizon.
Sometimes, first-time UAG users will incorrectly configure the View Connection server and UAG.
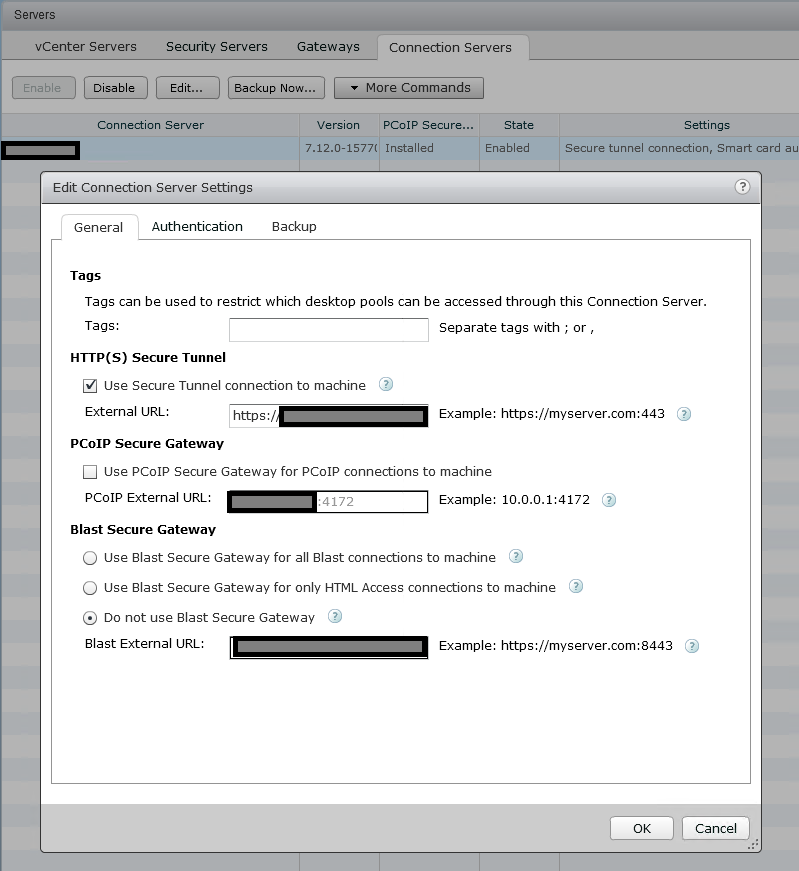
When configuring a UAG, you must disable both “Blast Secure Gateway”, and “PCoIP Secure Gateway” on the View Connection Server, as the UAG will be handling this. See below.
Secure Gateway Settings on View Connection Server when used with UAG
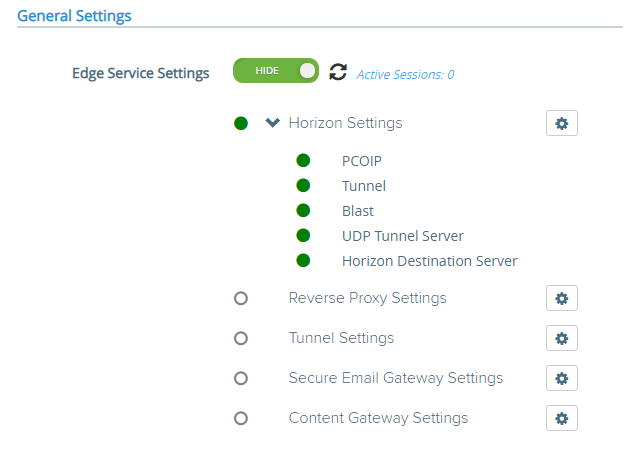
Another regular issue is when admins misconfigure the UAG itself. There are a number of key things that must be configured properly. These are the values that should be populated on the UAG under Horizon Settings.
Connection Server URL
https://ConnectionServerIP:443
Connection Server URL Thumbprint
sha1=SSLTHUMPRINT (Thumbprint of the SSL certificate your View Connection Server is using)
PCOIP External URL
UAG-EXTERNALIP:4172
Blast External URL
UAG-InternetFQDN:443
Tunnel External URL
UAG-InternetFQDN:443
You must also have a valid SSL certificate installed under “TLS Server Certificate Settings”. I’d recommend applying it to both the admin and internal interface. This is a certificate that must match the FQDN (internal and external) of your UAG appliance.
Once you’re good, you’re green!
VMware Unified Access Gateway showing valid
You should always see green lights, all protocols should work, and the connections should run smooth. If not, troubleshoot.
GPU Driver Issue
When using a GPU with your VM for 3D graphics, make sure you adhere to the requirements of the GPU vendor, along with the VMware requirements.
Some vendors have display count, resolution, and other limits that when reached, cause Blast Extreme to fail.
An incorrectly installed driver can also cause issues. Make sure that there are no issues with the drivers in the “Device Manager”.
Blast Extreme log files can be found on the guest VM in the following directory.
C:\ProgramData\VMware\VMware Blast\
Looking at these log files, you can find information that may pertain to the H.264 or display driver issues that will assist in troubleshooting.
When using GPUs such as Nvidia GRID and AMD MxGPU, it is recommended to disable the VMware SVGA 3D Driver and adapter inside of Device Manager after you install the applicable GPU drivers.
NVIDIA vGPU Issues
You may be experiencing issues related to the NVIDIA vGPU platform, either inside of the VM guest, or on the VMware ESXi host.
A corrupt VMware tools install, whether software or drivers can cause display issues. Make sure that the drivers (including the display driver) are installed and functioning properly.
It may be a good idea to completely uninstall VMware Tools and re-install.
If you’re experiencing display driver issues (such as a blank screen), before re-installing VMware Tools try forcibly removing the display driver.
Open “Device Manager”
Right click on the VMware Display adapter and open “Properties”
On the “Driver” tab, select “Uninstall”
Check the box for “Delete the driver software for this device”.
This will fully remove the VMware driver. Now re-install VMware Tools.
Make sure that if you are running 64-bit Windows in the VM then you install and use the 64-bit Horizon Agent.
You may experience issues with the “VMware Horizon Indirect Display Driver”. Some users have reported an error on this driver and issues loading it, resulting in a blank screen. To do this, I’d recommend forcibly uninstalling the driver and re-installing the Horizon Agent.
To forcibly remove the “VMware Horizon Indirect Display Driver”:
Open “Device Manager”
Right click on the “VMware Horizon Indirect Display Driver” and open “Properties”
On the “Driver” tab, select “Uninstall”
Check the box for “Delete the driver software for this device”.
Now proceed to uninstall and reinstall the Horizon View Agent.
When running the Horizon Agent on Horizon for Linux, make sure that forward and reverse DNS entries exist, and that DNS is functioning on the network where the Linux VM resides.
Also, as a reminder, it is recommended that you re-install the Horizon agent in versions up to and including Horizon 8 2103 after upgrading VMware Tools. As of Horizon 8 2106, you no longer need to re-install the Horizon Agent when performing a VMware Tools upgrade.
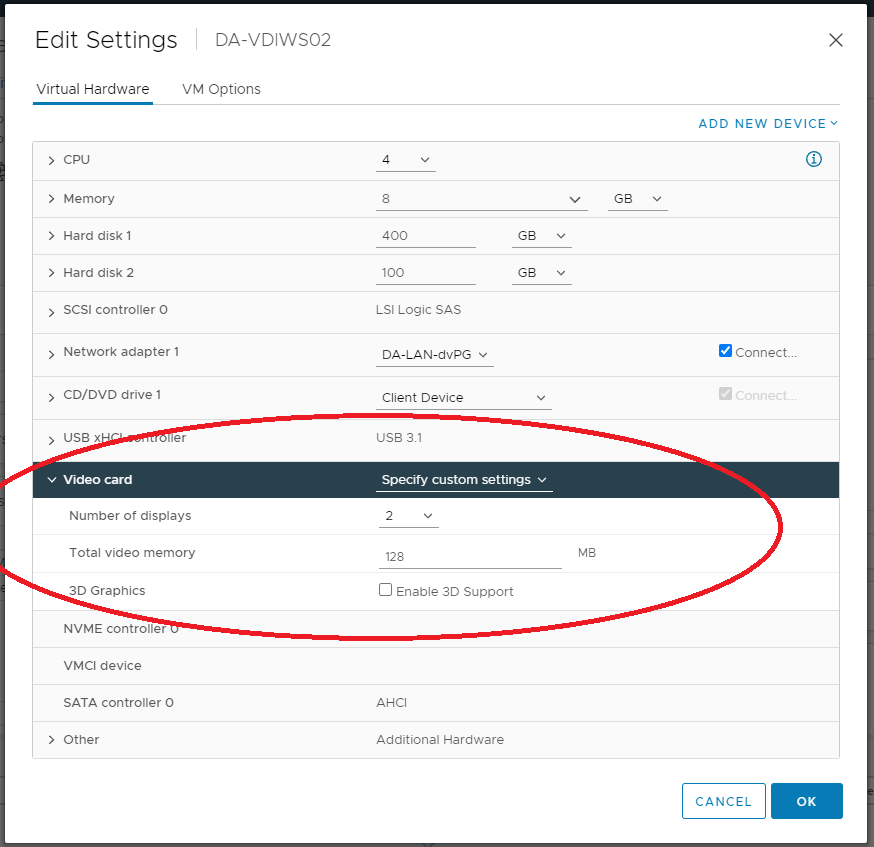
Video Settings (Video Memory (VRAM), Resolution, Number of Displays)
When experiencing video display issues or blank screens on VMware Horizon View, these could be associated with the guest VM’s memory, video memory (VRAM), display resolution, and number of displays.
vSphere Video RAM Configuration for VMware Horizon
If you do not have enough Video RAM (VRAM) allocated to the virtual machine and/or you have too many displays (multi-monitor), then you can experience the blank screen with Horizon.
Make sure you are adhering to the specifications put forth by VMware. Please see the following links for more information.
While this isn’t likely to cause a blank screen issue (it can though), it’s always a good idea to set your image to a lower resolution before snapping or converting to a template for deployment.
It’s a lot easier for the VMs to start using lower resolution and VRAM (Video Memory) and then increase to what’s needed, instead of starting at a crazy high resolution and then getting adjusted down.
I consider it a good practice to reduce the graphics resolution before creating and deploying the image to the desktop pools.
Protocol
When troubleshooting blank screens with VMware Horizon, you need to try to identify whether it’s specific to the guest VM, or if it’s associated with the connection protocol you’re using (and the route it takes whether through a Connection Server, or UAG).
Always try different protocols to see if the issue is associated with all, or one. Then try establishing connections and find if it’s isolated direct to the Connection Server, or through the UAG.
If the issue is with a specific protocol, you can view the protocol log files. If the issue is with the UAG, you can troubleshoot the UAG.
Log files can be found in the following directory:
C:\ProgramData\VMware\
HTTPS Proxy and redirection issues
If you are connecting through a network that does passive and/or transparent HTTPS scanning or uses a proxy server, you may experience issues with inability to connect, or blank screens.
You’ll need to modify your firewall or proxy to allow the VMware connection and open the required ports for VMware Horizon and create an exception not to touch or manipulate the VMware Horizon related traffic.
Login banner or disclaimer (PCoIP)
I haven’t seen or heard of this one in some time, but when using VMware Horizon with PCoIP, sessions can fail or show a blank screen when the legal disclaimer login banner is used on the Windows instance (Windows 7, Windows 10, or Windows 11).
It never stops surprising me how old some of the VMware Horizon View environments are that some businesses are running. VMware regularly updates, and releases new versions of VMware Horizon that resolve known issues and bugs in the software.
While it may be difficult, simply upgrading your VMware Horizon environment (VMware vSphere, View Connection Server, VMware Tools, VMware Horizon Agent) can often resolve many issues.
Blank Screen connecting to Physical PC running Horizon Agent
After troubleshooting these issues, you should be able to resolve the issue.
Conclusion
As you can see there are a number of different things that can cause Horizon View to show a blank screen on login. It’s always best to try to understand how the technology works, and establish where the failure points are.
Let me know if this helped you out, or if you find other reasons and feel I should add them to the list!
This website uses cookies to improve your experience. We'll assume you're ok with this, but you can opt-out if you wish.
Do you accept the use of cookies and accept our privacy policy? AcceptRejectCookie and Privacy Policy
Privacy & Cookies Policy
Privacy Overview
This website uses cookies to improve your experience while you navigate through the website. Out of these cookies, the cookies that are categorized as necessary are stored on your browser as they are essential for the working of basic functionalities of the website. We also use third-party cookies that help us analyze and understand how you use this website. These cookies will be stored in your browser only with your consent. You also have the option to opt-out of these cookies. But opting out of some of these cookies may have an effect on your browsing experience.