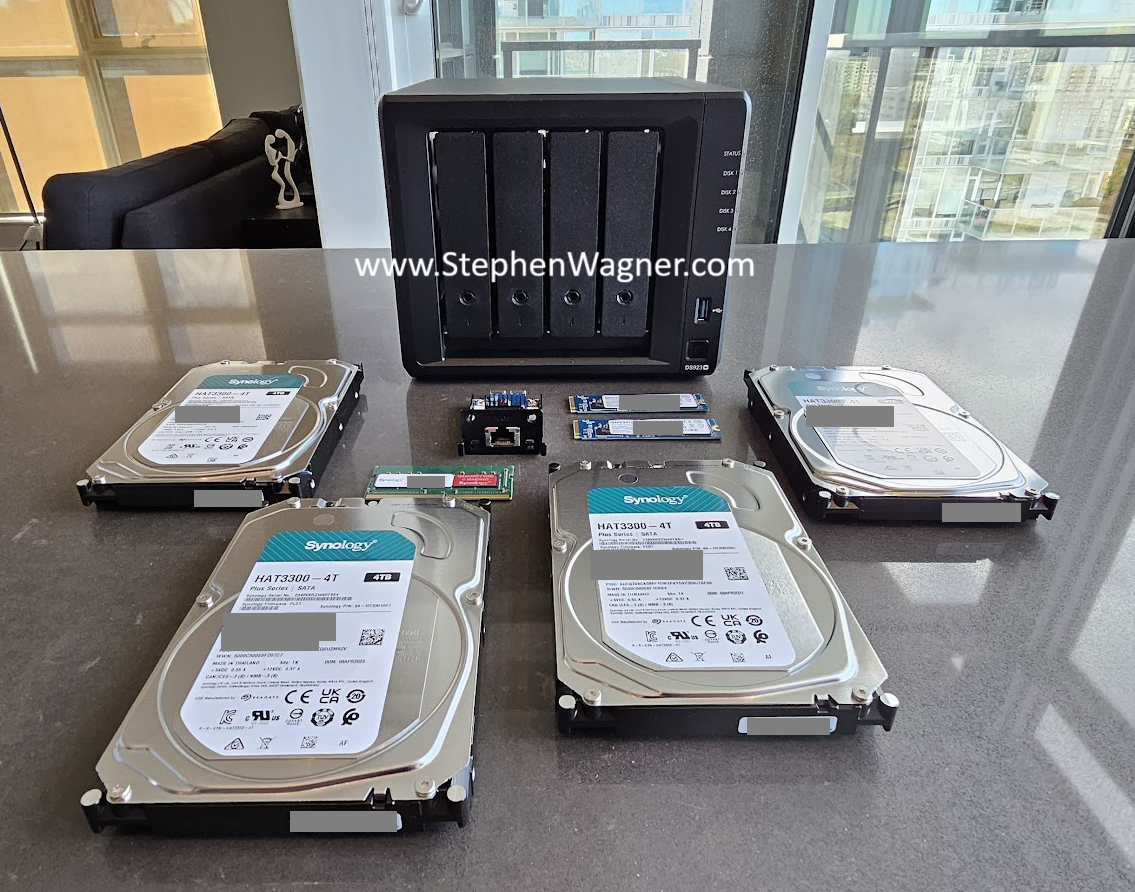
Connect with me!

Have a question? Want to hire me? Reach out and Connect!
I'm available for remote and onsite consulting!
To live chat with me, Click Here!
Synology

Synology DS923+ VMware vSphere Use case and Configuration

Today we’re going to cover a powerful little NAS being used with VMware; the Synology DS923+ VMware vSphere Use case and Configuration.

This little (but powerful) NAS is perfect for your VMware vSphere homelab and numerous other scenarios and uses. Let’s go over this specific use case, and how to best configure it with your VMware environment so you can fully take advantage of it.

Keep in mind that this post reviews only one of many potential uses, specifically with VMware vSphere (and ESXi). I’m hoping with time to review some other uses for this NAS.

Synology DS923+ VMware vSphere Use Case

The Synology DS923+ is a tiny yet powerful 4-Bay NAS, offering 2x1Gb NICs built-in, with the ability to add in a user-installable 10Gb NIC module. You can also add 2 x NVME drives for NVME SSD cache, giving you the perfect iSCSI target, in our case particularly for VMware vSphere and ESXi.

Synology DS923+ w/ 10Gb NIC, Disks, and 2 x NVME SSD for Cache

The highlights of this specific unit and configuration:

  • NVME SSD Cache – Provides high speed storage (also good at random I/O)
  • Redundant NICs – 1 x 10Gig (add-on) and 2 x 1GB (built-in)

Looking at the networking capabilities, we have 3 NICs when the optional 10Gb NIC is installed. This gives us a number of different potential configurations, but for VMware vSphere, we’ll map out the following:

  • NIC #1 – 10Gig: iSCSI Primary *(and SMB if using VLAN interfaces)*
  • NIC #2 – 1Gig: Management (and SMB w/o VLAN interfaces)
  • NIC #3 – 1Gig: iSCSI Fallback

Note: You could add VLAN interfaces to your Synology device on the 10Gig interface, and use VLANs to provide SMB and other services over the 10Gig link as well. Please note that adding VLAN interfaces is unsupported and may cause issues (including when performing upgrades).

What’s particularly nice about this NAS is that for the price point you’re able to provide 10Gb iSCSI to your ESXi hosts, while also having a fallback connection for redundancy. While the fallback NIC is limited to 1Gig which is substantially slower, it does allow your workload to continue to run, and most importantly without corruption or loss of data due to an iSCSI paths down situation.

Synology DS923+ iSCSI Configuration for VMware vSphere

So now that we’ve established the use case for the Synology DS923+, lets go over how to best configure it for your VMware vSphere environment, and get it connected to your ESXi hosts.

HPE Proliant Server running VMware ESXi with Synology DS923+

There’s a few things to note for the design of the configuration:

  • iSCSI should be using Jumbo Frames
    • Both the ESXi vmk iSCSI adapters and the iSCSI NIC on the Synology NAS
    • All iSCSI networking (switches) should have jumbo frames enabled
  • iSCSI Multi-pathing policy will be VMW_PSP_FIXED (Fixed Pathing)
    • We will NOT be using Round-Robin MPIO (VMW_PSP_RR)
    • Fixed pathing will be used with the 10Gig link being preferred, and 1Gig link acting as fallback
  • The Synology NAS iSCSI target should only be configured to listen and advertise on the iSCSI NICs (primary active and fallback)

Configure iSCSI on the Synology DS923+

To configure iSCSI on your Synology:

  1. Perform Basic Configuration
    • Configure NAS
    • Configure Static IP for Management on 1Gb NIC Interface
  2. Enable the 10Gb NIC Interface (For use with iSCSI Primary)
    • Configure a Static IP
    • Configure Jumbo Frames
  3. Enable the 1Gb NIC Interface (For use as fallback iSCSI)
    • Configure a Static IP
    • Configure Jumbo Frames
  4. Use the Synology “SAN Manager” to Configure the iSCSI Target
    • Create an iSCSI LUN and Target
      • Configure a LUN with your preferences (Thin provisioned, etc)
      • Configure the iSCSI Target
        • Enable “Allow multiple sessions from one or more iSCSI initiators” to allow multiple initiators to access (both from single hosts and/or multiple hosts)
        • Configure “Network Binding” to the 10Gig Primary link and 1Gb fallback NIC. We do not want it to advertise on the management interface
      • Configure “Host” initiator settings
        • This is where you will add your iSCSI host initiator IQNs, and provide “Read/Write” access

Overall, this is a basic iSCSI target configuration, with the only exception is that we are only using select interfaces for iSCSI connections. While we can use both the 10Gb and 1Gb connections, we’ll use the host settings to only use the primary and have the secondary as a fall back.

Note that the networks (and IPs) used above for iSCSI are on a network dedicated to iSCSI. We do not want to use our data networks for storage related traffic. They are separated not only for security, but also because they are using different frame/MTU sizes.

Configure ESXi to connect to the Synology DS923+

To configure the Synology NAS iSCSI Target on your ESXi hosts:

  1. Configure your ESXi host networking on your iSCSI Network
    • Configure Networking on your hosts
      • Configure your storage vSwitch and create a portgroup for each physical NIC
      • Configure a vmk adapter with IP for each portgroup you have
      • Configure each portgroup to only use one physical NIC as active, the rest unused
        • Each physical NIC should be used by only one portgroup
  2. Configure your iSCSI Initiator
    • If not already enabled, “Add Software Adapter” under “Storage Adapters” to add the iSCSI Software Adapter initiator.
    • Note the “iSCSI Name”. This is your initiator IQN, and needs to be added to the Synology iSCSI Target “Host” settings to provide access and add permissions (last item listed in the previous section configuring the Synology NAS).
    • Add your Synology’s Primary iSCSI interface and Secondary Fallback iSCSI interface IP addresses to your ESXi hosts “Dynamic Discovery” list. Do not use “Static Discovery” as this will auto-populate.
    • If you’re using the same IP subnet for all your iSCSI vmk adapters, enable iSCSI Port Binding.
      • Under “Network Port Binding”, click add, and select all your iSCSI vmk adapters which should auto-bind to the physical NIC owned by the port group they are using. They will not show active until you have completed all steps in this guide.
  3. Configure your LUN
    • Rescan your storage adapters
      • If you already have a VMFS volume, it should auto-mount and be added to the host.
    • If you haven’t already, create a new datastore by right clicking on the host, “Storage”, and “New Datastore”. Follow the wizard to create a new VMFS volume on your Synology iSCSI target.
  4. Configure proper fallback for the 10Gb and 1Gb link
    • On your ESXi hosts, under “Configure”, navigate to the “Storage Devices” tab, and identify all your “SYNOLOGY iSCSI Disk” devices.
    • For each “SYNOLOGY iSCSI Disk” device, under “Properties”, go to “Multipathing Policies”, “ACTIONS”, “Edit Multipathing”, and set it to “Fixed (VMware)”, while also setting the 10Gb path below under “Select the preferred path for this policy”.
  5. Repeat steps for each ESXi host.

As always, I recommend doing a “Rescan Storage” after any storage related changes. You may need to restart the host after enabling iSCSI Port binding.

Conclusion

You have now configured your VMware ESXi host(s) to connect to your Synology DS923+ with multiple paths for redundancy while favoring the faster 10Gb connection.

Stephen Wagner

Stephen Wagner is President of Digitally Accurate Inc., an IT Consulting, IT Services and IT Solutions company. Stephen Wagner is also a VMware vExpert, NVIDIA NGCA Advisor, and HPE Influencer, and also specializes in a number of technologies including Virtualization and VDI.

Share
Published by

Recent Posts

How to properly decommission a VMware ESXi Host

While most of us frequently deploy new ESXi hosts, a question and task not oftenly discussed is how to properly decommission a VMware ESXi host. Some might be surprised to… Read More

4 months ago

Disable the VMware Horizon Session Bar

This guide will outline the instructions to Disable the VMware Horizon Session Bar. These instructions can be used to disable the Horizon Session Bar (also known as the Horizon Client… Read More

4 months ago

vGPU Enabled VM DRS Evacuation during Maintenance Mode

Normally, any VMs that are NVIDIA vGPU enabled have to be manually migrated with manual vMotion if a host is placed in to maintenance mode, to evacuate the host. While… Read More

4 months ago

GPU issues with the VMware Horizon Indirect Display Driver

You may experience GPU issues with the VMware Horizon Indirect Display Driver in your environment when using 3rd party applications which incorrectly utilize the incorrect display adapter. This results with… Read More

4 months ago

How to Install the vSphere vCenter Root Certificate

Today we'll go over how to install the vSphere vCenter Root Certificate on your client system. Certificates are designed to verify the identity of the systems, software, and/or resources we… Read More

5 months ago

Teams Phone and VDI – A match made in the Cloud

Every organization is looking for ways to equip their mobile workforce, whether remote employees, travelling sales staff/representatives, or just providing more ways employees can work efficiently. Today I want to… Read More

5 months ago
Powered and Hosted by Digitally Accurate Inc. - Calgary IT Services, Solutions, and Managed Services