Jun 212025
 

A friendly reminder that it’s time to upgrade (or start planning) since VMware vSphere 7 is reaching end of life on October 2nd, 2025. This means that if you’re running VMware vSphere 7 in your environment, VMware will no longer release updates, security patches, and/or provide support for your environment.

Please note: You will require an active subscription to be entitled to, and also have access to the updates and upgrades. You’ll also want to check the interopability and HCLs to make sure your hardware is supported.

Upgrade Path for VMware vSphere Standard, vSphere Enterprise Plus)

It’s never been a better time to upgrade (literally) with the pending EOL. For customers running VMware vSphere Standard (VVS) or those with with VMware vSphere Enterprise Plus subscriptions, your upgrade path will be to vSphere 8.

Upgrade Path for VMware vSphere Foundation, VMware Cloud Foundation

For customers who are currently licensed for VMware vSphere Foundation (VVF), or VMware Cloud Foundation (VCF) subscriptions and licensing, you’ll be able to either upgrade to vSphere 8 products, or the nice and shiny new VMware vSphere Foundation 9 (VVF 9), or VMware Cloud Foundation 9 (VCF 9).

Upgrading VMware vCenter Server

You’ll always want to upgrade your VMware vCenter instance first (except when using VCF, as the procedures are different and out of the scope of this post). Just a reminder that this is a generally easy process where, using the installer, a new VM is deployed using the vCenter Server Installer ISO. The workflow then migrates and upgrades your data to the new appliance, shutting down the old.

Always make sure to perform a VAMI file-based backup, in addition to a snapshot of the previous vCSA appliance. I usually disabled DRS and HA before the backup/snapshot as well, as this allows easier recovery in the event of a failed vCenter upgrade.

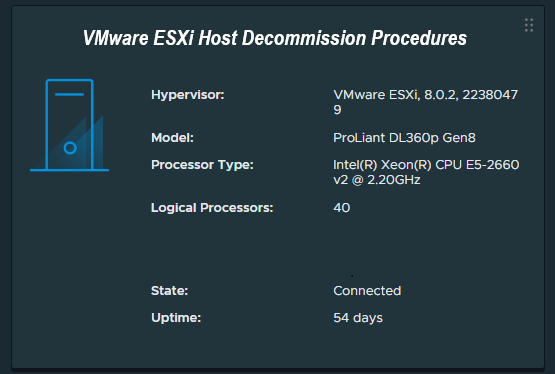
Upgrading VMware ESXi Hosts

When it comes to your VMware ESXi hosts (as I recommend to customers), use vLCM (VMware Lifecycle Management) and Image Based Updates if possible as this makes the upgrade a breeze (and supports QuickBoot). Note that baselines updates are deprecated.

If the hardware in your cluster comes from a single vendor (example, HPE, Cisco, Dell), you can use cluster based (and cluster focused) vLCM Image based updates.

Screenshot of VMware vLCM image based update configuration screen.

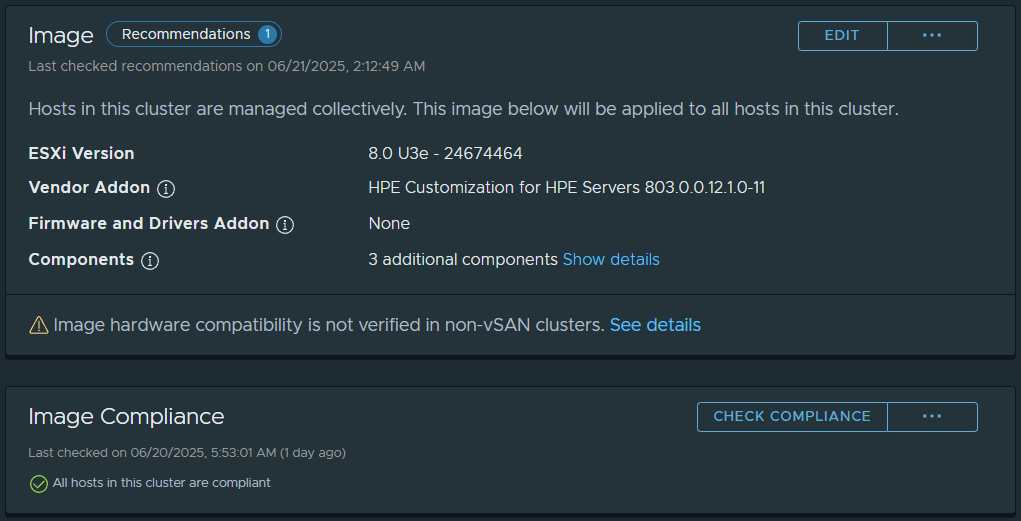
When you change your cluster to Image based Updates (irreversable for the cluster once created), you’ll be able to choose your target ESXi version, specify the Vendor add-on, and then customize additional components (such as adding the NVIDIA vGPU Host Driver and GPU Management daemon, storage plugins, etc).

After creating your image, you’ll then be able to apply it to your hosts. This can be used for minor updates, and also larger upgrades (such as VMware ESXi 7 to 8).

May 252024
 
VDI Gaming Demo with NVIDIA vGPU and Omnissa Horizon

Here’s a fun quick VDI Gaming Demo with NVIDIA vGPU and Omnissa Horizon 8, using an NVIDIA L4 GPU and the L4-12Q Profile.

This video is just for fun, and is just to show some of the capabilities of the technology, hardware, and software, in this case, with Cloud Gaming.

The NVIDIA vGPU solution provides the ability to “slice” and create multiple Virtual GPU (vGPU) devices for your Virtual Machines and Virtual workloads.

In this video:

  • Quick Introduction to NVIDIA vGPU with Omnissa Horizon 8
  • Validating NVIDIA vGPU functionality (with DirectX Diagnostics, Horizon Performance Monitor Tracker)
  • MechWarrior 5 Cloud Gaming
  • Heaven Benchmark

Environment Details:

  • 2 x HPE DL360p Gen8 Servers (2 x 10 Core Procs, 384GB of RAM)
    • 1 Server with NVIDIA A2
    • 1 Server with NVIDIA L4
  • VMware vSphere 8U2
  • Omnissa Horizon 8

Hope you enjoy the video and demo!

Jan 112024
 
ESXi-Host-Decommission

While most of us frequently deploy new ESXi hosts, a question and task not oftenly discussed is how to properly decommission a VMware ESXi host.

Some might be surprised to learn that you cannot simply just power down and remove the host from the vCenter server, as there are a number of steps that must be taken beforehand to ensure a proper successful decommission. Properly decommissioning the ESXi host avoids orphaned objects in the vCenter database, which can sometimes cause problems in the future.

Today we’ll go over how to properly decommission a VMware ESXi host in an environment with VMware vCenter Server.

The Process – How to decommission ESXi

We will detail the process and considerations to decommission an ESXi host. We will assume that you have since migrated all your VMs, templates, and files from the host, and it contains no data that requires backup or migration.

VMware ESXi Host Decommission Procedures

Process in Short:

  1. Enter Maintenance Mode
  2. Remove Host from vDS Switches
  3. Unmount and Detach iSCSI LUNs
  4. Move host from cluster to datacenter as standalone host
  5. Remove Host from Inventory

Please read further for extended procedures and more information.

Enter Maintenance Mode

We enter maintenance mode to confirm that no VMs are running on the host. You can simply right click the host, and enter maintenance mode.

Remove Host from vDS Switches

You must gracefully remove the host from any vDS switches (VMware Distributed Switches) before removing the host from vCenter Server.

You can create a standard vSwitch and migrate vmk (VMware Kernel) adapters from the vDS switch to standard vSwitch, to maintain communication with the vCenter server and other networks.

Please Note: If you are using vDS switches for iSCSI connectivity, you must gracefully develop a plan to deal with this beforehand, either by unmounting/detaching the iSCSI LUNs on the vDS before removing the switch, or gracefully migrating the vmk adapters to a standard vSwitch, using MPIO to avoid losing connectivity during the process.

Unmount and Detach iSCSI LUNs

You can now proceed to unmount and detach iSCSI LUNs from the selected system:

  1. Unmount the iSCSI LUN(s) from the host
  2. Detach the iSCSI LUN(s) from the host

You will unmount only on the selected host to be decommissioned, and then detach the LUNs (again only on the host you are decommissioning).

Move Host from Cluster to Datacenter as standalone host

While this may not be required, I usually do this to let vSphere Cluster Services (HA/DRS) adjust for the host removal, and also deal with reconfiguration of the HA agent on the ESXi Host. You can simply move the host from the cluster to the parent datacenter level.

Remove Host from Inventory

Once the host has been moved and a moment or two have elapsed, you can now proceed to remove the host from inventory.

While the host is powered on and still connected to vCenter, right click on the host and choose “Remove from Inventory”. This will gracefully remove objects from vCenter, and also uninstall the HA agent from the ESXi host.

Host Repurposing

At this point, you can now log directly on to the ESXi host using the local root password, and shutdown the host.

Dec 082023
 
vCenter-Root-CA-Missing

Today we’ll go over how to install the vSphere vCenter Root Certificate on your client system.

Certificates are designed to verify the identity of the systems, software, and/or resources we are accessing. If we aren’t able to verify and authenticate what we are accessing, how do we know that the resource we are sending information to, is really who they are?

Installing the vSphere vCenter Root Certificate on your client system, allows you to verify the identity of your VMware vCenter server, VMware ESXi hosts, and other resources, all while getting rid of those pesky certificate errors.

Certificate warning when connecting to vCenter vCSA

I see too many VMware vSphere administrators simply dismiss the certificate warnings, when instead they (and you) should be installing the Root CA on your system.

Why install the vCenter Server Root CA

Installing the vCenter Server’s Root CA, allows your computer to trust, verify, and validate any certificates issued by the vSphere Root Certification authority running on your vCenter appliance (vCSA). Essentially this translates to the following:

  • Your system will trust the Root CA and all certificates issued by the Root CA
    • This includes: VMware vCenter, vCSA VAMI, and ESXi hosts
  • When connecting to your vCenter server or ESXi hosts, you will not be presented with certificate issues
  • You will no longer have vCenter OVF Import and Datastore File Access Issues
    • This includes errors when deploying OVF templates
    • This includes errors when uploading files directly to a datastore
File Upload in vCenter to ESXi host operation failed

In addition to all of the above, you will start to take advantage of certificate based validation. Your system will verify and validate that when you connect to your vCenter or ESXi hosts, that you are indeed actually connecting to the intended system. When things are working, you won’t be prompted with a notification of certificate errors, whereas if something is wrong, you will be notifying of a possible security event.

How to install the vCenter Root CA

To install the vCenter Root CA on your system, perform the following:

  1. Navigate to your VMware vCenter “Getting Started” page.
    • This is the IP or FQDN of your vCenter server without the “ui” after the address. We only want to access the base domain.
    • Do not click on “Launch vSphere Client”.
  2. Right click on “Download trusted root CA certificates”, and click on save link as.
    Link to download vCenter trusted root CA Certificates
  3. Save this ZIP file to your computer, and extract the archive file
    • You must extract the ZIP file, do not open it by double-clicking on the ZIP file.
  4. Open and navigate through the extracted folders (certs/win in my case) and locate the certificates.
    VMware vCenter Root Certificates
  5. For each file that has the type of “Security Certificate”, right click on it and choose “Install Certificate”.
  6. Change “Store Location” to “Local Machine”
    • This makes your system trust the certificate, not just your user profile
  7. Choose “Place all certificates in the following store”, click Browse, and select “Trusted Root Certification Authorities”.
    Screenshot to Place in Trusted Root Certification Authorities
  8. Complete the wizard. If successful, you’ll see: “The import was successful.”.
  9. Repeat this for each file in that folder with the type of “Security Certificate”.

Alternatively, you can use a GPO with Active Directory or other workstation management techniques to deploy the Root CAs to multiple systems or all the systems in your domain.

Jul 252023
 

When it comes to virtualized workloads, one thing I commonly see overlooked in the design of the solution, is the placement of workloads. In this post, I want to cover VMware vSphere VM placement rules using the “VM/Host Rules” feature.

This is a feature that I commonly see overlooked and not configured, especially in smaller single cluster environments, however I’ve also seen this happen in very large scale environments as well.

Let’s cover the why, what, who, and how…

VM Workloads

While VMware vSphere does have a number of technologies built in for redundancy, load-balancing, and availability, as part of the larger solution we often find our workloads, specifically 3rd party platforms, with their own solutions that accomplish the same thing.

We need to identify which HA (High Availability) or redundancy solution to use, based on the application, service, and how it works.

For example, using VMware vSphere HA, or High Availability, if vCenter (and/or vCLS) detects a host goes offline, it can restart the workload on other online hosts. There is time associated with the detection and boot time, resulting in a loss of service during this period.

Third party solutions often have their own high availability or redundancy built in to the solution, such as Microsoft Active Directory. In this case with a standard configuration, at any time, any domain controller can respond to a clients request for resources. If one DC goes offline, other DCs can respond to the request resulting in no downtime.

Obviously, in the case of Active Directory Domain Controllers, you’d much prefer to have multiple DCs in your environment, instead of using one with vSphere HA.

Additionally, if you did have multiple domain controllers, you’d want to make sure they aren’t all placed on the same ESXi host. This is where we start to incorporate VM placement in to our solution.

VM Placement

When it comes to 3rd party solutions like mentioned above, we need to identify these workloads and factor them in to the design of the solution we are either implementing, maintaining, or improving.

Example of VM workloads used with VM Placement

A few examples of these workloads with their own load-balancing and availability technologies:

  • Microsoft Windows Active Directory Domain Controllers
  • Microsoft Windows Servers running DNS/DHCP Servers
  • Virtualized Active/Active or Active/Passive Firewall Appliances
  • VMware Horizon UAG (Unified Access Gateway) configured in HA mode
  • Other servers/services that have their own availability systems

As you can see, the applications all have their own special solution for availability, so we must insure the different “nodes” or “instances” are running on different ESXi hosts to avoid a host failure bringing down the entire solution.

Unless otherwise specified by the 3rd party vendor, I would recommend using VM/Host Rules in combination with vSphere DRS and HA.

Configuring VM Placement with VM/Host Rules

To configure these rules, follow the instructions below:

  1. Log on to your VMware vCenter Server
  2. Select a Cluster
  3. Click on the “Configure” tab, and then “VM/Host Rules”
    • Here you can Add/Edit/Delete VM Host Rules
  4. Click on “Add”, and give the rule a new name (Example: Domain Controllers)
  5. For “Type”, select “Separate Virtual Machines”
  6. Click “Add” and select your Domain Controllers and add them to the rule.
Screenshot rule creation for VM placement using VM Host Rules
Domain Controller VM Placement VM Host Rule

After you click “OK”, the rule should now be saved, and DRS will make sure these VMs are now running on separate hosts.

Below you can see another example of a configured system, separating 2 Active/Passive Firewall appliances.

VM placement and VM/Host Rules for Firewall appliances
VM/Host Rules for Firewall Appliances

As you can see, VM placement with VM/Host Rules is very easy to configure and deploy.

Additional Considerations

Note, if you implement these rules and do not have enough hosts to fullfill the requirements, the hosts may fail to be evacuated by DRS when placing in maintenance mode, or remediating with vLCM (Lifecycle Manager).

In this case, you’ll need to manually vMotion the VM’s to other hosts (to violate the rule) or shut some down.