2TB Rocket Nvme PCIe 4.0 M.2 2280 Internal SSD Solid State Drive
Today we’re going to be talking about Sabrent’s newest line of NVMe storage products, particularly the 2TB Rocket NVMe PCIe 4.0 M.2 2280 Internal SSD Solid State Drive or the Sabrent Rocket 4 2TB NVMe stick as I like to call it.
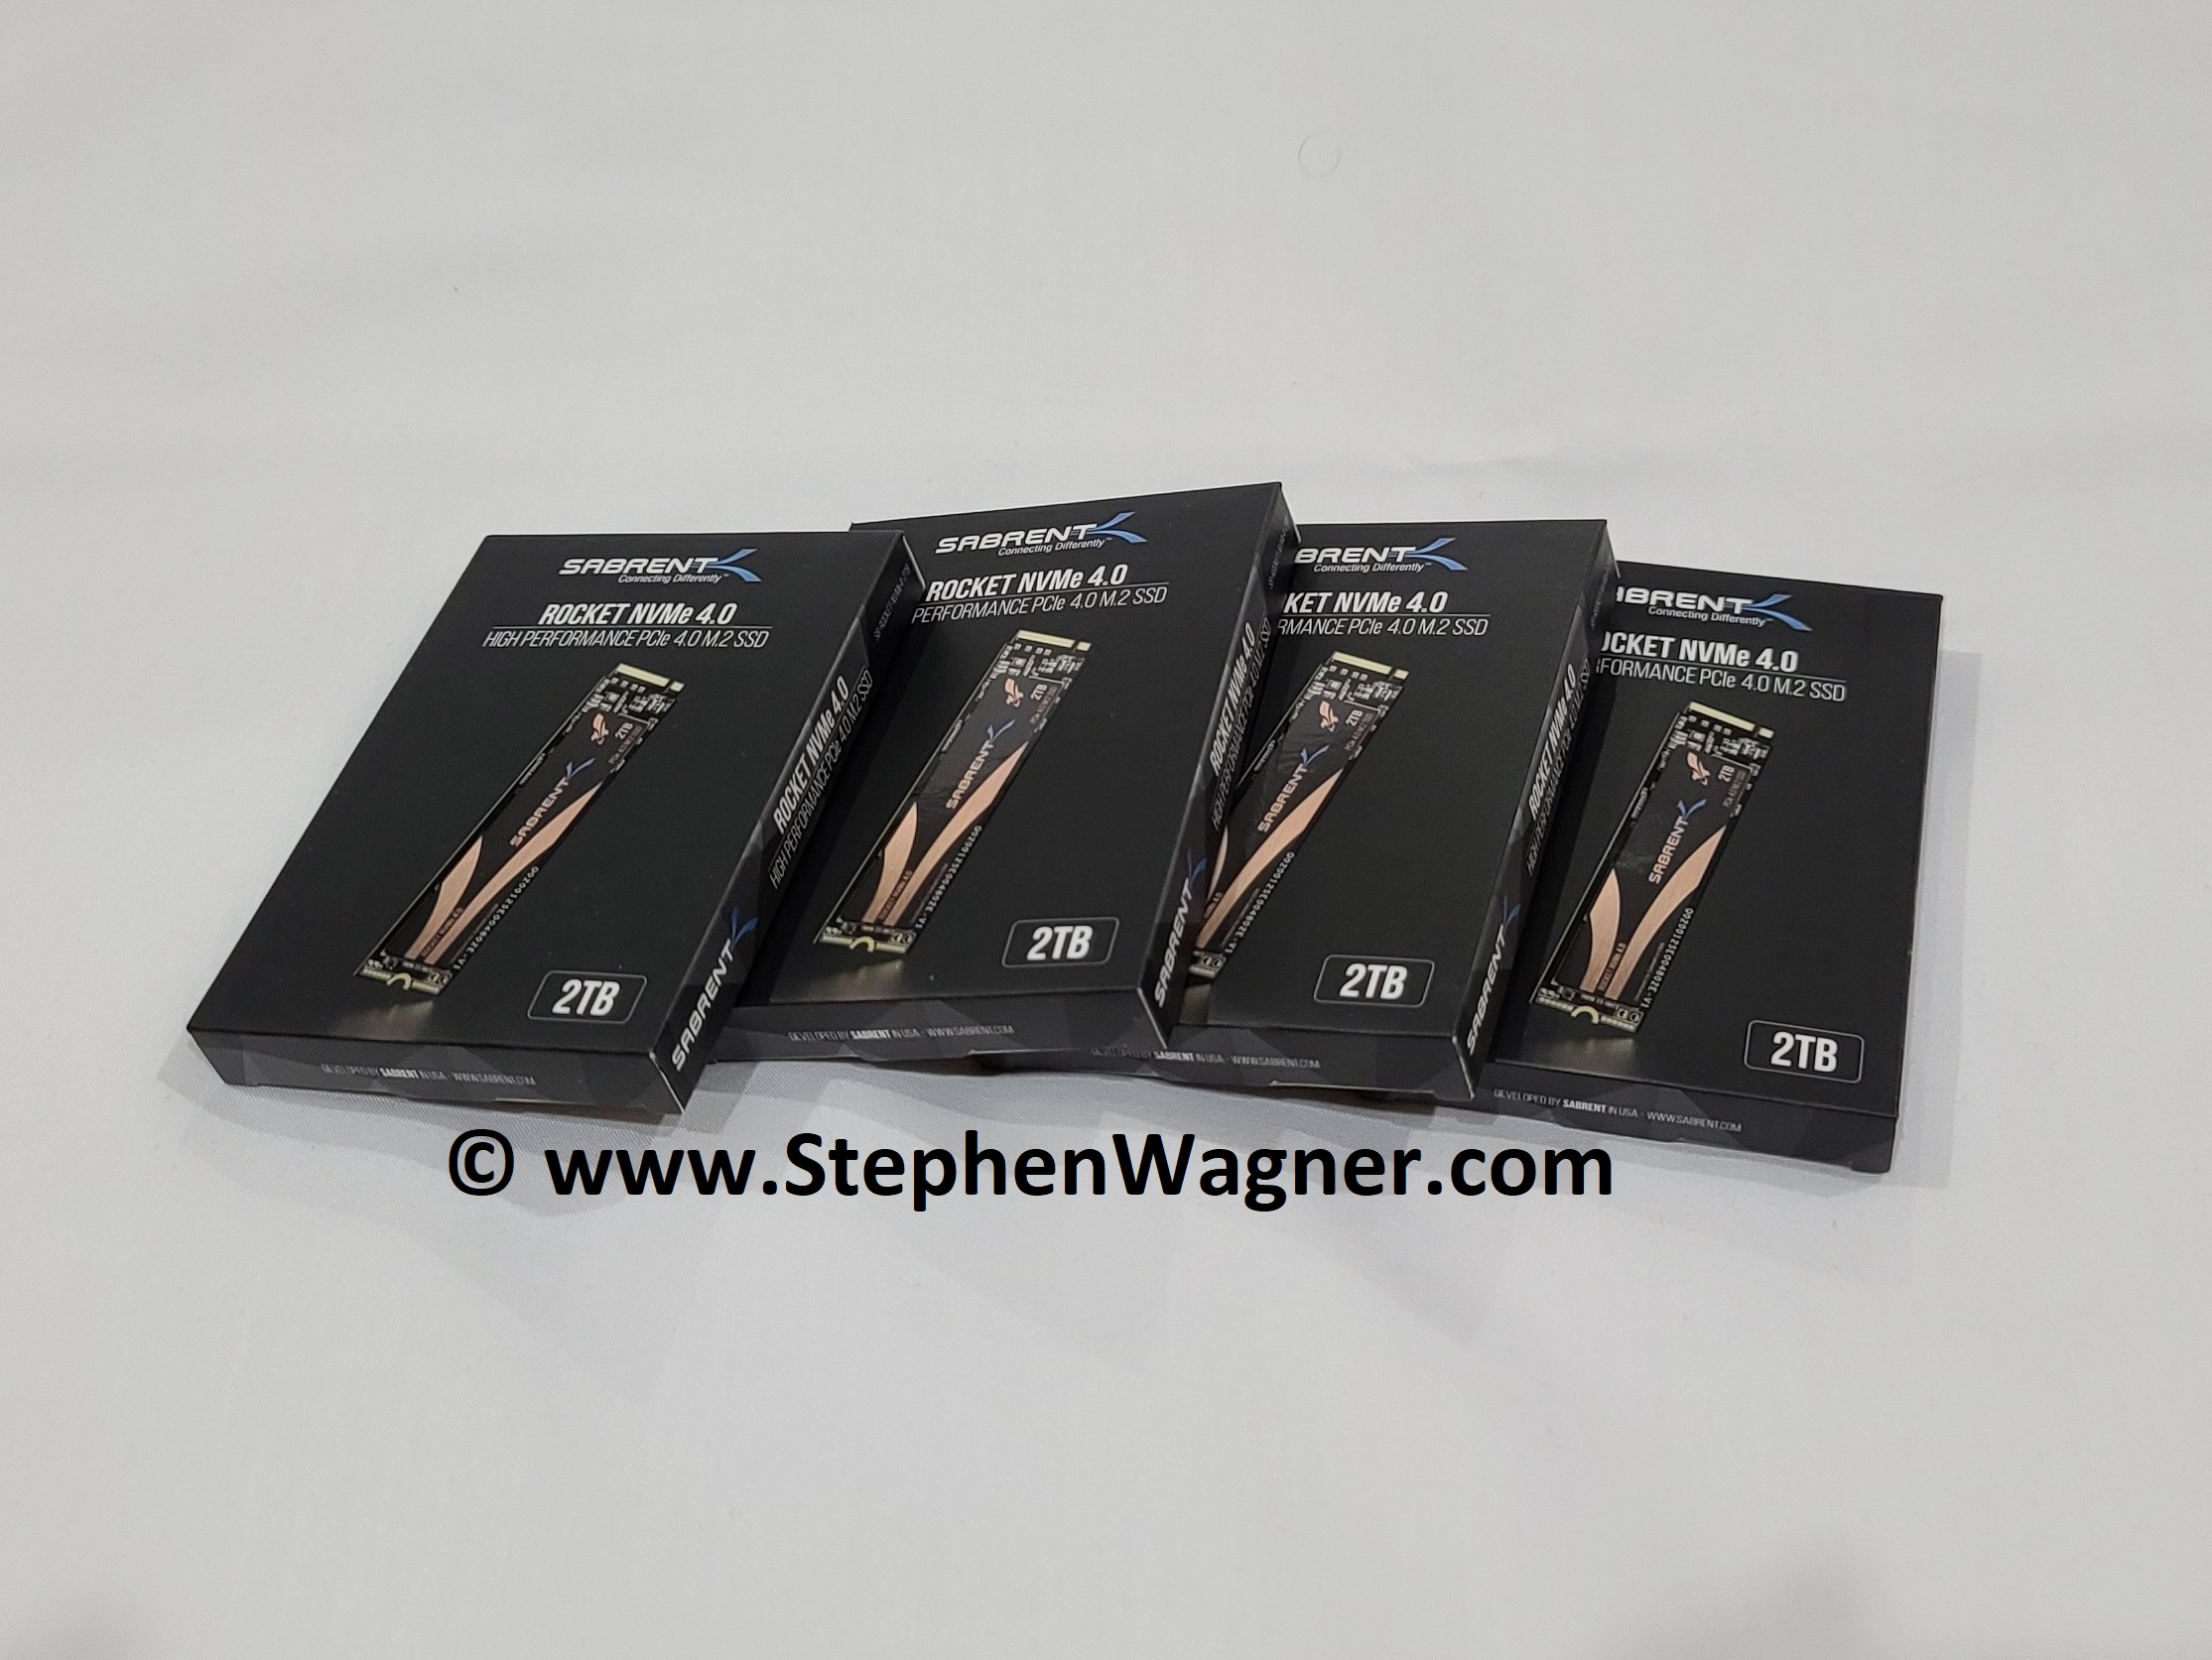
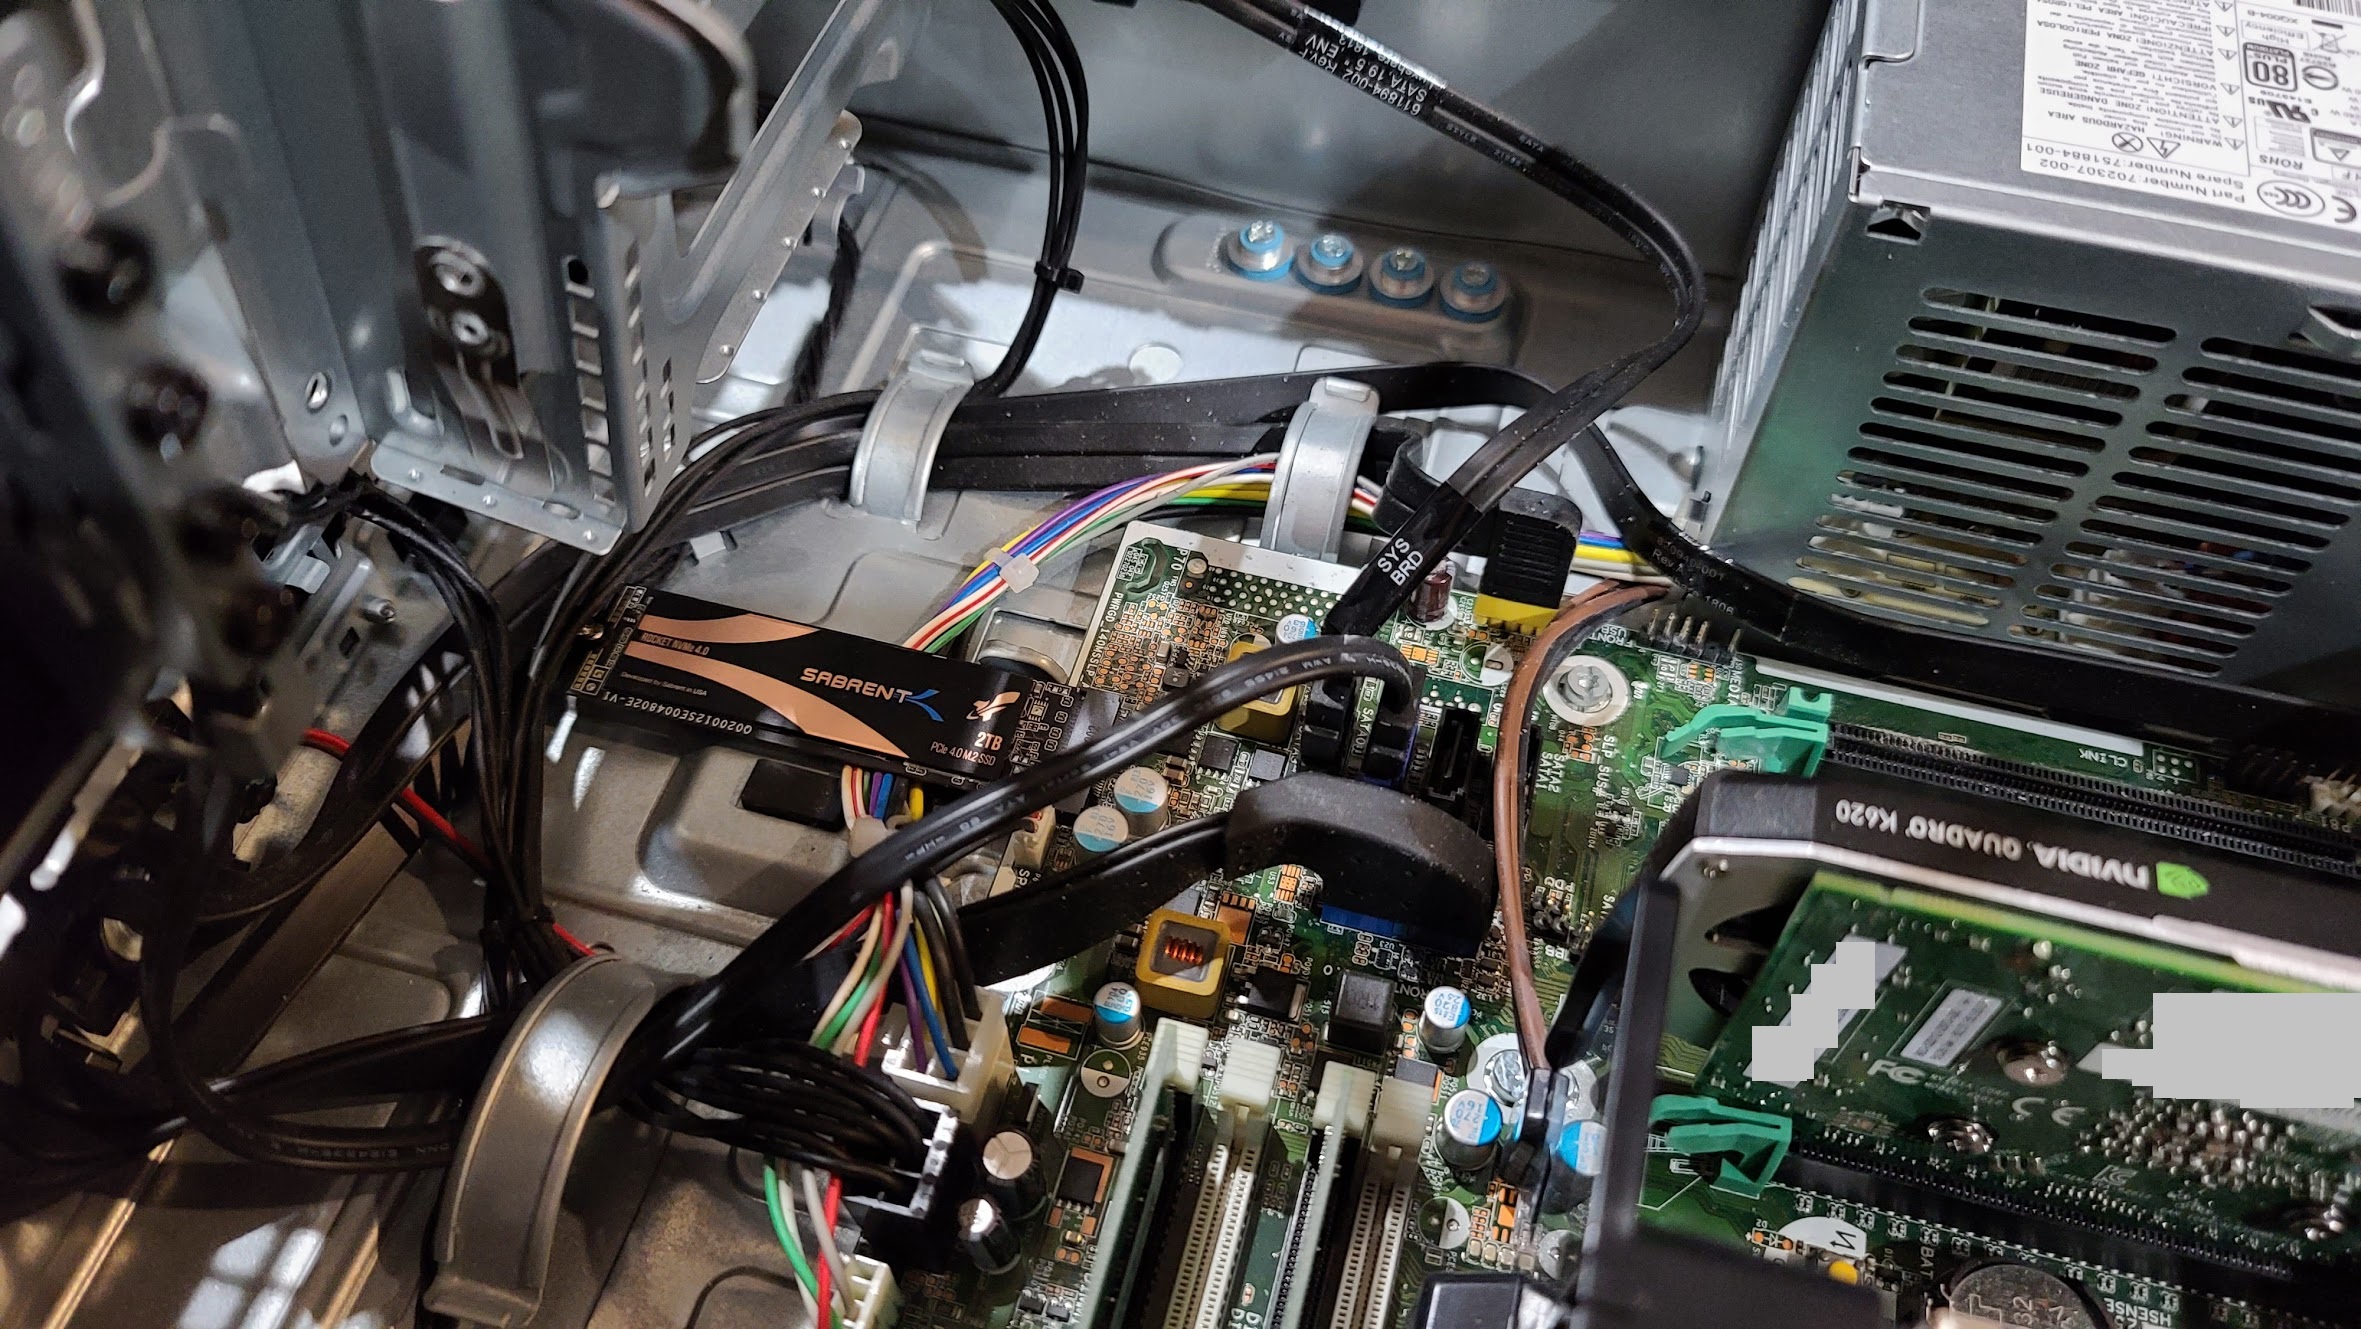
Last week I purchased a quantity of 4 of these for a total of 8TB of NVMe storage to use on an IOCrest IO-PEX40152 Quad NVMe PCIe Card. For the purpose of this review, we’re benchmarking one inside of an HP Z240 Workstation.
While these are targeted for users with a PCIe 4.0 interface, I’ll be using these on PCIe 3 as it’s backwards compatible. I purchased the PCIe 4 option to make sure the investment was future-proofed.
Keep reading for a bunch of pictures, specs, speed tests, benchmarks, information, and more!
Let’s get started with the review!
I’ve been working on a few special top-secret projects for the blog and YouTube channel, and needed some cost-effective yet high performing NVMe storage.
I needed at least 8TB of NVMe flash and I’m sure as all of you are aware, NVMe isn’t cheap.
After around a month of research I finally decided to pull the trigger and purchase a quantity of 4 x Sabrent Rocket 4 NVMe 2TB SSD. For future projects I’ll be using these in an IOCREST IO-PEX40152 NVME PCIe card.
These NVMe SSDs are targeted for consumers (normal users, gamers, power users, and IT professionals) and are a great fit! Just remember these do not have PLP (power loss protection), which is a feature that isn’t normally found in consumer SSDs.
See below for the specifications and features included with the Sabrent Rocket 4 2TB NVMe SSD.
Hardware Specs:
Features:
One of the perks of owning an IT company is that typically you can purchase all of your internal use product at cost or discount, unfortunately this was not the case.
I was unable to find the Sabrent products through any of the standard distribution channels and had to purchase through Amazon. This is unfortunate because I wouldn’t mind being able to sell these units to customers.
Amazon Purchase Links (2TB Model)
The PART#s are as follows for the different sizes:
| Product | NVMe Disk Size | PART# No Heatsink | PART# Heatsink |
| 2TB Rocket Nvme PCIe 4.0 M.2 2280 Internal SSD Solid State Drive | 2TB | SB-ROCKET-NVMe4-2TB | SB-ROCKET-NVMe4-HTSK-2TB |
| 1TB Rocket Nvme PCIe 4.0 M.2 2280 Internal SSD Solid State Drive | 1TB | SB-ROCKET-NVMe4-1TB | SB-ROCKET-NVMe4-HTSK-1TB |
| 500GB Rocket Nvme PCIe 4.0 M.2 2280 Internal SSD Solid State Drive | 500GB | SB-ROCKET-NVMe4-500 | SB-ROCKET-NVMe4-HTSK-500 |
At the time of creation of this post, purchasing from Amazon Canada the 2TB model would set you back $699.99CAD for a single unit, however there was a sale going on for $529.99CAD per unit.
Additionally, at the time of creation of this post the 2TB model on Amazon USA would set you back $399.98 USD.
A total quantity of 4 set me back around $2,119.96CAD on sale versus $2,799.96 at regular price.
If you’re familiar with NVMe pricing, you’ll notice that this pricing is extremely attractive when comparing to other high performance NVMe SSDs.
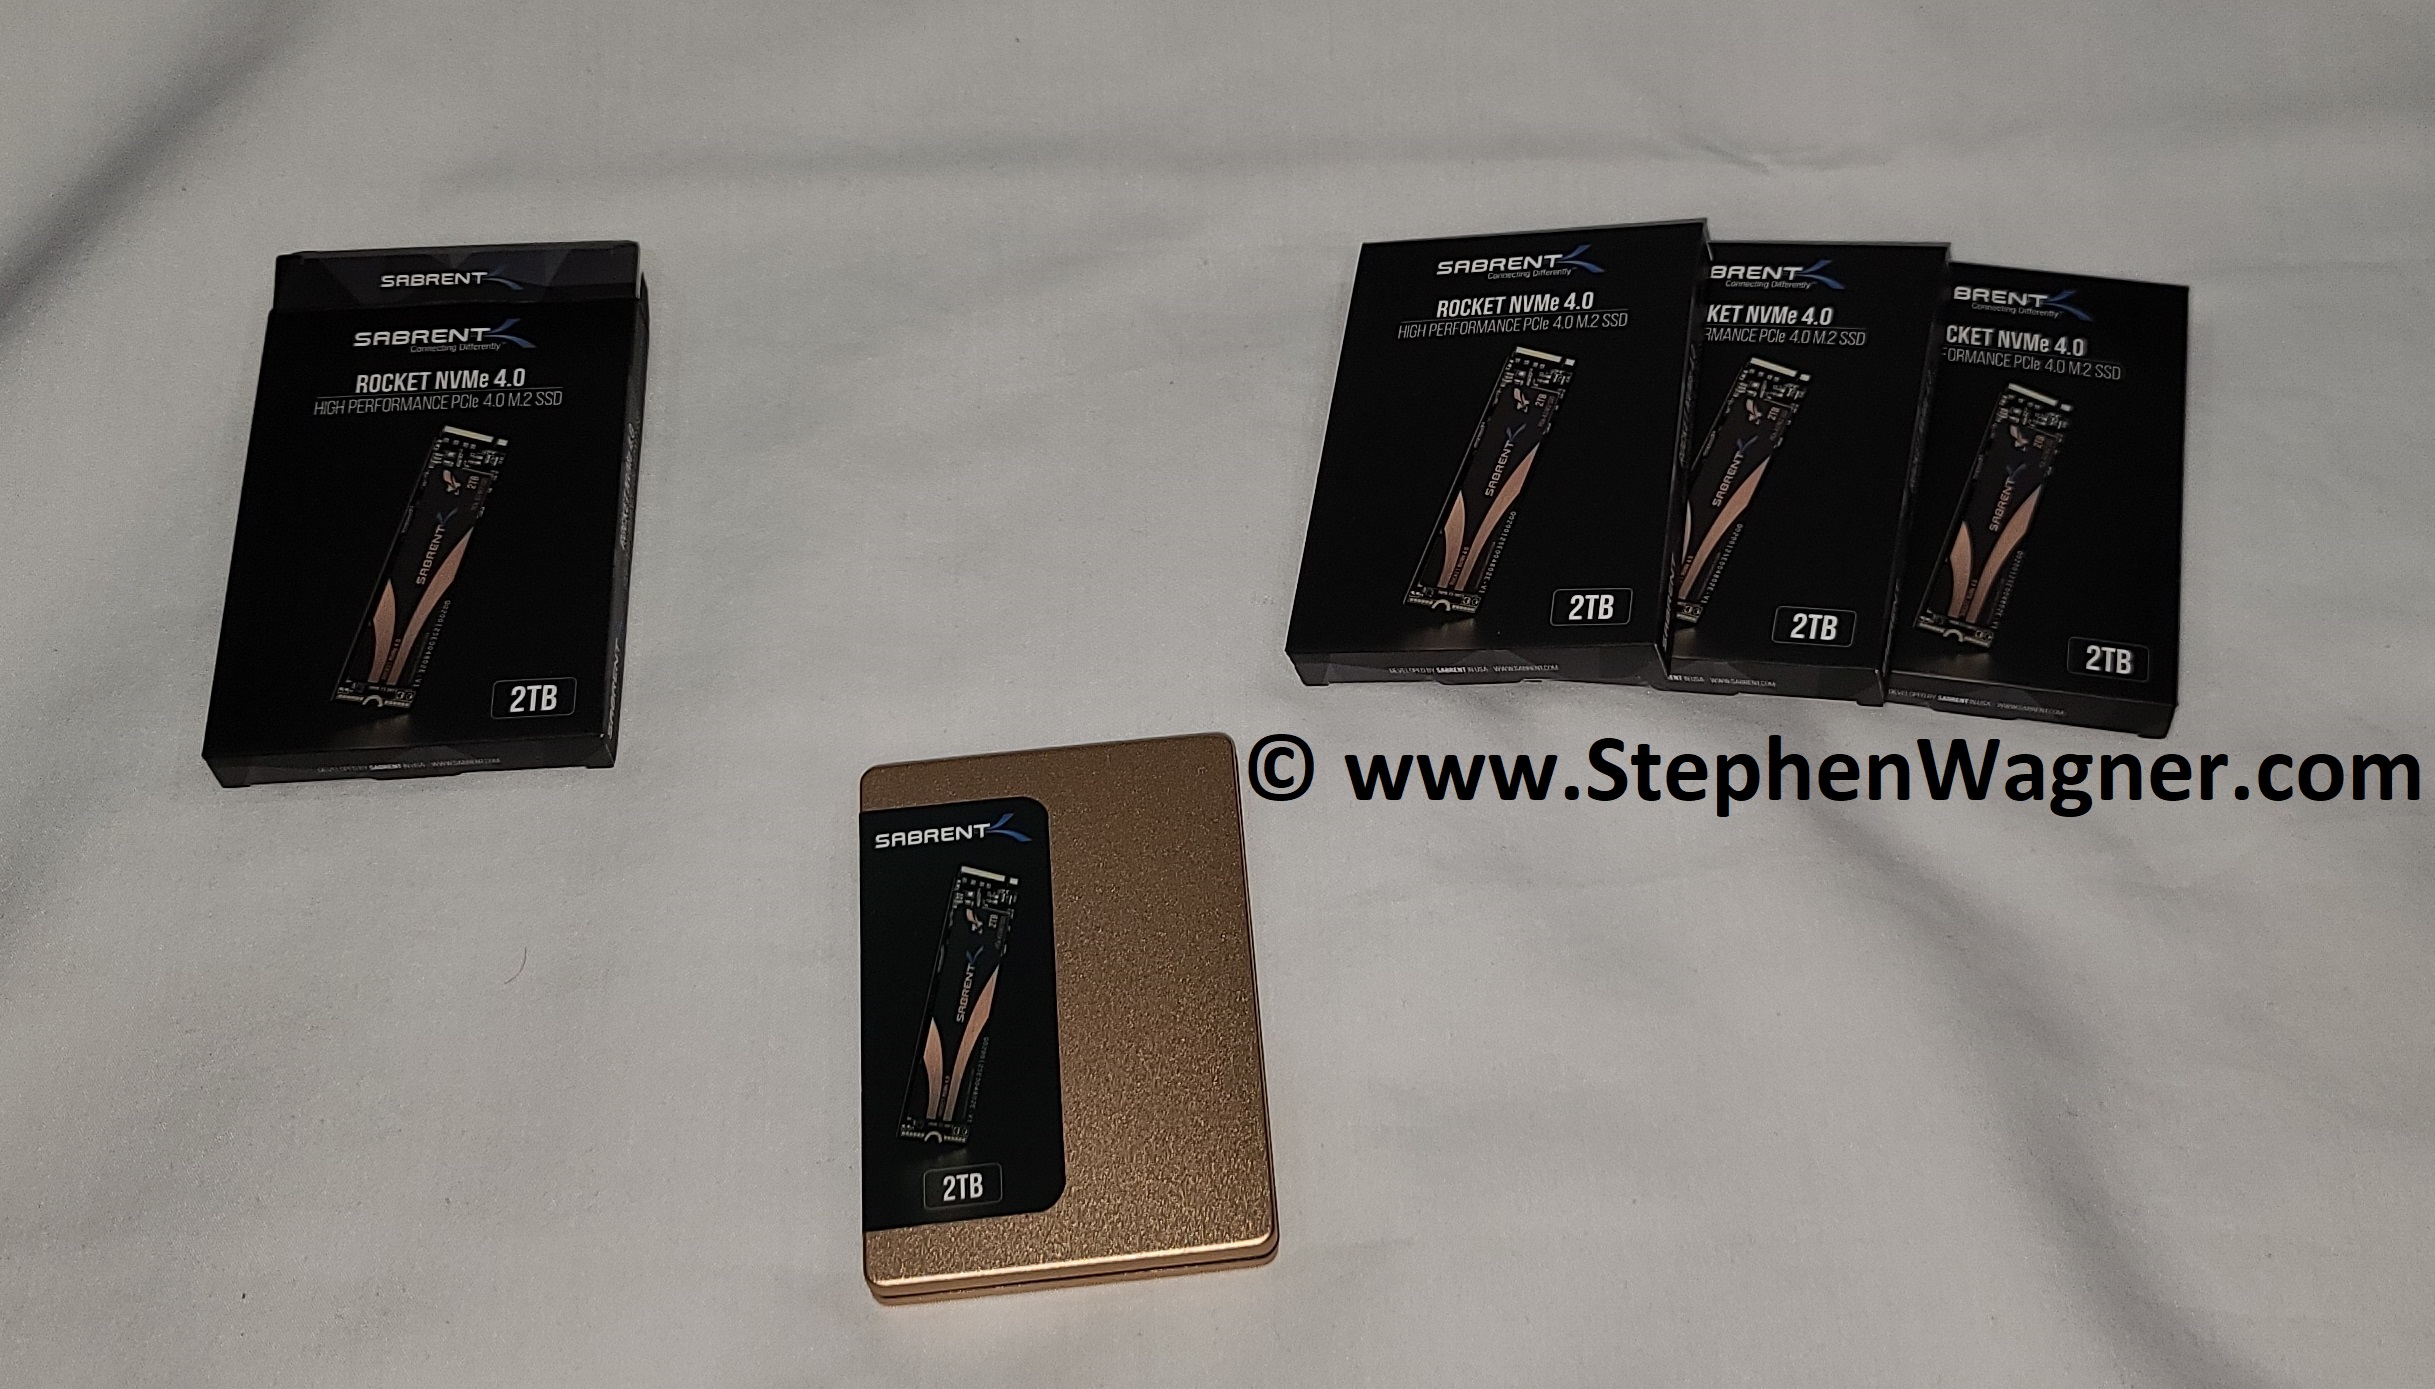
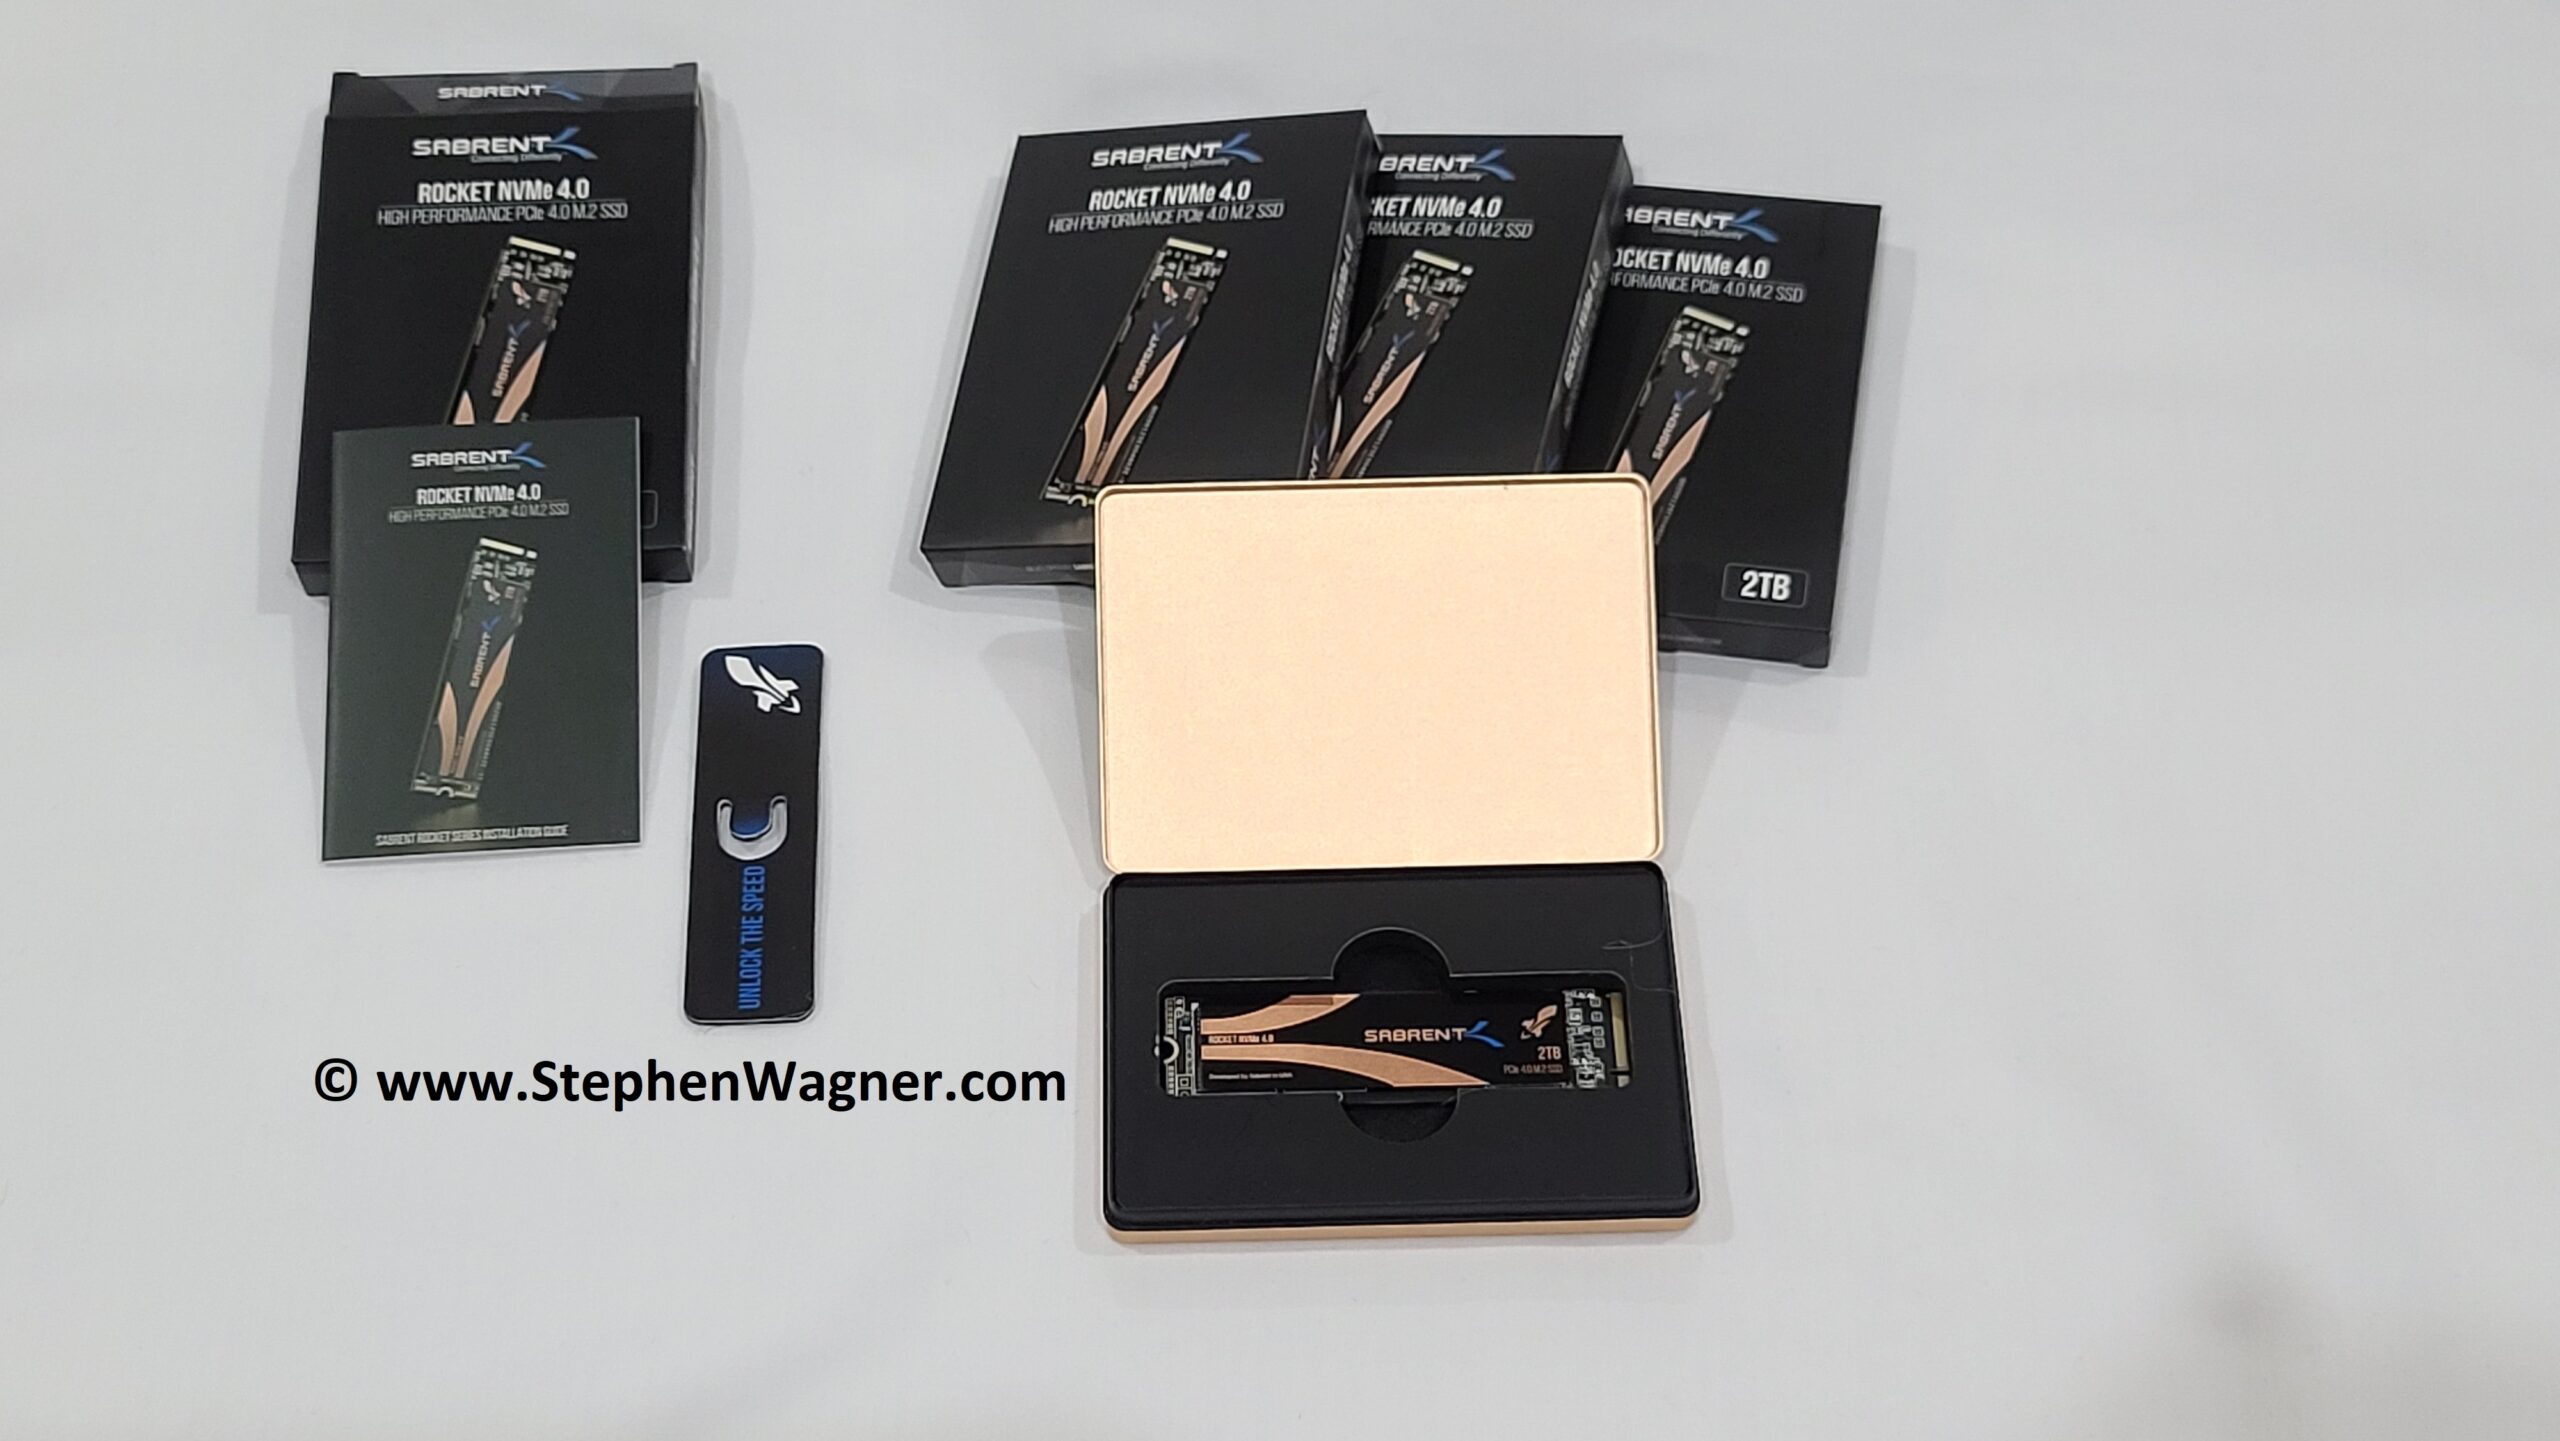
I have to say I was very impressed with the packaging! Small, sleek, and impressive!
Initially I was surprised how small the boxes were as they fit in the palm of your hand, but then you realize how small the NVMe sticks are, so it makes sense.
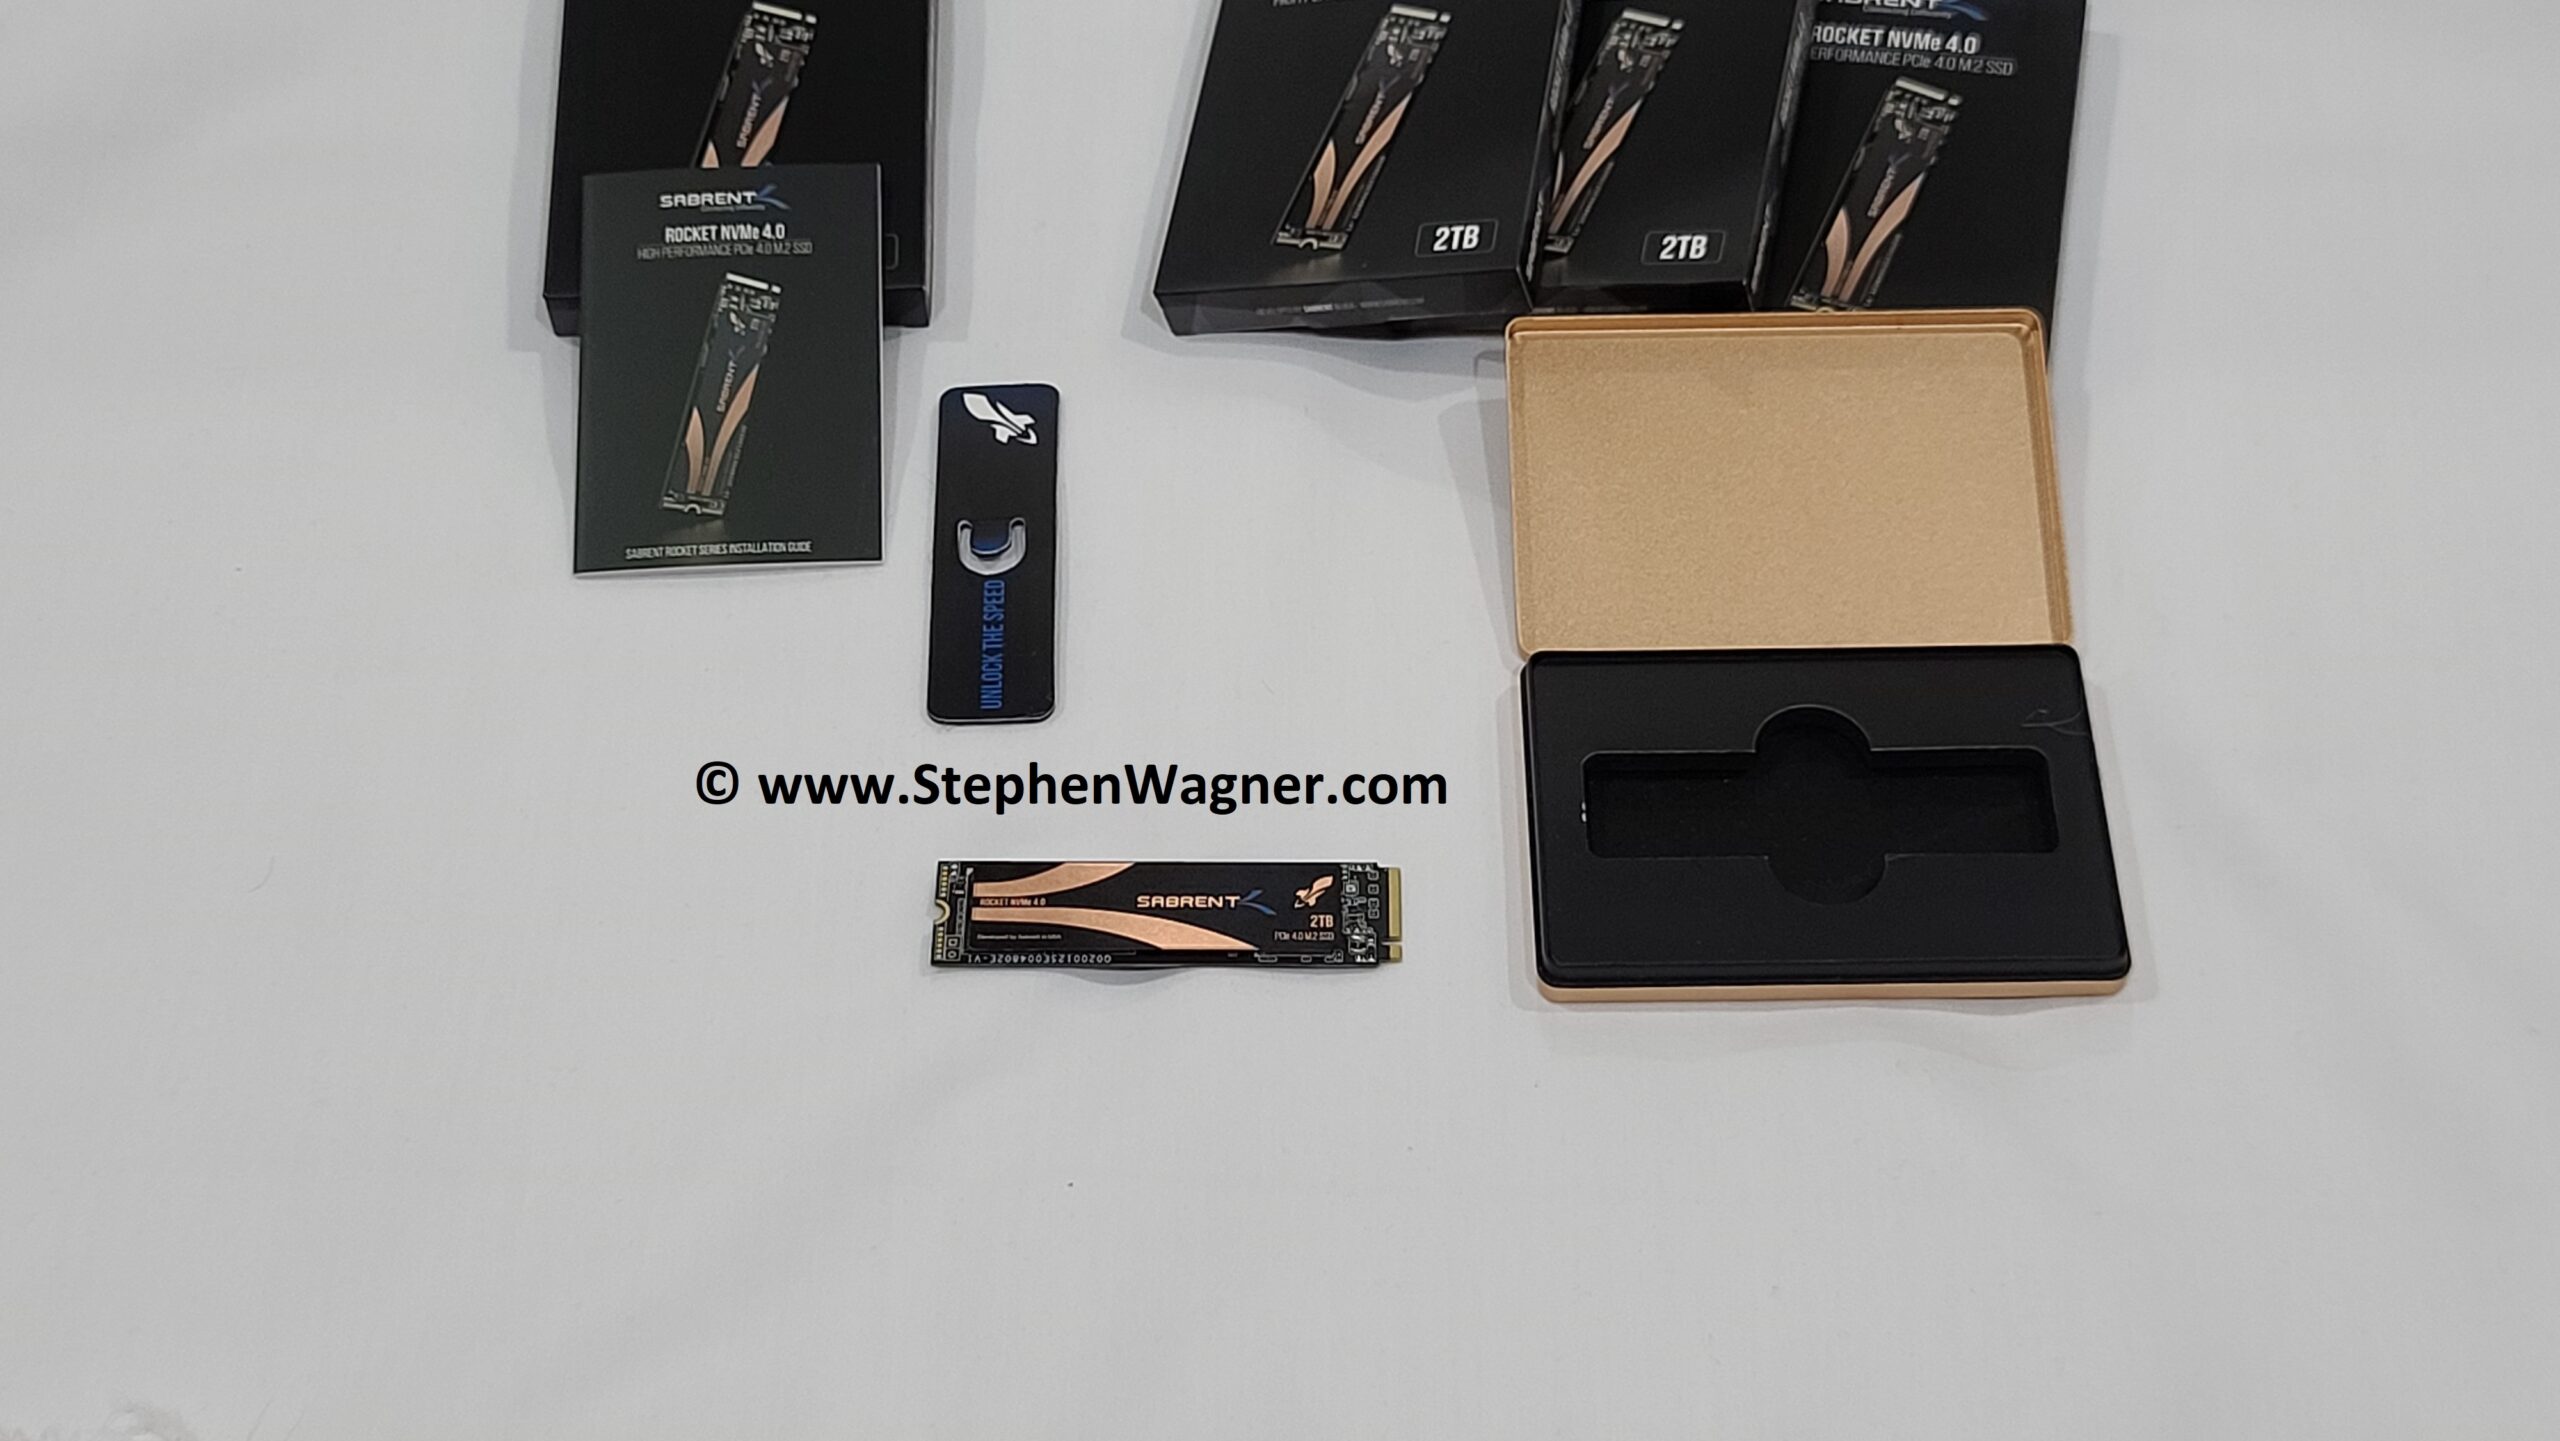
Opening the box you are presented with a beautiful metal case containing the instructions, information on the product warranty, and more.
And the NVME stick removed from it’s case
While some of the packaging may be unnecesary, after further thought I realized it’s great to have as you can re-use the packaging when storing NVMe drives to keep them safe and/or to put them in to storage.
And here’s a beautiful shot of 8TB of NVMe storage.
Now let’s move on to usage!
Setting one of these up in my HP Workstation was super easy. You simply populate the NVMe M.2 slot, install the screw, and boot up the system.
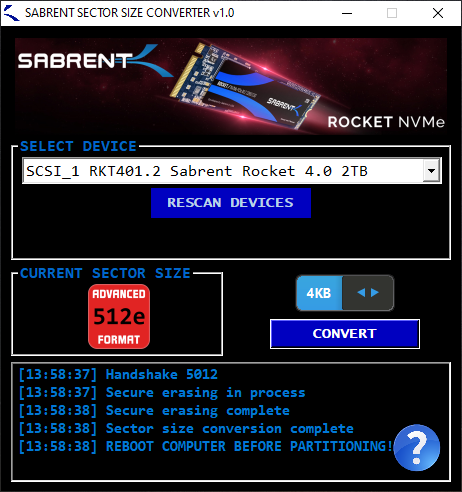
Upon booting, the Sabrent SSD was available inside of the Device Manager. I read on their website that they had some utilities so I wanted to see what configuration options I had access to before moving on to speed test benchmarks.
All Sabrent Rocket utilities can be downloaded from their website at https://www.sabrent.com/downloads/.
The Sabrent Sector Size Converter utility allows you to configure the sector size of your Sabrent Rocket SSD. Out of the box, I noticed mine was configured with a 512e sector format, which I promptly changed to 4K.
The change was easy, required a restart and I was good to go! You’ll notice it has a drop down to select which drive you want to modify, which is great if you have more than one SSD in your system.
I did notice one issue… When you have multiple (in my case 4) of these in one system, for some reason the sector size change utility had trouble changing one of them from 512e to 4K. It would appear to be succesful, but stay at 512e on reboot. Ultimately I removed all of the NVME sticks with the exception of the problematic one, ran the utility, and the issue was resolved.
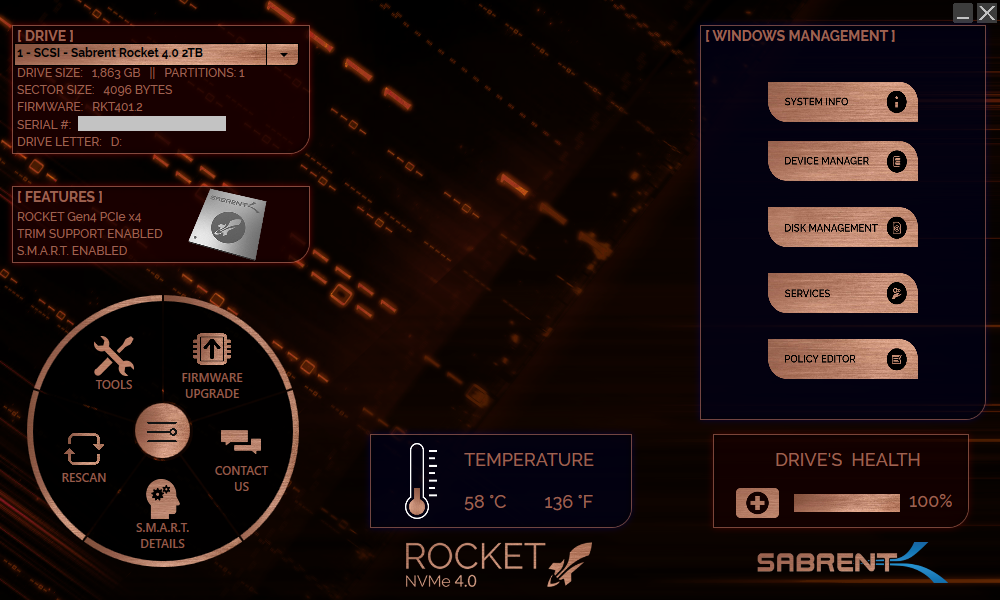
Another useful utility that was available for download is the Sabrent Rocket Control Panel.
The Sabrent Rocket Control Panel provides the following information:
You can also use this app to view S.M.A.R.T. information, flash updated Sabrent firmware, and more!
Now that we have this all configured, let’s move on to testing this SSD out!
The system we used to benchmark the Sabrent Rocket 4 2TB NVMe SSD is an HP Z240 SFF (Small Form Factor) workstation.
The specs of the Z240 Workstation:
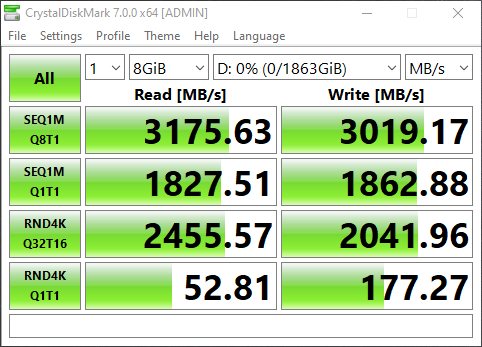
I ran a few tests using both CrystalDiskMark and ATTO Disk Benchmark, and the NVMe SSD performed flawlessly at extreme speeds!
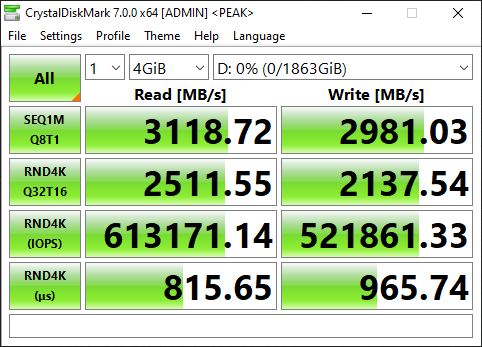
Loading up and benching with CrystalDiskMark, we see the following results:
As you can see, the Sabrent Rocket 4 2TB NVMe tested at a read speed of 3175.63MB/sec and write speed of 3019.17MB/sec.
Using the Peak Performance profile, we some amazing IO with 613171.14IOPS read and 521861.33IOPS write with RND4K.
While we’re only testing with a PCIe 3.0 system, these numbers are still amazing and inline with what’s advertised.
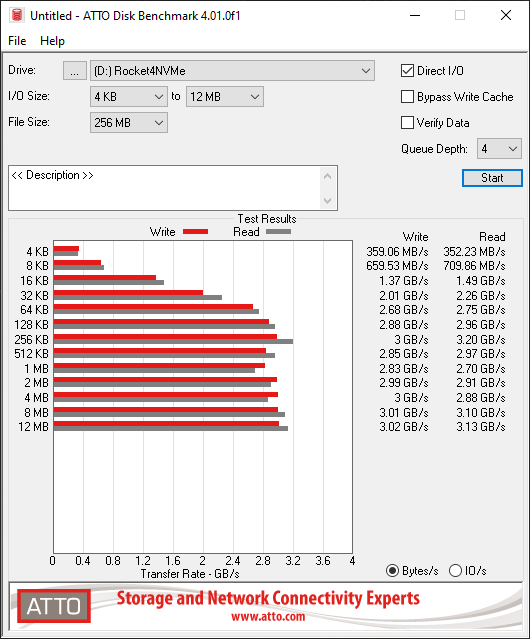
Switing over to ATTO Disk Benchmark, we test both speed and IOPS.
First, the speed benchmarks with I/O sized 4K to 12MB.
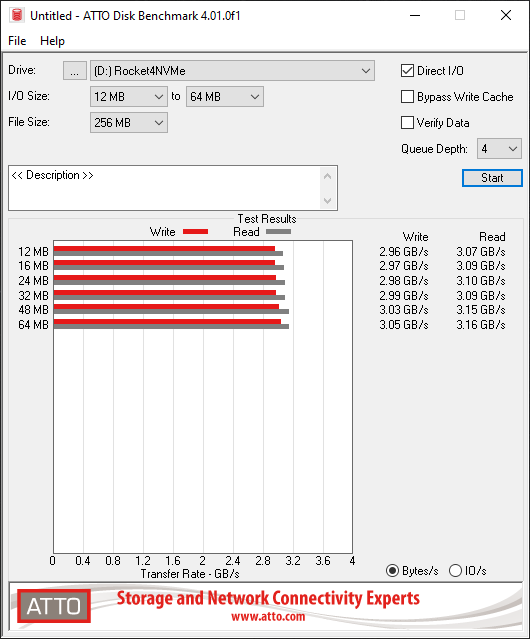
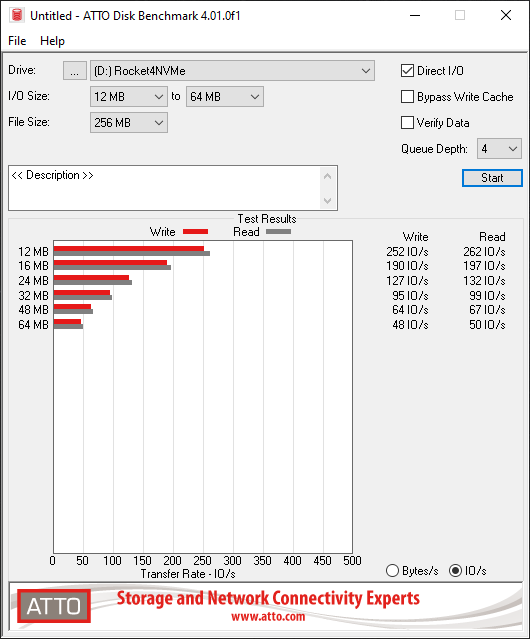
After taking a short cooldown break (we don’t have a heatsink installed), we tested 12MB to 64MB.
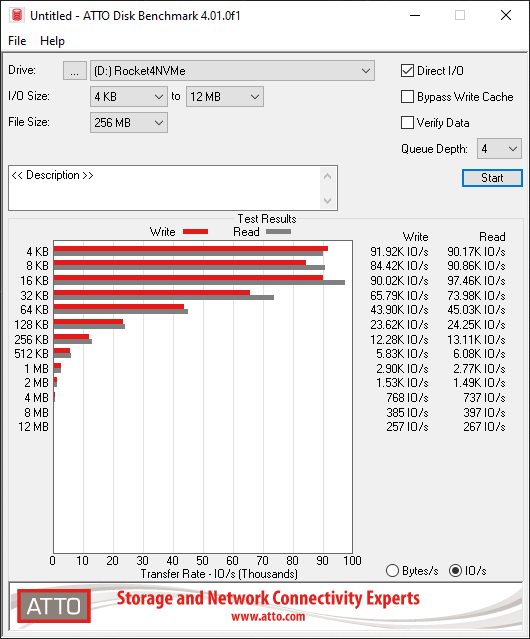
And now we move on to analyze the IO/s.
First from 4K to 12MB:
And then after a short break, 12MB to 64MB:
Those numbers are insane!
When you purchase a new Sabrent Rocket 4 SSD it comes with a 1 year standard warranty, however if you register your product within 90 days of purchase, you can extend it to an awesome 5 year warranty.
To register your product, visit https://www.sabrent.com/product-registration/
The process is easy if you have one device, however it very repettitive and takes time if you have multiuple as the steps have to be repeated for each device you have. Sabrent, if you’re listening a batch registration tool would be nice! 🙂
Remember that after registering your product, you should record your “Registration Unique ID” for future reference and use.
All-in-all I’d definitely recommend the Sabrent Rocket 4 NVMe SSD! It provides extreme performance, is extremely cost-effective, and I wouldn’t see any reason not to buy them.
Just remember that these SSDs (like all consumer SSDs) do not provide power loss protection, meaning you should not use these in enterprise environments (or in a NAS or SAN).
I’m really looking forward to using these in my upcoming blog and YouTube projects.
While most of us frequently deploy new ESXi hosts, a question and task not oftenly discussed is how to properly decommission a VMware ESXi host. Some might be surprised to… Read More
This guide will outline the instructions to Disable the VMware Horizon Session Bar. These instructions can be used to disable the Horizon Session Bar (also known as the Horizon Client… Read More
Normally, any VMs that are NVIDIA vGPU enabled have to be manually migrated with manual vMotion if a host is placed in to maintenance mode, to evacuate the host. While… Read More
You may experience GPU issues with the VMware Horizon Indirect Display Driver in your environment when using 3rd party applications which incorrectly utilize the incorrect display adapter. This results with… Read More
Today we're going to cover a powerful little NAS being used with VMware; the Synology DS923+ VMware vSphere Use case and Configuration. This little (but powerful) NAS is perfect for… Read More
Today we'll go over how to install the vSphere vCenter Root Certificate on your client system. Certificates are designed to verify the identity of the systems, software, and/or resources we… Read More
View Comments