Feb 182017
 
Windows Server Volume Shadow Copy Volumes Snapshot Screenshot

On VMware vSphere ESXi 6.5, 6.7, and 7.0, a condition exists where one is unable to take a quiesced snapshot. This is an issue that effects quite a few people and numerous forum threads can be found on the internet by those searching for the solution.

This issues can occur both when taking manual snapshots of virtual machines when one chooses “Quiesce guest filesystem”, or when using snapshot based backup applications such as vSphere Data Protection (vSphere vDP), Veeam, or other applications that utilize quiesced snapshots.

The Issue

I experienced this problem on one of my test VMs (Windows Server 2012 R2), however I believe it can occur on newer versions of Windows Server as well, including Windows Server 2016 and Windows Server 2019.

When this issue occurs, the snapshot will fail and the following errors will be present:

An error occurred while taking a snapshot: Failed to quiesce the virtual machine.
An error occurred while saving the snapshot: Failed to quiesce the virtual machine.

Performing standard troubleshooting, I restarted the VM, checked for VSS provider errors, and confirmed that the Windows Services involved with snapshots were in their correct state and configuration. Unfortunately this had no effect, and everything was configured the way it should be.

I also tried to re-install VMWare tools, which had no effect.

PLEASE NOTE: If you experience this issue, you should confirm the services are in their correct state and configuration, as outlined in VMware KB: 1007696. Source: https://kb.vmware.com/s/article/1007696

The Fix

In the days leading up to the failure when things were running properly, I did notice that the quiesced snapshots for that VM were taking a long time process, but were still functioning correctly before the failure.

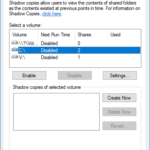
This morning during troubleshooting, I went ahead and deleted all the Windows Volume Shadow Copies (VSS Snapshots) which are internal and inside of the Virtual Machine itself. These are the shadow copies that the Windows guest operating system takes on it’s own filesystem (completely unrelated to VMware).

To my surprise after doing this, not only was I able to create a quiesced snapshot, but the snapshot processed almost instantly (200x faster than previously when it was functioning).

If you’re comfortable deleting all your snapshots, it may also be a good idea to fully disable and then re-enable the VSS Snapshots on the volume to make sure they are completely deleted and reset.

I’m assuming this was causing a high load for the VMware snapshot to process and a timeout was being hit on snapshot creation which caused the issue. While Windows volume shadow copies are unrelated to VMware snapshots, they both utilize the same VSS (Volume Shadow Copy Service) system inside of windows to function and process. One must also keep in mind that the Windows volume shadow copies will of course be part of a VMware snapshot since they are stored inside of the VMDK (the virtual disk) file.

PLEASE NOTE: Deleting your Windows Volume Shadow copies will delete your Windows volume snapshots inside of the virtual machine. You will lose the ability to restore files and folders from previous volume shadow copy snapshots. Be aware of what this means and what you are doing before attempting this fix.

Feb 142017
 

Years ago, HPE released the GL200 firmware for their HPE MSA 2040 SAN that allowed users to provision and use virtual disk groups (and virtual volumes). This firmware came with a whole bunch of features such as Read Cache, performance tiering, thin provisioning of virtual disk group based volumes, and being able to allocate and commission new virtual disk groups as required.

(Please Note: On virtual disk groups, you cannot add a single disk to an already created disk group, you must either create another disk group (best practice to create with the same number of disks, same RAID type, and same disk type), or migrate data, delete and re-create the disk group.)

The biggest thing with virtual storage, was the fact that volumes created on virtual disk groups, could span across multiple disk groups and provide access to different types of data, over different disks that offered different performance capabilities. Essentially, via an automated process internal to the MSA 2040, the SAN would place highly used data (hot data) on faster media such as SSD based disk groups, and place regularly/seldom used data (cold data) on slower types of media such as Enterprise SAS disks, or archival MDL SAS disks.

(Please Note: To use the performance tier either requires the purchase of a performance tiering license, or is bundled if you purchase an HPE MSA 2042 which additionally comes with SSD drives for use with “Read Cache” or “Performance tier.)

When the firmware was first released, I had no impulse to try it out since I have 24 x 900GB SAS disks (only one type of storage), and of course everything was running great, so why change it? With that being said, I’ve wanted and planned to one day kill off my linear storage groups, and implement the virtual disk groups. The key reason for me being thin provisioning (the MSA 2040 supports the “DELETE” VAAI function), and virtual based snapshots (in my environment, I require over-commitment of the volume). As a side-note, as of ESXi 6.5, ESXi now regularly unmaps unused blocks when using the VMFS-6 filesystem (if left enabled), which is great for SANs using thin provision that support the “DELETE” VAAI function.

My environment consisted of 2 linear disk groups, 12 disks in RAID5 owned by controller A, and 12 disks in RAID5 owned by controller B (24 disks total). Two weekends ago, I went ahead and migrated all my VMs to the other datastore (on the other volume), deleted the linear disk group, created a virtual disk group, and then migrated all the VMs back, deleted my second linear volume, and created a virtual disk group.

Overall the process was very easy and fast. No downtime is required for this operation if you’re licensed for Storage vMotion in your vSphere environment.

During testing, I’ve noticed absolutely no performance loss using virtual vs linear, except for some functions that utilize the VAAI storage providers which of course run faster on the virtual disk groups since it’s being offloaded to the SAN. This was a major concern for me as block linear based storage is accessed more directly, then virtual disk groups which add an extra level of software involvement between the controllers and disks (block based access vs file based access for the iSCSI targets being provided by the controllers).

Unfortunately since I have no SSDs and no extra room for disks, I won’t be able to try the performance tiering, but I’m looking forward to it in the future.

I highly recommend implementing virtual disk groups on your HPE MSA 2040 SAN!

Feb 082017
 

When running vSphere 6.5, 6.7, or 7.0 (or later) and utilizing a VMFS6 datastore, we now have access to automatic LUN reclaim (this unmaps unused blocks on your LUN), which automatically unmaps unused storage on your LUNs. This is very handy for thin provisioned storage.

Essentially when you unmap blocks, it “tells” the storage (SAN) that unused (deleted or moved data) blocks aren’t being used anymore and to unmap them, which decreases the allocated size on the storage layer and frees up storage space. Your storage LUN must support VAAI and the “Delete” function.

Now taking this a step further, most of you have noticed that storage reclaim in the vSphere client has two settings for priority in the web client; none, or low.

For those of you who feel daring or want to spice life up a bit, you can manually increase the priority of the automated space reclamation through the esxcli command. While I can’t recommend this (obviously VMware chose to hide these options due to performance considerations), you can follow these instructions to change the priority higher.

Manually Configure Storage Reclaim (UNMAP) Priority

To view the current settings:

esxcli storage vmfs reclaim config get --volume-label=DATASTORENAME

To set ESXi reclaim/unmap priority to medium:

esxcli storage vmfs reclaim config set --volume-label=DATASTORENAME --reclaim-priority=medium

To set ESXi reclaim/unmap priority to high:

esxcli storage vmfs reclaim config set --volume-label=DATASTORENAME --reclaim-priority=high

You can confirm these settings took effect by running the first “get” command to view the settings, or view the datastore in the storage section of the vSphere client. While the vSphere client will reflect the higher priority setting, if you change it lower and then want to change it back higher, you’ll need to use the esxcli command to bring it up to a higher priority again.

Happy Virtualizing! Leave a comment!

Feb 072017
 

With vSphere 6.5 came VMFS 6, and with VMFS 6 came the auto unmap feature. This is a great feature, and very handy for those of you using thin provisioning on your datastores hosted on storage that supports VAAI. However, you still have the ability to perform a manual UNMAP at high priority, even with VMware vSphere 7 and vSphere 8.

A while back, I noticed something interesting when running the manual unmap command for the first time. It isn’t well documented, but I thought I’d share for those of you who are doing a manual LUN unmap for the first time. This document will also provide you with the command to perform a manual unmap on a VMFS datastore.

Reason:

Automatic unmap (auto space reclamation) is on, however you want to speed it up or have a large chunk of block’s you want unmapped immediately, and don’t want to wait for the auto feature.

Problem:

I wasn’t noticing any unmaps were occurring automatically and I wanted to free up some space on the SAN, so I decided to run the old command to forcefully run the unmap to free up some space:

esxcli storage vmfs unmap --volume-label=DATASTORENAME --reclaim-unit=200

(The above command runs a manual unmap on a datastore)

After kicking it off, I noticed it wasn’t completing as fast as I thought it should be. I decided to enable SSH on the host and took a look at the /var/log/hostd.log file. To my surprise, it wasn’t stopping at a 200 block reclaim, it just kept cycling running over and over (repeatedly doing 200 blocks):

2017-02-07T14:12:37.365Z info hostd[XXXXXXXX] [Originator@XXXX sub=Libs opID=esxcli-fb-XXXX user=root] Unmap: Async Unmapped 200 blocks from volume XXXXXXXX-XXXXXXXX-XXXX-XXXXXXXXX
2017-02-07T14:12:37.978Z info hostd[XXXXXXXX] [Originator@XXXX sub=Libs opID=esxcli-fb-XXXX user=root] Unmap: Async Unmapped 200 blocks from volume XXXXXXXX-XXXXXXXX-XXXX-XXXXXXXXX
2017-02-07T14:12:38.585Z info hostd[XXXXXXXX] [Originator@XXXX sub=Libs opID=esxcli-fb-XXXX user=root] Unmap: Async Unmapped 200 blocks from volume XXXXXXXX-XXXXXXXX-XXXX-XXXXXXXXX
2017-02-07T14:12:39.191Z info hostd[XXXXXXXX] [Originator@XXXX sub=Libs opID=esxcli-fb-XXXX user=root] Unmap: Async Unmapped 200 blocks from volume XXXXXXXX-XXXXXXXX-XXXX-XXXXXXXXX
2017-02-07T14:12:39.808Z info hostd[XXXXXXXX] [Originator@XXXX sub=Libs opID=esxcli-fb-XXXX user=root] Unmap: Async Unmapped 200 blocks from volume XXXXXXXX-XXXXXXXX-XXXX-XXXXXXXXX
2017-02-07T14:12:40.426Z info hostd[XXXXXXXX] [Originator@XXXX sub=Libs opID=esxcli-fb-XXXX user=root] Unmap: Async Unmapped 200 blocks from volume XXXXXXXX-XXXXXXXX-XXXX-XXXXXXXXX
2017-02-07T14:12:41.050Z info hostd[XXXXXXXX] [Originator@XXXX sub=Libs opID=esxcli-fb-XXXX user=root] Unmap: Async Unmapped 200 blocks from volume XXXXXXXX-XXXXXXXX-XXXX-XXXXXXXXX
2017-02-07T14:12:41.659Z info hostd[XXXXXXXX] [Originator@XXXX sub=Libs opID=esxcli-fb-XXXX user=root] Unmap: Async Unmapped 200 blocks from volume XXXXXXXX-XXXXXXXX-XXXX-XXXXXXXXX
2017-02-07T14:12:42.275Z info hostd[XXXXXXXX] [Originator@XXXX sub=Libs opID=esxcli-fb-9XXXX user=root] Unmap: Async Unmapped 200 blocks from volume XXXXXXXX-XXXXXXXX-XXXX-XXXXXXXXX
2017-02-07T14:12:42.886Z info hostd[XXXXXXXX] [Originator@XXXX sub=Libs opID=esxcli-fb-XXXX user=root] Unmap: Async Unmapped 200 blocks from volume XXXXXXXX-XXXXXXXX-XXXX-XXXXXXXXX

That’s just a small segment of the logs, but essentially it just kept repeating the unmap/reclaim over and over in 200 block segments. I waited hours, tried to issue a “CTRL+C” to stop it, however it kept running.

I left it to run overnight and it did eventually finish while I was sleeping. I’m assuming it attempted to unmap everything it could across the entire datastore. Initially I thought this command would only unmap the specified block size.

When running this command, it will continue to cycle in the block size specified until it goes through the entire LUN. Be aware of this when you’re planning on running the command.

Essentially, I would advise not to manually run the unmap command unless you’re prepared to unmap and reclaim ALL your unused allocated space on your VMFS 6 datastore. In my case I did this because I had 4TB of deleted data that I wanted to unmap immediately, and didn’t want to wait for the automatic unmap.

I thought this may have been occurring because the automatic unmap function was on, so I tried it again after disabling auto unmap. The behavior was the same and it just kept running.

If you are tempted to run the unmap function, keep in mind it will continue to scan the entire volume (despite what block count you set). With this being said, if you are firm on running this, choose a larger block count (200 or higher) since smaller blocks will take forever (tested with a block size of 1 and after analyzing the logs and rate of unmaps, it would have taken over 3 months to complete on a 9TB array).

Update May 11th 2018: When running the manual unmap command with smaller “reclaim-unit” values (such as 1), your host may become unresponsive due to a memory overflow. vMotion’s will cease to function, and your ESXi host may need a restart to become fully functional. I’ve experienced this behavior twice. I highly suggest that if you perform this command, you do so while the host is in maintenance mode, and that your restart the host after a successful unmap sweep.

Feb 062017
 

Had a nasty little surprise with one of my clients this afternoon. Two days ago I updated their Sophos UTM (UTM220) to version 9.410-6 without any issues.

However, today I started to receive notifications that services were crashing (specifically ACC device agent).

After receiving a few of these, I logged in to check it out. Immediately there was no visible errors on the UTM itself, but after some further digging, I noticed these event logs in the “System Messages” log file:

2017:02:06-17:09:32 mail partitioncleaner[7918]: automatic cleaning for partition /tmp started (inodes: 0/100 blocks: 100/85)

2017:02:06-17:09:32 mail partitioncleaner[7918]: stopping deletion: can’t delete more files

Looks like a potential storage problem? Yes it was, but slightly more complicated.

I enabled SSH on the UTM and issued the “df” command (show’s volume usage), and found that the /tmp volume was 100% full.

Doing a “ls” and “ls -hl”, I found there were 25+ files that were around 235MB in size called: “AV-malware-names-XXXX-XXXXXX”.

Restarting the unit clears those files, however they come back shortly (I noticed it would add one every 5-10 minutes).

After some further digging (still haven’t heard back from Sophos on the support case), I came across some other users experiencing the same issues. While no one found a permanent resolution, they did mention this had to do with the Avira AV engine or possibly the dual scan engine.

Checking the UTM, I noticed that we had the E-Mail scanning configured for dual scan.

Solution (temporary workaround):

I went ahead and configured the E-Mail scanner (the only scanner I had that was using dual scan) to use single scan only. I then restarted the UTM. In my environment the default setting for single scanning is set to “Sophos”.

I am now sitting here with 30 minutes of uptime and absolutely no “AV-malware-names-XXXX-XXXXXX” files created.

I will post an update when I hear back from Sophos support.

Hope this helps someone else!


Update (after original post):

I heard back from Sophos support, this is a known bug in 9.410. The current official workaround is to change to single scan and use the AVIRA engine instead of the Sophos engine.

Update #2:

Received notification this morning of a new firmware update available (Version: 9.411003 – Maintenance Release). While I haven’t installed it, it appears from the Bugfixes notes that it was released to fix this issue:

 Fix [NUTM-6804]: [AWS] Update breaks HVM standalone installations
Fix [NUTM-6747]: [Email] SAVI scanner coredumps permanently in MailProxy after update to 9.410
Fix [NUTM-6802]: [Web] New coredumps from httpproxy after update to v9.410

Update #3:

I noticed that this bug was interrupting some mailflow on my Sophos UTM, as well as some of my clients. I went ahead and as an emergency situation, installed 9.411-3.

Things were fine for around 10 hours until I started to receive notification of the HTTP proxy failing and requiring restart. Logging in to the UTM, it was very unresponsive, sometimes completely unresponsive for around 10 minutes. Web browsing was not functioning at all on the internal network behind the UTM.

This issue still hasn’t been resolved. Hopefully we see a stable working fix sometime soon.