May 222024
 
Default New User Registry Hive

Today we’re going to dive in to how to modify or add to the new default user registry on Windows. This is the registry that is provisioned to new users when they log on to Windows for the first time.

These steps are required to make modifications to the registry, either to configure the users environment, and/or configure registry settings required for applications that may be install on the windows system that require configuration for a seamless user experience.

I regularly use this method to modify the default user registry on non-persistent VDI golden images for use with Omnissa Horizon (formerly VMware Horizon), however this can be used on traditional Windows systems (non-VDI), and/or other VDI platforms such as Citrix, AVD, and more!

Load the Default User Registry Hive

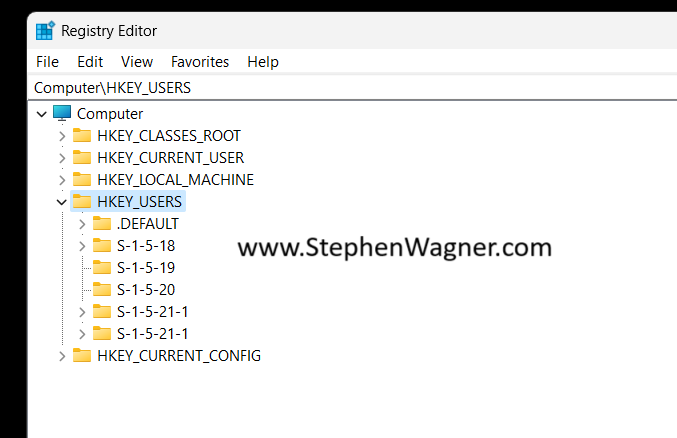
Let’s go ahead and get started! We’ll need to open “regedit” with administrative credentials (either logon as an admin, or “Run As” administrator). Then we’ll expand “HKEY_USERS”.

Next, we’ll go to “File” and then “Load Hive”. This will open a Windows File Explorer. We’ll navigate to the following directory:

C:\Users\Default\NTUSER.DAT

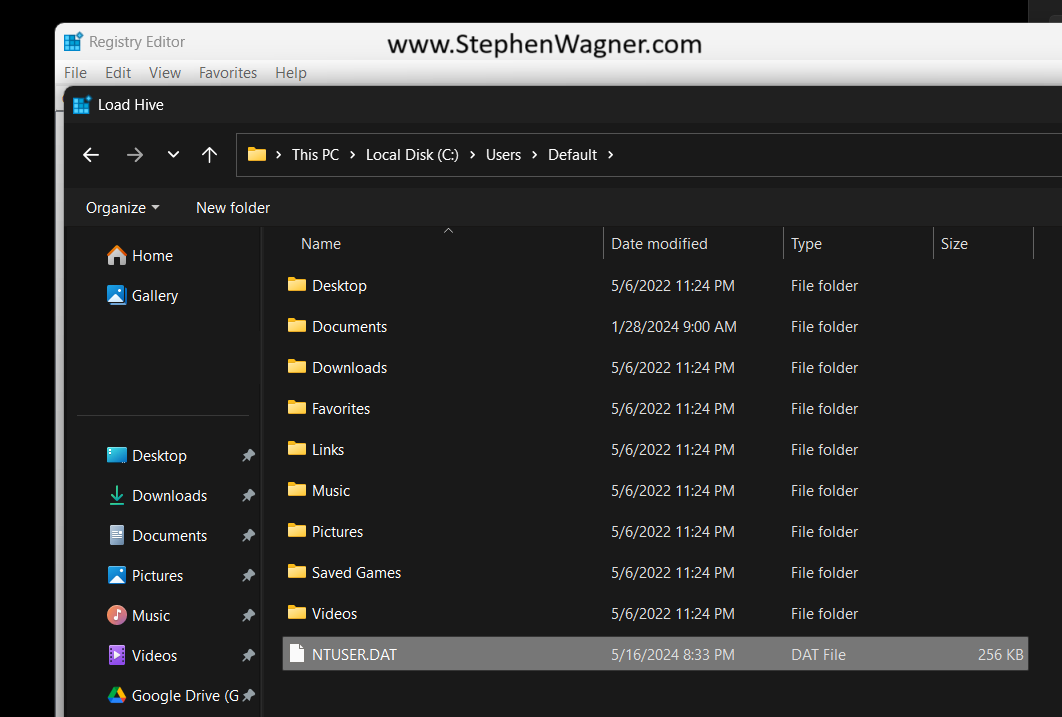
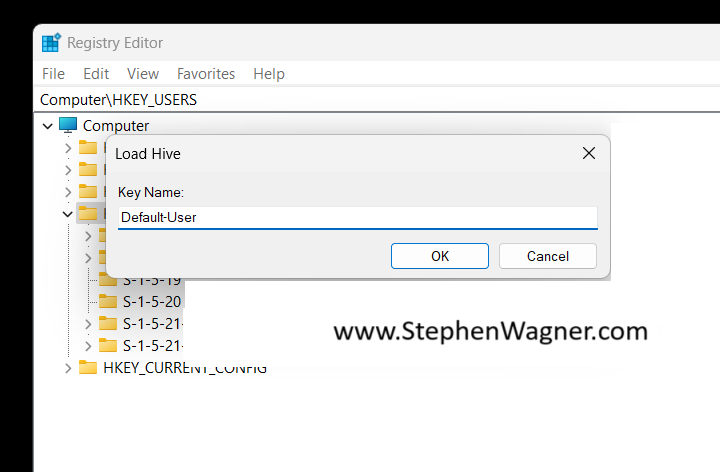
Once we select the “NTUSER.DAT” file, we’ll be prompted to load the hive and give it a key name. You can call it whatever you’d like (as long as it doesn’t conflict with an existing key), but for this example I’ll call it “Default-User”.

You’ll now notice that the Default User’s “HKEY_CURRENT_USER”, is now loaded as the hive you specified above, in our case it’s loaded as “Default-User”.

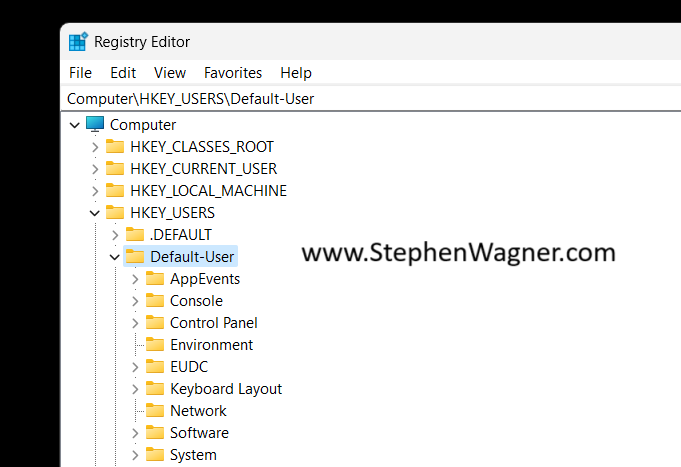
You can now make any modifications to the default users registry, including importing keys. If you’re using a “.reg” file, make sure you update it to reflect the registry hive location you’ve loaded.

Unload the Default User Registry Hive

Once you’ve made the modifications to the default user registry hive, whenever new users log on, they will be provisioned this hive.

We can now go ahead and unload the registry hive.

We’ll select the “Default-User” key (or whatever you called it), and select “Unload Hive”.

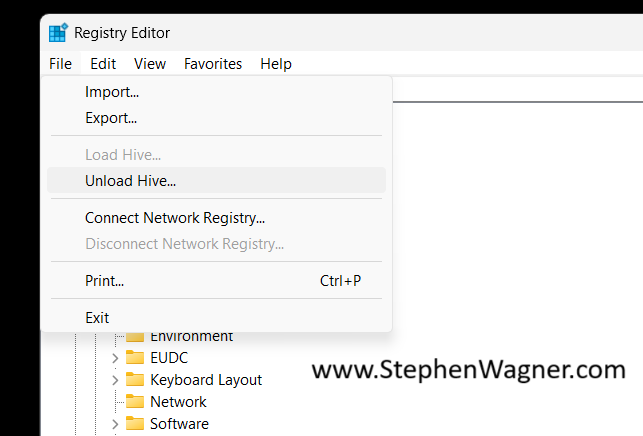
This will properly and gracefully close the default users registry hive.

Aug 142022
 
HP Printer on VDI

When it comes to troubleshooting login times with non-persistent VDI (VMware Horizon Instant Clones), I often find delays associated with printer drivers not being included in the golden image. In this post, I’m going to show you how to add a printer driver to an Instant Clone golden image!

Printing with non-persistent VDI and Instant Clones

In most environments, printers will be mapped for users during logon. If a printer is mapped or added and the driver is not added to the golden image, it will usually be retrieved from the print server and installed, adding to the login process and ultimately leading to a delay.

Due of the nature of non-persistent VDI and Instant Clones, every time the user goes to login and get’s a new VM, the driver will then be downloaded and installed each of these times, creating a redundant process wasting time and network bandwidth.

To avoid this, we need to inject the required printer drivers in to the golden image. You can add numerous drivers and should include all the drivers that any and all the users are expecting to use.

An important consideration: Try using Universal Print Drivers as much as possible. Universal Printer Drivers often support numerous different printers, which allows you to install one driver to support many different printers from the same vendor.

How to add a printer driver to an instant clone golden image

Below, I’ll show you how to inject a driver in to the Instant Clone golden image. Note that this doesn’t actually add a printer, but only installs the printer driver in to the Windows operating system so it is available for a printer to be configured and/or mapped.

Let’s get started! In this example we’ll add the HP Universal Driver. These instructions work on both Windows 10 and Windows 11 (as well as Windows Server operating systems):

  1. Click Start, type in “Print Management” and open the “Print Management”. You can also click Start, Run, and type “printmanagement.msc”.
    Launch Print Management
  2. On the left hand side, expand “Print Servers”, then expand your computer name, and select “Drivers”.
    Print Management Drivers
  3. Right click on “Drivers” and select “Add Driver”.
    Print Management Add Driver
  4. When the “Welcome to the Add Printer Driver Wizard” opens, click Next.
    Add Printer Driver Wizard
  5. Leave the default for the architecture. It should default to the architecture of the golden image.
  6. When you are at the “Printer Driver Selection” stage, click on “Have Disk”.
    Print Management Add Printer Driver Location
  7. Browse to the location of your printer driver. In this example, we navigate to the extracted HP Universal Print Driver.
    Browse Printer Driver Location
  8. Select the driver you want to install.
    VDI Select Printer Driver to Install
  9. Click on Finish to complete the driver installation.
    Finish installing Instant Clone Printer Driver

The driver you installed should now appear in the list as it has been installed in to the operating system and is now available should a user add a printer, or have a printer automatically mapped.

Screenshot of Printer Driver installed on non-persistent VDI Instant Clone golden image
Printer Driver installed on Non-Persistent Instance Clone Golden Image

Now seal, snap, and deploy your image, and you’re good to go!

Dec 132019
 
Microsoft Windows Logo

Yesterday, December 12th 2019, I powered on my Windows 10 1909 workstation to see that the start menu wasn’t working, along with the notification tray. I could launch programs from the taskbar, but search, start, and notifications were not functioning.

Attention: If you are experiencing issues with search, please continue reading to the bottom of the blog post and the update marked February 5th, 2020.

Since my workstation is running as a VDI instance, I checked vSphere and noticed the VM was running at extremely high CPU. Inside of the workstation, I opened up the event log and found numerous errors pertaining to the User Shell Experience, as well as multiple Windows 10 apps (UWP apps).

I tried to troubleshoot this using multiple methods found online on google. It sounds like this is a common issue for the past couple months, but no one has been able to find a fix.

Finally, after 14 hours of frusteration, I finally decided to restore the workstaton (VM) from a snapshot backup the night before. Powering it on the start menu was working. I installed some updates and everything is still working great.

If anyone has any information on this, please post it in the comments! I was surprised this isn’t easily fixable and actually required a restore from backup. I’m assuming numerous others are experiencing this issue.

Windows 10 Search on Start Menu not working

Update – February 5th 2020: Today, I noticed my search bar had stopped functioning. I also noticed lots of traffic to my blog for people searching for this. After some research I found this page: https://superuser.com/questions/1522905/windows-10-search-not-loading-showing-blank-window

I’ve condensed the fix. To resolve this issue, perform the following instructions:

  1. Open Notepad
  2. Copy and paste the below text:
    Windows Registry Editor Version 5.00
    
    [HKEY_CURRENT_USER\Software\Microsoft\Windows\CurrentVersion\Search]
    "CortanaConsent"=dword:00000000
    "BingSearchEnabled"=dword:00000000
  3. Save file as “FixSearch.reg”
  4. Run the file (double click) or import the .reg file in to your registry
  5. Restart explorer.exe or restart your computer

The issue should now be resolved.

May 222019
 
Microsoft Windows Logo

You may find yourself in a situation where an MMC snap-in errors out, and doesn’t allow you to reconfigure, fix, or use it. It becomes unusable.

In my case, this occurred on a system where I was trying to use the WSUS (Windows Server Update Services) snap-in, and it was configured for an old server that didn’t exist anymore.

When opening the WSUS MMC snap-in, it would report an error, give me the option to unload (which didn’t work), and do nothing else. There was no way to use or reconfigure it.

The Fix

To resolve this, you need to clear your local configuration for the snap-in. Your user profile contains all MMC snap-in information and configuration in the following directory:

C:\Users\USERNAME\AppData\Roaming\Microsoft\MMC

When browsing, here’s what it looks like on my system:

Picture of MMC user cache in appdata
User MMC config/cache folder

In my case, deleting the “wsus” file, reset the MMC snap-in, and allowed me to use it again and configure it for a new server.

Let me know if this helped you!

May 212019
 
Microsoft Windows Logo

You can now download the Windows 10 May 2019 – 1903 update!

You can use the Microsoft “Update Assistant” available at
https://www.microsoft.com/en-ca/software-download/windows10. Or you can use the Windows 10 Media Creation tool to make an ISO or upgrade an installation (available at the same link).

Windows 10 1903 is also available on VLSC.

Remember, if you need to install the Windows 10 RSAT tools, check out
https://www.stephenwagner.com/2018/10/05/windows-10-1809-october-update-rsat/ as this link has the instructions to install them on the May 2019 1903 update.

Successful installations

In case you’re worried about bugs, I’ve listed some of the machines I’ve successfully upgraded below:

  • Lenovo X1 Carbon, 1809 to 1903 – No issues
  • Windows 10 VM on VMware ESXi 6.5 (VDI with GRID sVGA) – No issues