Recently, new deployments of Windows 11 (23H2 images with the latest updates) have changed the behavior of the start menu and introduced the Windows 11 Microsoft Account Center.
This also effects 24H2, however 24H2 isn’t supported on Omnissa Horizon as of yet (to my knowledge) and probably most other VDI platforms, but this will be a concern once support is available.
The introduction of the Microsoft Account Center in the Windows Start Menu will become an issue for VDI deployments, as it changes the behavior of the Start Menu, and introduces some complexities for logging off users as well as introducing the need for training or alternative methods for users to log off.
Update – October 27 2024
When completing the latest Windows Updates, as of October 27th, 2024, the behavior has now changed.
The new behavior is now suitable for easy logoffs.
Behavior
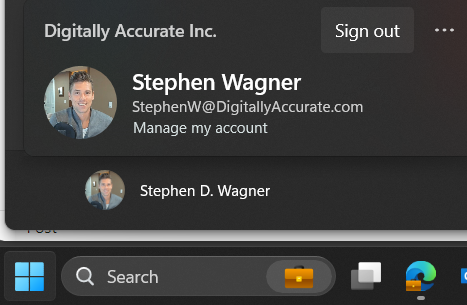
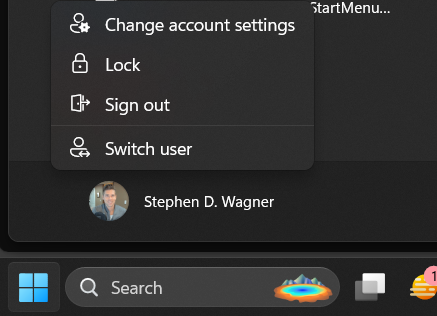
When clicking on Start and proceeding to click on the user name, users are no longer prompted with options like “Sign out, Switch User, Account Settings”. Users are now presented with the new “Microsoft Account Center”, which on non-VDI deployments provides actions for the Microsoft Account. Optimizing your image may slightly change the behavior of the Microsoft Account Center.
Here is an example of the original start menu:
Here is an example of the new start menu with the new Microsoft Account Center:
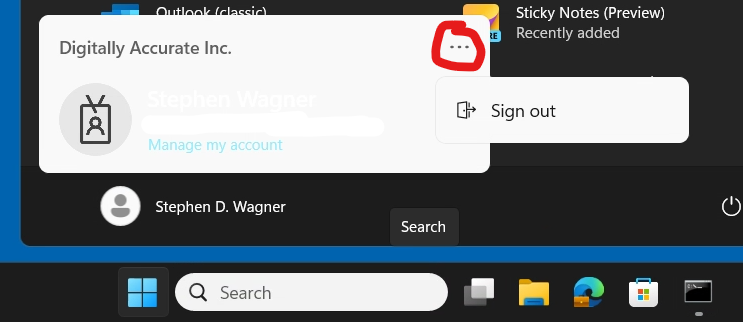
Users, who are expecting to be able to sign out, will not have to click on the “…” on the top right.
Additional Considerations
In addition to the examples provided above, the following behaviors can be expected:
On the base image, clicking the user icon will do nothing (and may possibly kill the start menu)
In deployments with Hybrid domain joined Instant Clones
If the machine hasn’t achieved Hybrid Domain Join, clicking the user account icon will function.
If the machine has Hybrid domain joined but a PRT has not been issued, click the user account icon will kill the start menu.
If the machine has Hybrid domain joined and a PRT has been issued, it will perform properly using the new style.
In deployments with Hybrid Domain Joining and PRT disabled, the new “Microsoft Account Center” from the user icon, should function properly with the new style.
As of today, I haven’t seen the latest Windows Updates change older base images, but I haven’t had the opportunity to sample a large enough number of environments. If this occurs, you may need to brief users on how to log out using the new “Microsoft Account Center”, using the “Log Off” function on the Horizon Client, or possibly even create a desktop shortcut for the users.
Workaround
To workaround this issue, you may need to train users on the new behaviour, advise them to Log off with the VMware Horizon client (proper logoff, not just clicking the “X” which will only disconnect sessions), or create a “Log off” shortcut on their desktop.
I will continue to investigate and update this post, hopefully ultimately with a fix.
When using Omnissa Horizon (formerly VMware Horizon), you may note that NVENC offload is disabled when using RDSH with NVIDIA vGPU. This may also affect other VDI and Application Delivery platforms that use RDSH (Remote Desktop Session Hosts) and NVIDIA vGPU (Virtual GPU).
One of the key benefits of deploying NVIDIA vGPU with Omnissa Horizon, is being able to use the NVIDIA NvENC (NVIDIA Encoder) to hardware encode your VDI session. This is also known as H264/H265/HEVC/AV1 offload.
This means that the encoding and compression of the remoted video session is handled by the GPU, instead of the CPU, freeing up resources on the VM guest and host, reducing latency with encoding, and also providing a much better user experience.
The Observation
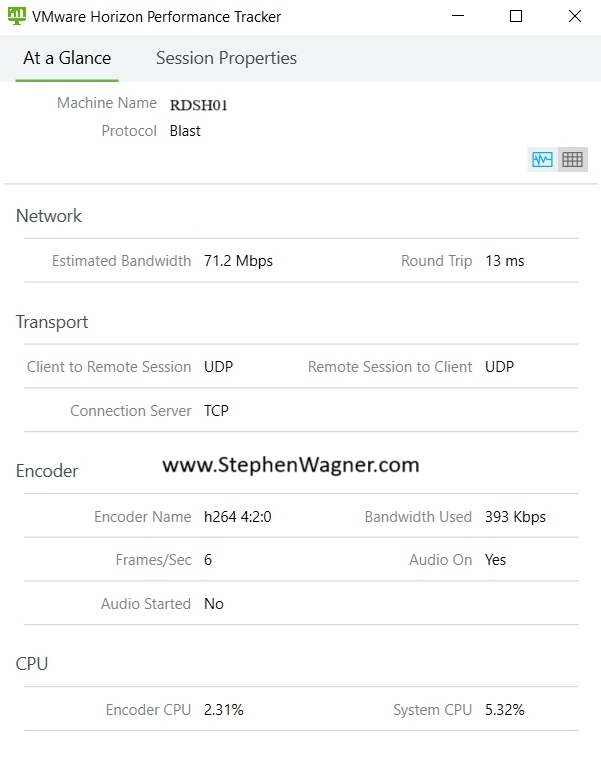
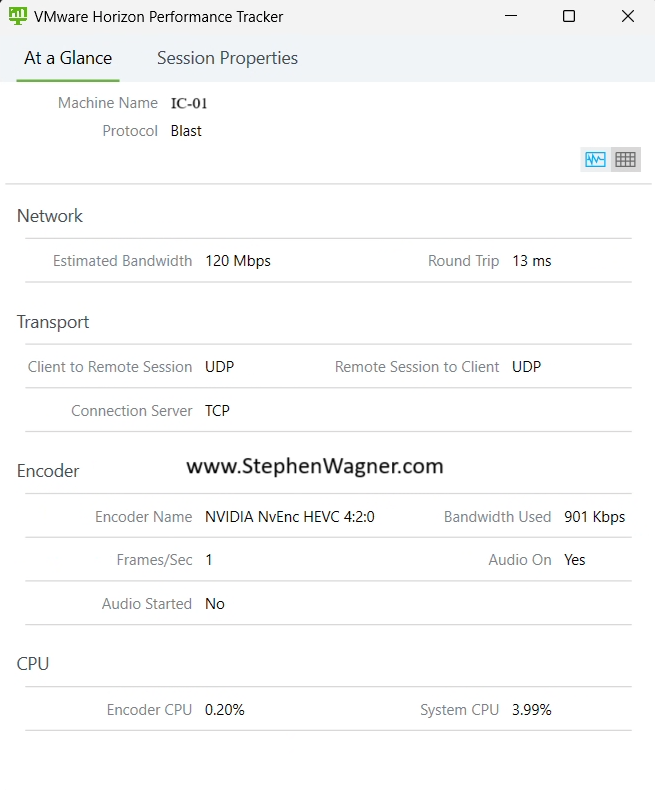
When deploying NVIDIA vGPU with vApps and Horizon Apps, you’ll note the following in the VMware Horizon Performance Tracker:
You can see above that the “Encoder Name” is using “h264 4:2:0”. This means that the CPU Software Based encoder is handing the encoding of the H264 BLAST Session. While the environment is 3D accelerated, the remoting protocol encoding is not hardware offloaded.
You’ll also note the following:
VMware Horizon Agent High CPU Usage
“nvidia-smi” on the host and VM does not report the encoder being used
This behavior is as expected due to the inability of RDS session hosts to be able to utilize NvENC. RDSH hosts utilize a software framebuffer for user environment and desktop delivery which cannot be used with NVENC.
Solution and/or Workaround
To work around this limitation, you have the option of using VDI desktops (in this case it would be preferable to use non-persistent Instant Clones) to deploy an “Application Pool” with vGPU enabled VMs.
Note that this is a major change to your solution architecture because pushing applications (and desktops) from Windows 10 or Windows 11 Guest VMs is a 1 to 1 relation, versus RDSH which supports many users to one VM.
Using Horizon, you could then push applications (not desktops) from these vGPU enabled Instant Clones, which would support NVENC and hardware offload, as shown in the example below:
In the image above, you’ll note that the “Encoder Name” is “NVIDIA NvEnc HEVC 4:2:0” showing us that NvEnc hardware offload and encoding is functioning and being used.
Note, that using this method to deploy Horizon Apps will result in more framebuffer being required, however may be offset since a smaller framebuffer can be used with individual VMs versus a large framebuffer being assigned and attached to an RDSH host.
Today we’re going to dive in to how to modify or add to the new default user registry on Windows. This is the registry that is provisioned to new users when they log on to Windows for the first time.
These steps are required to make modifications to the registry, either to configure the users environment, and/or configure registry settings required for applications that may be install on the windows system that require configuration for a seamless user experience.
I regularly use this method to modify the default user registry on non-persistent VDI golden images for use with Omnissa Horizon (formerly VMware Horizon), however this can be used on traditional Windows systems (non-VDI), and/or other VDI platforms such as Citrix, AVD, and more!
Load the Default User Registry Hive
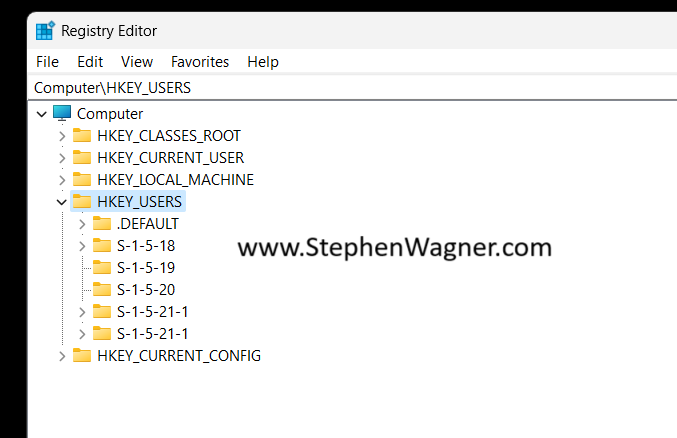
Let’s go ahead and get started! We’ll need to open “regedit” with administrative credentials (either logon as an admin, or “Run As” administrator). Then we’ll expand “HKEY_USERS”.
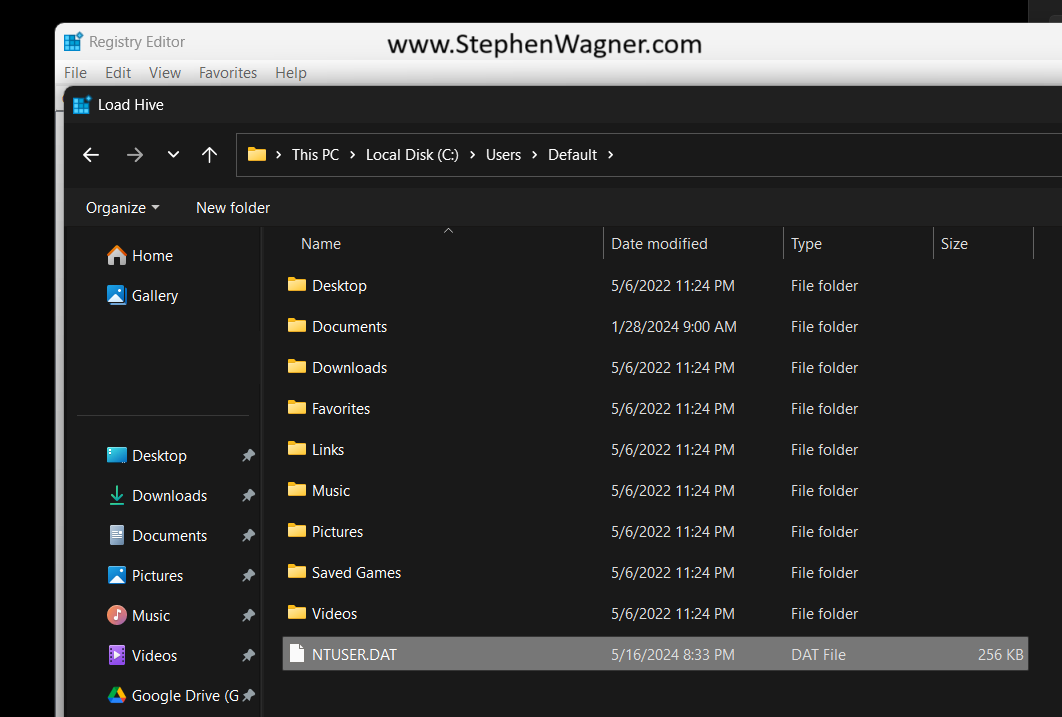
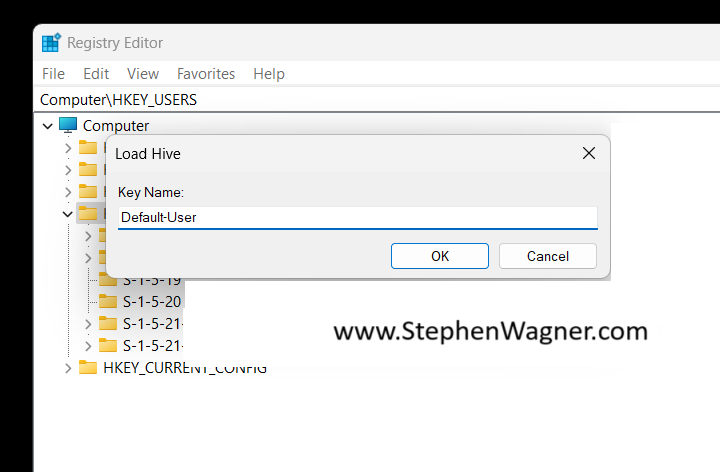
Next, we’ll go to “File” and then “Load Hive”. This will open a Windows File Explorer. We’ll navigate to the following directory:
C:\Users\Default\NTUSER.DAT
Once we select the “NTUSER.DAT” file, we’ll be prompted to load the hive and give it a key name. You can call it whatever you’d like (as long as it doesn’t conflict with an existing key), but for this example I’ll call it “Default-User”.
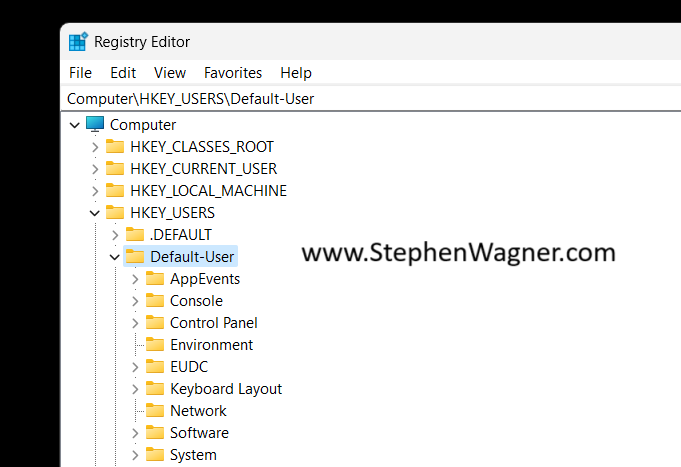
You’ll now notice that the Default User’s “HKEY_CURRENT_USER”, is now loaded as the hive you specified above, in our case it’s loaded as “Default-User”.
You can now make any modifications to the default users registry, including importing keys. If you’re using a “.reg” file, make sure you update it to reflect the registry hive location you’ve loaded.
Unload the Default User Registry Hive
Once you’ve made the modifications to the default user registry hive, whenever new users log on, they will be provisioned this hive.
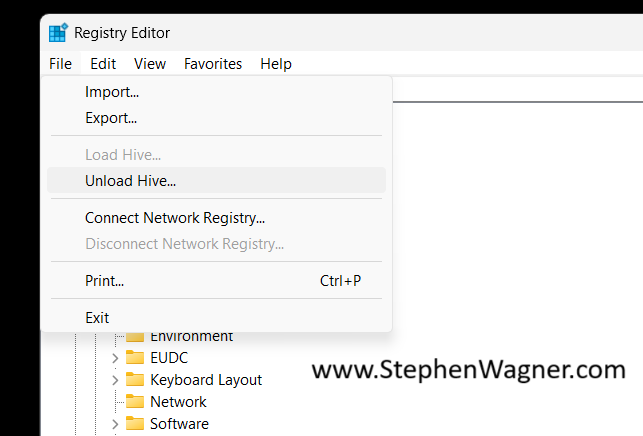
We can now go ahead and unload the registry hive.
We’ll select the “Default-User” key (or whatever you called it), and select “Unload Hive”.
This will properly and gracefully close the default users registry hive.
Every organization is looking for ways to equip their mobile workforce, whether remote employees, travelling sales staff/representatives, or just providing more ways employees can work efficiently. Today I want to talk about Microsoft Teams Phone and VDI – a match made in the Cloud.
I’m one of those people who travel frequently and rely not only on having a reliable working environment, but also having access to telecommunications.
Running Teams Phone on VDI is a clear win in these regards!
VDI and VoIP, a common struggle
As most of you know, VDI and VoIP applications can be a major struggle with 3rd party applications not providing audio optimizations for environments that use VDI. This commonly results in in sluggish, jolty, delayed, and/or poor audio quality, in addition to audio processing in your VDI environment which uses resources on your VDI cluster.
For years, the most common applications including Microsoft Teams, Zoom, and even Skype for Business provided VDI optimizations to allow high quality (optimized) audio processing, resulting in almost perfect video/audio telecommunications via VDI sessions, when implemented properly.
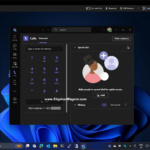
Teams Phone running on a VMware Horizon VDI Session
I was tired of using a 3rd party VoIP app, and wanted a more seamless experience, so I migrated over to Teams Phone for my organization, and I’m using it on VDI with VMware Horizon.
Microsoft Teams Phone
While I’ve heard a lot about Teams phone, Microsoft’s Phone System, and PSTN capabilities, I’ve only ever seen it deployed once in a client’s production environment. This put it on my list of curiosities to investigate in the future a few years back.
This past week I decided to migrate over to Microsoft Teams Phone for my organizations telephony and PSTN connectivity requirements. Not only did this eliminate my VoIP app on my desktops and laptops, but it also removed the requirement for a problematic VoIP client on my smartphone.
Teams Phone Benefits
Single app for team collaboration and VoIP
Single phone number (eliminates multiple extensions for multiple computers and devices)
Microsoft Phone System provides PBX capabilities
Cloud Based – No on-premise infrastructure required (except device & internet for client app)
I regularly use Microsoft Teams on all my desktops, laptops, and VDI sessions, along with my mobile phone, so the built-in capabilities for VoIP services, in an already fairly reliable app was a win-win!
I’ll go in to further detail on Teams Phone in a future blog post.
Teams Phone on VDI
Microsoft Teams already has VDI optimizations for video and audio in the original client and the new client. This provides an amazing high quality experience for users, while also offloading audio and video processing from your VDI environment to Microsoft Teams (handled by the endpoints and Microsoft’s servers).
When implementing Teams Phone on VDI, you take advantage of these capabilities providing an optimized and enhanced audio session for voice calls to the PSTN network.
This means you can have Teams running on a number of devices including your desktop, laptop, smartphone, VDI session, and have a single PSTN phone number that you can make and receive calls from, seamlessly.
Pretty cool, hey?
The Final Result
In my example, the final result will:
Reduce my corporate telephony costs by 50%
Eliminate the requirement for an on-prem PBX system
Remove the need for a 3rd party VoIP app on my workstations and mobile phone
Provide a higher quality end-user experience
Utilize existing VDI audio optimizations for a better experience
In this guide we will deploy and install the new Microsoft Teams for VDI (Virtual Desktop Infrastructure) client, and enable Microsoft Teams Media Optimization on Omnissa Horizon (formerly VMware Horizon).
This guide replaces and supersedes my old guide “Microsoft (Classic) Teams VDI Optimization for VMware Horizon” which covered the old Classic Teams client and VDI optimizations. The new Microsoft Teams app requires the same special considerations on VDI, and requires special installation instructions to function Omnissa Horizon and other VDI environments.
You can run the old and new Teams applications side by side in your environment as you transition users.
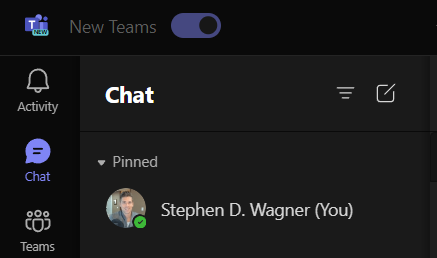
Switch between New Teams and old Teams on VDI
Let’s cover what the new Microsoft Teams app is about, and how to install it in your VDI deployment.
New Microsoft Teams app VDI optimized with Toggle for new/old version
Ultimately, it’s way faster, and consumes way less memory. And fortunately for us, it supports media optimizations for VDI environments.
My close friend and colleague, mobile jon, did a fantastic in-depth Deep Dive into the New Microsoft Teams and it’s inner workings that I highly recommend reading.
Interestingly enough, it uses the same media optimization channels for VDI as the old client used, so enablement and/or migrating from the old version is very simple if you’re running Omnissa Horizon, Citrix, AVD, and/or Windows 365.
Install New Microsoft Teams for VDI
While installing the new Teams is fairly simple for non-VDI environment (by simply either enabling the new version in the Teams Admin portal, or using your application manager to deploy the installer), a special method is required to deploy on your VDI images, whether persistent or non-persistent.
Do not include and bundle the Microsoft Teams install with your Microsoft 365 (Office 365) deployment as these need to be installed separately.
Please Note: If you have deployed non-persistent VDI (Instant Clones), you’ll want to make sure you disable auto-updates, as these should be performed manually on the base image. For persistent VDI, you will want auto updates enabled. See below for more information on configurating auto-updates.
You will also need to enable Microsoft Teams Media Optimization for the VDI platform you are using (in my case and example, Omnissa Horizon).
New Teams client app uses the same VDI media optimization channels as the old teams (for Omnissa Horizon, Citrix, AVD, and W365)
If you have already enabled Media Optimization for Teams on VDI for the old version, you can simply install the client using the special bulk installer for all users as shown below, as the new client uses the existing media optimizations.
While it is recommended to uninstall the old client and install the new client, you can choose to run both versions side by side together, providing an option to your users as to which version they would like to use.
Enable Media Optimization for Microsoft Teams on VDI
If you haven’t previously for the old client, you’ll need to enable the Teams Media Optimizations for VDI for your VDI platform.
For Omnissa Horizon, we’ll create a GPO and set the “Enable HTML5 Features” and “Enable Media Optimization for Microsoft Teams”, to “Enabled”. If you have done this for the old Teams app, you can skip this.
Computer Configuration -> Policies -> Administrative Templates -> Omnissa View Agent Configuration -> Omnissa HTML5 Features -> Omnissa WebRTC Redirection Features -> Enable Media Optimization for Microsoft Teams
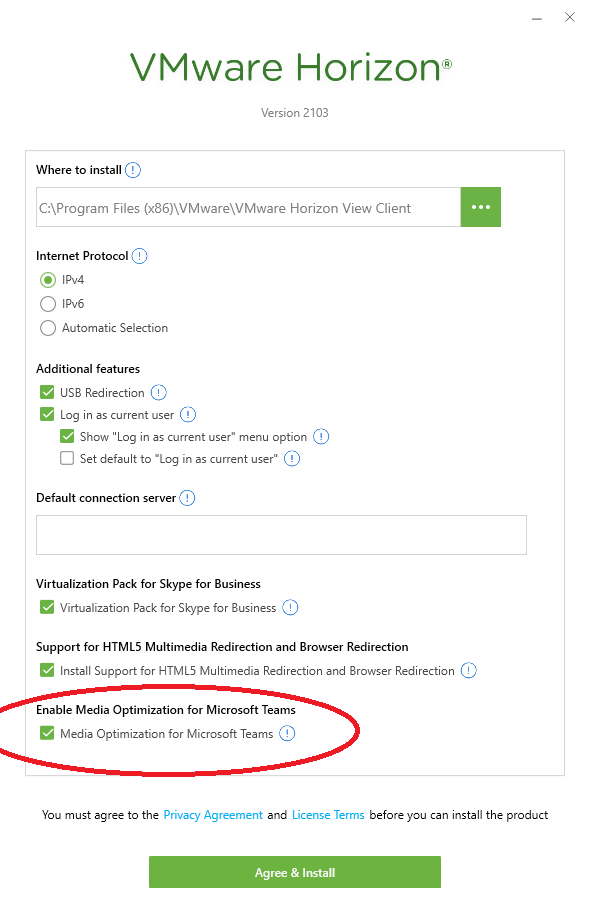
When installing the Omnissa Horizon client on Windows computers, you’ll need to make sure you check and enable the “Media Optimization for Microsoft Teams” option on the installer if prompted. Your install may automatically include Teams Optimization and not prompt.
Omnissa Horizon Client Install with Media Optimization for Microsoft Teams
If you are using a thin client or zero client, you’ll need to make sure you have the required firmware version installed, and any applicable vendor plugins installed and/or configurables enabled.
Install New Microsoft Teams client on VDI
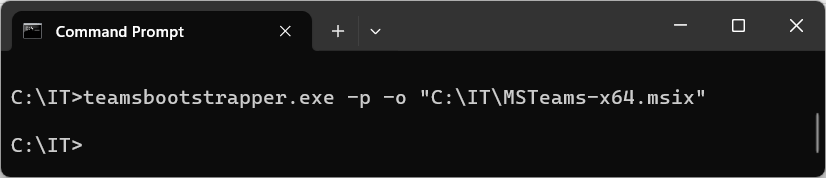
At this time, we will now install the new Teams app on to both non-persistent images, and persistent VDI VM guests. This method performs a live download and provisions as Administrator. If running this un-elevated, an elevation prompt will appear:
New Teams admin provisioned offline install for VDI
For the offline installation, you’ll need to download the appropriate MSI-X file in additional to the bootstrapper above. See below for download links:
For non-persistent environments, you’ll want to disable the auto update feature and install updates manually on your base image.
To disable auto-updates for the new Teams client, configure the registry key below on your base image:
HKEY_LOCAL_MACHINE\SOFTWARE\Microsoft\Teams
Create a DWORD value called “disableAutoUpdate”, and set to value of “1”.
New Teams app disappears after Optimization with OSOT
If you are using the Omnissa Operating System Optimization Tool (OSOT), you may notice that after installing New Teams in your base or golden image, that it disappears when publishing and pushing the image to your desktop pool.
The New Teams application is a Windows Store app, and organizations commonly choose to remove all Windows Store apps inside the golden image using the OSOT tool when optimizing the image. Doing this will remove New Teams from your image.
To workaround this issue, you’ll need to choose “Keep all Windows Store Applications” in the OSOT common options, which won’t remove Teams.
Using New Microsoft Teams with FSLogix Profile Containers
When using the new Teams client with FSLogix Profile Containers on non-persistent VDI, you must upgrade to FSLogix version 2.9.8716.30241 to support the new teams client.
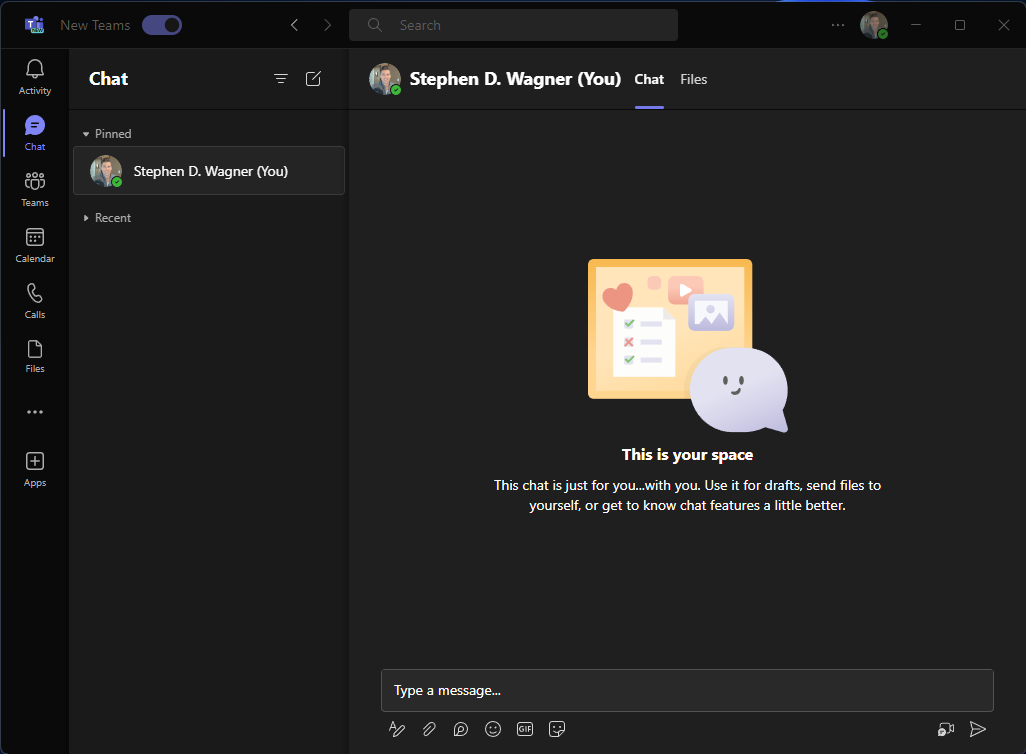
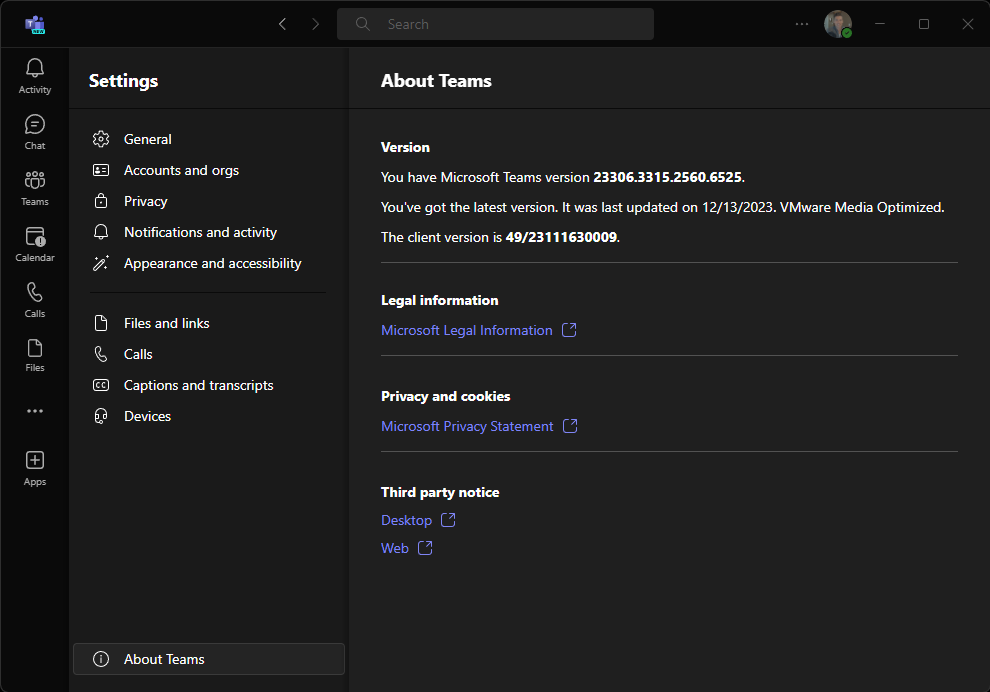
Confirm New Microsoft Teams VDI Optimization is working
To confirm that VDI Optimization is working on New Teams, open New Teams, click the “…” in the top right next to your user icon, click “Settings”, then click on “About Teams” on the far bottom of the Settings menu.
New Teams showing “Omnissa Media Optimized”
You’ll notice “Omnissa Media Optimized” which indicates VDI Optimization for Omnissa Horizon is functioning. The text will reflect for other platforms as well.
Uninstall New Microsoft Teams on VDI
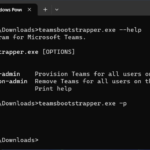
The Teams Boot Strap utility can also remove teams for all users on this machine as well by using the “-x” flag. Please see below for all the options for “teamsbootstrapper.exe”:
C:\Users\Administrator.DOMAIN\Downloads>teamsbootstrapper.exe --help
Provisioning program for Microsoft Teams.

Usage: teamsbootstrapper.exe [OPTIONS]

Options:
  -p, --provision-admin    Provision Teams for all users on this machine.
  -x, --deprovision-admin  Remove Teams for all users on this machine.
  -h, --help               Print help
Install New Microsoft Teams on Omnissa App Volumes / Citrix App Layering
Previously, using the New Teams bootstrapper, it appeared that it evaded and didn’t work with App Packaging and App attaching technologies such as Omnissa App Volumes and Citrix Application layering, however following the instructions on KB97141 will work.
The New Teams bootstrapper downloads and installs an MSIX app package to the computer running the bootstrapper.
Conclusion
It’s great news that we finally have a better performing Microsoft Teams client that supports VDI optimizations. With new Teams support for VDI reaching GA, and with the extensive testing I’ve performed in my own environment, I’d highly recommend switching over at your convenience!
This website uses cookies to improve your experience. We'll assume you're ok with this, but you can opt-out if you wish.
Do you accept the use of cookies and accept our privacy policy? AcceptRejectCookie and Privacy Policy
Privacy & Cookies Policy
Privacy Overview
This website uses cookies to improve your experience while you navigate through the website. Out of these cookies, the cookies that are categorized as necessary are stored on your browser as they are essential for the working of basic functionalities of the website. We also use third-party cookies that help us analyze and understand how you use this website. These cookies will be stored in your browser only with your consent. You also have the option to opt-out of these cookies. But opting out of some of these cookies may have an effect on your browsing experience.