May 172018
 
Digitally Accurate Inc. Logo

Looking for Calgary IT Managed Services or Calgary IT Consulting Services? We can help!

My company Digitally Accurate Inc.Ā (https://www.digitallyaccurate.com/) has been helping businesses for almost 12 years with their IT strategies.

Feel free to reach out via E-mail, telephone, or LinkedIn to see how I can help! You can also visit the “Hire Stephen Wagner” tab, and yes, you’ll get to meet me! šŸ™‚

My company is also partnered with numerous companies and can design, configure, and sell solutions including the following:

  • VMware Solution Design and Licensing
  • Veeam (Veeam Backup and Replication, Veeam Availability Suite, Veeam Backup Essentials)
  • HPE Servers, Storage, Networking
  • Aruba Networking
  • Microsoft Licensing (Including Office 365)
  • Sophos (Including Sophos UTM, and Sophos XG appliances)
  • 10ZiG Zero Clients
  • Duo Security (MFA)
  • Symantec (including Symantec Protection Suite)
  • Redhat (including RHEL: Redhat Enterprise Linux Server and Workstation)
  • Eaton UPS (Eaton Uninterrupted Power Supply and other Eaton power equipment)

Again, feel free to reach out for more information!

May 112018
 
Veeam Logo

This morning I noticed that CentOS 7.5 (1804) was available for upgrade via yum. After upgrading my CentOS instance from 7.4 to 7.5 on Microsoft Azure, I noticed that when running a backup using the Veeam Linux Agent, the system would crash and become completely unresponsive. I would have to manually restart the OS.

Upon reboot, I analyzed the console messages log and ran the backup again to see what was happening.

Here’s a look at my /var/log/messages:

May 11 07:24:46 HOSTNAME kernel: Request for unknown module key 'Veeam Software AG: 9d063645550b483bec752cb3c0249d5ede714b3e' err -11
May 11 07:24:46 HOSTNAME kernel: veeamsnap: loading out-of-tree module taints kernel.
May 11 07:24:46 HOSTNAME kernel: WARNING: module 'veeamsnap' built without retpoline-enabled compiler, may affect Spectre v2 mitigation
May 11 07:24:46 HOSTNAME kernel: veeamsnap: module verification failed: signature and/or required key missing - tainting kernel
May 11 07:24:46 HOSTNAME kernel: veeamsnap: applying kernel_stack fix up
May 11 07:24:46 HOSTNAME kernel:    veeamsnap:veeamsnap_init Loading
May 11 07:24:46 HOSTNAME kernel:    veeamsnap:veeamsnap_init Version: 2.0.0.400
May 11 07:24:46 HOSTNAME kernel:    veeamsnap:veeamsnap_init Author: Veeam Software AG
May 11 07:24:46 HOSTNAME kernel:    veeamsnap:veeamsnap_init licence: GPL
May 11 07:24:46 HOSTNAME kernel:    veeamsnap:veeamsnap_init description: Veeam Snapshot Kernel Module
May 11 07:24:46 HOSTNAME kernel:    veeamsnap:veeamsnap_init zerosnapdata: 1
May 11 07:24:46 HOSTNAME kernel:    veeamsnap:veeamsnap_init debuglogging: 0
May 11 07:24:46 HOSTNAME kernel:    veeamsnap:veeamsnap_init snapstore enabled
May 11 07:24:46 HOSTNAME kernel:    veeamsnap:veeamsnap_init start. container_alloc_counter=0
May 11 07:24:46 HOSTNAME kernel:    veeamsnap:veeamsnap_init start. container_sl_alloc_counter=0
May 11 07:24:46 HOSTNAME kernel:    veeamsnap:veeamsnap_init start. mem_cnt=0
May 11 07:24:46 HOSTNAME kernel:    veeamsnap:veeamsnap_init start. vmem_cnt=0
May 11 07:24:46 HOSTNAME kernel:    veeamsnap:ctrl_pipe_init .
May 11 07:24:46 HOSTNAME kernel:    veeamsnap:veeamsnap_init Module major=243
May 11 07:24:46 HOSTNAME kernel:    veeamsnap:blk_direct_bioset_create Specific bio set created.
May 11 07:24:46 HOSTNAME kernel:    veeamsnap:blk_redirect_bioset_create Specific bio set created.
May 11 07:24:46 HOSTNAME kernel:    veeamsnap:blk_deferred_bioset_create Specific bio set created.
May 11 07:24:46 HOSTNAME kernel:    veeamsnap:snapimage_init .
May 11 07:24:46 HOSTNAME kernel:    veeamsnap:snapimage_init Snapimage block device was registered. major=252
May 11 07:24:46 HOSTNAME kernel:    veeamsnap:veeamsnap_init end. container_alloc_counter=0
May 11 07:24:46 HOSTNAME kernel:    veeamsnap:veeamsnap_init end. container_sl_alloc_counter=0
May 11 07:24:46 HOSTNAME kernel:    veeamsnap:veeamsnap_init end. mem_cnt=1
May 11 07:24:46 HOSTNAME kernel:    veeamsnap:veeamsnap_init end. vmem_cnt=0
May 11 07:24:46 HOSTNAME kernel:    veeamsnap:ctrl_open file=0xffff95e4543b1800
May 11 07:24:46 HOSTNAME kernel:    veeamsnap:ctrl_pipe_new .
May 11 07:24:46 HOSTNAME kernel:    veeamsnap:ioctl_compatibility_flags Get compatibility flags
May 11 07:24:46 HOSTNAME kernel:    veeamsnap:ioctl_tracking_collect Collecting tracking device:
May 11 07:24:46 HOSTNAME kernel:    veeamsnap:tracking_collect Have not device under CBT.
May 11 07:24:46 HOSTNAME kernel:    veeamsnap:tracking_add Adding. dev_id=8:1
May 11 07:24:46 HOSTNAME kernel:    veeamsnap:tracker_Create dev_id 8:1
May 11 07:24:46 HOSTNAME kernel:    veeamsnap:tracker_Create SectorStart    =0x800
May 11 07:24:46 HOSTNAME kernel:    veeamsnap:tracker_Create SectorsCapacity=0xfa000
May 11 07:24:46 HOSTNAME kernel:    veeamsnap:tracker_cbt_start .
May 11 07:24:46 HOSTNAME kernel:    veeamsnap:cbt_map_create CBT map create.
May 11 07:24:47 HOSTNAME kernel: general protection fault: 0000 [#1] SMP
May 11 07:24:47 HOSTNAME kernel: Modules linked in: veeamsnap(OE) nf_conntrack_ipv4 nf_defrag_ipv4 xt_owner xt_conntrack nf_conntrack iptable_security ext4 mbcache jbd2 dm_mirror dm_region_hash dm_log dm_mod sb_edac iosf_mbi kvm_intel kvm irqbypass crc32_pclmul ghash_clmulni_intel aesni_intel lrw gf128mul glue_helper ablk_helper cryptd joydev pcspkr i2c_piix4 sg hv_utils i2c_core ptp pps_core hv_balloon ip_tables xfs libcrc32c sd_mod crc_t10dif crct10dif_generic ata_generic pata_acpi ata_piix hv_storvsc hv_netvsc libata scsi_transport_fc hid_hyperv hyperv_keyboard scsi_tgt hyperv_fb crct10dif_pclmul crct10dif_common crc32c_intel hv_vmbus floppy serio_raw
May 11 07:24:47 HOSTNAME kernel: CPU: 1 PID: 1712 Comm: Lpb Server thre Tainted: G           OE  ------------   3.10.0-862.2.3.el7.x86_64 #1
May 11 07:24:47 HOSTNAME kernel: Hardware name: Microsoft Corporation Virtual Machine/Virtual Machine, BIOS 090007  06/02/2017
May 11 07:24:47 HOSTNAME kernel: task: ffff95e447378000 ti: ffff95e45cbe0000 task.ti: ffff95e45cbe0000
May 11 07:24:47 HOSTNAME kernel: RIP: 0010:[]  [] page_array_memset+0x4d/0xa0 [veeamsnap]
May 11 07:24:47 HOSTNAME kernel: RSP: 0018:ffff95e45cbe3d60  EFLAGS: 00010246
May 11 07:24:47 HOSTNAME kernel: RAX: 0000000000000000 RBX: ffff95e449615200 RCX: 0000000000000200
May 11 07:24:47 HOSTNAME kernel: RDX: 0000000000000000 RSI: 0000000000000000 RDI: ffff187288716000
May 11 07:24:47 HOSTNAME kernel: RBP: ffff95e45cbe3d60 R08: ffffffffbe274fef R09: ffff95e460affa60
May 11 07:24:47 HOSTNAME kernel: R10: ffff95e460affa60 R11: 0000000000000000 R12: 0000000000000001
May 11 07:24:47 HOSTNAME kernel: R13: 00000000000fa000 R14: 0000000000000000 R15: 0000000000800001
May 11 07:24:47 HOSTNAME kernel: FS:  00007f336f7fe700(0000) GS:ffff95e495640000(0000) knlGS:0000000000000000
May 11 07:24:47 HOSTNAME kernel: CS:  0010 DS: 0000 ES: 0000 CR0: 0000000080050033
May 11 07:24:47 HOSTNAME kernel: CR2: 0000000000738df0 CR3: 00000002d3afc000 CR4: 00000000001406e0
May 11 07:24:47 HOSTNAME kernel: Call Trace:
May 11 07:24:47 HOSTNAME kernel: [] cbt_map_allocate+0x6e/0x160 [veeamsnap]
May 11 07:24:47 HOSTNAME kernel: [] cbt_map_create+0x73/0x100 [veeamsnap]
May 11 07:24:47 HOSTNAME kernel: [] tracker_cbt_start+0x5a/0xc0 [veeamsnap]
May 11 07:24:47 HOSTNAME kernel: [] tracker_Create+0x16a/0x650 [veeamsnap]
May 11 07:24:47 HOSTNAME kernel: [] tracking_add+0x2e0/0x450 [veeamsnap]
May 11 07:24:47 HOSTNAME kernel: [] ioctl_tracking_add+0x6c/0x170 [veeamsnap]
May 11 07:24:47 HOSTNAME kernel: [] ctrl_unlocked_ioctl+0x4e/0x60 [veeamsnap]
May 11 07:24:47 HOSTNAME kernel: [] do_vfs_ioctl+0x350/0x560
May 11 07:24:47 HOSTNAME kernel: [] ? __sb_end_write+0x31/0x60
May 11 07:24:47 HOSTNAME kernel: [] ? vfs_write+0x182/0x1f0
May 11 07:24:47 HOSTNAME kernel: [] SyS_ioctl+0xa1/0xc0
May 11 07:24:47 HOSTNAME kernel: [] system_call_fastpath+0x1c/0x21
May 11 07:24:47 HOSTNAME kernel: Code: 01 49 89 f9 48 0f af c2 49 8b 79 10 ba 00 10 00 00 40 f6 c7 01 75 47 40 f6 c7 02 75 51 40 f6 c7 04 75 2b 89 d1 c1 e9 03 83 e2 07  48 ab 74 0e 41 89 c8 83 c1 01 39 d1 42 88 34 07 72 f2 49 83
May 11 07:24:47 HOSTNAME kernel: RIP  [] page_array_memset+0x4d/0xa0 [veeamsnap]
May 11 07:24:47 HOSTNAME kernel: RSP 
May 11 07:24:47 HOSTNAME kernel: ---[ end trace 96b51a664f4baef9 ]---

It appeared the veeamsnap module was causing a protection fault with the kernel, causing the system to crash.

In an effort to troubleshoot, I uninstalled and reinstalled Veeam and tried rebuilding the kernel module, however the issue still persisted. After some searching, I came across these two posts:

https://forums.veeam.com/veeam-agent-for-linux-f41/veeam-agent-for-linux-and-rhel-7-5-crash-t50170.html

https://www.veeam.com/kb2569

According to the KB, the veeamsnap module isn’t compatible with kernel versionĀ 3.10.0-862.

Checking my system after upgrading CentOS 7.5:

[root@HOSTNAME ~]# uname -a
Linux HOSTNAME.somedomain.com 3.10.0-862.2.3.el7.x86_64 #1 SMP Wed May 9 18:05:47 UTC 2018 x86_64 x86_64 x86_64 GNU/Linux
[root@HOSTNAME ~]# cat /etc/redhat-release
CentOS Linux release 7.5.1804 (Core)


Essentially, as of right now the Veeam Agent for Linux is not yet supported on CentOS 7.5, RHEL 7.5, or Oracle RHCK 7.5. If you’re running any of these, hold off and do not install Veeam Agent for Linux. If you are scheduling an upgrade, do not perform upgrade unless you want to break your backup. It sounds like this should be fixed in a future update.

May 082018
 

Recently a customer of mine who is using an outdated version of Intuit QuickBooks on their Terminal Server (RDS Remote Desktop Services) started to experience an issue when users attempted to log on. QuickBooks would initialize, then prompt the TLS 1.2 warning message, and then completely crash. This would prevent the users from doing any tasks.

In an effort to troubleshoot this, I tried to use different accounts, checked the QBW.ini file for any flags that could dismiss this message, tried Intuit’s “TLS preparedness tool” (which still scares me because I have no idea what system changes it made on the server), etc… All of these attempts had no effect on the issue.

For a temporary workaround, you’ll need to load up QuickBooks on a workstation (not using terminal services). You’ll need to open the datafile, select “Do Not Show this again”, and then close. You’ll need to do this for each datafile. Please note that if you do not receive the prompts on other datafiles, you’ll need to open the datafile with a different Quickbooks username (QB account, not Windows account) in order to get it to prompt.

This issue should only occur on older versions of Quickbooks when using TS/RDS. To officially resolve this issue, I recommend upgrading to a more recent (and in support) version of Quickbooks.

May 062018
 
DUO

I’m a big fan of MFA, specifically Duo Security‘s product (I did a corporate blog post here). I’ve been using this product for some time and use it for an extra level of protection on my workstations, servers, and customer sites. I liked it so much so that my company (Digitally Accurate Inc.) became a partner and now resells the services.

Here’s a demo of DUO MFA being used with CentOS Linux:

Today I want to write about a couple issues I had when deploying the pam_duo module on CentOS Linux 7. The original duo guide can be found atĀ https://duo.com/docs/duounix, however while it did work for the most part, I noticed there were some issues with the pam configuration files, especially if you are wanting to use Duo MFA with usernames and passwords, and not keys for authentication.

A symptom of the issue: I noticed that when following the instructions on the website for deployment, after entering the username, it would skip the password prompt, and go right for DUO authentication, completely bypassing the password all together. I’m assuming this is because the guide was written for key authentication, but I figured I’d do a quick crash-course post on the topic and create a simple guide. I also noticed that sometimes even if an incorrect password was typed in, it would allow authentication if DUO passed as successful.

Ultimately I decided to learn about PAM, understand what it was doing, and finally configure it properly. Using the guide below I can confirm the password and MFA authentication operate correctly.

To configure Duo MFA on CentOS 7 for use with usernames and passwords

First and foremost, you must log in to your Duo Account and go to applications, click “Protect an Application” and select “Unix Application”. Configure the application and document/log your ikey, secret key, and API hostname.

Now we want to create a yum repo where we can install, and keep the pam_duo module up to date. Create the fileĀ /etc/yum.repos.d/duosec.repo and then populate it with the following:

[duosecurity]
name=Duo Security Repository
baseurl=http://pkg.duosecurity.com/CentOS/$releasever/$basearch
enabled=1
gpgcheck=1

We’ll need to install the signging key that the repo uses, and then install the duo_unix package. By using yum, we’ll be able to keep this package regularly up to date when we update the server. Run the following commands:

rpm --import https://duo.com/RPM-GPG-KEY-DUO
yum install duo_unix

Configure the pam_duo module by editing the /etc/duo/pam_duo.conf file. You’ll need to populate the lines with your ikey, secret key, and API hostname that you documented above. We use “failmode=safe” so that in the event of an internet disconnection, we can still login to the server without duo. It’s safe to enable this fail-safe, as the purpose is to protect it against the internet. Please see below:

[duo]
; Duo integration key
ikey = XXXXXXXXXXXXXXXXXXXX
; Duo secret key
skey = XXXXXXXXXXXXXXXXXXXXXXXXXXXXXXXXXXXXXXX
; Duo API host
host = XXXXXXXXX.duosecurity.com
; Send command for Duo Push authentication
pushinfo = yes
; failmode safe if no internet it works (secure locks it up)
failmode = safe

Configure sshd to allow Challenge Response Authentication by editing /etc/ssh/sshd_config, then locate and change “ChallengeResponseAuthentication” to yes. Please note that the line should already be there, and you should simply have to move the comment symbol to comment the old line, and uncomment the below line as shown below:

ChallengeResponseAuthentication yes

And now it gets tricky… We need to edit the pam authentication files to incorporate the Duo MFA service in to it’s authentication process. I highly recommend that throughout this, you open (and leave open) an additional SSH session, so that if you make a change in error and lock yourself out, you can use the extra SSH session to revert any changes to the system to re-allow access. It’s always best to make a backup and copy of these files so you can easily revert if needed.

DISCLAIMER: I am not responsable if you lock yourself out of your system. Please make sure that you have an extra SSH session open so that you can revert changes. It is assumed you are aware of the seriousness of the changes you are making and that you are taking all precautions (including a backup) to protect yourself from any errors.

Essentially two files are used for authentication that we need to modify. One file is for SSH logins, and the other is for console logins. In my case, I wanted to protect both methods. You can do either, or both. If you are doing both, it may be a good idea to test with SSH, before making modifications to your console login, to make sure your settings are correct. Please see below for the modifications to enable pam_duo:

/etc/pam.d/password-auth (this file is used for SSH authentication)

#%PAM-1.0
# This file is auto-generated.
# User changes will be destroyed the next time authconfig is run.
auth        required      pam_env.so
auth        required      pam_faildelay.so delay=2000000
#auth        sufficient    pam_unix.so nullok try_first_pass
auth        requisite     pam_unix.so nullok try_first_pass
auth  sufficient pam_duo.so
auth        requisite     pam_succeed_if.so uid >= 1000 quiet_success
auth        required      pam_deny.so

account     required      pam_unix.so
account     sufficient    pam_localuser.so
account     sufficient    pam_succeed_if.so uid < 1000 quiet
account     required      pam_permit.so

password    requisite     pam_pwquality.so try_first_pass local_users_only retry=3 authtok_type=
password    sufficient    pam_unix.so sha512 shadow nullok try_first_pass use_authtok


password    required      pam_deny.so

session     optional      pam_keyinit.so revoke
session     required      pam_limits.so
-session     optional      pam_systemd.so
session     [success=1 default=ignore] pam_succeed_if.so service in crond quiet use_uid
session     required      pam_unix.so

/etc/pam.d/system-auth (this file is used for console authentication)

auth        required      pam_env.so
auth        sufficient    pam_fprintd.so
#auth        sufficient    pam_unix.so nullok try_first_pass
# Next two lines are for DUO mod
auth        requisite     pam_unix.so nullok try_first_pass
auth        sufficient    pam_duo.so
auth        requisite     pam_succeed_if.so uid >= 1000 quiet_success
auth        required      pam_deny.so

account     required      pam_unix.so
account     sufficient    pam_localuser.so
account     sufficient    pam_succeed_if.so uid < 1000 quiet
account     required      pam_permit.so

password    requisite     pam_pwquality.so try_first_pass local_users_only retry=3 authtok_type= ucredit=-1 lcredit=-1 dcredit=-1 ocredit=-1
password    sufficient    pam_unix.so sha512 shadow nullok try_first_pass use_authtok remember=5
password    required      pam_deny.so

session     optional      pam_keyinit.so revoke
session     required      pam_limits.so
-session     optional      pam_systemd.so
session     [success=1 default=ignore] pam_succeed_if.so service in crond quiet use_uid
session     required      pam_unix.so

Now, we must restart sshd for the changes to take affect. Please make sure you have your extra SSH session open in the event you need to rollback your /etc/pam.d/ files. Restart the sshd service using the following command:

service sshd restart

Attempt to open a new SSH session to your server. It should now ask for a username, password, and then prompt for Duo authentication. And you’re done!

More information on Duo Multi Factor Authentication (MFA) can be found here.

May 062018
 
Sophos XG and Sophos UTM

Today I’m going to be talking about connecting a Sophos XG firewall to a Sophos UTM firewall for a site-to-site VPN connection specifically using SSL tunneling. Furthermore we are doing this to connect a Microsoft Azure Virtual Network (using a Sophos XG instance) to an On-Premise LAN (running a Sophos UTM).

This type of connection and configuration is standard for corporations, businesses, and organizations who have workloads on Microsoft Azure and need to connect their Azure environment to their corporate LAN. To learn how to deploy Sophos XG in Microsoft Azure, please read this post.

WARNING AND DISCLAIMER: Following the steps in this document if done incorrectly or if your environment is different from the one used in this example, can cause network connectivity issues or a loss of connectivity. An assumption is made that you are skillful enough to know what tasks you are performing and what result they may have on your own environment. You may need to revert these steps if connectivity is lost to restore access to your environment.

Let’s ask some key questions and get some answers:

  • Why are we using both (2) products, Sophos XG and Sophos UTM for the connection instead of using the same product on each end?
    • Sophos only supports deployment of the Sophos XG on Microsoft Azure. Sophos UTM cannot be deployed on Azure. Numerous companies and organizations are still using the Sophos UTM product for their on-premise IT infrastructure. There is a need to have these different products co-exist and function together, like in this specific example.
  • Why are we using a Sophos XG Appliance/Instance to handle the VPN on Microsoft Azure, instead of using the Microsoft branded Azure VPN Gateway?
    • Microsoft Azure has a VPN gateway appliance which can handle the Azure side of the VPN connection, however this is a resource that costs money (instance time and instance data transfer) and has limited configuration options. Numerous companies and organizations are using Sophos XG instances on Azure to protect their internet facing workloads already. Instead of paying for 2 resources (Sophos XG and Microsoft VPN Gateway), you can consolidate and use one for both. You also have extra functionality and security options when using the Sophos XG instance to handle VPN traffic (IPS, strict firewall rules, packet inspection, etc). The Sophos firewalls can be centrally managed/monitored via Sophos Management Products (Sophos SUM (Sophos UTM Manager), and/or Sophos CFM (Sophos Central Firewall Manager)).
  • Why are we using an SSL VPN connection instead of IPSec or other type of VPN?
    • Microsoft Azure blocks some IP Protocol traffic within Virtual Networks. As quoted: “IP-in-IP encapsulated packets, and Generic Routing Encapsulation (GRE) packets are blocked within VNets” (perĀ https://docs.microsoft.com/en-us/azure/virtual-network/virtual-networks-faq), which means that while you could configure an IPsec tunnel, none of the traffic would pass through the Virtual Networks. We utilize SSL VPNs to overcome this limitation as all traffic goes over the SSL connection.

Let’s address what components we will discuss in this post:

The information inside of this post can be used for any of the 4 components above and don’t necessarily have to be used in the same configuration. An example: This guide could be used by someone wanting to connect an on-premise XG and on-premise UTM unit together via SSL VPN (with no need or use for Azure). Another example: The section on routing tables can provide information for someone using a different network security product on Microsoft Azure. However, the ultimate goal of this article is to address all four of the components together for a complete end to end deployment.

Now let’s get to the configuration of each of the four components.

Deploy a Sophos XG instance/appliance to Microsoft Azure

In a previous post, I covered how to deploy a new Sophos XG firewall appliance/instance to Microsoft Azure, specifially allowing deployment to existing resource groups. The full URL (and instructions) can be found atĀ https://www.stephenwagner.com/2018/05/05/deploy-sophos-xg-firewall-microsoft-azure-existing-resource-group/

Sophos XG to Sophos UTM SSL VPN Connection Configuration and Encryption Settings

We will configure the SSL VPN settings on both the Microsoft Azure Sophos XG appliance/instance, and the on-premise Sophos UTM appliance/instance. Afterwards, we will create a tunnel, configure it, enable it, and establish connectivity between the two Sophos firewall instances. During this process, we’ll be configring the SSL VPN settings on both appliance/instances, configuring the tunnel, configuring encryption settings, and establishing VPN communication.

Please note, with this configuration there are essentially 3 networks: the Azure network, the SSL transit network (this is the network in between the networks we are connecting that is part of the SSL VPN), and the on-premise network. When you configure your firewall rules (not in the scope of this document), you must factor this in and allow applicable traffic to/from the SSL network so that the packets can pass. This SSL transit network is specified in the “Show VPN Settings” on the XG unit under “SSL VPN”, and “IPv4 Lease Range”. This network must be different and not overlap any subnets you are using on both your Azure network, and on-premise network. In my case I chose something way off in an entirely different IP space (172.16.0.0), and I suggest you do as well.

Follow these steps to configure the SSL VPN settings on both Sophos XG and UTM appliances/instances.

  1. Log on to the Sophos XG appliance, select “VPN” under “Configure” on the left hand side, and then select the gear icon with “Show VPN Settings” on the top right. See example.
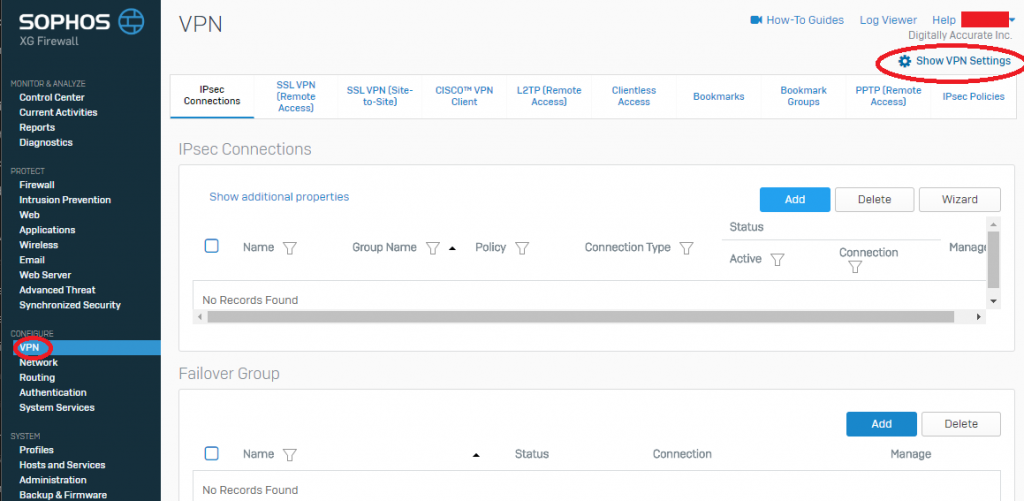
    Sophos XG Show VPN Settings

    Sophos XG Show VPN Settings

  2. Configure your “SSL VPN Settings” and “Cryptographic Settings” to be similar to the example below. Please modify to reflect your own environment. Cryptographic settings should match example below. Please note that the “IPv4 Lease Range” is not for your Azure or Internal LAN subnet, but actually the subnet used by the SSL VPN server. This value has to be an entirely new subnet dedicated for SSL VPN functions.
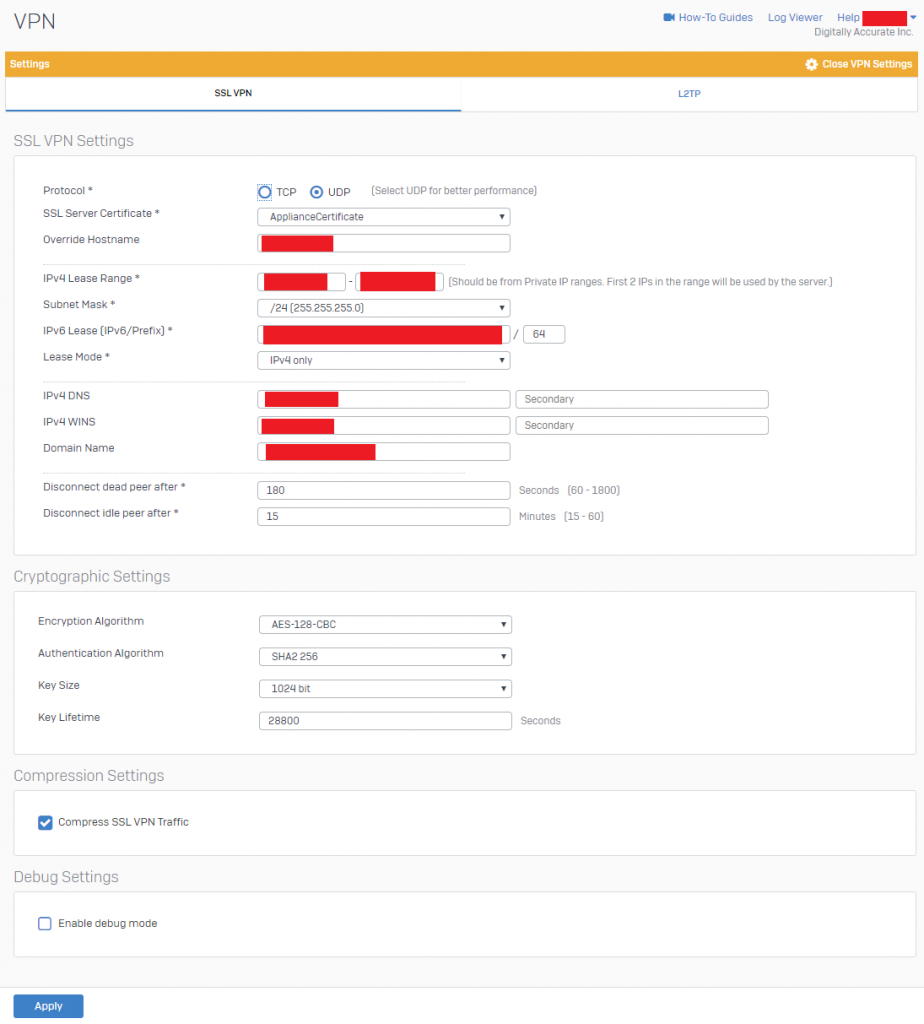
    Sophos XG SSL VPN Settings

    Sophos XG SSL VPN Settings

  3. Log on to the Sophos UTM appliance, select “Site-to-Site VPN”, then select “SSL”, then click on the “Advanced” tab.
  4. Configure your “Advanced” settings to reflect the following below.
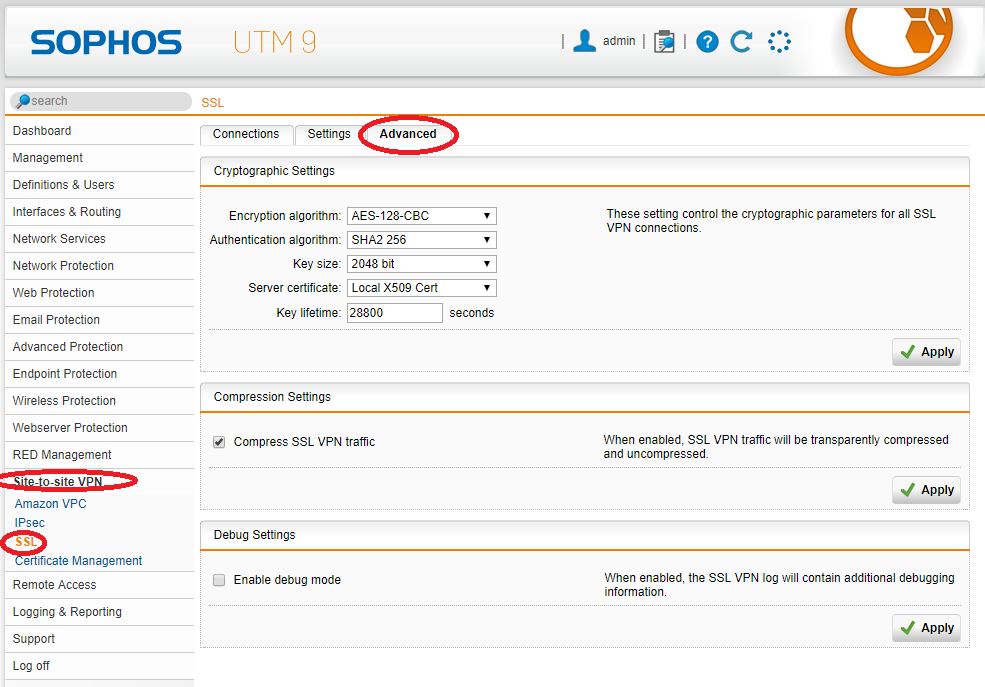
    Sophos UTM SSL Site-to-Site VPN Advanced Settings

    Sophos UTM SSL Site-to-Site VPN Advanced Settings

You have now configured the general SSL VPN Advanced settings, we can now move on to configuring the tunnel itself.

To configure the SSL Site to Site VPN tunnel between the Sophos appliances, we’ll need to configure the Sophos XG (on Azure) to act as a server, and the Sophos UTM (on prem) which will act as the client. Side note: In my own testing, I found that the XG had to be the server in order to get them to connect.

To configure the SSL VPN tunnel Server on the Sophos XG:

  1. Log on to your Sophos XG interface, click on “VPN” under “Configure” on the left hand side, and then choose “SSL VPN (Site-to-Site)” from the top. Then click “Add” under the “Server” section. As shown below.
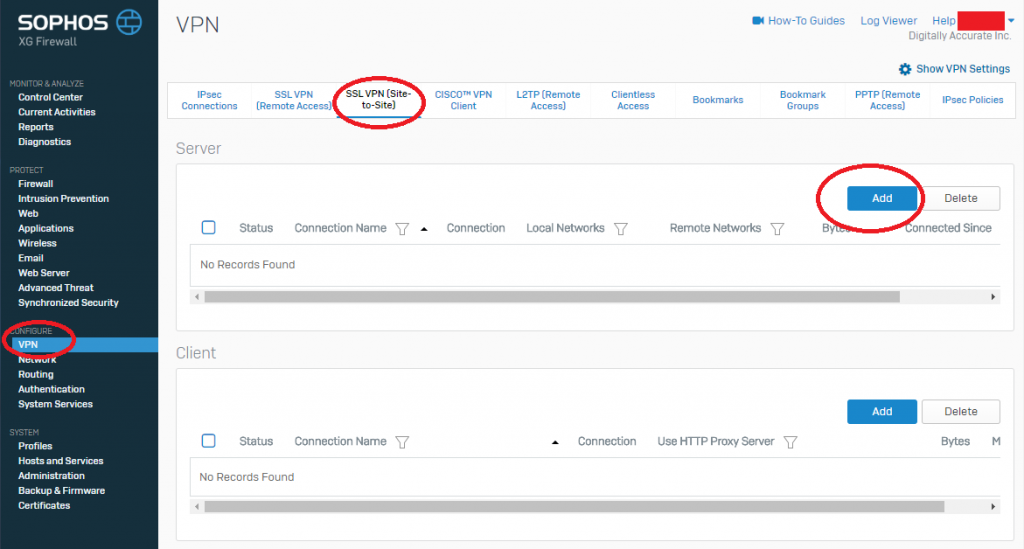
    Sophos XG SSL VPN (Site-to-Site) Settings

    Sophos XG SSL VPN (Site-to-Site) Settings

  2. Now give the VPN connection a name, enter a friendly description, and specify Local Networks (Azure Subnets), and Remote Networks (On-Prem Networks). And then click “Save” as shown below.
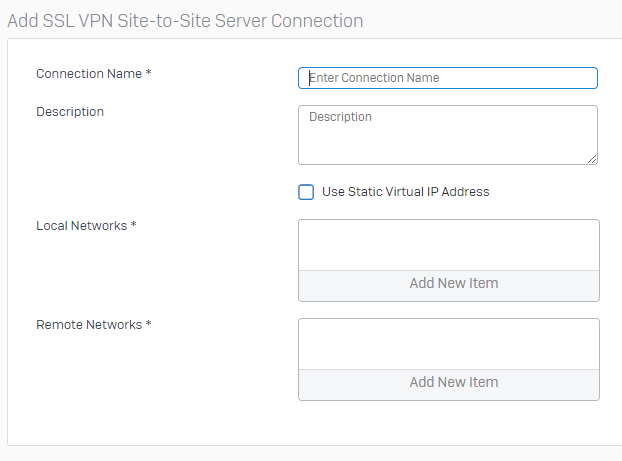
    Sophos XG Create new SSL VPN Server

    Sophos XG Create new SSL VPN Server

  3. Now we need to download the configuration so that we can load it on to your Sophos UTM so it know’s how to connect. While still in the “SSL VPN (Site-to-Site)” window, look for the column called “Manage”, and click the download icon (you can confirm it’s download via the mouse-over description). As shown below.
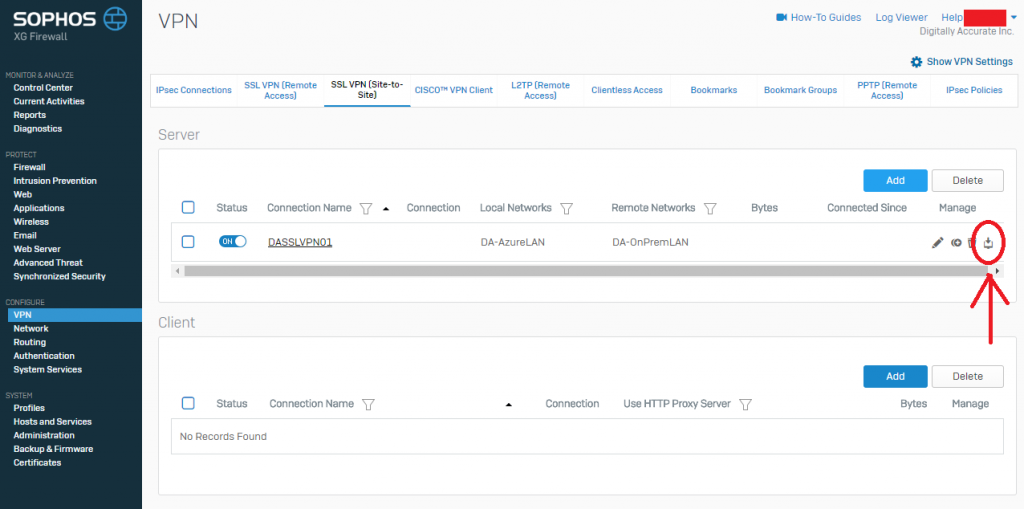
    Sophos XG SSL VPN Server Download Config

    Sophos XG SSL VPN Server Download Config

  4. Save this file to your computer as we’ll need it for configuring the Sophos UTM

To configure the SSL VPN tunnel Client on the Sophos UTM:

  1. Log on to your Sophos UTM web interface, click on “Site-to-Site VPN” on the left hand side, and then select “New SSL Connection”. As shown below in step 2.
  2. Set the Connection type to “Client”, give it a friendly name. Now click on the folder next to “Configuration File” to brows to the VPN config file (this is the file we downloaded above from the Sophos XG unit). In my case, I also selected the “Override peer hostname” as I wanted to over the hostname of the Sophos XG unit (to avoid problems I chose an IP address). This value sets the hostname of the server that the UTM is connecting to. We also uncheck the “Automatic firewall rules” as we don’t want any rules automatically created, we want to specify only what is needed.
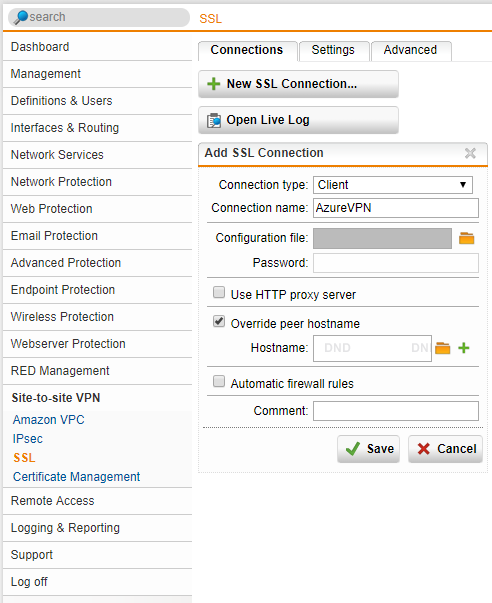
    Sophos UTM Create New SSL VPN Connection

    Sophos UTM Create New SSL VPN Connection

  3. Hit Save, and you should be left with something like below.

You have now fully configured the SSL Site-to-Site VPN tunnel between your Sophos XG and Sophos UTM instances.

To confirm a functioning VPN tunnel on your Sophos XG unit, you should see something similar to below.
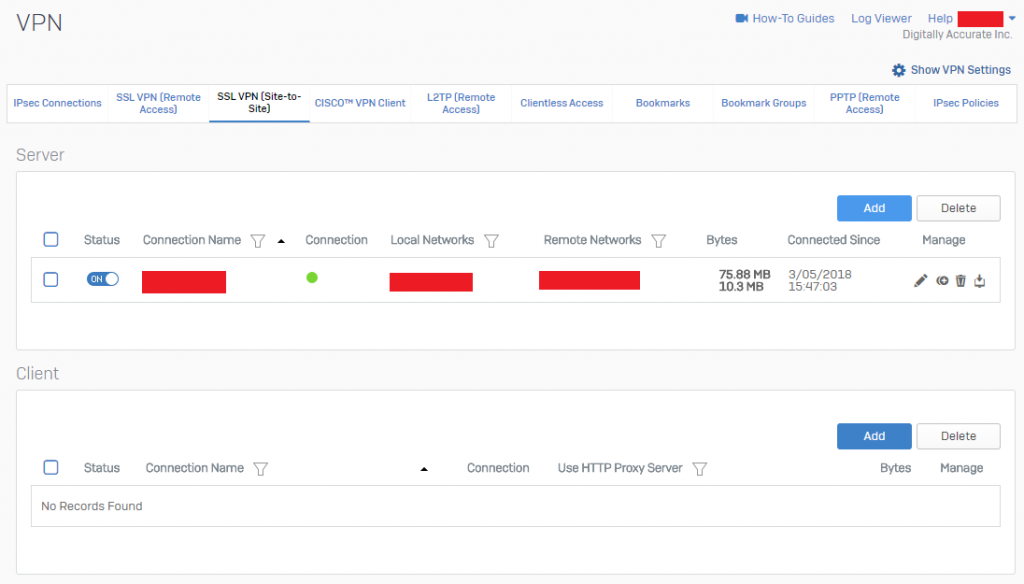
Sophos XG SSL VPN (Site-to-Site) Active VPN Status

Sophos XG SSL VPN (Site-to-Site) Active VPN Status

To confirm a functioning VPN tunnel on your Sophos UTM unit, you should see something simialar to below.
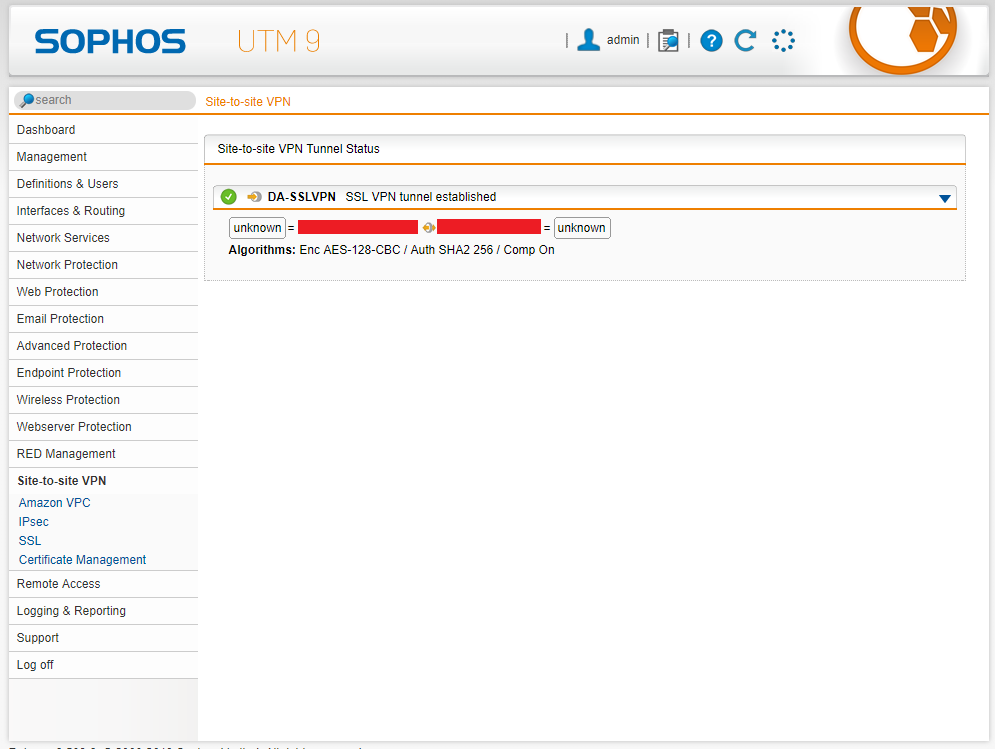
Sophos UTM Active VPN Status

Sophos UTM Active VPN Status

Please note that a bug with XG to UTM VPN, is that on the Sophos UTM reports the active subnets as “unknown” as shown above on both sides. This can be safely ignored.

You can start to test some basic communication, however you still need to create firewall rules. Please note that the Azure network will not be routable until you continue the steps below and configure proper routing.

Microsoft Azure VNet (Virtual Network) custom routing table

When you create a Virtual Network (VNet) in Microsoft Azure, Azure will handle the routing for you automatically. It will create routers and other “instances” to handle network connectivity as you provision new subnets, gateways, devices, and network paths. Since we are deploying our own router, we want to override these default routing tables that are automatically created.

When looking at our target configuration, our Sophos XG unit will have an internet facing static IP, and will be handling communication between our internal network (and hosts), the internet (outside world), and our internal on-premise network (LAN). Because of this, we have to make changes to our Azure enviroinment so that the default subnet network route becomes the Internal IP Address of the Sophos XG firewall. We need to configure routes for both our Azure subnets (if wanted), our corporate on-premise LAN, and our catch-all route for internet access (0.0.0.0/0).

Once we create our own routing table, we’ll need to assign it to specific subnets to make those specific subnets enforce the routes.

To create a custom Route Table:

  1. Log in to the Azure Portal, View “All Resources”, click on the “Add” button at the top to create a new resource, or simply click on “Create a resource” on the top left of the Azure Portal.
  2. Select Networking on the left side of the table, then select “Route Table”. See example below.
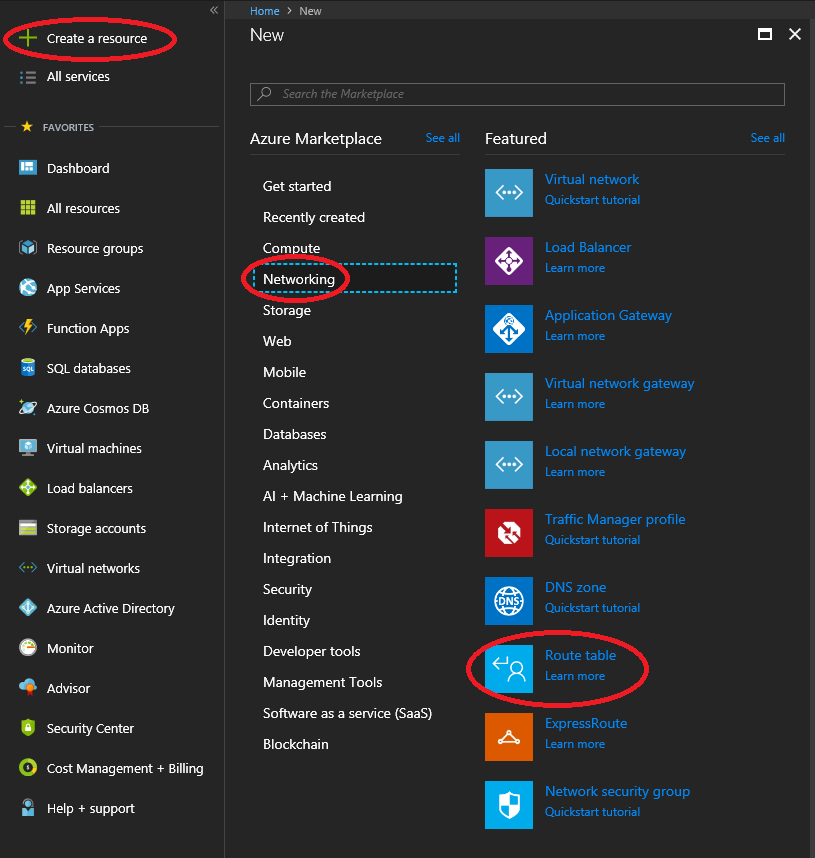
    Sophos XG Azure Add Resource Route Table

    Sophos XG Azure Add Resource Route Table

  3. Populate the fields, select the subscription, resource group, and the Location of where you’d like to place this. For “Resource Group”, select “Use existing”, and then specify the Resource Group you are attaching this to.
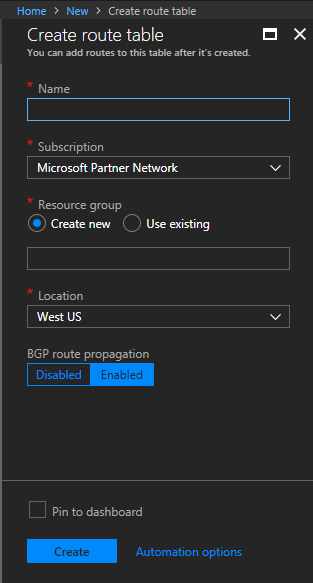
    Sophos XG Azure Create Route Table

    Sophos XG Azure Create Route Table

  4. Select “Create” to complete the creation of the route table.
  5. Now that we have a customer routing table, we want to create a route. With the “Route Table” object still open, open the “Routes” tab to open the page from the column on the left.
  6. Click on Add, and then create a route for the CIDR block that covers both your Azure subnets, and corporate on-premise LAN subnet. PLEASE NOTE: This CIDR block (Address prefix) should be large enough that it includes both your Azure subnets and your on-premise network. This will make this rule apply to all traffic destined for those networks. Under “Next Hop Type”, select “Virtual Appliance”, and then enter the IP address of your Sophos XG LAN Network interface. Then click save.
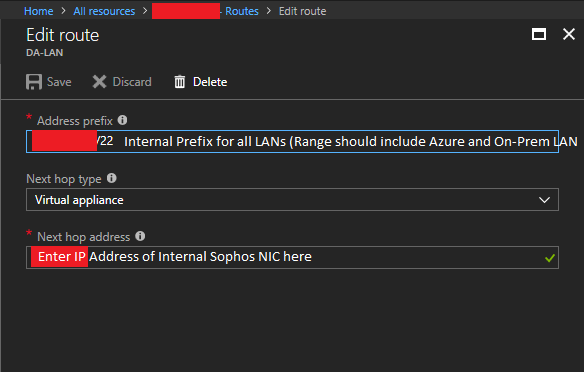
    Sophos XG Azure Route Table LAN Route

    Sophos XG Azure Route Table LAN Route

  7. Click on Add, and then create a catch all route for the internet/WAN with an address prefix of 0.0.0.0/0. Under “Next Hop Type”, select “Virtual Appliance”, and then enter the IP address of your Sophos XG LAN Network interface. Then click save.
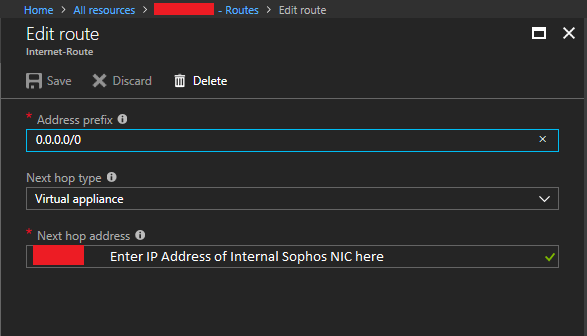
    Sophos XG Azure Route Table Internet Route

    Sophos XG Azure Route Table Internet Route

  8. The Route’s section should look similar to this.
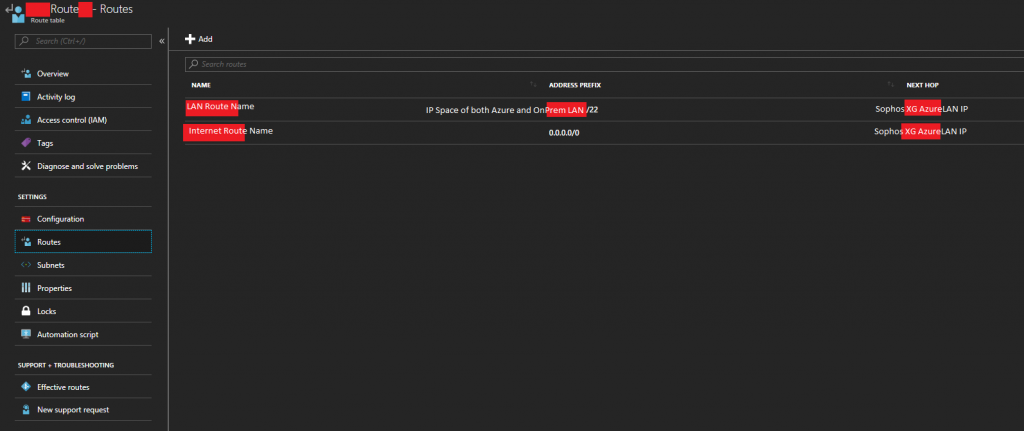
    Sophos XG Azure Route Table Route List

    Sophos XG Azure Route Table Route List

  9. Now we need to assign the route table to the chosen subnets. This will apply the routes we created above to specific subnets on our Azure Virtual Network (VNet). With the “Route Table” object still open, open the “Subnets” page from the column on the left.
  10. Click on “Associate” to add this to an existing subnet. And then associate it to your Azure Virtual Network subnet where the XG and your VMs reside.
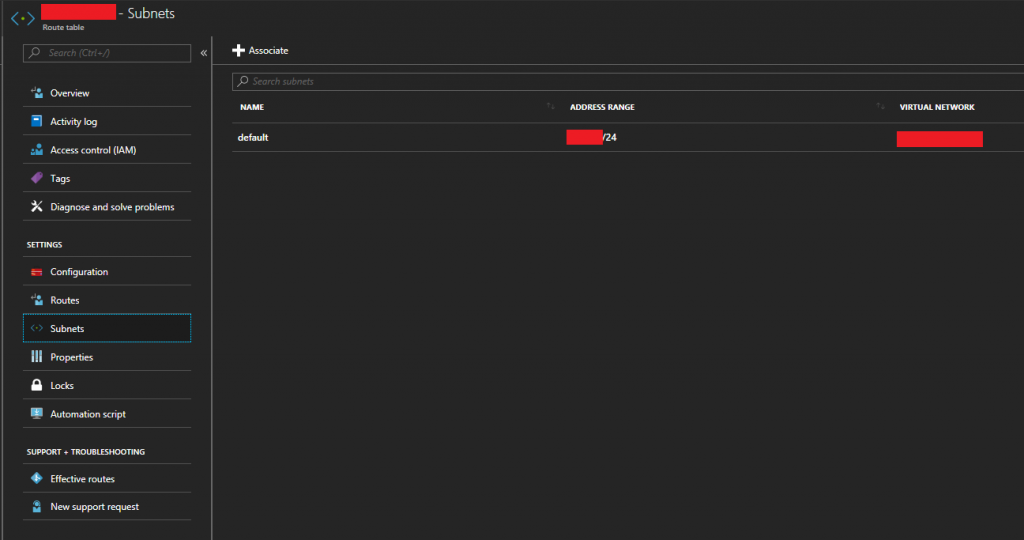
    Sophos XG Azure Route Table Associate Subnet

    Sophos XG Azure Route Table Associate Subnet

  11. Now completed, the “Overview” tab should look similar to this.
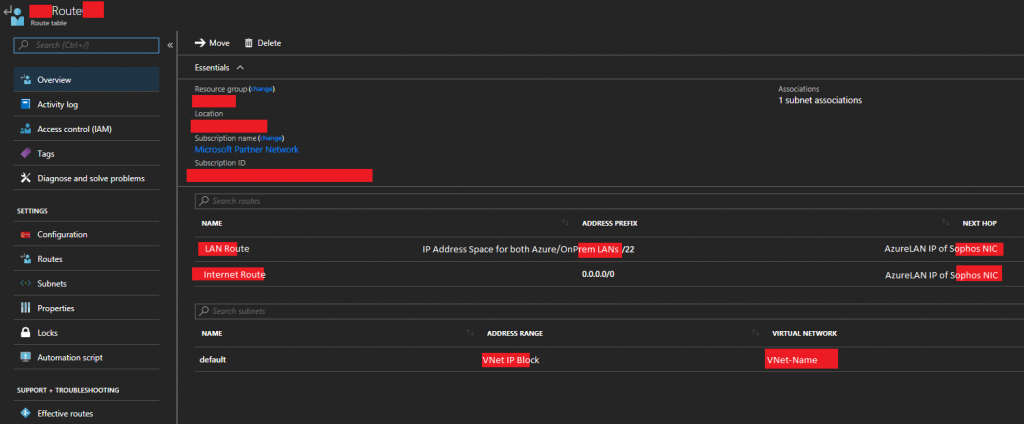
    Sophos XG Azure Route Table Overview

    Sophos XG Azure Route Table Overview

You’ve successful configured a custom routing table for your Microsoft Azure subnet which will route packets destined for other subnets (including internet/WAN) to your Sophos XG for further routing.

Microsoft Azure enable IP Forwarding on Virtual Network Interface

In order for a VM (Virtual Machine) to have the ability to forward and route packets, we need to enable “IP Forwarding” on both the Internal and External NIC of the Sophos XG appliance running on Azure.

To enable this:

  1. Log in to the Azure Portal, view “All Resources” and select one of the “Network interface” objects for your Sophos XG appliance/instance.
  2. Click on “IP configurations” under the “SETTINGS” group.
  3. Look for “IP forwarding” under “IP forwarding settings”. Set this toggle to “Enabled” as per below.
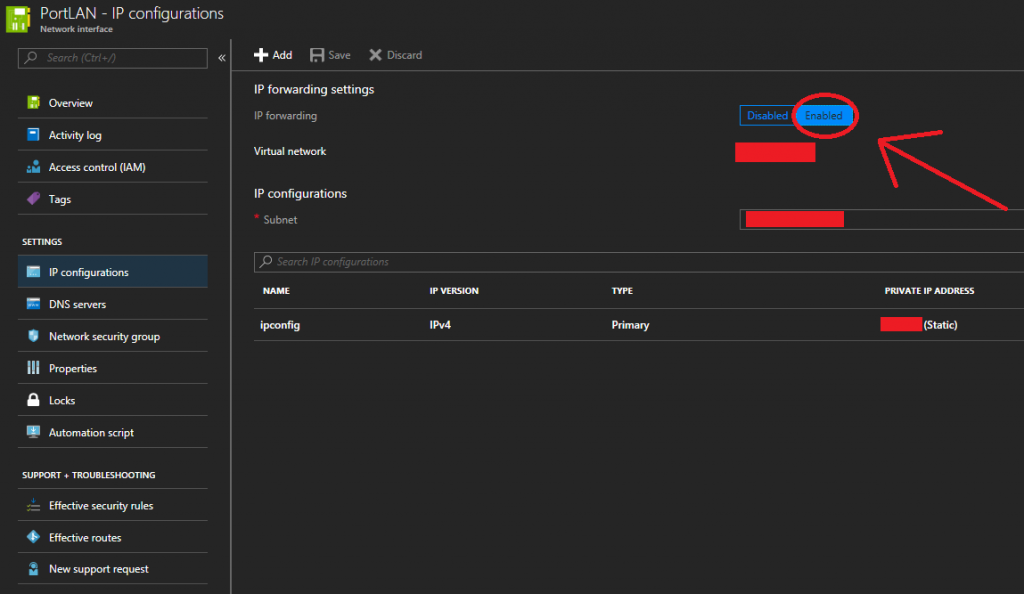
    Enable IP Forwarding on Microsoft Azure Network Interface

    Enable IP Forwarding on Microsoft Azure Network Interface

  4. Click Save
  5. Repeat for the other Sophos Network interface (both External and Internal need this enabled)

IP Forwarding has now been enabled. The Sophos XG appliance can now successfully route packets in your Microsoft Azure Virtual Network (VNet).

Conclusion

At this point you’ll have everything configured. You’ll have a SSL VPN between your Azure hosted Sophos XG instance and your on-premise Sophos UTM, as well as connectvity between both of the networks. You will now need to configure all your firewall rules to only permit the traffic you want to traverse from internal-azure to internal-onprem as well as external WAN traffic (this is beyond the scope of this document). You need to take care in making sure you only permit traffic that should be going over these network links. Now that both networks are connected, it provides another means to connect and communicate with the other networks which increases your security risks. You’re not only securing against one internet connection on one LAN, but 2 internet connections across 2 networks.

In my scenario by configuring this I was able to decommission the Microsoft Azure VPN Gateway (minimizing costs), and have my own security appliance/instance handle the communication between both networks and also protect both networks with all the fancy features that the Sophos XG and UTM line offer.

Leave a comment with feedback!

May 052018
 
Sophos XG Firewall Azure

When deploying the Sophos XG Firewall on to Microsoft Azure, it seems as if you always need to create a new resource group and are limited to certain regions. This is not the case.

This is true when using the “Sophos XG Firewall on Microsoft Azure” quick start guide here, and/or when using the Microsoft Azure Marketplace. If you attempt to deploy to an existing Resource Group, it will prevent you from doing so. It may also restrict you from using some configurations and virtual machine sizes, and also limit which region you can deploy to.

If you’re like me and already have Infrastructure in Microsoft’s Cloud and want more control over configuration and deployment, then your’re probably looking at deploying in to an existing Resource Group, using a more customized configuration, and may have the requirement to deploy to other Azure regions. See below for my own “Quick start to customized Sophos XG deployments on Microsoft Azure” guide.

Also, another interesting note is that the Sophos XG firewalls on Azure do not support the Microsoft Azure backup features. Since you cannot use the Azure backup features on Azure for the Sophos XG firewalls, you’ll need to use the internal Sophos XG configuration backup function. Once configured, you’ll need to be aware of how to deploy a new XG instance (in to an existing Resource Group) in the event of a failure. If a catastrophic failure does occur, you’ll need to re-provision a new Sophos XG instance on Azure, and then restore the Sophos XG configuration to the VM.

Sophos has alternative methods for deploying to Azure, however they are difficult to find. I actually had to spend quite a bit of time to find information, and then spent tons of time learning how to deploy it properly as well. Sophos has GitHub configured as a repo for their Azure XG deployment templates, along with some other goodies that may come in handy. The URL for their GitHub site is https://github.com/sophos-iaas/xg-azure

Before we begin, we make the following assumptions:

  • You are knowledgeable and skilled with Microsoft Azure
  • You are familiar with deploying VMs and objects to Microsoft Azure
  • You have already configured a resource group and/or have existing objects deployed
  • You have already configured subnets for your Sophos XG (Internal and WAN facing)

How to deploy Sophos XG Firewall on Microsoft Azure to existing Resource Group in any region.

Now let’s get started. Here’s my Quick start guide to customized Sophos XG deployments on Microsoft Azure (in to existing Resource Groups).

  1. Go toĀ https://github.com/sophos-iaas/xg-azureĀ and read the page. Once you’re ready to start, scroll down to “Deployment via template”, and select the button that says “Deploy to Azure”.
    Sophos XG GitHub Site
  2. Log in to Microsoft Azure (if you’re not already) and you’ll see the template ready to be deployed. Before filling out the fields, I would recommend looking at what fields are required, and documenting which sections you need to fill out with what details you will populate. I always record and document these settings so that if an issue ever pops up, or if I need to re deploy, I’ll have the previous settings immediately available. If you’re deploying in to an existing Resource Group, configure the fields to reflect it. To proceed with the template deployment, populate the fields, review the ToS, and continue if you accept the terms. See below for the blank template.
    Sophos XG Azure Deployment Template Page 1
    Sophos XG Azure Deployment Template Page 2
  3. After populating the template and executing the deployment, if all goes well you’re Sophos XG firewall should now be deployed in to your existing Resource Group. Please see below for an example of a successful deployment.
    Sophos XG Azure Successful Deployment Template Page 1
    Sophos XG Azure Successful Deployment Template Page 2
  4. And that is it! You can now head over to “All Resources” to view all the objects and make sure everything is configured properly. After double or triple checking your config, and checking/configuring your security groups, you can power up the VM and start playing with your new Sophos XG Firewall deployed on Microsoft Azure.

Final Thoughts

After doing all this you should be able to deploy these on the fly whenever needed. As mentioned above, this is critical knowledge for Sophos XG admins using Microsoft Azure as this process needs to be known for backup and disaster recovery purposes. Also, chances are you’ll need to attempt deployment multiple times before successfully deploying the instance. I had 4 or 5 unsuccessful deployment attempts due to various issues such as mis-typed fields, blank fields, and incorrectly populated fields, so don’t feel bad if it takes you some time. It’s a learning process!

Leave a comment and let me know how your deployment went and if you have any questions!

May 012018
 
Fedora Logo

When attempting to upgrade from Fedora Core 27 to Fedora Core 28, it may fail on the nss-pem package.

I spent some time trying to find the solution for this, and came across numerous posts on the “Red Hat Bugzilla”, particularly this post.

Unfortunately no fix was found.

See below for an example on the failed upgrade output:

[root@SYSTEMZ01 ~]# dnf system-upgrade download --releasever=28
Before you continue ensure that your system is fully upgraded by running "dnf --refresh upgrade". Do you want to continue [y/N]: y
Fedora 28 - x86_64 - Updates
$
Fedora 28 - x86_64
$
google-chrome
$
RPM Fusion for Fedora 28 - Free - Updates
$
RPM Fusion for Fedora 28 - Free
$
RPM Fusion for Fedora 28 - Nonfree - Updates
$
RPM Fusion for Fedora 28 - Nonfree
$
skype (stable)
$
Last metadata expiration check: 0:00:00 ago on Tue 01 May 2018 04:28:04 PM MDT.
Error:
 Problem: nss-pem-1.0.3-6.fc27.i686 has inferior architecture
  - nss-pem-1.0.3-6.fc27.x86_64 does not belong to a distupgrade repository
  - problem with installed package nss-pem-1.0.3-6.fc27.i686

To resolve this, manually install the nss-pem packages from FC28 prior to the upgrade using the following command.

dnf install nss-pem-1.0.3-9.fc28 --releasever=28

After doing so, re-attempt to upgrade and the upgrade should now proceed.