Today we’ll go over how to install the vSphere vCenter Root Certificate on your client system.
Certificates are designed to verify the identity of the systems, software, and/or resources we are accessing. If we aren’t able to verify and authenticate what we are accessing, how do we know that the resource we are sending information to, is really who they are?
Installing the vSphere vCenter Root Certificate on your client system, allows you to verify the identity of your VMware vCenter server, VMware ESXi hosts, and other resources, all while getting rid of those pesky certificate errors.
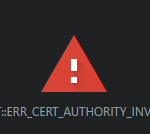
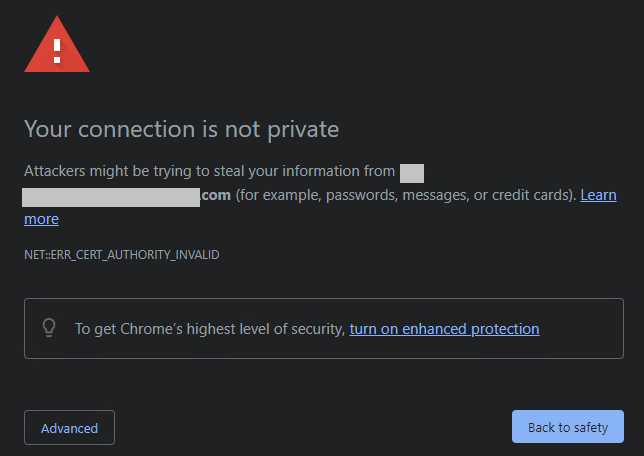
Certificate warning when connecting to vCenter vCSA
I see too many VMware vSphere administrators simply dismiss the certificate warnings, when instead they (and you) should be installing the Root CA on your system.
Why install the vCenter Server Root CA
Installing the vCenter Server’s Root CA, allows your computer to trust, verify, and validate any certificates issued by the vSphere Root Certification authority running on your vCenter appliance (vCSA). Essentially this translates to the following:
Your system will trust the Root CA and all certificates issued by the Root CA
This includes: VMware vCenter, vCSA VAMI, and ESXi hosts
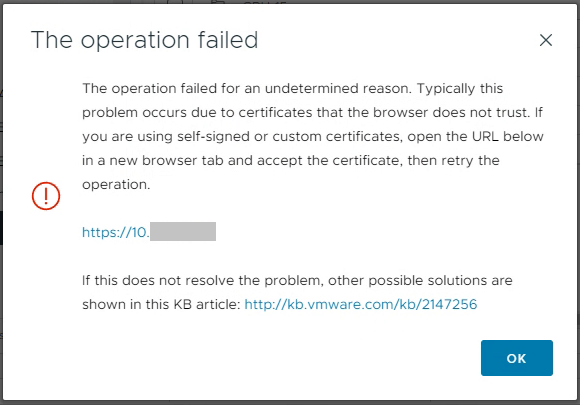
When connecting to your vCenter server or ESXi hosts, you will not be presented with certificate issues
This includes errors when uploading files directly to a datastore
File Upload in vCenter to ESXi host operation failed
In addition to all of the above, you will start to take advantage of certificate based validation. Your system will verify and validate that when you connect to your vCenter or ESXi hosts, that you are indeed actually connecting to the intended system. When things are working, you won’t be prompted with a notification of certificate errors, whereas if something is wrong, you will be notifying of a possible security event.
How to install the vCenter Root CA
To install the vCenter Root CA on your system, perform the following:
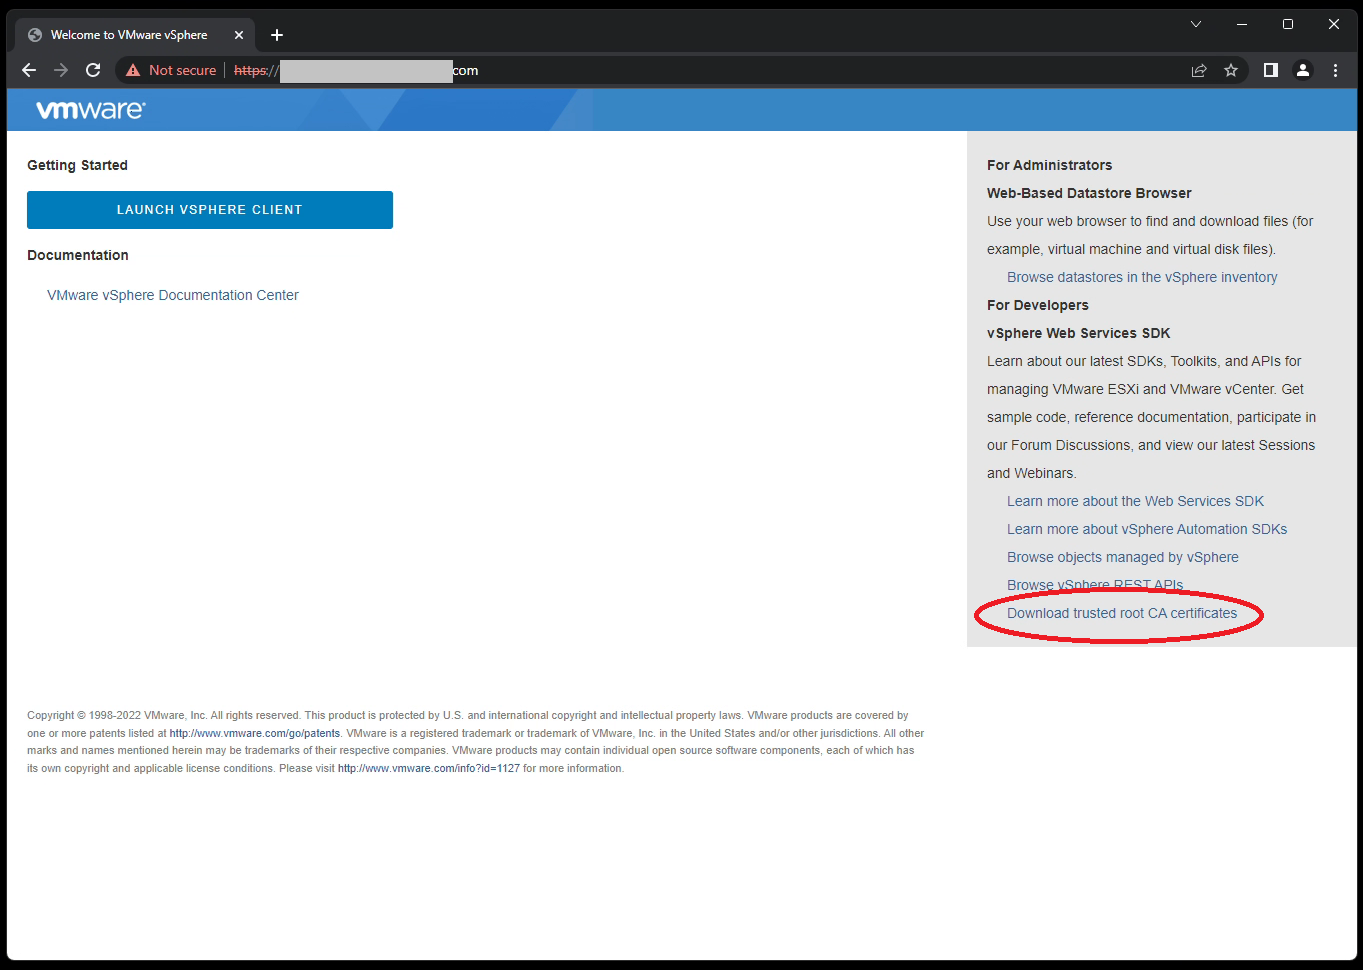
Navigate to your VMware vCenter “Getting Started” page.
This is the IP or FQDN of your vCenter server without the “ui” after the address. We only want to access the base domain.
Do not click on “Launch vSphere Client”.
Right click on “Download trusted root CA certificates”, and click on save link as.
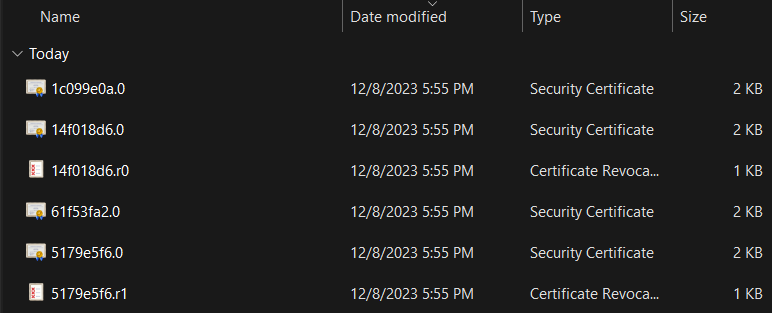
Save this ZIP file to your computer, and extract the archive file
You must extract the ZIP file, do not open it by double-clicking on the ZIP file.
Open and navigate through the extracted folders (certs/win in my case) and locate the certificates.
For each file that has the type of “Security Certificate”, right click on it and choose “Install Certificate”.
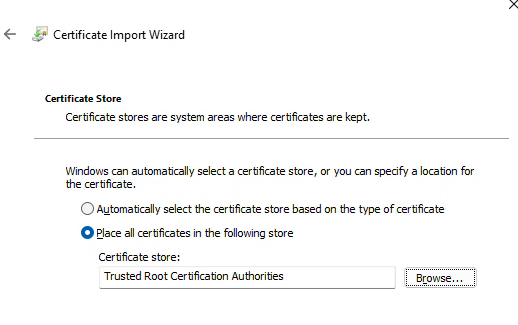
Change “Store Location” to “Local Machine”
This makes your system trust the certificate, not just your user profile
Choose “Place all certificates in the following store”, click Browse, and select “Trusted Root Certification Authorities”.
Complete the wizard. If successful, you’ll see: “The import was successful.”.
Repeat this for each file in that folder with the type of “Security Certificate”.
Alternatively, you can use a GPO with Active Directory or other workstation management techniques to deploy the Root CAs to multiple systems or all the systems in your domain.
Today we’re going to discuss and deploy Active Directory Certificate Services on a Windows Server 2022 Server. Additionally, we’ll also be generating a domain certificate request inside of IIS and then assign the resultant certificate to a WSUS Server.
This video will demonstrate and explain the process of deploying a Windows Server 2022 Certification Authority with AD CS.
Check it out and feel free to leave a comment! Scroll down below for more information and details on the guide.
Windows Server 2022: Active Directory Certificate Services Discussion and Installation Guide
Who’s this guide for
This guide is perfect for a seasoned IT professional or a beginner who is looking at getting experience with Windows Server 2022.
What’s included in the video
In this guide I will walk you through the following:
Today, the DST Root CA X3 certificate expired, leaving many devices on the internet having issues connecting to services and certificates that use this Root CA, including those using Let’s Encrypt certificates.
Some of these problematic devices include Samsung Galaxy phones, iPhones, VDI zero and thin clients, and even Sophos UTM firewalls.
In my environment, I noticed a number of issues when browsing to websites that use the free Let’s Encrypt certificates, as the Web Protection Web Filtering service on my Sophos UTM firewall would report the certificate has expired and not allow me access to the websites using it.
The Problem
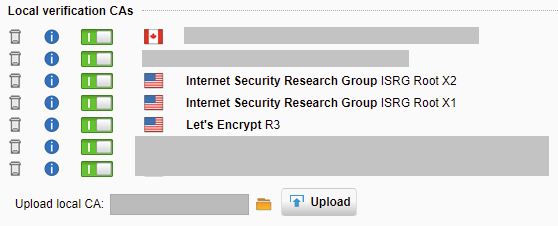
Let’s Encrypt originally used the “DST Root CA X3” certificate to issue Let’s Encrypt certificates. However, as time has passed and the service has been used more, they now use “ISRG Root X1” and “ISRG Root X2” as Root CA’s and “Let’s Encrypt R3” as an intermediate certificate.
You can download them by clicking the links above or go to https://letsencrypt.org/certificates/ for more information and to download if you don’t trust the above links.
After downloading and adding these Root CAs and the Intermediate CA to your computer or device, you should have the full certificate chain to validate the Let’s Encrypt certificates. You only need to add the two root certificates. The Let’s Encrypt certificates that are used on websites that you visit and that you might have deployed on your servers should now work without any issues.
If you’re still having issues, you can try deleting the “DST Root CA X3” certificate from your existing Root CAs. Also, you may need to close and reopen any software and/or browsers for it to work with the new certificate.
HTTPS Scanning/Filtering Firewall Fix (Sophos UTM as example)
If you have a firewall that scans HTTPs traffic, you’ll need to add the two root certificates above to the HTTPS Certification authority list.
As an example, to fix this on the Sophos UTM firewall, follow the instructions below:
Download the 3 certificates above.
Log on to your Sophos UTM
Navigate to “Web Protection”, “Filtering Options”, and “HTTPS CAs” tab.
Disable the old “Digital Signature Trust Co. DST Root CA X3” Certificate in the list.
Using the “Upload local CA”, browse to and select 1 of the 3 certificates, then click upload.
Repeat step 5 for each of the 3 certificates listed above.
The issue has been fixed! You should now see all 3 certificates in the “Local verification CAs” list.
The steps should be similar for other firewalls that provide HTTPS Scanning and Filtering.
When you’re looking for additional or enhanced options to secure you’re business and enterprise IT systems, MFA/2FA can help you achieve this. Get away from the traditional single password, and implement additional means of authentication! MFA provides a great compliment to your cyber-security policies.
MFA is short for Multi Factor authentication, additionally 2FA is short for Two Factor Authentication. While they are somewhat the same, multi means many, and 2 means two. Additional security is provided with both, since it provides more means of authentication.
Traditionally, users authenticate with 1 (one) level of authentication: their password. In simple terms MFA/2FA in addition to a password, provides a 2nd method of authentication and identity validation. By requiring users to authentication with a 2nd mechanism, this provides enhanced security.
Why use MFA/2FA
In a large portion of security breaches, we see users passwords become compromised. This can happen during a phishing attack, virus, keylogger, or other ways. Once a malicious user or bot has a users credentials (username and password), they can access resources available to that user.
By implementing a 2nd level of authentication, even if a users password becomes compromised, the real (or malicious user) must pass a 2nd authentication check. While this is easy for the real user, in most cases it’s nearly impossible for a malicious user. If a password get’s compromised, nothing can be accessed as it requires a 2nd level of authentication. If this 2nd method is a cell phone or hardware token, a malicious user won’t be ale to access the users resources unless they steal the cell phone, or hardware token.
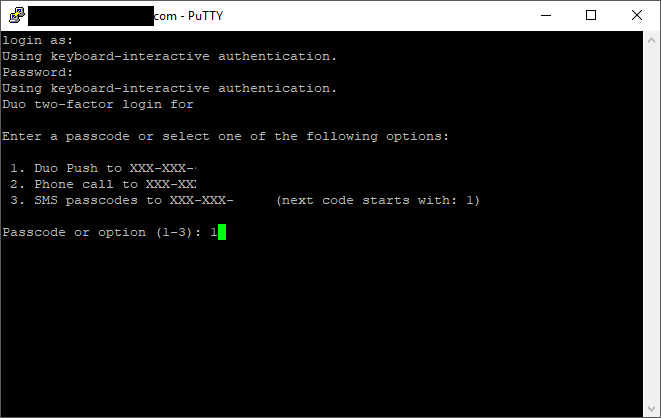
How does MFA/2FA work
When deploying MFA or 2FA you have the option of using an app, hardware token (fob), or phone verification to perform the additional authentication check.
After a user attempts to logs on to a computer or service with their username and password, the 2nd level of authentication will be presented, and must pass in order for the login request to succeed.
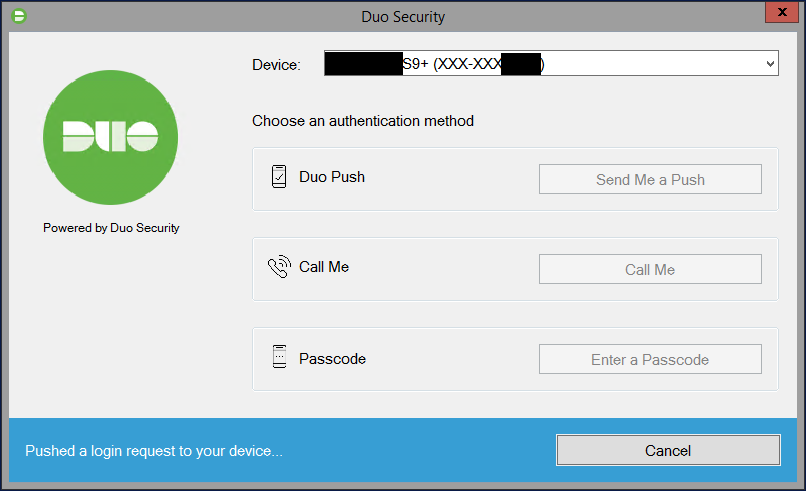
Please see below for an example of 2FA selection screen after a successful username and password:
Duo Security Windows Login MFA 2FA Prompt
After selecting an authentication method for MFA or 2FA, you can use the following
2FA with App (Duo Push)
Duo Push sends an authentication challenge to your mobile device which a user can then approve or deny.
Please see below for an example of Duo Push:
Duo Push to Mobile App on Android
Once the user selects to approve or deny the login request, the original login will either be approved or denied. We often see this as being the preferred MFA/2FA method.
2FA with phone verification (Call Me)
Duo phone verification (Call Me) will call you on your phone number (pre-configured by your IT staff) and challenge you to either hangup to deny the login request, or press a button on the keypad to accept the login request.
While we rarely use this option, it is handy to have as a backup method.
2FA with Hardware Token (Passcode)
Duo Passcode challenges are handled using a hardware token (or you can generate a passcode using the Duo App). Once you select this method, you will be prompted to enter the passcode to complete the 2FA authentication challenge. If you enter the correct passcode, the login will be accepted.
Here is a Duo D-100 Token that uses HOTP (HMAC-based One Time Password):
Duo D-100 HOTP Hardware Token
When you press the green button, a passcode will be temporarily displayed on the LCD display which you can use to complete the passcode challenge.
You can purchase Hardware Token’s directly from Digitally Accurate Inc by contacting us, your existing Duo Partner, or from Duo directly. Duo is also compatible with other 3rd party hardware tokens that use HOTP and TOTP.
2FA with U2F
While you can’t visibly see the option for U2F, you can use U2F as an MFA or 2FA authentication challenge. This includes devices like a Yubikey from Yubico, which plugs in to the USB port of your computer. You can attach a Yubikey to your key chain, and bring it around with you. The Yubikey simply plugs in to your USB port and has a button that you press when you want to authenticate.
When the 2FA window pops up, simply hit the button and your Yubikey will complete the MFA/2FA challange.
What can MFA/2FA protect
Duo MFA supports numerous cloud and on-premise applications, services, protocols, and technologies. While the list is very large (full list available at https://duo.com/product/every-application), we regularly deploy and use Duo Security for the following configurations.
Windows Logins (Server and Workstation Logon)
Duo MFA can be deployed to not only protect your Windows Servers and Workstations, but also your remote access system as well.
When logging on to a Windows Server or Windows Workstation, a user will be presented with the following screen for 2FA authentication:
Duo Security Windows Login MFA 2FA Prompt
Below you can see a video demonstration of DUO on Windows Login.
DUO works with both Windows Logins and RDP (Remote Desktop Protocol) Logins.
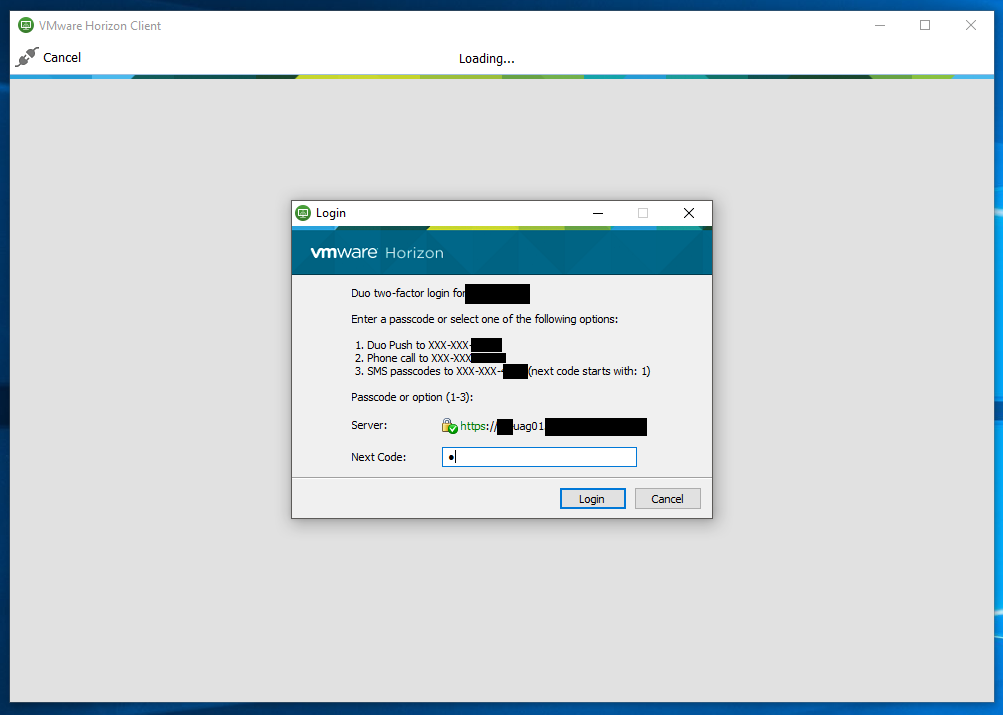
VMWare Horizon View Clients (VMWare VDI Logon)
Duo MFA can be deployed to protect your VDI (Virtual Desktop Infrastructure) by requiring MFA or 2FA when users log in to access their desktops.
When logging on to the VMware Horizon Client, a user will be presented with the following screen for 2FA authentication:
Duo Security VMWare Horizon Client Login MFA 2FA Prompt
Below you can see a video demonstration of DUO on VMware Horizon View (VDI) Login.
Sophos UTM (Admin and User Portal Logon)
Duo MFA can be deployed to protect your Sophos UTM firewall. You can protect the admin account, as well as user accounts when accessing the user portal.
If you’re using the VPN functionality on the Sophos UTM, you can also protect VPN logins with Duo MFA.
Unix and Linux (Server and Workstation Logon)
Duo MFA can be deployed to protect your Unix and Linux Servers. You can protect all user accounts, including the root user.
We regularly deploy this with Fedora and CentOS (even FreePBX) and you can protect both SSH and/or console logins.
When logging on to a Unix or Linux server, a user will be presented with the following screen for 2FA authentication:
Duo Security CentOS Linux login MFA 2FA Prompt
Below you can see a video demonstration of DUO on Linux.
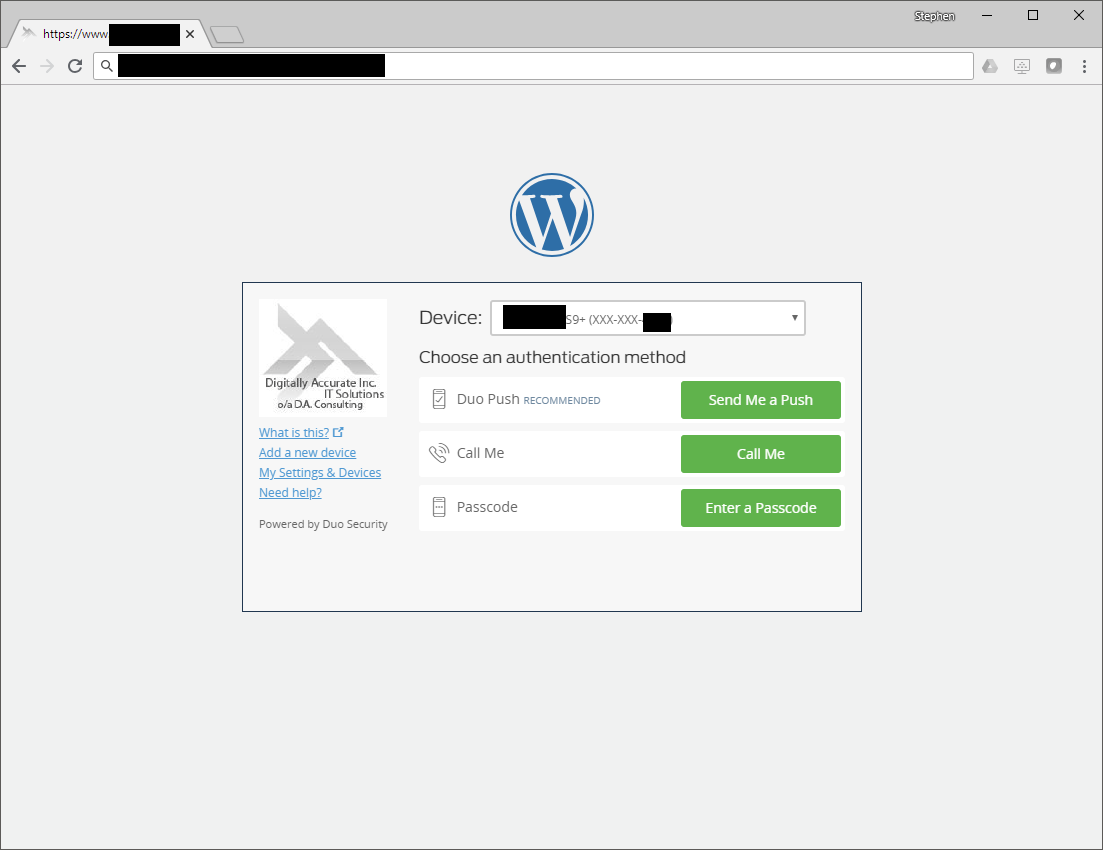
WordPress Logon
Duo MFA can be deployed to protect your WordPress blog. You can protect your admin and other user accounts.
If you have a popular blog, you know how often bots are attempting to hack and brute force your passwords. If by chance your admin password becomes compromised, using MFA or 2FA can protect your site.
When logging on to a WordPress blog admin interface, a user will be presented with the following screen for 2FA authentication:
Duo Security WordPress Login MFA 2FA Prompt
Below you can see a video demonstration of DUO on a WordPress blog.
How easy is it to implement
Implementing Duo MFA is very easy and works with your existing IT Infrastructure. It can easily be setup, configured, and maintained on your existing servers, workstations, and network devices.
Duo offers numerous plugins (for windows), as well as options for RADIUS type authentication mechanisms, and other types of authentication.
How easy is it to manage
Duo is managed through the Duo Security web portal. Your IT admins can manage users, MFA devices, tokens, and secured applications via the web interface. You can also deploy appliances that allow users to manage, provision, and add their MFA devices and settings.
Duo also integrates with Active Directory to make managing and maintaining users easy and fairly automated.
In the last few
months, the crisis with COVID19 has put organizations in a panic to enable employees
to be able to work from home, to continue business productivity, keep employees
safe, and keep employees on the payroll. It’s good for business, and it’s good
for employees to avoid layoffs so everyone keeps their jobs.
This has put IT departments and IT professionals in a hectic position where they must roll out and deploy remote access technologies on the fly, often with little or no notice.
I’ve heard horror stories where organization leadership has made decisions without consulting IT which resulted in the inability to work, also where organizations didn’t involve their IT teams in strategizing and planning moving forward.
In this post I’m going to outline the most efficient way to rapidly deploy Remote Desktop Services (RDS) for employee remote access.
Remote Access Technologies
There’s a number of different remote access technologies and software packages available today. Some are designed to allow you to work fully remotely (providing a remote desktop to office resources), and some are designed to provide access to specific resources remotely (such as documents, files, etc).
The main technologies typically used for remote access include:
Miscellaneous 3rd party packages providing remote access to desktops
The main software packages that enable a remote workforce include:
Microsoft Office 365
Microsoft 365
Skype for Business
Microsoft Teams
Zoom
Numerous other applications and cloud suites
Every technology or application has it’s purpose and is deployed depending on the business requirements, however in this specific situation we need a solution that is easy and fast to deploy.
For most small to medium sized businesses, Remote Desktop Services would be the easiest solution to roll out on such short notice.
Remote Desktop Services (RDS)
Remote Desktop Services is a server/client technology that allows the client to connect to the server, and have access to a full Windows desktop that’s actually running on the server itself.
These sessions are encrypted, secure, and essentially brings the display to the connecting client, and brings back mouse and keyboard feedback.
With Remote Desktop Services, you’re maintaining one Windows Server that provides multiple concurrent sessions for multiple concurrent users. You can install software packages (database applications, Microsoft Office 365, and other line of business applications), and make them available to the connecting users.
Even users who are accessing large files have a beautiful experience since the data never leaves your IT environment, only the sessions display is transmitted.
This works great for home users who have slow internet connections, users who are travelling, or using their cell networks LTE connection to connect.
For administrators, it provides an easy way to manage a desktop experience for multiple users by maintain a single server. There are also many additional controls you can implement to limit access and optimize the experience.
What’s required
When deploying RDS, you’ll need the following:
A dedicated Server or dedicated Virtual Machine running Microsoft Windows Server to be configured as a Remote Desktop Services server.
Remote Desktop Services CALs (Client Access Licenses – One CAL is required for each user or device)
A high speed internet connection (that can handle multiple RDS sessions)
A firewall to protect the RDS Server and preferably 2FA/MFA logins
A Static IP and DNS entries to make the server available to the internet and your users
You’ll want the RDS server to be dedicated strictly to Remote Desktop Services sessions. You will not want to run any other servers or services on this server or virtual machine.
You will need to purchase RDS CALs. A Remote Desktop Services Client access license, is required for every device or user you have connected to your RDS server. During your initial purchase of RDS CALs, you must choose between user count based licensing, or device count based licensing. If you need help with licensing Microsoft Remote Desktop Services, please feel free to reach out to me.
The connections between the server and client consist of an encrypted presentation of the display, as well as mouse/keyboard feedback, and other peripherals. For a single session it’s not much, which means your users don’t ultra fast internet connections. However, on the server side if you are running multiple sessions, the bandwidth requirements add up.
Remote Desktop Services servers are often under attack on the internet. You’ll find that the servers are subjected to scans, brute force attempts, and exploit execution. You’ll want to make sure that you have both a firewall (with intrusion prevention) and a security technology like DUO Security Two Factor Authentication configured to protect your server.
Finally, you’ll need a static IP on the internet and a friendly DNS hostname for your employees to connect to using the Remote Desktop Protocol (RDP) Client, such as “remote.companyname.com”.
Deploying RDS
Deploying RDS is easy. Here is a brief summary of the steps to rapidly deploy a Remote Desktop Services server for remote access.
Install Windows Server on the server or virtual machine that will host RDS.
Configure networking (static IP) and join to domain.
Configure Remote Desktop Services and Remote Desktop Web Access
Configure an SSL Certificate
Configure user session settings
Install user software on the RDS Server (Including Office 365, Line of Business applications, and others)
Configure ACLs (Access Control) to secure user access.
Test the environment
Move to production
Even with limited to no experience with Remote Desktop Services, an IT professional will be able to deploy the first server within hours. A focus must be paid to securing the environment, performance enhancements can be made later after deployment.
As mentioned above, your RDS server will be subject to ongoing attacks. These attacks include vulnerability scans, bruteforce attempts, and targeted exploitation attempts.
You’ll want to make sure that you have and enforce strict password policies to stop bruteforce attempts.
A firewall should be implemented that includes an intrusion prevention system to identify and stop intrusion attempts.
You should implement two factor authentication using a product like Duo from Duo Security.
Your new RDS server while enabling a mobile workforce, also substantially increases your security footprint. Considerations must always be made and factored in when deploying internet available services.
Below is a video demo of what Duo Security Two Facter authentication looks like when logging in to an RDP session.
Duo Security Two Factor Authentication on Remote Desktop Services RDS Demo
Optimizations
There’s a fair number of optimizations which can be made in an RDS environment. I’m going to cover a few of the most widely used below.
Please note, you should also configure the RDS Group Policy Objects (GPO) as well.
Folder Redirection
While most data should be stored on network shares, we often find that users will store data and files on their Desktop and My Documents.
If you have available and extra storage, you can enable Desktop and My Documents Folder redirection. This will redirect users Desktop’s and My Document’s folders to a network share. On local computers on your network, the computers will retain a cached copy for performance.
If you deploy an RDS Server and have Folder redirection configured, the users My Documents and Desktop will be available to that user. Additionally since the server is on the same network as the share hosting the data, the RDS server will not retain a local cached copy (saving space).
If you are considering implementing and turning on Folder Redirection, I would recommend doing so before deploying an RDS Server (especially before a user logs in for the first time).
Anti-virus and Endpoint Protection
Careful consideration must be made when choosing the antivirus and endpoint protection software for your RDS environment.
First, you must make sure that your antivirus and/or endpoint protection vendor supports Remote Desktop Services, and then also deploy their recommended settings for that type of environment.
A proper endpoint protection solution should run few processes for all users, and not individual processes for each user.
Service Delivery
For continued service delivery, your IT staff must monitor and maintain the server. This includes monitoring logs, updating it via Windows Update, and updating the various applications your users are using.
As the environment grows, you can deploy additional RDS Servers and create an RDS Farm. If you get to this point you’ll be able to deploy a load balancer and grow as more performance is required, or additional users are brought online.
Software Installation
When installing software on your Remote Desktop Services Server, extra steps must be taken so that the registry is properly handled for the multi-user environment.
Before launching a software installer, open a command prompt (elevated as Administrator) and run the following command:
change user /install
This will change your user session to an install mode. You can now run your software installation.
After the software installation is complete, put the RDS Server back in to execution mode with the following command:
change user /execute
Performing the above will make sure that the registry is properly handled during software installation for proper functioning of software in a multi-user RDS environment. Restarting the server will always automatically bring it back up in execute mode.
Conclusion
Deploying a Remote Desktop Services server is a great way to get a large number of users online and working remotely in a short amount of time. This keeps management happy, employees happy, and maintains a productive workforce.
As I mentioned, there are numerous other technologies so depending on what your company has already implemented or is using, may change what solution would be best for you.
If you have any questions or require help or assistance with deploying Remote Desktop Services for your organization, don’t hesitate to reach out to me!
This website uses cookies to improve your experience. We'll assume you're ok with this, but you can opt-out if you wish.
Do you accept the use of cookies and accept our privacy policy? AcceptRejectCookie and Privacy Policy
Privacy & Cookies Policy
Privacy Overview
This website uses cookies to improve your experience while you navigate through the website. Out of these cookies, the cookies that are categorized as necessary are stored on your browser as they are essential for the working of basic functionalities of the website. We also use third-party cookies that help us analyze and understand how you use this website. These cookies will be stored in your browser only with your consent. You also have the option to opt-out of these cookies. But opting out of some of these cookies may have an effect on your browsing experience.