Today I’m going to show you the process to install Horizon Agent for Linux on Ubuntu 22.04 LTS. We’ll be installing the Horizon Agent for Linux from VMware Horizon 8 version 2209.
The official documentation from VMware is helpful, but unfortunately doesn’t provide all the information to get up and running quickly, which is why I’ve put together this guide as a “Quick Start”.
Please note, that this is just a guide to get to the point where you can install NVIDIA vGPU drivers and have installed the Horizon Agent for Linux on the VM. This will provide you with a persistent VM that you can use with Horizon, and the instructions can be adapted for use in a non-persistent instant clone environment as well.
Create a VM on your vCenter Server, attached the Ubuntu 22.04 LTS ISO, and install Ubuntu
Install any Root CA’s or modifications you need for network access (usually not needed unless you’re on an enterprise network)
Update Ubuntu as root apt update apt upgrade reboot
Install software needed for VMware Horizon Agent for Linux as root apt install make gcc libglvnd-dev open-vm-tools open-vm-tools-dev open-vm-tools-desktop
Install your software (Chrome, etc.)
Install NVIDIA vGPU drivers if you are using NVIDIA vGPU (this must be performed before install the Horizon Agent). Make sure the installer modifies and configures the X configuration files.
Add the Ubuntu 22.04 LTS VM to the manual desktop pool
Entitle the User account to the desktop pool and assign to the VM
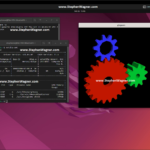
Connect to the Ubuntu 22.04 Linux VDI VM from the VMware Horizon Client
You should now be able to connect to the Ubuntu Linux VDI VM using the VMware Horizon client. Additionally, if you installed the vGPU drivers for NVIDIA vGPU, you should have full 3D acceleration and functionality.
In this post, I’m going to provide instructions and a guide on how to install the Horizon Agent for Linux on Ubuntu 20.04 LTS. This will allow you to run and connect to an Ubuntu VDI VM with VMware Horizon View.
In the past I’ve created instructions on how to do this on earlier versions of Ubuntu, as well as RedHat Linux, but it’s getting easier than ever and requires less steps than previous guides.
I decided to create the updated tutorial after purchasing an AMD S7150 x2 and wanted to get it up and running with Ubuntu 20.04 LTS and see if it works.
Create a VM on your vCenter Server, attached the Ubuntu 20.04 LTS ISO, and install Ubuntu
Install any Root CA’s or modifications you need for network access (usually not needed unless you’re on an enterprise network)
Update Ubuntu as root apt update apt upgrade
Install software needed for VMware Horizon Agent for Linux as root apt install openssh-server python python-dbus python-gobject open-vm-tools-desktop
Install your software (Chrome, etc.)
Install any vGPU or GPU Drivers you need before installing the Horizon Agent
Install the Horizon Agent For Linux as root (Enabling Audio, Disabling SSO) ./install_viewagent.sh -a yes -S no
Reboot the Ubuntu VM
Log on to your Horizon Connection Server
Create a manual pool and configure it
Add the Ubuntu 20.04 LTS VM to the manual desktop pool
Entitle the User account to the desktop pool and assign to the VM
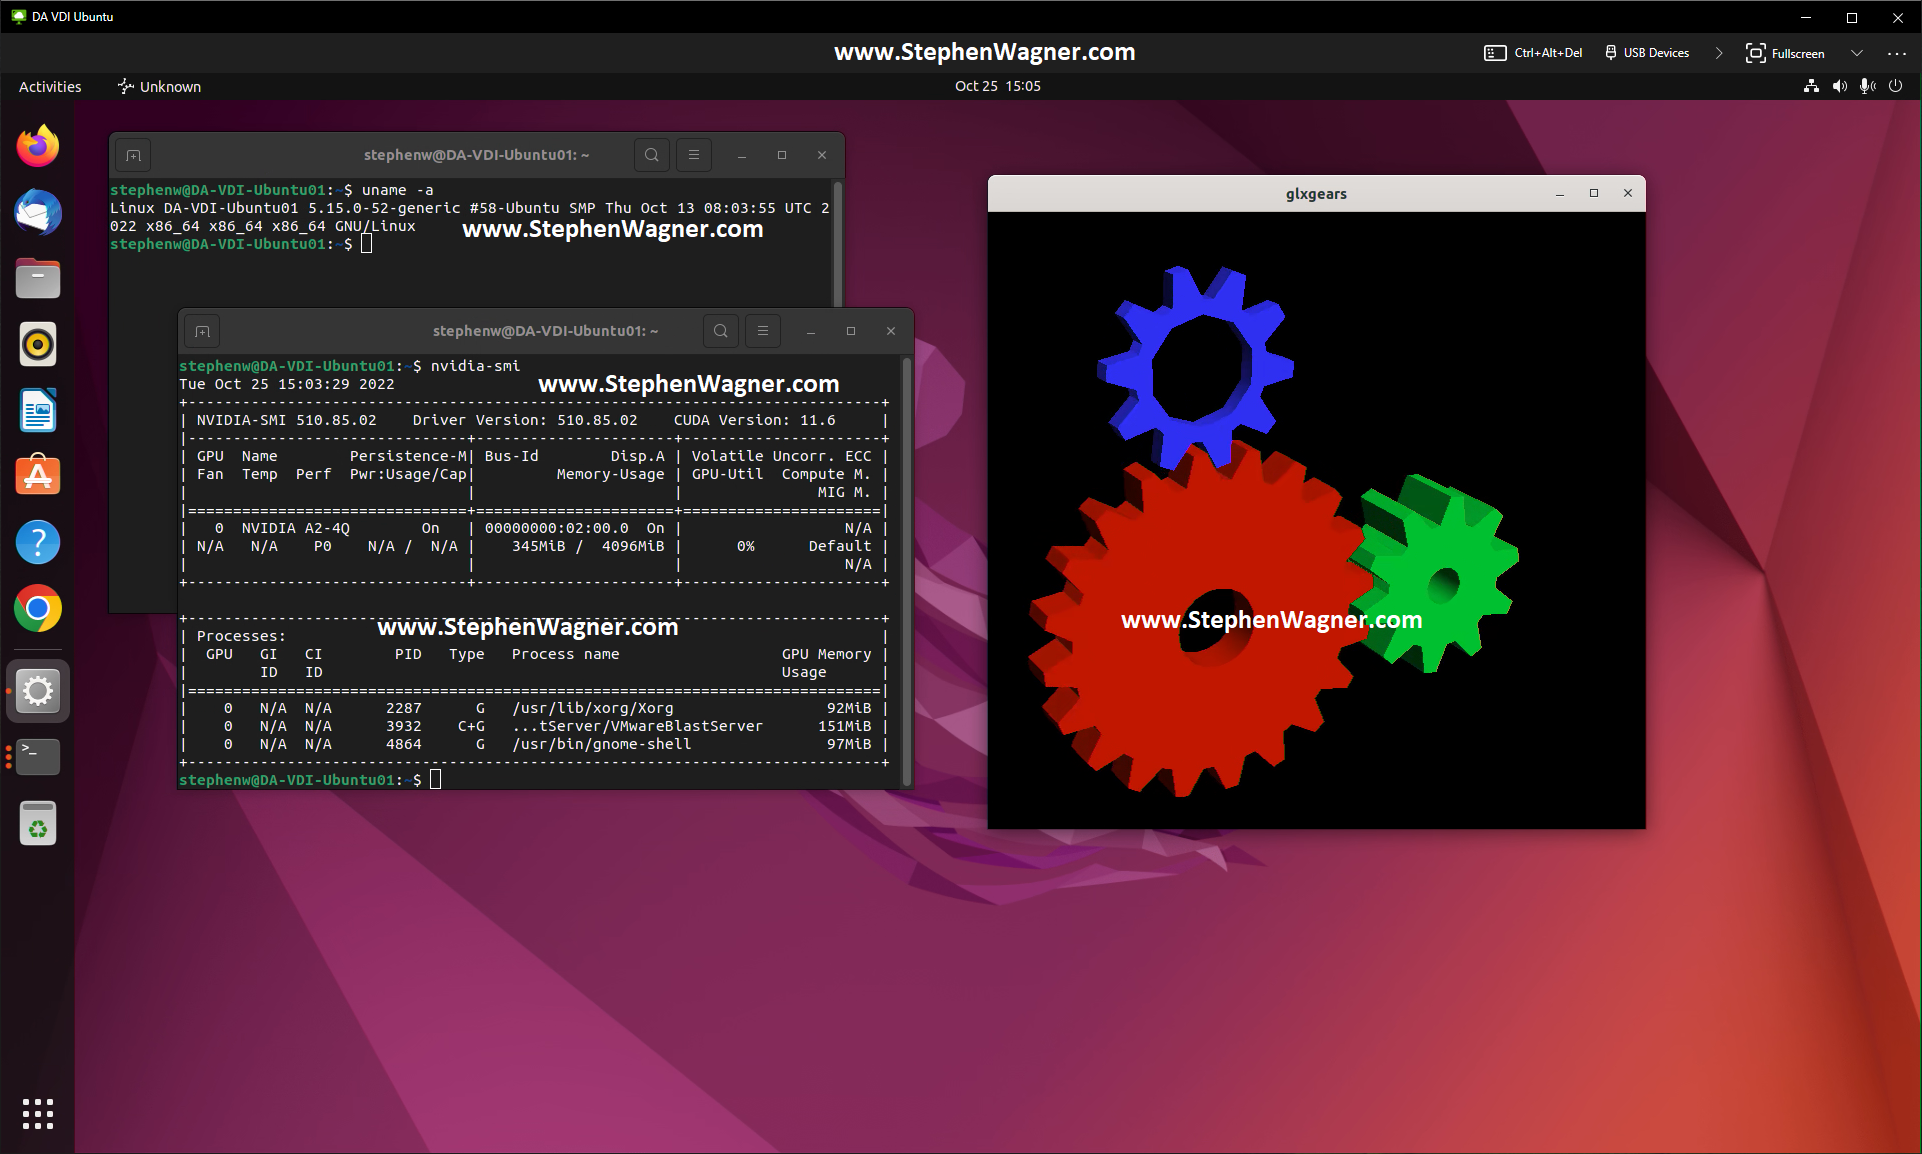
Connect to the Ubuntu 20.04 Linux VDI VM from the VMware Horizon Client
And that’s it, you should now be running.
As for the AMD S7150 x2, I noticed that Ubuntu 20.04 LTS came with the drivers for it called “amdgpu”. Please note that this driver does not work with VMware Horizon View. After installing “mesa-utils”, running “glxgears” and “glxinfo” it did appear that 3D Acceleration was working, however after further investigation it turned out this is CPU rendering and not using the S7150 x2 GPU.
You now have a VDI VM running Ubuntu Linux on VMware Horizon View.
When you’re looking for additional or enhanced options to secure you’re business and enterprise IT systems, MFA/2FA can help you achieve this. Get away from the traditional single password, and implement additional means of authentication! MFA provides a great compliment to your cyber-security policies.
MFA is short for Multi Factor authentication, additionally 2FA is short for Two Factor Authentication. While they are somewhat the same, multi means many, and 2 means two. Additional security is provided with both, since it provides more means of authentication.
Traditionally, users authenticate with 1 (one) level of authentication: their password. In simple terms MFA/2FA in addition to a password, provides a 2nd method of authentication and identity validation. By requiring users to authentication with a 2nd mechanism, this provides enhanced security.
Why use MFA/2FA
In a large portion of security breaches, we see users passwords become compromised. This can happen during a phishing attack, virus, keylogger, or other ways. Once a malicious user or bot has a users credentials (username and password), they can access resources available to that user.
By implementing a 2nd level of authentication, even if a users password becomes compromised, the real (or malicious user) must pass a 2nd authentication check. While this is easy for the real user, in most cases it’s nearly impossible for a malicious user. If a password get’s compromised, nothing can be accessed as it requires a 2nd level of authentication. If this 2nd method is a cell phone or hardware token, a malicious user won’t be ale to access the users resources unless they steal the cell phone, or hardware token.
How does MFA/2FA work
When deploying MFA or 2FA you have the option of using an app, hardware token (fob), or phone verification to perform the additional authentication check.
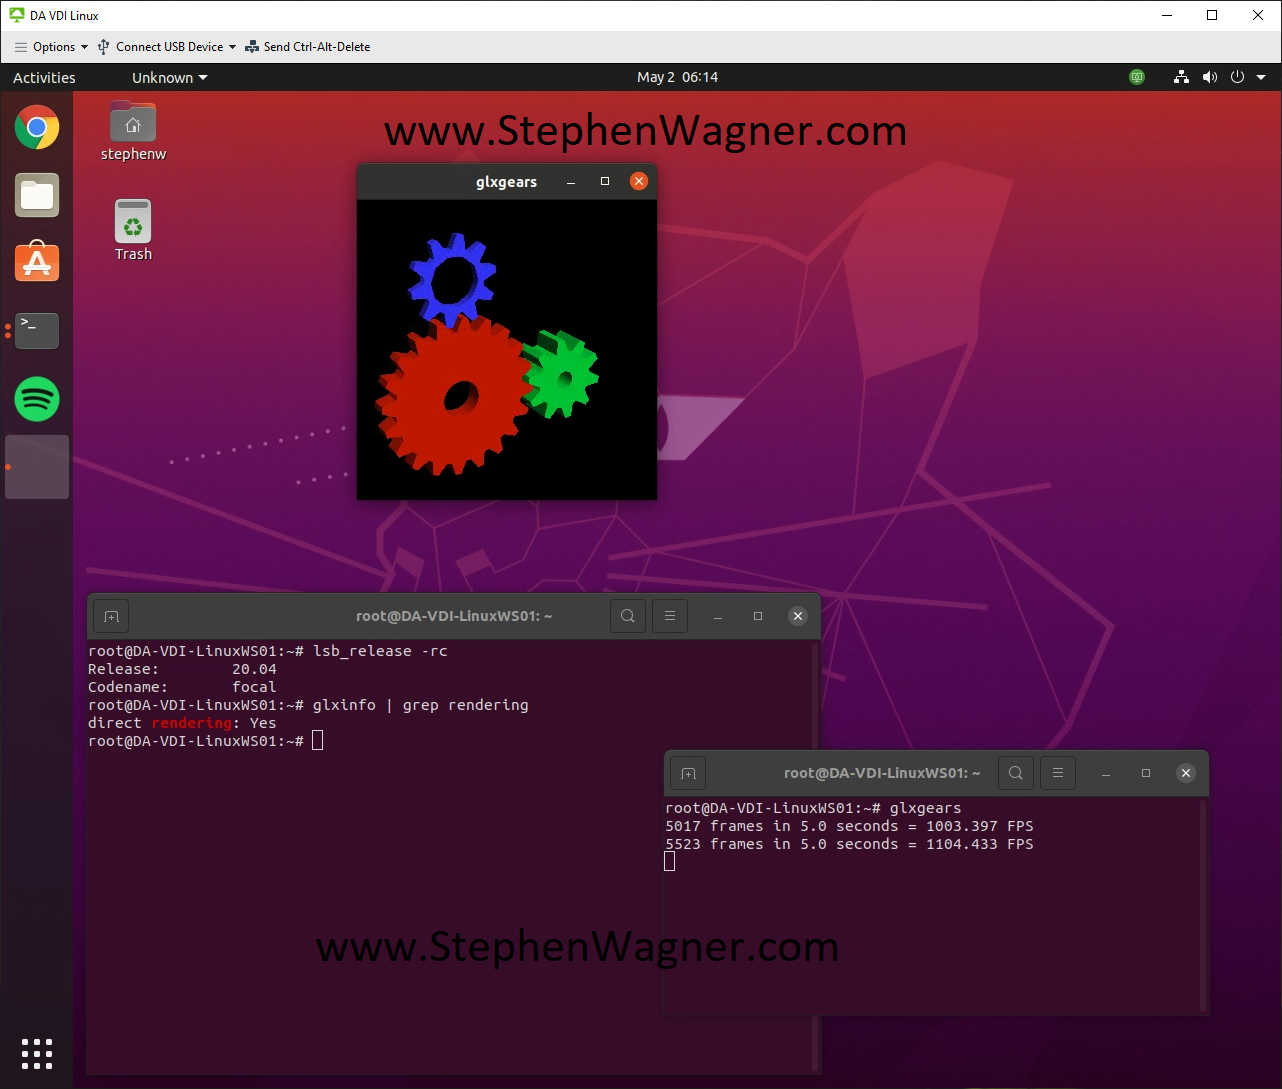
After a user attempts to logs on to a computer or service with their username and password, the 2nd level of authentication will be presented, and must pass in order for the login request to succeed.
Please see below for an example of 2FA selection screen after a successful username and password:
Duo Security Windows Login MFA 2FA Prompt
After selecting an authentication method for MFA or 2FA, you can use the following
2FA with App (Duo Push)
Duo Push sends an authentication challenge to your mobile device which a user can then approve or deny.
Please see below for an example of Duo Push:
Duo Push to Mobile App on Android
Once the user selects to approve or deny the login request, the original login will either be approved or denied. We often see this as being the preferred MFA/2FA method.
2FA with phone verification (Call Me)
Duo phone verification (Call Me) will call you on your phone number (pre-configured by your IT staff) and challenge you to either hangup to deny the login request, or press a button on the keypad to accept the login request.
While we rarely use this option, it is handy to have as a backup method.
2FA with Hardware Token (Passcode)
Duo Passcode challenges are handled using a hardware token (or you can generate a passcode using the Duo App). Once you select this method, you will be prompted to enter the passcode to complete the 2FA authentication challenge. If you enter the correct passcode, the login will be accepted.
Here is a Duo D-100 Token that uses HOTP (HMAC-based One Time Password):
Duo D-100 HOTP Hardware Token
When you press the green button, a passcode will be temporarily displayed on the LCD display which you can use to complete the passcode challenge.
You can purchase Hardware Token’s directly from Digitally Accurate Inc by contacting us, your existing Duo Partner, or from Duo directly. Duo is also compatible with other 3rd party hardware tokens that use HOTP and TOTP.
2FA with U2F
While you can’t visibly see the option for U2F, you can use U2F as an MFA or 2FA authentication challenge. This includes devices like a Yubikey from Yubico, which plugs in to the USB port of your computer. You can attach a Yubikey to your key chain, and bring it around with you. The Yubikey simply plugs in to your USB port and has a button that you press when you want to authenticate.
When the 2FA window pops up, simply hit the button and your Yubikey will complete the MFA/2FA challange.
What can MFA/2FA protect
Duo MFA supports numerous cloud and on-premise applications, services, protocols, and technologies. While the list is very large (full list available at https://duo.com/product/every-application), we regularly deploy and use Duo Security for the following configurations.
Windows Logins (Server and Workstation Logon)
Duo MFA can be deployed to not only protect your Windows Servers and Workstations, but also your remote access system as well.
When logging on to a Windows Server or Windows Workstation, a user will be presented with the following screen for 2FA authentication:
Duo Security Windows Login MFA 2FA Prompt
Below you can see a video demonstration of DUO on Windows Login.
DUO works with both Windows Logins and RDP (Remote Desktop Protocol) Logins.
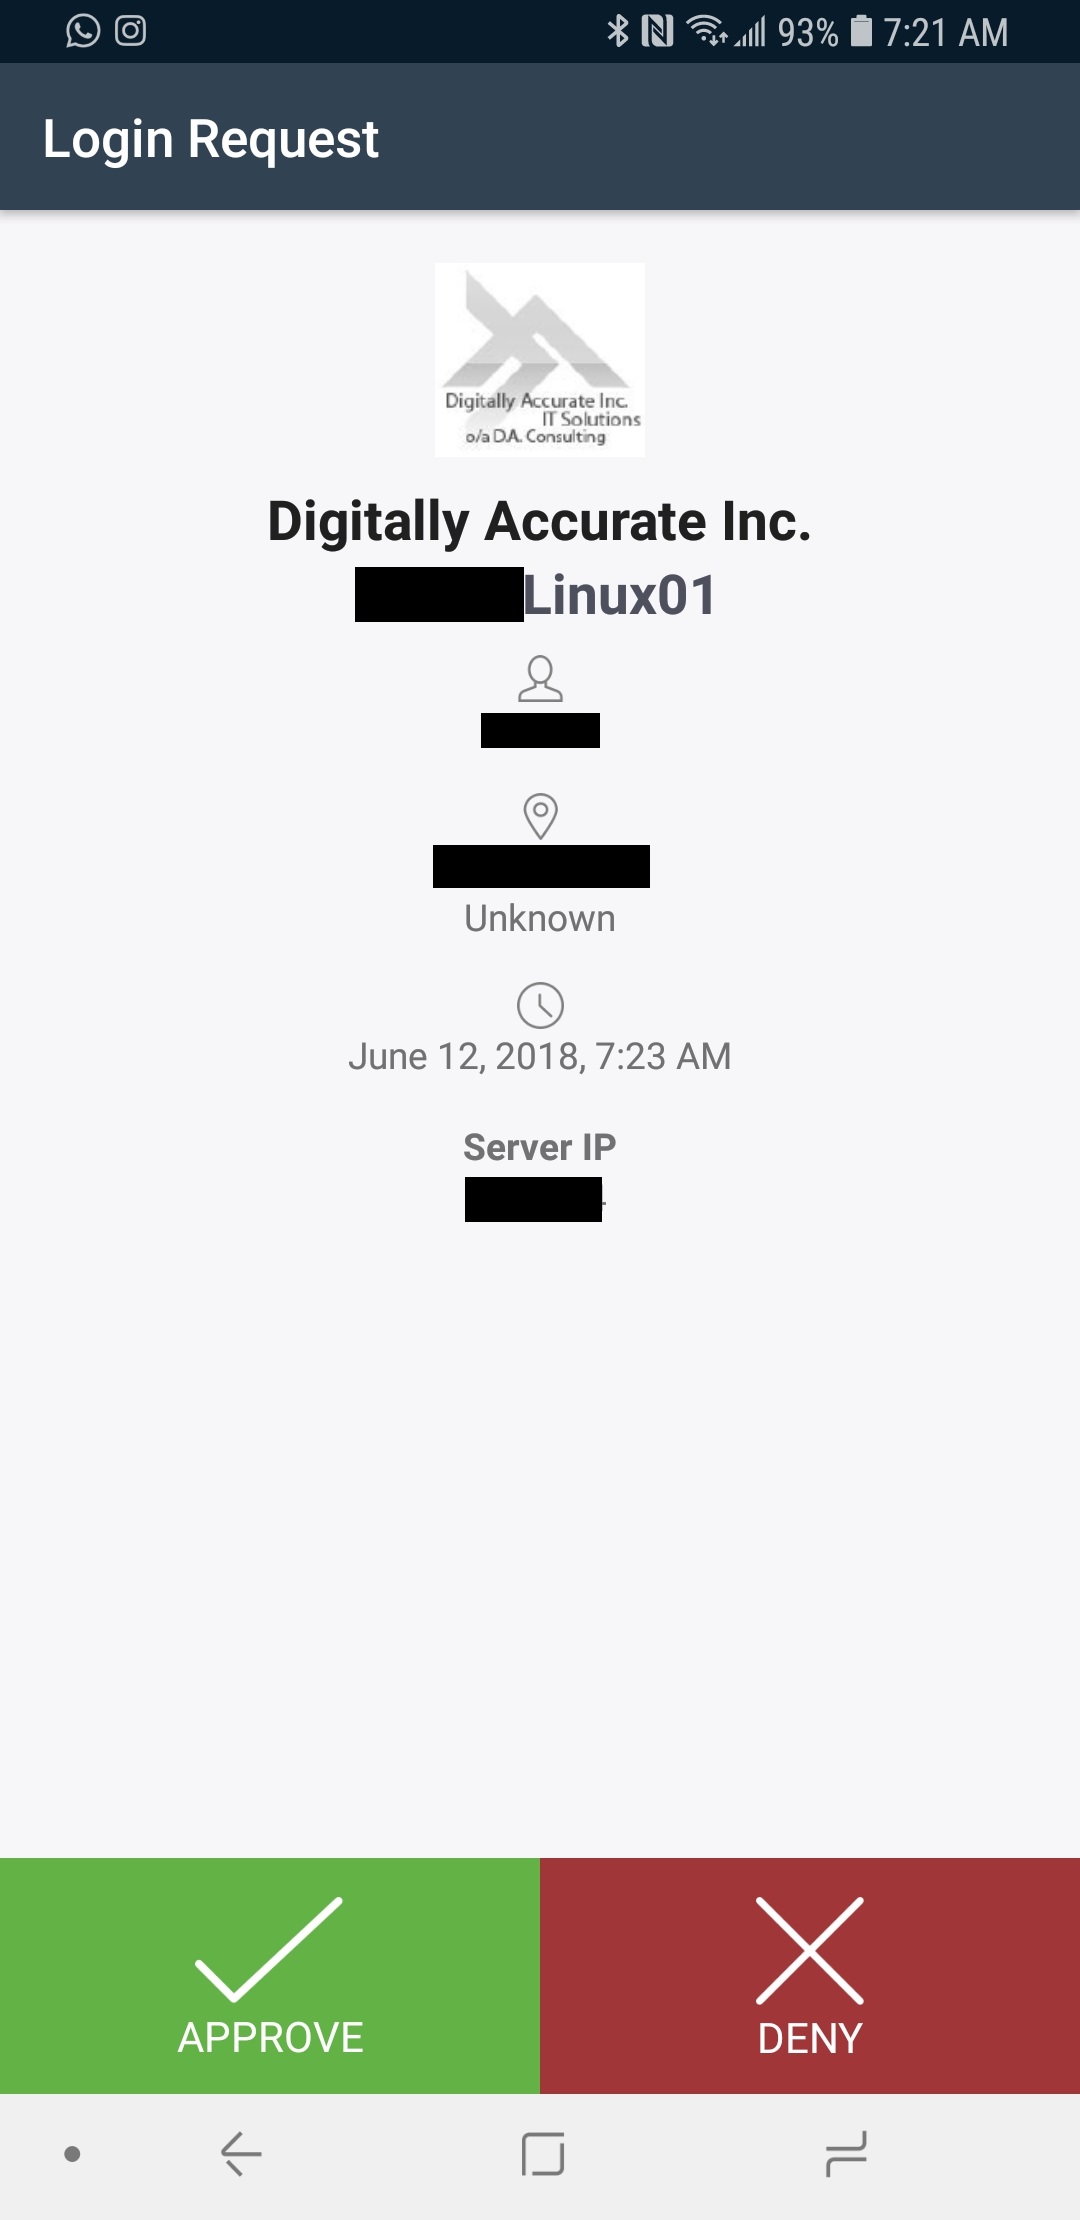
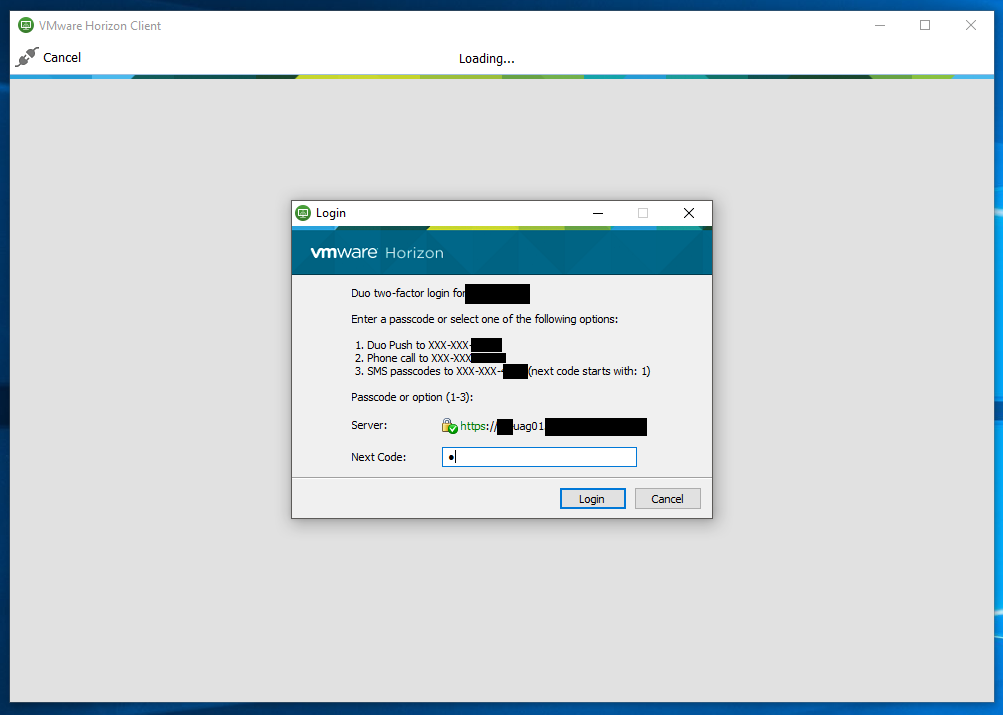
VMWare Horizon View Clients (VMWare VDI Logon)
Duo MFA can be deployed to protect your VDI (Virtual Desktop Infrastructure) by requiring MFA or 2FA when users log in to access their desktops.
When logging on to the VMware Horizon Client, a user will be presented with the following screen for 2FA authentication:
Duo Security VMWare Horizon Client Login MFA 2FA Prompt
Below you can see a video demonstration of DUO on VMware Horizon View (VDI) Login.
Sophos UTM (Admin and User Portal Logon)
Duo MFA can be deployed to protect your Sophos UTM firewall. You can protect the admin account, as well as user accounts when accessing the user portal.
If you’re using the VPN functionality on the Sophos UTM, you can also protect VPN logins with Duo MFA.
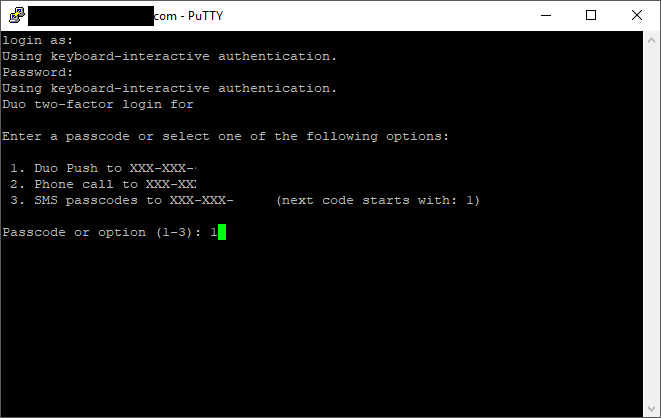
Unix and Linux (Server and Workstation Logon)
Duo MFA can be deployed to protect your Unix and Linux Servers. You can protect all user accounts, including the root user.
We regularly deploy this with Fedora and CentOS (even FreePBX) and you can protect both SSH and/or console logins.
When logging on to a Unix or Linux server, a user will be presented with the following screen for 2FA authentication:
Duo Security CentOS Linux login MFA 2FA Prompt
Below you can see a video demonstration of DUO on Linux.
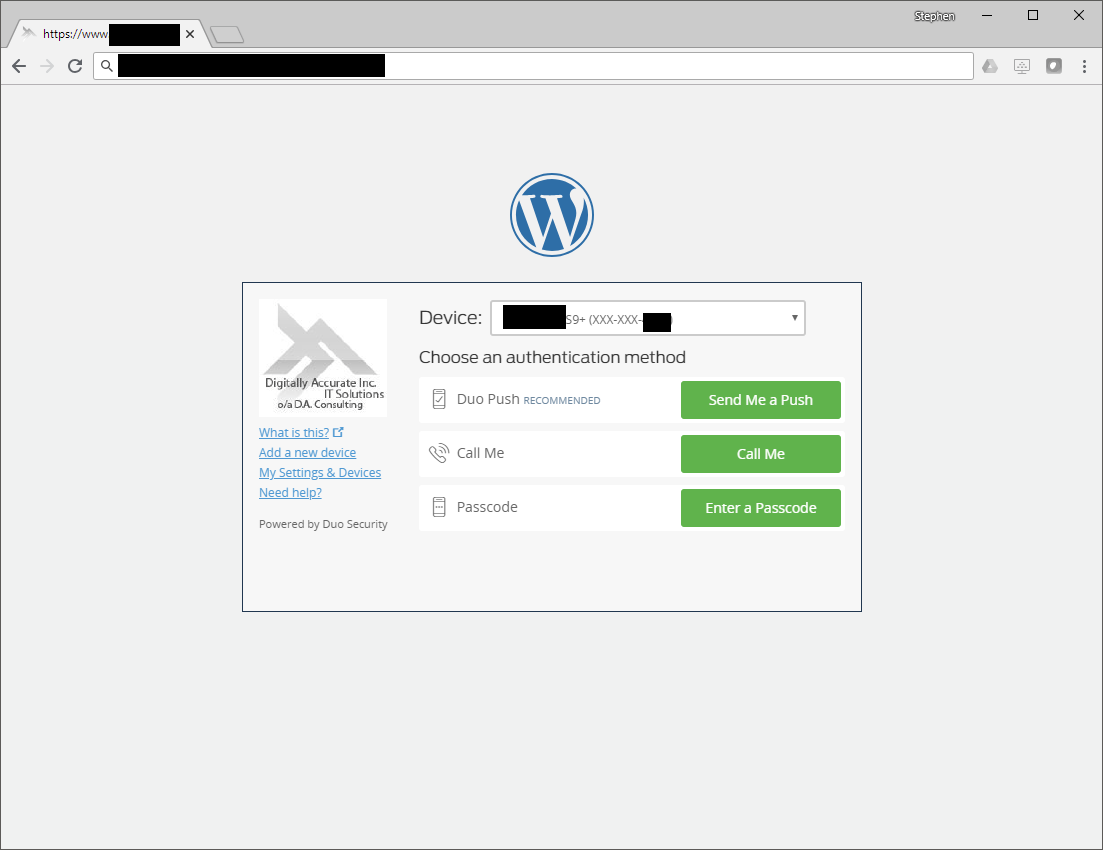
WordPress Logon
Duo MFA can be deployed to protect your WordPress blog. You can protect your admin and other user accounts.
If you have a popular blog, you know how often bots are attempting to hack and brute force your passwords. If by chance your admin password becomes compromised, using MFA or 2FA can protect your site.
When logging on to a WordPress blog admin interface, a user will be presented with the following screen for 2FA authentication:
Duo Security WordPress Login MFA 2FA Prompt
Below you can see a video demonstration of DUO on a WordPress blog.
How easy is it to implement
Implementing Duo MFA is very easy and works with your existing IT Infrastructure. It can easily be setup, configured, and maintained on your existing servers, workstations, and network devices.
Duo offers numerous plugins (for windows), as well as options for RADIUS type authentication mechanisms, and other types of authentication.
How easy is it to manage
Duo is managed through the Duo Security web portal. Your IT admins can manage users, MFA devices, tokens, and secured applications via the web interface. You can also deploy appliances that allow users to manage, provision, and add their MFA devices and settings.
Duo also integrates with Active Directory to make managing and maintaining users easy and fairly automated.
Run the command “paste <(cat /sys/class/thermal/thermal_zone/type) <(cat /sys/class/thermal/thermal_zone/temp) | column -s $’\t’ -t | sed ‘s/(.)..$/.\1°C/'” as root to get the CPU temperature on Ubuntu Server.
A great and useful purpose for old embedded Linux wireless routers, is to re-purpose them as VLAN breakout boxes!
If you’re like me, you probably have a bunch of old Linksys (or other brand) Linux embedded wireless routers sitting around your home. You probably also have VLANs running on your home network or homelab for various reasons.
Let’s get to it!
Why would we need to do this?
VLANs are great, but typically the money it costs for VLAN supported switches, APs, routers, and other devices is more than your typical home gear.
You may be able to justify these purchases for your core network infrastructure, but when your cabling out to individual rooms in your house or apartment, you may not want to spend a lot of money on switches for that room.
The cost of a gigabit embedded Linux router is usually a lot less than a manageable switch that provides VLANs. At the same time, if you’re a true geek you probably have at least 5 of these embedded Linux routers sitting around in boxes… Why spend money at all?
What does this accomplish?
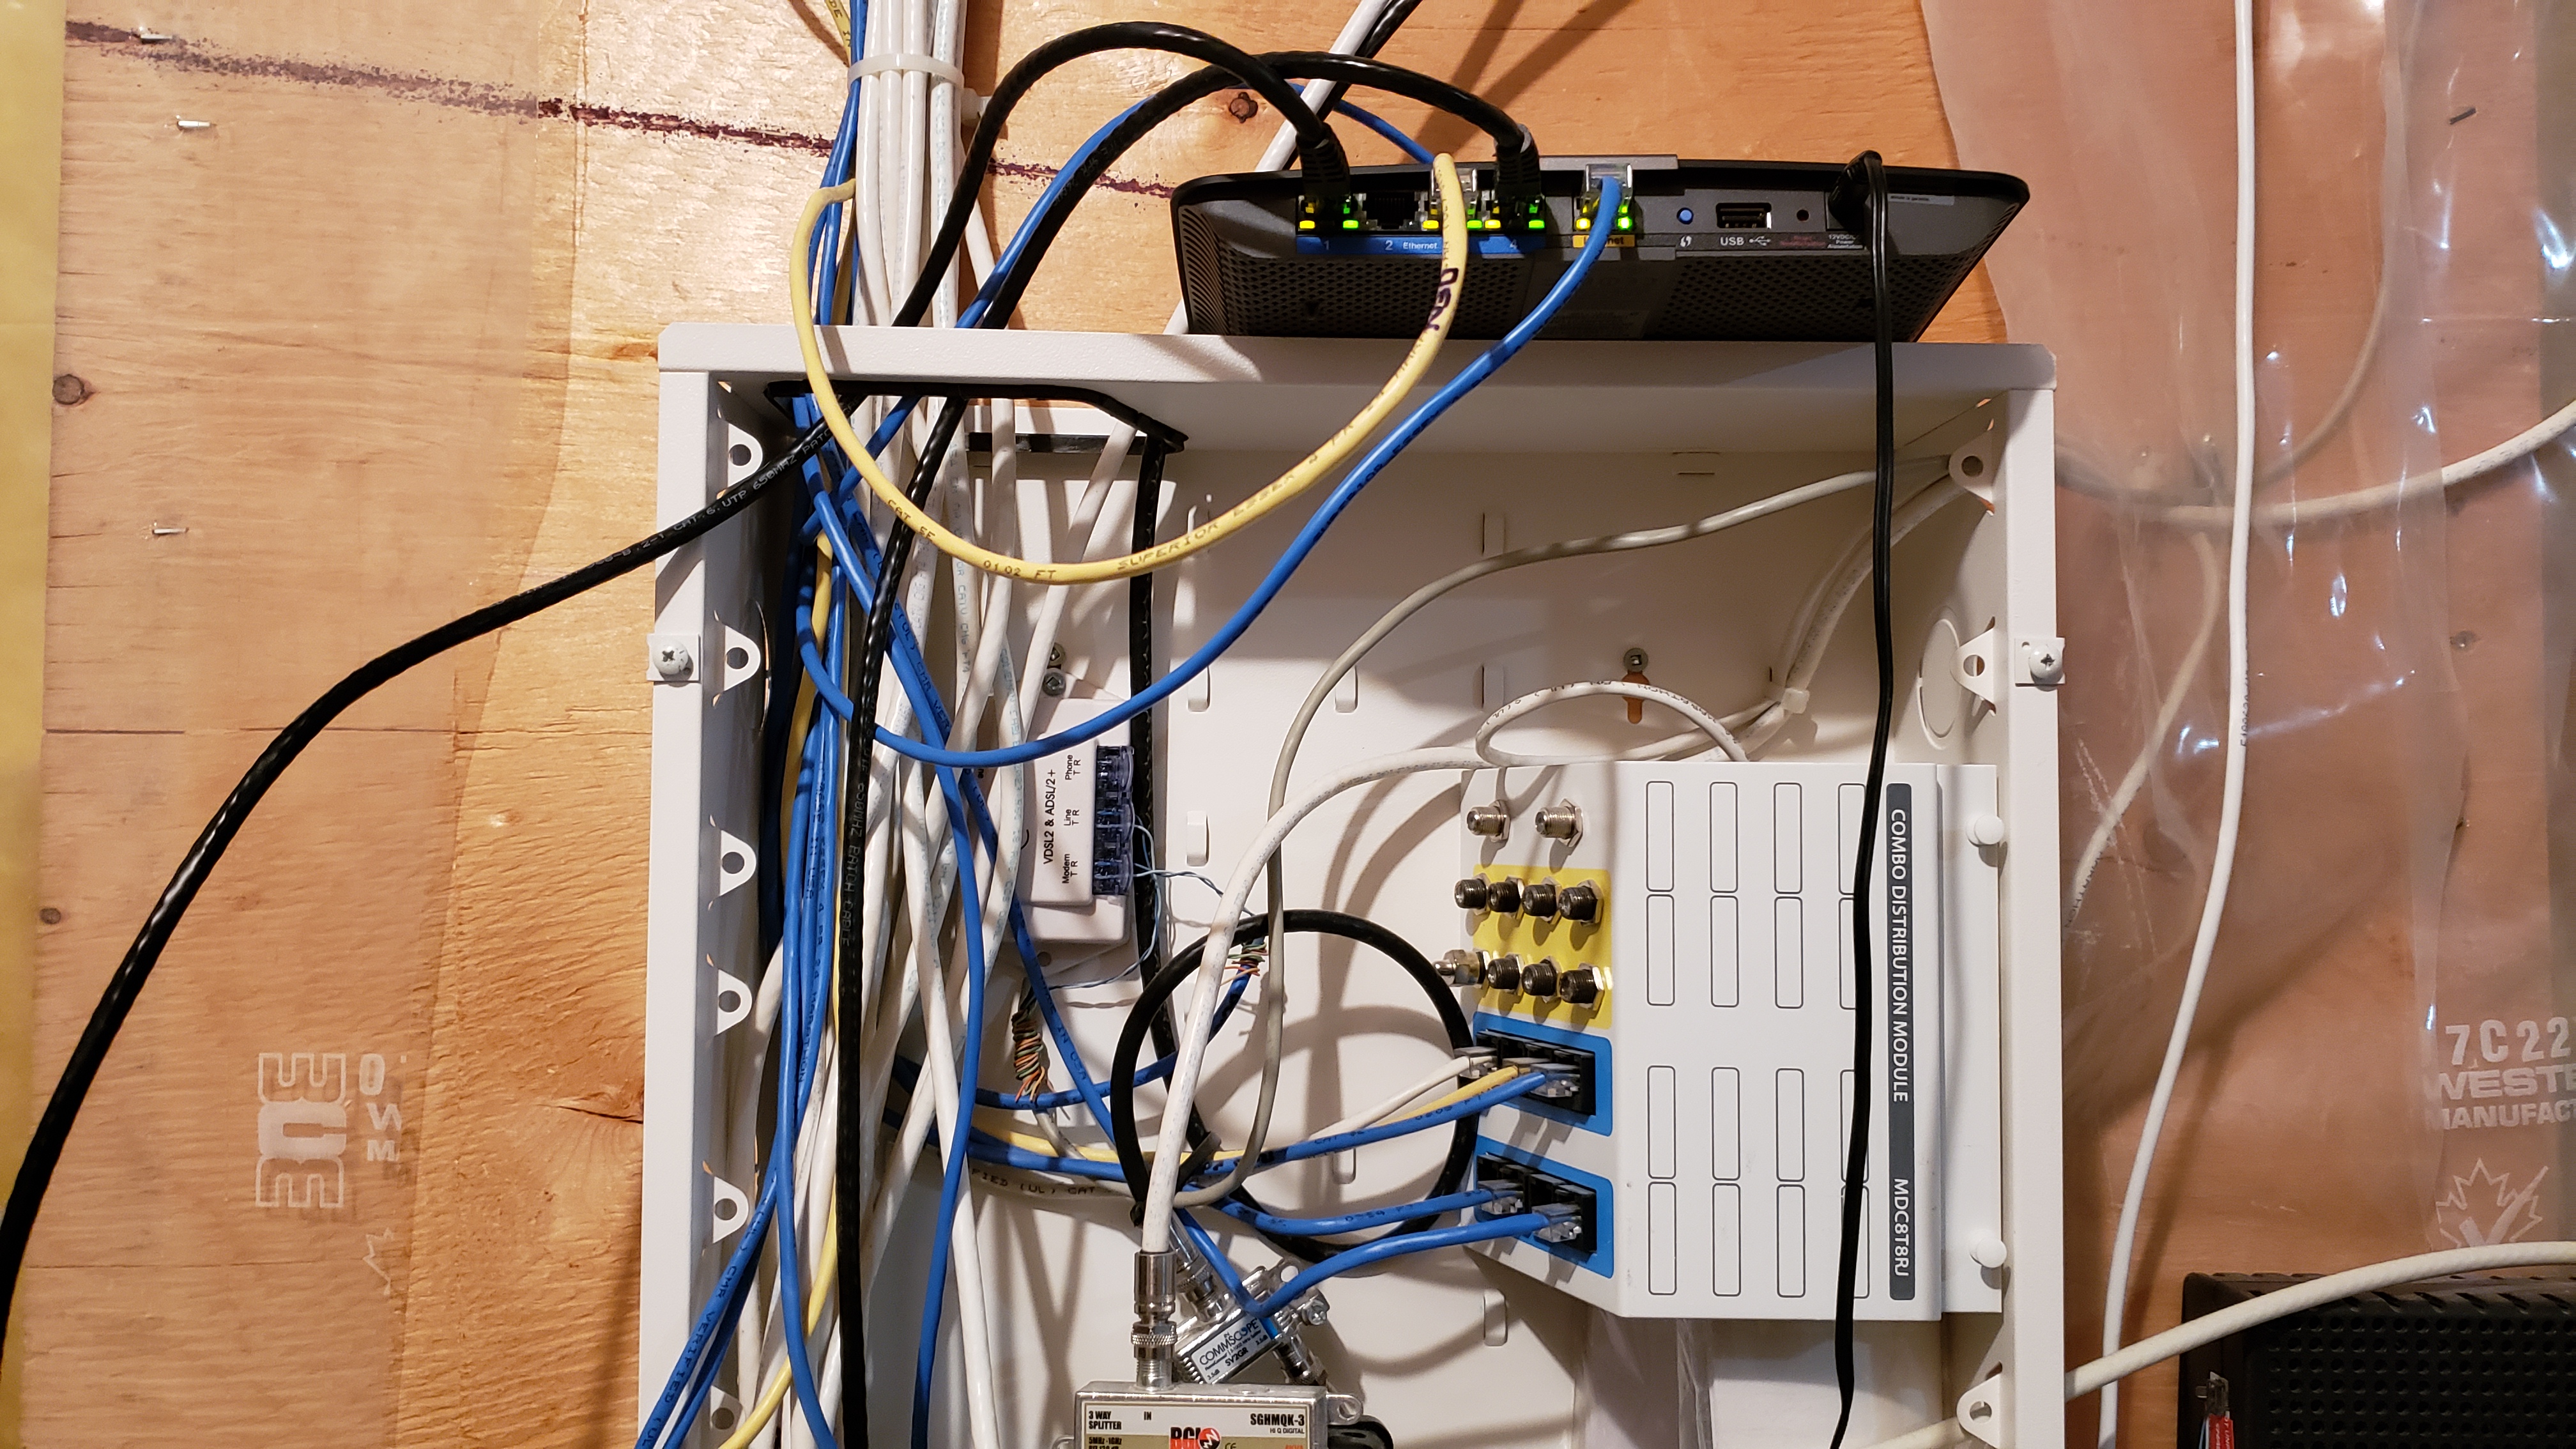
As an example: In my basement I have a single Cat 5e Ethernet cable providing all VLANs in a trunk from my server room. In my basement I have all my multimedia devices, IoT devices, a wireless access point (with 3 SSIDs/VLANs), and more.
Instead of purchasing an expensive manageable switch that supports VLANs, I ended up flashing OpenWRT on a couple Linksys E4200v2 wireless access points. I then connect the OpenWRT device to my Ubiquiti UniFi Network Infrastructure.
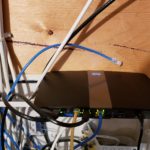
Linksys OpenWRT Switch On Panel
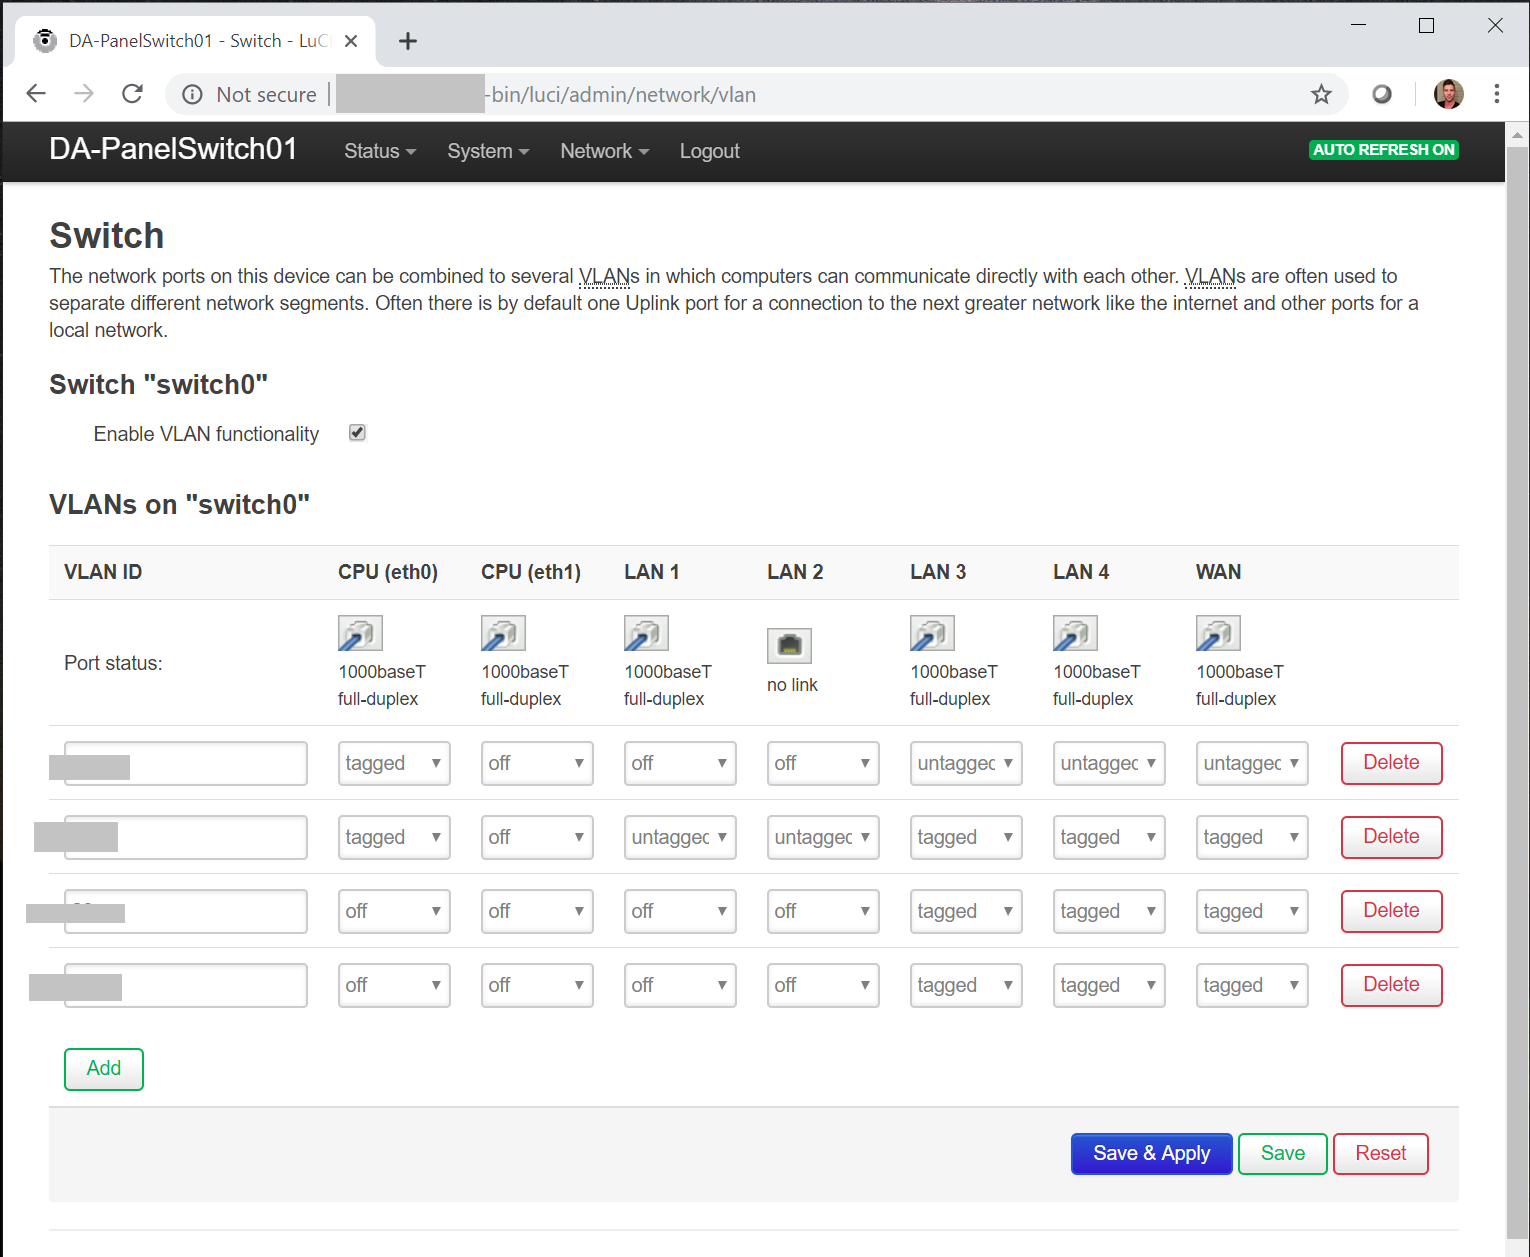
On the E4200 for my basement, I configured the WAN port to accept the incoming VLAN trunk and then configured the other LAN ports depending on their purpose. One of the LAN ports remains as a VLAN trunk for the Ubiquiti UniFi NanoHD wireless access point (as it needs all VLANs), and the other LAN ports untag traffic on various VLANs for specific purposes. One of these ports is the output for my main network LAN (which goes to a normal non-VLAN switch).
OpenWRT VLAN Configuration Basement AP
All you have to do is make sure you label the ports so you know what VLAN or trunk you’re plugging in to.
This is why I call it a “VLAN Breakout Box”! I also make sure to disable all the wireless radios on the router as I don’t need these (it also reduces the load on the CPU, although negligible).
So how do we do this?
We use OpenWRT and flash it to compatible embedded Linux wireless routers, switches, and other devices. It can even be used on x86 hardware.
If we’re picky, we’d prefer embedded SBC (Single Board Computer) devices that have a switch-on-chip setup, so that the packet switching can be handled via hardware and not software. We want this for better performance.
You can download and find more information about OpenWRT here: https://openwrt.org/
Always make sure you know what you’re doing when flashing hardware. You may brick your device if you fail to follow instructions properly.
On a final note, one of the reasons why I prefer OpenWRT over DD-WRT, is that with the GUI, you can configure any acceptable VLAN ID, whereas on DD-WRT you’re restricted to a very limited number of VLANs.
This website uses cookies to improve your experience. We'll assume you're ok with this, but you can opt-out if you wish.
Do you accept the use of cookies and accept our privacy policy? AcceptRejectCookie and Privacy Policy
Privacy & Cookies Policy
Privacy Overview
This website uses cookies to improve your experience while you navigate through the website. Out of these cookies, the cookies that are categorized as necessary are stored on your browser as they are essential for the working of basic functionalities of the website. We also use third-party cookies that help us analyze and understand how you use this website. These cookies will be stored in your browser only with your consent. You also have the option to opt-out of these cookies. But opting out of some of these cookies may have an effect on your browsing experience.