Today I’m going to be talking about connecting a Sophos XG firewall to a Sophos UTM firewall for a site-to-site VPN connection specifically using SSL tunneling. Furthermore we are doing this to connect a Microsoft Azure Virtual Network (using a Sophos XG instance) to an On-Premise LAN (running a Sophos UTM).
This type of connection and configuration is standard for corporations, businesses, and organizations who have workloads on Microsoft Azure and need to connect their Azure environment to their corporate LAN. To learn how to deploy Sophos XG in Microsoft Azure, please read this post.
WARNING AND DISCLAIMER: Following the steps in this document if done incorrectly or if your environment is different from the one used in this example, can cause network connectivity issues or a loss of connectivity. An assumption is made that you are skillful enough to know what tasks you are performing and what result they may have on your own environment. You may need to revert these steps if connectivity is lost to restore access to your environment.
Let’s ask some key questions and get some answers:
- Why are we using both (2) products, Sophos XG and Sophos UTM for the connection instead of using the same product on each end?
- Sophos only supports deployment of the Sophos XG on Microsoft Azure. Sophos UTM cannot be deployed on Azure. Numerous companies and organizations are still using the Sophos UTM product for their on-premise IT infrastructure. There is a need to have these different products co-exist and function together, like in this specific example.
- Why are we using a Sophos XG Appliance/Instance to handle the VPN on Microsoft Azure, instead of using the Microsoft branded Azure VPN Gateway?
- Microsoft Azure has a VPN gateway appliance which can handle the Azure side of the VPN connection, however this is a resource that costs money (instance time and instance data transfer) and has limited configuration options. Numerous companies and organizations are using Sophos XG instances on Azure to protect their internet facing workloads already. Instead of paying for 2 resources (Sophos XG and Microsoft VPN Gateway), you can consolidate and use one for both. You also have extra functionality and security options when using the Sophos XG instance to handle VPN traffic (IPS, strict firewall rules, packet inspection, etc). The Sophos firewalls can be centrally managed/monitored via Sophos Management Products (Sophos SUM (Sophos UTM Manager), and/or Sophos CFM (Sophos Central Firewall Manager)).
- Why are we using an SSL VPN connection instead of IPSec or other type of VPN?
- Microsoft Azure blocks some IP Protocol traffic within Virtual Networks. As quoted: “IP-in-IP encapsulated packets, and Generic Routing Encapsulation (GRE) packets are blocked within VNets” (per https://docs.microsoft.com/en-us/azure/virtual-network/virtual-networks-faq), which means that while you could configure an IPsec tunnel, none of the traffic would pass through the Virtual Networks. We utilize SSL VPNs to overcome this limitation as all traffic goes over the SSL connection.
Let’s address what components we will discuss in this post:
The information inside of this post can be used for any of the 4 components above and don’t necessarily have to be used in the same configuration. An example: This guide could be used by someone wanting to connect an on-premise XG and on-premise UTM unit together via SSL VPN (with no need or use for Azure). Another example: The section on routing tables can provide information for someone using a different network security product on Microsoft Azure. However, the ultimate goal of this article is to address all four of the components together for a complete end to end deployment.
Now let’s get to the configuration of each of the four components.
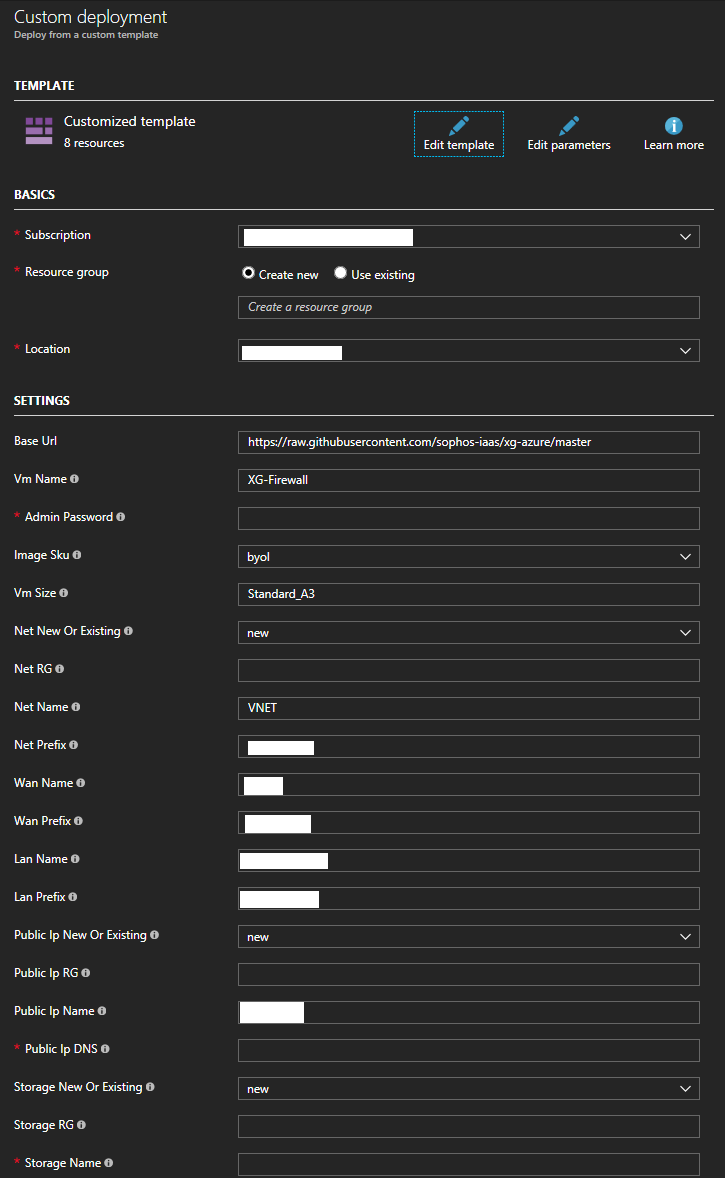
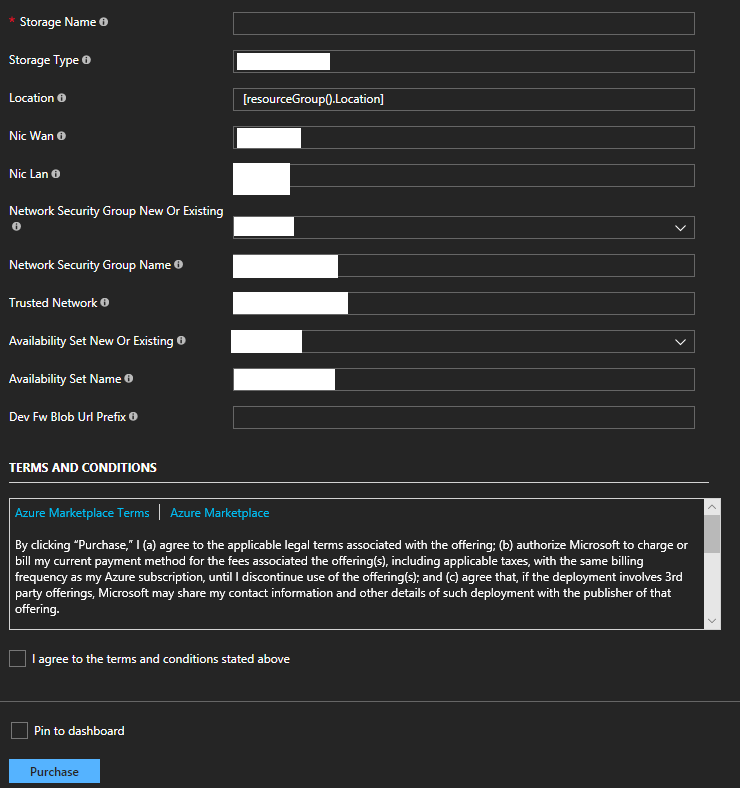
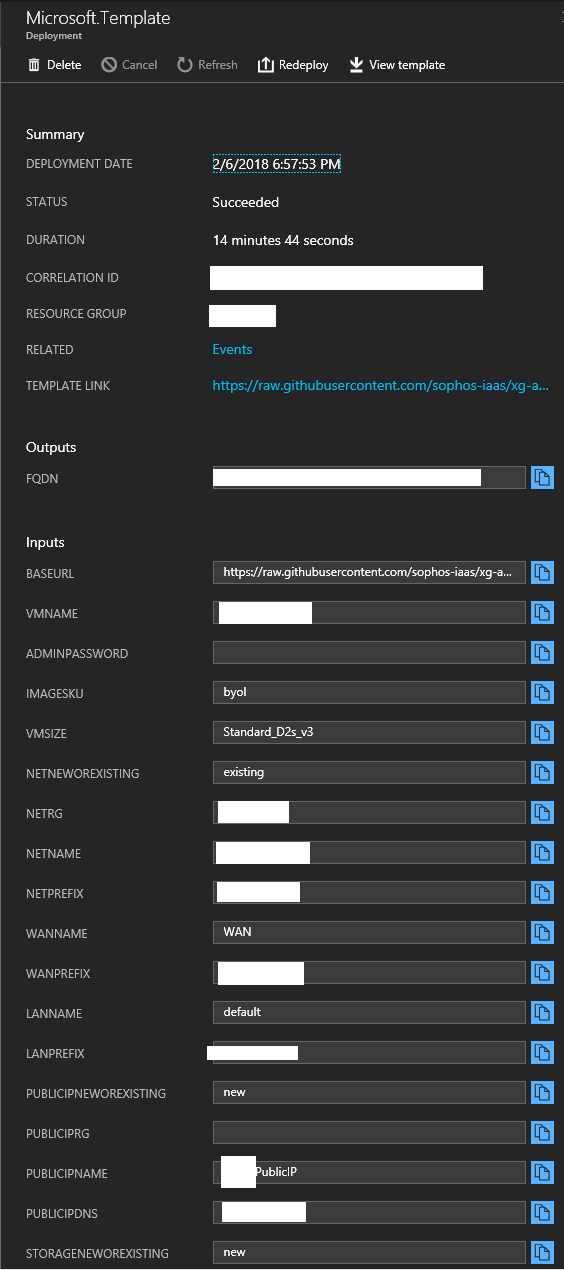
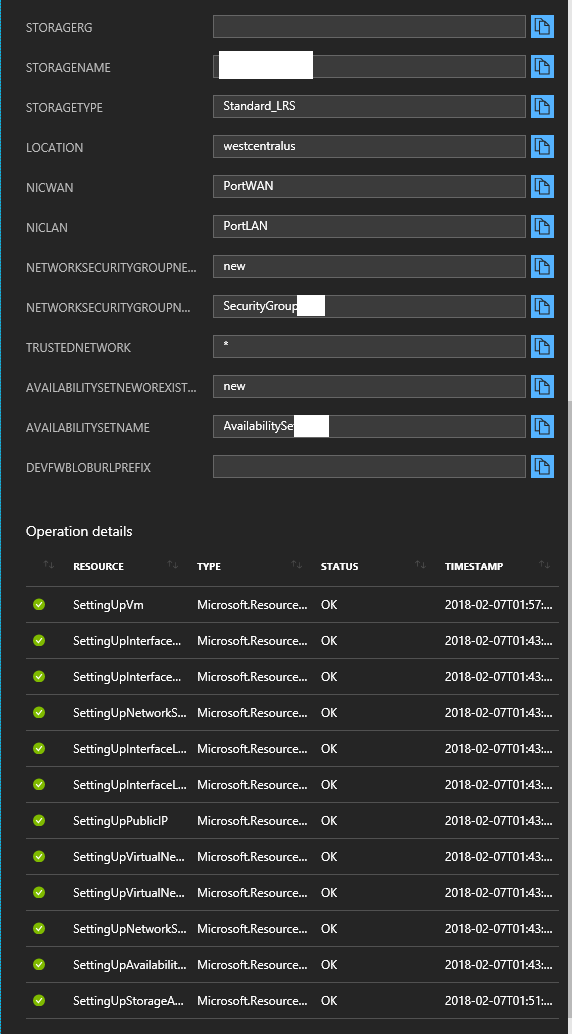
Deploy a Sophos XG instance/appliance to Microsoft Azure
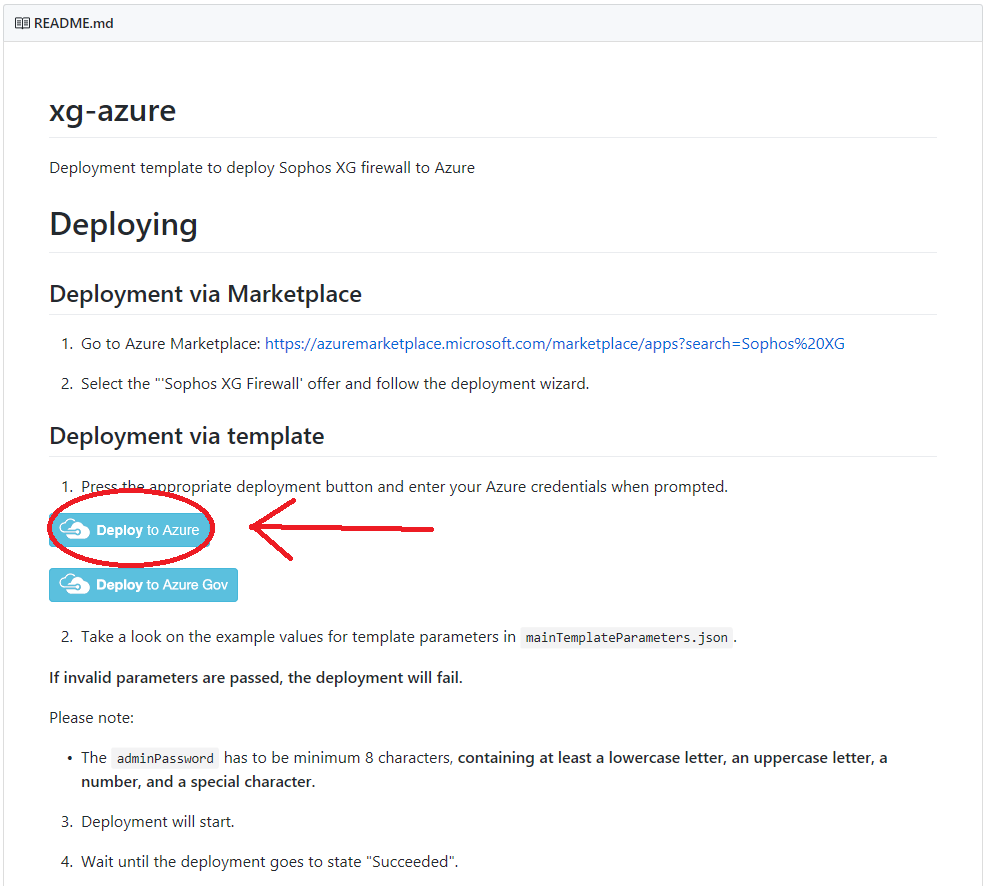
In a previous post, I covered how to deploy a new Sophos XG firewall appliance/instance to Microsoft Azure, specifially allowing deployment to existing resource groups. The full URL (and instructions) can be found at https://www.stephenwagner.com/2018/05/05/deploy-sophos-xg-firewall-microsoft-azure-existing-resource-group/
Sophos XG to Sophos UTM SSL VPN Connection Configuration and Encryption Settings
We will configure the SSL VPN settings on both the Microsoft Azure Sophos XG appliance/instance, and the on-premise Sophos UTM appliance/instance. Afterwards, we will create a tunnel, configure it, enable it, and establish connectivity between the two Sophos firewall instances. During this process, we’ll be configring the SSL VPN settings on both appliance/instances, configuring the tunnel, configuring encryption settings, and establishing VPN communication.
Please note, with this configuration there are essentially 3 networks: the Azure network, the SSL transit network (this is the network in between the networks we are connecting that is part of the SSL VPN), and the on-premise network. When you configure your firewall rules (not in the scope of this document), you must factor this in and allow applicable traffic to/from the SSL network so that the packets can pass. This SSL transit network is specified in the “Show VPN Settings” on the XG unit under “SSL VPN”, and “IPv4 Lease Range”. This network must be different and not overlap any subnets you are using on both your Azure network, and on-premise network. In my case I chose something way off in an entirely different IP space (172.16.0.0), and I suggest you do as well.
Follow these steps to configure the SSL VPN settings on both Sophos XG and UTM appliances/instances.
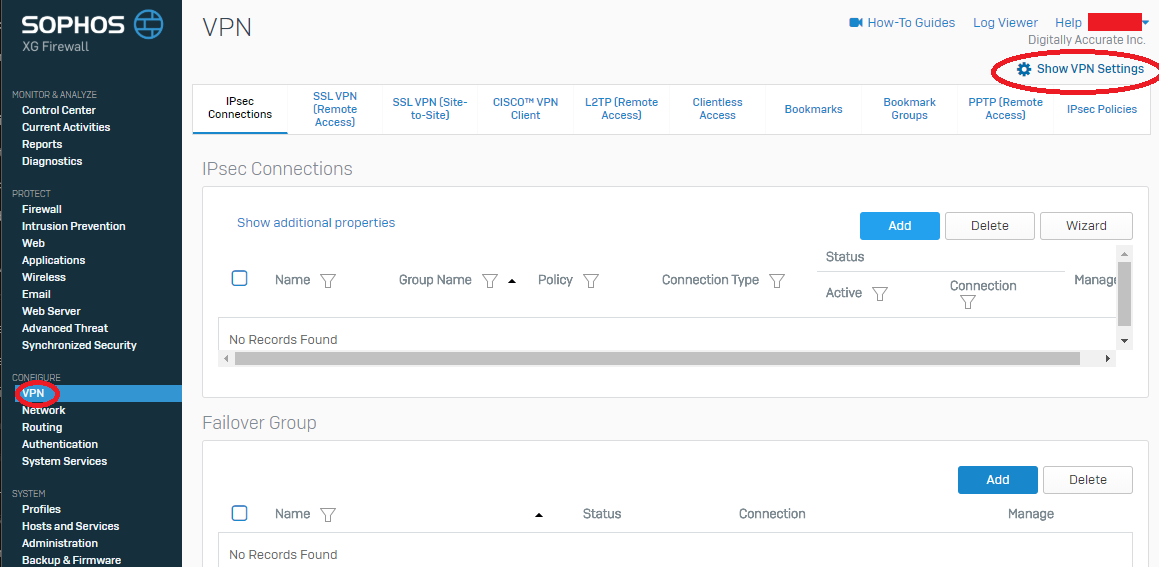
- Log on to the Sophos XG appliance, select “VPN” under “Configure” on the left hand side, and then select the gear icon with “Show VPN Settings” on the top right. See example.
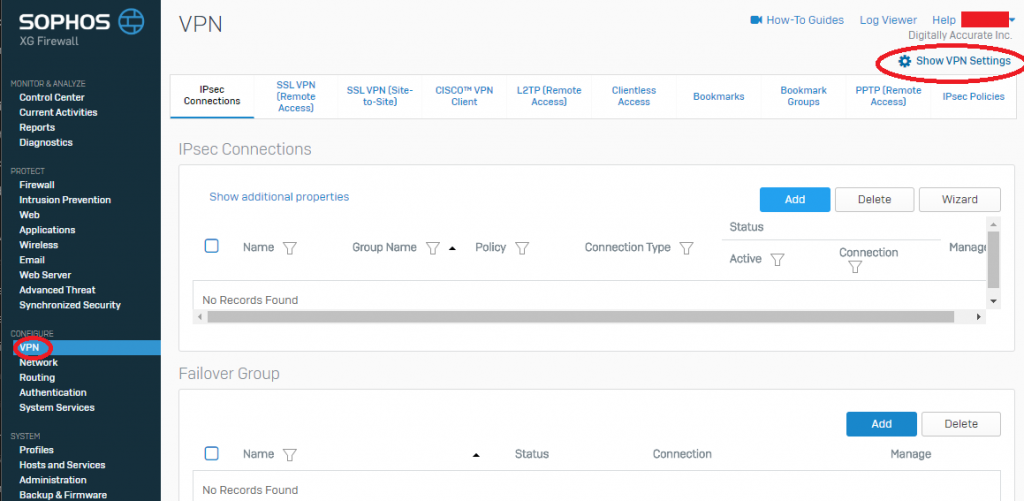
Sophos XG Show VPN Settings
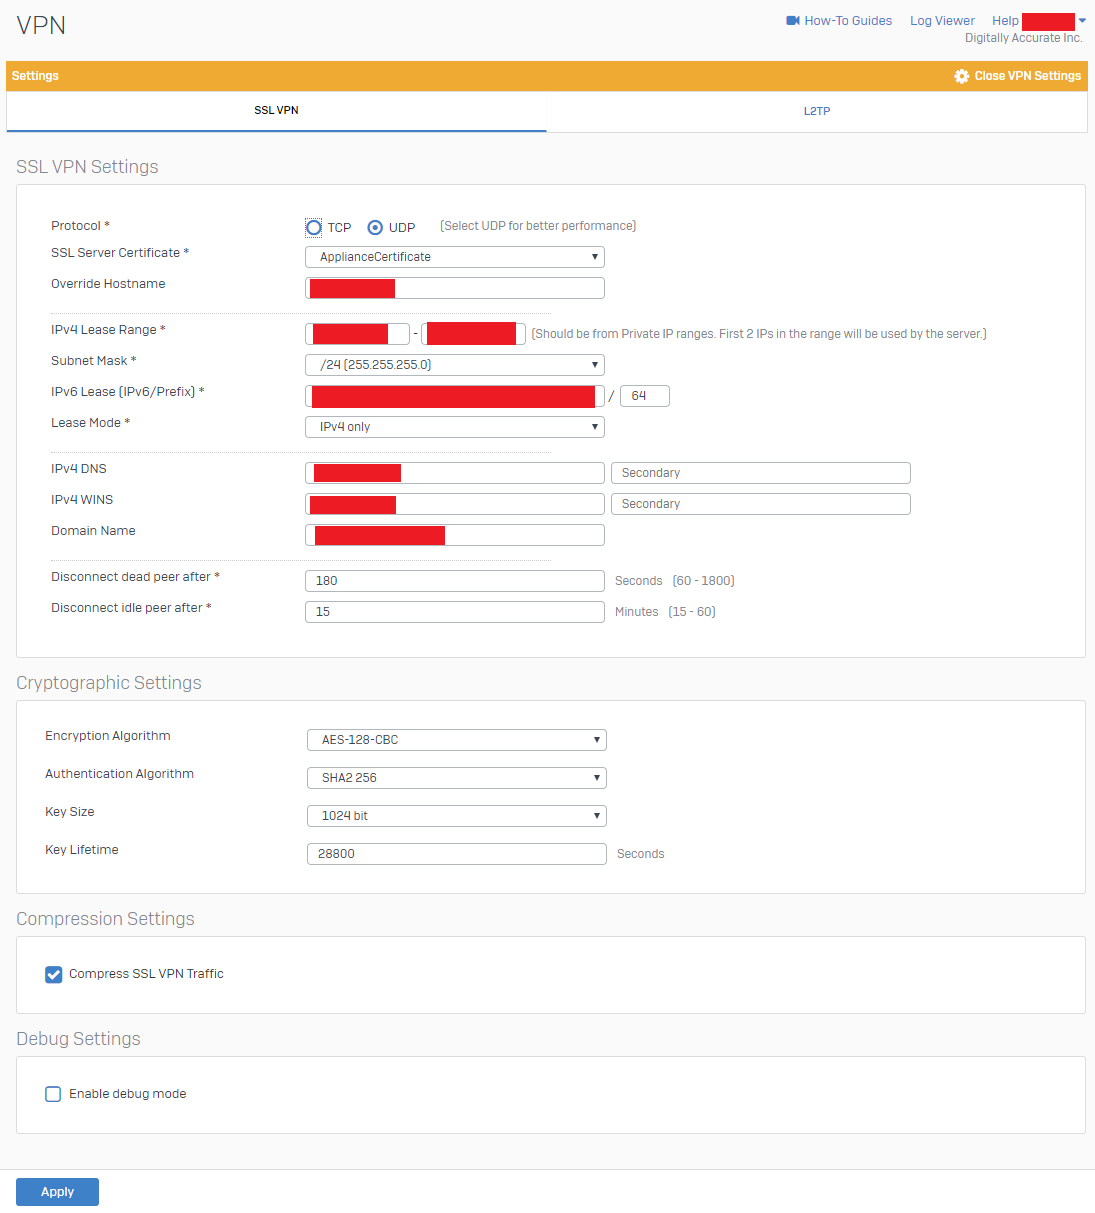
- Configure your “SSL VPN Settings” and “Cryptographic Settings” to be similar to the example below. Please modify to reflect your own environment. Cryptographic settings should match example below. Please note that the “IPv4 Lease Range” is not for your Azure or Internal LAN subnet, but actually the subnet used by the SSL VPN server. This value has to be an entirely new subnet dedicated for SSL VPN functions.
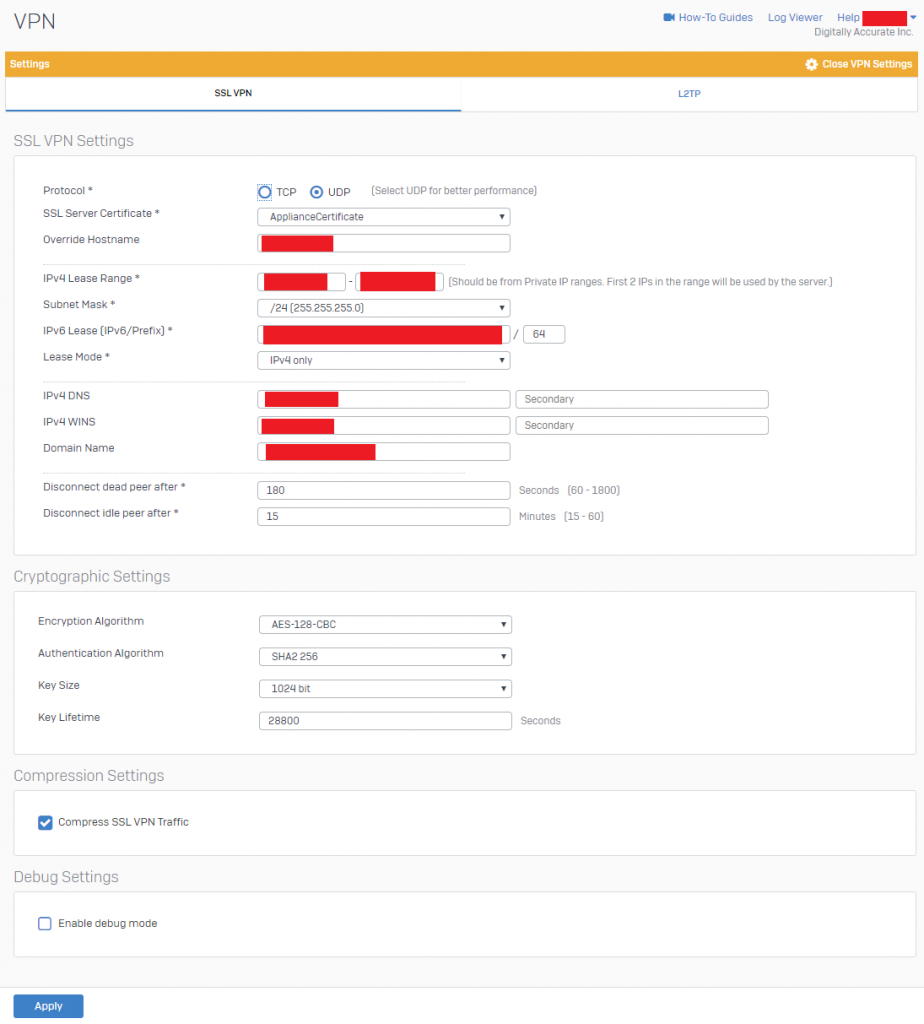
Sophos XG SSL VPN Settings
- Log on to the Sophos UTM appliance, select “Site-to-Site VPN”, then select “SSL”, then click on the “Advanced” tab.
- Configure your “Advanced” settings to reflect the following below.
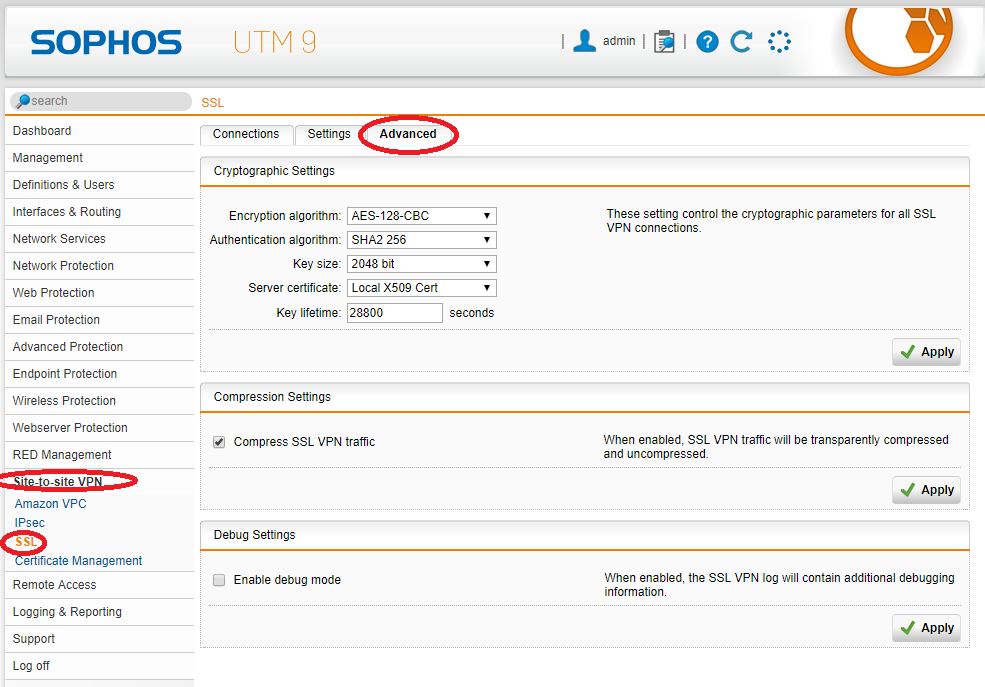
Sophos UTM SSL Site-to-Site VPN Advanced Settings
You have now configured the general SSL VPN Advanced settings, we can now move on to configuring the tunnel itself.
To configure the SSL Site to Site VPN tunnel between the Sophos appliances, we’ll need to configure the Sophos XG (on Azure) to act as a server, and the Sophos UTM (on prem) which will act as the client. Side note: In my own testing, I found that the XG had to be the server in order to get them to connect.
To configure the SSL VPN tunnel Server on the Sophos XG:
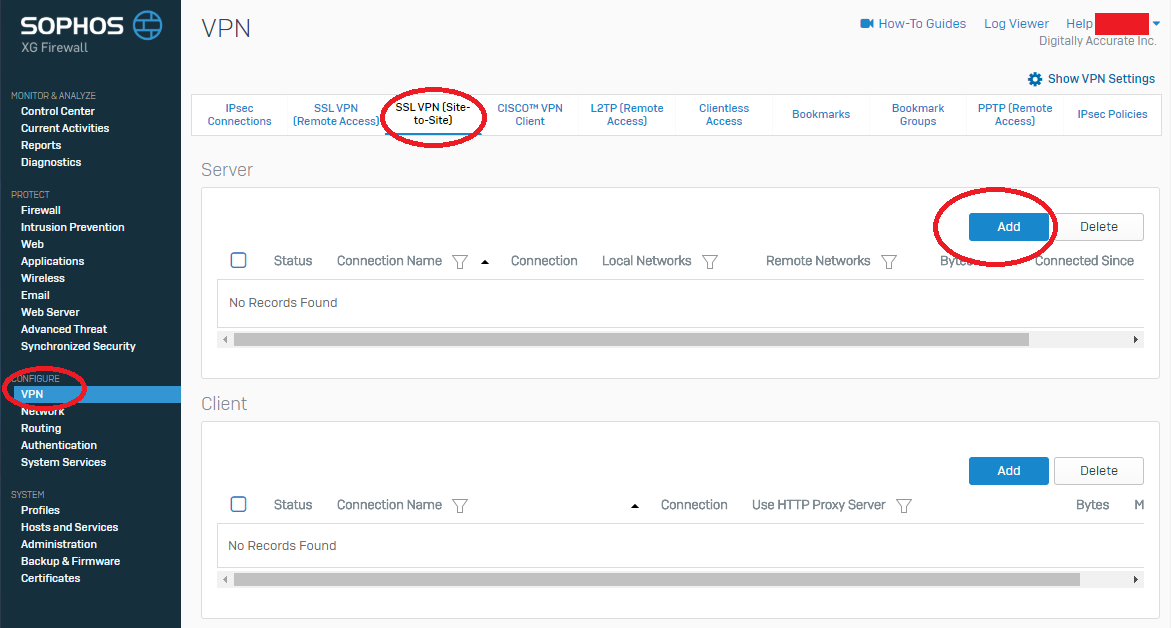
- Log on to your Sophos XG interface, click on “VPN” under “Configure” on the left hand side, and then choose “SSL VPN (Site-to-Site)” from the top. Then click “Add” under the “Server” section. As shown below.
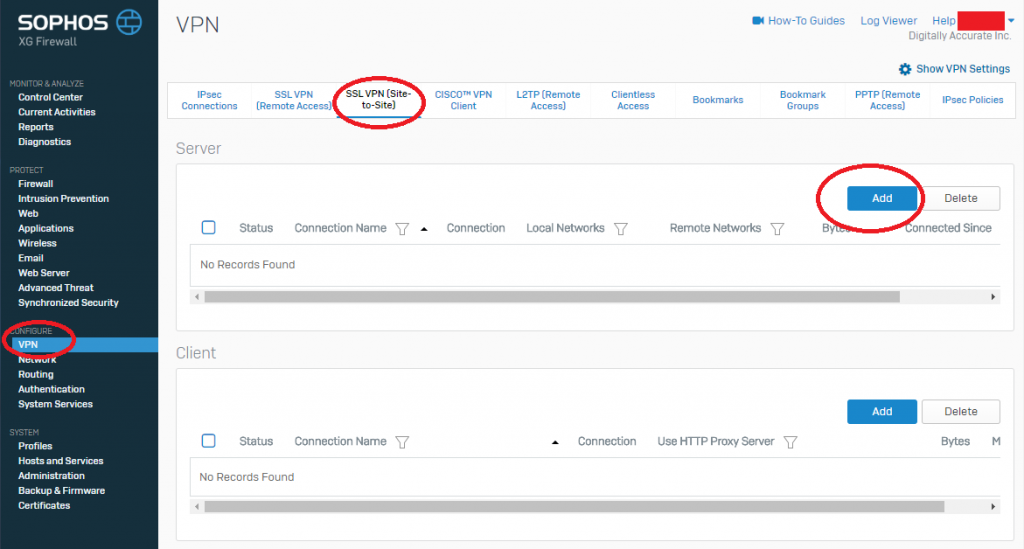
Sophos XG SSL VPN (Site-to-Site) Settings
- Now give the VPN connection a name, enter a friendly description, and specify Local Networks (Azure Subnets), and Remote Networks (On-Prem Networks). And then click “Save” as shown below.
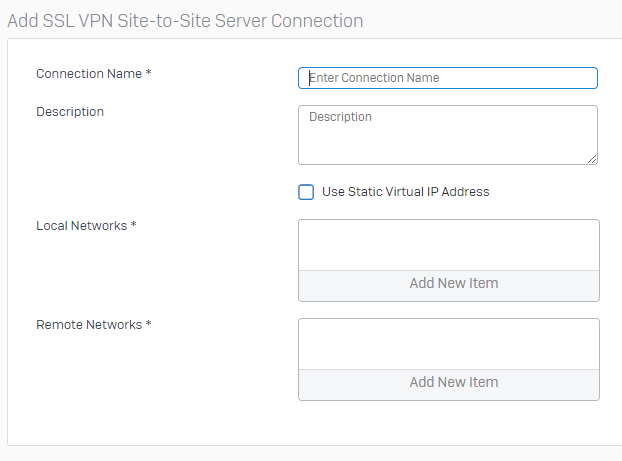
Sophos XG Create new SSL VPN Server
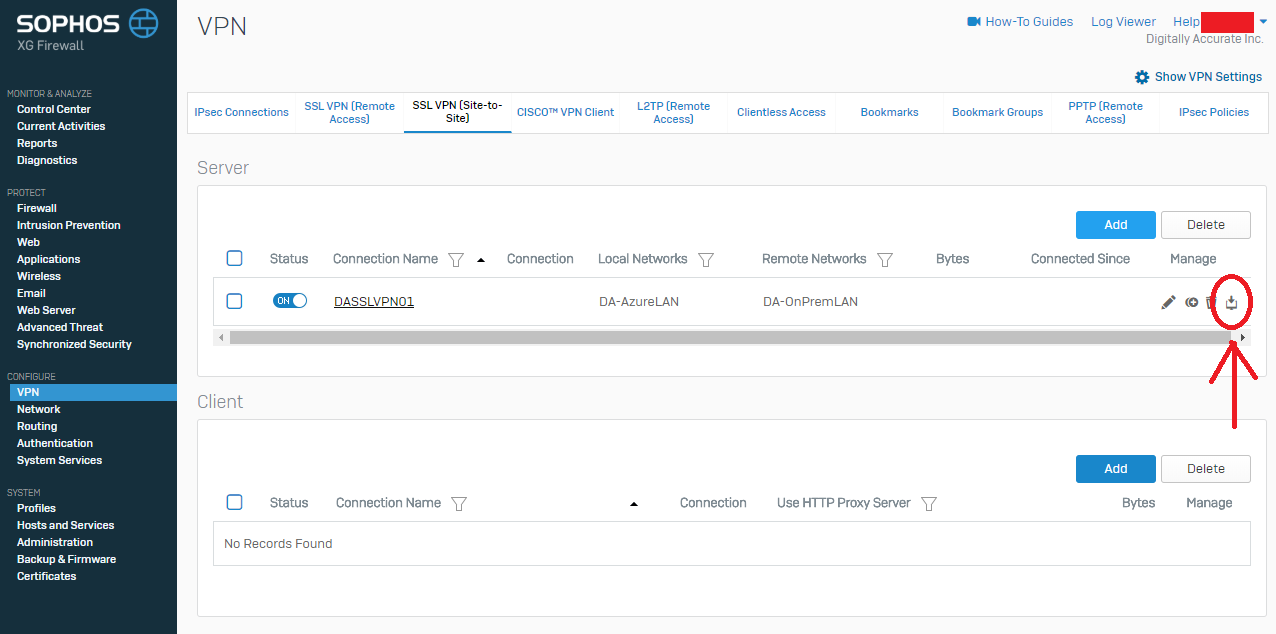
- Now we need to download the configuration so that we can load it on to your Sophos UTM so it know’s how to connect. While still in the “SSL VPN (Site-to-Site)” window, look for the column called “Manage”, and click the download icon (you can confirm it’s download via the mouse-over description). As shown below.

Sophos XG SSL VPN Server Download Config
- Save this file to your computer as we’ll need it for configuring the Sophos UTM
To configure the SSL VPN tunnel Client on the Sophos UTM:
- Log on to your Sophos UTM web interface, click on “Site-to-Site VPN” on the left hand side, and then select “New SSL Connection”. As shown below in step 2.
- Set the Connection type to “Client”, give it a friendly name. Now click on the folder next to “Configuration File” to brows to the VPN config file (this is the file we downloaded above from the Sophos XG unit). In my case, I also selected the “Override peer hostname” as I wanted to over the hostname of the Sophos XG unit (to avoid problems I chose an IP address). This value sets the hostname of the server that the UTM is connecting to. We also uncheck the “Automatic firewall rules” as we don’t want any rules automatically created, we want to specify only what is needed.
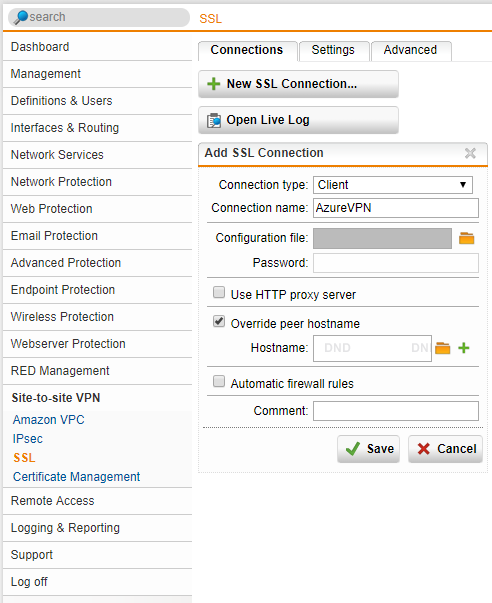
Sophos UTM Create New SSL VPN Connection
- Hit Save, and you should be left with something like below.
You have now fully configured the SSL Site-to-Site VPN tunnel between your Sophos XG and Sophos UTM instances.
To confirm a functioning VPN tunnel on your Sophos XG unit, you should see something similar to below.
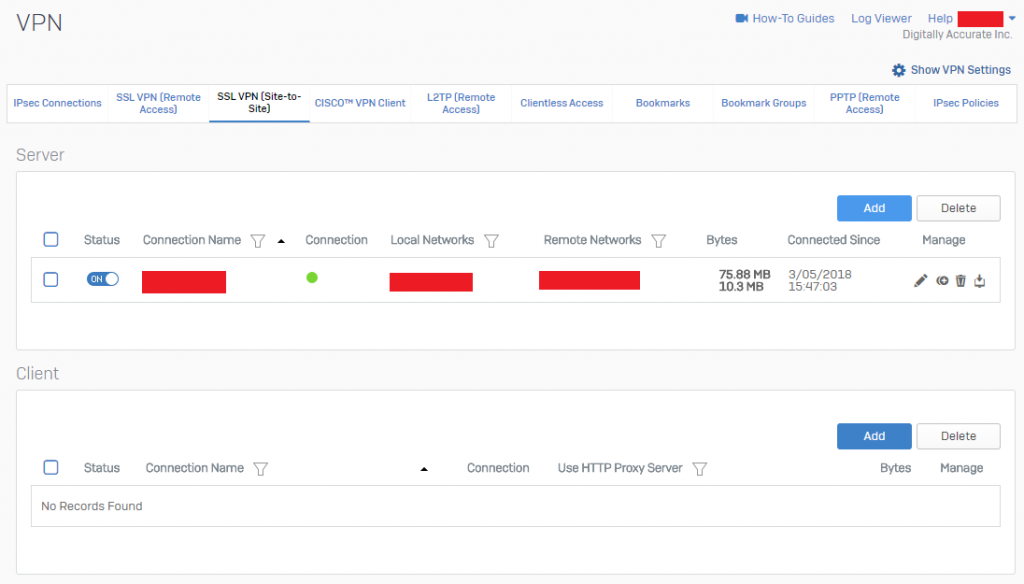
Sophos XG SSL VPN (Site-to-Site) Active VPN Status
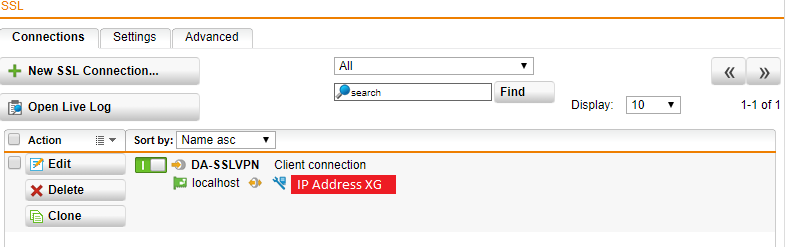
To confirm a functioning VPN tunnel on your Sophos UTM unit, you should see something simialar to below.
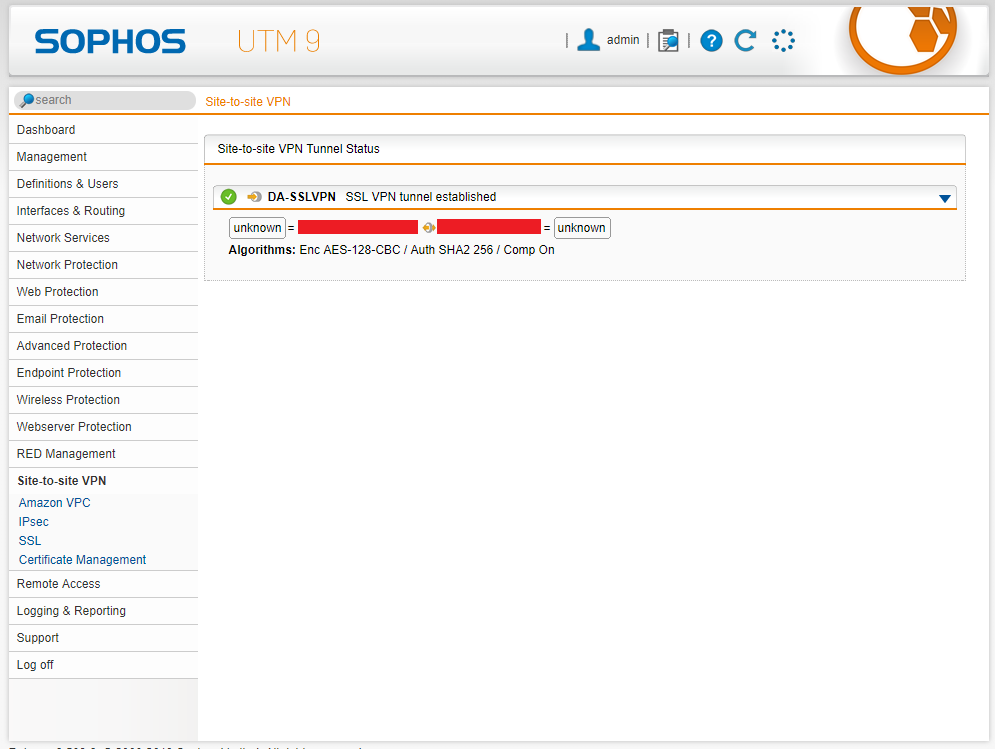
Sophos UTM Active VPN Status
Please note that a bug with XG to UTM VPN, is that on the Sophos UTM reports the active subnets as “unknown” as shown above on both sides. This can be safely ignored.
You can start to test some basic communication, however you still need to create firewall rules. Please note that the Azure network will not be routable until you continue the steps below and configure proper routing.
Microsoft Azure VNet (Virtual Network) custom routing table
When you create a Virtual Network (VNet) in Microsoft Azure, Azure will handle the routing for you automatically. It will create routers and other “instances” to handle network connectivity as you provision new subnets, gateways, devices, and network paths. Since we are deploying our own router, we want to override these default routing tables that are automatically created.
When looking at our target configuration, our Sophos XG unit will have an internet facing static IP, and will be handling communication between our internal network (and hosts), the internet (outside world), and our internal on-premise network (LAN). Because of this, we have to make changes to our Azure enviroinment so that the default subnet network route becomes the Internal IP Address of the Sophos XG firewall. We need to configure routes for both our Azure subnets (if wanted), our corporate on-premise LAN, and our catch-all route for internet access (0.0.0.0/0).
Once we create our own routing table, we’ll need to assign it to specific subnets to make those specific subnets enforce the routes.
To create a custom Route Table:
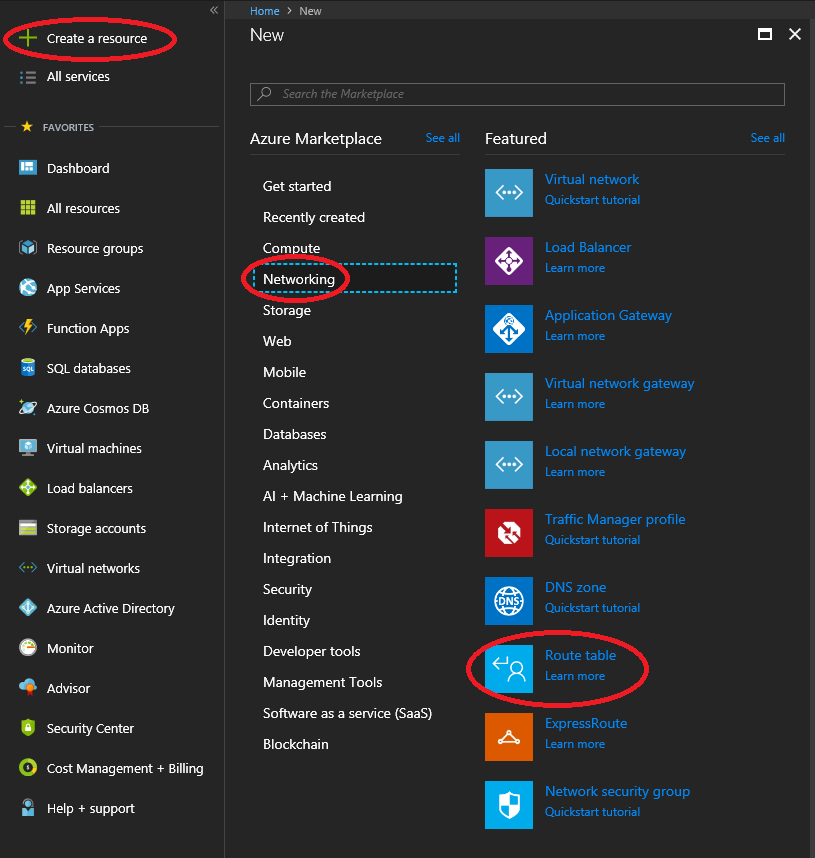
- Log in to the Azure Portal, View “All Resources”, click on the “Add” button at the top to create a new resource, or simply click on “Create a resource” on the top left of the Azure Portal.
- Select Networking on the left side of the table, then select “Route Table”. See example below.
Sophos XG Azure Add Resource Route Table
- Populate the fields, select the subscription, resource group, and the Location of where you’d like to place this. For “Resource Group”, select “Use existing”, and then specify the Resource Group you are attaching this to.
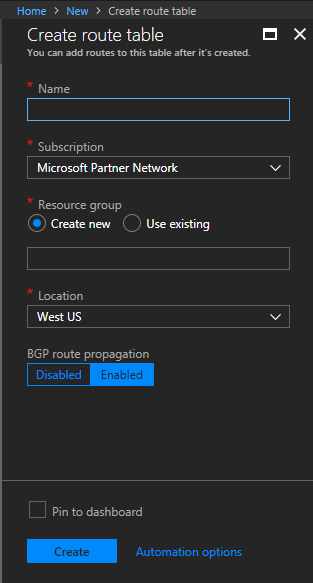
Sophos XG Azure Create Route Table
- Select “Create” to complete the creation of the route table.
- Now that we have a customer routing table, we want to create a route. With the “Route Table” object still open, open the “Routes” tab to open the page from the column on the left.
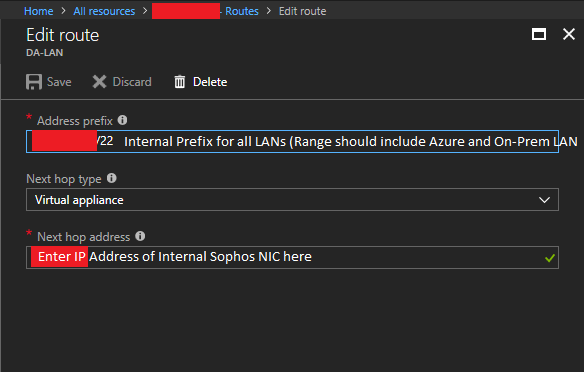
- Click on Add, and then create a route for the CIDR block that covers both your Azure subnets, and corporate on-premise LAN subnet. PLEASE NOTE: This CIDR block (Address prefix) should be large enough that it includes both your Azure subnets and your on-premise network. This will make this rule apply to all traffic destined for those networks. Under “Next Hop Type”, select “Virtual Appliance”, and then enter the IP address of your Sophos XG LAN Network interface. Then click save.
Sophos XG Azure Route Table LAN Route
- Click on Add, and then create a catch all route for the internet/WAN with an address prefix of 0.0.0.0/0. Under “Next Hop Type”, select “Virtual Appliance”, and then enter the IP address of your Sophos XG LAN Network interface. Then click save.
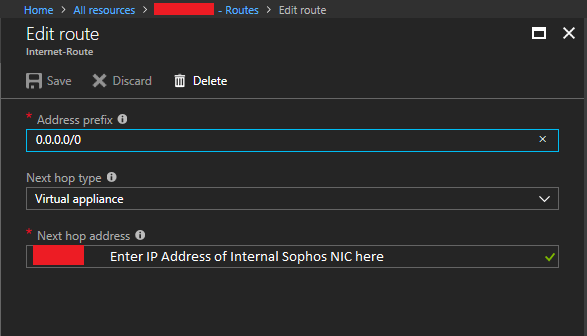
Sophos XG Azure Route Table Internet Route
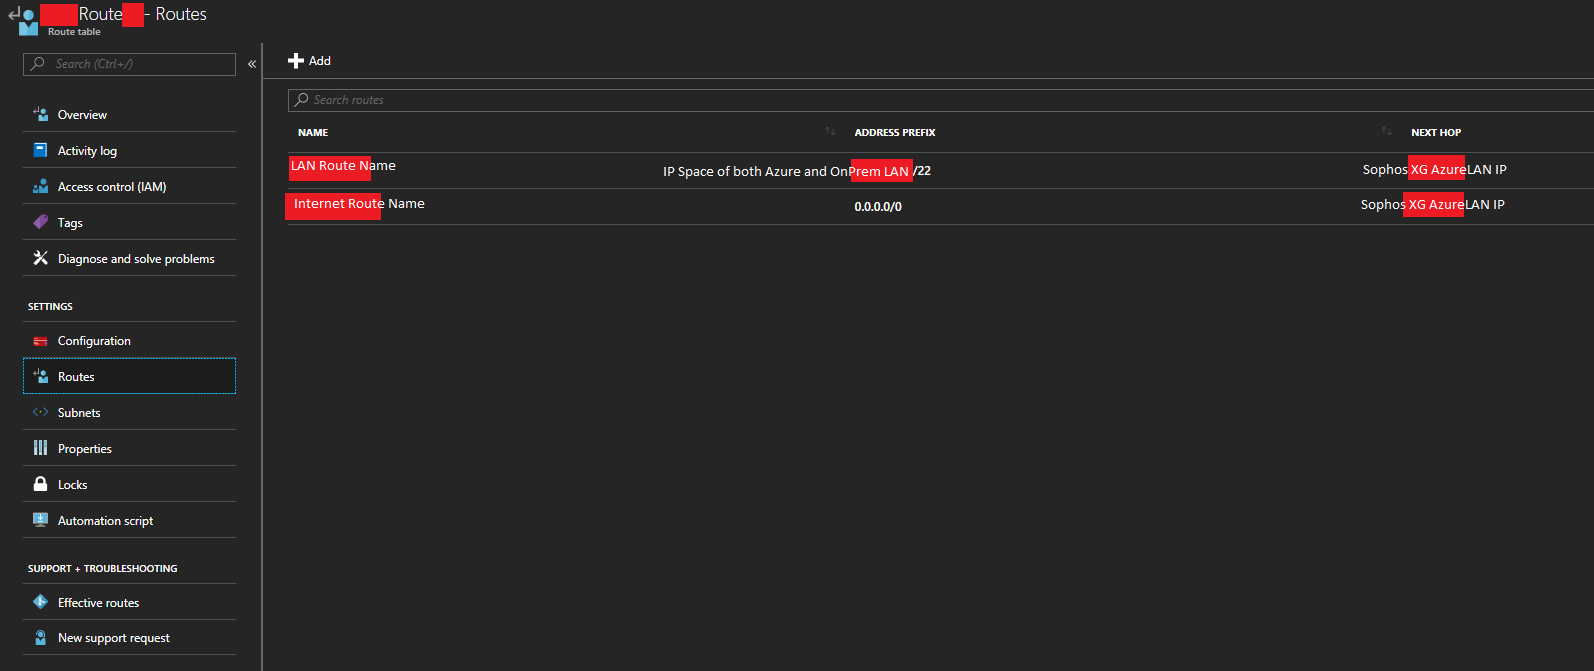
- The Route’s section should look similar to this.

Sophos XG Azure Route Table Route List
- Now we need to assign the route table to the chosen subnets. This will apply the routes we created above to specific subnets on our Azure Virtual Network (VNet). With the “Route Table” object still open, open the “Subnets” page from the column on the left.
- Click on “Associate” to add this to an existing subnet. And then associate it to your Azure Virtual Network subnet where the XG and your VMs reside.
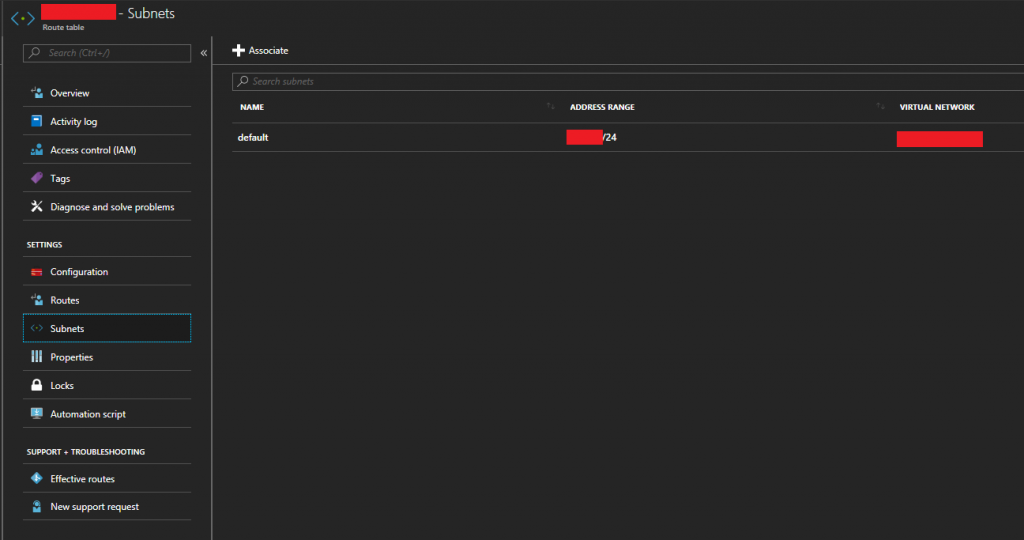
Sophos XG Azure Route Table Associate Subnet
- Now completed, the “Overview” tab should look similar to this.
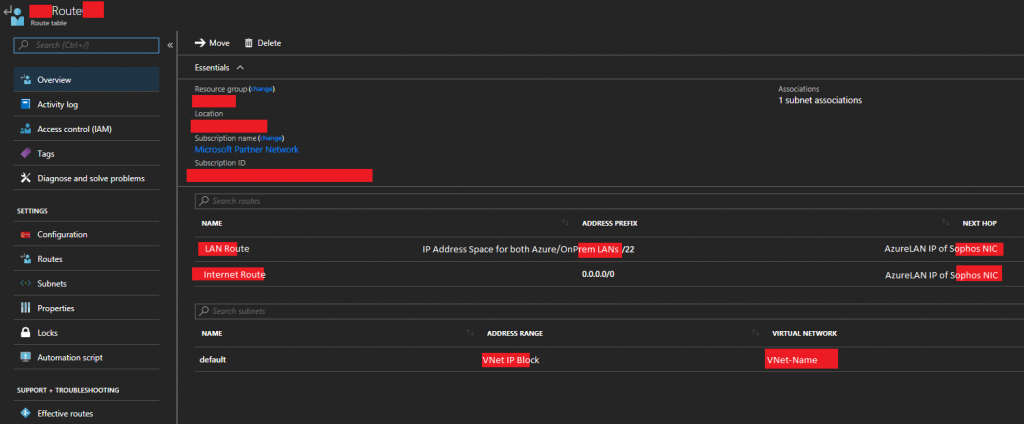
Sophos XG Azure Route Table Overview
You’ve successful configured a custom routing table for your Microsoft Azure subnet which will route packets destined for other subnets (including internet/WAN) to your Sophos XG for further routing.
Microsoft Azure enable IP Forwarding on Virtual Network Interface
In order for a VM (Virtual Machine) to have the ability to forward and route packets, we need to enable “IP Forwarding” on both the Internal and External NIC of the Sophos XG appliance running on Azure.
To enable this:
- Log in to the Azure Portal, view “All Resources” and select one of the “Network interface” objects for your Sophos XG appliance/instance.
- Click on “IP configurations” under the “SETTINGS” group.
- Look for “IP forwarding” under “IP forwarding settings”. Set this toggle to “Enabled” as per below.
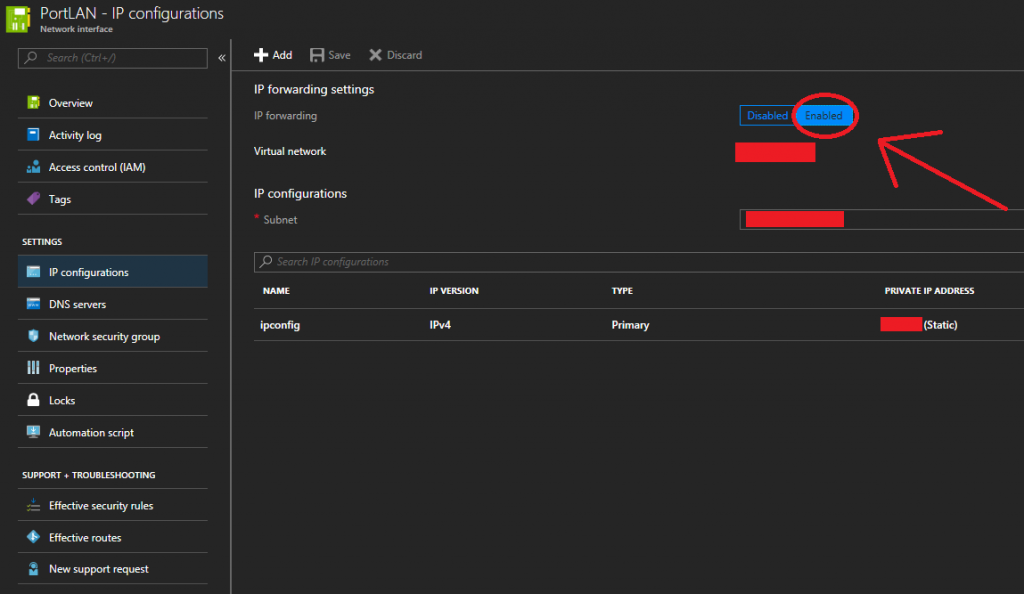
Enable IP Forwarding on Microsoft Azure Network Interface
- Click Save
- Repeat for the other Sophos Network interface (both External and Internal need this enabled)
IP Forwarding has now been enabled. The Sophos XG appliance can now successfully route packets in your Microsoft Azure Virtual Network (VNet).
Conclusion
At this point you’ll have everything configured. You’ll have a SSL VPN between your Azure hosted Sophos XG instance and your on-premise Sophos UTM, as well as connectvity between both of the networks. You will now need to configure all your firewall rules to only permit the traffic you want to traverse from internal-azure to internal-onprem as well as external WAN traffic (this is beyond the scope of this document). You need to take care in making sure you only permit traffic that should be going over these network links. Now that both networks are connected, it provides another means to connect and communicate with the other networks which increases your security risks. You’re not only securing against one internet connection on one LAN, but 2 internet connections across 2 networks.
In my scenario by configuring this I was able to decommission the Microsoft Azure VPN Gateway (minimizing costs), and have my own security appliance/instance handle the communication between both networks and also protect both networks with all the fancy features that the Sophos XG and UTM line offer.
Leave a comment with feedback!