Dec 282023
 
Synology DS923+

Today we’re going to cover a powerful little NAS being used with VMware; the Synology DS923+ VMware vSphere Use case and Configuration.

This little (but powerful) NAS is perfect for your VMware vSphere homelab and numerous other scenarios and uses. Let’s go over this specific use case, and how to best configure it with your VMware environment so you can fully take advantage of it.

Keep in mind that this post reviews only one of many potential uses, specifically with VMware vSphere (and ESXi). I’m hoping with time to review some other uses for this NAS.

Synology DS923+ VMware vSphere Use Case

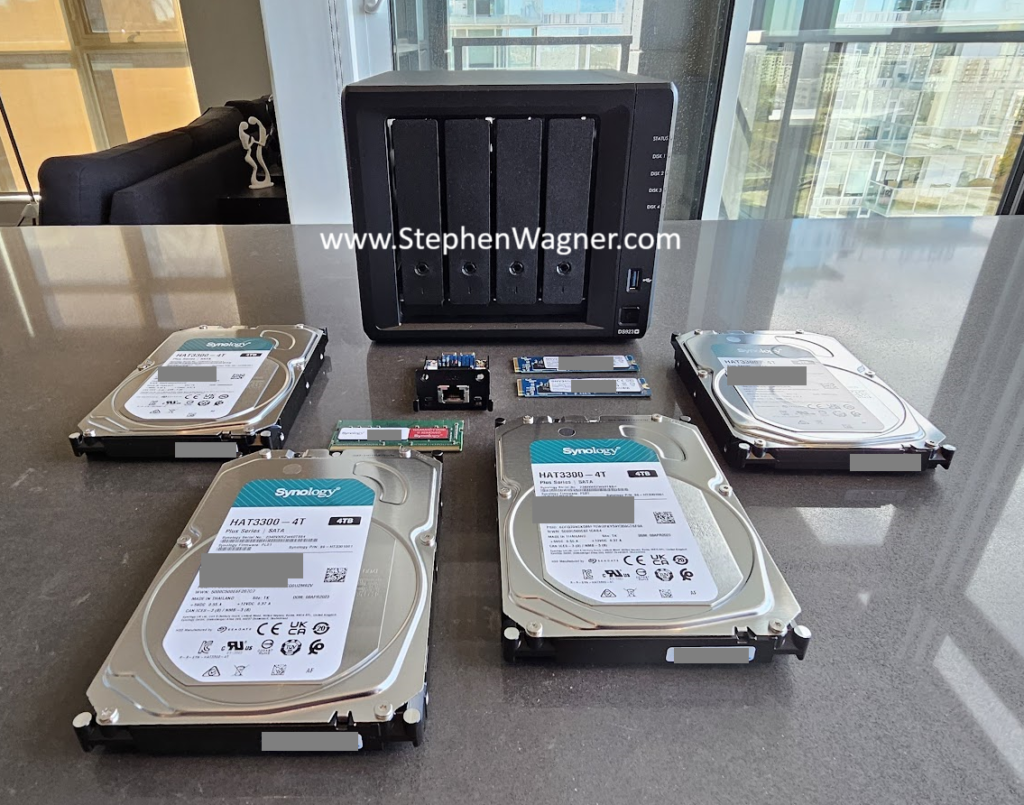
The Synology DS923+ is a tiny yet powerful 4-Bay NAS, offering 2x1Gb NICs built-in, with the ability to add in a user-installable 10Gb NIC module. You can also add 2 x NVME drives for NVME SSD cache, giving you the perfect iSCSI target, in our case particularly for VMware vSphere and ESXi.

Synology DS923+ w/ 10Gb NIC, Disks, and 2 x NVME SSD for Cache

The highlights of this specific unit and configuration:

  • NVME SSD Cache – Provides high speed storage (also good at random I/O)
  • Redundant NICs – 1 x 10Gig (add-on) and 2 x 1GB (built-in)

Looking at the networking capabilities, we have 3 NICs when the optional 10Gb NIC is installed. This gives us a number of different potential configurations, but for VMware vSphere, we’ll map out the following:

  • NIC #1 – 10Gig: iSCSI Primary *(and SMB if using VLAN interfaces)*
  • NIC #2 – 1Gig: Management (and SMB w/o VLAN interfaces)
  • NIC #3 – 1Gig: iSCSI Fallback

Note: You could add VLAN interfaces to your Synology device on the 10Gig interface, and use VLANs to provide SMB and other services over the 10Gig link as well. Please note that adding VLAN interfaces is unsupported and may cause issues (including when performing upgrades).

What’s particularly nice about this NAS is that for the price point you’re able to provide 10Gb iSCSI to your ESXi hosts, while also having a fallback connection for redundancy. While the fallback NIC is limited to 1Gig which is substantially slower, it does allow your workload to continue to run, and most importantly without corruption or loss of data due to an iSCSI paths down situation.

Synology DS923+ iSCSI Configuration for VMware vSphere

So now that we’ve established the use case for the Synology DS923+, lets go over how to best configure it for your VMware vSphere environment, and get it connected to your ESXi hosts.

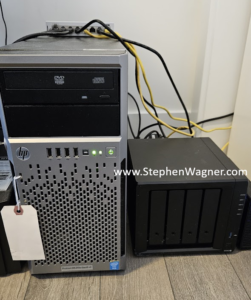
HPE Proliant Server running VMware ESXi with Synology DS923+

There’s a few things to note for the design of the configuration:

  • iSCSI should be using Jumbo Frames
    • Both the ESXi vmk iSCSI adapters and the iSCSI NIC on the Synology NAS
    • All iSCSI networking (switches) should have jumbo frames enabled
  • iSCSI Multi-pathing policy will be VMW_PSP_FIXED (Fixed Pathing)
    • We will NOT be using Round-Robin MPIO (VMW_PSP_RR)
    • Fixed pathing will be used with the 10Gig link being preferred, and 1Gig link acting as fallback
  • The Synology NAS iSCSI target should only be configured to listen and advertise on the iSCSI NICs (primary active and fallback)

Configure iSCSI on the Synology DS923+

To configure iSCSI on your Synology:

  1. Perform Basic Configuration
    • Configure NAS
    • Configure Static IP for Management on 1Gb NIC Interface
  2. Enable the 10Gb NIC Interface (For use with iSCSI Primary)
    • Configure a Static IP
    • Configure Jumbo Frames
  3. Enable the 1Gb NIC Interface (For use as fallback iSCSI)
    • Configure a Static IP
    • Configure Jumbo Frames
  4. Use the Synology “SAN Manager” to Configure the iSCSI Target
    • Create an iSCSI LUN and Target
      • Configure a LUN with your preferences (Thin provisioned, etc)
      • Configure the iSCSI Target
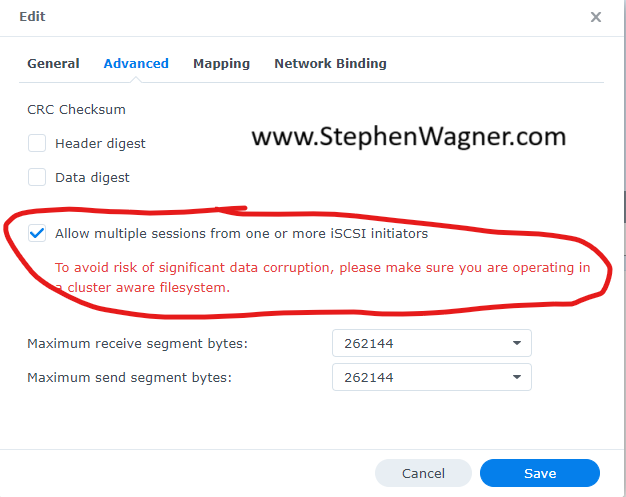
        • Enable “Allow multiple sessions from one or more iSCSI initiators” to allow multiple initiators to access (both from single hosts and/or multiple hosts)Allow multiple sessions from one or more iSCSI initiators
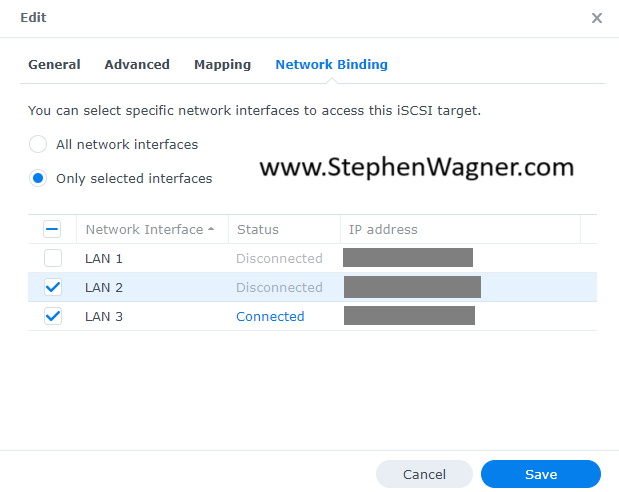
        • Configure “Network Binding” to the 10Gig Primary link and 1Gb fallback NIC. We do not want it to advertise on the management interfaceSynology iSCSI Target Network Binding
      • Configure “Host” initiator settings
        • This is where you will add your iSCSI host initiator IQNs, and provide “Read/Write” access

Overall, this is a basic iSCSI target configuration, with the only exception is that we are only using select interfaces for iSCSI connections. While we can use both the 10Gb and 1Gb connections, we’ll use the host settings to only use the primary and have the secondary as a fall back.

Note that the networks (and IPs) used above for iSCSI are on a network dedicated to iSCSI. We do not want to use our data networks for storage related traffic. They are separated not only for security, but also because they are using different frame/MTU sizes.

Configure ESXi to connect to the Synology DS923+

To configure the Synology NAS iSCSI Target on your ESXi hosts:

  1. Configure your ESXi host networking on your iSCSI Network
    • Configure Networking on your hosts
      • Configure your storage vSwitch and create a portgroup for each physical NIC
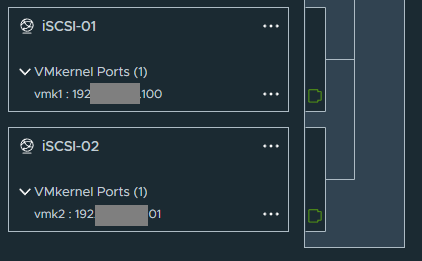
      • Configure a vmk adapter with IP for each portgroup you haveiSCSI Port Groups for iSCSI VMK adapters
      • Configure each portgroup to only use one physical NIC as active, the rest unused
        • Each physical NIC should be used by only one portgroup
  2. Configure your iSCSI Initiator
    • If not already enabled, “Add Software Adapter” under “Storage Adapters” to add the iSCSI Software Adapter initiator.
    • Note the “iSCSI Name”. This is your initiator IQN, and needs to be added to the Synology iSCSI Target “Host” settings to provide access and add permissions (last item listed in the previous section configuring the Synology NAS).
    • Add your Synology’s Primary iSCSI interface and Secondary Fallback iSCSI interface IP addresses to your ESXi hosts “Dynamic Discovery” list. Do not use “Static Discovery” as this will auto-populate.
    • If you’re using the same IP subnet for all your iSCSI vmk adapters, enable iSCSI Port Binding.
      • Under “Network Port Binding”, click add, and select all your iSCSI vmk adapters which should auto-bind to the physical NIC owned by the port group they are using. They will not show active until you have completed all steps in this guide.iSCSI Port Binding
  3. Configure your LUN
    • Rescan your storage adapters
      • If you already have a VMFS volume, it should auto-mount and be added to the host.
    • If you haven’t already, create a new datastore by right clicking on the host, “Storage”, and “New Datastore”. Follow the wizard to create a new VMFS volume on your Synology iSCSI target.
  4. Configure proper fallback for the 10Gb and 1Gb link
    • On your ESXi hosts, under “Configure”, navigate to the “Storage Devices” tab, and identify all your “SYNOLOGY iSCSI Disk” devices.
    • For each “SYNOLOGY iSCSI Disk” device, under “Properties”, go to “Multipathing Policies”, “ACTIONS”, “Edit Multipathing”, and set it to “Fixed (VMware)”, while also setting the 10Gb path below under “Select the preferred path for this policy”.
  5. Repeat steps for each ESXi host.

As always, I recommend doing a “Rescan Storage” after any storage related changes. You may need to restart the host after enabling iSCSI Port binding.

Conclusion

You have now configured your VMware ESXi host(s) to connect to your Synology DS923+ with multiple paths for redundancy while favoring the faster 10Gb connection.
Dec 022021
 

As I’m watching the Synology: 2022 AND BEYOND event live I wanted to write this post to share with you some of my favorite parts.

For those of you wanting to tune in (while live) or watch the replay you can view it below.

You can also visit: https://event.synology.com/en-us/annual_event to watch the stream (or replay) and find out more information.

DSM 7.0.1 and DSM 7.1

As an IT professional and enthusiast, here’s a list of some of my favorite new features, functionalities and improvements.

DSM 7.0.1

  • High Availability Improvements
    • 40% less time needed for failovers and switchovers
    • 80% less time needed for system updates
  • System Responsiveness and Performance enhancements
    • 56x faster SMB (Windows File Share) searches
    • 70% speed up in application launches
    • 80% faster RAID 6 performance (for double parity RAID)
  • Enhanced Drive Replacement
    • Replace predicted failure/presumed unhealthy/to-be-retired drives with unused healthy drives that are in other bays.
    • Switch without degrading your array/storage pool
  • Auto Drive Replacement
    • Clones predicted failure/presumed unhealthy drive to available hot spare, switching automatically when the drive fails without requiring RAID rebuild time
  • Volume-wide data deduplication (on all flash arrays)
    • Scheduled or Manual Volume Wide Deduplication on all flash volumes
    • Click here for information on supported models and configurations
  • Synology Directory Server
    • Secondary domain controllers provide additional redundancy and availability of directory services
    • Provides ability to deploy additional domain controllers at additional locations

DSM 7.1 (Coming Soon)

  • SMB Multichannel
    • Utilize multiple network links and network connections to combine speed with SMB (Windows File Share) file transfers
    • Provides redundancy and fault tolerance
  • DFS Support over SMB
    • Combine multiple Synology NAS file servers to provide file services to your network using Distributed File System (DFS)
  • Active Insight
    • Numerous updates to make Active Insight more powerful when it comes to managing numerous Synology NAS units.
    • Enhanced control and information on System Updates
    • Suspicious activity detection recognizes suspicious activity on the NAS units (example: unusual login times and locations, unused accounts being used after being idle, failed logins, etc).
    • Task monitoring for Hyper Backup
  • Synology Directory
    • Read-only domain controller support provides ability to deploy read only domain controllers at remote sites that may not be physically secure while providing local cached copies of the directory.

And that’s not all…

Synology has also made numerous improvements to their Data Protection Services, Surveillance suite, Wireless Networking, Synology C2 Cloud, and more, but you’ll have to check it out for yourself. There are tons of other goodies for office workers, small business owners, photography enthusiast, and more that I haven’t included in this list.

Oct 092021
 

One of the new real cool features of the Synology C2 Cloud and Synology DSM 7.0 is the ability to back your Synology DiskStation NAS up to the cloud.

Using the Synology’s “C2 Storage” service, you can use Synology Hyper Backup on DSM 7.0 to backup your your File Shares, NAS, applications, and data to the cloud.

Below, I will show the process of creating a Hyper Backup Backup task to backup a few Synology File Shares to the Synology C2 Storage Service.

NAS Backup (and Restore) with Synology C2 Cloud Video

For a full video guide and demonstration, please enjoy this video! Please continue scrolling for a text guide (with images).

Synology DiskStation NAS Backup (and Restore) with Synology C2 Storage Cloud!

Backup NAS to Synology C2 Storage

It’s very easy to back your NAS up to the cloud. Here’s a quick guide showing how it’s done.

We’re going to assume you already have some File Shares configured on your NAS. These can be Windows File Shares, NFS Exports, and even Active Backup for Business storage repositories. In my case, I want to back up 2 Windows File Shares to the Synology C2 Storage service.

  1. Open Hyper Backup
  2. If you have no existing backup jobs, the “Backup Wizard” should automatically open to configure a new job. If you have existing jobs, select the “+” on the top left of the window.
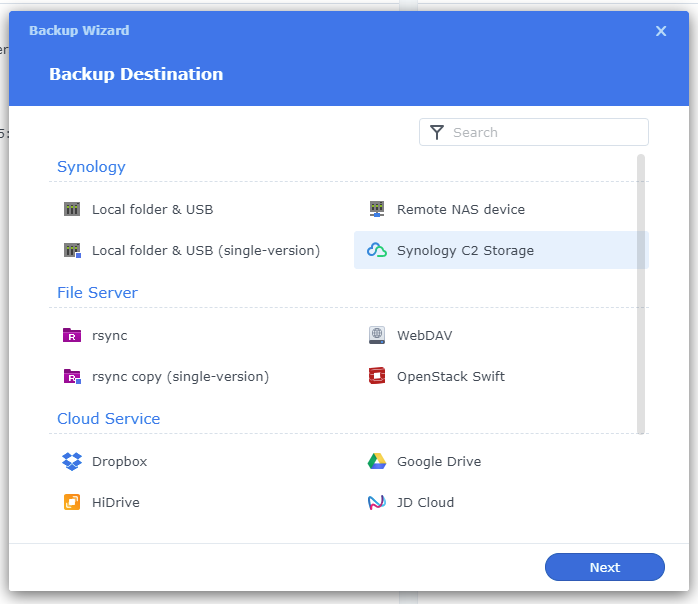
  3. Under “Backup Destination”, choose “Synology C2 Storage”.
    Hyper Backup Destination
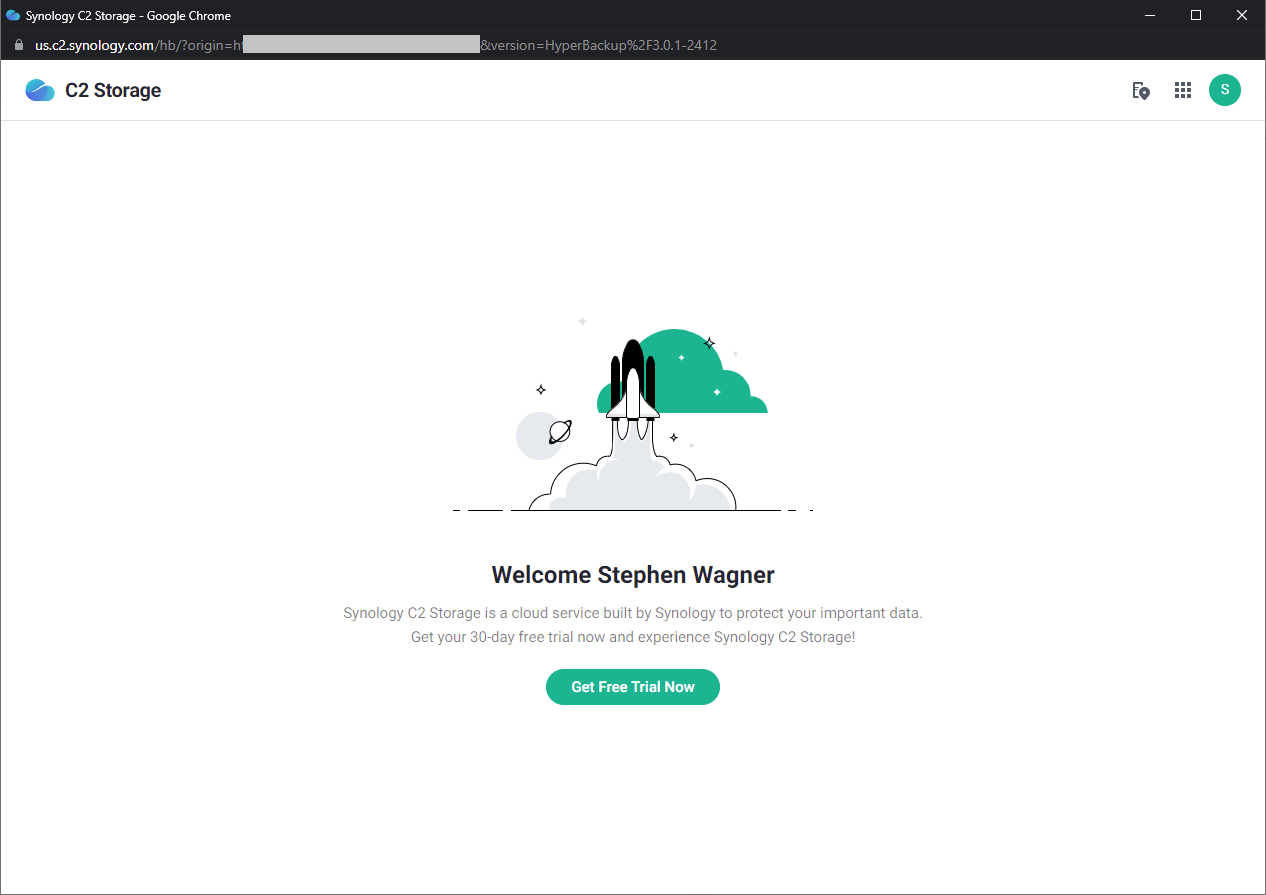
  4. This will open a new window asking you to log on to the Synology C2 Storage Service. You may have to create a new account, or log in with your existing Synology credentials. From here you can start a free trial.
    Synology C2 Storage - Get Free Trial Now
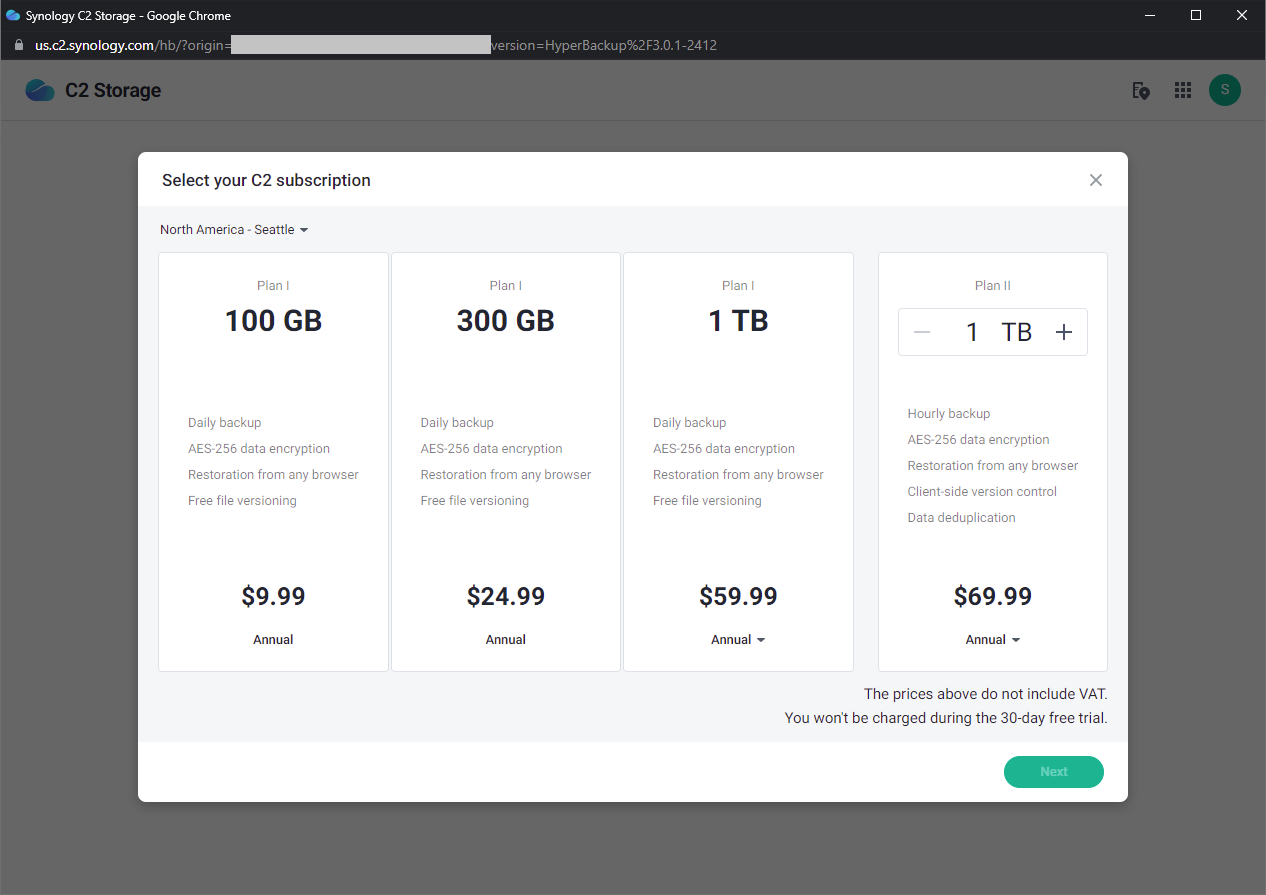
  5. Choose a subscription and plan. You should get a 30-day free trial.
    Synology C2 Storage - Select your C2 subscription
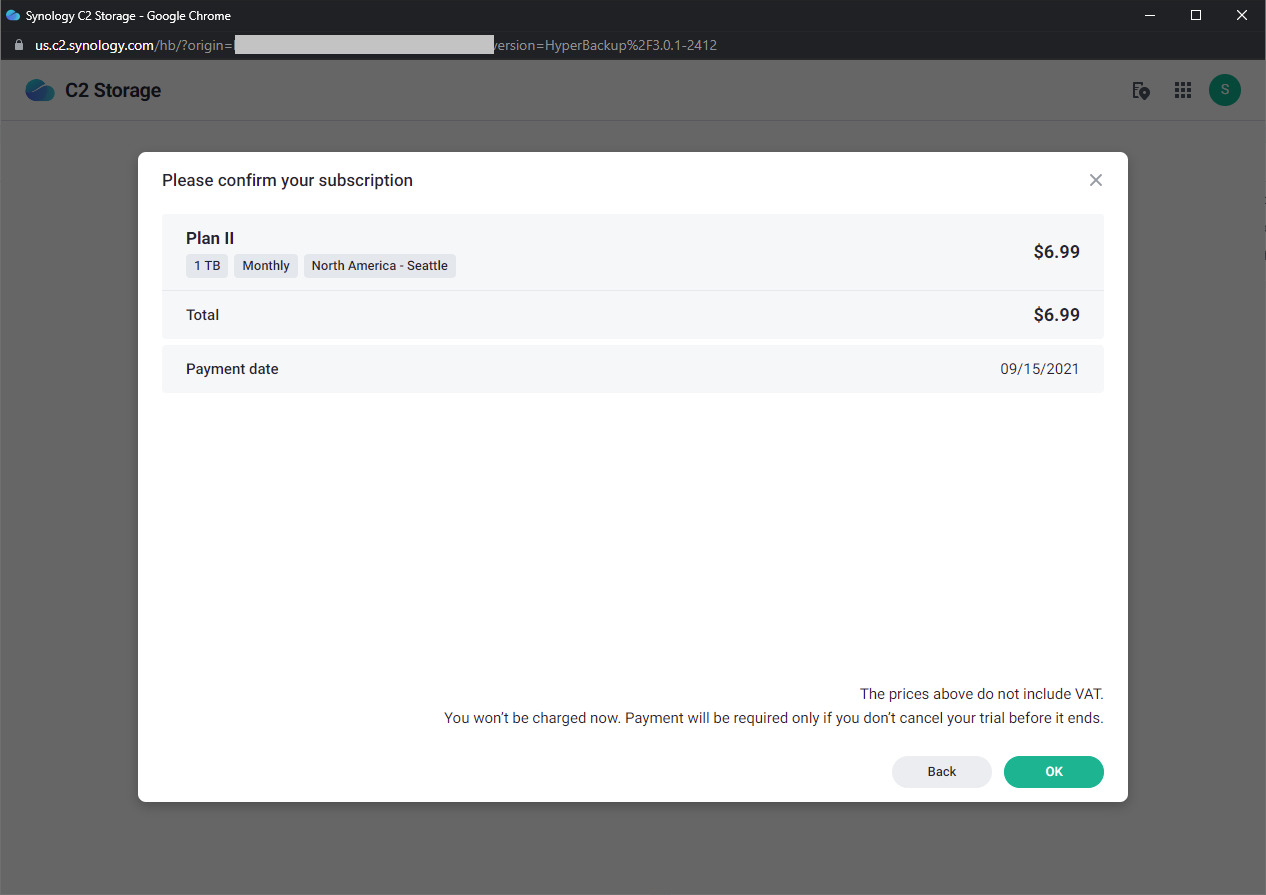
  6. Confirm your subscription
    Synology C2 Storage - Confirm Subscription
  7. Accept the TOS (Terms of Service)
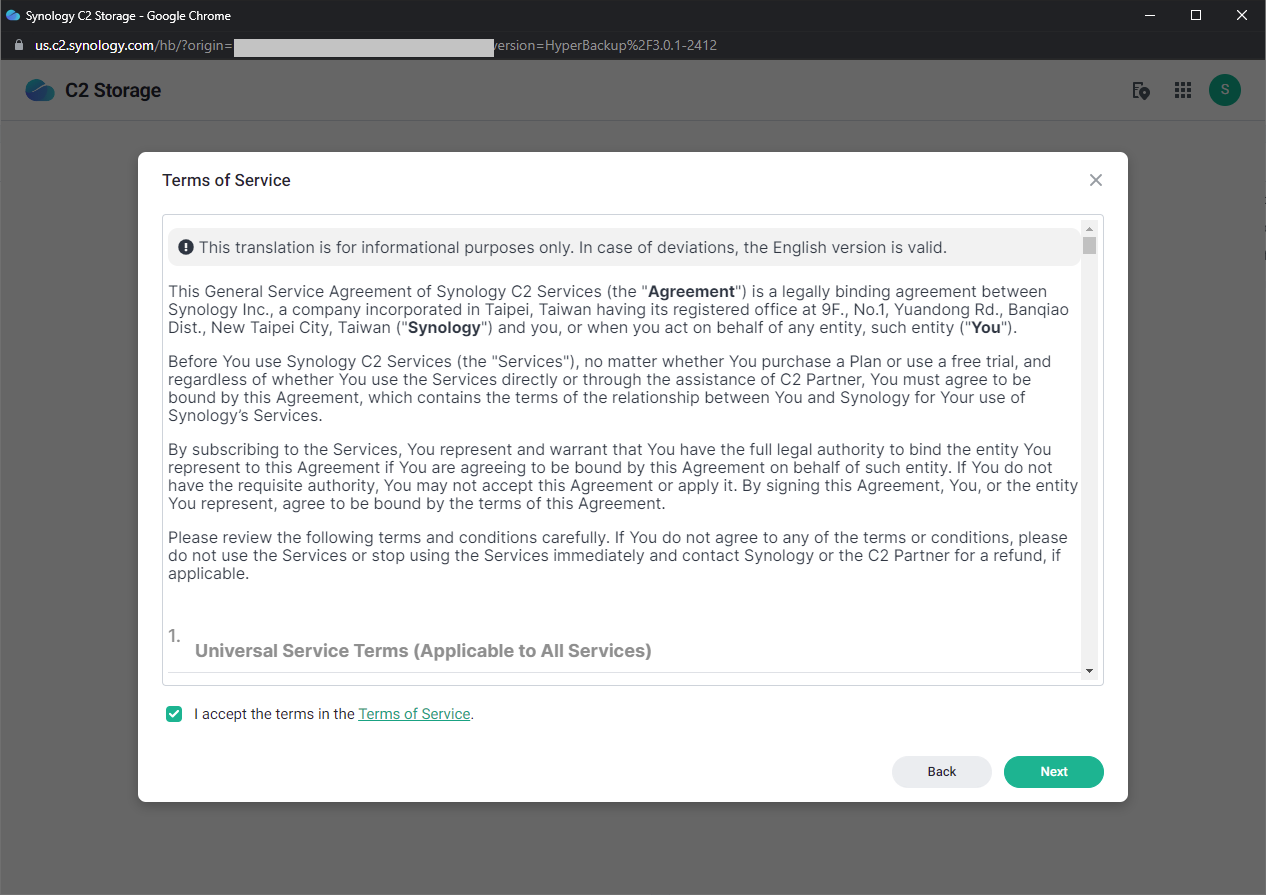
    Synology C2 Storage - Terms of Service
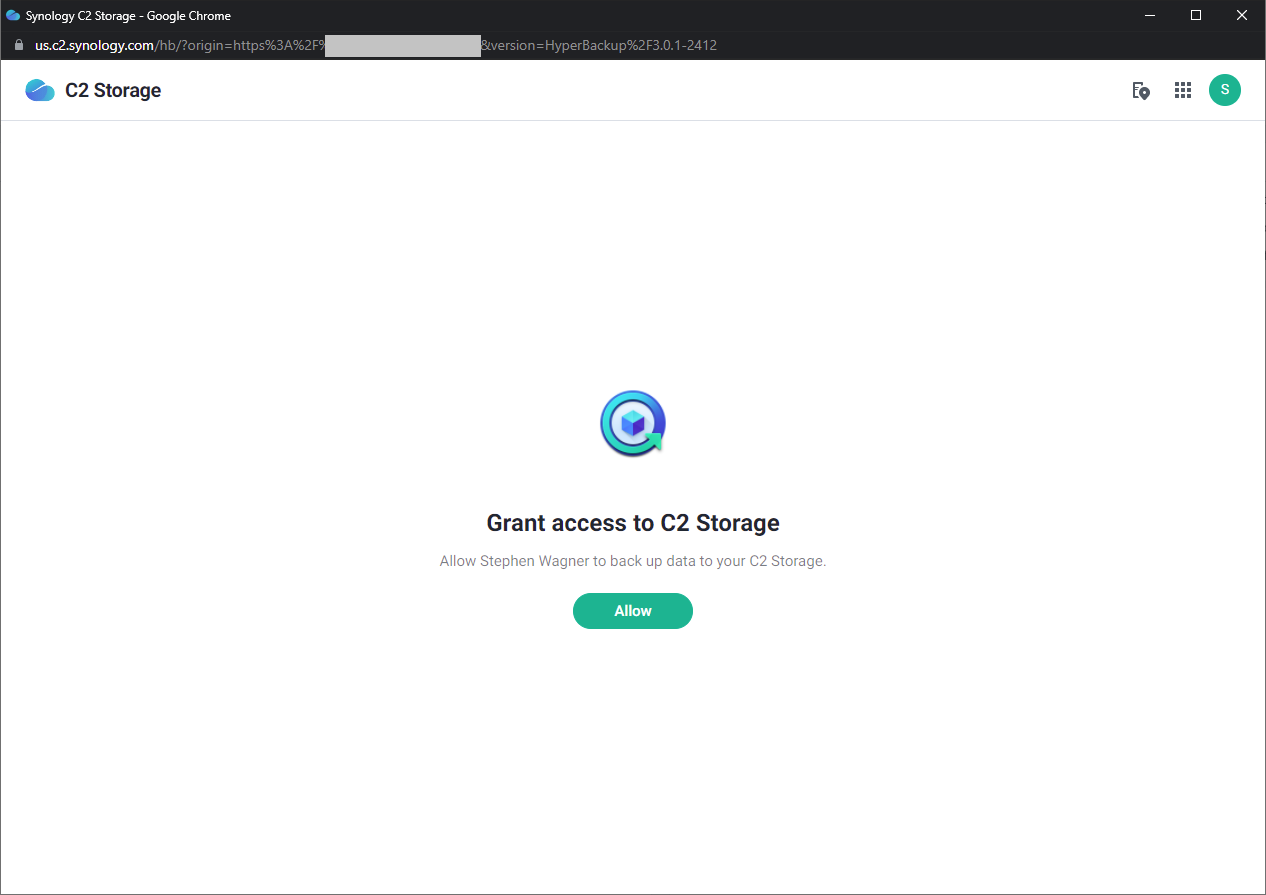
  8. You must now “Grant access to C2 Storage”. This will allow your user account to access the C2 Storage service.
    Synology C2 Storage - Grant Access
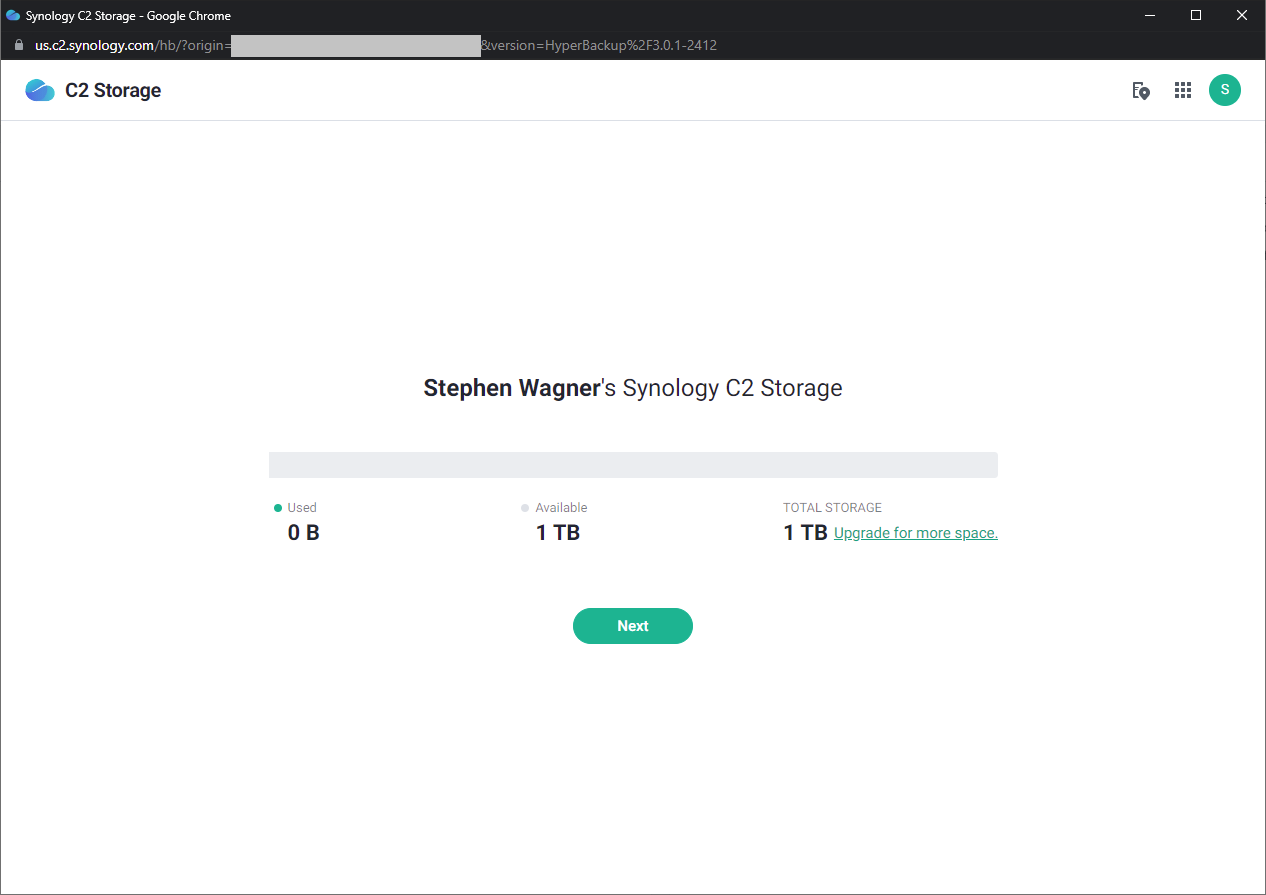
  9. You will now be presented with information on your Synology C2 Storage Account
    Synology C2 Storage Account Information
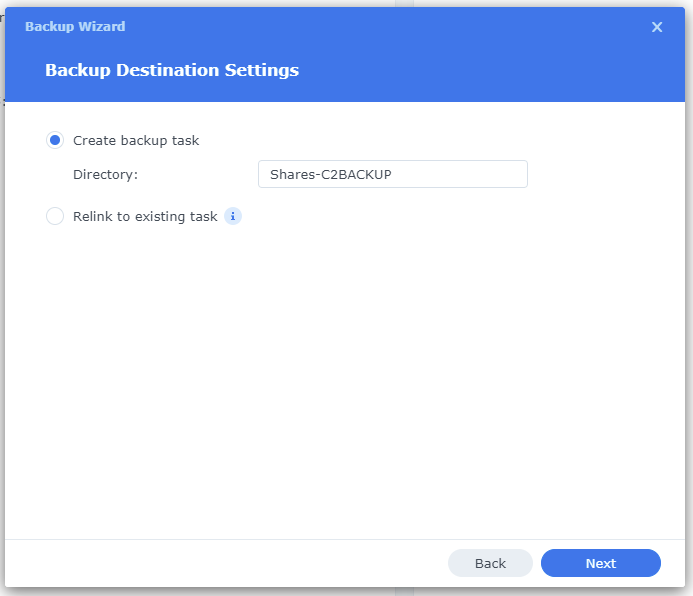
  10. You will now be redirected back to Hyper Backup. You’ll need to create a name for the new backup task destination directory.
    Hyper Backup Destination Settings
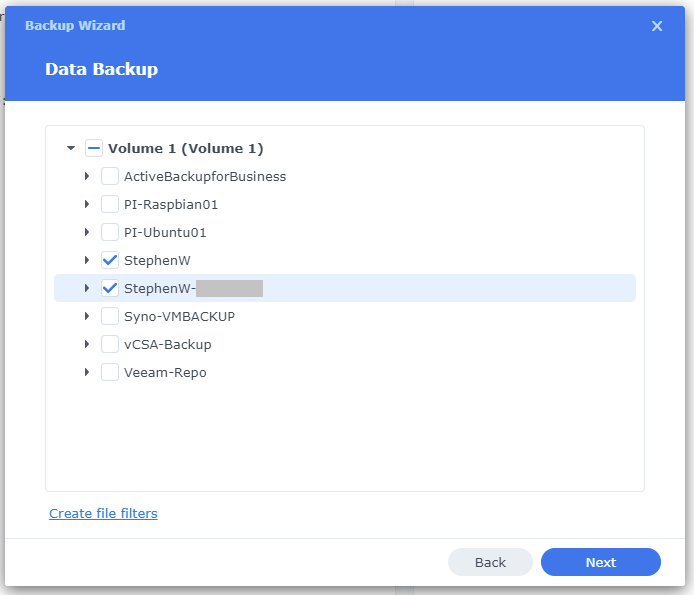
  11. Here’s where you will configure which File Shares (or volumes) to backup to Synology C2.
    Hyper Backup Choose Data Backup Sources
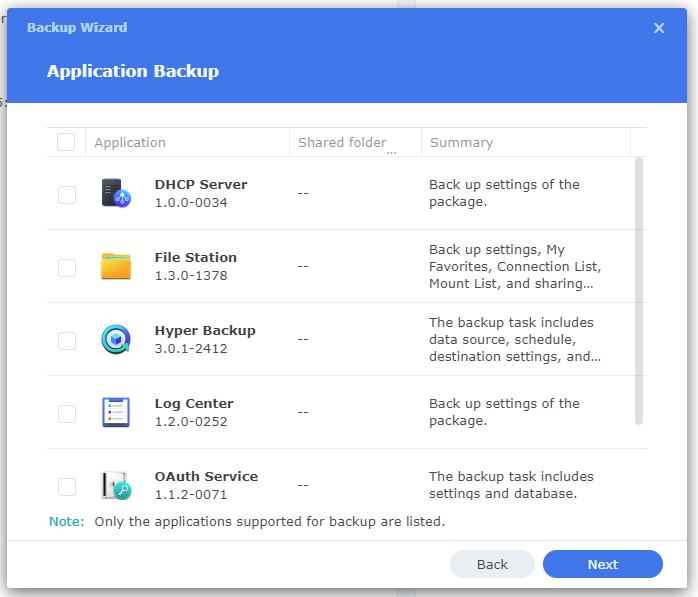
  12. You also have the ability to backup Synology Applications. This is helpful should you wish to backup your entire Synology NAS to Synology’s C2 cloud. I’m only doing shares, so I hit next without selecting anything.
    Hyper Backup Application Backup
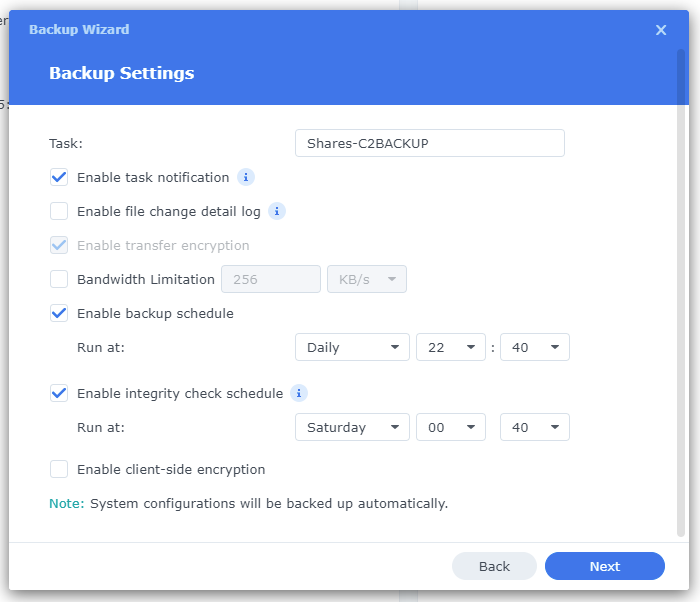
  13. Now we will configure the Backup Task settings. This includes the task name, notifications, file change logs, bandwidth limits, backup schedule, and integrity check schedule. We can also “Enable client-side encryption” which we will use to encrypt the data on the cloud.
    Hyper Backup Backup Settings
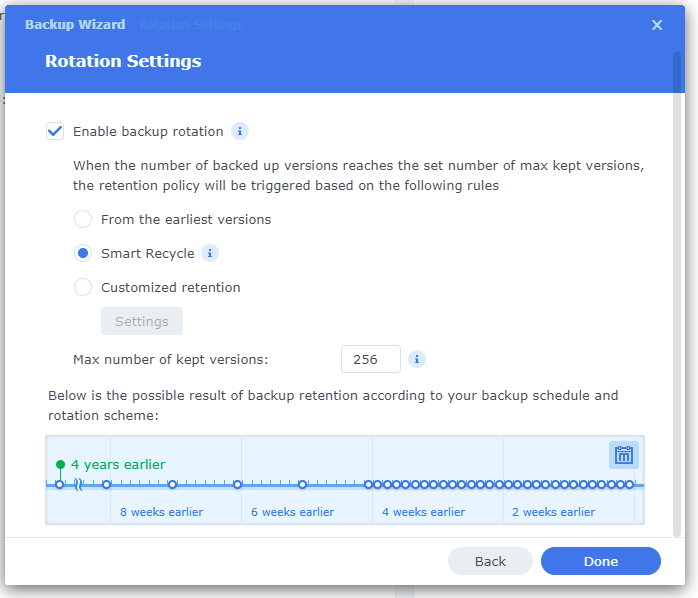
  14. After proceeding, we will now configure backup rotation settings. I enabled backup rotation with “Smart Recycle”.
    Hyper Backup Rotation Settings
  15. If you enabled encryption, you will be prompted to download your encryption key. Save this file in a safe location as you will need it in the event your NAS fails and you need to access your cloud storage.
    Hyper Backup Synology C2 Encryption PEM key file

And that’s it! You have now configured your NAS to backup to Synology C2 Cloud!

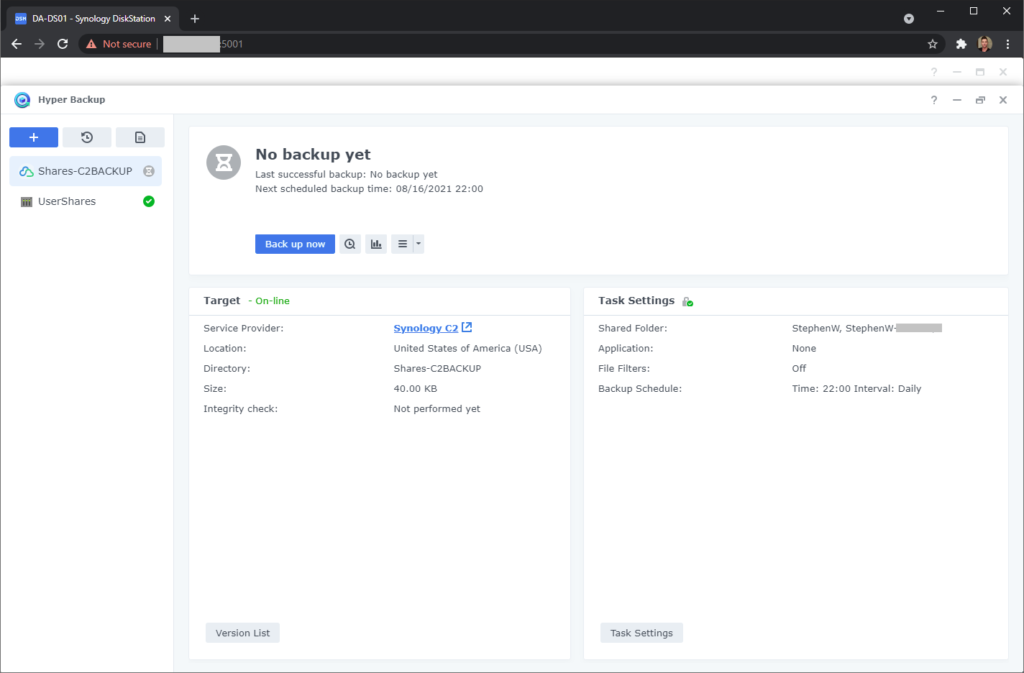
Hyper Backup NAS Backup to Synology C2 Cloud

We have now configured the backup job. Let’s go ahead and kick off a backup by clicking on “Back up now”.

And that’s it! After some time, your backup should complete and you data should be safe on the Synology C2 Cloud.

What happens when your run of out space

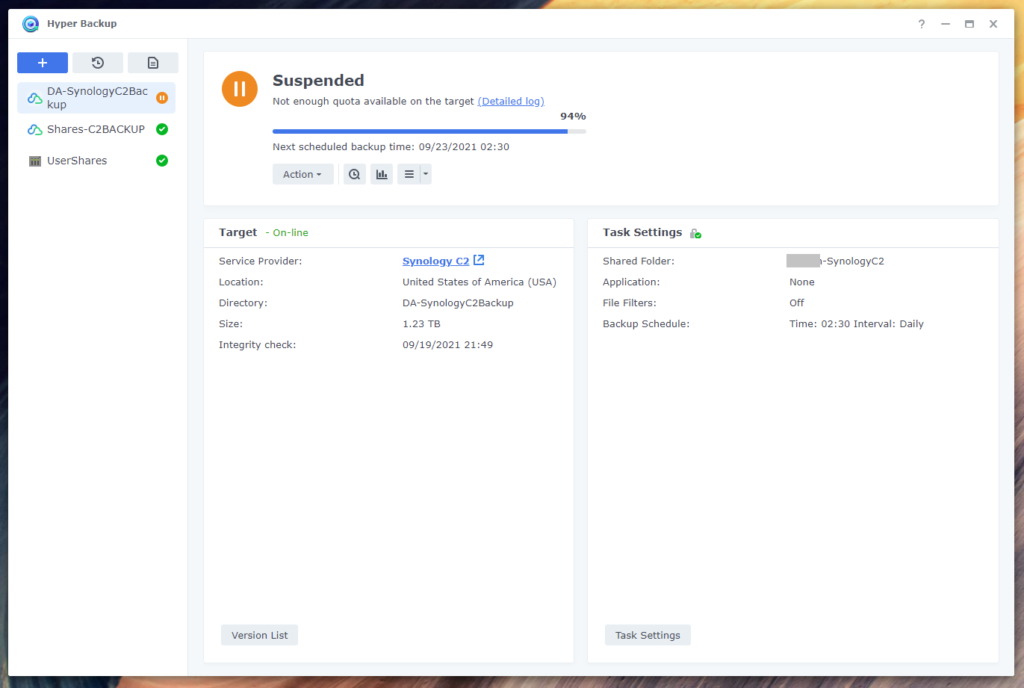
This is a question many of you will be asking, and I was curious myself. I went ahead and uploaded a bunch of garbage data to max out my plan.

Synology Hyper Backup C2 Storage - Not enough quota available on the target
Synology Hyper Backup C2 Storage – Not enough quota available on the target

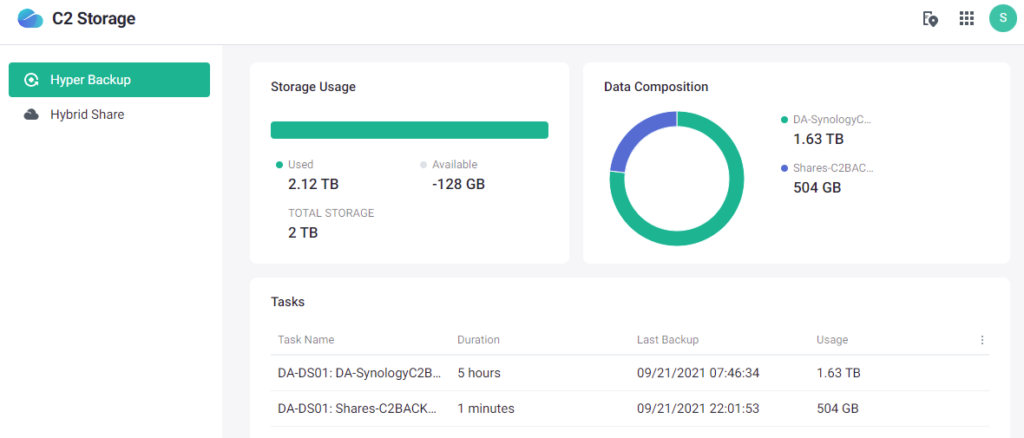
To my surprise Synology allowed me to exceed my plan by a decent amount of storage until the backup job went in to a “Suspended” state reporting “Not enough quota available on the target”. I actually exceeded the storage by 128GB!!! This is extremely generous!

Synology C2 Storage - Storage overage
Synology C2 Storage – Storage overage

To find out how well the NAS would recover from this situation, I logged on to the Synology C2 Storage service and increased my purchased storage. I was able to simply click on “Action” and “Resume” the backup without any issues… It actually resumed where it left off.

Conclusion

The Synology C2 Storage Cloud service is a great option for backing up your DiskStation NAS and all your important files to the cloud. In my case I use my NAS as a backup, and then further backup my NAS both to a removable hard drive, and the Synology C2 Cloud, keeping me compliant with the 3-2-1 backup rule.

The pricing is amazing and there’s extra cost to backup and restore, which means no upload or download costs. They even provide de-duplication so you’re not paying to store duplicated data.

As part of the backup process, Hyper Backup only copies over blocks of data and files that have changed, which significantly helps bandwidth usage as only what’s changed is copied.

I highly recommend using Synology C2 Storage with your Synology DiskStation NAS!

Sep 232021
 

Synology C2 Cloud, C2 Backup and C2 Storage are new ways to backup smart! Using Synology’s C2 Cloud, you can not only back up your Synology DiskStation NAS and all of it’s contents to the cloud, but you can also backup your endpoints directly to the cloud as well now, including Workstations and Servers providing “Centralized protection for Microsoft workloads”.

I want to give a brief overview with what you can do with it, and yes I’ve tried it and so far love it! It works great!

With DSM 7, came a big expansion of Synology’s C2 Cloud Offering

I first heard about Synology C2 Cloud during a VMUG User Group presentation that was sponsored by Synology a few months ago.

I was very impressed with the presentation on the new Synology DSM 7 operating system, it’s capabilities, and the integration with the new Synology C2 Cloud. It really peaked my interest!

With the release of DSM 7.0 (on June 29th 2021), Synology also launched a number of Cloud initiatives delivered by their C2 Cloud platform. This included C2 Transfer, C2 Identity, and C2 Storage. As of today, they have released C2 Backup!

With the fresh release, I want to go over Synology’s C2 Backup, and C2 Storage.

What can we do with C2 Backup and C2 Storage?

The possibilities are almost endless, but let’s list some of the main uses that come to mind:

  • Backup Synology DiskStation NAS to Synology C2 Cloud
    • Backup your Synology DiskStation File Shares
    • Backup your Synology Photo Collection and Videos
    • Backup your Synology Apps
    • Backup your backups to the cloud (disk to disk to cloud)
  • Active Backup for Business
    • Backup Workstations and Servers to NAS, then replicate to Cloud
    • Backup Microsoft 365 to NAS, then replicate to Cloud
    • Backup Virtual Machines to NAS, then replicate and/or archive to Cloud
  • Endpoint Backup direct to Synology C2 Backup
    • Backup a Windows Desktop or Laptop directly to Synology C2 Cloud

One of the biggest threats we have today is ransomware. Ransomware has been ravaging businesses and corporations, destroying and deleting their backups and holding the companies at hostage. It’s even effected the home user, holding their private and valuable files on their computers and NAS devices hostage.

Another common threat is general disasters, including hardware failure, fires, and other events causing complete loss of data.

Using both the Synology DiskStation and the Synology C2 Cloud we can mitigate these risks by backing up your data.

And with any backup, we should always abide by the 3-2-1 rule having 3 copies, on 2 different platforms/media types, and one off-site. Backing up to your Synology NAS and then replicating it up to Synology C2 cloud, you can achieve this level of protection.

Synology C2 Cloud also provides C2 Identify and C2 transfer for business services, which I won’t cover in this post.

Use Case Examples

Below I’ll list a few of the most common uses cases I would expect.

Home or Small Business File Share backup

For home or small business users, file and data storage is typically handled via Windows Shares, and the Synology DiskStation NAS is perfect for providing this type of storage.

Using the Synology DiskStation, you can back these shares to Synology’s C2 Storage Service further protecting your data and also keeping it off-site. You can still also backup to other sources such as removable hard drives.

Complete NAS backup

You can now fully backup your entire NAS to the Synology C2 Storage service. Providing an easy way to restore it, should you ever have a disaster including ransomware, a catastrophic failure, or fire, and have lost your unit needing to replace it fully.

Active Backup for Business Replication

If you’re using Active Backup for Business, you probably already know you can backup the following to your NAS:

  • Microsoft Windows Servers
  • Microsoft Windows Workstation
  • Microsoft 365 (Office 365) data
  • VMware Virtual Machines
  • And more!

Now we have the ability to replicate these backups to Synology’s C2 Storage service, to further protect our backups and also archive data.

Endpoint Backup (new with Synology C2 Backup)

Now you can backup Microsoft Windows endpoints (workstations, laptops, and tablets) directly to the Synology C2 Backup service!

You can backup an unlimited numbers of Microsoft endpoints with the only limitation being how much storage you’re paying for.

Endpoint backups include full-system backups (using incremental updates to save bandwidth), and provide bare mental restore capabilities, as well as file-level recovery when you only need to grab a few files from a backup without restoring the entire system.

You also have the ability to deploy the C2 Backup agent via Active Directory GPOs for ease of deployment.

And don’t forget, this is a perfect way to backup mobile users with laptops!

Is it Encrypted?

One question you might be asking is if the data is safe and encrypted. It sure is (if you enable it)!

The Synology C2 Cloud provides client-side encryption using AES 256-bit encryption with private keys.

In my testing when enabled, the data is encrypted on my Synology DiskStation NAS and then uploaded to Synology’s C2 Cloud. Encryption is handled via a password and a PEM key (AES 256) that you must save and keep safe (preferably not on any of your computers, but on a USB key somewhere safe)! Hold on to this, because you’ll need it in the event of a disaster.

In the case of C2 Storage, while the data is encrypted and then stored on Synology’s servers, there are some actions you can take via a web interface to view/download your data to your computer, instead of restoring to your NAS. Keep in mind if you do this, you’ll need to enter your password in to Synology’s servers, however they state the password will not be saved and will be destroyed after the task completion.

In the case of C2 Backup, you’ll have a powerful web interface where you can manage backups, restore backups, restore files, and more.

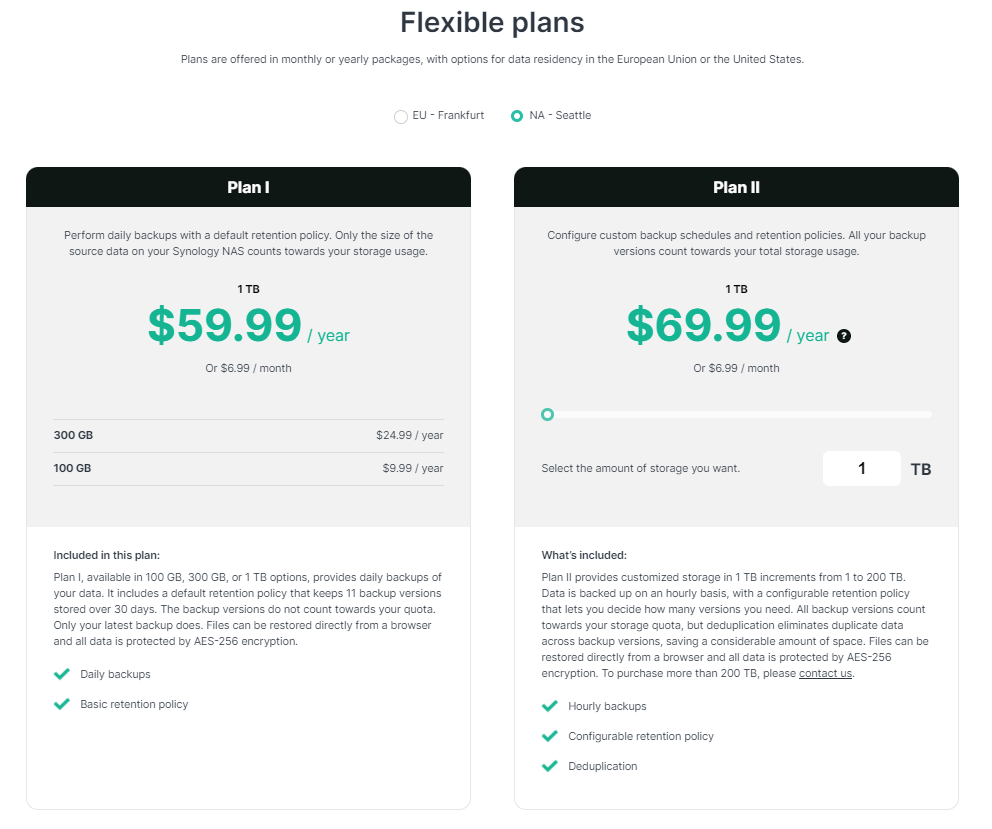
How much does it cost?

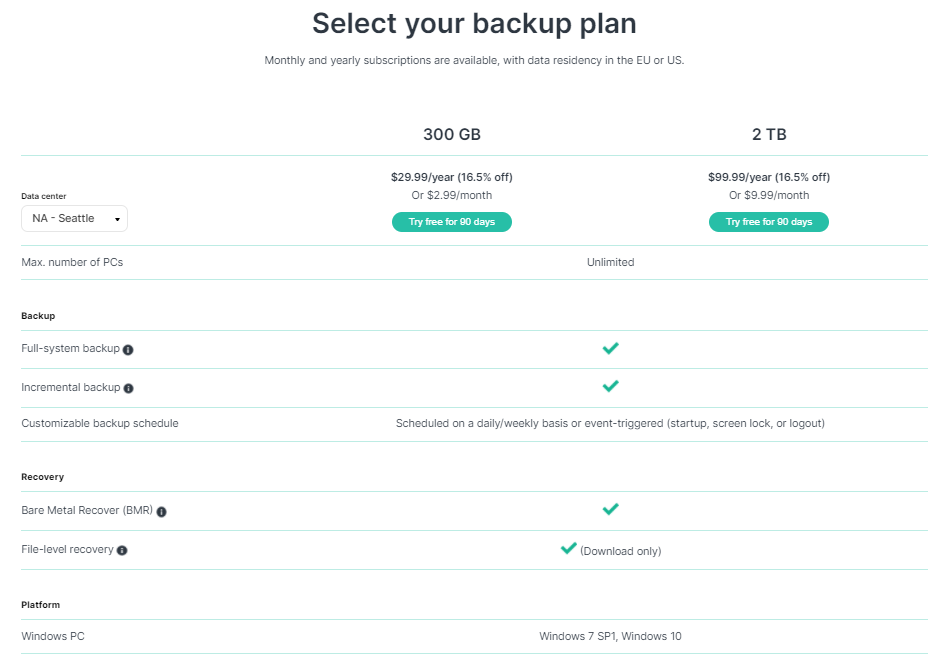
For the C2 Storage Service, the pricing table below (US Dollars):

For the C2 Backup Service, the pricing table is below (US Dollars):

You’ll notice that right now the C2 Backup Service is limited to only a 300GB plan and 2TB plan.

Features to come

While you can today deploy any of the features listed in this post, there are some future capabilities that are coming soon…

Soon, using Synology C2 Backup, you’ll be able to automatically backup your Microsoft 365 data (including Exchange Online and OneDrive for Business) direct to Synology’s C2 Backup.

While you can already back this data up to your NAS (and then replicate to C2 Storage), soon you’ll be able to cutout the NAS and have it go direct.

In conclusion

I’d highly recommend checking out the Synology C2 Cloud portfolio of services as I’ve already deployed and am currently using the Synology C2 Storage service in my homelab with my Synology DiskStation NAS.

Synology also has another datacenter available to choose from Germany.

More information can be found at the following links:

C2 FAQ

Synology C2 Backup (for business)

Synology C2 Transfer (for business)

Synology C2 Identity (for business)

Synology C2 Storage (for business)

Pricing information can be found at the following links:

Synology C2 Backup Pricing (for business)

Synology C2 Storage Pricing (for business)

I’ll be posting some tutorials and reviews so stay tuned! In the meantime, leave a comment if you’ve used any of these products in your environment!

Sep 132021
 
Synology C2 Cloud Logo

So if you’re like me, you’ve just deployed your Synology DiskStation DSM NAS to backup to the Synology C2 Cloud (C2 Backup) or access Synology Hybrid Shares (C2 Storage).

But wait, you’re having issues with disconnections or slow speeds? It could be your firewall!

If you have an advanced firewall or an enterprise grade firewall, you’ll need to make some exceptions to avoid HTTPS scanning and interception, IPS, and other mechanisms that could be blocking traffic destined for the Synology’s C2 Cloud.

The Problem

While I wouldn’t necessarily call it a problem, your Synology NAS uses HTTPS (Port 443) to connect to Synology’s C2 Cloud. This actually makes things very easy and in most cases works off the bat with most firewalls.

When it comes to more complicated firewalls or enterprise firewalls, you may have the following technologies deployed which could be causing connection issues to the Synology C2 Cloud:

  • HTTPS Scanning
  • IPS (Intrusion Prevention System)
  • Traffic tagging and identification
  • QoS

The above technologies may either be slowing down or causing issues with communication.

The Fix

Here’s how we’ll configure the Synology C2 Firewall Exceptions!

To fix this, we need to make a few exceptions on the firewall. In my case I’m using a Sophos UTM, however using the information below you should be able to create rules for your own firewall even if the vendor is different.

First, let’s start with Synology’s C2 Cloud DNS hostnames, domains, and IP ranges. I identified these through my own troubleshooting and packet analysis:

Synology C2 Cloud DNS

  • synology.com
  • c2.synology.com
  • us.c2.synology.com

Synology C2 IP Range (CIDR Block)

  • 66.150.175.0/24

Please Note that the above are for the Synology C2 Cloud datacenter in the US region.

We’ll need to create exception rules for the above hosts, and IP range to avoid any type of traffic interception or scanning.

HTTPS Scanning Exclusion

On the Sophos UTM, I created an exception on the HTTPS Scanner to exclude any type of scanning for web (HTTP and HTTPS) traffic destined for these hosts. The entries in the exception are below:

^https?://([A-Za-z0-9.-]*\.)?synology\.com/
^https?://([A-Za-z0-9.-]*\.)?c2\.synology\.com/
^https?://([A-Za-z0-9.-]*\.)?us\.c2\.synology\.com/

I also created a Network Definition Group (called it Synology C2 Group) for the IP CIDR range, along with the DNS hostnames, and added it to the transport mode skiplist under “Skip Transparent Destination Hosts/Nets”.

IPS (Intrusion Prevention)

IPS systems can slow down traffic significantly as they scan inbound and outbound data. This shouldn’t disrupt the connection to the Synology C2 Cloud, but will slow it down.

Using the network definition created above (Synology C2 Group), we’ll go to the IPS settings and create an exception. We’ll disable all IPS features on traffic “Going to these destinations” and apply it to the “Synology C2 Group” network group definition.

QoS and other Systems

You’ll also want to make sure that if your using QoS that you configure the applicable rules to put the priority you want on the Synology C2 Cloud traffic.

After that, you should be good to go and now enjoying the Synology C2 Cloud!

Aug 122019
 
DS1813+

Around a month ago I decided to turn on and start utilizing NFS v4.1 (Version 4.1) in DSM on my Synology DS1813+ NAS. As most of you know, I have a vSphere cluster with 3 ESXi hosts, which are backed by an HPE MSA 2040 SAN, and my Synology DS1813+ NAS.

The reason why I did this was to test the new version out, and attempt to increase both throughput and redundancy in my environment.

If you’re a regular reader you know that from my original plans (post here), and than from my issues later with iSCSI (post here), that I finally ultimately setup my Synology NAS to act as a NFS datastore. At the moment I use my HPE MSA 2040 SAN for my hot storage, and I use the Synology DS1813+ for cold storage. I’ve been running this way for a few years now.

Why NFS?

Some of you may ask why I chose to use NFS? Well, I’m an iSCSI kinda guy, but I’ve had tons of issues with iSCSI on DSM, especially MPIO on the Synology NAS. The overhead was horrible on the unit (result of the lack of hardware specs on the NAS) for both block and file access to iSCSI targets (block target, vs virtualized (fileio) target).

I also found a major issue, where if one of the drives were dying or dead, the NAS wouldn’t report it as dead, and it would bring the iSCSI target to a complete halt, resulting in days spending time finding out what’s going on, and then finally replacing the drive when you found out it was the issue.

After spending forever trying to tweak and optimize, I found that NFS was best for the Synology NAS unit of mine.

What’s this new NFS v4.1 thing?

Well, it’s not actually that new! NFS v4.1 was released in January 2010 and aimed to support clustered environments (such as virtualized environments, vSphere, ESXi). It includes a feature called Session trunking mechanism, which is also known as NFS Multipathing.

We all love the word multipathing, don’t we? As most of you iSCSI and virtualization people know, we want multipathing on everything. It provides redundancy as well as increased throughput.

How do we turn on NFS Multipathing?

According to the VMware vSphere product documentation (here)

While NFS 3 with ESXi does not provide multipathing support, NFS 4.1 supports multiple paths.


NFS 3 uses one TCP connection for I/O. As a result, ESXi supports I/O on only one IP address or hostname for the NFS server, and does not support multiple paths. Depending on your network infrastructure and configuration, you can use the network stack to configure multiple connections to the storage targets. In this case, you must have multiple datastores, each datastore using separate network connections between the host and the storage.


NFS 4.1 provides multipathing for servers that support the session trunking. When the trunking is available, you can use multiple IP addresses to access a single NFS volume. Client ID trunking is not supported.

So it is supported! Now what?

In order to use NFS multipathing, the following must be present:

  • Multiple NICs configured on your NAS with functioning IP addresses
  • A gateway is only configured on ONE of those NICs
  • NFS v4.1 is turned on inside of the DSM web interface
  • A NFS export exists on your DSM
  • You have a version of ESXi that supports NFS v4.1

So let’s get to it! Enabling NFS v4.1 Multipathing

  1. First log in to the DSM web interface, and configure your NIC adapters in the Control Panel. As mentioned above, only configure the default gateway on one of your adapters.Synology Multiple NICs Configured Screenshot
  2. While still in the Control Panel, navigate to “File Services” on the left, expand NFS, and check both “Enable NFS” and “Enable NFSv4.1 support”. You can leave the NFSv4 domain blank.Enabling NFSv4.1 on Synology DSM
  3. If you haven’t already configured an NFS export on the NAS, do so now. No further special configuration for v4.1 is required other than the norm.
  4. Log on to your ESXi host, go to storage, and add a new datastore. Choose to add an NFS datastore.
  5. On the “Select NFS version”, select “NFS 4.1”, and select next.Selecting the NFS version on the Add Datastore Dialog box on ESXi
  6. Enter the datastore name, the folder on the NAS, and enter the Synology NAS IP addresses, separated by commas. Example below:New NFS Datastore details and configuration on ESXi dialog box
  7. Press the Green “+” and you’ll see it spreads them to the “Servers to be added”, each server entry reflecting an IP on the NAS. (please note I made a typo on one of the IPs).List of Servers/IPs for NFS Multipathing on ESXi Add Datastore dialog box
  8. Follow through with the wizard, and it will be added as a datastore.

That’s it! You’re done and are now using NFS Multipathing on your ESXi host!

In my case, I have all 4 NICs in my DS1813+ configured and connected to a switch. My ESXi hosts have 10Gb DAC connections to that switch, and can now utilize it at faster speeds. During intensive I/O loads, I’ve seen the full aggregated network throughput hit and sustain around 370MB/s.

After resolving the issues mentioned below, I’ve been running for weeks with absolutely no problems, and I’m enjoying the increased speed to the NAS.

Additional Important Information

After enabling this, I noticed that RAM and Memory usage had drastically increased on the Synology NAS. This would peak when my ESXi hosts would restart. This issue escalated to the NAS running out of memory (both physical and swap) and ultimately crashing.

After weeks of troubleshooting I found the processes that were causing this. While the processes were unrelated, this issue would only occur when using NFS Multipathing and NFS v4.1. To resolve this, I had to remove the “pkgctl-SynoFinder” package, and disable the services. I could do this in my environment because I only use the NAS for NFS and iSCSI. This resolved the issue. I created a blog post here to outline how to resolve this. I also further optimized the NAS and memory usage by disabling other unneeded services in a post here, targeted for other users like myself, who only use it for NFS/iSCSI.

Leave a comment and let me know if this post helped!

Jul 312019
 

If you’re like me and use a Synology NAS as an NFS or iSCSI datastore for your VMware environment, you want to optimize it as much as possible to reduce any hardware resource utilization.

Specifically we want to disable any services that we aren’t using which may use CPU or memory resources. On my DS1813+ I was having issues with a bug that was causing memory overflows (the post is here), and while dealing with that, I decided to take it a step further and optimize my unit.

Optimize the NAS

In my case, I don’t use any file services, and only use my Synology NAS (Synology DS1813+) as an NFS and iSCSI datastore. Specifically I use multipath for NFSv4.1 and iSCSI.

If you don’t use SMB (Samba / Windows File Shares), you can make some optimizations which will free up substantial system resources.

Disable and/or uninstall unneeded packages

First step, open up the “Package Center” in the web GUI and either disable, or uninstall all the packages that you don’t need, require, or use.

To disable a package, select the package in Package Center, then click on the arrow beside “Open”. A drop down will open up, and “Disable” or “Stop” will appear if you can turn off the service. This may or may not be persistent on a fresh boot.

To uninstall a package, select the packet in Package Center, then click on the arrow beside “Open”. A drop down will open up, and “Uninstall” will appear. Selecting this will uninstall the package.

Disable the indexing service

As mentioned here, the indexing service can consume quite a bit of RAM/memory and CPU on your Synology unit.

To stop this service, SSH in to the unit as admin, then us the command “sudo su” to get a root shell, and finally run this command.

synoservice --disable pkgctl-SynoFinder

The above command will probably not persist on boot, and needs to be ran each fresh boot. You can however uninstall the package with the command below to completely remove it.

synopkg uninstall SynoFinder

Doing this will free up substantial resources.

Disable SMB (Samba), and NMBD

I noticed that both smbd and nmbd (Samba/Windows File Share Services) were consuming quite a bit of CPU and memory as well. I don’t use these, so I can disable them.

To disable them, I ran the following command in an SSH session (remember to “sudo su” from admin to root).

synoservice --disable nmbd
synoservice --disable samba

Keep in mind that while this should be persistent on boot, it wasn’t on my system. Please see the section below on how to make it persistent on booth.

Disable thumbnail generation (thumbd)

When viewing processes on the Synology NAS and sorting by memory, there are numerous “thumbd” processes (sometimes over 10). These processes deal with thumbnail generation for the filestation viewer.

Since I’m not using this, I can disable it. To do this, we either have to rename or delete the following file. I do recommend making a backup of the file.

/var/packages/FileStation/target/etc/conf/thumbd.conf

I’m going to rename it so that the service daemon can’t find it when it initializes, which causes the process not to start on boot.

cd /var/packages/FileStation/target/etc/conf/
mv thumbd.conf thumbd.conf.bak

Doing the above will stop it from running on boot.

Make the optimizations persistent on boot

In this section, I will show you how to make all the settings above persistent on boot. Even though I have removed the SynoFinder package, I still will create a startup script on the Synology NAS to “disable” it just to be safe.

First, SSH in to the unit, and run “sudo su” to get a root shell.

Run the following commands to change directory to the startup script, and open a text editor to create a startup script.

cd /usr/local/etc/rc.d/
vi speedup.sh

While in the vi file editor, press “i” to enter insert mode. Copy and paste the code below:

case "$1" in
    start)
                echo "Turning off memory garbage"
                        synoservice --disable nmbd
                        synoservice --disable samba
                        synoservice --disable pkgctl-SynoFinder
                        ;;
    stop)
                        echo "Pertend we care and are turning something on"
                        ;;
        *)
        echo "Usage: $1 {start|stop}"
                exit 1
esac
exit 0

Now press escape, then type “:wq” and hit enter to save and close the vi text editor. Run the following command to make the script executable.

chmod 755 speedup.sh

That’s it!

Conclusion

After making the above changes, you should see a substantial performance increase and reduction in system resources!

In the future I plan on digging deeper in to optimization as I still see other services I may be able to trim down, after confirming they aren’t essential to the function of the NAS.

Feel like you can add anything? Leave a comment!

Jul 312019
 

Once I upgraded my Synology NAS to DSM 6.2 I started to experience frequent lockups and freezing on my DS1813+. The Synology DS1813+ would become unresponsive and I wouldn’t be able to SSH or use the web GUI to access it. In this state, NFS sometimes would become unresponsive.

When this occured, I would need to press and hold the power button to force it to shutdown, or pull the power. This is extremely risky as it can cause data corruption.

I’m currently running DSM 6.2.2-24922 Update 2.

The cause

This occurred for over a month until it started to interfere with ESXi hosts. I also noticed that the issue would occur when restarting any of my 3 ESXi hosts, and would definitely occur if I restarted more than one.

During the restarting, while logged in to the web GUI and SSH, I was able to see that the memory (RAM) usage would skyrocket. Finally the kernel would panic and attempt to reduce memory usage once the swap file had filled up (keep in mind my DS1813+ has 4GB of memory).

Analyzing “top” as well as looking at processes, I noticed the Synology index service was causing excessive memory and CPU usage. On a fresh boot of the NAS, it would consume over 500MB of memory.

The fix (Please scroll down and see updates)

In my case, I only use my Synology NAS for an NFS/iSCSI datastore for my ESXi environment, and do not use it for SMB (Samba/File Shares), so I don’t need the indexing service.

I went ahead and SSH’ed in to the unit, and ran the following commands to turn off the service. Please note, this needs to be run as root (use “sudo su” to elevate from admin to root).

synoservice --disable pkgctl-SynoFinder

While it did work, and the memory was instantly freed, the setting did not stay persistant on boot. To uninstalling the Indexing service, run the following command.

synopkg uninstall SynoFinder

Doing this resolved the issue and freed up tons of memory. The unit is now stable.

Update May 31st, 2020 – Increased Stability

After troubleshooting I noticed that the majority of stability issues would start occurring when ESXi hosts accessing NFS exports on the Synology diskstation are restarted.

I went ahead and stopped using NFS, started using iSCSI with MPIO, and the stability of the Synology NAS has greatly improved. I will continue to monitor this.

I still have plans to hack the Synology NAS and put my own OS on it.

Update May 2nd, 2020 – It’s still crashing, and really frustrating me

Today I had to restart my 3 ESXi hosts that are connected to the NFS export on the Synology Disk Station. After restarting the hosts, the Synology device has gone in to a lock-up state once again. It appears the issue is still present.

The device is responding to pings, and still provides access to SMB and NFS, but the web GUI, SSH, and console access is unresponsive.

I’m officially going to start planning on either retiring this device as this is unacceptable, especially in addition to all the issues over the years, or I may try an attempt at hacking the Synology Diskstation to run my own OS.

Update April 21st, 2020 – What I thought was the fix

After a few more serious crashes and lockups, I finally decided to do something about this. I went ahead and backed up my data, deleted the arrays, performed a factory reset on the Synology Disk Station. I also zero’d the metadata and MBR off all the drives.

I then configured the Synology NAS from scratch, used Btrfs (instead of ext4), restored the backups.

The NAS now appears to be running great and has not suffered any lockups or crashses since. I’ve also been noticing that memory management is working a lot better.

I have a feeling that this issue was caused due to the long term chaining of updates (numerous updates installed over time), or the use of the ext4 filesystem.

Update March 20th, 2020

As of March 2020 this issue is still occurring on numerous new firmware updates and version. I’ve tried reaching out to Synology on twitter directly a few times about this issue as well as e-mail (indirectly regarding something else) and have still not received or heard a response. As of this time the issue is still occurring on a regular basis on DSM 6.2.2-24922 Update 4. I’ve taken production and important workloads of the device since I can’t have the device continuously crashing or freezing overnight.

Update – August 16th, 2019

My Synology NAS has been stable since I applied the fix, however after an uptime of a few weeks, I noticed that when restarting servers, the memory usage does hike up (example, from 6% to 46%). However, with the fixes applied above, the unit is stable and no longer crashes.