Jan 212022
 
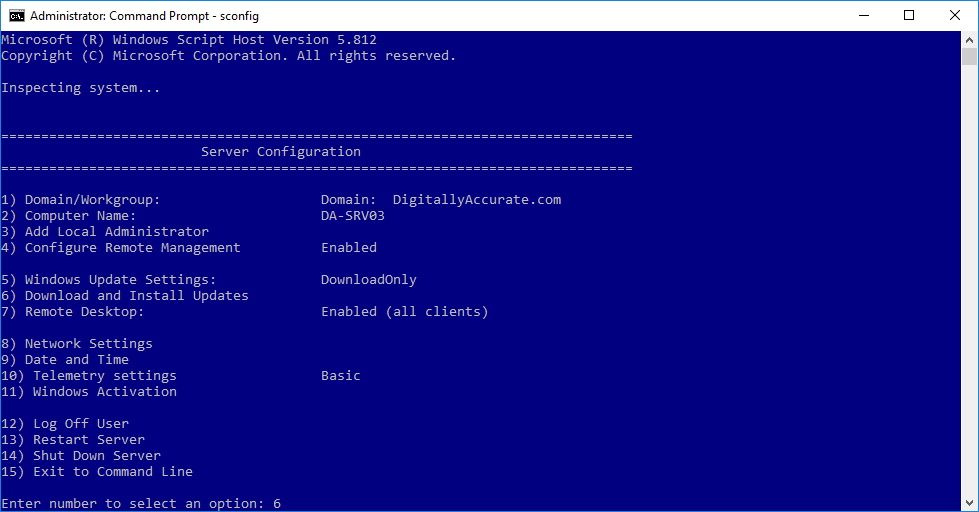
sconfig Server Configuration menu

We’re all used to updating our Windows Server operating systems with the Windows Update GUI, but did you know that you can update your server using command prompt and “sconfig”?

The past few years I’ve been managing quite a few Windows Server Core Instances that as we all know, do not have a GUI. In order to update those instances, you need to run Windows Update using the command line, but this method actually also works on normal Windows Server instances with the GUI as well!

Windows Update from CLI (Command Prompt)

Please enjoy this video or read on for why and how!

Why?

Using a GUI is great, however sometimes it’s not needed, and sometimes it even causes problems if it looses the backend connection where it’s pulling the data from. I’ve seen this true on newer Windows operating systems where the Windows Update GUI stops updating and you just sit there thinking the updates are running, when they are actually all complete.

The GUI also creates additional overhead and clutter. If there was an easier alternative to perform this function, wouldn’t it just make sense?

On Windows Server instances that have a GUI, I find it way faster and more responsive to just open an elevated (Administrative) command prompt, and kick off Windows Updates from there.

How

You can use this method on all modern Windows Server versions:

  • Windows Server (with a GUI)
  • Windows Server Core (without a GUI)

This also works with Windows Server Update Services so you can use this method either connecting to Windows Update (Microsoft Update) or Windows Server Update Services (WSUS).

Now lets get started!

  1. Open an Administrative (elevated) command prompt
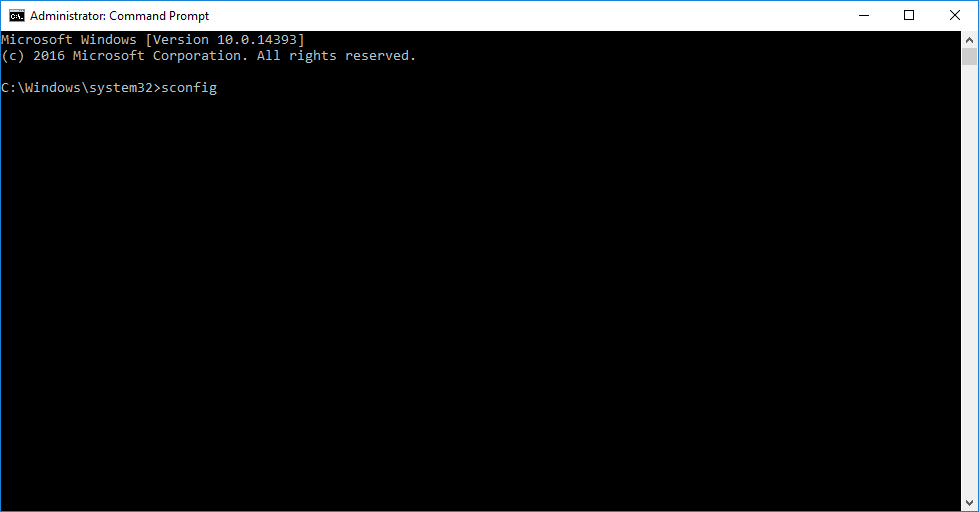
  2. Run “sconfig” to launch the “Server Configuration” application
    command prompt launch sconfig
  3. Select option “6” to “Download and Install Windows Updates”
    sconfig Server Configuration menu
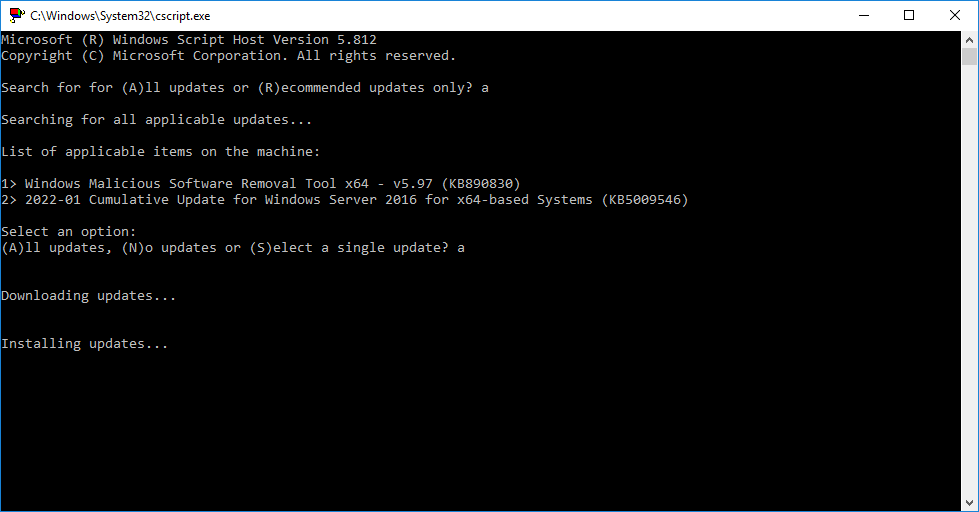
  4. Choose “A” for all updates, or “R” for recommended updates, and a scan will start
  5. After the available updates are shown, choose “A” for all updates, “N” for no updates, or “S” for single update selection

After performing the above, the updates will download and install.

sconfig Windows Update running
“sconfig” Windows Update downloading and installing

I find it so much easier to use this method when updating many/multiple servers instead of the GUI. Once the updates are complete and you’re back at the “Server Configuration” application, you can use option “13” to restart Windows.

Oct 072019
 
Microsoft Windows Server Logo Image

Today I’m going to be talking about Read Only Domain Controllers (RODC). An RODC is a Read Only Domain Controller for Active Directory Services inside of Microsoft Windows Server. It has become one of my favorite discoveries in the last 10 years for use with clients in certain situations.

A Read Only Domain Controller is similar to a regular Domain Controller, with the exception that the content is synchronized and available as a read-only copy. You cannot write to an RODC AD database.

Let’s explore RODC’s in more depth and find out what they are, why they are used, and use-case scenario examples.

What is an RODC

Read Only Domain Controllers were originally released with Windows Server 2008, and have been available on all versions since (including Windows Server 2008R2, Windows Server 2012/2012R2, Windows Server 2016, and Windows Server 2019).

A Domain controller that is an RODC contains a read-only cached copy of the Active Directory database. Additional sets of controls are available to control and limit this information and what is stored and cached.

Why an RODC

A Read Only Domain Controller is typically placed in situations and scenarios where a standard writable domain controller cannot be placed. The AD data/information can be filtered so that important items such as passwords, credentials, and other security sensitive information are not cached on that server. This provides a safety mechanism if the RODC is stolen or compromised (either physically, or virtually). You can control it so that only required information is cached, such as credentials for the users in the specific office.

RODC’s are meant to be used at remote offices and/or branch offices (ROBO) to allow services to function that rely on Active Directory such as file/print services and other Active Directory applications. Also, typically at these sites it either wouldn’t make sense or be safe to have a writable domain controller, however the RODC is needed to cache AD information, and enhance performance of these AD applications.

Offloading Active Directory requests to a single cached copy onsite on an RODC significantly reduces bandwidth pipe requirements versus having numerous computers and users authenticating and requesting Active Directory content over a site-to-site VPN between the main office and remote office/branch office.

Also, if you have an office with an unstable internet connection where the site-to-site VPN regularly has issues or isn’t always available, having an RODC available to handle Active Directory requests can keep that office online and functioning.

Scenarios for an RODC

In the past I’ve used Read Only Domain Controllers for a few different types of scenarios. I’ll get in to them below and explain why.

The scenarios:

  • AD Cache for ROBO (Remote Office Branch Office)
    • Unstable internet connection
    • AD Services at remote site (File/Print, LoB)
    • Numerous Users accessing Active Directory
    • Improve login times
  • ROBO with Potential Security issues (theft, lack of survailence, etc.)
    • Office is in remote area with delayed physical security response, risk of theft
    • Server physical security at risk, employees could have access
  • Corporate Infrastructure hosted in the Cloud
    • Domain Controller in the Cloud
    • Need a DC on-premise to handle logins and resource access

AD Cache for ROBO (Remote Office Branch Office)

Implementing an RODC in this situation is an excellent example. In a situation where an office has unreliable (intermittent or slow) internet but is critical to business continuity, an RODC can keep them up and running uninterrupted.

Typically, if you were just using a Site-to-Site VPN, if that connection went down, users wouldn’t be able to authenticate against Active Directory or access resources in Active Directory. Having an RODC on-site, allows them to authenticate (if their credentials are stored) and access resources.

As most IT professionals are aware, having a large number of users authenticating and accessing these resources over a VPN can use up the bandwidth pipe and cause issues. Having an RODC locally virtually eliminates VPN bandwidth usage to only Active Directory synchronization, and synchronization deltas.

Finally, having users authenticate locally instead of a saturated high latency VPN connection, improves their login time and performance.

ROBO with Potential Security issues (theft, lack of survailence, etc.)

If you have a remote site with security concerns, an RODC can help you with your security strategy.

If an RODC is physically stolen, only credentials that are filtered to be cached on that RODC are stored locally, this usually excludes administrative accounts as well as other users and services that aren’t accessed or used at the remote site. Also, because the domain controller isn’t writable, the thief cannot power on, inject data in to Active Directory and have it sync to your other domain controllers if they somehow gained access to your internal network.

The above also holds true for possible malicious employees who may have skills or knowledge, or allow other 3rd parties to have physical or virtual access to the server.

In the event of a disaster, restoring or recreating an RODC is easy and fast. Since it synchronizes from writable DCs on the network, the concerns of traditional writable domain controller restores don’t need to be considered.

Corporate Infrastructure hosted in the Cloud

If by chance most of your corporate infrastructure is hosted in the cloud, you know that you still need some on-premise resources and infrastructure to handle and offload bandwidth requirements between your LAN network and virtual cloud LAN network.

Typically, in most cases you’d have an on-site on-premise domain controller to handle local login and authentication, as well as resource access. But why use a fully writable domain controller, when you can use an easy to manage and maintain RODC?

Using an RODC at your local site allows you to offload services off the pipe, to the RODC, again limiting bandwidth requirements to AD synchronizations and delta synchronizations. This allows your bandwidth to be used for more important things like Line of Business applications, e-mail, etc.

As most IT professionals prefer simple and functional, this keeps simplified and easy to manage.

Conclusion

RODC’s are a perfect tool to compliment your IT infrastructure and help secure it as well. I’ve placed numerous Read Only Domain Controllers at customers branch offices, remote oil and gas sites, and in various other scenarios.

Not only have they kept these customers up and running during outages, but the ease of use and ease of management make it common sense to use this technology.
May 162019
 

There may be a situation where you wish to completely reinstall WSUS from scratch. This can occur for a number of reasons, but most commonly is due to database corruption, or performance issues due to a WSUS database that hasn’t been maintained properly with the normal maintenance.

Commonly, when regular maintenance hasn’t occurred on a WSUS database, when an admin finally performs it, it can take days and weeks to re-index the database, clean up the database, and run the cleanup wizards.

Also, due to timeouts on IIS, the cleanup wizard may fail which could ultimately cause database corruption.

Administrators often want or choose to blast away their WSUS install, and completely start from scratch. I’ve done this numerous times in my own environment as well as numerous customer environments.

In this guide, we are going to assume that you’re running WSUS on a Windows Server that is dedicated to WSUS and is using the WID (Windows Internal Database) which is essentially a built-in version of SQL Express.

PLEASE NOTE: If you are using Microsoft SQL, these instructions will not apply to you and will require modification. Only use these instructions if the above applies to you.

What’s involved

WSUS (Windows Server Update Services) relies on numerous Windows roles and features to function. As part of the instructions we’ll need to completely clear out:

  • WSUS Role, Configuration, and Folders/Files
  • IIS Role, Configuration, and Folders/Files
  • WID Feature, Configuration, and Database Files

Since we are completely removing IIS (Role, Configuration, and Folders/Files), only proceed if the server is dedicated to WSUS. If you are using IIS for anything else, this will completely clear the configuration and files. You also do not want to run this on a domain controller as Active Directory also uses WID.

Let’s get to it!

Instructions

  1. Open “Server Manager” either on the host, or remotely and connect to the host you’d like to reinstall on.
  2. Open “Remove Roles and Features” wizard.
  3. Click “Next”, and select the Server, and click “Next” again.
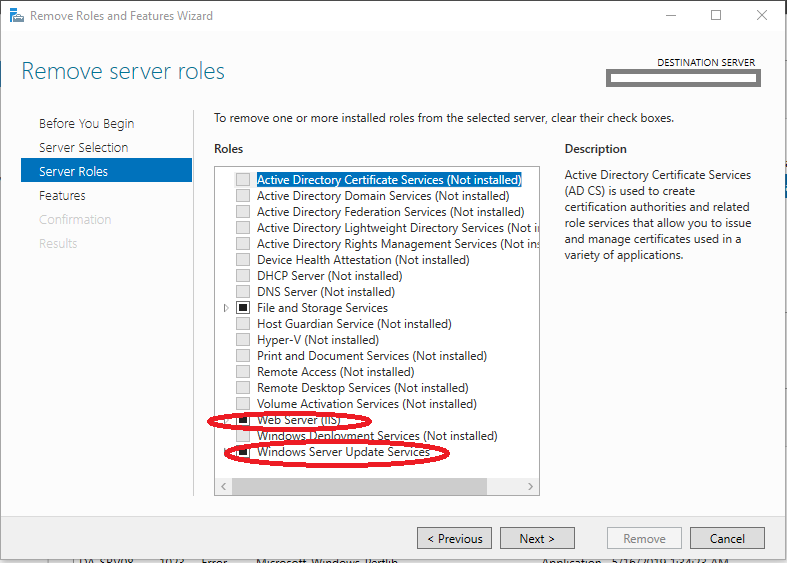
  4. On the “Remove server roles” screen, under “Roles”, we want to de-select the following: “Web Server (IIS)” and “Windows Server Update Services” as shown below. Selecting WSUS and IIS Roles to be Removed
  5. Click “Next”
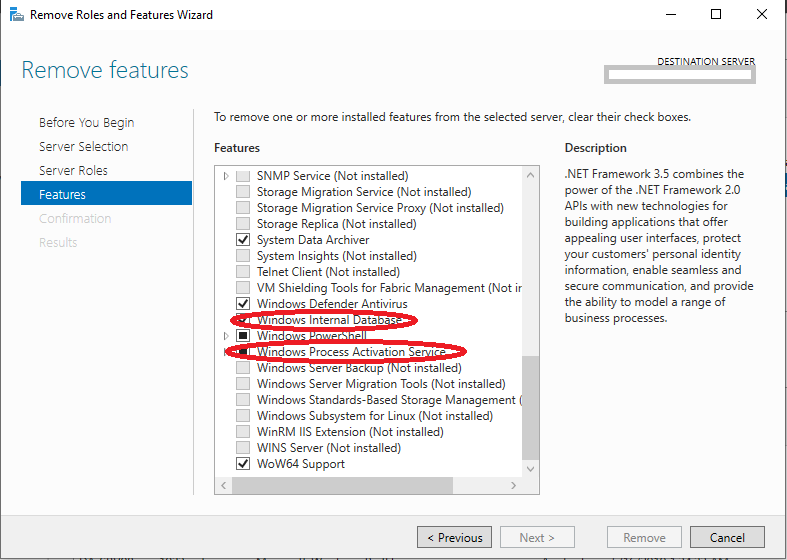
  6. On the “Remove features” screen, under “Features”, we want to de-select the following: “Windows Internal Database” and “Windows Process Activation Service” as shown below. Selecting WID and WPAS Features for Removal
  7. Click “Next” and follow the wizard to completion and remove the roles and features.
  8. Restart the Server.
  9. Open an administrative command prompt on the server, and run the command “powershell” or open powershell directly.
  10. Run the following command in powershell to remove any bits and pieces:
    Remove-WindowsFeature -Name UpdateServices,UpdateServices-DB,UpdateServices-RSAT,UpdateServices-API
  11. Restart the Server.
  12. We now must delete the WSUS folders and files. Delete the following folders:
    C:\WSUS
    C:\Program Files\Update Services

    Note: You may have stored the WSUS content directory somewhere else, please delete this as well.
  13. We now must delete the IIS folders and files (and configuration, including the WsusPool application pool, bindings, etc.). Delete the following folders:
    C:\inetpub
    C:\Windows\System32\inetsrv

    Note: You may have issues deleting the “inetsrv” directory. If this occurs, simply rename it to “inetsrv.bad”.
  14. We now must delete the WID (Windows Internal Database) folders and files (including the WSUS SQL Express database). Delete the following folder:
    C:\Windows\WID
  15. While we removed the IIS folders and files, we deleted a needed system file. Run the following command to restore the file:
    sfc /scannow
  16. Restart the Server.

WSUS, IIS, and WID have at this point been completely removed. We will now proceed to install, apply a memory fix, and configure WSUS.

For instructions on installing WSUS on Server Core, please click here: https://www.stephenwagner.com/2019/05/15/guide-using-installing-wsus-windows-server-core-2019/

  1. Open “powershell” (by typing powershell) and Install the WSUS Role with the following command:
    Install-WindowsFeature UpdateServices -Restart
  2. (Optional) If you want to install the WSUS MMC Snap-In/GUI, run the following command in the powershell window:
    Install-WindowsFeature UpdateServices-RSAT, UpdateServices-UI
  3. Run the post installation task command in command prompt to configure WSUS:
    "C:\Program Files\Update Services\Tools\wsusutil.exe" postinstall CONTENT_DIR=C:\WSUS
  4. AT THIS POINT DO NOT CONTINUE CONFIGURING WSUS AS YOU MUST APPLY A MEMORY FIX TO IIS.
  5. Apply the “Private Memory Limit (KB)” fix as provided here: https://www.stephenwagner.com/2019/05/14/wsus-iis-memory-issue-error-connection-error/
  6. Restart the Server.
  7. Open the WSUS MMC on the server or remotely from a workstation on the network and connect it to the WSUS instance on your Server Core install.
  8. Run through the wizard as you would normally and perform an synchronization.
  9. WSUS has been re-installed.

And that’s it. You’ve completely reinstalled WSUS from scratch on your Windows Server.

Oct 082018
 
Microsoft Windows Logo

If you are running Microsoft Windows in a domain environment with WSUS configured, you may notice that you’re not able to install some FODs (Features on Demand), or use the “Turn Windows features on or off”. This will stop you from installing things like the RSAT tools, .NET Framework, Language Speech packs, etc…

You may see “failure to download files”, “cannot download”, or errors like “0x800F0954” when running DISM to install packages.

To resolve this, you need to modify your domain’s group policy settings to allow your workstations to query Windows Update servers for additional content. The workstations will still use your WSUS server for approvals, downloads, and updates, however in the event content is not found, it will query Windows Update.

Enable download of “Optional features” directly from Windows Update

  1. Open the group policy editor on your domain
  2. Create a new GPO, or modify an existing one. Make sure it applies to the computers you’d like
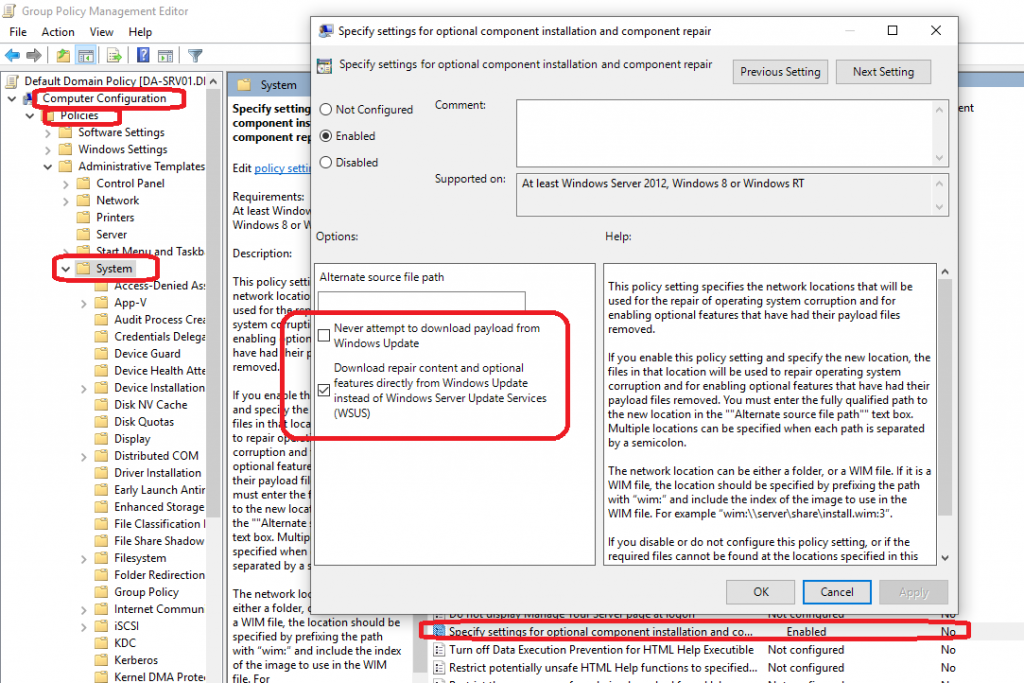
  3. Navigate to “Computer Configuration”, “Policies”, “Administrative Templates”, and then “System”.
  4. Double click or open “Specify settings for optional component installation and component repair”
  5. Make sure “Never attempt to download payload from Windows Update” is NOT checked
  6. Make sure “Download repair content and optional features directly from Windows Update instead of Windows Server Update Services (WSUS)” IS checked.
  7. Wait for your GPO to update, or run “gpupdate /force” on the workstations.

Please see an example of the configuration below:

Download repair content and optional features directly from Windows Update instead of Windows Server Update Services (WSUS)

You should now be able to download/install RSAT, .NET, Speech language packs, and more!

Sep 162018
 
Microsoft Windows Logo

I’ve noticed an issue with Microsoft Windows Server 2016, where a default install, when joined to an Active Directory Domain, will not get it’s time from the domain itself, but rather from “time.windows.com”.

I first noticed this a couple months ago when I had some time issues with one of my Server 2016 member servers. I ran “net time” which reported time from the domain controller, so I simply restarted the VM and it resolved the issue (or so I thought). I did not know there was a larger underlying issue.

While performing maintenance today, I noticed that all Windows Server 2016 VMs were getting their time from “time.windows.com”. When running “w32tm /monitor”, the hosts actually reported the PDC time sources, yet it still used the internet ntp server. I checked all my Windows Server 2012 R2 member servers and they didn’t have the issue. All workstations running Windows 10 didn’t have the issue either.

When this issue occurs, you’ll notice in the event log that the Windows Time Service actually finds your domain controllers as time sources, but then overrides it with the internet server time.windows.com for some reason. The only reference you’ll find pertaining to “time.windows.com”, will be when you run the “w32tm /query /configuration” command.

We need to change the time source from that host to the domain “NT5DS” time source. We’ll do so by resetting the configuration to default settings on the member server.

How to reset the Windows Time Service (w32tm) to default settings

PLEASE NOTE: Only run this on member servers that are experiencing this issue. Do not run this on your domain controller.

  1. Open an elevated (administrative) command prompt
  2. Run the following commands:
    net stop w32time
    w32tm /unregister
    w32tm /register
    net start w32time
  3. Restart the server (may not be needed, but is a good idea)

After doing this, when running “w32tm /query /configuration” you’ll notice the time source will now reflect “NT5DS”, and the servers should now being using your domain hierarchy time sources (domain controllers).

Feb 182017
 
Windows Server Volume Shadow Copy Volumes Snapshot Screenshot

On VMware vSphere ESXi 6.5, 6.7, and 7.0, a condition exists where one is unable to take a quiesced snapshot. This is an issue that effects quite a few people and numerous forum threads can be found on the internet by those searching for the solution.

This issues can occur both when taking manual snapshots of virtual machines when one chooses “Quiesce guest filesystem”, or when using snapshot based backup applications such as vSphere Data Protection (vSphere vDP), Veeam, or other applications that utilize quiesced snapshots.

The Issue

I experienced this problem on one of my test VMs (Windows Server 2012 R2), however I believe it can occur on newer versions of Windows Server as well, including Windows Server 2016 and Windows Server 2019.

When this issue occurs, the snapshot will fail and the following errors will be present:

An error occurred while taking a snapshot: Failed to quiesce the virtual machine.
An error occurred while saving the snapshot: Failed to quiesce the virtual machine.

Performing standard troubleshooting, I restarted the VM, checked for VSS provider errors, and confirmed that the Windows Services involved with snapshots were in their correct state and configuration. Unfortunately this had no effect, and everything was configured the way it should be.

I also tried to re-install VMWare tools, which had no effect.

PLEASE NOTE: If you experience this issue, you should confirm the services are in their correct state and configuration, as outlined in VMware KB: 1007696. Source: https://kb.vmware.com/s/article/1007696

The Fix

In the days leading up to the failure when things were running properly, I did notice that the quiesced snapshots for that VM were taking a long time process, but were still functioning correctly before the failure.

This morning during troubleshooting, I went ahead and deleted all the Windows Volume Shadow Copies (VSS Snapshots) which are internal and inside of the Virtual Machine itself. These are the shadow copies that the Windows guest operating system takes on it’s own filesystem (completely unrelated to VMware).

To my surprise after doing this, not only was I able to create a quiesced snapshot, but the snapshot processed almost instantly (200x faster than previously when it was functioning).

If you’re comfortable deleting all your snapshots, it may also be a good idea to fully disable and then re-enable the VSS Snapshots on the volume to make sure they are completely deleted and reset.

I’m assuming this was causing a high load for the VMware snapshot to process and a timeout was being hit on snapshot creation which caused the issue. While Windows volume shadow copies are unrelated to VMware snapshots, they both utilize the same VSS (Volume Shadow Copy Service) system inside of windows to function and process. One must also keep in mind that the Windows volume shadow copies will of course be part of a VMware snapshot since they are stored inside of the VMDK (the virtual disk) file.

PLEASE NOTE: Deleting your Windows Volume Shadow copies will delete your Windows volume snapshots inside of the virtual machine. You will lose the ability to restore files and folders from previous volume shadow copy snapshots. Be aware of what this means and what you are doing before attempting this fix.