Every organization is looking for ways to equip their mobile workforce, whether remote employees, travelling sales staff/representatives, or just providing more ways employees can work efficiently. Today I want to talk about Microsoft Teams Phone and VDI – a match made in the Cloud.
I’m one of those people who travel frequently and rely not only on having a reliable working environment, but also having access to telecommunications.
Running Teams Phone on VDI is a clear win in these regards!
VDI and VoIP, a common struggle
As most of you know, VDI and VoIP applications can be a major struggle with 3rd party applications not providing audio optimizations for environments that use VDI. This commonly results in in sluggish, jolty, delayed, and/or poor audio quality, in addition to audio processing in your VDI environment which uses resources on your VDI cluster.
For years, the most common applications including Microsoft Teams, Zoom, and even Skype for Business provided VDI optimizations to allow high quality (optimized) audio processing, resulting in almost perfect video/audio telecommunications via VDI sessions, when implemented properly.
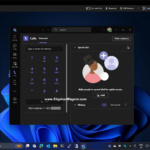
Teams Phone running on a VMware Horizon VDI Session
I was tired of using a 3rd party VoIP app, and wanted a more seamless experience, so I migrated over to Teams Phone for my organization, and I’m using it on VDI with VMware Horizon.
Microsoft Teams Phone
While I’ve heard a lot about Teams phone, Microsoft’s Phone System, and PSTN capabilities, I’ve only ever seen it deployed once in a client’s production environment. This put it on my list of curiosities to investigate in the future a few years back.
This past week I decided to migrate over to Microsoft Teams Phone for my organizations telephony and PSTN connectivity requirements. Not only did this eliminate my VoIP app on my desktops and laptops, but it also removed the requirement for a problematic VoIP client on my smartphone.
Teams Phone Benefits
Single app for team collaboration and VoIP
Single phone number (eliminates multiple extensions for multiple computers and devices)
Microsoft Phone System provides PBX capabilities
Cloud Based – No on-premise infrastructure required (except device & internet for client app)
I regularly use Microsoft Teams on all my desktops, laptops, and VDI sessions, along with my mobile phone, so the built-in capabilities for VoIP services, in an already fairly reliable app was a win-win!
I’ll go in to further detail on Teams Phone in a future blog post.
Teams Phone on VDI
Microsoft Teams already has VDI optimizations for video and audio in the original client and the new client. This provides an amazing high quality experience for users, while also offloading audio and video processing from your VDI environment to Microsoft Teams (handled by the endpoints and Microsoft’s servers).
When implementing Teams Phone on VDI, you take advantage of these capabilities providing an optimized and enhanced audio session for voice calls to the PSTN network.
This means you can have Teams running on a number of devices including your desktop, laptop, smartphone, VDI session, and have a single PSTN phone number that you can make and receive calls from, seamlessly.
Pretty cool, hey?
The Final Result
In my example, the final result will:
Reduce my corporate telephony costs by 50%
Eliminate the requirement for an on-prem PBX system
Remove the need for a 3rd party VoIP app on my workstations and mobile phone
Provide a higher quality end-user experience
Utilize existing VDI audio optimizations for a better experience
When you deploy and install Microsoft Office 365 to a VDI environment, especially with non-persistent VDI (such as Omnissa Horizon Instant clones), special considerations must be followed.
In this guide I will teach you how to deploy Office 365 in a VDI environment, both with persistent and non-persistent (Instant Clones) VDI Virtual Machines. This guide was built using Omnissa Horizon (formerly VMware Horizon), however applies to all VDI deployments including Citrix XenServer and AVD (Azure Virtual Desktops). Additionally this works on both Windows 10, and Windows 11.
By the time you’re done reading this guide (and watching the video), you’ll be able to fully deploy Office 365 (Microsoft 365) to your VDI environment.
Microsoft 365 Standard, Office 365 Business, Office 365 Business Premium, and Office 365 Business Essentials cannot be used as they do not include or support Shared Computer Activation.
An exception is made for Microsoft 365 Business Premium which actually includes Microsoft 365 Apps for Business, but doesn’t support enabling “Shared Computer Activation” via Group Policy Object and SCA must be enabled using the XML configuration file method.
What is Shared Computer Activation (SCA)
Shared computer activation is an optional activation method built inside of Office 365 and Microsoft 365, designed to control and manage activations on shared computers. Originally this technology was used for Office 365 on RDS (Remote Desktop Servers) to handle multiple users since Office 365 is activated and licensed per user.
Later, this technology was modified to handle Office 365 activations in non-persistent VDI environments. When utilizing SCA (Shared Computer Activation), when a user runs and activates Office 365, an activation token is generated and saved. These activation tokens are saved to a network location that the users has access to which allows the user to roam.
Due to the nature of non-persistent VDI, a user will always be logging in to a system they have never logged in to before. When Office 365 is deployed properly, it will call out to and look for the roaming activation token to automatically activate Office 365 without calling out to Microsoft’s servers.
This is also handy with persistent VDI, where you can have a roaming activation token be used on multiple desktop pools as it follows the users.
These activation tokens once generated are valid for 30 days and remove the need to activate Office during that timeframe. As expiration nears, Office will automatically reach out to Microsoft’s servers and attempt to renew the licensing activation token.
You’ll want to make sure that you have implemented Azure AD Connect and SSO (Single Sign-On) properly along with the correct GPOs (covered later in this post) for auto-activation to function without prompting users to sign-in to activate. For more information, check out my post on Understanding Microsoft Azure AD SSO with VDI.
If you have not using SCA, you’ll need to follow additional special steps to have roaming profiles include the licensing directory, however I do not recommend using that method. The licensing information (and activation) without SCA is stored in the following directory:
%localappdata%\Microsoft\Office\16.0\Licensing
You can configure Shared Computer Activation and the location of the roaming activation token using Group Policy, the local registry, or the configuration.xml file for the Office Deployment Tool.
Shared Computer Activation is ONLY required for non-persistent VDI. If you are using persistent VDI where users are assigned a desktop they are frequently using, shared computer activation is not necessary and does not need to be used.
Even though Shared Computer Activation is not required for persistent desktops, I might still recommend using it if you have users using multiple desktop pools, or you’re regularly changing your persistent desktop golden image and refreshing the environment.
Later in the document, we’ll cover configuring Share Computer Activation.
Deploying and Installing Office 365 to the VDI Environment
The steps to deploy and install Office 365 to VDI vary depending if you’re using persistent or non-persistent VDI. In both types of deployments you’ll want to make sure that you use the Office Deployment Tool which uses an XML file for configuration to deploy the application suite.
Office Deployment Tool and Office Customization Tool
Using the Office Deployment Tool and the Office Customization Tool, you can customize your Office 365 installation to your specific needs and requirements.
Using the tool, you can create a configuration.xml and control settings like the following:
Architecture (32-bit or 64-bit)
Products to install (Office Suites, Visio, Project, and additional products)
Products to exclude
Update Channel
Language Settings and Language Packs
Installation Options (Installation Source and configurable items)
Upgrade Options
Licensing and Activation (EULA acceptance, KMS/MAK, User based vs Shared Computer Activation vs Device Activation)
Application Preferences
Once you have a configuration.xml file from the Office Customization Tool, you can use the Office Deployment Tool to deploy and install Office 365 using those customizations and configuration.
The configurations you use will vary depending on your VDI deployment type which I will get in to below.
Installing Office 365 with Persistent VDI
To deploy Office 365 with persistent VDI, Shared Computer Activation is not required.
You will however, want to use the Office Deployment Tool to prepare the base image for automated pools, or manually install Office 365 in to the VDI Virtual Machine.
See below for the instructions on Installing Office 365 on Persistent VDI:
These variables enable Shared Computer Activation and disable automatic activation. Save the XML file.
We’re now going to run the tool and download the Office installation files using the xml from above by running the following command (if you modified the XML file and/or changed the filename, use the filename you saved it as):
setup.exe /download configuration.xml
There will be no output and it will take a while so be patient.
We can now install Office 365 using your XML configuration by running the following command (if you modified the XML file and/or changed the filename, use the filename you saved it as):
setup.exe /configure configuration.xml
Office 365 should now install silently, and then afterwards you should be good to go!
If you did not use SCA, the product will need to be activated manually or automatically via GPO.
If you did use SCA, you’ll want to use the GPOs to configure first-run activation, as well as the location of the roaming activation tokens.
Please note: With persistent VDI, you’ll want to make sure that you leave the Office 365 updating mechanism enabled as these VMs will not be destroyed on logoff. The behavior will match that of a typical workstation as far as software updates are concerned.
Even if you are using persistent VDI, I highly recommend you read the notes below on installing Office 365 on non-persistent VDI as you may want to incorporate that configuration in to your deployment.
Installing Office 365 with Non-Persistent (Instant Clones) VDI
To deploy Office 365 with non-persistent VDI, things are a little different than with persistent. Shared Computer Activation is recommended and required if you’re not using profile capture software like FSLogix. You can however still use SCA with FSLogix.
We’ll use the Office Deployment Tool to prepare the base image. Using the tool, we’ll want to make sure we exclude the following applications from the XML file:
Microsoft Teams
OneDrive
Using the Office 365 installer for the above products will cause issues as the software gets installed in the user profile instead of the operating system itself.
These applications have their own separate special “All User” installation MSI files that we need to use to install to the base image.
We’ll use the Office Customization Tool (OCT) at https://config.office.com/ to create a configuration XML file for our Non-Persistent Office 365 deployment.
Below is an example of the XML file generated from the Office Customization Tool for Instant Clones (Non-Persistent VDI) Virtual Machines:
You’ll notice I chose not to include Groove, Lync, Publisher, and Bing Search. This is because these are not used in my environment. I’d recommend excluding applications you don’t require in your base image.
You’ll also notice that I chose to disable Office 365 updates as these get managed and handled inside of the base image and we don’t want the instant clones attempting to update Office as the VMs are deleted on logoff. We also choose to accept the EULA for users so they are not prompted.
After we have our configuration XML file, we’ll proceed to installing Office 365 on the non-persistent base image:
Create a directory that you can work in and store the Office 365 installation files.
Open the file you downloaded from the Office Deployment Tool on the Microsoft Download site, extract the files in to the working directory you created in step 2.
Copy the XML file created above from the Office Customization Tool in to this directory.
Open a Command Prompt, and change in to that working directory.
Confirm that SCA (Shared Computer Activation) is enabled by viewing the XML configuration file. You should see the following text:
We’re now going to run the tool and download the Office installation files using the xml from above by running the following command:
setup.exe /download non-persistentVDI.xml
There will be no output and it will take a while so be patient.
We can now install Office 365 using your XML configuration by running the following command:
setup.exe /configure non-persistentVDI.xml
Office 365 should now install silently.
For the skipped applications (Teams, OneDrive) we’ll install these applications separately. Go ahead and download the MSI installers from below and follow the instructions below:
Installers:
Microsoft Classic Teams – MSI Download: 64-Bit, 32-Bit
To install Microsoft OneDrive on non-persistent VDI using the EXE file above, run the following command on the base image:
OneDriveSetup.exe /allusers
After installing, open the Windows Task Scheduler and disable the following OneDrive update task:
OneDrive Per-Machine Standalone Update Task
Additionally, open the Windows services and disable the OneDrive update service:
OneDrive Updater Service
Updating Office 365 in a VDI Environment
In persistent VDI environments, the auto-update mechanism will be enabled and activated (unless you chose to disable it), and Office will update as it does with normal windows instances. You can modify and/or control this behavior using the Microsoft Office ADMX Templates and Group Policy.
In non-persistent VDI environments the updating mechanism will be disabled (as per the XML configuration example above). To update the base image you’ll need to run the “setup.exe” again with the “download” and “configure” switch, so make sure you keep your configuration XML file.
Here is an example of the Office 365 Update process on a non-persistent VDI base image. We run the following commands on the base image to update Office 365:
setup.exe /download non-persistentVDI.xml
setup.exe /configure non-persistentVDI.xml
The commands above will download and install the most up to date version of Office 365 using the channel specified in the XML file. You then deploy the updated base image.
Configuring Microsoft Office 365 for the VDI Environment
Once Office 365 is installed in the base image (or VM), we can begin configuring Office 365 for the VDI environment.
To configure and centrally manage your O365 deployment, we’ll want to use GPOs (Group Policy Objects). This will allow us to configure everything including “first run configuration” and roll out a standardized configuration to users using both persistent and non-persistent VDI.
You’ll probably want to create an OU (Organizational Unit) if you haven’t already for your VDI VMs (separate for persistent and non-persistent VDI) inside of Active Directory, and then create a new Group Policy Object and apply it to that OU. In that new GPO, we’ll be configuring the following:
We’ll be configuring the following “Computer Configuration” items:
We’ll start with the Computer Configuration Items.
Microsoft Office – Licensing Configuration
If you’re using SCA (Shared Computer Activation) for licensing, we need to specify where to store the users activation tokens. You may have configured a special location for these, or may just store them with your user profiles.
First we need to enable Shared Computer Activation. Navigate to:
And set “Use shared computer activation” to Enabled.
If you’re using FSLogix and redirecting the profile to a VHD file, you don’t need to perform the steps below. If you’re not using FSLogix and are not using a profile redirection mechanism, we’ll need to set “Specify the location to save the licensing token used by shared computer activation”. We’ll set this to the location where you’d like to store the roaming activation tokens. As an example, to store to the roaming User Profile share, I’d set it to the following:
\\PROFILE-SERVER\UserProfiles$\%USERNAME%
Microsoft Office – Update Configuration
If you’re usBecause this is a VDI environment, we want automatic updating disabled since IT will manage the updates.
We’ll also set “Hide option to enable or disable updates” to Enabled to hide it from the users.
Microsoft OneDrive – Known Folders, Use OneDrive Files On-Demand
There’s some basic configuration for OneDrive that we’ll want to configure as we don’t want our users profile folders being copied or redirected to OneDrive. We also want OneDrive to be used with Files On-Demand so that users OneDrive contents aren’t cached/copied to the VDI user profiles.
This configuration is ONLY if you are using OneDrive and/or have it installed.
“Prevent users from moving their Windows known folders to OneDrive” to Enabled
“Prevent users from redirecting their Windows known folders to their PC” to Enabled
“Prompt users to move Windows known folders to OneDrive” to Disabled
“Silently move Windows known folders to OneDrive” to “Disabled”
“Silently sign in users to the OneDrive sync app with their Windows credentials” to “Enabled”
“Use OneDrive Files On-Demand” to Enabled
We’ve new configured OneDrive for VDI Users.
Windows – Group Policy Loopback Processing Mode
Since we’ll be applying the above “Computer Configuration” GPO settings to users when they log on to the non-persistent Instant Clone VDI VMs, we’ll need to activate Loopback Processing of Group Policy (click the link for more information). This will allow use to have the “Computer Configuration” applied during User Logon and have higher precedence over their existing User Settings.
We’ll navigate to the following:
Computer Configuration -> Policies -> Administrative Templates -> System -> Group Policy
And set “Configure user Group Policy loopback processing mode” to Enabled, and “Mode” to Merge.
We’ve fully configured the Computer Configuration in the GPO. We will now configure the User Configuration items.
Microsoft Office – First Run Configuration
As most of you know, when running Microsoft Office 365 for the first time, there are numerous windows, movies, and wizards for the first time run. We want to disable all of this so it appears that Office is pre-configured to the user, this will allow them to just log on and start working.
We’ll head over to:
User Configuration -> Policies -> Administrative Templates -> Microsoft Office 2016 -> First Run
And set the following items:
“Disable First Run Movie” to Enabled
“Disable Office First Run on application boot” to Enabled
Microsoft Office – Block Personal Microsoft Account Sign-in
Since we’re paying for and want the user to use their Microsoft 365 account and not their personal M365/O365 accounts, we’ll stop them from being able to add personal Microsoft Accounts to Office 365.
Head over to:
User Configuration -> Policies -> Administrative Templates -> Microsoft Office 2016 -> Miscellaneous
And set “Block signing into Office” to Enabled, and then set the additional option to “Organization ID only”
Microsoft Office – Subscription/Licensing Activation
We don’t want the activation window being shown to the user, nor the requirement for it to be configured, so we’ll configure Office 365 to automatically activate using SSO (Single Sign On).
Navigate to:
User Configuration -> Policies -> Administrative Templates -> Microsoft Office 2016 -> Subscription Activation
And then set “Automatically activate Office with federated organization credentials” to Enabled.
This will automatically activate Office 365 for the VDI user.
Microsoft Outlook – Disable E-Mail Account Configuration
We’ll be configuring the e-mail profiles for the users so that no initial configuration will be needed. Again, just another step to let them log in and get to work right away.
Inside of:
User Configuration -> Policies -> Administrative Templates -> Microsoft Outlook 2016 -> Account Settings -> E-mail
And we’ll set the following:
“Prevent Office 365 E-mail accounts from being configured within a simplified Interface” to Disabled
“Prevent Outlook from interacting with the account settings detection service” to Enabled
Microsoft Outlook – Exchange account profile configuration
When using Exchange, we’ll want your users Outlook Profile to be auto-configured for their Exchange account so we’ll need to configure the following setting.
Navigate to:
User Configuration -> Policies -> Administrative Templates -> Microsoft Outlook 2016 -> Account Settings -> Exchange
And set “Automatically configure profile based on Active Directory Primary SMTP address” to Enabled.
After setting this, it will automatically add the Exchange Account when they open Outlook and they’ll be ready to go! Note, that there is an additional setting with a similar name appended with “One time Only”. Using the One time Only will not try to apply the configuration on all subsequent Outlook runs.
Microsoft Outlook – Disable Cached Exchange Mode
If you’re using persistent VDI, hosted exchange, or FSLogix, you won’t want to configure this item.
When using on-premise Exchange with VDI, we don’t want users cached Outlook mailboxes (OST files) stored on the roaming profile, or the Instant Clone. We can stop this by disabling Exchange caching.
Navigate to:
User Configuration -> Policies -> Administrative Templates -> Microsoft Outlook 2016 -> Account Settings -> Exchange -> Cached Exchange Mode
And we’ll set the two following settings:
“Cached Exchange Mode (File | Cached Exchange Mode)” to Disabled
“Use Cached Exchange Mode for new and existing Outlook profiles” to Disabled
This will configure Exchange to run in “Online Mode”.
Microsoft Office Common Identity Registry – For Roaming Profiles
If you’re using Roaming profiles and folder redirection with non-persistent VDI and instant clones, the user may be prompted repeatedly on new logins to log in to their Office 365 account (with a login prompt) even though SCA is configured and working. This setting is not required when using FSLogix.
When troubleshooting this, one may think that the issue is related to SCA, when it is actually not. This prompt is occurring because of authentication issues with Office 365.
To correct this issue, we’ll need to add a registry configuration to the GPO that will delete a key on login.
User Configuration -> Preferences -> Windows Settings -> Registry
We’ll create a new registry GPO item, that will “delete” the key path below inside of “HKEY_CURRENT_USER”:
SOFTWARE\Microsoft\Office\16.0\Common\Identity
This will delete the Identity key on login, and allow Office 365 to function. This may not be needed if using FSLogix or other profile management suites.
Deploying the Base Image
At this point you can push and deploy the base image and have users log in to the VDI environment and Office 365 should be fully functioning.
Please keep in mind there are different methods for deploying and configuring Office 365 depending on what application delivery and profile management software you may be using. This is just a guide to get you started!
By deploying a Group Policy Objects to configure Office 365, you’ll be able to configure Office 365 for first time use, activate the product, roll out pre-defined configuration, and even automatically configure Outlook mail profiles.
Following these steps will help you provide a zero-configuration experience for your end users so that everything is up and running for them when they connect the first time. I will also provide a number of GPO settings which will enhance the user experience.
What’s Required
To Configure Microsoft Office 365 on a Remote Desktop Services Server, you’ll need:
A Remote Desktop Services Server (Configured and Running)
Microsoft 365 Apps for Enterprise (formerly named as Office 365 ProPlus)
Microsoft 365 Apps for Enterprise ADMX GPO Administrative Templates (Download here)
Shared Computer Activation
In order to properly configure and activate Office 365 in a Remote Desktop Services Environment, you will need to Install Office 365 with Shared Computer Activation. You can read my guide by clicking on the link.
Configure Office 365
Once you’re ready to go, you can begin configuration.
To make things as simple as possible and centrally manage every aspect of your O365 deployment, we want to configure everything via GPO (Group Policy Objects). This will allow us to configure everything including “first run configuration” and roll out a standardized configuration to users.
You’ll probably want to create an OU (Organizational Unit) inside of Active Directory for your RDS farm, and then create a new Group Policy Object and apply it to that OU. In that new GPO, we’ll be configuring the following:
We’ll be configuring the following “Computer Configuration” items:
Since we’re using SCA (Shared Computer Activation) for licensing, we need to specify where to store the users activation tokens. You may have configured a special location for these, or may just store them with your user profiles.
First we need to activate Shared Computer Activation. Navigate to:
And set “Use shared computer activation” to Enabled.
Next we’ll set “Specify the location to save the licensing token used by shared computer activation” to the location where you’d like to store the activation tokens. As an example, to store to the User Profile share, I’d use the following:
\\PROFILE-SERVER\UserProfiles$\%USERNAME%
Microsoft Office – Update Configuration
Because this is a Remote Desktop Services server, we want automatic updating disabled since IT will manage the updates.
We’ll also set “Hide option to enable or disable updates” to Enabled to hide it from the users.
Microsoft OneDrive – Known Folders, Use OneDrive Files On-Demand
There’s some basic configuration for OneDrive that we’ll want to configure as we don’t want our users profile folders being copied or redirected to OneDrive, and we also want OneDrive to be used with Files On-Demand so that users OneDrive contents aren’t cached/copied to the RDS Server.
“Prevent users from moving their Windows known folders to OneDrive” to Enabled
“Prevent users from redirecting their Windows known folders to their PC” to Enabled
“Prompt users to move Windows known folders to OneDrive” to Disabled
“Use OneDrive Files On-Demand” to Enabled
We’ve new configured OneDrive for RDS Users.
Windows – Group Policy Loopback Processing Mode
Since we’ll be applying the above “Computer Configuration” GPO settings to users when they log on to the RDS Server, we’ll need to activate Loopback Processing of Group Policy (click the link for more information). This will allow use to have the “Computer Configuration” applied during User Logon and have higher precedence over their existing User Settings.
We’ll navigate to the following:
Computer Configuration -> Policies -> Administrative Templates -> System -> Group Policy
And set “Configure user Group Policy loopback processing mode” to Enabled, and “Mode” to Merge.
Microsoft Office – First Run Configuration
As most of you know, when running Microsoft Office 365 for the first time, there are numerous windows, movies, and wizards for the first time run. We want to disable all of this so it appears that Office is pre-configured to the user, this will allow them to just log on and start working.
We’ll head over to:
User Configuration -> Policies -> Administrative Templates -> Microsoft Office 2016 -> First Run
And set the following items:
“Disable First Run Movie” to Enabled
“Disable Office First Run on application boot” to Enabled
Microsoft Office – Block Personal Microsoft Account Sign-in
Since we’re paying for and want the user to use their Microsoft 365 account and not their personal, we’ll stop them from being able to add personal Microsoft Accounts to Office 365.
Head over to:
User Configuration -> Policies -> Administrative Templates -> Microsoft Office 2016 -> Miscellaneous
And set “Block signing into Office” to Enabled, and then set the additional option to “Organization ID only”
Microsoft Office – Subscription/Licensing Activation
Earlier in the post we configured Office 365 to use SCA, now we’ll need to configure how it’s activated. We don’t want the activation window being shown to the user, nor the requirement for it to be configured, so we’ll configure Office 365 to automatically active using SSO (Single Sign On).
Navigate to:
User Configuration -> Policies -> Administrative Templates -> Microsoft Office 2016 -> Subscription Activation
And then set “Automatically activate Office with federated organization credentials” to Enabled.
Microsoft Outlook – Disable E-Mail Account Configuration
We’ll be configuring the e-mail profiles for the users so that no initial configuration will be needed. Again, just another step to let them log in and get to work right away.
Inside of:
User Configuration -> Policies -> Administrative Templates -> Microsoft Outlook 2016 -> Account Settings -> E-mail
And we’ll set the following:
“Prevent Office 365 E-mail accounts from being configured within a simplified Interface” to Disabled
“Prevent Outlook from interacting with the account settings detection service” to Enabled
Microsoft Outlook – Exchange account profile configuration
We’ll want your users Outlook Profile to be auto-configured for their Exchange account so we’ll need to configure the following setting.
Navigate to:
User Configuration -> Policies -> Administrative Templates -> Microsoft Outlook 2016 -> Account Settings -> Exchange
And set “Automatically configure profile based on Active Directory Primary SMTP address” to Enabled.
After setting this, it will automatically add the Exchange Account when they open Outlook and they’ll be ready to go! Note, that there is an additional setting with a similar name appended with “One time Only”. Using the One time Only will not try to apply the configuration on all subsequent Outlook runs.
Microsoft Outlook – Disable Cached Exchange Mode
Since we’ll have numerous users using the RDS server or servers, we don’t want users cached Outlook mailboxes (OST files) stored on the RDS server. We can stop this by disabling Exchange caching.
Navigate to:
User Configuration -> Policies -> Administrative Templates -> Microsoft Outlook 2016 -> Account Settings -> Exchange -> Cached Exchange Mode
And we’ll set the two following settings:
“Cached Exchange Mode (File | Cached Exchange Mode)” to Disabled
“Use Cached Exchange Mode for new and existing Outlook profiles” to Disabled
This guide will show you to install Microsoft (Classic) Teams and deploy Microsoft Teams VDI Optimization on VMWare Horizon for Manual Pools, Automated Pools, and Instant Clone Pools, for use with both persistent and non-persistent VDI. This guide works for Microsoft Teams on Windows 10 and Windows 11, including the new Windows 11 22H2.
Please see my post Deploy and install the New Teams for VDI to learn how to deploy the new Teams client for VDI. The Classic client will go end of support on June 30, 2024.
Before Microsoft Teams VDI Optimization, VMware’s RTAV (Real-Time Audio-Video) was generally used. This offloaded audio and video to the VMware Horizon Client utilizing a dedicated channel over the connection to optimize the data exchange. With minor tweaks (check out my post on enhancing RTAV webcam with VMware Horizon), this actually worked quite well with the exception of microphone quality on the end-users side, and high bandwidth requirements.
Starting with Horizon View 7.13 and Horizon View 8 (2006), VMware Horizon now supports Microsoft Teams Optimization. This technology offloads the Teams call directly to the endpoint (or client device), essentially drawing over the VDI VM’s Teams visual interface and not involving the VDI Virtual Machine at all. The client application (or thin client) handles this and connects directly to the internet for the Teams Call. One less hop for data, one less processing point, and one less load off your server infrastructure.
Microsoft Teams Optimization uses WebRTC to function.
Deploying Microsoft Teams Optimization on VMware Horizon VDI
There are two components required to deploy Microsoft Teams Optimization for VDI.
Microsoft Specific Setup and Configuration of Microsoft Teams
VMware Specific Setup and Configuration for Microsoft Teams
We’ll cover both in this blog post.
Microsoft Specific Setup and Configuration of Microsoft Teams Optimization
First and foremost, do NOT bundle the Microsoft Teams install with your Microsoft 365 (Office 365) deployment, they should be installed separately.
We’re going to be installing Microsoft Teams using the “per-machine” method, where it’s installed in the Program Files of the OS, instead of the usual “per-user” install where it’s installed in the user “AppData” folder.
Non-persistent (Instant Clones) VDI requires Microsoft Teams to be installed “Per-Machine”, whereas persistent VDI can use both “Per-Machine” and “Per-User” for Teams. I use the “Per-Machine” for almost all VDI deployments. This allows you to manage versions utilizing MSIs and GPOs.
Please Note that when using “Per-Machine”, automatic updates are disabled. In order to upgrade Teams, you’ll need to re-install the newer version. Take this in to account when planning your deployment. If you use the per-user, it will auto-update.
For Teams Optimization to work, your endpoints and/or clients MUST have internet access.
Let’s Install Microsoft Teams (VDI Optimized)
For Per-Machine (Non-Persistent Desktops) Install, use the following command:
And that’s it for the Microsoft Specific side of things!
VMware Specific Setup and Configuration for Microsoft Teams Optimization
When it comes to the VMware Specific Setup and Configuration for Microsoft Teams Optimization, it’s a little bit more complex.
VMware Horizon Client Installation
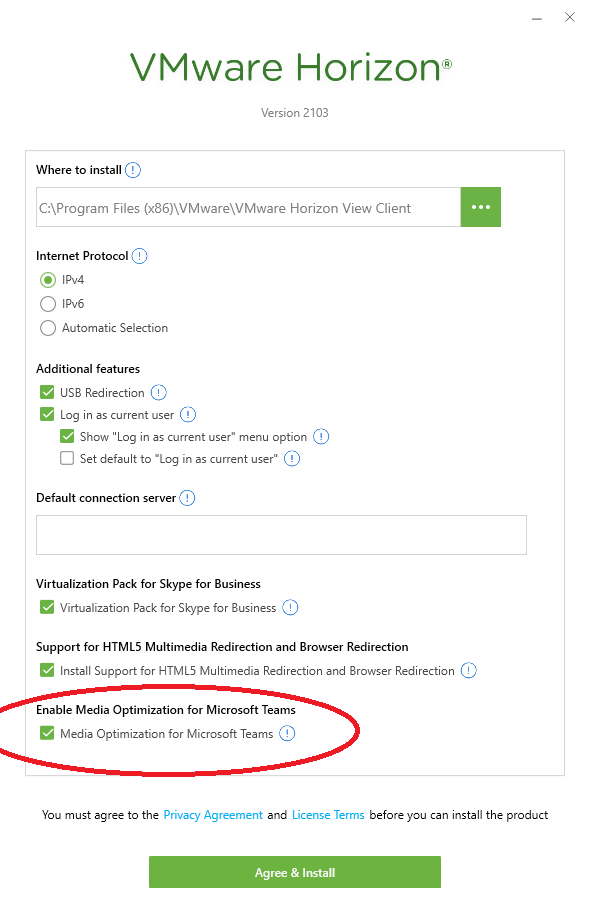
When installing the VMware Horizon Client, the Microsoft Teams optimization feature should be installed by default. However, doing a custom install, make sure that “Media Optimization for Microsoft Teams” is enabled (as per the screenshot below):
VMware View Client Install with Microsoft Teams Optimization
Group Policy Object to enable WebRTC and Microsoft Teams Optimization
You’ll only want to configure GPOs for those users and sessions where you plan on actually utilizing Microsoft Teams Optimization. Do not apply these GPOs to endpoints where you wish to use RTAV and don’t want to use Teams optimization, as it will enforce some limitations that come with the technology (explained in Microsoft’s documentation).
We’ll need to enable VMware HTML5 Features and Microsoft Teams Optimization (WebRTC) inside of Group Policy. Head over and open your existing VDI GPO or create a new GPO. You’ll need to make sure you’ve installed the latest VMware Horizon GPO Bundle. There are two switches we need to set to “Enabled”.
Expand the following, and set “Enable HTML5 Features” to “Enabled”:
Next, we’ll set “Enable Media Optimization for Microsoft Teams” to “Enabled”. You’ll find it in the following:
Computer Configuration -> Policies -> Administrative Templates -> VMware View Agent Configuration -> VMware HTML5 Features -> VMware WebRTC Redirection Features -> Enable Media Optimization for Microsoft Teams
And that’s it, you’re GPOs are now configured.
If you’re running a persistent desktop, run “gpupdate /force” in an elevated command prompt to grab the updated GPOs. If you’re running a non-persistent desktop pool, you’ll need to push the base image snapshot again so your instant clones will have the latest GPOs.
Confirming Microsoft Teams Optimization for VDI
There’s a simple and easy way to test if you’re currently running Microsoft Teams Optimized for VDI.
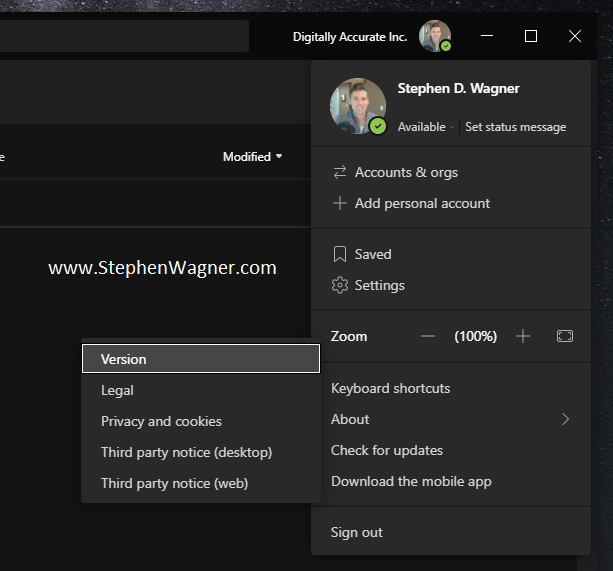
Open Microsoft Teams
Click on your Profile Picture to the right of your Company Name
Expand “About”, and select “Version”
Microsoft Teams – About and Version to check Teams Optimization for VDI
After selecting this, you’ll see a toolbar appear horizontally underneath the search, company name, and your profile picture with some information. Please see the below examples to determine if you’re running in 1 of 3 modes.
The following indicates that Microsoft Teams is running in normal mode (VDI Teams Optimization is Disabled). If you have configured VMware RTAV, then it will be using RTAV.
Microsoft Teams VDI Optimization disabled
The following indicates that Microsoft Teams is running in VDI Optimized mode (VDI Teams Optimization is Enabled showing “VMware Media Optimized”).
Microsoft Teams VDI Optimization enabled
The following indicates that Microsoft Teams is configured for VDI Optimization, however is not functioning and running in fallback mode. If you have VMware RTAV configured, it will be falling back to using RTAV. (VDI Teams Optimization is Enabled but not working showing “VMware Media Not Connected”, and is using RTAV if configured).
Microsoft Teams VDI Optimization Fallback
If you’re having issues or experiencing unexpected results, please go back and check your work. You may also want to review Microsoft’s and VMware’s documentation.
Conclusion
This guide should get you up and running quickly with Microsoft Teams Optimization for VDI. I’d recommend taking the time to read both VMware’s and Microsoft’s documentation to fully understand the technology, limitations, and other configurables that you can use and fine-tune your VDI deployment.
One of the most widely used applications suite is Microsoft Office, particularly Microsoft Office 365.
In order to deploy Microsoft Office 365 in a Remote Desktop Services environment, a number of requirements must be met. There is also special instructions which must be followed to properly deploy it.
After reading and completing the steps in this blog post and deploying Office 365, you can head over to my guide on how to Configure Office 365 in a Remote Desktop Services Environment using GPOs to pre-configure Microsoft Office and it’s applications for when your users log in.
What’s required
To deploy Microsoft Office 365 on a Remote Desktop Services Server, you’ll need:
A Remote Desktop Services Server (Configured and Running)
Microsoft 365 Apps for Enterprise (formerly named as Office 365 ProPlus)
Licensing
Special attention must be paid to licensing. In order to properly license and activate Office 365, you’ll need one of the following products that supports Shared Computer Activation:
Microsoft 365 Apps for Enterprise (formerly known as Office 365 ProPlus)
Microsoft 365 Standard, Office 365 Business, Office 365 Business Premium, and Office 365 Business Essentials cannot be used as they do not include or support Shared Computer Activation.
An exception is made for Microsoft 365 Business Premium which actually includes Microsoft 365 Apps for Business, but doesn’t support enabling “Shared Computer Activation” via Group Policy Objects and must be done using the XML configuration file method.
Installing Office 365
Once you have the proper licensing and you’re ready to proceed, you can start!
To download the 32-bit version or enterprise version, use one of the other xml files that are in the directory.
There will be no output and it will take a while so be patient.
Now we want to open the xml file we previously used (in our case “configuration-Office365-x64.xml”) and add the following lines to the file right above the final line (right above </Configuration>):
Office 365 should now install silently, and then afterwards you should be good to go!
When a user logs in for the first time it will ask them to activate on their account. The user must have a license attached to their Office 365 account.
This website uses cookies to improve your experience. We'll assume you're ok with this, but you can opt-out if you wish.
Do you accept the use of cookies and accept our privacy policy? AcceptRejectCookie and Privacy Policy
Privacy & Cookies Policy
Privacy Overview
This website uses cookies to improve your experience while you navigate through the website. Out of these cookies, the cookies that are categorized as necessary are stored on your browser as they are essential for the working of basic functionalities of the website. We also use third-party cookies that help us analyze and understand how you use this website. These cookies will be stored in your browser only with your consent. You also have the option to opt-out of these cookies. But opting out of some of these cookies may have an effect on your browsing experience.