Oct 302022
 
vGPU nvidia-smi GPU Link Info

If you’re like me, you want to make sure that your environment is as optimized as possible. I recently noticed that my NVIDIA A2 vGPU was reporting the vGPU PCIe Link Speed and Generation that the card was using was below what it was supposed to be running at on my VMware vSphere ESXi host.

I needed to find out if this was being reported incorrectly, if there was an issue, or something else effecting this. In my case, the specific GPU I was using is supposed to support PCIe Gen4, and has a physical connector supporting 4x, my host has PCIe Gen3 slots, so I should at least be getting Gen3 speeds.

NVIDIA A2 vGPU

The Problem

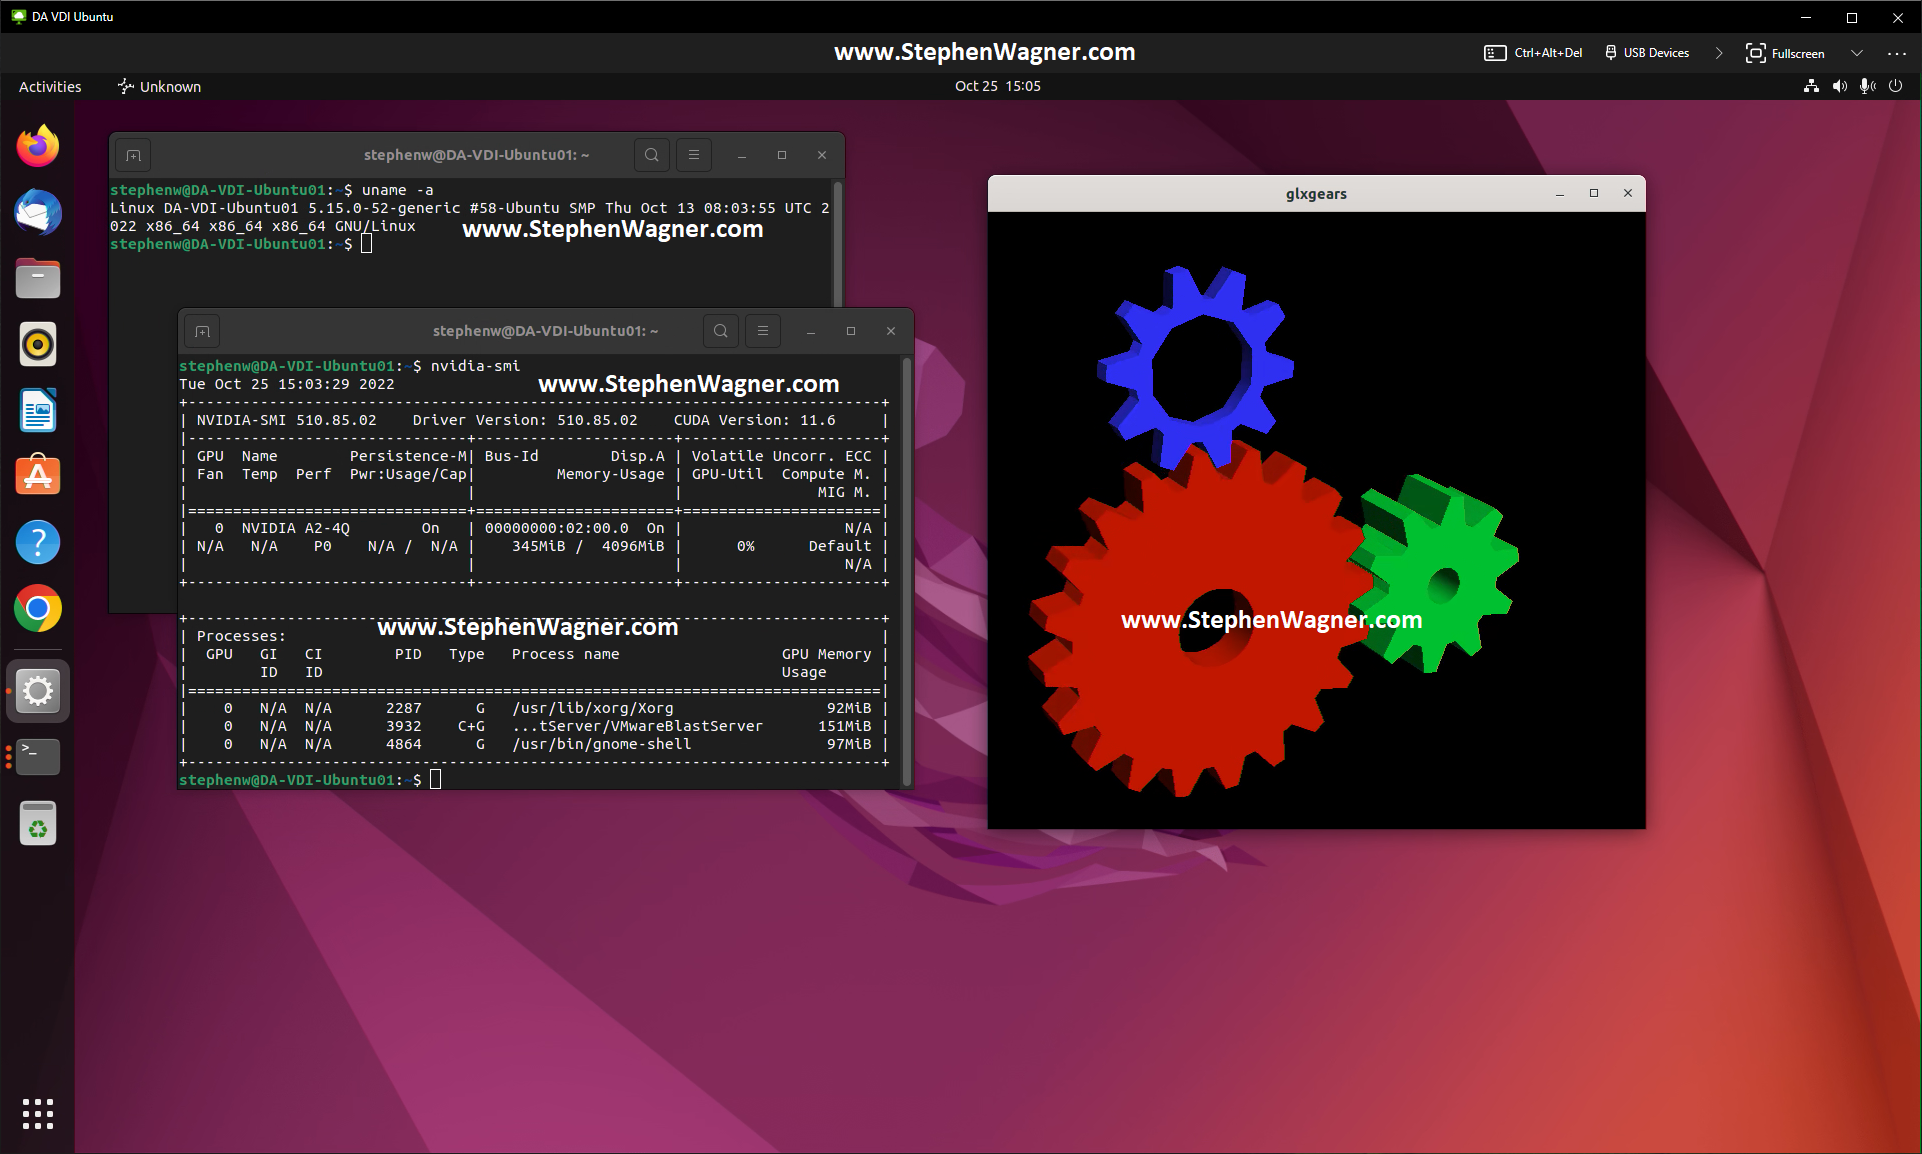
When running the command “nvidia-smi -q”, the GPU was reporting that it was only running at PCIe Gen 1 speeds, as shown below:

        GPU Link Info
            PCIe Generation
                Max                       : 3
                Current                   : 1
                Device Current            : 1
                Device Max                : 4
                Host Max                  : N/A
            Link Width
                Max                       : 16x
                Current                   : 8x

Something else worth noting, is that the card states that it supports a 16x interface, when it actually only physical has a 8x connector. I believe they use this chip on another board that has multiple GPUs on a single board that actually supports 16x.

You could say I was quite puzzled. Why would the card only be running at PCIe Generation 1 speeds? I thought it could be any of the scenarios below:

  • Dynamic mode that alternates when required (possibly for power savings)
  • Hardware issue
  • Hardware Limitation (I’m using this in an older server)
  • Software issues
  • Configuration issue

Unfortunately, when searching the internet, I couldn’t find many references to this metric, however I did find references from other user’s copy/pastes of “nvidia-smi -q” which had the same values (running PCIe Gen1), even with beefier and more high-end cards.

The Solution

After some more searching, I finally came across an NVIDIA technical document titled “Useful nvidia-smi Queries” that states that the current PCIe Generation Link speed “may be reduced when the GPU is not in use”. This confirms that it’s dynamic and adjusts when needed.

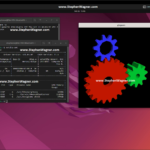
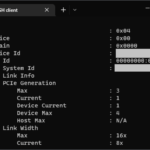
Finally, I decided to give some games a shot in a couple of the VMs, and to my surprise when running a game, the “Device Current” and “Current” PCIe Generation changed to PCIe Gen3 (note that my server isn’t capable of PCIe Gen4, which is the cards maximum), as shown below:

        GPU Link Info
            PCIe Generation
                Max                       : 3
                Current                   : 3
                Device Current            : 3
                Device Max                : 4
                Host Max                  : N/A
            Link Width
                Max                       : 16x
                Current                   : 8x

In conclusion, if you notice this in your environment, do not be alarmed as this is completely normal and expected behavior.

Oct 252022
 
Screenshot of Horizon Agent for Linux on Ubuntu 22.04 LTS

Today I’m going to show you the process to install Horizon Agent for Linux on Ubuntu 22.04 LTS. We’ll be installing the Horizon Agent for Linux from VMware Horizon 8 version 2209.

The official documentation from VMware is helpful, but unfortunately doesn’t provide all the information to get up and running quickly, which is why I’ve put together this guide as a “Quick Start”.

Please note, that this is just a guide to get to the point where you can install NVIDIA vGPU drivers and have installed the Horizon Agent for Linux on the VM. This will provide you with a persistent VM that you can use with Horizon, and the instructions can be adapted for use in a non-persistent instant clone environment as well.

Screenshot of Horizon Agent for Linux on Ubuntu 22.04 LTS
Horizon Agent for Linux on Ubuntu 22.04 LTS

I highly recommend reading VMware’s documentation for Linux Desktops and Applications in Horizon.

Requirements

  • VMware Horizon 8 (I’m running VMware Horizon 8 2209)
  • Horizon Enterprise or Horizon for Linux Licensing
  • Ubuntu 22.04 LTS Installer ISO (download here)
  • Horizon Agent for Linux (download here)
  • Functioning internal DNS

Instructions

  1. Create a VM on your vCenter Server, attached the Ubuntu 22.04 LTS ISO, and install Ubuntu
  2. Install any Root CA’s or modifications you need for network access (usually not needed unless you’re on an enterprise network)
  3. Update Ubuntu as root
    apt update
    apt upgrade
    reboot
  4. Install software needed for VMware Horizon Agent for Linux as root
    apt install make gcc libglvnd-dev open-vm-tools open-vm-tools-dev open-vm-tools-desktop
  5. Install your software (Chrome, etc.)
  6. Install NVIDIA vGPU drivers if you are using NVIDIA vGPU (this must be performed before install the Horizon Agent). Make sure the installer modifies and configures the X configuration files.
  7. Install the Horizon Agent For Linux as root (accepting TOS, enabling audio, and disabling SSO).
    See Command-line Options for Installing Horizon Agent for Linux
    ./install_viewagent.sh -A yes -a yes -S no
  8. Reboot the Ubuntu VM
  9. Log on to your Horizon Connection Server
  10. Create a manual pool and configure it
  11. Add the Ubuntu 22.04 LTS VM to the manual desktop pool
  12. Entitle the User account to the desktop pool and assign to the VM
  13. Connect to the Ubuntu 22.04 Linux VDI VM from the VMware Horizon Client

You should now be able to connect to the Ubuntu Linux VDI VM using the VMware Horizon client. Additionally, if you installed the vGPU drivers for NVIDIA vGPU, you should have full 3D acceleration and functionality.

Oct 032022
 
NVIDIA A2 vGPU

When deploying automated desktop pools with NVIDIA vGPU on VMware Horizon with an NVIDIA A2 GPU, you may notice provisioning fails with an error.

Error during Provisioning Cloning of VM VM-NAME-01 has failed: Fault type is UNKNOWN_FAULT_FATAL - No GPU capable host available for provisioning VM-NAME-01 with profile nvidia_a2-4q. Please refer to VMware KB 59271 for more details.

Further, when visiting VMware KB 59271 and performing the instructions, provisioning still continues to fail.

Screenshot of error message Automated vGPU Desktop Pool fails to provision due to missing vGPU profiles
Automated vGPU Desktop Pool fails to provision due to missing vGPU profiles

Essentially, at present there is no “supported” to resolve this issue without applying the fix listed in this post. Additionally, if you’re a VMware customer with an active support agreement, I would recommend opening a ticket with VMware Support so that it can be addressed in a future release.

The Problem

The NVIDIA A2 GPU is fairly new, along with VMware vSphere support. Even newer, is the support for vGPU and VMware Horizon, requiring the latest drivers (vGPU Drivers versions 14.2 released August 2022) to enable vGPU profiles for the card.

After troubleshooting this, I noted that the “graphic-profiles.properties” file in “C:\Program Files\VMware\VMware View\Server\broker\conf” did not contain any NVIDIA A2 vGPU Profiles. Additionally, the file available on the VMware KB was also missing these profiles.

The Fix

To fix this, I referenced the NVIDIA vGPU User Guide to note the vGPU profiles allowed on the card, and created my own entries for the configuration file.

After adding these entries, restarting the server (or service), I was able to provision NVIDIA A2 enabled vGPU desktop pools.

To resolve this issue, add the following entries to your “graphic-profiles.properties” file in “C:\Program Files\VMware\VMware View\Server\broker\conf” (note, the contents of the file is case-sensitive):

# NVIDIA A2 Profiles
# Q-Series Virtual GPU Types for NVIDIA A2
nvidia_a2-16q=1
nvidia_a2-8q=2
nvidia_a2-4q=4
nvidia_a2-2q=8
nvidia_a2-1q=16

# B-Series Virtual GPU Types for NVIDIA A2
nvidia_a2-2b=8
nvidia_a2-1b=16

# C-Series Virtual GPU Types for NVIDIA A2
nvidia_a2-16c=1
nvidia_a2-8c=2
nvidia_a2-4c=4

# A-Series Virtual GPU Types for NVIDIA A2
nvidia_a2-16a=1
nvidia_a2-8a=2
nvidia_a2-4a=4
nvidia_a2-2a=8
nvidia_a2-1a=16

After restarting the server or services, you should now be able to use the NVIDIA A2 vGPU profiles with VMware Horizon automated (vGPU) desktop pools.

You should be able to use this fix for other new vGPU cards that have been recently released where the profiles have not been configured for Horizon. VMware is likely to fix this in future released of VMware Horizon.

Oct 022022
 
Veeam-SQL

So, there’s a common problem where when performing a backup, you’ll see it fail with Veeam Unable to Truncate Microsoft SQL Server transaction logs.

This is usually due to permission problems either with the account used for guest processing, or with permissions inside of your SQL database. Typically in most cases this can be resolved by referencing the appropriate Veeam KB article which outlines the permissions required for proper guest processing of Microsoft SQL servers.

However, in some rare cases you may have everything configured properly, however the backup may continue to present these warnings with where it’s unable to truncate Microsoft SQL Server transaction logs.

The Problem

I recently deployed an SQL Server in a domain, and of course made sure to setup the proper backup procedures as I’ve done a million times.

However, when performing a backup, the backup would present a warning with the following message:

Error message on Veeam backup, Unable to Truncate Microsoft SQL Server transaction logs
Veeam Backup Warning – Unable to Truncate Microsoft SQL Server transaction logs.
Unable to truncate Microsoft SQL Server transaction logs. Details: Failed to call RPC function 'Vss.TruncateSqlLogs': Error code: 0x80004005. Failed to invoke func [TruncateSqlLogs]: Unspecified error. Failed to process 'TruncateSQLLog' command. Failed to logon user [ReallyLongDomainName\Admin-Account]. Win32 error:The user name or password is incorrect. Code: 1326.

This was very odd as I configured everything properly, and even confirmed it when referring the Veeam KB listed above in this post.

So I decided to look at this as if it was something different, something with credentials, or a different problem.

I noticed that in this specific customer environment, that their FQDN for their domain was so long, that the NETBIOS domain name did not equal their FQDN domain name.

In this example, the following was observed:

FQDN: LongCompanyName.com
NETBIOS DOMAIN: LCNDOMAIN

Due to the length of the domain, they shortened the NETBIOS domain with abbreviated letters.

When configuring the Veeam credentials for guest processing, one would assume that when using the “AD Search” function, it would have pulled the “LCNDOMAIN\BackupAdminProcessing” account, however when using the check feature, it actually created an entry for “LongCompanyName\BackupAdminProcessing”, which was technically incorrect as it didn’t match the SAM logon format for the account.

The Fix

Because of the observation noted above, I created a manual credential entry for “LCNDOMAIN\BackupAdminProcessing”, reconfigured the backup job to use those new credentials, and it worked!

The issue is because when using the AD search function in the credential manager, Veeam doesn’t translate and pull the NETBIOS domain, but uses the SAM logon format and assumes the UPN Domain matches the NETBIOS domain name.

While this may hold true in most scenarios, there may be rare situations (like above) where the NETBIOS domain name does not match the domain used in the UPN suffix.