Dec 282023
 
Synology DS923+

Today we’re going to cover a powerful little NAS being used with VMware; the Synology DS923+ VMware vSphere Use case and Configuration.

This little (but powerful) NAS is perfect for your VMware vSphere homelab and numerous other scenarios and uses. Let’s go over this specific use case, and how to best configure it with your VMware environment so you can fully take advantage of it.

Keep in mind that this post reviews only one of many potential uses, specifically with VMware vSphere (and ESXi). I’m hoping with time to review some other uses for this NAS.

Synology DS923+ VMware vSphere Use Case

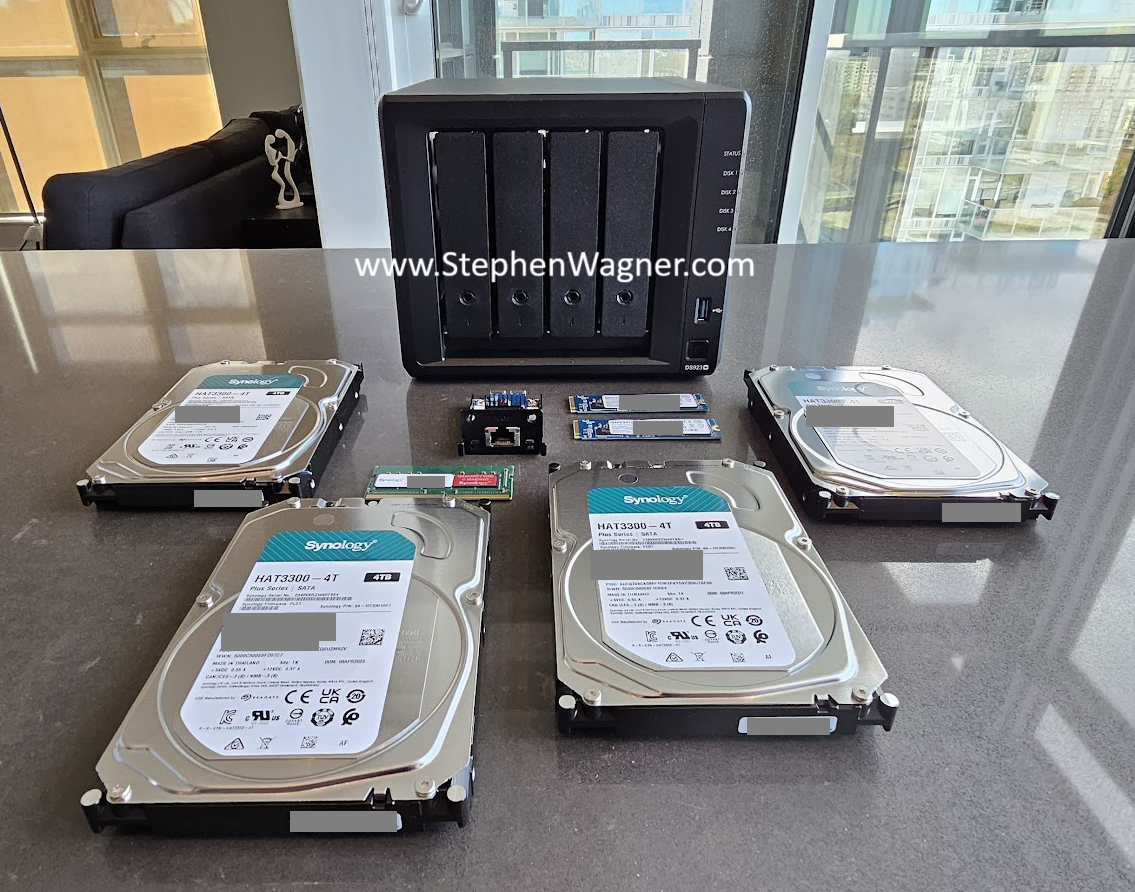
The Synology DS923+ is a tiny yet powerful 4-Bay NAS, offering 2x1Gb NICs built-in, with the ability to add in a user-installable 10Gb NIC module. You can also add 2 x NVME drives for NVME SSD cache, giving you the perfect iSCSI target, in our case particularly for VMware vSphere and ESXi.

Synology DS923+ w/ 10Gb NIC, Disks, and 2 x NVME SSD for Cache

The highlights of this specific unit and configuration:

  • NVME SSD Cache – Provides high speed storage (also good at random I/O)
  • Redundant NICs – 1 x 10Gig (add-on) and 2 x 1GB (built-in)

Looking at the networking capabilities, we have 3 NICs when the optional 10Gb NIC is installed. This gives us a number of different potential configurations, but for VMware vSphere, we’ll map out the following:

  • NIC #1 – 10Gig: iSCSI Primary *(and SMB if using VLAN interfaces)*
  • NIC #2 – 1Gig: Management (and SMB w/o VLAN interfaces)
  • NIC #3 – 1Gig: iSCSI Fallback

Note: You could add VLAN interfaces to your Synology device on the 10Gig interface, and use VLANs to provide SMB and other services over the 10Gig link as well. Please note that adding VLAN interfaces is unsupported and may cause issues (including when performing upgrades).

What’s particularly nice about this NAS is that for the price point you’re able to provide 10Gb iSCSI to your ESXi hosts, while also having a fallback connection for redundancy. While the fallback NIC is limited to 1Gig which is substantially slower, it does allow your workload to continue to run, and most importantly without corruption or loss of data due to an iSCSI paths down situation.

Synology DS923+ iSCSI Configuration for VMware vSphere

So now that we’ve established the use case for the Synology DS923+, lets go over how to best configure it for your VMware vSphere environment, and get it connected to your ESXi hosts.

HPE Proliant Server running VMware ESXi with Synology DS923+

There’s a few things to note for the design of the configuration:

  • iSCSI should be using Jumbo Frames
    • Both the ESXi vmk iSCSI adapters and the iSCSI NIC on the Synology NAS
    • All iSCSI networking (switches) should have jumbo frames enabled
  • iSCSI Multi-pathing policy will be VMW_PSP_FIXED (Fixed Pathing)
    • We will NOT be using Round-Robin MPIO (VMW_PSP_RR)
    • Fixed pathing will be used with the 10Gig link being preferred, and 1Gig link acting as fallback
  • The Synology NAS iSCSI target should only be configured to listen and advertise on the iSCSI NICs (primary active and fallback)

Configure iSCSI on the Synology DS923+

To configure iSCSI on your Synology:

  1. Perform Basic Configuration
    • Configure NAS
    • Configure Static IP for Management on 1Gb NIC Interface
  2. Enable the 10Gb NIC Interface (For use with iSCSI Primary)
    • Configure a Static IP
    • Configure Jumbo Frames
  3. Enable the 1Gb NIC Interface (For use as fallback iSCSI)
    • Configure a Static IP
    • Configure Jumbo Frames
  4. Use the Synology “SAN Manager” to Configure the iSCSI Target
    • Create an iSCSI LUN and Target
      • Configure a LUN with your preferences (Thin provisioned, etc)
      • Configure the iSCSI Target
        • Enable “Allow multiple sessions from one or more iSCSI initiators” to allow multiple initiators to access (both from single hosts and/or multiple hosts)Allow multiple sessions from one or more iSCSI initiators
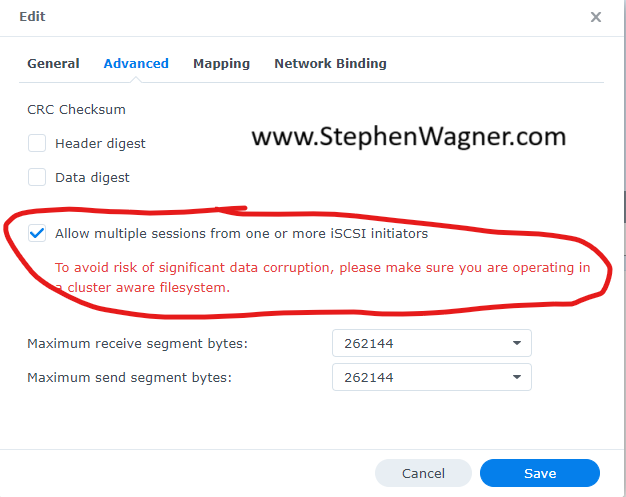
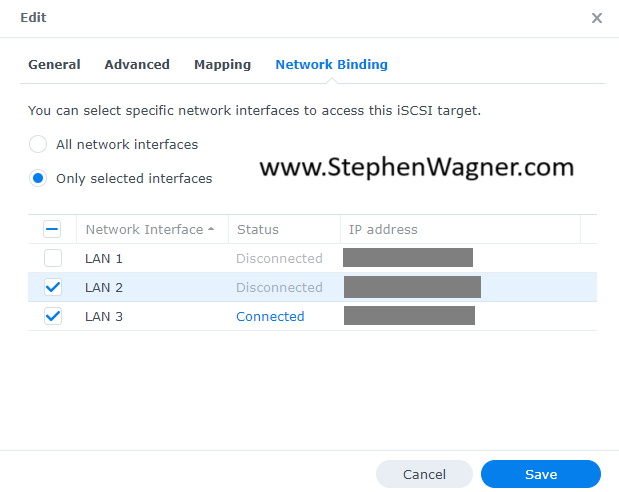
        • Configure “Network Binding” to the 10Gig Primary link and 1Gb fallback NIC. We do not want it to advertise on the management interfaceSynology iSCSI Target Network Binding
      • Configure “Host” initiator settings
        • This is where you will add your iSCSI host initiator IQNs, and provide “Read/Write” access

Overall, this is a basic iSCSI target configuration, with the only exception is that we are only using select interfaces for iSCSI connections. While we can use both the 10Gb and 1Gb connections, we’ll use the host settings to only use the primary and have the secondary as a fall back.

Note that the networks (and IPs) used above for iSCSI are on a network dedicated to iSCSI. We do not want to use our data networks for storage related traffic. They are separated not only for security, but also because they are using different frame/MTU sizes.

Configure ESXi to connect to the Synology DS923+

To configure the Synology NAS iSCSI Target on your ESXi hosts:

  1. Configure your ESXi host networking on your iSCSI Network
    • Configure Networking on your hosts
      • Configure your storage vSwitch and create a portgroup for each physical NIC
      • Configure a vmk adapter with IP for each portgroup you haveiSCSI Port Groups for iSCSI VMK adapters
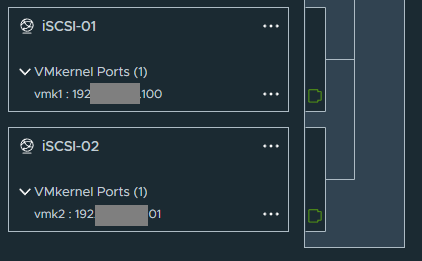
      • Configure each portgroup to only use one physical NIC as active, the rest unused
        • Each physical NIC should be used by only one portgroup
  2. Configure your iSCSI Initiator
    • If not already enabled, “Add Software Adapter” under “Storage Adapters” to add the iSCSI Software Adapter initiator.
    • Note the “iSCSI Name”. This is your initiator IQN, and needs to be added to the Synology iSCSI Target “Host” settings to provide access and add permissions (last item listed in the previous section configuring the Synology NAS).
    • Add your Synology’s Primary iSCSI interface and Secondary Fallback iSCSI interface IP addresses to your ESXi hosts “Dynamic Discovery” list. Do not use “Static Discovery” as this will auto-populate.
    • If you’re using the same IP subnet for all your iSCSI vmk adapters, enable iSCSI Port Binding.
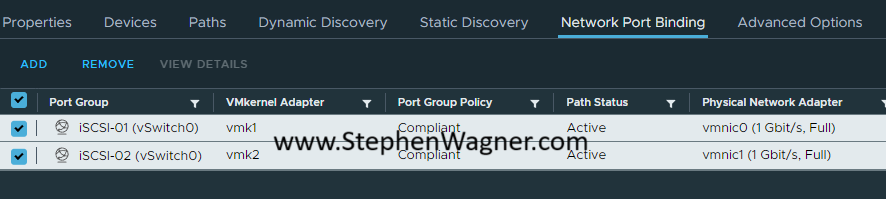
      • Under “Network Port Binding”, click add, and select all your iSCSI vmk adapters which should auto-bind to the physical NIC owned by the port group they are using. They will not show active until you have completed all steps in this guide.iSCSI Port Binding
  3. Configure your LUN
    • Rescan your storage adapters
      • If you already have a VMFS volume, it should auto-mount and be added to the host.
    • If you haven’t already, create a new datastore by right clicking on the host, “Storage”, and “New Datastore”. Follow the wizard to create a new VMFS volume on your Synology iSCSI target.
  4. Configure proper fallback for the 10Gb and 1Gb link
    • On your ESXi hosts, under “Configure”, navigate to the “Storage Devices” tab, and identify all your “SYNOLOGY iSCSI Disk” devices.
    • For each “SYNOLOGY iSCSI Disk” device, under “Properties”, go to “Multipathing Policies”, “ACTIONS”, “Edit Multipathing”, and set it to “Fixed (VMware)”, while also setting the 10Gb path below under “Select the preferred path for this policy”.
  5. Repeat steps for each ESXi host.

As always, I recommend doing a “Rescan Storage” after any storage related changes. You may need to restart the host after enabling iSCSI Port binding.

Conclusion

You have now configured your VMware ESXi host(s) to connect to your Synology DS923+ with multiple paths for redundancy while favoring the faster 10Gb connection.

Dec 022021
 

As I’m watching the Synology: 2022 AND BEYOND event live I wanted to write this post to share with you some of my favorite parts.

For those of you wanting to tune in (while live) or watch the replay you can view it below.

You can also visit: https://event.synology.com/en-us/annual_event to watch the stream (or replay) and find out more information.

DSM 7.0.1 and DSM 7.1

As an IT professional and enthusiast, here’s a list of some of my favorite new features, functionalities and improvements.

DSM 7.0.1

  • High Availability Improvements
    • 40% less time needed for failovers and switchovers
    • 80% less time needed for system updates
  • System Responsiveness and Performance enhancements
    • 56x faster SMB (Windows File Share) searches
    • 70% speed up in application launches
    • 80% faster RAID 6 performance (for double parity RAID)
  • Enhanced Drive Replacement
    • Replace predicted failure/presumed unhealthy/to-be-retired drives with unused healthy drives that are in other bays.
    • Switch without degrading your array/storage pool
  • Auto Drive Replacement
    • Clones predicted failure/presumed unhealthy drive to available hot spare, switching automatically when the drive fails without requiring RAID rebuild time
  • Volume-wide data deduplication (on all flash arrays)
    • Scheduled or Manual Volume Wide Deduplication on all flash volumes
    • Click here for information on supported models and configurations
  • Synology Directory Server
    • Secondary domain controllers provide additional redundancy and availability of directory services
    • Provides ability to deploy additional domain controllers at additional locations

DSM 7.1 (Coming Soon)

  • SMB Multichannel
    • Utilize multiple network links and network connections to combine speed with SMB (Windows File Share) file transfers
    • Provides redundancy and fault tolerance
  • DFS Support over SMB
    • Combine multiple Synology NAS file servers to provide file services to your network using Distributed File System (DFS)
  • Active Insight
    • Numerous updates to make Active Insight more powerful when it comes to managing numerous Synology NAS units.
    • Enhanced control and information on System Updates
    • Suspicious activity detection recognizes suspicious activity on the NAS units (example: unusual login times and locations, unused accounts being used after being idle, failed logins, etc).
    • Task monitoring for Hyper Backup
  • Synology Directory
    • Read-only domain controller support provides ability to deploy read only domain controllers at remote sites that may not be physically secure while providing local cached copies of the directory.

And that’s not all…

Synology has also made numerous improvements to their Data Protection Services, Surveillance suite, Wireless Networking, Synology C2 Cloud, and more, but you’ll have to check it out for yourself. There are tons of other goodies for office workers, small business owners, photography enthusiast, and more that I haven’t included in this list.

Oct 092021
 

One of the new real cool features of the Synology C2 Cloud and Synology DSM 7.0 is the ability to back your Synology DiskStation NAS up to the cloud.

Using the Synology’s “C2 Storage” service, you can use Synology Hyper Backup on DSM 7.0 to backup your your File Shares, NAS, applications, and data to the cloud.

Below, I will show the process of creating a Hyper Backup Backup task to backup a few Synology File Shares to the Synology C2 Storage Service.

NAS Backup (and Restore) with Synology C2 Cloud Video

For a full video guide and demonstration, please enjoy this video! Please continue scrolling for a text guide (with images).

Synology DiskStation NAS Backup (and Restore) with Synology C2 Storage Cloud!

Backup NAS to Synology C2 Storage

It’s very easy to back your NAS up to the cloud. Here’s a quick guide showing how it’s done.

We’re going to assume you already have some File Shares configured on your NAS. These can be Windows File Shares, NFS Exports, and even Active Backup for Business storage repositories. In my case, I want to back up 2 Windows File Shares to the Synology C2 Storage service.

  1. Open Hyper Backup
  2. If you have no existing backup jobs, the “Backup Wizard” should automatically open to configure a new job. If you have existing jobs, select the “+” on the top left of the window.
  3. Under “Backup Destination”, choose “Synology C2 Storage”.
    Hyper Backup Destination
  4. This will open a new window asking you to log on to the Synology C2 Storage Service. You may have to create a new account, or log in with your existing Synology credentials. From here you can start a free trial.
    Synology C2 Storage - Get Free Trial Now
  5. Choose a subscription and plan. You should get a 30-day free trial.
    Synology C2 Storage - Select your C2 subscription
  6. Confirm your subscription
    Synology C2 Storage - Confirm Subscription
  7. Accept the TOS (Terms of Service)
    Synology C2 Storage - Terms of Service
  8. You must now “Grant access to C2 Storage”. This will allow your user account to access the C2 Storage service.
    Synology C2 Storage - Grant Access
  9. You will now be presented with information on your Synology C2 Storage Account
    Synology C2 Storage Account Information
  10. You will now be redirected back to Hyper Backup. You’ll need to create a name for the new backup task destination directory.
    Hyper Backup Destination Settings
  11. Here’s where you will configure which File Shares (or volumes) to backup to Synology C2.
    Hyper Backup Choose Data Backup Sources
  12. You also have the ability to backup Synology Applications. This is helpful should you wish to backup your entire Synology NAS to Synology’s C2 cloud. I’m only doing shares, so I hit next without selecting anything.
    Hyper Backup Application Backup
  13. Now we will configure the Backup Task settings. This includes the task name, notifications, file change logs, bandwidth limits, backup schedule, and integrity check schedule. We can also “Enable client-side encryption” which we will use to encrypt the data on the cloud.
    Hyper Backup Backup Settings
  14. After proceeding, we will now configure backup rotation settings. I enabled backup rotation with “Smart Recycle”.
    Hyper Backup Rotation Settings
  15. If you enabled encryption, you will be prompted to download your encryption key. Save this file in a safe location as you will need it in the event your NAS fails and you need to access your cloud storage.
    Hyper Backup Synology C2 Encryption PEM key file

And that’s it! You have now configured your NAS to backup to Synology C2 Cloud!

Hyper Backup NAS Backup to Synology C2 Cloud

We have now configured the backup job. Let’s go ahead and kick off a backup by clicking on “Back up now”.

And that’s it! After some time, your backup should complete and you data should be safe on the Synology C2 Cloud.

What happens when your run of out space

This is a question many of you will be asking, and I was curious myself. I went ahead and uploaded a bunch of garbage data to max out my plan.

Synology Hyper Backup C2 Storage - Not enough quota available on the target
Synology Hyper Backup C2 Storage – Not enough quota available on the target

To my surprise Synology allowed me to exceed my plan by a decent amount of storage until the backup job went in to a “Suspended” state reporting “Not enough quota available on the target”. I actually exceeded the storage by 128GB!!! This is extremely generous!

Synology C2 Storage - Storage overage
Synology C2 Storage – Storage overage

To find out how well the NAS would recover from this situation, I logged on to the Synology C2 Storage service and increased my purchased storage. I was able to simply click on “Action” and “Resume” the backup without any issues… It actually resumed where it left off.

Conclusion

The Synology C2 Storage Cloud service is a great option for backing up your DiskStation NAS and all your important files to the cloud. In my case I use my NAS as a backup, and then further backup my NAS both to a removable hard drive, and the Synology C2 Cloud, keeping me compliant with the 3-2-1 backup rule.

The pricing is amazing and there’s extra cost to backup and restore, which means no upload or download costs. They even provide de-duplication so you’re not paying to store duplicated data.

As part of the backup process, Hyper Backup only copies over blocks of data and files that have changed, which significantly helps bandwidth usage as only what’s changed is copied.

I highly recommend using Synology C2 Storage with your Synology DiskStation NAS!