May 222019
 
Microsoft Windows Logo

You may find yourself in a situation where an MMC snap-in errors out, and doesn’t allow you to reconfigure, fix, or use it. It becomes unusable.

In my case, this occurred on a system where I was trying to use the WSUS (Windows Server Update Services) snap-in, and it was configured for an old server that didn’t exist anymore.

When opening the WSUS MMC snap-in, it would report an error, give me the option to unload (which didn’t work), and do nothing else. There was no way to use or reconfigure it.

The Fix

To resolve this, you need to clear your local configuration for the snap-in. Your user profile contains all MMC snap-in information and configuration in the following directory:

C:\Users\USERNAME\AppData\Roaming\Microsoft\MMC

When browsing, here’s what it looks like on my system:

Picture of MMC user cache in appdata
User MMC config/cache folder

In my case, deleting the “wsus” file, reset the MMC snap-in, and allowed me to use it again and configure it for a new server.

Let me know if this helped you!

May 212019
 
Microsoft Windows Logo

You can now download the Windows 10 May 2019 – 1903 update!

You can use the Microsoft “Update Assistant” available at
https://www.microsoft.com/en-ca/software-download/windows10. Or you can use the Windows 10 Media Creation tool to make an ISO or upgrade an installation (available at the same link).

Windows 10 1903 is also available on VLSC.

Remember, if you need to install the Windows 10 RSAT tools, check out
https://www.stephenwagner.com/2018/10/05/windows-10-1809-october-update-rsat/ as this link has the instructions to install them on the May 2019 1903 update.

Successful installations

In case you’re worried about bugs, I’ve listed some of the machines I’ve successfully upgraded below:

  • Lenovo X1 Carbon, 1809 to 1903 – No issues
  • Windows 10 VM on VMware ESXi 6.5 (VDI with GRID sVGA) – No issues
May 182019
 
VMware Horizon View Mobile Client Android Windows 10 VDI Desktop

Since I’ve installed and configured my Nvidia GRID K1, I’ve been wanting to do a graphics quality demo video. I finally had some time to put a demo together.

I wanted to highlight what type of graphics can be achieved in a VDI environment. Even using an old Nvidia GRID K1 card, we can still achieve amazing graphical performance in a virtual desktop environment.

This demo outlines 3D accelerated graphics provided by vGPU.

Demo Video

Please see below for the video:

Information

Demo Specifications

  • VMware Horizon View 7.8
  • NVidia GRID K1
  • GRID vGPU Profile: GRID K180q
  • HPE ML310e Gen8 V2
  • ESXi 6.5 U2
  • Virtual Desktop: Windows 10 Enterprise
  • Game: Steam – Counter-Strike Global Offensive (CS:GO)

Please Note

  • Resolution of the Virtual Desktop is set to 1024×768
  • Blast Extreme is the protocol used
  • Graphics on game are set to max
  • Motion is smooth in person, screen recorder caused some jitter
  • This video was then edited on that VM using CyberLink PowerDirector
  • vGPU is being used on the VM
May 172019
 
Right side of MSA 2040

You may encounter a situation where you’re unable to connect to the management interface or NIC on your HPE MSA array. When this condition occurs, you are not able to ping the NIC, and the SMU (web interface) will not load.

When you visibly look at the array, the AMBER warning light may or may not be flashing.

If you have a dual controller setup, and connect to the SMU on the other controller, you may see numerous log entries where the management NIC port status changes repeatedly from up to down.

What’s happening

I’ve witnessed this issue occur on 2 separate HPE MSA 2040 storage arrays (both with dual controllers).

When you physically look at the management NICs on the controller in question, you’ll notice that the port status LED indicator turns on, and turns off repeatedly. The link status keeps changing from up to down (as reflected in the logs).

The Fix

Restarting the unit will have no effect. Changing the network cable will have no effect.

To resolve this issue, you must play with the network cable and re-seat it a few times (possibly half-way if possible a couple times as sketchy as that sounds).

If you can get the link status up, and disconnect/reconnect the cable before the light turns off, the connection will stay up. It will continue to function and survive restarts until sometime in the future when you disconnect it and reconnect it.

Replacing the controller may also fix it, however in the first instance I observed this, the replacement controller exhibited the same behavior months later in the future.

May 162019
 

There may be a situation where you wish to completely reinstall WSUS from scratch. This can occur for a number of reasons, but most commonly is due to database corruption, or performance issues due to a WSUS database that hasn’t been maintained properly with the normal maintenance.

Commonly, when regular maintenance hasn’t occurred on a WSUS database, when an admin finally performs it, it can take days and weeks to re-index the database, clean up the database, and run the cleanup wizards.

Also, due to timeouts on IIS, the cleanup wizard may fail which could ultimately cause database corruption.

Administrators often want or choose to blast away their WSUS install, and completely start from scratch. I’ve done this numerous times in my own environment as well as numerous customer environments.

In this guide, we are going to assume that you’re running WSUS on a Windows Server that is dedicated to WSUS and is using the WID (Windows Internal Database) which is essentially a built-in version of SQL Express.

PLEASE NOTE: If you are using Microsoft SQL, these instructions will not apply to you and will require modification. Only use these instructions if the above applies to you.

What’s involved

WSUS (Windows Server Update Services) relies on numerous Windows roles and features to function. As part of the instructions we’ll need to completely clear out:

  • WSUS Role, Configuration, and Folders/Files
  • IIS Role, Configuration, and Folders/Files
  • WID Feature, Configuration, and Database Files

Since we are completely removing IIS (Role, Configuration, and Folders/Files), only proceed if the server is dedicated to WSUS. If you are using IIS for anything else, this will completely clear the configuration and files. You also do not want to run this on a domain controller as Active Directory also uses WID.

Let’s get to it!

Instructions

  1. Open “Server Manager” either on the host, or remotely and connect to the host you’d like to reinstall on.
  2. Open “Remove Roles and Features” wizard.
  3. Click “Next”, and select the Server, and click “Next” again.
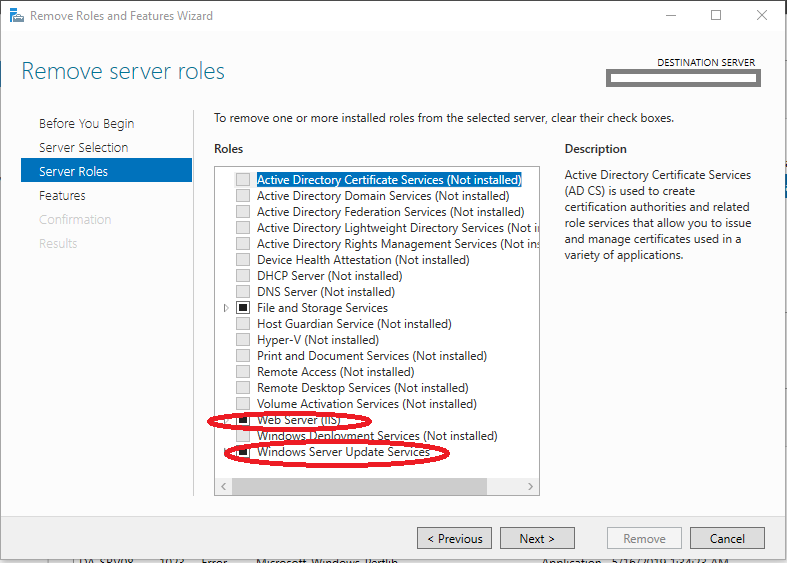
  4. On the “Remove server roles” screen, under “Roles”, we want to de-select the following: “Web Server (IIS)” and “Windows Server Update Services” as shown below. Selecting WSUS and IIS Roles to be Removed
  5. Click “Next”
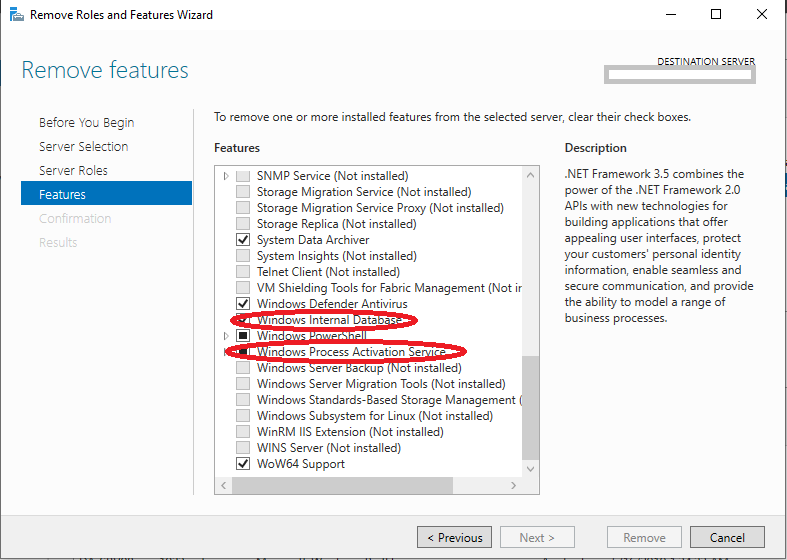
  6. On the “Remove features” screen, under “Features”, we want to de-select the following: “Windows Internal Database” and “Windows Process Activation Service” as shown below. Selecting WID and WPAS Features for Removal
  7. Click “Next” and follow the wizard to completion and remove the roles and features.
  8. Restart the Server.
  9. Open an administrative command prompt on the server, and run the command “powershell” or open powershell directly.
  10. Run the following command in powershell to remove any bits and pieces:
    Remove-WindowsFeature -Name UpdateServices,UpdateServices-DB,UpdateServices-RSAT,UpdateServices-API
  11. Restart the Server.
  12. We now must delete the WSUS folders and files. Delete the following folders:
    C:\WSUS
    C:\Program Files\Update Services

    Note: You may have stored the WSUS content directory somewhere else, please delete this as well.
  13. We now must delete the IIS folders and files (and configuration, including the WsusPool application pool, bindings, etc.). Delete the following folders:
    C:\inetpub
    C:\Windows\System32\inetsrv

    Note: You may have issues deleting the “inetsrv” directory. If this occurs, simply rename it to “inetsrv.bad”.
  14. We now must delete the WID (Windows Internal Database) folders and files (including the WSUS SQL Express database). Delete the following folder:
    C:\Windows\WID
  15. While we removed the IIS folders and files, we deleted a needed system file. Run the following command to restore the file:
    sfc /scannow
  16. Restart the Server.

WSUS, IIS, and WID have at this point been completely removed. We will now proceed to install, apply a memory fix, and configure WSUS.

For instructions on installing WSUS on Server Core, please click here: https://www.stephenwagner.com/2019/05/15/guide-using-installing-wsus-windows-server-core-2019/

  1. Open “powershell” (by typing powershell) and Install the WSUS Role with the following command:
    Install-WindowsFeature UpdateServices -Restart
  2. (Optional) If you want to install the WSUS MMC Snap-In/GUI, run the following command in the powershell window:
    Install-WindowsFeature UpdateServices-RSAT, UpdateServices-UI
  3. Run the post installation task command in command prompt to configure WSUS:
    "C:\Program Files\Update Services\Tools\wsusutil.exe" postinstall CONTENT_DIR=C:\WSUS
  4. AT THIS POINT DO NOT CONTINUE CONFIGURING WSUS AS YOU MUST APPLY A MEMORY FIX TO IIS.
  5. Apply the “Private Memory Limit (KB)” fix as provided here: https://www.stephenwagner.com/2019/05/14/wsus-iis-memory-issue-error-connection-error/
  6. Restart the Server.
  7. Open the WSUS MMC on the server or remotely from a workstation on the network and connect it to the WSUS instance on your Server Core install.
  8. Run through the wizard as you would normally and perform an synchronization.
  9. WSUS has been re-installed.

And that’s it. You’ve completely reinstalled WSUS from scratch on your Windows Server.

May 152019
 

Windows Server Core (on Windows Server 2019) is a great way to reduce the performance and security footprint of your servers. The operating system itself is minimalist and provides no GUI except for a command prompt, and some basic windows and tools.

All administration on Server Core must be performed via the command prompt, powershell, or remote administration tools (such as Server Manager, or the new Windows Admin Center.

Server Core provides a fantastic foundation for Windows Server Roles (roles that are integrated in the operating system), and can be installed with ease, managed remotely, and managed easily. It’s also nice too because you can allocate less CPU and RAM to virtual machines running Windows Server Core.

Getting started may be a bit tricky as you might need to learn and verse yourself with some commands, powershell, and remote management kung-fu, but overtime it’s easy!

Why WSUS?

I think I can speak for most admins out there when I say that a WSUS deployment typically consists of a single VM, with the WSUS, IIS, and WID roles installed.

WSUS is usually CPU and RAM intensive (when doing synchronizations), requires disk space, and doesn’t do much else. Because of the spikes, we usually keep this VM separate and don’t mix it with other LoBs or roles, with the exception of perhaps a file server.

Whether or not your VM runs WSUS alone, or also as a file server, since both of these roles are “Windows Roles and Features”, they are perfect to deploy on a Windows Server Core install.

There should be little administrative requirement on the WSUS server, other than re-indexing scripts, and cleanup scripts which can easily be ran from the command prompt, and the occasional Windows Update that will be installed.

Because you don’t require any 3rd party software, management consoles, or GUI related elements, it’s perfect for Server Core. By skipping on the GUI and applications, you’ll be able to allocate that memory, for WSUS/IIS itself.

How to Install and Configure WSUS on Windows Server Core

  1. Install Windows Server 2019 – Server Core
  2. Configure Network, Join to Domain, Update, etc.
  3. Open “powershell” (by typing powershell) and Install the WSUS Role with the following command:
    Install-WindowsFeature UpdateServices -Restart
  4. Exit powershell with “exit” and run the post installation task command in command prompt to configure WSUS:
    "C:\Program Files\Update Services\Tools\wsusutil.exe" postinstall CONTENT_DIR=C:\WSUS
  5. AT THIS POINT DO NOT CONTINUE CONFIGURING WSUS AS YOU MUST APPLY A MEMORY FIX TO IIS.
  6. Enable Remote IIS Management to manage and modify IIS config (to apply the memory fix below), as provided here: https://www.stephenwagner.com/2019/05/14/manage-remotely-iis-on-windows-server-2019-server-core/
  7. Apply “Private Memory Limit (KB)” fix as provided here: https://www.stephenwagner.com/2019/05/14/wsus-iis-memory-issue-error-connection-error/
  8. Install the “Windows Server Update Services” mmc applet which is included in the Windows 10 RSAT tools. Instructions to install the RSAT are provided here: https://www.stephenwagner.com/2018/10/05/windows-10-1809-october-update-rsat/
  9. Open the WSUS MMC on a server or workstation on the network and connect it to the WSUS instance on your Server Core install.
  10. Run through the wizard as you would normally and perform an synchronization.
  11. Modify your GPO to point your servers and workstations towards your WSUS server.
  12. Enable Windows Update “Features on Demand” and “Turn Windows features on or off” via GPO as provided here:
    https://www.stephenwagner.com/2018/10/08/enable-windows-update-features-on-demand-and-turn-windows-features-on-or-off-in-wsus-environments/
  13. Install the “sqlcmd” command so you can regularly run the WSUS re-index script, as provided here: https://www.stephenwagner.com/2019/05/14/run-wsus-cleanup-index-script-windows-server-core-without-sql-management-studio/

You’re done!

Don’t forget to regularly re-index your WSUS database and perform the routine maintenance!

Tips n Tricks

  • Need to view, modify, cut/paste, or delete files and folders? Open up notepad from the command prompt to get a simple GUI where you can do this.
  • CTRL + SHIFT + ESC will open a Task Manager to monitor the Server Core install
  • You can use “Server Manager” remotely to manage the Server Core install after you’ve enabled it inside of “sconfig”.
May 142019
 

You’re running WSUS (Windows Server Update Services) on Windows Server 2019 Server Core, and you want to run the WSUS Re-Index or WSUS Cleanup script, but you can’t because you cannot install the SQL Management Studio on Windows Server Core.

Well, there’s a way around this. To run SQL scripts on the WID (Windows Internal Database) on Windows Server Core, we’ll need to install “sqlcmd” (info here).

Now normally with Microsoft SQL, you’d simply connect remotely using the SQL Management Studio, and you can if you’re using fully blown Microsoft SQL Server with your WSUS implementation, however most of us aren’t. In most small deployments, WSUS is configured using WID (Windows Internal Database) which is essentially Microsoft SQL Express.

Microsoft SQL Express doesn’t support remote named pipe connections, and there’s no easy way to configure TCP connections with the registry editor, so the easiest way to accomplish executing SQL scripts is to install and use the “sqlcmd”.

Instructions

Install the SQLCMD command utility

  1. First we need to identify the version of SQL express that’s running WID on the server running Windows Server Core 2019.
  2. Open “notepad” and open the following file which containts the WID log.
    C:\Windows\WID\Log\error
  3. At the beginning of the log file, you’ll note the Microsoft SQL version that’s running. In my case it’s “Microsoft SQL Server 2014 (SP2-GDR)” specifically 12.0.5214.6 as shown below.
    2019-05-14 10:52:47.79 Server      Microsoft SQL Server 2014 (SP2-GDR) (KB4057120) - 12.0.5214.6 (X64) 
    	Jan  9 2018 15:03:12 
    	Copyright (c) Microsoft Corporation
    	Windows Internal Database (64-bit) on Windows NT 6.3  (Build 17763: ) (Hypervisor)
  4. The “sqlcmd” is part of the Microsoft SQL Server Feature Pack, so a quick search of “SQL Server 2014 SP2 Feature Pack” returned the following URL:
    https://www.microsoft.com/en-us/download/details.aspx?id=53164
  5. When you click download, you’ll notice multiple files. Choose the ”
    ENU\x64\MsSqlCmdLnUtils.msi” file to download.
  6. Copy this file over to your server running Windows Server Core.
  7. Execute and run the installer. Follow the prompts.
  8. You’ll notice the installer will error and require “Microsoft ODBC Driver 11 for SQL Server”. A quick search finds this download:
    https://www.microsoft.com/en-ca/download/details.aspx?id=36434
  9. Download the above file, install the “Microsoft ODBC Driver 11 for SQL Server”.
  10. Re-start the “MsSqlCmdLnUtils.msi” installer, and it should now complete.
  11. You have now installed the SQLcmd utility.

Run the WSUS Re-Index Script

  1. Download the WSUS Database Re-Index script from:
    https://gallery.technet.microsoft.com/scriptcenter/6f8cde49-5c52-4abd-9820-f1d270ddea61
  2. Copy the script to the server.
  3. Run the following command from the command prompt:
    sqlcmd -S np:\\.\pipe\Microsoft##WID\tsql\query –i C:\Folder\WsusDBMaintenance.sql

You’ve officially installed the sqlcmd and ran the WSUS Re-Index script on Windows Server Core. Congratulations!

May 142019
 
IIS Logo Image

So you have a Windows Server 2019 running Server Core with no GUI installed, and you have installed and are using the IIS (Internet Information Services) role and would like to manage or modify IIS configuration.

Because Windows Server Core doesn’t have a full GUI, you cannot install or use the Internet Information Services (IIS) Manager on this server.

I originally had to figure this out so I could modify the “WsusPool” Application Pool on IIS on a Windows Server Core install that was hosting a WSUS Server to increase the Private Memory Maximum setting.

To manage, modify, or edit IIS configuration, you’ll need to use the IIS Manager on a different server/computer, and remotely connect to the IIS instance on Server Core. From here you will be able to edit/modify the server as much as you require.

Requirements

To do this, you’ll need the following:

  • Target: Windows Server with IIS role installed
  • Remote System with IIS Manager installed to connect to target

In my case the target is running Windows Server 2019 Server Core, however you can also use the instructions to enable access on the fully blown Windows Server installs as well.

Instructions

Follow these instructions to enable remote IIS management.

  1. Log on to the target server.
  2. Open PowerShell (by typing “powershell” at the command prompt) and install the Web Management Service with the following command.
    Install-WindowsFeature Web-Mgmt-Service
  3. Create a firewall exception (if needed) by running the following command in PowerShell.
    netsh advfirewall firewall add rule name=”IIS Remote Management” dir=in action=allow service=WMSVC
  4. Open the Registry Editor by running “regedit”.
  5. Do either of the following:
    Navigate to the following key:
    HKEY_LOCAL_MACHINE\SOFTWARE\Microsoft\WebManagement\Server

    Then set “EnableRemoteManagement” to “1” as shown:
    Registry Modifcation of EnableRemoteManagement
    Or save the below as a file.reg:
    Windows Registry Editor Version 5.00
    
    [HKEY_LOCAL_MACHINE\SOFTWARE\Microsoft\WebManagement\Server]
    "EnableRemoteManagement"=dword:00000001

    And then import it using command prompt with the command:
    reg import file.reg
  6. Configure the Web Management Service to run on boot by running the following command in command prompt.
    sc config WMSVC start= auto
  7. Start the Web Management Service by running the following command in command prompt.
    net start WMSVC
  8. Open the “Internet Information Services (IIS) Manager” on the remote machine.
    Internet Information (IIS) Services in Start Menu
  9. On the left pane, right click on “Start Page”, and select “Connect to a Server”.
    Connect to Remote IIS Server Window
  10. Enter the server name or IP and click “Next”.
  11. Enter the credentials and click “Next”.
  12. Give the Connection a friendly name (I usually just leave it), and click “Finish”.
  13. You may be prompted with a “Server Certificate Alert”. Click “Connect” to bypass it.
    IIS Certificate Warning Dialog
  14. You now have the remote target IIS instance listed in the “Connections” pane. You can now manage the server.
    IIS Server List Window Pane

Congratulations, you can now remotely manage your IIS instance running on Windows Server Core.

May 142019
 

There may be a point in time where you may wish to clear and rebuild the search index catalog on your Microsoft Exchange 2016 Server. This will cause the server to rebuild the search index from scratch.

In my case, for the past month or so Outlook 2019 (Office 365) clients connecting to an on-premise Microsoft Exchange 2016 Server, have been seeing the message “We’re having trouble fetching results from the server…”. The user can click on “Let’s look on your computer instead.” and the search will complete.

When troubleshooting this issue, I tried all of the following:

  • Clearing and rebuilding the Search index on the client computers
  • Deleted the OST files to re-create the local cached copy on the client computers
  • Restarting the Exchange Server
  • Restarting the Client Computers
  • Analyzing the Event Log for any errors (none)

None of the above helped in troubleshooting.

We're having trouble fetching results from the server...
Outlook: “We’re having trouble fetching results from the server…”

Because of this, I decided to clear and rebuild the Search Index catalog for the mailbox database on the Exchange Server.

To check the status and to see if your index is corrupt, run the following command:

Get-MailboxDatabaseCopyStatus |  ft ContentIndexState

“ContentIndexState” will report as “Corrupt” if it is corrupt, or “Healthy” if it is healthy.

[PS] C:\Windows\system32>Get-MailboxDatabaseCopyStatus |  ft ContentIndexState

ContentIndexState
-----------------
          Healthy

My server reported as healthy, but I still chose to run the instructions below to rebuild the index.

Instructions

To do delete and re-create your Exchange Server Mailbox Database Search Index Catalog, please perform the following instructions.

Please Note: This is only for Exchange servers that are not part of a DAG. Do not perform these steps if your server is part of an Exchange cluster. Always make sure you have a complete backup of your server.

  1. Log on to your Exchange server.
  2. From the Start Menu, expand “Microsoft Exchange Server 2016”, and right-click on “Exchange Management Shell”, and select “Run as Administrator”.
    Administrative Exchange Management Shell
  3. Type the following commands to stop required search services.
    Stop-Service MSExchangeFastSearch
    Stop-Service HostControllerService
  4. Open a file browser (you may need Administrative privilege) and navigate to your Exchange mailbox directory.
    C:\Program Files\Microsoft\Exchange Server\V15\Mailbox\Mailbox Database NumberNumberNumber
  5. You’ll see a folder inside of the mailbox folder with a GUID type name with Single at the end. Delete or move this (preferred is move to alternate location). I’ve put an example below.
    12854239C-1823-8c32-ODJQ-SSDFK123CSDFG.1.Single

    This is the folder you want to move/delete.
  6. Go back to the “Exchange Management Shell”, and run the following commands to start the services.
    Start-Service MSExchangeFastSearch
    Start-Service HostControllerService
  7. As mentioned above, you can check the status of the rebuild by running the “Get-MailboxDatabaseCopyStatus” command, and looking at the “ContentIndexState” status.

That’s it! After running the command, you may notice your server will experience heavy CPU usage due to Exchange rebuilding the search index.

After rebuilding the search index, I noticed that my Outlook clients were able to successfully search on the server without having to select “Let’s look on your computer instead.”.

May 142019
 

On a fresh or existing WSUS install, you may notice that the WSUS Administrator MMC applet stops functioning and present the error “Error: Connection Error – An error occurred trying to connect to the WSUS Server.”

I originally experienced this on Windows Server Update Services running on Windows Server 2012 R2 and applied the fix. Recently, I deployed Windows Server Update Services on a new Windows Server 2019 – Server Core install, and experienced this issue during the first synchronization. Before realizing what the issue was, I attempted to re-install WSUS and IIS from scratch numerous times until I came across old notes. One would have thought they would have resolved this issue on a new server operating system.

When the issue occurs, all processes will appear to be running on the server. Looking at the server event log, you’ll notice multiple application errors:

  • Event ID: 13042 - Windows Server Update Services
    Description: Self-update is not working.
  • Event ID: 12002 - Windows Server Update Services
    Description: The Reporting Web Service is not working.
  • Event ID: 12012 - Windows Server Update Services
    Description: The API Remoting Web Service is not working.
  • Event ID: 12032 - Windows Server Update Services
    Description: The Server Synchronization Web Service is not working.
  • Event ID: 12022 - Windows Server Update Services
    Description: The Client Web Service is not working.
  • Event ID: 12042 - Windows Server Update Services
    Description: The SimpleAuth Web Service is not working.
  • Event ID: 12052 - Windows Server Update Services
    Description: The DSS Authentication Web Service is not working.
  • Event ID: 12072 - Windows Server Update Services
    Description: The WSUS content directory is not accessible.
    System.Net.WebException: The remote server returned an error: (503) Server Unavailable.
       at System.Net.HttpWebRequest.GetResponse()
       at Microsoft.UpdateServices.Internal.HealthMonitoring.HmtWebServices.CheckContentDirWebAccess(EventLoggingType type, HealthEventLogger logger)

You will also see the below error message when attempting to use the WSUS MMC.

WSUS Connection Error presented when memory issue occurs
WSUS 503 Error: Connection Error

The Problem

This issue occurs because the WSUS application pool in IIS “WsusPool” has reached it’s maximum private memory limit and attempts to recycle the memory usage.

Ultimately I believe this causes the IIS worker process to crash since it has run out of memory, and the pending command (whether it’s a synchronization or something else) fails to complete.

Previously, I noticed database corruption on a WSUS SQL Express database when this issue occurred, so I recommend applying the fix on a fresh install of WSUS.

The Fix

To resolve this issue, we need to adjust the max

  1. On the server running WSUS and IIS, open the “Internet Information Services (IIS) Manager” inside of the “Windows Administrative Tools” (found in the start menu, or Control Panel).
    Internet Information (IIS) Services in Start Menu
  2. On the left hand side under “Connections”, expand the server, and select “Application Pools”.
    IIS Application Pools Selected
  3. On the right hand side under “Application Pools” heading, right-click on “WsusPool” and select “Advanced Settings”.
    WsusPool Application Pool Selected with Right-Click
  4. In the “Advanced Settings” window, scroll down until you see “Private Memory Limit (KB)”. Either change this to “0” (as shown below) to set no memory limit, or increase the limit to the value you prefer.
    Private Memory Limit set to "0" in WsusPool IIS Application Pool
  5. Select “Ok” to close the window.
  6. Restart IIS by running “iisreset” from an administrative command prompt, restarting the server, or selecting “Restart” under “Manage Server” when looking at the default pane in IIS when the server is selected.

The issue should now be resolved and your WSUS server should no longer be crashing.

If you are applying this fix on a Server Core install, you’ll need to connect remotely to the IIS instance to apply the fix.