In this video, I sit down and chat with Joe Cooper to find out “What’s the deal with TPMs, vTPMs, vSphere NKP, and VDI?”
We’ll be talking about everything from Physical TPMs, to Virtual TPM (vTPM), VMware vSphere Native Key Provider (NKP), and specialized workloads such as Virtual Desktop Infrastructure (VDI).
A big thank you to Joe Cooper for co-producing and joining me on this video.
In this video, I’ll show you how to properly create a Windows 11 gold image, for use with Omnissa Horizon VDI (both persistent VM template full-clones, and non-persistent Instant Clones).
We’ll be using the manual process to create the VDI Golden Image.
In this video, I’ll show you how to:
Use Windows ADK and WinPE add-on to create a WinPE ISO to pre-boot the Windows 11 Installer
Use the WinPE ISO to pre-boot and install Windows 11, without a vTPM
Prepare the Windows 11 image for deployment
Install Omnissa Horizon agent
Install Microsoft 365 using the ODT (Office Deployment Toolkit)
Use the Omnissa Operating System Optimization Tool (OSOT)
Optimize the image using OSOT
Generalize the image using OSOT
Finalize the image using OSOT
Note on VDI (Virtual Desktop Infrastrucutre), TPM and vTPM devices
When deploying Windows 11 in VDI environments there are special considerations due to Windows 11 TPM requirements. Windows 11 Golden images should not have a vTPM, nor should they ever have a vTPM attached and then removed. Attaching and removing a vTPM or TPM from Windows 11 is considered data loss, and can cause issues with the image.
If you are deploying persistent full-clones, after the cloning process you can add a vTPM to the persistent VM.
If you are deploying non-persistent Instant Clones, the desktop pool in Horizon should be configured to add a vTPM to Instant Clones on provisioning.
References
A big thank you goes out to Graeme Gordon and Hilko Lantinga for their documentation and techzone articles providing this information for Partners, Customers, and Community!
Joe Cooper and I (Stephen Wagner), talk about AI Prototyping and AI Development with NVIDIA vGPU powered Virtualized Workstations.
Using NVIDIA vGPU technology, NIMs (NVIDIA Inference Microservices), and VDI you can enable high powered, private, and secure AI Development Workstations.
These environments can be spun up on your VMware infrastructure using NVIDIA datacenter GPUs, NVIDIA NIMs, and using Omnissa Horizon or Citrix for delivery.
Today we’re going to dive in to how to modify or add to the new default user registry on Windows. This is the registry that is provisioned to new users when they log on to Windows for the first time.
These steps are required to make modifications to the registry, either to configure the users environment, and/or configure registry settings required for applications that may be install on the windows system that require configuration for a seamless user experience.
I regularly use this method to modify the default user registry on non-persistent VDI golden images for use with Omnissa Horizon (formerly VMware Horizon), however this can be used on traditional Windows systems (non-VDI), and/or other VDI platforms such as Citrix, AVD, and more!
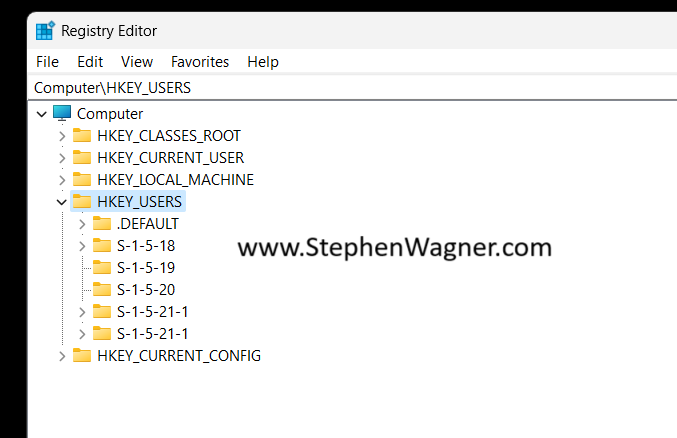
Load the Default User Registry Hive
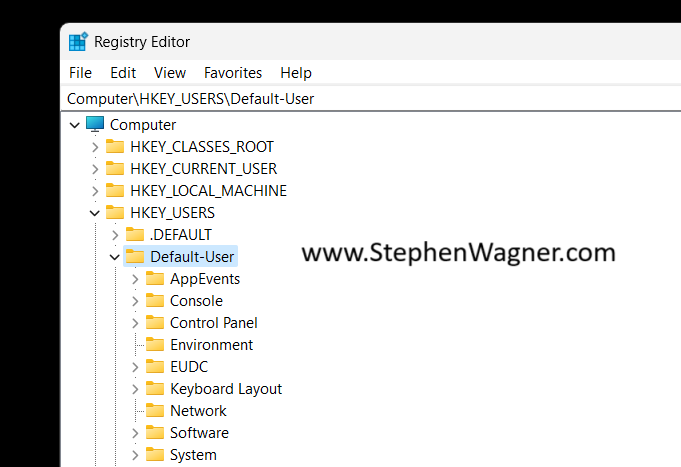
Let’s go ahead and get started! We’ll need to open “regedit” with administrative credentials (either logon as an admin, or “Run As” administrator). Then we’ll expand “HKEY_USERS”.
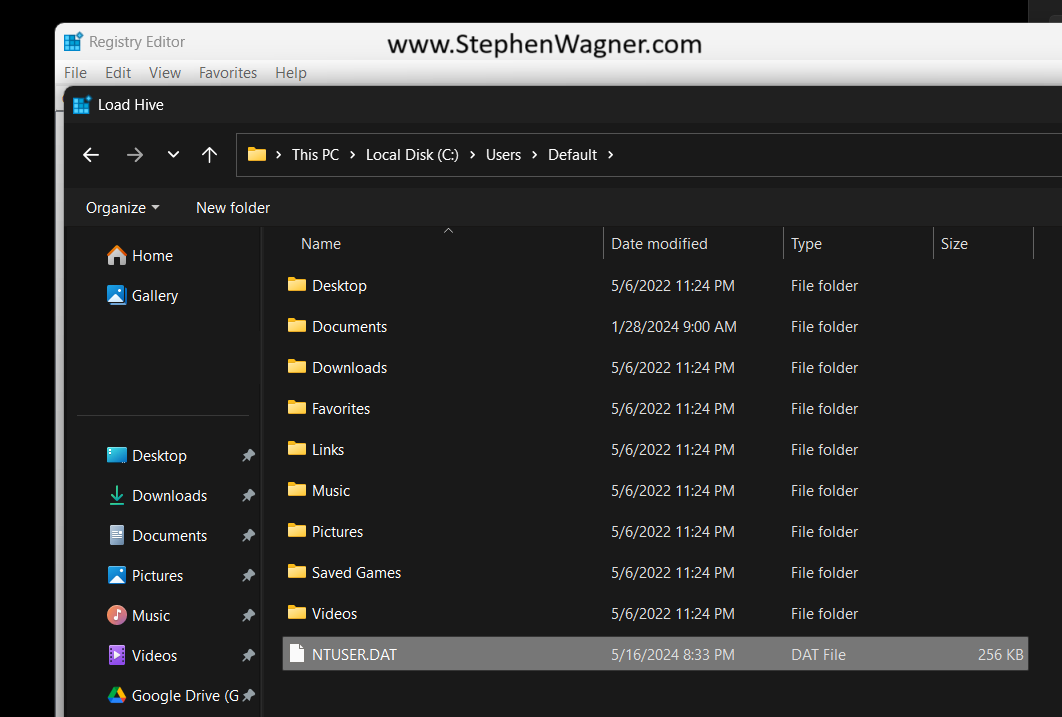
Next, we’ll go to “File” and then “Load Hive”. This will open a Windows File Explorer. We’ll navigate to the following directory:
C:\Users\Default\NTUSER.DAT
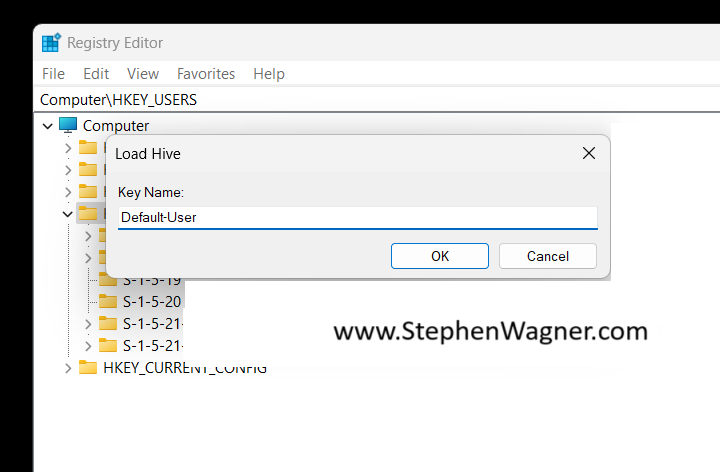
Once we select the “NTUSER.DAT” file, we’ll be prompted to load the hive and give it a key name. You can call it whatever you’d like (as long as it doesn’t conflict with an existing key), but for this example I’ll call it “Default-User”.
You’ll now notice that the Default User’s “HKEY_CURRENT_USER”, is now loaded as the hive you specified above, in our case it’s loaded as “Default-User”.
You can now make any modifications to the default users registry, including importing keys. If you’re using a “.reg” file, make sure you update it to reflect the registry hive location you’ve loaded.
Unload the Default User Registry Hive
Once you’ve made the modifications to the default user registry hive, whenever new users log on, they will be provisioned this hive.
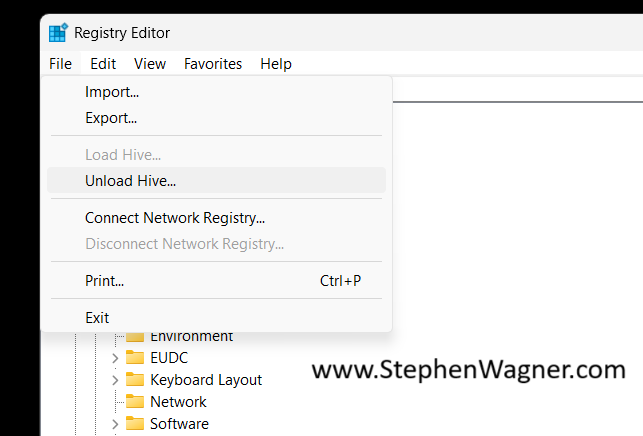
We can now go ahead and unload the registry hive.
We’ll select the “Default-User” key (or whatever you called it), and select “Unload Hive”.
This will properly and gracefully close the default users registry hive.
Every organization is looking for ways to equip their mobile workforce, whether remote employees, travelling sales staff/representatives, or just providing more ways employees can work efficiently. Today I want to talk about Microsoft Teams Phone and VDI – a match made in the Cloud.
I’m one of those people who travel frequently and rely not only on having a reliable working environment, but also having access to telecommunications.
Running Teams Phone on VDI is a clear win in these regards!
VDI and VoIP, a common struggle
As most of you know, VDI and VoIP applications can be a major struggle with 3rd party applications not providing audio optimizations for environments that use VDI. This commonly results in in sluggish, jolty, delayed, and/or poor audio quality, in addition to audio processing in your VDI environment which uses resources on your VDI cluster.
For years, the most common applications including Microsoft Teams, Zoom, and even Skype for Business provided VDI optimizations to allow high quality (optimized) audio processing, resulting in almost perfect video/audio telecommunications via VDI sessions, when implemented properly.
Teams Phone running on a VMware Horizon VDI Session
I was tired of using a 3rd party VoIP app, and wanted a more seamless experience, so I migrated over to Teams Phone for my organization, and I’m using it on VDI with VMware Horizon.
Microsoft Teams Phone
While I’ve heard a lot about Teams phone, Microsoft’s Phone System, and PSTN capabilities, I’ve only ever seen it deployed once in a client’s production environment. This put it on my list of curiosities to investigate in the future a few years back.
This past week I decided to migrate over to Microsoft Teams Phone for my organizations telephony and PSTN connectivity requirements. Not only did this eliminate my VoIP app on my desktops and laptops, but it also removed the requirement for a problematic VoIP client on my smartphone.
Teams Phone Benefits
Single app for team collaboration and VoIP
Single phone number (eliminates multiple extensions for multiple computers and devices)
Microsoft Phone System provides PBX capabilities
Cloud Based – No on-premise infrastructure required (except device & internet for client app)
I regularly use Microsoft Teams on all my desktops, laptops, and VDI sessions, along with my mobile phone, so the built-in capabilities for VoIP services, in an already fairly reliable app was a win-win!
I’ll go in to further detail on Teams Phone in a future blog post.
Teams Phone on VDI
Microsoft Teams already has VDI optimizations for video and audio in the original client and the new client. This provides an amazing high quality experience for users, while also offloading audio and video processing from your VDI environment to Microsoft Teams (handled by the endpoints and Microsoft’s servers).
When implementing Teams Phone on VDI, you take advantage of these capabilities providing an optimized and enhanced audio session for voice calls to the PSTN network.
This means you can have Teams running on a number of devices including your desktop, laptop, smartphone, VDI session, and have a single PSTN phone number that you can make and receive calls from, seamlessly.
Pretty cool, hey?
The Final Result
In my example, the final result will:
Reduce my corporate telephony costs by 50%
Eliminate the requirement for an on-prem PBX system
Remove the need for a 3rd party VoIP app on my workstations and mobile phone
Provide a higher quality end-user experience
Utilize existing VDI audio optimizations for a better experience
This website uses cookies to improve your experience. We'll assume you're ok with this, but you can opt-out if you wish.
Do you accept the use of cookies and accept our privacy policy? AcceptRejectCookie and Privacy Policy
Privacy & Cookies Policy
Privacy Overview
This website uses cookies to improve your experience while you navigate through the website. Out of these cookies, the cookies that are categorized as necessary are stored on your browser as they are essential for the working of basic functionalities of the website. We also use third-party cookies that help us analyze and understand how you use this website. These cookies will be stored in your browser only with your consent. You also have the option to opt-out of these cookies. But opting out of some of these cookies may have an effect on your browsing experience.