Recently, new deployments of Windows 11 (23H2 images with the latest updates) have changed the behavior of the start menu and introduced the Windows 11 Microsoft Account Center.
This also effects 24H2, however 24H2 isn’t supported on Omnissa Horizon as of yet (to my knowledge) and probably most other VDI platforms, but this will be a concern once support is available.
The introduction of the Microsoft Account Center in the Windows Start Menu will become an issue for VDI deployments, as it changes the behavior of the Start Menu, and introduces some complexities for logging off users as well as introducing the need for training or alternative methods for users to log off.
Update – October 27 2024
When completing the latest Windows Updates, as of October 27th, 2024, the behavior has now changed.
The new behavior is now suitable for easy logoffs.
Behavior
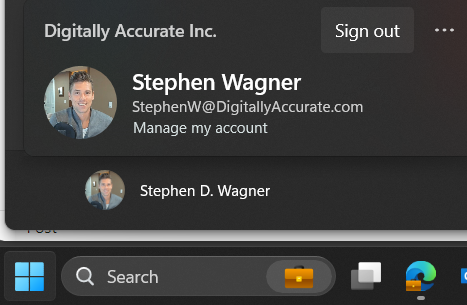
When clicking on Start and proceeding to click on the user name, users are no longer prompted with options like “Sign out, Switch User, Account Settings”. Users are now presented with the new “Microsoft Account Center”, which on non-VDI deployments provides actions for the Microsoft Account. Optimizing your image may slightly change the behavior of the Microsoft Account Center.
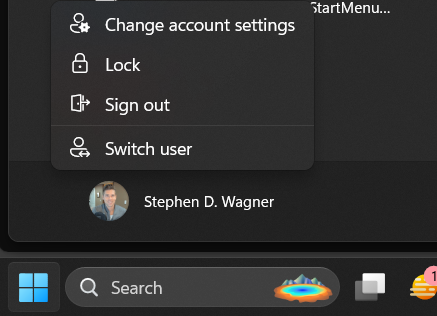
Here is an example of the original start menu:
Here is an example of the new start menu with the new Microsoft Account Center:
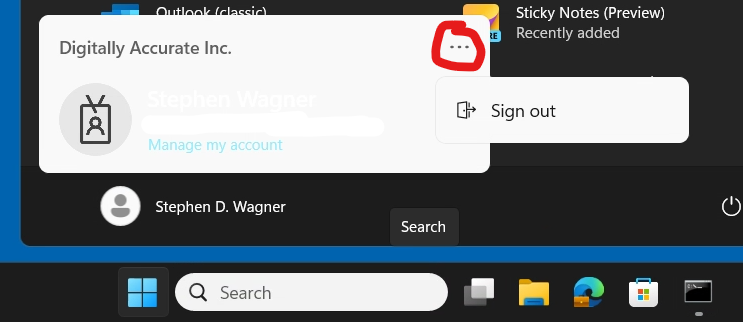
Users, who are expecting to be able to sign out, will not have to click on the “…” on the top right.
Additional Considerations
In addition to the examples provided above, the following behaviors can be expected:
On the base image, clicking the user icon will do nothing (and may possibly kill the start menu)
In deployments with Hybrid domain joined Instant Clones
If the machine hasn’t achieved Hybrid Domain Join, clicking the user account icon will function.
If the machine has Hybrid domain joined but a PRT has not been issued, click the user account icon will kill the start menu.
If the machine has Hybrid domain joined and a PRT has been issued, it will perform properly using the new style.
In deployments with Hybrid Domain Joining and PRT disabled, the new “Microsoft Account Center” from the user icon, should function properly with the new style.
As of today, I haven’t seen the latest Windows Updates change older base images, but I haven’t had the opportunity to sample a large enough number of environments. If this occurs, you may need to brief users on how to log out using the new “Microsoft Account Center”, using the “Log Off” function on the Horizon Client, or possibly even create a desktop shortcut for the users.
Workaround
To workaround this issue, you may need to train users on the new behaviour, advise them to Log off with the VMware Horizon client (proper logoff, not just clicking the “X” which will only disconnect sessions), or create a “Log off” shortcut on their desktop.
I will continue to investigate and update this post, hopefully ultimately with a fix.
Today we’re going to dive in to how to modify or add to the new default user registry on Windows. This is the registry that is provisioned to new users when they log on to Windows for the first time.
These steps are required to make modifications to the registry, either to configure the users environment, and/or configure registry settings required for applications that may be install on the windows system that require configuration for a seamless user experience.
I regularly use this method to modify the default user registry on non-persistent VDI golden images for use with Omnissa Horizon (formerly VMware Horizon), however this can be used on traditional Windows systems (non-VDI), and/or other VDI platforms such as Citrix, AVD, and more!
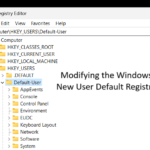
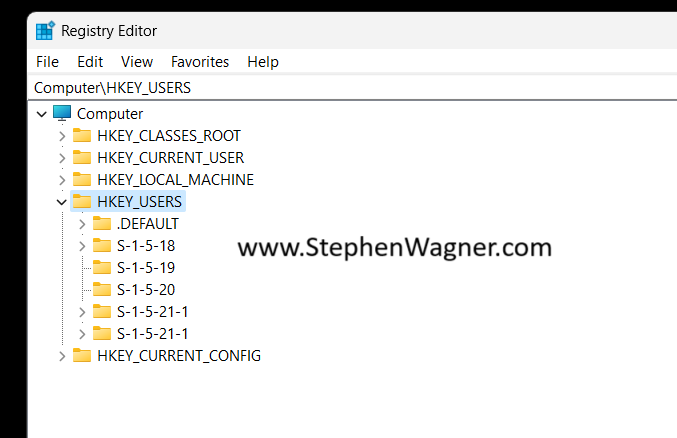
Load the Default User Registry Hive
Let’s go ahead and get started! We’ll need to open “regedit” with administrative credentials (either logon as an admin, or “Run As” administrator). Then we’ll expand “HKEY_USERS”.
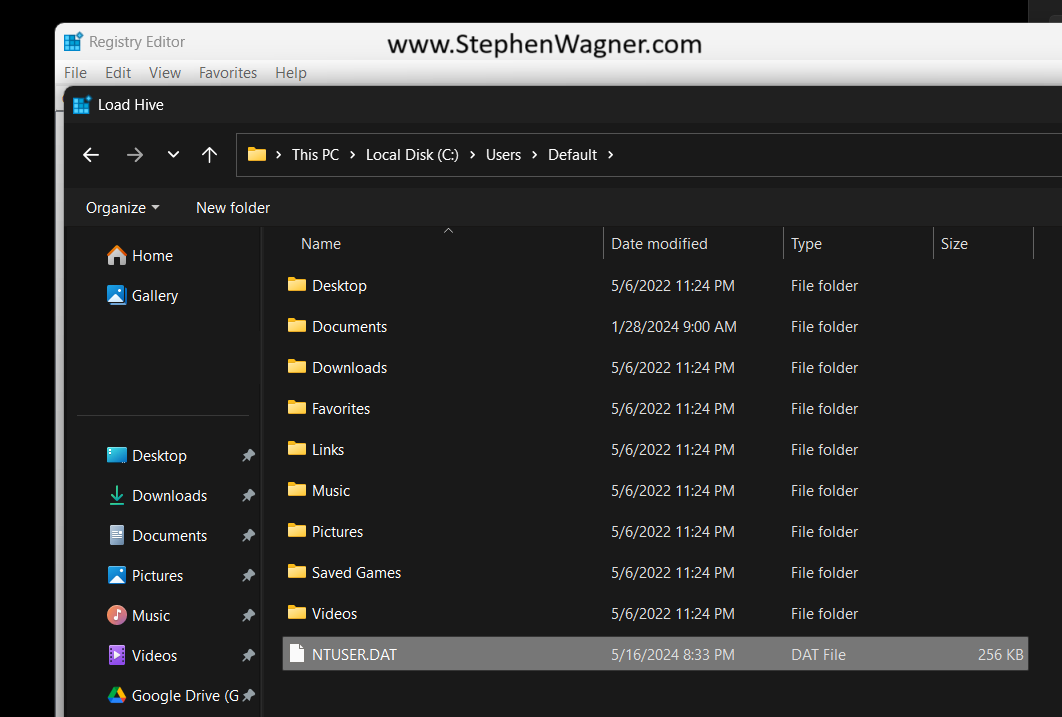
Next, we’ll go to “File” and then “Load Hive”. This will open a Windows File Explorer. We’ll navigate to the following directory:
C:\Users\Default\NTUSER.DAT
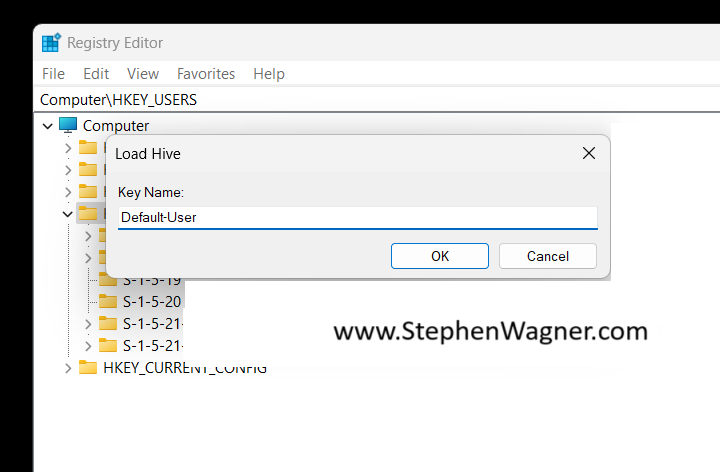
Once we select the “NTUSER.DAT” file, we’ll be prompted to load the hive and give it a key name. You can call it whatever you’d like (as long as it doesn’t conflict with an existing key), but for this example I’ll call it “Default-User”.
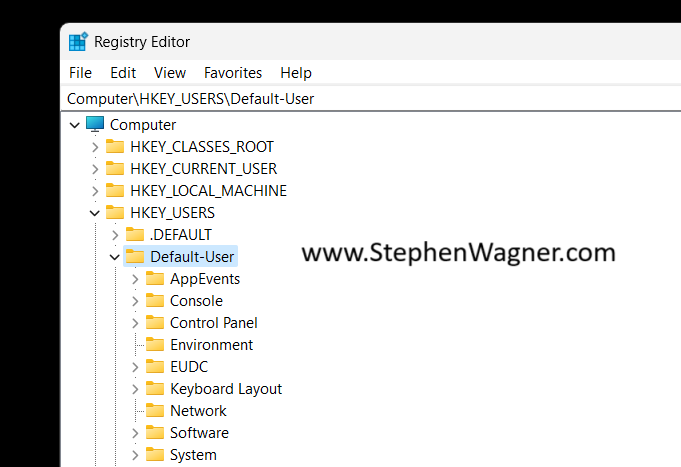
You’ll now notice that the Default User’s “HKEY_CURRENT_USER”, is now loaded as the hive you specified above, in our case it’s loaded as “Default-User”.
You can now make any modifications to the default users registry, including importing keys. If you’re using a “.reg” file, make sure you update it to reflect the registry hive location you’ve loaded.
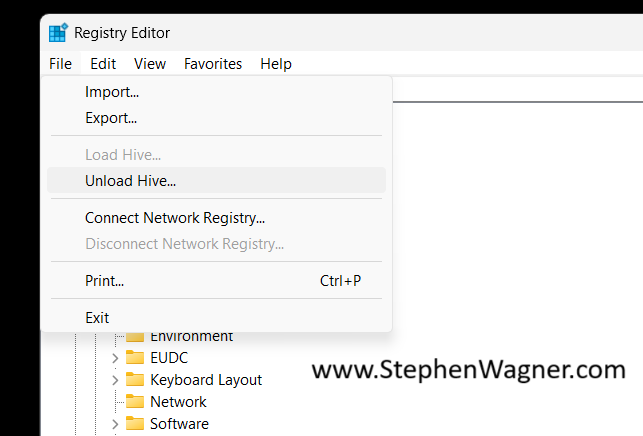
Unload the Default User Registry Hive
Once you’ve made the modifications to the default user registry hive, whenever new users log on, they will be provisioned this hive.
We can now go ahead and unload the registry hive.
We’ll select the “Default-User” key (or whatever you called it), and select “Unload Hive”.
This will properly and gracefully close the default users registry hive.
If you’re anything like me, you were excited to get your hands on the latest Windows 11 22H2 Feature Update after it was released on September 20th, 2022. However, while it was releassed, as with all feature upgrades, it is deployed on a slow basis and not widely immediately available for download. So you may be asking how to force Windows 11 22H2 Feature Update.
From what I understand, for most x86 users, the Windows 11 22H2 Feature Upgrade made itself available slowly over the months after it’s release, however there may be some of you who still don’t have access to it.
Additionally, there may be some of you who are using special hardware such as ARM64, like me with my Lenovo X13s Windows-on-ARM laptop, who haven’t been offered the update as I believe it’s being rolled out slower than its x86 counterpart.
However, if you’re using ARM64, you cannot use any of those above as they are designed for x86 systems. I waited some time, but decided I wanted to find a way to force this update.
Inside of WSUS, I tried to approve the Windows 11 22H2 Feature Update, however that had no success, as the system wasn’t checking for that update (it wasn’t “required”). I then tried to modify the local GPOs to force the feature update, which to my surprise worked!
Instructions to force the update
This should work on systems that are not domain joined, as well as systems that are domain joined, even with WSUS.
Please note that this will only force the update if your system is approved for the update. Microsoft has various safeguards in place for certain scenarios and hardware, to block the update. See below on how to disable safeguards for feature updates.
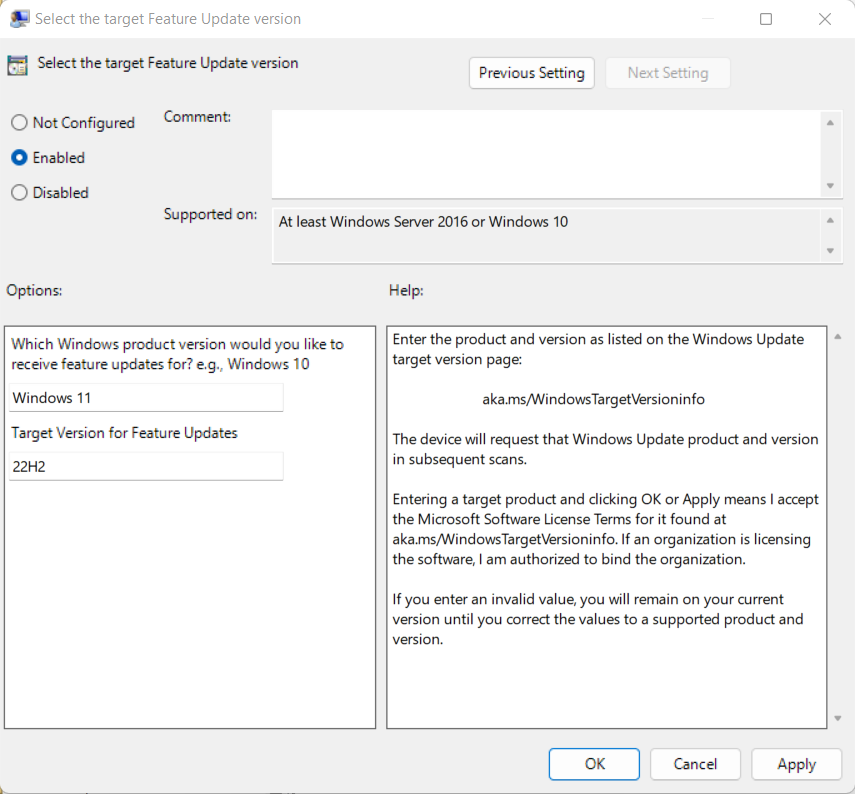
In order to Force Windows 11 22H2 Feature Update, follow the instructions below:
Open the Local Group Policy via the start menu, or run “gpedit.msc”.
Expand “Local Computer Policy\Computer Configuration\Administrative Templates\Windows Components\Windows Update\Manage updates offered from Windows Update”
Open “Select the target Feature Update version”
Set the first field (Which Windows product version would you like to receive feature updates for), to “Windows 11”
Set the second field (Target Version for Feature Updates) to “22H2”.
Click Apply, Click Ok, close the windows.
Either restart the system, or run “gpupdate /force” to force the system to see the settings.
Check for Windows Update (From Microsoft Update if you’re using WSUS), you should now see the update available. You may need to check a few times and/or restart the system again.
Install the Feature Upgrade, and then go back to the setting and set to “Not Configured” to ensure you receive future feature upgrades.
See below for a screenshot of the setting:
Force Windows 11 22H2 Feature Update with Local Group Policy
For those with a domain and/or work environment, you could deploy this setting over a wide variety of computers using your Active Directory Domain’s Group Policy Objects.
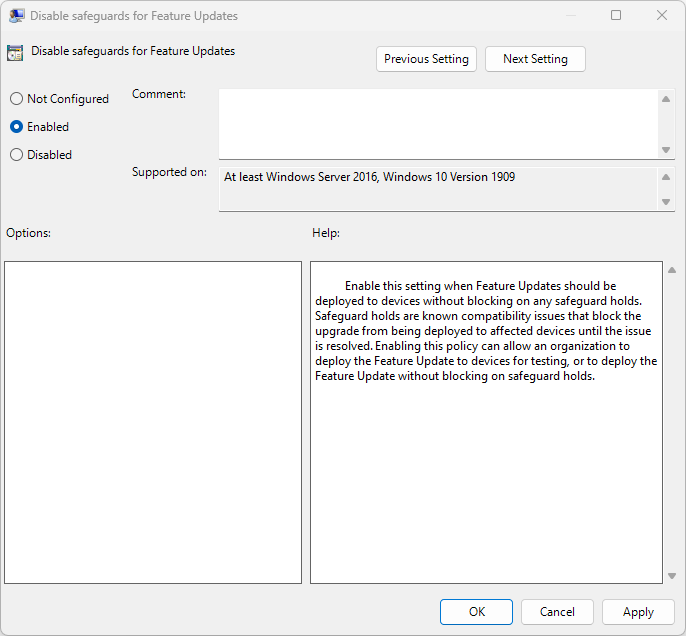
Disable Safeguards for Feature Updates
If the above doesn’t work there is a chance that you may be blocked from upgrading due to safeguards put in place by Microsoft to protect you against known issues from the “Windows 11, version 22H2 known issues and notifications” page.
Keep in mind that these safeguards are in place to protect you and your system from experiencing issues, possibly even issues that could result in a unrecoverable situation. I do not recommend doing this unless you have a backup and know what you are doing.
To disable safeguards for features:
Make sure you still have the “Local Group Policy” MMC still open on “Local Computer Policy\Computer Configuration\Administrative Templates\Windows Components\Windows Update\Manage updates offered from Windows Update”.
Open “Disable Safeguards for Feature Updates”
Set this option to “Enabled”, click Apply, and then OK.
See below for a screenshot of the setting:
Disable Safeguards for Feature Updates
After applying this, you should now be able to upgrade to Windows 11, version 22H2.
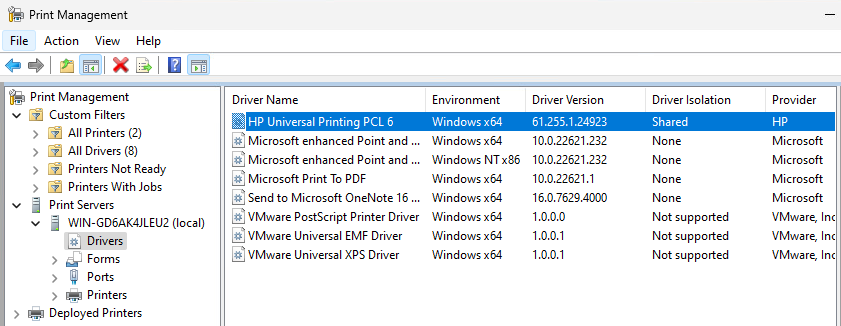
When it comes to troubleshooting login times with non-persistent VDI (VMware Horizon Instant Clones), I often find delays associated with printer drivers not being included in the golden image. In this post, I’m going to show you how to add a printer driver to an Instant Clone golden image!
Printing with non-persistent VDI and Instant Clones
In most environments, printers will be mapped for users during logon. If a printer is mapped or added and the driver is not added to the golden image, it will usually be retrieved from the print server and installed, adding to the login process and ultimately leading to a delay.
Due of the nature of non-persistent VDI and Instant Clones, every time the user goes to login and get’s a new VM, the driver will then be downloaded and installed each of these times, creating a redundant process wasting time and network bandwidth.
To avoid this, we need to inject the required printer drivers in to the golden image. You can add numerous drivers and should include all the drivers that any and all the users are expecting to use.
An important consideration: Try using Universal Print Drivers as much as possible. Universal Printer Drivers often support numerous different printers, which allows you to install one driver to support many different printers from the same vendor.
How to add a printer driver to an instant clone golden image
Below, I’ll show you how to inject a driver in to the Instant Clone golden image. Note that this doesn’t actually add a printer, but only installs the printer driver in to the Windows operating system so it is available for a printer to be configured and/or mapped.
Let’s get started! In this example we’ll add the HP Universal Driver. These instructions work on both Windows 10 and Windows 11 (as well as Windows Server operating systems):
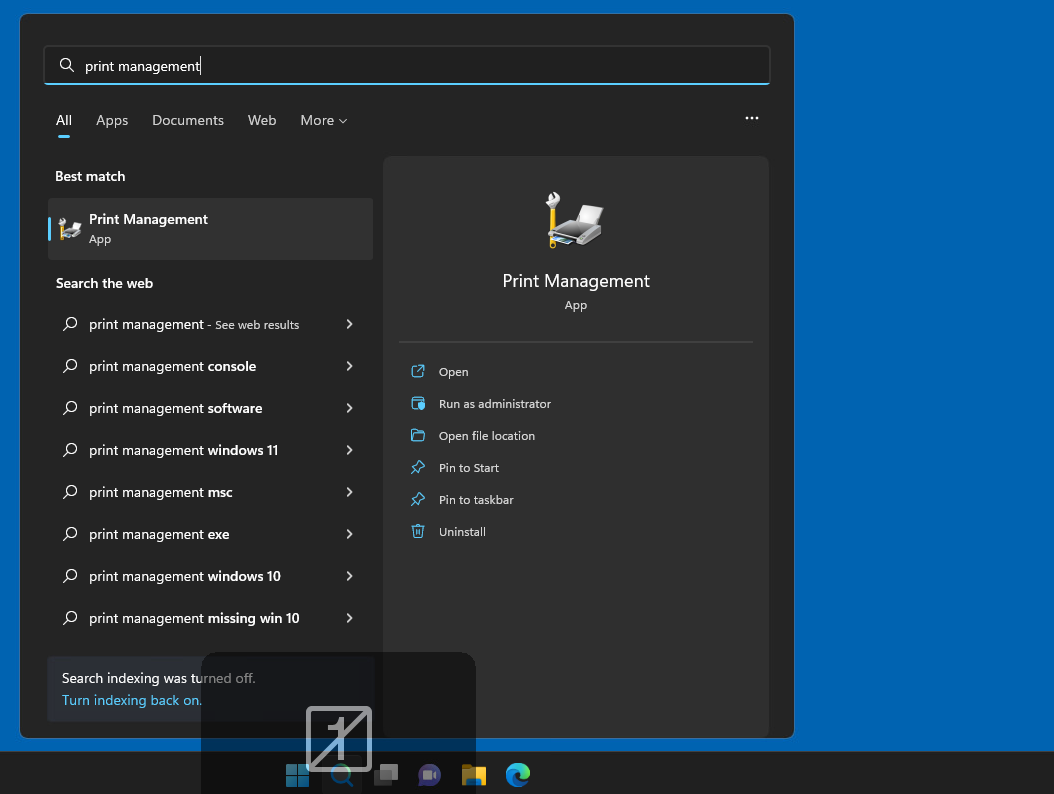
Click Start, type in “Print Management” and open the “Print Management”. You can also click Start, Run, and type “printmanagement.msc”.
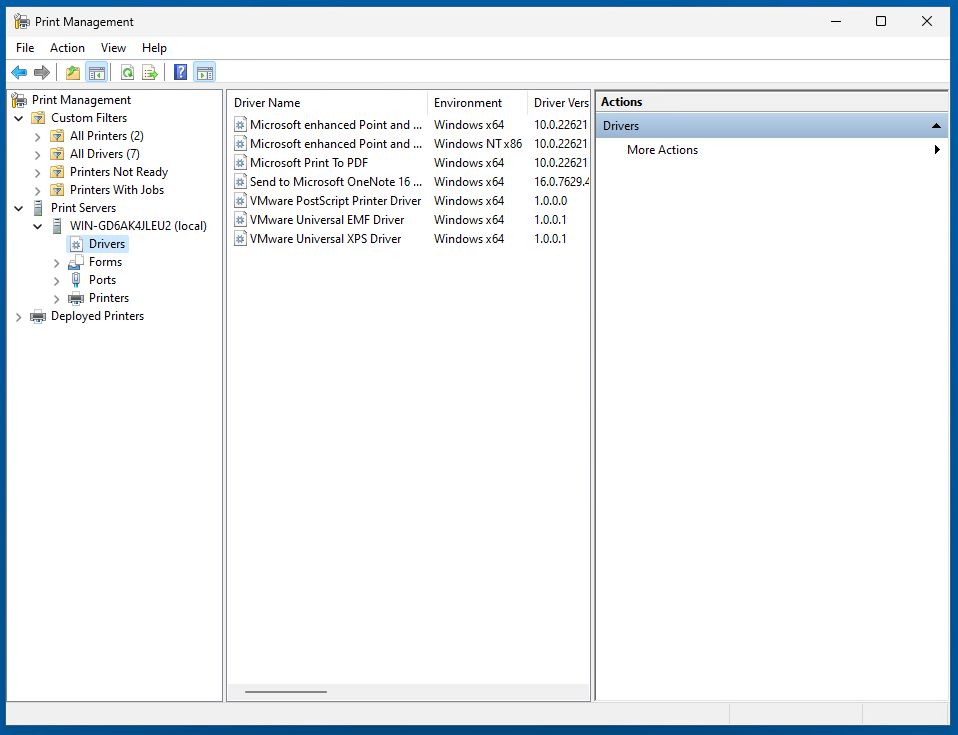
On the left hand side, expand “Print Servers”, then expand your computer name, and select “Drivers”.
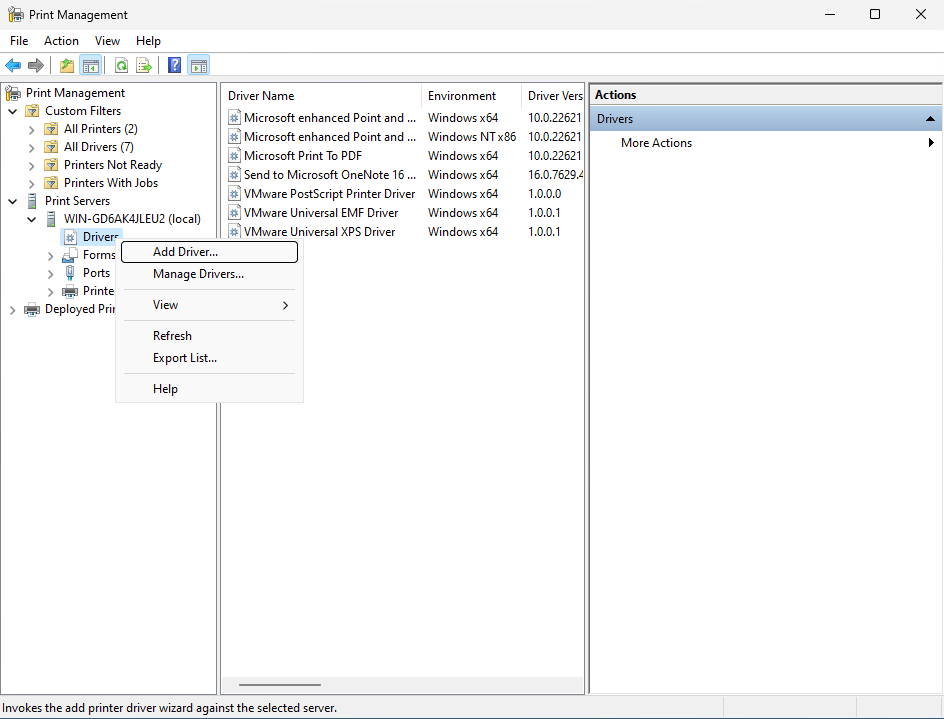
Right click on “Drivers” and select “Add Driver”.
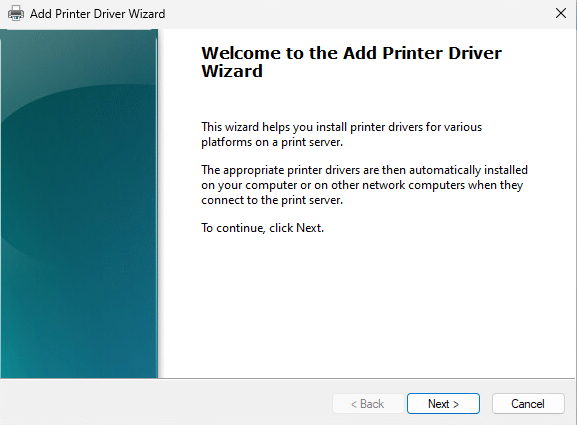
When the “Welcome to the Add Printer Driver Wizard” opens, click Next.
Leave the default for the architecture. It should default to the architecture of the golden image.
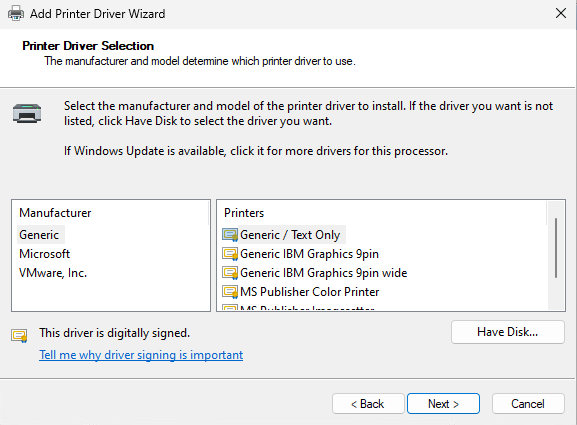
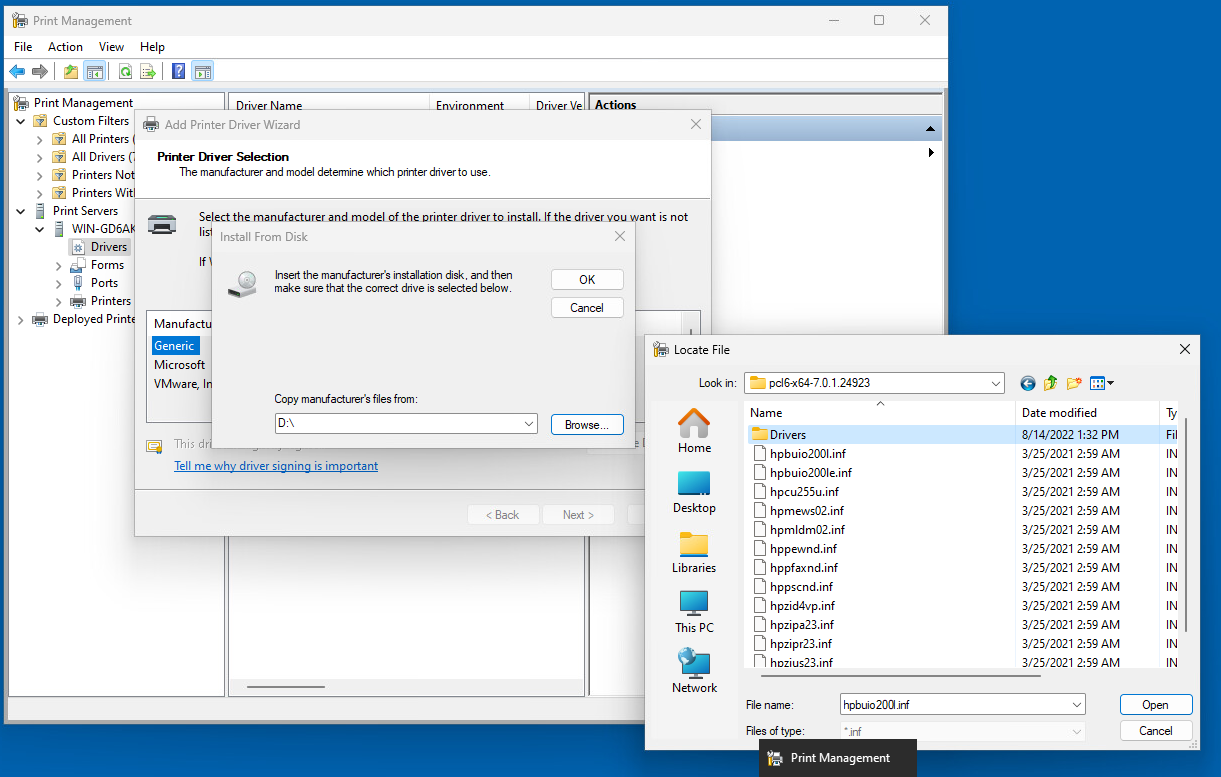
When you are at the “Printer Driver Selection” stage, click on “Have Disk”.
Browse to the location of your printer driver. In this example, we navigate to the extracted HP Universal Print Driver.
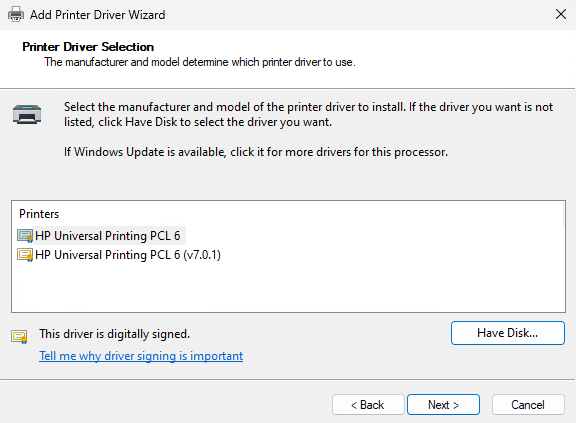
Select the driver you want to install.
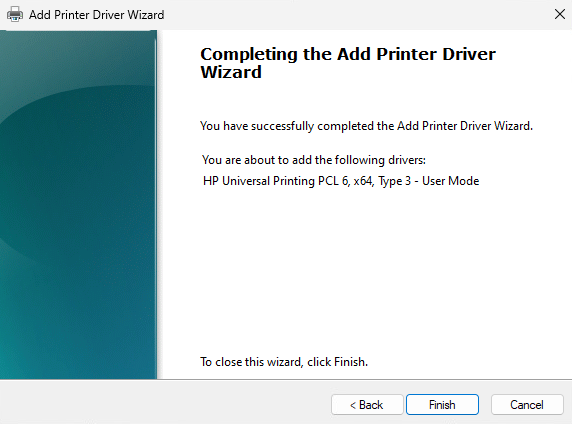
Click on Finish to complete the driver installation.
The driver you installed should now appear in the list as it has been installed in to the operating system and is now available should a user add a printer, or have a printer automatically mapped.
Printer Driver installed on Non-Persistent Instance Clone Golden Image
Now seal, snap, and deploy your image, and you’re good to go!
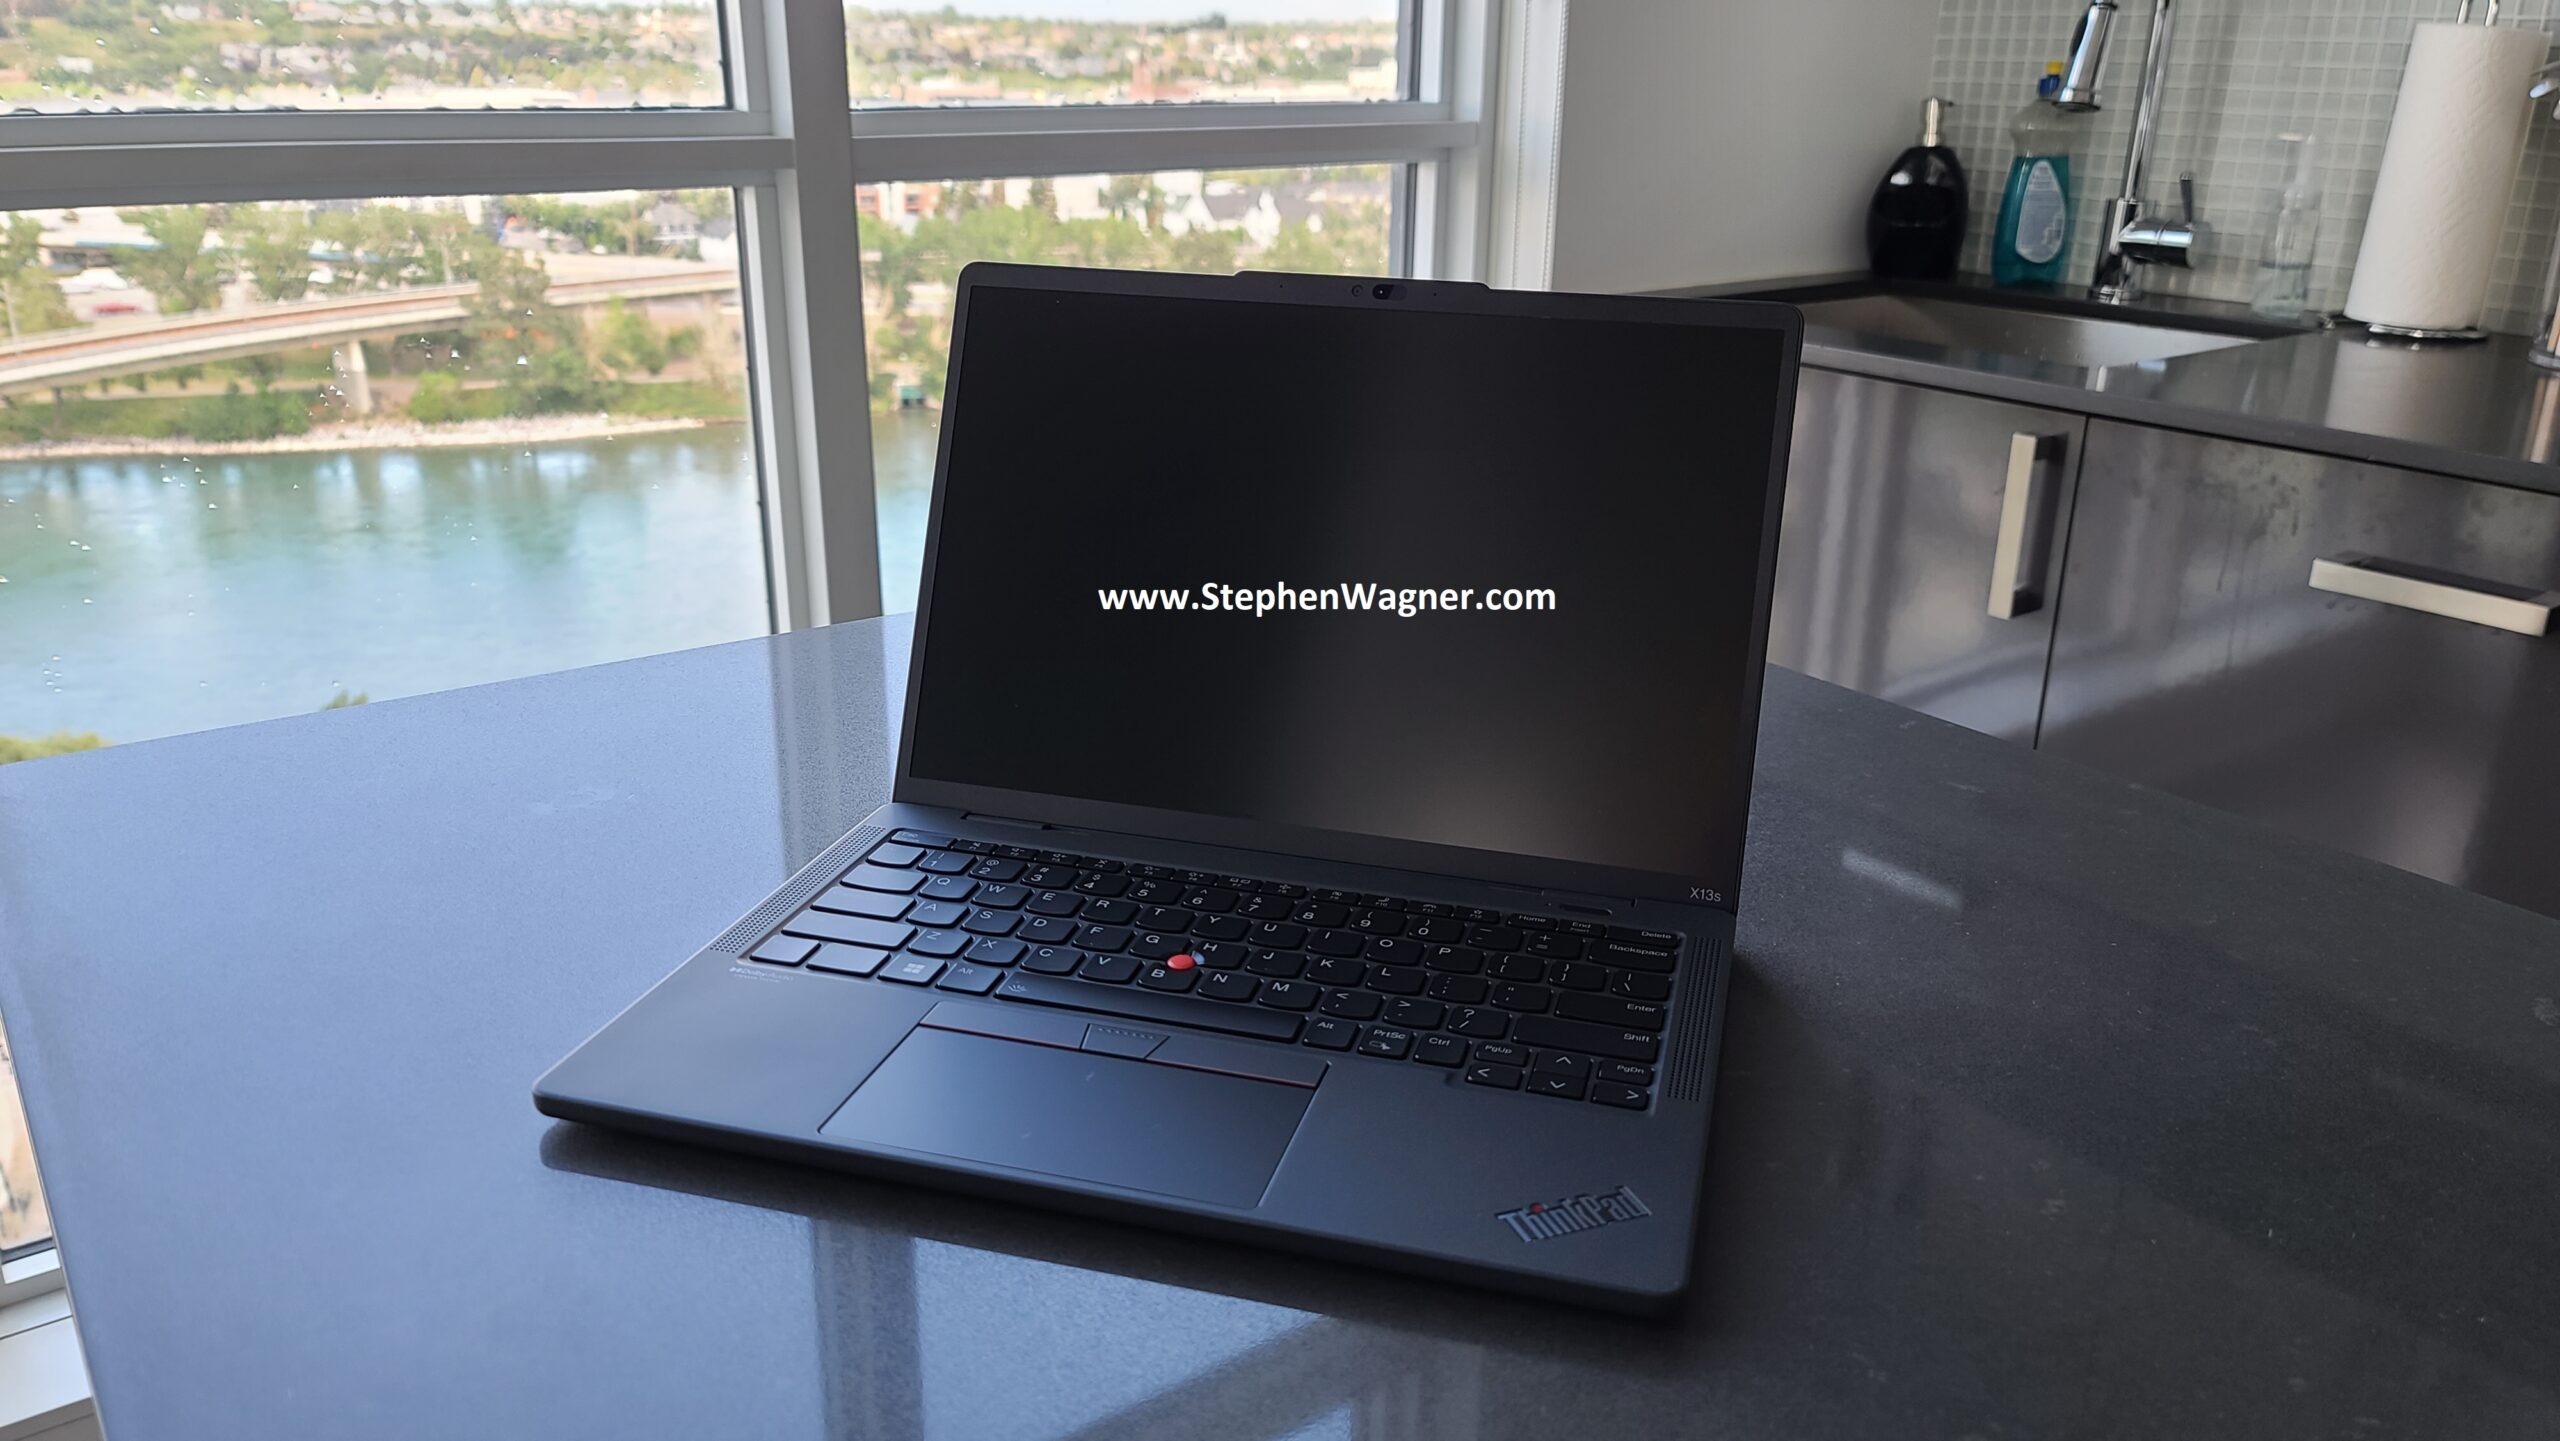
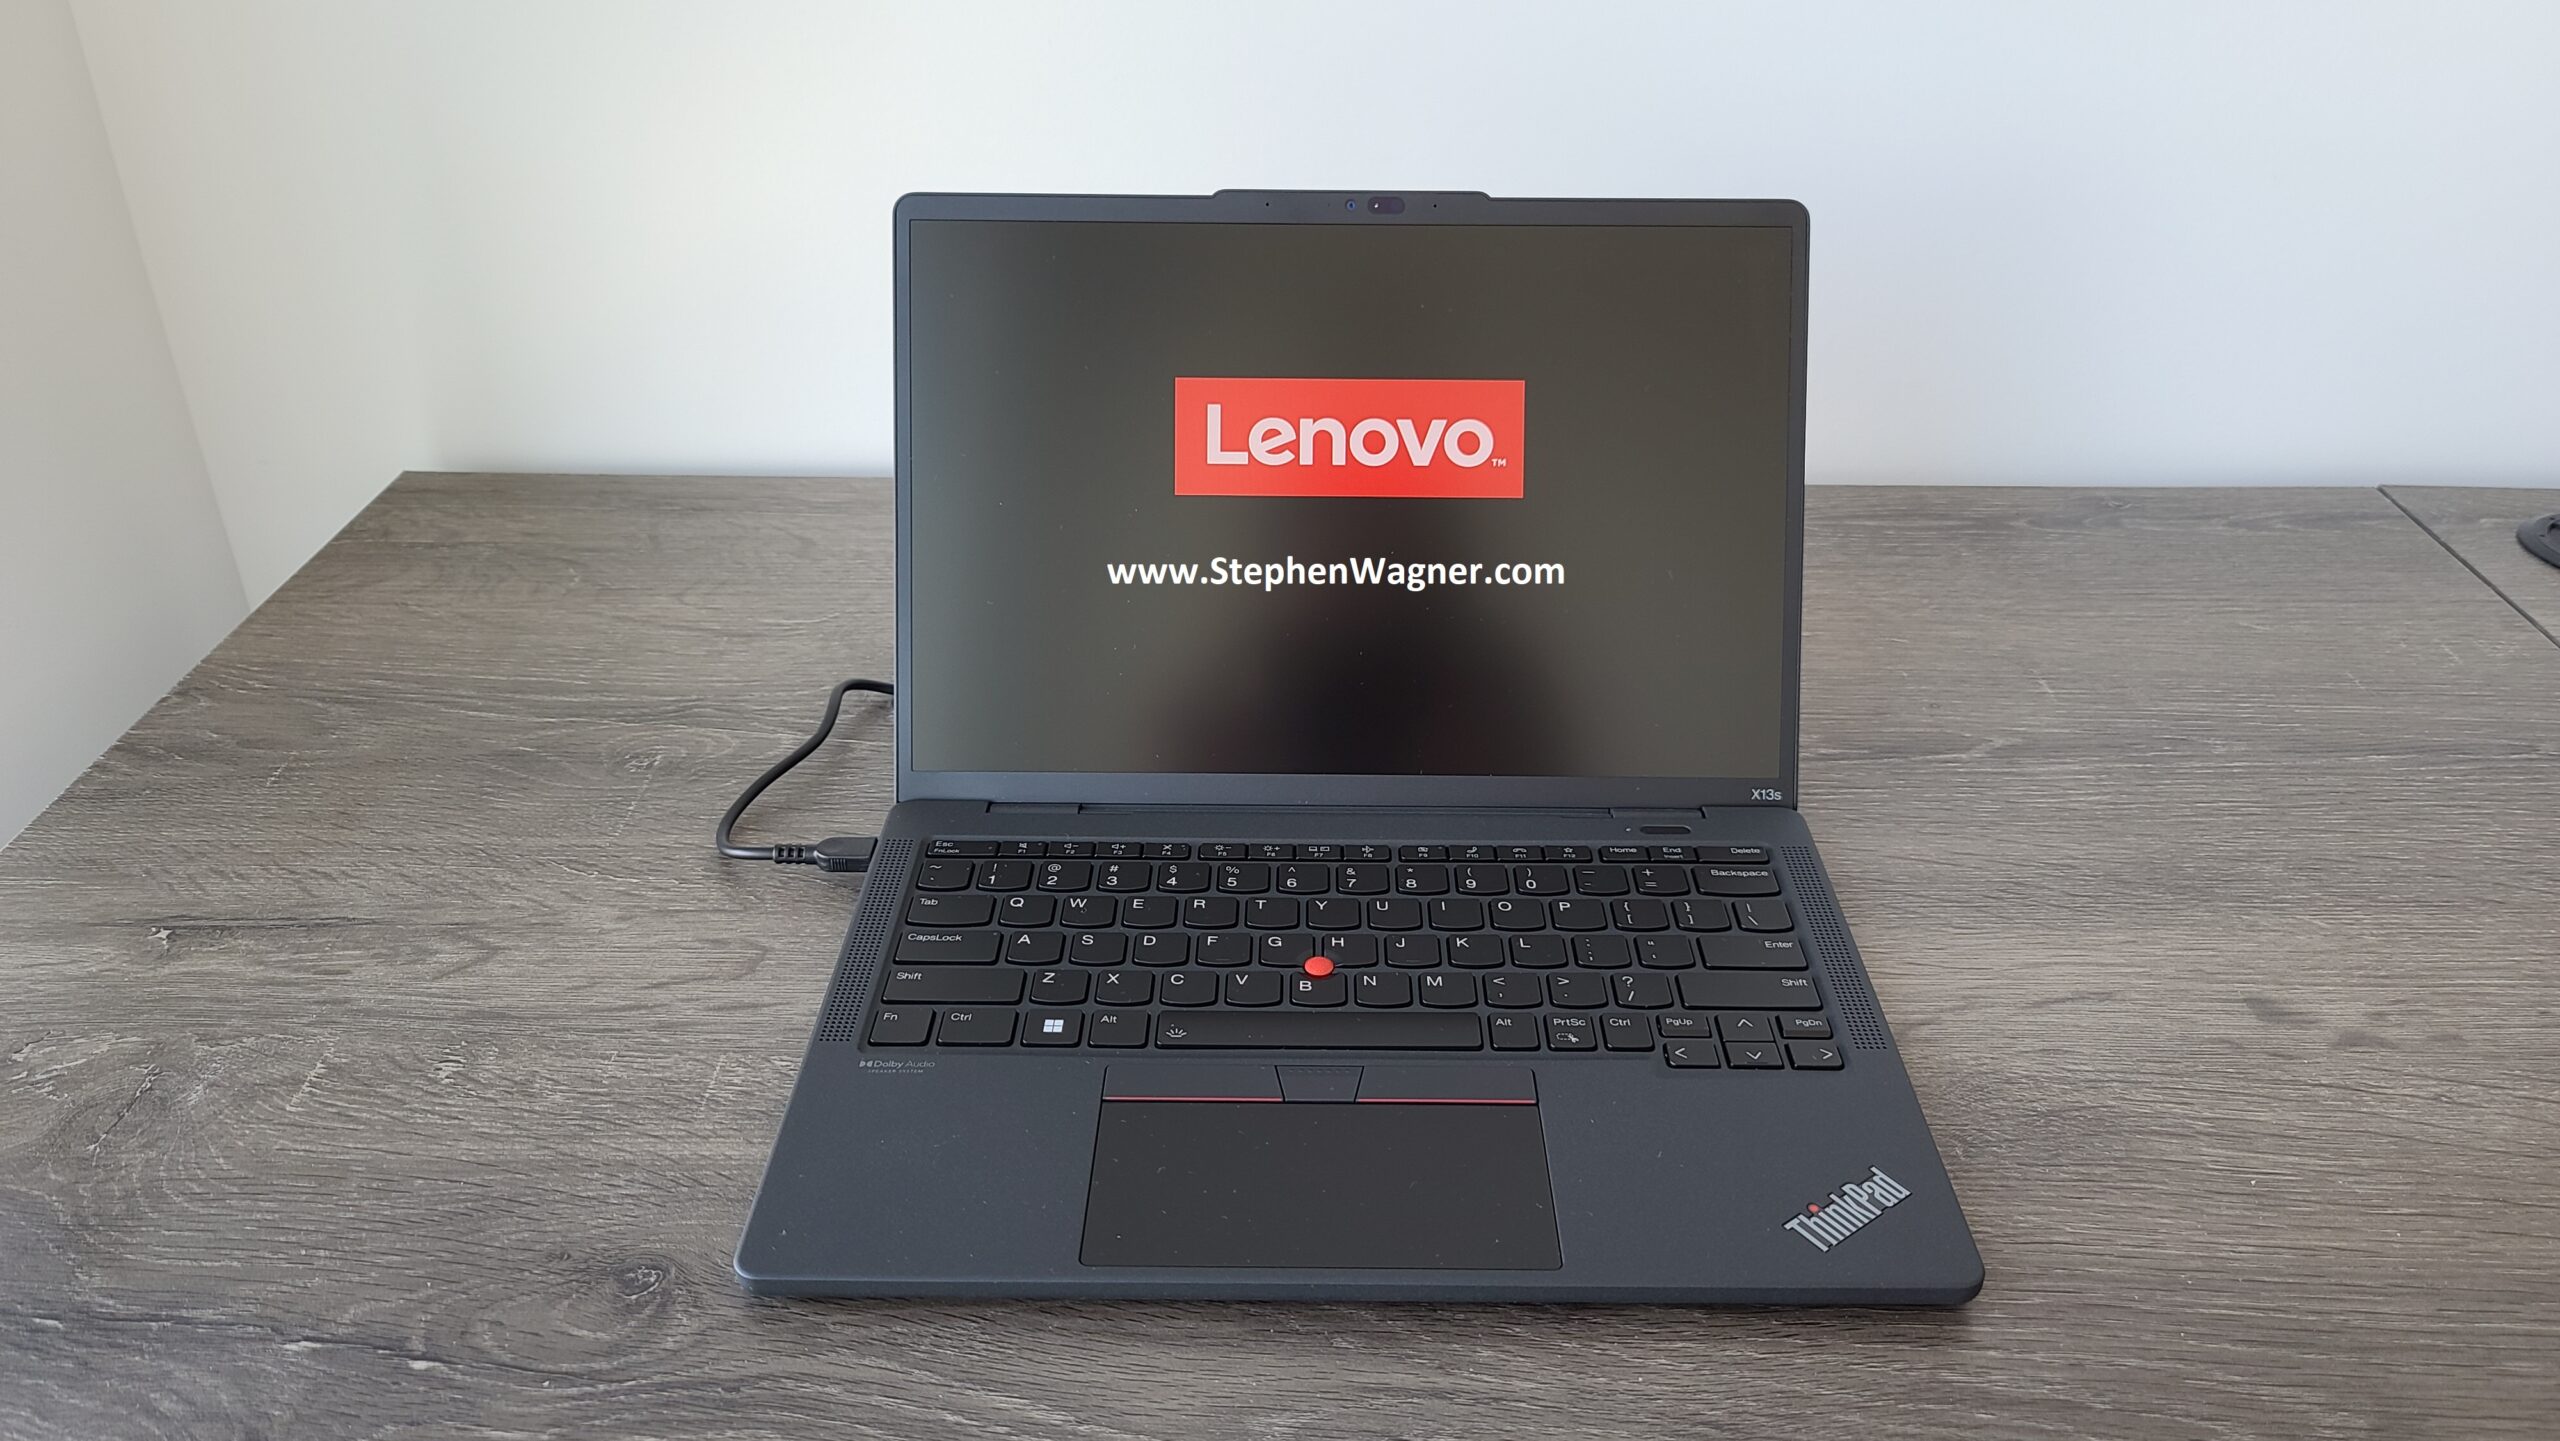
I purchased the new Lenovo X13s Windows on ARM laptop, and wanted to share my first impressions with the device. I plan on creating a full review in a later post, however I wanted to provide some insight on my initial first impressions, as these can be a game changer or deal breaker for most people considering purchasing this laptop.
I’m going to break this blog post up in to a few key sections that were the most important, and most noticeable when first getting my hands on this device.
Lenovo Thinkpad X13s
I’ll be limiting this post to the first impressions as much as possible saving the rest for the full review.
Pre-purchase expectations and initial thoughts
With lots of travel approaching, and with an aging laptop (Lenovo X1 Carbon Gen-2013), I needed to purchase a new laptop that I could use that would fit my requirements:
WWAN (Preferably 5G)
Good Battery Life
Good Performance
Stylish
Application Use
VDI – VMware Horizon Client
Microsoft Office
IT Applications (Putty, WinSCP, RDP)
Microsoft Teams
Zoom
You can see that my usage is similar to the business road warrior professional, with an IT add-on. I’m usually always connected to a VDI session, and also spend 50-100% of the day on Zoom or Microsoft Teams meetings.
With full knowledge about ARM architecture, and the new laptops and devices that have been released, I decided to take a big risk and try one of the new Windows on ARM laptops, specially the Lenovo X13s.
ARM laptops generally provide great performance, really good battery life, and an “always on” ready to go environment.
Specifications
I’ll be saving the tech spec deep dive for the full review, however I wanted to provide some basic information on the specifications of the model I purchased.
Lenovo X13s in Box
Part Number: 21BX0008US
CPU: Snapdragon® 8cx Gen 3 Compute Platform (3.00 GHz up to 3.00 GHz)
I specifically wanted a large SSD, lots of RAM, and definitely the 5G WWAN modem built in. I purchased the highest configured model without going custom (to take advantage of special pricing and promotions).
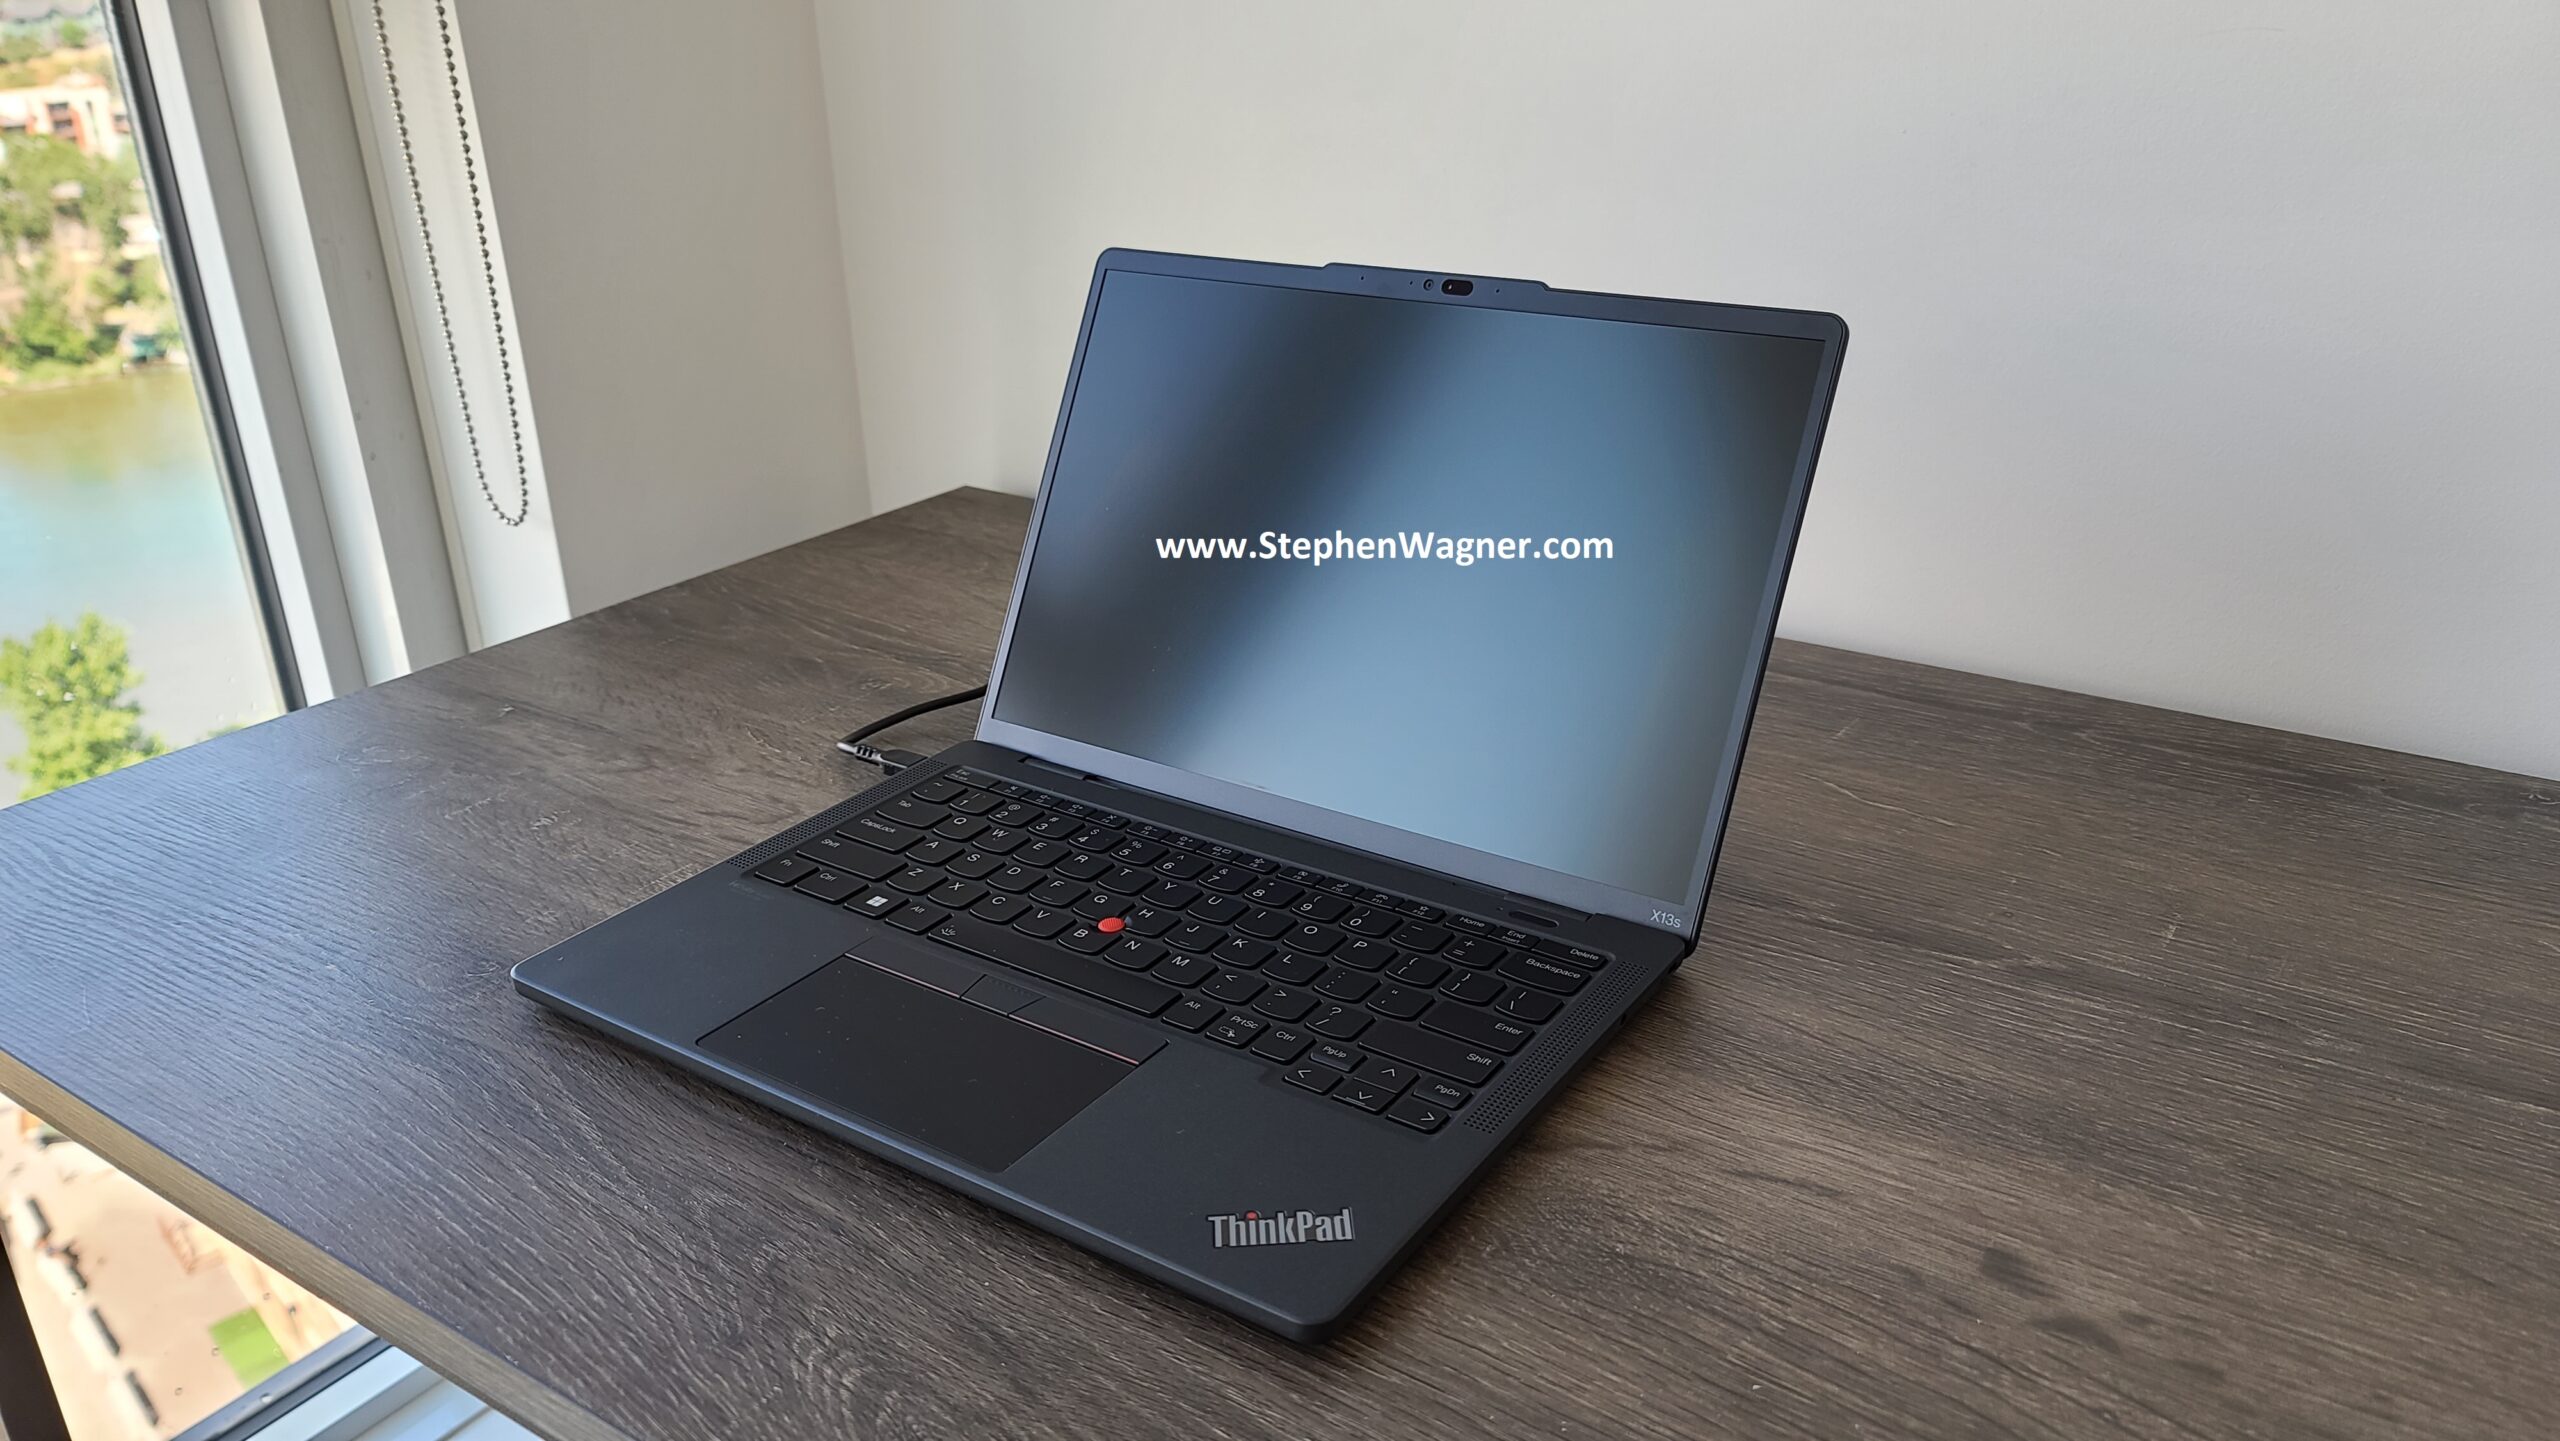
First Impressions
Design
Receiving the laptop, the first things that really stick out are the size, texture (quality of materials), thinness, and no fan ports. It’s a very beautifully designed laptop.
Lenovo X13s
While it is smaller than I expected, it does not feel cheap. The materials used with this laptop give it the same quality and feel as the X1 Carbon.
Physical Size
For whatever reasons, I was expecting something the same size as my original X1 Carbon, however the X13s is thinner and has a slightly smaller width and height in comparison.
Originally I thought this was going to be a problem, but after using the laptop, I’m absolutely in love with the size of this. As far as portability and usability, based on first impressions, this thing has both!
Keyboard
Surprisngly, because of the smaller size of the laptop, I’ve actually found is very easy to type quickly. I’ve noticed that on all the of laptops I’ve owned, as well as desktop keyboards, I can type the fasted on the X13s, because of the size of the keyboard as well as the layout and feel.
Keystrokes feel and sounds amazing, with a perfectly built keyboard. I honestly have no complaints…
Display
The display is absolutely beautiful. Even though I thought there is an option for a 400-knit display, my model has the 300-knit because I wanted the touchscreen.
Visibility in my apartment with all the windows open on a sunny day, I can see everything crisply on this display.
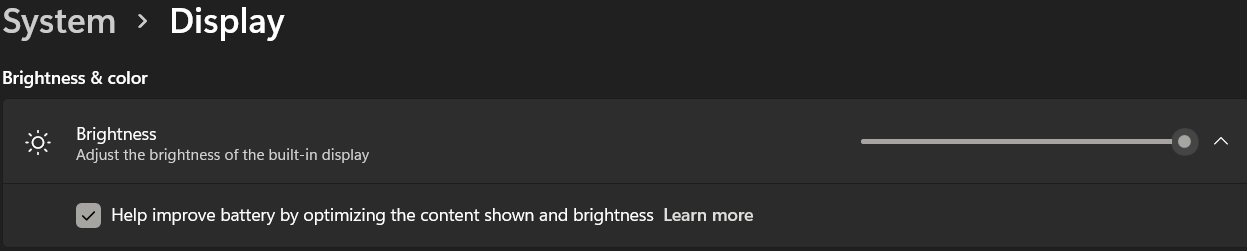
The only thing I noticed is that when viewing black/gray scale content (most of my UI and apps are in dark mode), it looks like the backlight dims and sometimes text becomes faded. You can still see everything fine, however this causes for an odd effect when the screen content changes to something with white or color.
To fix this, uncheck “Help improved battery by optimizing the content shown and brightness” in settings:
Display auto-dimming for battery
After unchecking this option, everything is perfect!
Battery
The battery on this unit is absolutely blowing my mind. In 4 days of usage, I’ve never used a laptop that can hold up to this and barely use any battery.
Comparing this to my old X1 in 4 days of usage, I probably would have had to charge it 3-4 times. The X13s just keeps going and going and going.
Very impressed with this, as it’s going to help with travel and staying connected on the go.
Speakers and Sound
The sound is fantastic, and playing music sounds great. The laptop includes a sound system enhanced with Dolby.
I’m not much of an audiophile, but I have to say I was impressed with the volume and quality of audio that comes from the laptop.
Termperature
This laptop has no fans or air ducts. One would think this would make up for a laptop that runs up hot, but I have to say I haven’t really noticed any hot temperatures except for when I first booted it up and did Windows Updates, Lenovo Updates, Microsoft Office installer, and a bunch of other things.
Even under extremely heavy load during the installs, the heat generated was actually less than what I would have expected, or experienced with my old Lenovo X1 Carbon.
Windows 11 for ARM64 (Windows on ARM)
For the most part, if you didn’t understand what Windows on ARM was, processor architectures, or the difference between this laptop and others, you’d notice absolutely nothing different from a normal laptop (except maybe if you were gaming).
I have to say that Microsoft knocked it out of the park with the development of Windows 11 on ARM, and it’s definitely 100% ready for primetime use, both for regular users as well as enterprise/business users.
The one thing I can’t comment on is gaming. While I haven’t done any testing (as I don’t game much), there may be additional considerations as far as stability and performance, or even capabilities of gaming.
Applications
When it comes to applications, while the X13s does support x86 and x64 emulation, you should always try to run native ARM/ARM64 applications. Running applications native to the architecture will provide the best performance as well as battery life.
After getting going, I noticed the following applications had native ARM64 support:
Microsoft Office
Microsoft Teams
Zoom
Putty
Edge (built off Chromium)
I also loaded numerous applications that are x86/x64 and emulated:
VMware Horizon Client
Chrome
WinSCP
All the above applications, both ARM and x86/x64 run fantastic without any problems. I was concerned that the whole emulation error would be a mess but I’ve seriously had no problems.
Performance
I can’t say enough how snappy Windows 11 on ARM and the X13s is. I never thought I’d say it, but this is the fastest performing Windows 11 system I’ve used when it comes to responsiveness of the OS and applications.
Connectivity
The built-in 5G connectivity was super easy to setup. The laptop can use an eSIM or traditional physical SIM. I had the experience of using both at different points (because of issues with my cell phone provider).
The eSIM was super easy to setup and you can manage multiple different profiles. I simply purchased an eSIM, and scanned the QR code with the webcam.
When I had to switch to the physical SIM (because my provider doesn’t support 5G with eSIMs), I simply popped the SIM tray and install the card.
It’s very easy to not only switch between eSIM profiles, but also switch between the eSIM and normal SIM. This is great if you’re travelling to other countries as you can easily switch between your local providers eSIM, and install a foreign SIM to use local data.
You speed will vary depending on provider, but I was able to achieve full speed that was expected my provider, and I was pleasantly surprised with better than expected low latencies, which is great for VDI which I use regularly.
Always on
Because of the ARM processor, Windows is “always on”. There’s no resume from suspend time, just like your ARM based cell/mobile phone.
The laptop is virtually always on and ready to go when I need to work.
Overall First Impressions
Overall, my first impressions with this laptop have been fantastic and this laptop is exceeding my best expectations. Windows 11 on ARM is definitely a serious contender when it comes to choosing the right laptop/notebook.
Lenovo X13s Powered On
The OS is snappy, everything works the way you’d expect on Windows, and so far I’m very happy with the investment I made when purchasing this laptop. I can’t wait to do some travelling with this to start using it to it’s full potential.
Add in 5G always-on connectivity, and it feels like this thing is unstoppable…
This website uses cookies to improve your experience. We'll assume you're ok with this, but you can opt-out if you wish.
Do you accept the use of cookies and accept our privacy policy? AcceptRejectCookie and Privacy Policy
Privacy & Cookies Policy
Privacy Overview
This website uses cookies to improve your experience while you navigate through the website. Out of these cookies, the cookies that are categorized as necessary are stored on your browser as they are essential for the working of basic functionalities of the website. We also use third-party cookies that help us analyze and understand how you use this website. These cookies will be stored in your browser only with your consent. You also have the option to opt-out of these cookies. But opting out of some of these cookies may have an effect on your browsing experience.