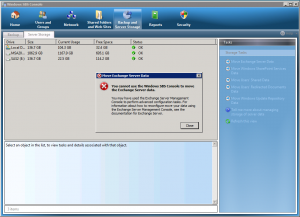
The other day I received a notification that one of my clients were running out of space on their SAS RAID Array which contained their Exchange 2007 mailbox data store database. While I have every plan to increase the size of this partition, I still have to temporarily fix things so we don’t run out of space. Technically, to put a temporary fix on this, I had to move the Exchange Server Data to another partition on the server which had plenty of space. Typically, this is very easy on Microsoft Small Business Server 2008. However, in this specific scenario we were getting an error when trying to run the wizard to move the data:
“You cannot use the Windows SBS Console to move the Exchange Server data. – You may have used the Exchange Server Management Console to perform advanced configuration tasks. For information about how to reconfigure move your data using the Exchange Server Management Console, see the documentation for Microsoft Exchange Server“
After receiving this error I went ahead and looked for the logs pertaining to the move wizards. The error log mentioned that configuration was altered from the default (which is acceptable since we have done some modifications to our Exchange config), and I also believe this is occurred due to both our “First Storage Group” and “Second Storage Group” already being hosted on different logical partitions. From what I have read, you cannot modify your Exchange configuration too heavily, nor have your different storage groups on different partitions for the wizard to work.
Since this happened, we have to move the Exchange data manually using the Exchange Management Console. These instructions will work for both Microsoft Windows Small Business Server 2008, and also Microsoft Exchange 2007 running on a standard Microsoft Windows Server (only if your not using any replication to other Exchange Servers). Please note that during this move, all move functions will require the database to be dismounted from the information store. Only Exchange 2010 (or later) supports live moving.
Instructions to move the Exchange database (First Storage Group – Mailbox Database):
Important: Always back up your server before doing heavy operations like this in case something goes wrong. To back Microsoft Exchange up, you have to have backup software that is “Exchange Aware” and can properly back it up.
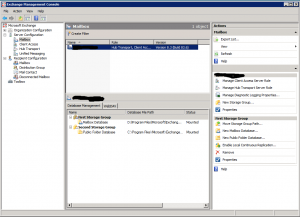
1) Launch the Microsoft Exchange Management Console and locate the Database Management information – You should be able to find the Exchange Management console in your start menu. When opening it should prompt for a UAC (run as Administrator) privileges, grant it. If it does not prompt you to run as Administrator, right click on “Exchange Management Console” and select “Run as Administrator”. Once you have opened the console, expand “Server Configuration” and “Mailbox”.
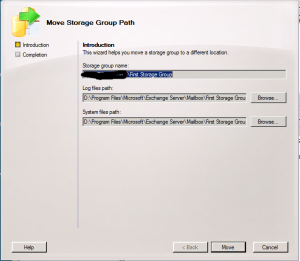
2) Move Storage Group Path -First we need to move the “Storage Group Path” for the “First Storage Group” (which contains our Exchange Mailboxes). This will move the files that are related to logs, transaction files, etc… To do this, right click on “First Storage Group”, and select “Move Storage Group Path…”. Follow the wizard. Inside of the wizard, you will choose the new location in both the “Log files path” and “System files path”. Finally after you have specified the location, it will dismount the database and perform the move function.
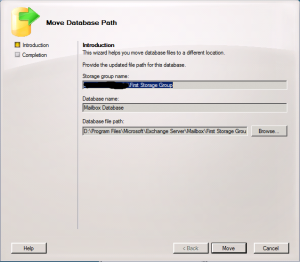
3) Move Database Path – Now we need to move the actual database path of the “Mailbox Database”. This will actually move the Exchange mailboxes on our server to a new location. To do this, right click on “Mailbox Database” and select “Move database path…”. Follow the wizard. Inside of the wizard, you will choose the new location for the “Database file path”. Finally after you have specified the location, it will dismount the database and perform the move function.
4) Move Public Folders (If desired) – If you desire, you can also move your “Public Folders” by performing the same steps for the “Second Storage Group” and the “Public Folder Database”. In my case, our public folders are very small, so I didn’t bother.
You have now moved your Exchange 2007 mailbox database.
If you need any assistance or help with SBS, please don’t hesitate to reach out. I provide SBS Consulting Services, more information can be found here: https://www.stephenwagner.com/2020/02/28/microsoft-small-business-server-migration-upgrade/.


