I’ve had my main web server directly on the net for some time now. The box runs CentOS and I always have it fully up to date, with a minimal install just to act as a web server.
It’s always concerned me a little bit, the fact is I keep the box up to date as much as possible, but it’s still always in the back of my mind.
This weekend I had some time to mess around with some stuff. I wanted to get it setup behind my Sophos UTM, however I did NOT want it to use the public IP address that it’s setup for as I have numerous static IPs all for different services.
I spent a good 3-4 hours doing lots of searching on Google, and Astaro.org. I saw a few people that wanted to do the same thing as me, but didn’t really find an explanation for anything.
Ultimately I wanted to setup another external IP address on the Sophos UTM software appliance box, and have that external IP dedicated to JUST the web server. Everything else would continue to run as configured before I started modifying anything.
I finally got it going, and I thought I would do a little write up on this since I saw a lot of people were curious, however no one was having luck with it. So far I’ve just done it for my main web server, however in the future I’ll be doing this with a few more external IPs and servers of mine. So let’s log into the Astaro web interface and get started!
PLEASE NOTE: I performed this configuration on Astaro Security Gateway Version 8, this will also work on a Sophos UTM
- Configure the additional IP – “Interfaces & Routing”, then choose “Interfaces”. Select the “Additional Addresses” tab on the top of the screen. Hit the “New additional address…” button and configure the additional IP. Please note this worked for me as all my static IPs use the same gateway for the most part, if you have multiple statics that use different gateways this may not work for you. In my case I called this address “DA-Web”. Make sure you enable this afterwards by hitting the green light!
- Configure the NAT Rules – On the left select “Network Security”, then choose the sub item “NAT”. We do not want to touch anything under “Masquerading” so lets go ahead and select the “DNAT/SNAT” tab. In this section we need to create two rules, one for DNAT, and one for SNAT. Keep in mind that “Full NAT” is available, but due to the setup of the traffic initiation I don’t think we want to touch this at all.
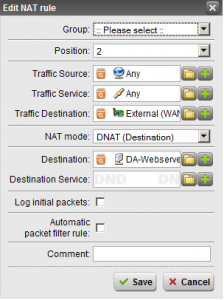
- Create the DNAT Rule – Hit the “New NAT rule” button. Set “Position” to Top”. “Traffic Source” and “Traffic Service” to “Any”. “Traffic Destination” set to the additional address you created (keep in mind this has the same name as the main external, only with the name of the connection inside of it). Set “NAT mode” to “DNAT”. And finally set Destination to the server you want this going to, or create a new definition for the server. Make sure “Automatic packet filter rule” is NOT checked. See image below for my setup.

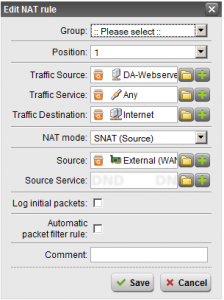
- Create the SNAT Rule – Hit the “New NAT rule” button. Set the “Position” to top. “Traffic Source” should be set to the definition you created for the server you are doing this for. “Traffic Service” should be “Any”. “Traffic Destination” should be “Internet”. Keep in mind this is very important, we want to make sure that if you use multiple subnets inside your network that SNAT is ONLY performed when needed when data gets shipped out to the Internet, and NOT when your internal boxes are accessing it. Set “NAT mode” to SNAT. And finally “Source” being the additional IP you created (again this looks like your normal External IP, but hold the mouse over when selecting the definition to make sure it’s the “additional” IP you created). Make sure “Automatic packet filter rule” is NOT checked. See image below for my setup.

- Create Packet Filter Rules – Now it’s time to open some ports up so that your server can offer services to the internet. This is fairly standard so I’m sure that you can do it on your own. In my example I created a few rules that allowed HTTP, DNS, and FTP from “any” using the service, to the destination “DA-Webserver” to allow the traffic I needed.
This should be it, it should be working now. If you don’t want to create the packet filter rules and want ALL traffic allowed, you can simply forget section c above, and when creating the DNAT and SNAT rules check the “Create automatic packet filter rules” box on both rules. Keep in mind this will be opening your box up to the internet!
If you find this useful, have any questions, or want to comment or tell me how to do it better, please leave me a comment!
Thanks!


