Feb 142017
 

Years ago, HPE released the GL200 firmware for their HPE MSA 2040 SAN that allowed users to provision and use virtual disk groups (and virtual volumes). This firmware came with a whole bunch of features such as Read Cache, performance tiering, thin provisioning of virtual disk group based volumes, and being able to allocate and commission new virtual disk groups as required.

(Please Note: On virtual disk groups, you cannot add a single disk to an already created disk group, you must either create another disk group (best practice to create with the same number of disks, same RAID type, and same disk type), or migrate data, delete and re-create the disk group.)

The biggest thing with virtual storage, was the fact that volumes created on virtual disk groups, could span across multiple disk groups and provide access to different types of data, over different disks that offered different performance capabilities. Essentially, via an automated process internal to the MSA 2040, the SAN would place highly used data (hot data) on faster media such as SSD based disk groups, and place regularly/seldom used data (cold data) on slower types of media such as Enterprise SAS disks, or archival MDL SAS disks.

(Please Note: To use the performance tier either requires the purchase of a performance tiering license, or is bundled if you purchase an HPE MSA 2042 which additionally comes with SSD drives for use with “Read Cache” or “Performance tier.)

When the firmware was first released, I had no impulse to try it out since I have 24 x 900GB SAS disks (only one type of storage), and of course everything was running great, so why change it? With that being said, I’ve wanted and planned to one day kill off my linear storage groups, and implement the virtual disk groups. The key reason for me being thin provisioning (the MSA 2040 supports the “DELETE” VAAI function), and virtual based snapshots (in my environment, I require over-commitment of the volume). As a side-note, as of ESXi 6.5, ESXi now regularly unmaps unused blocks when using the VMFS-6 filesystem (if left enabled), which is great for SANs using thin provision that support the “DELETE” VAAI function.

My environment consisted of 2 linear disk groups, 12 disks in RAID5 owned by controller A, and 12 disks in RAID5 owned by controller B (24 disks total). Two weekends ago, I went ahead and migrated all my VMs to the other datastore (on the other volume), deleted the linear disk group, created a virtual disk group, and then migrated all the VMs back, deleted my second linear volume, and created a virtual disk group.

Overall the process was very easy and fast. No downtime is required for this operation if you’re licensed for Storage vMotion in your vSphere environment.

During testing, I’ve noticed absolutely no performance loss using virtual vs linear, except for some functions that utilize the VAAI storage providers which of course run faster on the virtual disk groups since it’s being offloaded to the SAN. This was a major concern for me as block linear based storage is accessed more directly, then virtual disk groups which add an extra level of software involvement between the controllers and disks (block based access vs file based access for the iSCSI targets being provided by the controllers).

Unfortunately since I have no SSDs and no extra room for disks, I won’t be able to try the performance tiering, but I’m looking forward to it in the future.

I highly recommend implementing virtual disk groups on your HPE MSA 2040 SAN!
Nov 052016
 

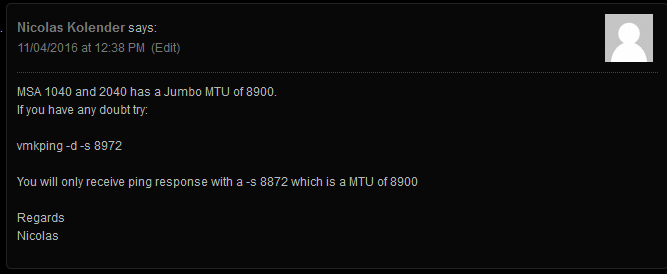
Yesterday, I had a reader (Nicolas) leave a comment on one of my previous blog posts bringing my attention to the MTU for Jumbo Frames on the HPE MSA 2040 SAN.

MSA 2040 MTU Comment

Since I first started working with the MSA 2040. Looking at numerous HPE documents outlining configuration and best practices, the documents did confirm that the unit supported Jumbo Frames. However, the documentation on the MTU was never clearly stated and can be confusing. I was under the assumption that the unit supported 9000 MTU, while reserving 100 bytes for overhead. This is not necessarily the case.

Nicolas chimed in and provided details on his tests which confirmed the HPE MSA 2040 does actually have a working MTU of 8900. In my configuration I did the tests (that Nicolas outlined), and confirmed that the MTU would cause packet fragmentation if the MTU was greater than 8900.

ESXi vmkping usage: https://kb.vmware.com/selfservice/microsites/search.do?language=en_US&cmd=displayKC&externalId=1003728

This is a big discovery because packet fragmentation will not only degrade performance, but flood the links with lots of packet fragmentation.

I went ahead and re-configured my ESXi hosts to use an MTU of 8900 on the network used with my SAN. This immediately created a MASSIVE performance increase (both speed, and IOPS). I highly recommend that users of the MSA 2040 SAN confirm this on their own, and update the MTUs as they see fit.

Also, this brings up another consideration. Ideally, on a single network, you want all devices to be running the same MTU. If your MSA 2040 SAN is on a storage network with other SAN devices (or any other device), you may want to configure all of them to use the MTU of 8900 if possible (and of course, don’t forget your servers).

A big thank you to Nicolas for pointing this out!

Sep 232016
 

Well, recently one of the servers I monitor and maintain in a remote oil town recently started throwing out a Windows event log warning:

Event ID: 129

Source: HpCISSs2

Description: Reset to device, \Device\RaidPort0, was issued.

The server is an HP ML350p Gen8 (Windows Server 2008 R2) running latest firmware and management software. It has 2 RAID Arrays (RAID1, and RAID5), and a total of 6 disks.

Researching this error, I read that most people had this occur when running the latest HP WBEM providers, as well as anti-virus software. In our case, I actually tried to downgrade to an older version, but noticed the warning still occurs. While we do have anti-virus, it’s not actively scanning (only weekly scheduled scans).

In the process of troubleshooting, I noticed that under the HP Systems Management Homepage, one of the drives in the RAID1 array, had the following stats:

Hard Read Erros:  150
Recovery Read Errors:  7
Total Seeks:  0
Seek Errors:  0

I found these numbers to be very high in my experience. None of the other drives had anything close to this (in 4 years of running, only one other disk had a read error (a single one), this disk however had tons. For some reason the drive is still reporting as operational, when I’d expect it to be marked as a predicted failure, or failed.

While all online documentation was pointing towards at locks on the array by software, from my own experience I think it was actually the array waiting for a read operation on the array, and it was this single disk that was causing a threshold to be hit in the driver, that caused a retry to recover the read operation.

Called up HPE support, I mentioned I’d like to have the drive replaced. The support engineer consulted her senior engineer and reviewed the evidence I presented (along with ADU reports, and Active Monitoring health reports), the senior engineer concurred that the drive should be replaced.

Replacing the drive resolved the issue. I’m also noticing a performance increase on the array as well.

Make sure to always check the stats on the individual components of your RAID arrays, even if everything is operating sound.

Jul 302016
 

I have identified and confirmed with 2 different HPE MSA 2040 SANs an issue with SMTP notifications. I’ve identified the issue with multiple firmware versions (even the latest version as of the date of this article being written). The issue stops e-mail notifications from being sent from the MSA 2040 when the SAN is configured with some SMTP relays. This issue also occurs on HPE MSA 2050 arrays, as well as HPE MSA 2052 arrays.

The main concern is that some administrators may configure the notification service believing it is working, when in fact it is not. This could cause problems if the SAN isn’t regularly monitored and if e-mail notifications alone are being used to monitor its health.

Configuration:

-MSA 2040 (2050/2052) Dual Controller SAN configured with SMTP notifications

-SMTP destination server configured as EXIM mail proxy (in my case a Sophos UTM firewall)

Symptoms:

-Test notifications are not received (even though the MSA confirms OK on transmission)

-Real notifications are not received

-Occasionally if numerous tests are sent in a short period of time (5+ tests within 3 seconds), one of the tests may actually go through.

Events and Logs observed:

/var/log/smtp/2016/06/smtp-2016-06-20.log.gz:2016:06:20-20:44:29 SERVERNAME exim-in[16539]: 2016-06-20 20:44:29 SMTP connection from [SAN:CONTROLLER:IP:ADDY]:36977 (TCP/IP connection count = 1)

/var/log/smtp/2016/06/smtp-2016-06-20.log.gz:2016:06:20-20:44:29 SERVERNAME exim-in[18615]: 2016-06-20 20:44:29 SMTP protocol synchronization error (input sent without waiting for greeting): rejected connection from H=[SAN:CONTEROLLER:IP:ADDY]:36977 input=”NOOP\r\n”

Resolution:

To resolve this issue, I tried numerous things however the only fix I could come up with, is configuring the SAN to relay SMTP notifications through a Exchange 2013 Server. To do this, you must create a special connector to allow SMTP relaying of anonymous messages (security must be configured on this connector to stop SPAM), and further modify security permissions on that send connector to allow transmission to external e-mail addresses. After doing this, e-mail notifications (and weekly SMTP reports) from the SAN are being received reliably.

Additional Notes:

-While in my case the issue was occurring with EXIM on a Sophos UTM firewall, I believe this issue may occur with other E-mail servers or SMTP relay servers.

-Tried configuring numerous exceptions on the SMTP relay with no effect.

-Rejected e-mail messages do not appear in the mail manager, only the SMTP relay log on the Sophos UTM.

-Always test SMTP notifications on a regular basis.

Apr 102016
 

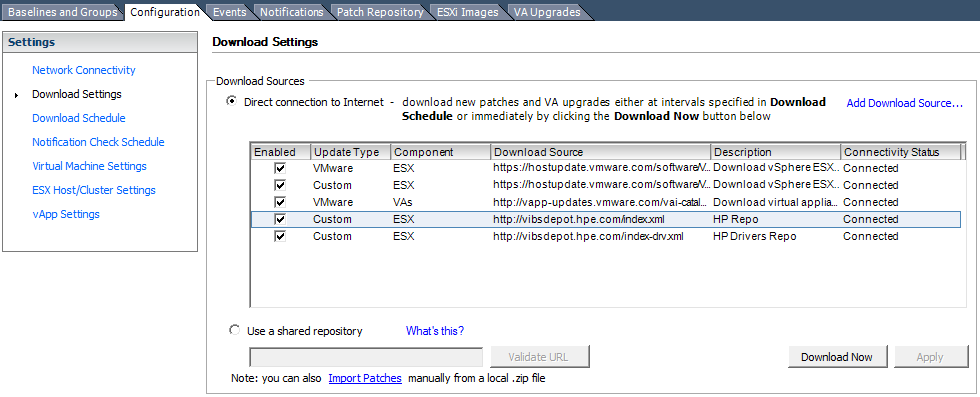
For those of you that use HP’s vibsdepot with VMWare Update Manager, you may have noticed that as of late you have not been able to synchronize patch definitions from the HP vibsdepot source.

I suspected this may have had something to do with the fact that in the past, the hp.com domain was being used to host these files, and with the company split, all enterprise related hosting has now moved to hpe.com

To fix this, simply log in to a vSphere client, jump to the “Admin View”, then “Download Settings” on the left. Right click on the HP related Download sources and simply update the URLs from hp.com to hpe.com and the problem is solved. After clicking on test, connectivity status updates to “Connected”.

Old URLS:

http://vibsdepot.hp.com/index.xml

http://vibsdepot.hp.com/index-drv.xml

New URLS:

http://vibsdepot.hpe.com/index.xml

http://vibsdepot.hpe.com/index-drv.xml

VMWare HPe vibsdepot

VMWare HPE vibsdepot

I later noticed this “notice” on HPE’s website (http://vibsdepot.hpe.com/):

HPE vibsdepot notice

HPE vibsdepot notice

Mar 262016
 

An issue that’s been making me rip my hair apart for some time… And a fix for you experiencing the same.


Equipment:

HP Proliant DL360 G6 Server (with a P800 Controller) running Server 2012 R2 and Backup Exec 2014

HP MSL-2024 Tape Library with a single HP SAS LTO-6 Tape Drive


Symptoms:

-After a clean restart, a backup job completes successfully. Subsequent jobs fail until server or services restarted.

-While the initial backup does complete, errors/warnings can be seen in the adamm.log and the Event Viewer even when successful.

-Subsequent backups failing report that the device is offline. The Windows Device Manager reports everything is fine.

-Windows Server itself does not report any device errors whatsoever.


Observations:

[5648] 03/05/16 07:50:46 Adamm Mover Error: DeviceIo: 03:07:00:00 – Device error 1167 on “\\.\Tape0”, SCSI cmd 0a, 1 total errors
[5648] 03/05/16 07:55:46 Adamm Mover Error: DeviceIo: 03:07:00:00 – Refresh handle on “\\.\Tape0”, SCSI cmd 00, new handle 214, error 0
[5648] 03/05/16 07:55:46 Adamm Mover Error: DeviceIo: 00:00:00:00 – Retry Logic: Retry logic was engaged on device: HP       Ultrium 6-SCSI
[5648] 03/05/16 07:55:46 Adamm Mover Error: DeviceIo: 00:00:00:00 – Retry Logic: Original settings restored on device: HP       Ultrium 6-SCSI

Event ID 58053
Backup Exec Alert: Storage Error
(Server: “WhatsMySRVRname”) The device state has been set to offline because the device attached to the computer is not responding.

Ensure that the drive hardware is turned on and is properly cabled. After you correct the problem, right-click the device, and then click Offline to clear the check mark and bring the device online.

[09968] 03/05/16 01:42:08.426 DeviceIo: 03:07:00:00 – Refresh handle on “\\.\Tape0”, SCSI cmd 17, new handle ffffffff, error 32
[09968] 03/05/16 01:42:08.426 DeviceIo: 03:07:00:00 – Refresh handle on “\\.\Tape0”, SCSI cmd 1a, new handle ffffffff, error 32
[09968] 03/05/16 01:22:07.867 PvlSession::DismountMedia( 0, 0, 0 )
Job = {JOBHEXNUMBERZZZZZZ} “ServerBackup-Full”
Changer    = {CHANGERZZZZ} “Robotic library 0001”
Drive      = {MYBACKUPDRVXZZZZZ} “Tape drive 0001”
Slot       = 13
Media      = {MEDIAZIDZZZZ} “BARCODEID”
ERROR = 0xE0008114 (E_PVL_CHANGER_NOT_AVAILABLE)

[19812] 03/05/16 01:42:12.613 DeviceIo: 03:07:00:00 – Refresh handle on “\\.\Tape0”, SCSI cmd 1a, new handle ffffffff, error 32
[19812] 03/05/16 01:42:13.129 DeviceIo: 03:07:00:00 – Refresh handle on “\\.\Tape0”, SCSI cmd 00, new handle ffffffff, error 32
[19812] 03/05/16 01:42:13.645 PvlDrive::DisableAccess() – ReserveDevice failed, offline device
Drive = 1007 “Tape drive 0001”
ERROR = 0x0000001F (ERROR_GEN_FAILURE)

[19812] 03/05/16 01:42:13.645 PvlDrive::UpdateOnlineState()
Drive = 1007 “Tape drive 0001”
ERROR = The device is offline!

Event ID 1000
Faulting application name: wmiprvse.exe, version: 6.3.9600.17415, time stamp: 0x54505614
Faulting module name: MSVCR110.dll, version: 11.0.51106.1, time stamp: 0x5098826e


Research:

I spent a ton of time researching this… Old support threads were pointing me in all different directions, most of the threads being old, mentioning drivers, etc… Initially I thought it was hardware related, until through testing I got the gut feeling it was software related. There was absolutely no articles covering Backup Exec 2014 running on Windows Server 2012 R2 with this specific issue.

Tried a bunch of stuff, including swapping the P800 controller, for another HP P212. While it didn’t fix the issue, I gained some backup speed! 🙂

Updating the HP software (agents, providers, HP SMH, WBEM) had no effect.

Disabling the HP providers, and disabling the HP Monitoring, Insight, Management services had no effect whatsoever. Tried different firmware versions, also tried different drivers for the Library and Tape drive, no effect. Tried factory resets, no effect. Tried Library and Tape tools, all tests passed.

Disabled other monitoring software we have in place to monitor software/hardware on clients servers, no effect.


Resolution:

-Uninstalled the HP WBEM Providers and Agents.

-Added a “BusyRetryCount” 32-bit DWORD value of 250 (decimal) to the “Storport” key under “Device Parameters” in all the Tape Library and Tape Drive Registry entries. Example:

[HKEY_LOCAL_MACHINE\SYSTEM\CurrentControlSet\Enum\SCSI\Changer&Ven_HP&Prod_MSL_G3_Series\5&334e8424&0&000500\Device Parameters\Storport]
“BusyRetryCount”=dword:000000fa

This needs to be added to ONLY and ALL the tape device entries (under HKEY_LOCAL_MACHINE\SYSTEM\CurrentControlSet\Enum\SCSI\) for the Tape Library and Tape Drives. You probably will have to create “Storport” key under the devices “Device Parameters” key.

After doing this, the backups run consecutively with absolutely no issues. The event log is CLEAN, and Adamm.log is clean, and the “Faulting application name: wmiprvse.exe” errors in the event log no longer occur.

Fixed!


Additional Notes:

-Both “fixes” were applied at the same time. I believe the WBEM providers/agent caused the Event ID 1000 errors on WMIPRVSE.exe. While the registry keys alone may have possibly resolved the backup issues, I believe there still would have been an underlying issue with WMIPRVSE.exe faulting that could have other consequences.

-I do not believe the original installation of the HP WBEM providers caused the issue, I have a feeling a subsequent Windows Update, Backup Exec update, other module update, or an update to the HP software may have caused the issue to occur at a later time than original install. I do remember we didn’t have an issue with the backups for months, until one day it started occurring.

-I will be re-installing the HP providers and agents at a later time. I will be uninstalling all of them, and re-installing from scratch the latest versions. I will post an update with my results.

-There is a chance the registry key is needed for the HP software to co-exist with Backup Exec backups for this configuration.

-There is a chance that the registry key isn’t needed if you never load the HP software.

Feb 082016
 

For some time now, I’ve been having issues using HP Intelligent Provisioning to update the firmware of my HP Proliant DL360p Gen8 servers. Typically, when configured and when running the firmware update option, it times out saying it cannot connect to HP’s servers.

With the recent separation of HP and HPE (HP Enterprise), I had a feeling this had to do with separation of their FTP server storage which houses all the updates.

Other behaviors when experiencing the issue, messages shown:

Retrieving data, this may take a few minutes…
Looking for updates, this may take a few minutes…
This process is taking longer than expected – Wait or Quit

Keep in mind that version 2.x of HP’s Intelligent Provision package is only for Gen9 (Generation 9) servers. For Gen8 (Generation 8) servers, you need the latest version of 1.x which at this time is 1.62(b) dated August 5th, 2015.

Download this version for your Gen8 servers from HPE’s Support website. After downloading the HPIP162b.2015_0730.43.iso file, burn it to a DVD, or mount it to a virtual media on your iLo connection, and update the software on the server during boot.

After doing this, you will be able to connect and check for firmware. I’m assuming you probably need the updated 2.x image if you’re running a Gen9 server.

HP Intelligent Provisioning Website

HP Intelligent Provisioning Recovery Media (Update Tool) Version 1.62 (b)

Cheers!

Jun 072014
 

I’ve had the HPE MSA 2040 setup, configured, and running for about a week now. Thankfully this weekend I had some time to hit some benchmarks. Let’s take a look at the HPE MSA 2040 benchmarks on read, write, and IOPS.

First some info on the setup:

-2 X HPE Proliant DL360p Gen8 Servers (2 X 10 Core processors each, 128GB RAM each)

-HPE MSA 2040 Dual Controller – Configured for iSCSI

-HPE MSA 2040 is equipped with 24 X 900GB SAS Dual Port Enterprise Drives

-Each host is directly attached via 2 X 10Gb DAC cables (Each server has 1 DAC cable going to controller A, and Each server has 1 DAC cable going to controller B)

-2 vDisks are configured, each owned by a separate controller

-Disks 1-12 configured as RAID 5 owned by Controller A (512K Chunk Size Set)

-Disks 13-24 configured as RAID 5 owned by Controller B (512K Chunk Size Set)

-While round robin is configured, only one optimized path exists (only one path is being used) for each host to the datastore I tested

-Utilized “VMWare I/O Analyzer” (https://labs.vmware.com/flings/io-analyzer) which uses IOMeter for testing

-Running 2 “VMWare I/O Analyzer” VMs as worker processes. Both workers are testing at the same time, testing the same datastore.

Sequential Read Speed:

MSA2040-ReadMax Read: 1480.28MB/sec

Sequential Write Speed:

MSA2040-WriteMax Write: 1313.38MB/sec

See below for IOPS (Max Throughput) testing:

Please note: The MaxIOPS and MaxWriteIOPS workloads were used. These workloads don’t have any randomness, so I’m assuming the cache module answered all the I/O requests, however I could be wrong. Tests were run for 120 seconds. What this means is that this is more of a test of what the controller is capable of handling itself over a single 10Gb link from the controller to the host.

IOPS Read Testing:

MSA2040-MaxIOPSMax Read IOPS: 70679.91IOPS

IOPS Write Testing:

MSA2040-WriteOPSMax Write IOPS: 29452.35IOPS

PLEASE NOTE:

-These benchmarks were done by 2 seperate worker processes (1 running on each ESXi host) accessing the same datastore.

-I was running a VMWare vDP replication in the background (My bad, I know…).

-Sum is combined throughput of both hosts, Average is per host throughput.

Conclusion:

Holy crap this is fast! I’m betting the speed limit I’m hitting is the 10Gb interface. I need to get some more paths setup to the SAN!

Cheers

May 282014
 

In the last few months, my company (Digitally Accurate Inc.) and our sister company (Wagner Consulting Services), have been working on a number of new cool projects. As a result of this, we needed to purchase more servers, and implement an enterprise grade SAN. This is how we got started with the HPE MSA 2040 SAN (formerly known as the HP MSA 2040 SAN), specifically a fully loaded HPE MSA 2040 Dual Controller SAN unit.

The Purchase

For the server, we purchased another HPE Proliant DL360p Gen8 (with 2 X 10 Core Processors, and 128Gb of RAM, exact same as our existing server), however I won’t be getting that in to this blog post.

Now for storage, we decided to pull the trigger and purchase an HPE MSA 2040 Dual Controller SAN. We purchased it as a CTO (Configure to Order), and loaded it up with 4 X 1Gb iSCSI RJ45 SFP+ modules (there’s a minimum requirement of 1 4-pack SFP), and 24 X HPE 900Gb 2.5inch 10k RPM SAS Dual Port Enterprise drives. Even though we have the 4 1Gb iSCSI modules, we aren’t using them to connect to the SAN. We also placed an order for 4 X 10Gb DAC cables.

To connect the SAN to the servers, we purchased 2 X HPE Dual Port 10Gb Server SFP+ NICs, one for each server. The SAN will connect to each server with 2 X 10Gb DAC cables, one going to Controller A, and one going to Controller B.

HPE MSA 2040 Configuration

I must say that configuration was an absolute breeze. As always, using intelligent provisioning on the DL360p, we had ESXi up and running in seconds with it installed to the on-board 8GB micro-sd card.

I’m completely new to the MSA 2040 SAN and have actually never played with, or configured one. After turning it on, I immediately went to HPE’s website and downloaded the latest firmware for both the drives, and the controllers themselves. It’s a well known fact that to enable iSCSI on the unit, you have to have the controllers running the latest firmware version.

Turning on the unit, I noticed the management NIC on the controllers quickly grabbed an IP from my DHCP server. Logging in, I found the web interface extremely easy to use. Right away I went to the firmware upgrade section, and uploaded the appropriate firmware file for the 24 X 900GB drives. The firmware took seconds to flash. I went ahead and restarted the entire storage unit to make sure that the drives were restarted with the flashed firmware (a proper shutdown of course).

While you can update the controller firmware with the web interface, I chose not to do this as HPE provides a Windows executable that will connect to the management interface and update both controllers. Even though I didn’t have the unit configured yet, it’s a very interesting process that occurs. You can do live controller firmware updates with a Dual Controller MSA 2040 (as in no downtime). The way this works is, the firmware update utility first updates Controller A. If you have a multipath (MPIO) configuration where your hosts are configured to use both controllers, all I/O is passed to the other controller while the firmware update takes place. When it is complete, I/O resumes on that controller and the firmware update then takes place on the other controller. This allows you to do online firmware updates that will result in absolutely ZERO downtime. Very neat! PLEASE REMEMBER, this does not apply to drive firmware updates. When you update the hard drive firmware, there can be ZERO I/O occurring. You’d want to make sure all your connected hosts are offline, and no software connection exists to the SAN.

Anyways, the firmware update completed successfully. Now it was time to configure the unit and start playing. I read through a couple quick documents on where to get started. If I did this right the first time, I wouldn’t have to bother doing it again.

I used the wizards available to first configure the actually storage, and then provisioning and mapping to the hosts. When deploying a SAN, you should always write down and create a map of your Storage area Network topology. It helps when it comes time to configure, and really helps with reducing mistakes in the configuration. I quickly jaunted down the IP configuration for the various ports on each controller, the IPs I was going to assign to the NICs on the servers, and drew out a quick diagram as to how things will connect.

Since the MSA 2040 is a Dual Controller SAN, you want to make sure that each host can at least directly access both controllers. Therefore, in my configuration with a NIC with 2 ports, port 1 on the NIC would connect to a port on controller A of the SAN, while port 2 would connect to controller B on the SAN. When you do this and configure all the software properly (VMWare in my case), you can create a configuration that allows load balancing and fault tolerance. Keep in mind that in the Active/Active design of the MSA 2040, a controller has ownership of their configured vDisk. Most I/O will go through only to the main controller configured for that vDisk, but in the event the controller goes down, it will jump over to the other controller and I/O will proceed uninterrupted until your resolve the fault.

First part, I had to run the configuration wizard and set the various environment settings. This includes time, management port settings, unit names, friendly names, and most importantly host connection settings. I configured all the host ports for iSCSI and set the applicable IP addresses that I created in my SAN topology document in the above paragraph. Although the host ports can sit on the same subnets, it is best practice to use multiple subnets.

Jumping in to the storage provisioning wizard, I decided to create 2 separate RAID 5 arrays. The first array contains disks 1 to 12 (and while I have controller ownership set to auto, it will be assigned to controller A), and the second array contains disk 13 to 24 (again ownership is set to auto, but it will be assigned to controller B). After this, I assigned the LUN numbers, and then mapped the LUNs to all ports on the MSA 2040, ultimately allowing access to both iSCSI targets (and RAID volumes) to any port.

I’m now sitting here thinking “This was too easy”. And it turns out it was just that easy! The RAID volumes started to initialize.

VMware vSphere Configuration

At this point, I jumped on to my vSphere demo environment and configured the vDistributed iSCSI switches. I mapped the various uplinks to the various portgroups, confirmed that there was hardware link connectivity. I jumped in to the software iSCSI imitator, typed in the discovery IP, and BAM! The iSCSI initiator found all available paths, and both RAID disks I configured. Did this for the other host as well, connected to the iSCSI target, formatted the volumes as VMFS and I was done!

I’m still shocked that such a high performance and powerful unit was this easy to configure and get running. I’ve had it running for 24 hours now and have had no problems. This DESTROYS my old storage configuration in performance, thankfully I can keep my old setup for a vDP (VMWare Data Protection) instance.

HPE MSA 2040 Pictures

I’ve attached some pics below. I have to apologize for how ghetto the images/setup is. Keep in mind this is a test demo environment for showcasing the technologies and their capabilities.

HPe MSA 2040 SAN - Front Image
HPE MSA 2040 SAN – Front Image
HP MSA 2040 - Side Image
HP MSA 2040 – Side Image
HPe MSA 2040 SAN with drives - Front Right Image
HPE MSA 2040 SAN with drives – Front Right Image
HP MSA 2040 Rear Power Supply and iSCSI Controllers
HPe MSA 2040 Dual Controller - Rear Image
HPE MSA 2040 Dual Controller – Rear Image
HP MSA 2040 Dual Controller SAN - Rear Image
HP MSA 2040 Dual Controller SAN – Rear Image
HPe Proliant DL 360p Gen8 HP MSA 2040 Dual Controller SAN
HP Proliant DL 360p Gen8
HP MSA 2040 Dual Controller SAN
HPe MSA 2040 Dual Controller SAN
HPE MSA 2040 – With Power
HP MSA 2040 - Side shot with power on
HP MSA 2040 – Side shot with power on
HP Proliant DL360p Gen8 - UID LED on
HP Proliant DL360p Gen8 – UID LED on
HP Proliant DL360p Gen8 HP MSA 2040 Dual Controller SAN VMWare vSphere
HP Proliant DL360p Gen8
HP MSA 2040 Dual Controller SAN
VMWare vSphere

Update: HPE has updated the MSA product line and the 2040 has now been replaced by the HPE MSA 2050 SAN Dual Controller SAN. There are now also SSD Cache models such as the HPE MSA 2052 Dual Controller SAN.

May 312013
 

Back in February, I was approached by a company that had multiple offices. They wanted my company to come in and implement a system that allowed them to share information, share files, communicate, use their line of business applications, and be easily manageable.

Just an FYI, I provide Microsoft Small Business Server consulting services, including migrations! For more information, please visit https://www.stephenwagner.com/2020/02/28/microsoft-small-business-server-migration-upgrade/.

The Solution – Microsoft Small Business Server 2011

The first thing that always comes to mind is Microsoft Small Business Server 2011. However, what made this environment interesting is that they had two branch offices in addition to their headquarters all in different cities. One of their branch offices had 8+ users working out of it, and one only had a couple, with their main headquarters having 5+ users.

Usually when administrators think of SBS, they think of a single server (two server with the premium add-on) solution that provides a small business with up to 75 users with a stable, enterprise feature packed, IT infrastructure.

SBS 2011 Includes:

  • Windows Server 2008 R2 Standard
  • Exchange Server 2010
  • Microsoft SharePoint Foundation 2010
  • Microsoft SQL Server 2008 R2 Express
  • Windows Server Update Services
  • (And an additional Server 2008 R2 license with Microsoft SQL Server 2008 R2 Standard if the premium add-on is purchased)

Essentially this is all a small business typically needs, even if they have powerful line of business applications.

Additional Domain Controller on SBS

One misconception about Windows Small Business Server is the limitation of having a single domain controller. IT professionals often think that you cannot have any more domain controllers in an SBS environment. This actually isn’t true. SBS does allow multiple domain controllers, as long as there is a single forest, and not multiple domains. You can have a backup domain controller, and you can have multiple RODCs (Read Only Domain Controller), as long as the primary Active Directory roles stay with the SBS primary domain controller. You can have as many global catalogs as you’d like! As long as you pay for the proper licenses of all the additional servers 🙂

This is where this came in handy. While I’ve known about this for some time, this was the first time I was attempting at putting something like this in to production.

The Plan

The plan was to setup SBS 2011 Premium at the HQ along with a second server at the HQ hosting their SQL, line of business applications, and Remote desktop Services (formerly Terminal Services) applications. Their HQ would be sitting behind an Astaro Security Gateway 220 (Sophos UTM).

The SBS 2011 Premium (2 Servers) setup at the HQ office will provide:

  • Active Directory services
  • DHCP and DNS Services
  • Printing and file services (to the HQ and all branch offices)
  • Microsoft Exchange
  • “My Document” and “Desktop” redirection for client computers/users
  • SQL DB services for LoB’s
  • Remote Desktop Services (Terminal Services) to push applications out in to the field

The first branch office, will have a Windows Server 2008 R2 server, promoted to a Read Only Domain Controller (RODC), sitting behind an Astaro Security Gateway 110. The Astaro Security Gateway’s would establish a site-to-site branch VPN between the two offices and route the appropriate subnets. At the first branch office, there is issues with connectivity (they’re in the middle of nowhere), so they will have two internet connections with two separate ISPs (1 line of sight long range wireless backhaul, and one simple ADSL connection) which the ASG 110 will provide load balancing and fault tolerance.

The RODC at the first branch office will provide:

  • Active Directory services for (cached) user logon and authentication
  • Printing and file services (for both HQ and branch offices)
  • DHCP and DNS services
  • “My Documents” and “Desktop” redirection for client computers/users.
  • WSUS replica server (replicates approvals and updates from WSUS on the SBS server at the main office).
  • Exchange access (via the VPN connection)

Users at the first branch office will be accessing file shares located both on their local RODC, along with file shares located on the HQ server in Calgary. The main wireless backhaul has more then enough bandwidth to support SMB (Samba) shares over the VPN connection. After testing, it turns out the backup ADSL connection also handles this fairly well for the types of files they will be accessing.

The second branch office, will have an Astaro RED device (Remote Ethernet Device). The Astaro/Sophos RED devices, act as a remote ethernet port for your Astaro Security Gateways. Once configured, it’s as if the ASG at the HQ has an ethernet cable running to the branch office. It’s similar to a VPN, however (I could be wrong) I think it uses EoIP (Ethernet over IP). The second branch doesn’t require a domain controller due to the small number of users. As far as this branch office goes, this is the last we’ll talk about it as there’s no special configuration required for these guys.

The second branch office will have the following services:

  • DHCP (via the ASG 220 in Calgary)
  • DNS (via the main HQ SBS server)
  • File and print services (via the HQ SBS server and other branch server)
  • “My Document” and “Desktop” redirection (over the WAN via the HQ SBS server)
  • Exchange access (via the Astaro RED device)

Hardware

For all the servers, we chose HP hardware as always! The main SBS server, along with the RODC were brand new HP Proliant ML350p Gen8s. The second server at the HQ (running the premium add-on) is a re-purposed HP ML110 G7. I always configure iLo on all servers (especially remote servers) just so I can troubleshoot issues in the event of an emergency if the OS is down.

Implemenation

I’ll explain how this was all implemented.

  1. Configure and setup a typical SBS 2011 environment. I’m going to assume you already know how to do this. You’ll need to install the OS. Run through the SBS configuration wizards, enable all the proper firewall rules, configure users, install applicable server applications, etc…
  2. Configure the premium add-on. Install the Remote Desktop Services role (please note that you’ll need to purchase RDS CAL’s as they aren’t included with SBS). You can skip this step if you don’t plan on using RDS or the premium server at the main site.
  3. Configure all the Astaro devices. Configure a Router to Router VPN connection. Create the applicable firewall rules to allow traffic. You probably know this, but make sure both networks have their own subnet and are routing the separate subnets properly.
  4. Install Windows Server 2008 R2 on to the target RODC box (please note, in my case, I had to purchase an additional Server 2008 license since I was already using the premium add-on at the HQ site. (If you purchase the premium add-on, but aren’t using it at your main office, you can use this license at the remote site).
  5. Make sure the VPN is working and the servers can communicate with each other.
  6. Promote the target RODC to a read only domain controller. You can launch the famous dcpromo. Make sure you check the “Read Only domain controller” option when  you promote the server.
  7. You now have a working environment.
  8. Join computers using the SBS connect wizard. (DO NOT LOG ON AS THE REMOTE USERS UNTIL YOU READ THIS ENTIRE DOCUMENT)

I did all the above steps at my office and configured the servers before deploying them at the client site.

You essentially have a working basic network. Now to get to the tricky stuff! This tricky stuff is to enable folder redirection at the branch site to their own server (instead of the SBS server), and get them their own WSUS replica server.

Now to the fancy stuff!

1. Installing WSUS on the RODC using the add role feature in Windows Server: You have to remember that RODC’s are exactly what they say! !READ ONLY! (As far as Active directory goes)! Installing WSUS on a RODC will fail off the bat. It will report that access is denied when trying to create certain security groups. You’ll have to manually create these two groups in Active Directory on your primary SBS server to get it to work:

  • SQLServer2005MSFTEUser$RODCSERVERNAME$Microsoft##SSEE
  • SQLServer2005MSSQLUser$RODCSERVERNAME$Microsoft##SSEE

Replace RODCSERVERNAME with the computer name of your RODC Server. You’ll actually notice that two similiar groups already exist (with the server name different) for the existing Windows SBS WSUS install, this existing groups are for the main WSUS server. After creating these groups, this will allow it to install. After this is complete, follow through the WSUS configuration wizard to configure it as a replica for your primary SBS WSUS server.

2. One BIG thing to keep in mind is that with RODC’s you need to configure what accounts (both user and computer) are allowed to be “cached”. Cached credentials allow the RODC to authenticate computers and users in the event the primary domain controller is down. If you do not configure this, if the internet goes down, or the primary domain controller isn’t available, no one will be able to log in to their computers or access network resources at the branch site. When you promoted the server to a RODC, two groups were created in Active Directory: Allow RODC Cached Logins, and Deny RODC Cached Logins (I could be wrong on the exact name since I’m going off memory). You can’t just select and add users to these groups, you need to also select and add the computers they use as well since computers have their own “computer account” in Active Directory.

To overcome this, create two security groups under their respective existing groups. One group will be for users of the branch office, the other group will be for computers of the branch office. Make sure to add applicable users and groups as members of the security groups. Now go to the “Allow RODC Cached Logins” group created by the dc promotion, and add those two new security groups to that group. This will allow remote users and remote computers to authenticate using cached security credentials. PLEASE NOTE: DO NOT CACHE YOUR ADMINISTRATIVE ACCOUNT!!! Instead, create a separate administrative account for that remote office and cache that.

3. One of the sweet things about SBS is all the pre-configured Group policy objects that enable the automatic configuration of the WSUS server, folder redirection, and a bunch of other great stuff. You have to keep in mind that off of the above config, if left alone up to this point, the computers in the branch office will use the folder redirection settings and WSUS settings from the main office. Remote users folder redirection (whatever you have selected, in my case My Documents and Desktop redirection) locations will be stored on the main HQ server. If you’re alright with this and not concerned about the size of the user folders, you can leave this. What I needed to do (for reasons of simple disaster recovery purposes) is have the folder re-directions for the branch office users store the redirection on their own local branch server. Also, we need to have the computers connect to the local branch WSUS server as well (we don’t want each computer pulling updates over the VPN connection as this will use up tons of bandwidth). What’s really neat is when users open applications via RemoteApp (over RDS), if they export files to their desktop inside of RemoteApp, it’ll actually be immediately available on their computer desktop since the RDS server is using these GPOs.

To do this, we’ll need to duplicate and modify a couple of the default GPOs, and also create some OU (Organizational Unit) containers inside of Active Directory so we can apply the new GPOs to them.

First, under “SBSComputers” create an OU called “Branch01Comps” (or call it whatever you want). Then under “SBSUsers” create an OU called “Branch01Users”. Now keep in mind you want to have this fully configured before any users log on for the first time. All of this configuration should be done AFTER the computer is joined (using the SBS connect) to the domain and AFTER the users are configured, but BEFORE the user logs in for the first time. Move the branch office computer accounts to the new Branch office computers OU, and move the Branch office user accounts to the Branch office users OU.

Now open up the Group policy Management Management Console. You want to duplicate 2 GPOs: Update Services Common Settings Policy (rename the duplicate to “Branch Update Services Common Settings Policy” or something), and Small Business Server Folder Redirection Policy (rename the duplicate to “Branch Folder Redirection” or something).

Link the new duplicated Update Services policy to the Branch Computers OU we just created, and link the new duplicated folder redirection to the new users policy we just created.

Modify the duplicated server update policy to reflect the address of the new branch WSUS replica server. Computers at the branch office will now pull updates from that server.

As for Folder redirection, it’s a bit tricky. You’ll need to create a share (with full share access to all users), and then set special file permissions on the folder that you shared (info available at http://technet.microsoft.com/en-us/library/cc736916%28v=ws.10%29.aspx). On top of that, you’ll need to find a way to actually create the child users folders under that share/folder in which you created. I did this by going in to active directory, opening each remote user, and setting their profile variable to the file share. When I hit apply this would create a folder with their username with the applicable permissions under that share, after this was done, I would undo that variable setting and the directory created would stay. Repeat this for each remote user at that specific branch office. You’ll also need to do this each time you add a new user if they bring on more staff, you’ll also need to add all new computers and new users to the appropriate OUs, and security groups we’ve created above.

FINALLY you can now go in to the GPO you duplicated for Branch Folder redirection. Modify the GPO to reflect the new storage path for the redirection objects you want (just a matter of changing the server name).

4. Configure Active Directory Sites and Services. You’ll need to go in to Active Directory Sites and Services and configure sites for each subnet you have (you main HQ subnet, branch 1 subent, and branch 2 subnet), and set the applicable domain controller to those sites. In my case, I created 3 sites, and configured the HQ subnet and second branch to authenticate off the main SBS PDC, and configured the first branch (with their own RODC) to authenticate off their own RODC. Essentially, this tells the computers which domain controller they should be authenticating against.

And you’re done!

A few things to remember, whenever adding new users and/or computers to the branch, ALWAYS join using SBS wizard, add computer to the branch OU, add user to the branch OU, create the users master redirection folder using the profile var in the AD user object, and separately add both user and computer accounts as members of the security group we created to cache credentials.

And remember, always always always test your configuration before throwing it out in to production. In my case, I got it running first try without any problems, but I let it run as a test environment for over a month before deploying to production!

We’ve had this environment running for months now and it’s working great. What’s even cooler is how well the Astaro Security Gateway (Sophos UTM) is handling the multiple WAN connections during failures, it’s super slick!