
We all know that vMotion is awesome, but what is even more awesome? Optimizing VMware vMotion to make it redundant and faster!
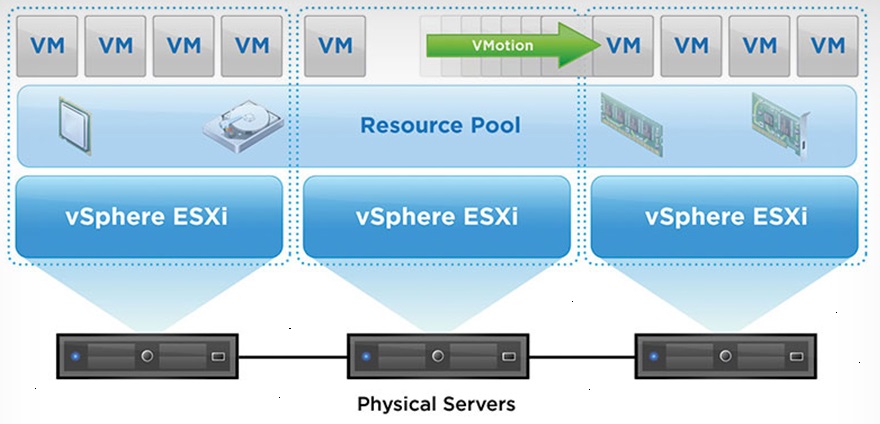
vMotion allows us to migrate live Virtual Machines from one ESXi host to another without any downtime. This allows us to perform physical maintenance on the ESXi hosts, update and restart the hosts, and also load balance VMs across the hosts. We can even take this a step further use DRS (Distributed Resource Scheduler) automation to intelligently load the hosts on VM boot and to dynamically load balance the VMs as they run.
In this post, I’m hoping to provide information on how to fully optimize and use vMotion to it’s full potential.
VMware vMotion
Most of you are probably running vMotion in your environment, whether it’s a homelab, dev environment, or production environment.
I typically see vMotion deployed on the existing data network in smaller environments, I see it deployed on it’s own network in larger environments, and in very highly configured environments I see it being used with the vMotion TCP stack.
While you can preform a vMotion with 1Gb networking, you certainly almost always want at least 10Gb networking for the vMotion network, to avoid any long running VMs. Typically most IT admins are happy with live migration vMotion’s in the seconds, and not the minutes.
VMware vMotion Optimization
So you might ask, if vMotion is working and you’re satisfied, what is there to optimize? There’s actually a few things, but first let’s talk about what we can improve on.
We’re aiming for improvements with:
- Throughput/Speed
- Faster vMotion
- Faster Speed
- Less Time
- Migrate more VMs
- Evacuate hosts faster
- Enable more aggressive DRS
- Migrate many VMs at once very quickly
- Faster vMotion
- Redundancy
- Redundant vMotion Interfaces (NICs and Uplinks)
- More Complex vMotion Configurations
- vMotion over different subnets and VLANs
- vMotion routed over Layer 3 networks
- vMotion over different subnets and VLANs
To achieve the above, we can focus on the following optimizations:
- Enable Jumbo Frames
- Saturation of NIC/Uplink for vMotion
- Multi-NIC/Uplink vMotion
- Use of the vMotion TCP Stack
Let’s get to it!
Enable Jumbo Frames
I can’t stress enough how important it is to use Jumbo Frames for specialized network traffic on high speed network links. I highly recommend you enable Jumbo Frames on your vMotion network.
Note, that you’ll need to have a physical switch and NICs that supports Jumbo frames.
In my own high throughput testing on a 10Gb link, without using Jumbo frames I was only able to achieve transfer speeds of ~6.7Gbps, whereas enabling Jumbo Frames allowed me to achieve speeds of ~9.8Gbps.
When enabling this inside of vSphere and/or ESXi, you’ll need to make sure you change and update the applicable vmk adapter, vSwitch/vDS switches, and port groups. Additionally as mentioned above you’ll need to enable it on your physical switches.
Saturation NIC/Uplink for vMotion
You may assume that once you configure a vMotion enabled NIC, that when performing migrations you will be able to fully saturate it. This is not necessarily the case!
When performing a vMotion, the vmk adapter is bound to a single thread (or CPU core). Depending on the power of your processor and the speed of the NIC, you may not actually be able to fully saturate a single 10Gb uplink.
In my own testing in my homelab, I needed to have a total of 2 VMK adapters to saturate a single 10Gb link.
If you’re running 40Gb or even 100Gb, you definitely want to look at adding multiple VMK adapters to your vMotion network to be able to fully saturate a single NIC or Uplink.
You can do this by simply configuring multiple VMK adapters per host with different IP addresses on the same subnet.
One important thing to mention is that if you have multiple physical NICs and Uplinks connected to your vMotion switch, this change will not help you utilize multiple physical interfaces (NICs/Uplinks). See “Multi-NIC/Uplink vMotion”.
Please note: As of VMware vSphere 7 Update 2, the above is not required as vMotion has been optimized to use multiple streams to fully saturate the interface. See VMware’s blog post “Faster vMotion Makes Balancing Workloads Invisible” for more information.
Multi-NIC/Uplink vMotion
Another situation is where we may want to utilize multiple NICs and Uplinks for vMotion. When implemented correctly, this can provide load balancing (additional throughput) as well as redundancy on the vMotion network.
If you were to simply add additional NIC interfaces as Uplinks to your vMotion network, this would add redundancy in the event of a failover but it wouldn’t actually result in increased speed or throughput as special configuration is required.
To take advantage of the additional bandwidth made available by additional Uplinks, we need to specially configure multiple portgroups on the switch (vSwitch or vDS Distributed Switch), and configure each portgroup to only use one of the Uplinks as the “Active Uplink” with the rest of the uplinks under “Standby Uplink”.
Example Configuration
- vSwitch or vDS Switch
- Portgroup 1
- Active Uplink: Uplink 1
- Standby Uplinks: Uplink 2, Uplink 3, Uplink 4
- Portgroup 2
- Active Uplink: Uplink 2
- Standby Uplinks: Uplink 1, Uplink 3, Uplink 4
- Portgroup 3
- Active Uplink: Uplink 3
- Standby Uplinks: Uplink 1, Uplink 2, Uplink 4
- Portgroup 4
- Active Uplink: Uplink 4
- Standby Uplinks: Uplink 1, Uplink 2, Uplink 3
- Portgroup 1
You would then place a single or multiple vmk adapters on each of the portgroups per host, which would result in essentially mapping the vmk(s) to the specific uplink. This will allow you to utilize multiple NICs for vMotion.
And remember, you may not be able to fully saturate a NIC interface (as stated above) with a single vmk adapter, so I highly recommend creating multiple vmk adapters on each of the Port groups above to make sure that you’re not only using multiple NICs, but that you can also fully saturate each of the NICs.
For more information, see VMware’s KB “Multiple-NIC vMotion in vSphere (2007467)“.
Use of the vMotion TCP Stack
VMware released the vMotion TCP Stack to provided added security to vMotion capabilities, as well as introduce vMotion over multiple subnets (routed vMotion over layer 3).
Using the vMotion TCP Stack, you can isolate and have the vMotion network using it’s own gateway separate from the other vmk adapters using the traditional TCP stack on the ESXi host.
This stack is optimized for vMotion.
Please note, that troubleshooting processes may be different when Troubleshooting vMotion using the vMotion TCP/IP Stack (click the link for my blog post on troubleshooting).
For more information, see VMware’s Documentation on “vMotion TCP/IP Stack“.
[…] short, the faster we migrate the VM, the less the STUN Time will be. Check out my blog post on Optimizing VMware vMotion which includes how to perform the above […]
Great blog man.
Thanks Ray!