Dec 082016
 

So you just completed your migration from an earlier version of vSphere up to vSphere 6.5 (particularly vCenter 6.5 Virtual Appliance). When trying to log in to the vSphere web client, you receive numerous “The VMware enhanced authentication plugin has updated it’s SSL certificate in Firefox. Please restart Firefox.”. You’ll usually see 2 of these messages in a row on each page load.

You’ll also note that the “Enhanced Authentication Plugin” doesn’t function after the install (it won’t pull your Active Directory authentication information).

To resolve this:

Uninstall all vSphere plugins from your workstation. I went ahead and uninstalled all vSphere related software on my workstation, this includes the deprecated vSphere C# client application, all authentication plugins, etc… These are all old.

Open up your web browser and point to your vCenter server (https://vCENTERSERVERNAME), and download the “Trusted root CA certificates” from VMCA (VMware certificate authority).

Download and extract the ZIP file. Navigate through the extracted contents to the windows certs. These root CA certificates need to be installed to your “Trusted Root Certification Authorities” store on your system, and make sure you skip the “Certificate Revocation List” file which ends in a “.r0”.

To install them, right click, choose “Install Certificate”, choose “Local Machine”, yes to UAC prompt, then choose “Place all certificates in the following store”, browse, and select “Trusted Root Certification Authorities”, and finally finish. Repeat for each of the certificates. Your workstation will now “trust” all certificates issued by your VMware Certificate Authority (VMCA).

You can now re-open your web browser, download the “Enhanced Authentication Plugin” from your vCenter instance, and install. After restarting your computer, the plugin should function and the messages will no longer appear.

Leave a comment!

Dec 072016
 

Well, I start writing this post minutes after completing my first vSphere 6.0 upgrade to vSphere 6.5, and as always with VMware products it went extremely smooth (although with any upgrade there are minor hiccups).

Thankfully with the evolution of virtualization technology, upgrades such as the upgrade to vSphere 6.5 is such a massive change to your infrastructure, yet the process is extremely simplified, can be easily rolled out, and in the event of problems has very simple clear paths to revert back and re-attempt. Failed upgrades usually aren’t catastrophic, and don’t even affect production environments.

Whenever I do these vSphere upgrades, I find it funny how you’re making such massive changes to your infrastructure with each click and step, yet the thought process and understanding behind it is so simple and easy to follow. Essentially, after one of these upgrades you look back and think: “Wow, for the little amount of work I did, I sure did accomplish a lot”. It’s just one of the beauties of virtualization, especially holding true with VMware products.

To top it all off you can complete the entire upgrade/migration without even powering off any of your virtual machines. You could do this live, during business hours, in a production environment… How cool is that!

Just to provide some insights in to my environment, here’s a list of the hardware and configuration:

-2 X HPE Proliant DL360p Gen8 Servers (each with dual processors, and each with 128GB RAM, no local storage)

-1 X HPE MSA2040 Dual Controller SAN (each host has multiple connections to the SAN via 10Gb DAC iSCSI, 1 connection to each of the dual controllers)

-VMware vSphere 6.0 running on Windows Virtual Machine (Windows Server 2008 R2)

-VMware Update Manager (Running on the same server as the vCenter Server)

-VMware Data Protection (2 x VMware vDP Appliances, one as a backup server, one as a replication target)

-VMware ESXi 6.0 installed on to SD-cards in the servers (using HPE Customized ESXi installation)

One of the main reasons why I was so quick to adopt and migrate to vSphere 6.5, was I was extremely interested in the prospect of migrating a Windows based vCenter instance, to the new vCenter 6.5 appliance. This is handy as it simplifies the environment, reduces licensing costs and requirements, and reduces time/effort on server administration and maintenance.

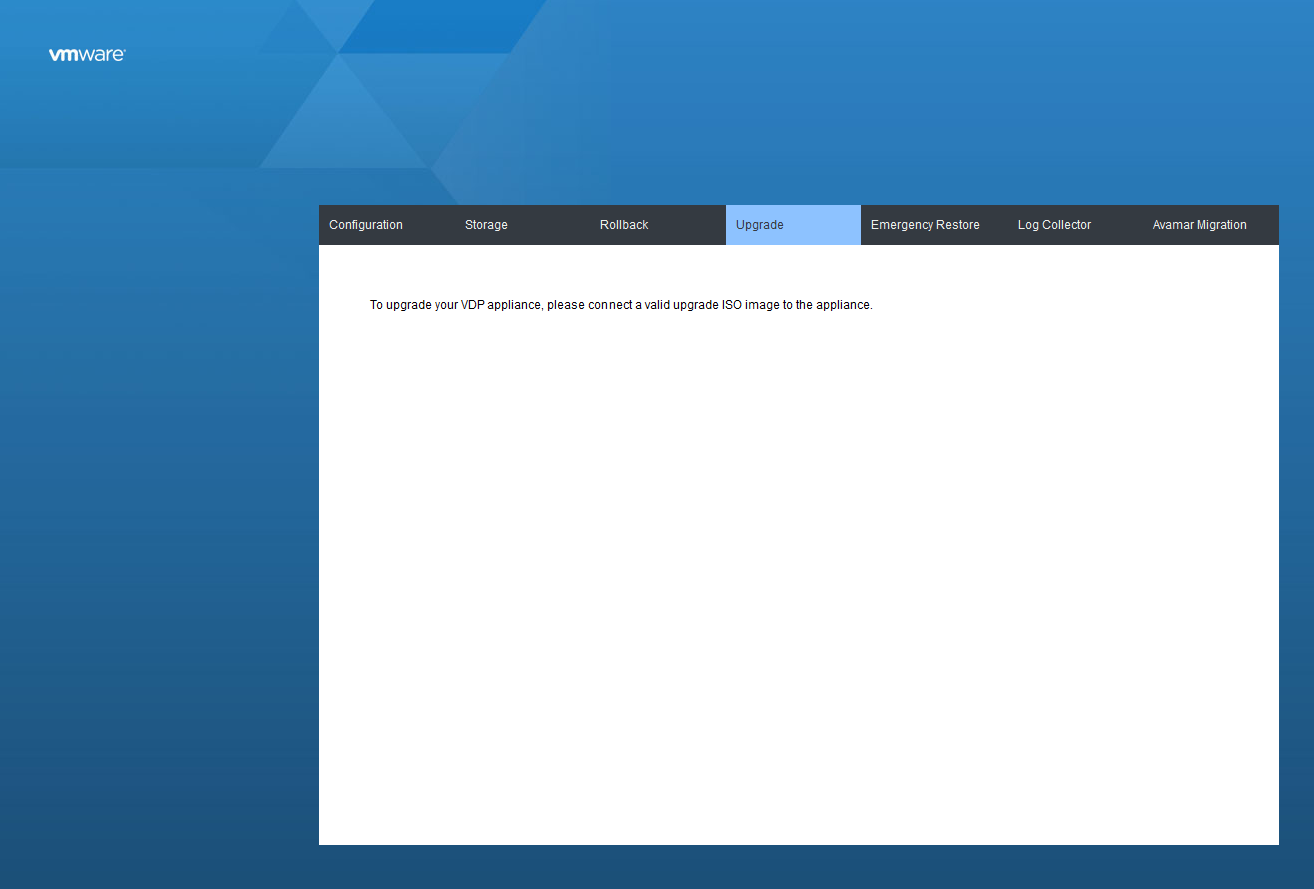
First and foremost, following the recommended upgrade path (you have to specifically do the upgrades and migrations for all the separate modules/systems in a certain order), I had to upgrade my vDP appliances first. For vDP to support vCenter 6.5, you must upgrade your vDP appliances to 6.1.3. As with all vDP upgrades, you must shut down the appliance, mark all the data disks as dependent, take a snapshot, and mount the upgrade ISO, and then boot and initiate the upgrade from the appliance web interface. After you complete the upgrade and confirm the appliance is functioning, you shut down the appliance, remove the snapshot, mark all data disks as independent (except the first Virtual disk, you only mark virtual disk 2+ and up as independent), and you’re done your upgrade.

A note on a problem I dealt with during the upgrade process for vDP to version 6.1.3 (appliance does not detect mounted ISO image) can be found here: http://www.stephenwagner.com/?p=1107

Moving on to vCenter! VMware did a great job with this. You load up the VMware Migration Assistant tool on your source vCenter server, load up the migration/installation application on a separate computer (the workstation you’re using), and it does the rest. After prepping the destination vCenter appliance, it exports the data from the source server, copies it to the destination server, shuts down the source VM, and then imports the data to the destination appliance and takes over the role. It’s the coolest thing ever watching this happen live. Upon restart, you’ve completed your vCenter Server migration.

A note on a problem I dealt with during the migration process (which involved exporting VMware Update Manager from the source server) can be found here: http://www.stephenwagner.com/?p=1115

And as for the final step, it’s now time to upgrade your ESXi hosts to version 6.5. As always, this is an easy task with VMware Update Manager, and can be easily and quickly rolled out to multiple ESXi hosts (thanks to vMotion and DRS). After downloading your ESXi installation ISO (in my case I use the HPE customized image), you upload it in to your new VMware Update Manager instance, add it to an upgrade baseline, and then attach the baseline to your hosts. To push this upgrade out, simply select the cluster or specific host (depending on if you want to rollout to a single host, or multiple at once), and remediate! After a couple restarts the upgrade is done.

A note on a problem I dealt with during ESXi 6.5 upgrade (conflicting VIBs marking image as incompatible when deploying HPE customized image) can be found here: http://www.stephenwagner.com/?p=1120

After all of the above, the entire environment is now running on vSphere 6.5! Don’t forget to take a backup before and after the upgrade, and also upgrade your VM hardware versions to 6.5 (VM compatibility version), and upgrade VMware tools on all your VMs.

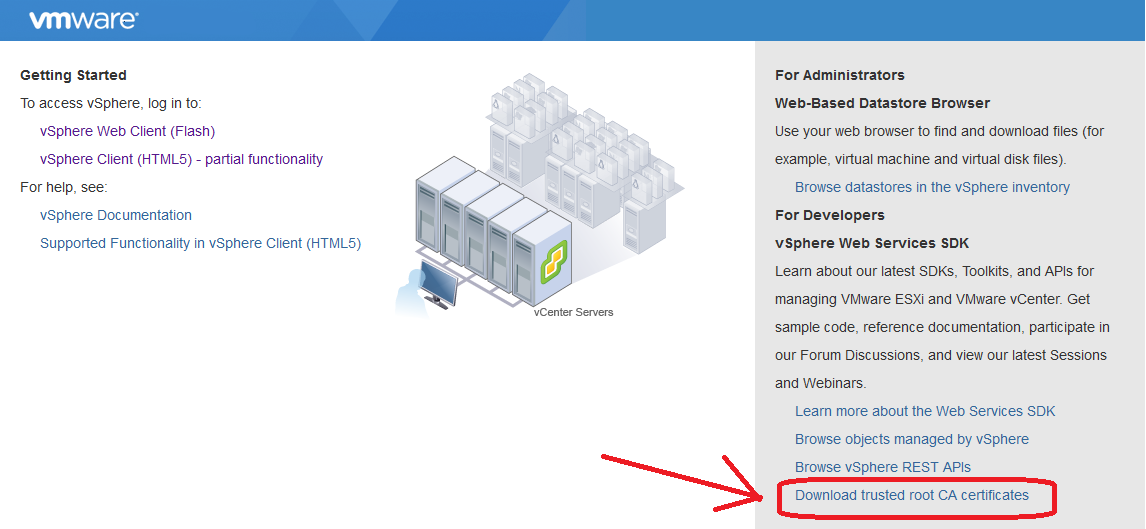
Make sure to visit https://YOURVCENTERSERVER to download the VMware Certificate Authority (VMCA) root certificates, and add them to the “Trusted Root Certification Authorities” on your workstation so you can validate all the SSL certs that vCenter uses. Also, note that the vSphere C# client (the windows application) has been deprecated, and you now must use the vSphere Web Client, or the new HTML5 web client.

Happy Virtualizing! Leave a comment!

Dec 072016
 

When upgrading VMware vSphere and your ESXi hosts to version 6.5, 6.7, or 7.0, you may experience an error similar to:

"The upgrade contains the following set of conflicting VIBs: Mellanox_bootbank_net.XXXXversionnumbersXXXX. Remove the conflicting VIBs or use Image Builder to create a custom ISO."

This is due to conflicting VIBs on your ESXi host. This post will go in to detail as to what causes it, and how to resolve it.

The issue

After successfully completing the migration from vCenter 6.0 (on Windows) to the vCenter 6.5 Appliance, all I had remaining was to upgrade my ESXi hosts to ESXi 6.5.

In my test environment, I run 2 x HPE Proliant DL360p Gen8 servers. I also have always used the HPE customized ESXi image for installs and upgrades.

It was easy enough to download the customized HPE installation image from VMware’s website, I then loaded it in to VMware Update Manager on the vCenter appliance, created a baseline, and was prepared to upgrade the hosts.

I successfully upgraded one of my hosts without any issues, however after scanning on my second host, it reported the upgrade as incompatible and stated: “The upgrade contains the following set of conflicting VIBs: Mellanox_bootbank_net.XXXXversionnumbersXXXX. Remove the conflicting VIBs or use Image Builder to create a custom ISO.”

The fix

I checked the host to see if I was even using the Mellanox drivers, and thankfully I wasn’t and could safely remove them. If you are using the drivers that are causing the conflict, DO NOT REMOVE them as it could disconnect all network interfaces from your host. In my case, since they were not being used, uninstalling them would not effect the system.

I SSH’ed in to the host and ran the following commands:

esxcli software vib list | grep Mell

(This command above shows the VIB package that the Mellanox driver is inside of. In my case, it returned “net-mst”)

esxcli network nic list

(This command above verifies which drivers you are using on your network interfaces on the host)

esxcli software vib remove -n net-mst

(This command above removes the VIB that contains the problematic driver)
After doing this, I restarted the host, scanned for upgrades, and successfully applied the new vCenter 6.5 ESXi Customized HPE image.

Hope this helps! Leave a comment!

Dec 072016
 

During my first migration from VMware vCenter 6.0 to VMware vCenter 6.5 Virtual appliance, the migration failed. The migration installation UI would shutdown the source VM, and numerous errors would occur afterwards when the destination vCenter appliance would try finishing configuration.

If you were monitoring the source vCenter server, during the export process, one would notice that an error pops up while compressing the source data. The error presented is generated from Windows creating an archive (zip file), the error reads: “The compressed (zipped) folder is invalid or corrupted.”. The entire migration process halts until you dismiss this message, with the entire migration ultimately failing (at first it appears to continue, but ultimately fails).

If you continued, and had the migration fail. You’ll need to power off the failed (new) vCenter appliance (it’s garbage now), and you’ll need to power on the source (original) vCenter server. The active directory trust will no longer exist at this point, so you’ll need to log on with a local (non-domain) account (on the source server), and re-create the computer trust on the domain using the netdom command:

netdom resetpwd /s:SERVERNAMEOFDOMAINCONTROLLER /ud:DOMAIN\ADMINACCOUNT /pd:*

After re-creating the trust, restart the original vCenter server. You have now reverted to your original vCenter instance and can retry the migration.

Now back to the main issue. I tried a bunch of different things and wasted an entire evening (checking character lengths on paths/filenames, trying different settings, pausing processes in case timeouts were being hit, etc…) however finally I noticed that the compression archive would crash/fail on a file called “vum_registry”.

VUM brings VMware Update Manager to mind, which I do have installed, configured, and running.

I went ahead and uninstalled VMware Update Manager off my source server (as it’s easy enough to re-configure from scratch after the migration). I then proceeded to initiate a migration. To my surprise, the “data to migrate” went from 7.9GB to 2.4GB. This is a huge sign that something was messed up with my VMware update manager deployment (even though it was working fine). I’m assuming there were either filenames that were too long (exceeded the 260 character limit on paths and filenames), special characters were being used where they shouldn’t, or something else was messed up.

After the uninstall of Update Manager, the migration completed successfully. Leave a comment!

Dec 052016
 

In the process of prepping my test environment so I can upgrade from vSphere 6.1 to 6.5, one of the prerequisites is to first upgrade your VDP appliances to version 6.1.3 (6.1.3 is the only version of VDP that supports vSphere 6.5). In my environment I’ll be upgrading VDP from 6.1.2 to 6.1.3.

After downloading the ISO, changing my disks to dependant, creating a snapshot, and attaching the ISO to the VM. My VDP appliances would not recognize the ISO image, showing the dreaded: “To upgrade your VDP appliance, place connect a valid upgrade ISO image to the appliance.”.

NoISODetected

I tried a few things, including trying the old “patch” that was issues for 6.1 when it couldn’t detect, unfortunately it didn’t help. I also tried to manually mount the virtual CD-Rom to the mountpoint but had no luck. The mountpoint /mnt/auto/cdrom is locked by the autofs service. If you try to modify these files (such as delete, create, etc…), you’ll encounter a bunch of errors and have no luck (permission denied, file and/or directory doesn’t exist, etc…).

Essentially the autofs service was not auto-mounting the virtual CD drive to the mount point.

To fix this:

  1. SSH in to the VDP appliance
  2. Run command “sudo su” to run commands as root
  3. Use vi to edit the auto.mnt file using command: “vi /etc/auto.mnt”
  4. At the end of the first line in the file, you will see “/dev/cdrom” (without quotation), change this to “/dev/sr0” (again, without quotation)
  5. Save the file (after editing the text, Ctrl+c, then type “:w” and enter which writes the file, then type “:q” then enter to quit vi.
  6. Reload the autofs config using command: “/etc/init.d/autofs reload”
  7. At the shell, run “mount” to show the active mountpoints, you’ll notice the ISO is now mounted after a few seconds.
  8. You can now initiate the upgrade. Start it.
  9. At 71%, autofs updates via a RPM, and the changes you made to the config are cleared. IMMEDIATELY edit the /etc/auto.mnt file again, change “/dev/cdrom” to “/dev/sr0” and save the file, and issue the command “/etc/init.d/autofs reload”. Do this as fast as possible.
  10. You’re good to go, the install will continue and take some time. The web interface will fail, and become unresponsive. Simply wait, and the vDP appliance will eventually shut down (in my case it took over 30 minutes after the web interface failed to reconnect, in a high performance environment for the vDP VM to shut down).

And done! Leave a comment!