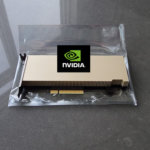
Here’s a fun quick VDI Gaming Demo with NVIDIA vGPU and Omnissa Horizon 8, using an NVIDIA L4 GPU and the L4-12Q Profile.
This video is just for fun, and is just to show some of the capabilities of the technology, hardware, and software, in this case, with Cloud Gaming.
The NVIDIA vGPU solution provides the ability to “slice” and create multiple Virtual GPU (vGPU) devices for your Virtual Machines and Virtual workloads.
In this video:
Quick Introduction to NVIDIA vGPU with Omnissa Horizon 8
When deploying NVIDIA vGPU across a VDI environment, I often see IT teams deploy the licensing token directly on the persistent VMs, or on the non-persistent base golden image. This often causes a nightmare when the client activation token must be updated.
I highly recommend considering network placement of the NVIDIA vGPU Licensing Client Configuration token file for your deployments.
In this post we’ll review the Client Configuration Token File, why you’d want to place it on the network, and how to do so.
What is the Client Configuration Token File
The Client Configuration Token File, tells the NVIDIA vGPU driver on your VM where to find the licensing server information. This token will point the driver to either the CLS or DLS licensing server and request the applicable license to be issued.
By default, the vGPU driver will check the following location for the token:
While this is common, there’s a much better (and easier) method that you can use to deploy the Client Configuration Tokens, using Network Shares, to ease management of these files.
Placing the NVIDIA vGPU Licensing client configuration token on a network share
Using the Windows Registry, along with a GPO (Group Policy Object), you can configure a network location for the NVIDIA Client Configuration Token, so that your systems whether Persistent or Non-Persistent will use this location.
In the event of a token change, you can simply delete and remove the old token, and place a new configuration token, and all the systems will have immediate access to it, without manually updating individual systems.
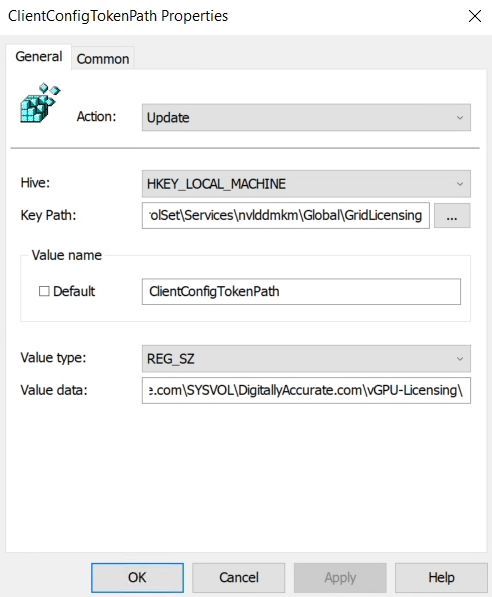
Here we’ll use the registry and a GPO to configure the token location:
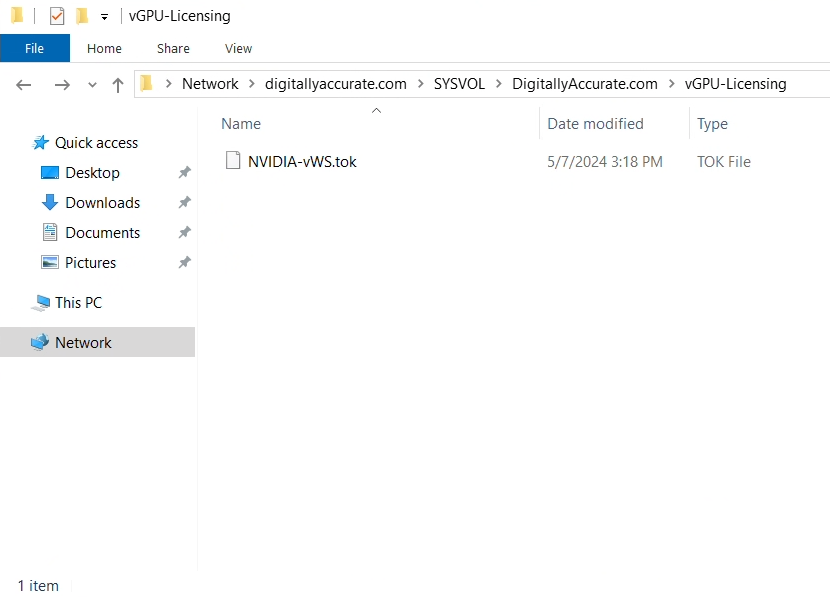
Using an administrative account, create a folder called “vGPU-Licensing” on your domain SYSVOL share.
Value Data: \\Domain.com\SYSVOL\Domain.com\vGPU-Licensing
Change the network location to match your environment and your setup
After populating the fields, it should be similar to the following example:
Hit Apply, then Ok, then link the newly created GPO to the OU where your VDI VM guests are located with NVIDIA vGPU.
That’s it! All we did was created a GPO which configures the Registry key “ClientConfigTokenPath” inside of HKEY_LOCAL_MACHINE\SYSTEM\CurrentControlSet\Services\nvlddmkm\Global\GridLicensing\ and set it to a network share that has the configuration tokens.
Please note, the NVIDIA licensing service accesses the network location using the services security context (not the user’s context), which is why I chose the SYSVOL share, as the computer accounts have read access to this location (example, reading the GPOs on boot and user logon).
Additionally, note that the registry key and location may vary if you’re using older versions of the NVIDIA vGPU Driver. The key used in this post is for versions 16.x and 17.x.
You may notice a frozen session or frozen screen with NVIDIA vGPU, Windows 11, and Omnissa Horizon (formerly VMware Horizon) in your VDI environment.
While I’ve mostly observed this issue using non-persistent Instant Clones with vGPU on Windows 11 23H2, I have also noticed issues and anomalies with persistent VMs as well.
I’ve noticed this issue across multiple customer environments, and was able to replicate it in my own environment. I’ll go over the problem and solution below.
The Problem
This issue occurs due to the combination of hardware being used, the VMware SVGA driver, a secondary “Virtual Display”, and the resolution being set during logon and initialization of the VMware Horizon VDI session.
When a user logs on, the resolutions are set across all virtual displays. There is an issue where due to a timeout (observed in log files), the resolution cannot be set, resulting in a session that either appears to be frozen, or if active, the interactive cursor is actually off-set from the visible display (your mouse is somewhere else, other than where it’s being displayed).
The Solution
In my troubleshooting, I’ve identified the following solutions:
Solution #1
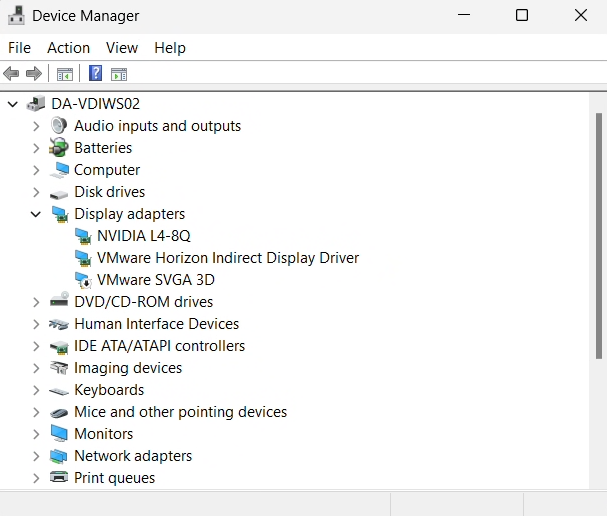
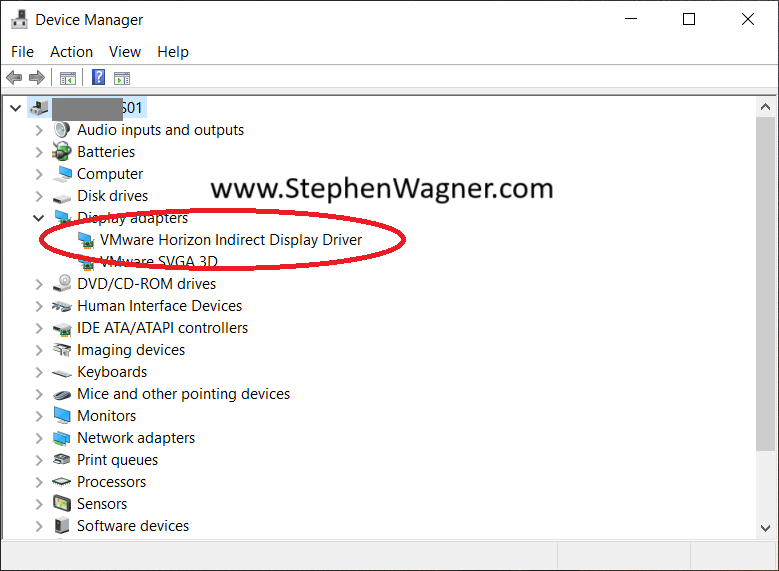
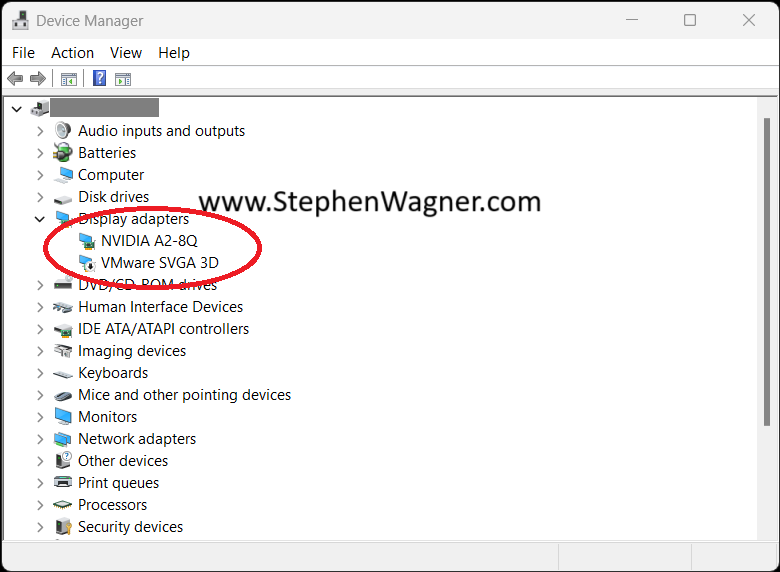
To resolve this issue, disable the “VMware SVGA 3D” Display Adapter in the Windows Explorer (as shown below). Simply right-click on “VMware SVGA 3D” and set to Disabled.
After disabling this Display Adapter, you’ll noticed the issue will be resolved, and you’ll also notice your VDI sessions are established very quickly (including initializing the resolutions with vGPU).
If you’re using non-persistent VDI (VMware Horizon Instant Clones), you’ll need to perform this on your base image.
Note: By disabling this adapter, you will lose the ability to use the VMware Console on VMware vSphere vCenter. To gain console access, you’ll either need to enable the VMware SVGA 3D adapter in a VDI session, or remove the vGPU adapter.
Solution #2
Another solution is to force the VDI session to use the VMware Horizon Indirect Display Driver.
Open Windows Registry and navigate to the following location: HKLM\Software\Policies\VMware, Inc.\VMware Blast\Config
Create a new Registry String (REG_SZ) called “PixelProviderForceViddCapture” and set it to: 1
Note: If you force the use of the VMware Horizon Indirect Display Driver as your Primary Display Driver, you may run in to GPU issues with the VMware Horizon Indirect Display Driver where the capabilities of your NVIDIA vGPU may not be detected by your applications that require the features and capabilities that come from an NVIDIA GPU.
Normally, any VMs that are NVIDIA vGPU enabled have to be manually migrated with manual vMotion if a host is placed in to maintenance mode, to evacuate the host. While we may have grown accustomed to this, there is a better way, with vGPU Enabled VM DRS Evacuation during Maintenance mode!
A new feature that was introduced with vSphere 7.0 U3f, was the ability to configure and allow automatic vMotion of VMs with vGPUs, meaning that DRS can now migrate your VDI and AI/ML vGPU enabled workloads when hosts are placed in to maintenance mode. This also allows you to streamline remediation with vLCM when updating vGPU enabled hosts running vGPU enabled VMs.
Additionally, as of vSphere 8.0 U2, DRS can now estimate the STUN times required for vMotion of vGPU enabled VMs, and control whether automatic DRS vMotion’s are allowed. This STUN time limit can be set buy an administrator.
Enable automatic vMotion evacuation of vGPU enabled VMs
To enable the automatic vMotion of vGPU enabled VMs on your vSphere Cluster:
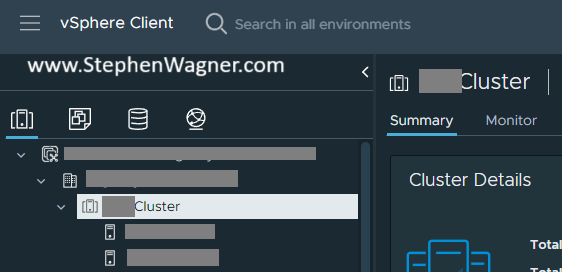
Navigate to your vSphere Cluster.
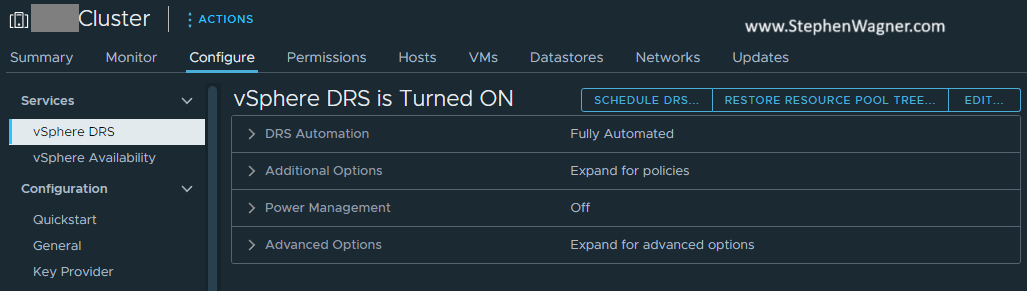
Click on the “Configure” Tab, and then select “vSphere DRS”, and click “Edit”.
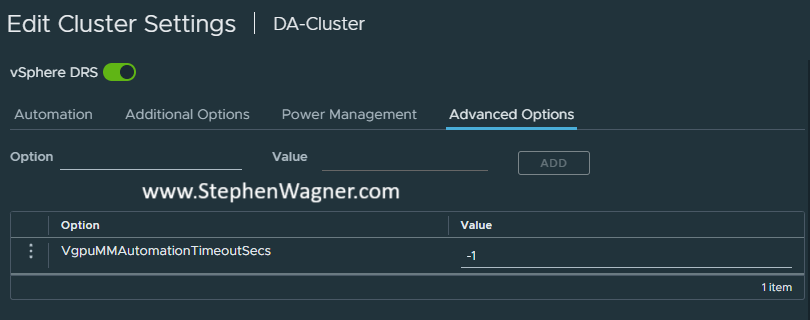
Navigate to the “Advanced Options” tab.
Add “VgpuMMAutomationTimeoutSecs” and set to “-1”.
After performing the above, when you place a host with vGPU enabled Virtual Machines in to Maintenance Mode, vSphere DRS will evacuate and migrate the VMs to other hosts in the cluster that have the required hardware.
If you attempt to place a host in to Maintenance Mode without enabling automatic vMotion of vGPU enabled VMs, it will fail with the error: “DRS failed to generate a vMotion recommendation for a virtual machine on a host entering Maintenance Mode“.
Enable and Configure vGPU STUN Time Estimate and Limits
If you are running vSphere 8U2 or higher, you can enable vGPU STUN time estimation and limits for DRS on the vGPU enabled cluster. Similar to the instructions above, we can add and configure two variables to the vSphere DRS cluster “Advanced Options”.
To enable STUN time estimation, add PassthroughDrsAutomation and set to “1”.
To override the default vMotion STUN time limit of 100 seconds, add VmDevicesStunTimeTolerated and set it to your preferred maximum number of seconds. Alternatively, you can set this limit Per VM by navigating to the VM in vSphere and adding this variable under the “VM Options” “Advanced Settings” section.
You may experience GPU issues with the VMware Horizon Indirect Display Driver in your environment when using 3rd party applications which incorrectly utilize the incorrect display adapter. This results with the inability to use and/or run GPU accelerated workloads including VDI, AI, and ML.
This issue effects NVIDIA vGPU (both vGPU and vDGA passthrough), AMD MxGPU, and Intel Data Center GPU Flex GPUs using SR-IOV, in any deployment where the VMware Indirect Display Driver is installed.
When this issue occurs, the application will incorrectly query the capabilities of the VMware Indirect Display Adapter instead of the GPU that is presented to the VM, resulting in a scenario where the application isn’t aware of the capabilities of the GPU you are utilizing, failing to utilize the GPU, and hardware acceleration, such as hardware encoding (NVENC) and hardware decoding.
What is the VMware Horizon Indirect Display Driver
The VMware Horizon Indirect Display Driver, also known as the VMware Indirect Display Driver, is a “virtual” display driver that isn’t bound to a specific hypervisor, and works with many deployments because of the lack of that limitation.
GPU Issues with the VMware Horizon Indirect Display Driver Enabled
This driver is installed with the VMware Horizon agent, and can work in conjunction with hardware acceleration, including GPUs (such as NVIDIA vGPU, AMD MxGPU, and Intel Data Center GPUs using SR-IOV).
Under normal circumstances, the VMware Horizon Indirect Display Driver is prioritized as a fallback driver for remoting protocols, except in environments where no hypervisor or GPU display drivers are available (like Horizon Cloud on Azure) in which case it would become the priority.
The Problem
Applications designed to use a GPU, may not be able to correctly identify which display adapter to use on the VM. While you may have a GPU, vGPU, or 3D acceleration in your environment, the application may be unaware of the device and/or its capabilities.
This is caused by the application either not correctly using the preferred primary display adapter (GPU and/or vGPU), or not being designed to handle multiple display adapters (and drivers).
Example Scenario:
When using CyberLink PowerDirector 360 in a VMware Horizon environment with an NVIDIA vGPU, the application will query the VM’s Windows instance for hardware acceleration capabilities, specifically hardware encoding, hardware decoding, and use of APIs like NVIDIA’s NVENC encoder. In this scenario, while the VM does have an NVIDIA vGPU workstation profile attached with a valid NVIDIA RTX Virtual Workstation (vWS) license, the application is only aware of the VMware Indirect Display Driver and it’s capabilities. This results in all hardware accelerated encoding and decoding capabilities to be disabled.
Example Symptoms
3D Acceleration not detected by application
CUDA Cores not available for application
OpenCL not available
DirectX and Direct3D usage unavailable
In all scenarios, the VM will appear to have 3D acceleration, however one or multiple applications won’t have access.
The Solution
Thanks to the design of the VMware Indirect Display Driver, it should be prioritized in a fashion that it’s used only when other display drivers aren’t available (including NVIDIA vGPU), or system resources aren’t available; however, some 3rd party application may not be able to reference the prioritization, or support multi-GPU (multi display driver), resulting in the incorrect display adapter being used.
As a workaround, you can remove the VMware Indirect Display Driver from the Windows instance running in the VM.
NVIDIA vGPU with VMware Horizon Indirect Display Driver Removed
Please note that simply disabling the “VMware Horizon Indirect Display Driver” will not suffice. A full removal (Right Click, “Uninstall Device”) is required to workaround this issue. Additionally, upgrading or re-installing the VMware Horizon Agent will re-install the VMware Indirect Display Driver.
This website uses cookies to improve your experience. We'll assume you're ok with this, but you can opt-out if you wish.
Do you accept the use of cookies and accept our privacy policy? AcceptRejectCookie and Privacy Policy
Privacy & Cookies Policy
Privacy Overview
This website uses cookies to improve your experience while you navigate through the website. Out of these cookies, the cookies that are categorized as necessary are stored on your browser as they are essential for the working of basic functionalities of the website. We also use third-party cookies that help us analyze and understand how you use this website. These cookies will be stored in your browser only with your consent. You also have the option to opt-out of these cookies. But opting out of some of these cookies may have an effect on your browsing experience.