I’m happy to announce today that you can now deploy vGPU Mixed Size Virtual GPU types with VMware vSphere 8U3, also known as “Heterogeneous Time-Slice Sizes” or “Heterogeneous vGPU types”.
VMware vSphere 8U3 was released yesterday (June 26th, 2024), and brought with it numerous new features and functionality. However, mixed vGPU types deserves it’s own blog post as it’s a major game-changer for those who use NVIDIA vGPU for AI and VDI workloads, including Omnissa Horizon.
NVIDIA vGPU (Virtual GPU) Types
When deploying NVIDIA vGPU, you configure Virtual GPU types that provide Workstation RTX (vWS Q-Series), Virtual PC (vPC B-Series), or Virtual Apps (vApps A-Series) class capabilities to virtual machines.
On top of the classifications above, you also needed to configure the Framebuffer memory size (or VRAM/Video RAM) allotted to the vGPU.
Historically, when you powered the first VM, the physical GPU that provides vGPU, would then only be able to serve that Virtual GPU type (class and Framebuffer size) to other VMs, locking all the VMs on running on that GPU to same vGPU type. If you had multiple GPUs in a server, you could run different vGPU types on the different physical GPU, however each GPU would be locked to the vGPU type of the first VM started with it.
NVIDIA Mixed Size Virtual GPU Type functionality
Earlier this year, NVIDIA provided the ability to deploy heterogeneous mixed vGPU types through the vGPU drivers, first starting with the ability to run different classifications (you could mix vWS and vPC), and the later adding support for mixed-size frame buffers (example, mixing a 4Q and 8Q profile on the same GPU).
While the NVIDIA vGPU solution supported this, VMware vSphere did not immediately add support so it couldn’t take advantage of this until the new release of VMware vSphere 8U3, VMware vCenter 8U3, and VMware ESXi 8U3.
To configure different classifications (vWS mixed with vPC), it requires no configuration other than using a host-driver and guest-driver that support it, however to use different sized framebuffers, it needs to be enabled on the host.
To Enable vGPU Mixed Size Virtual GPU types:
- Log on to VMware vCenter
- Confirm all vGPU enabled Virtual Machines are powered off
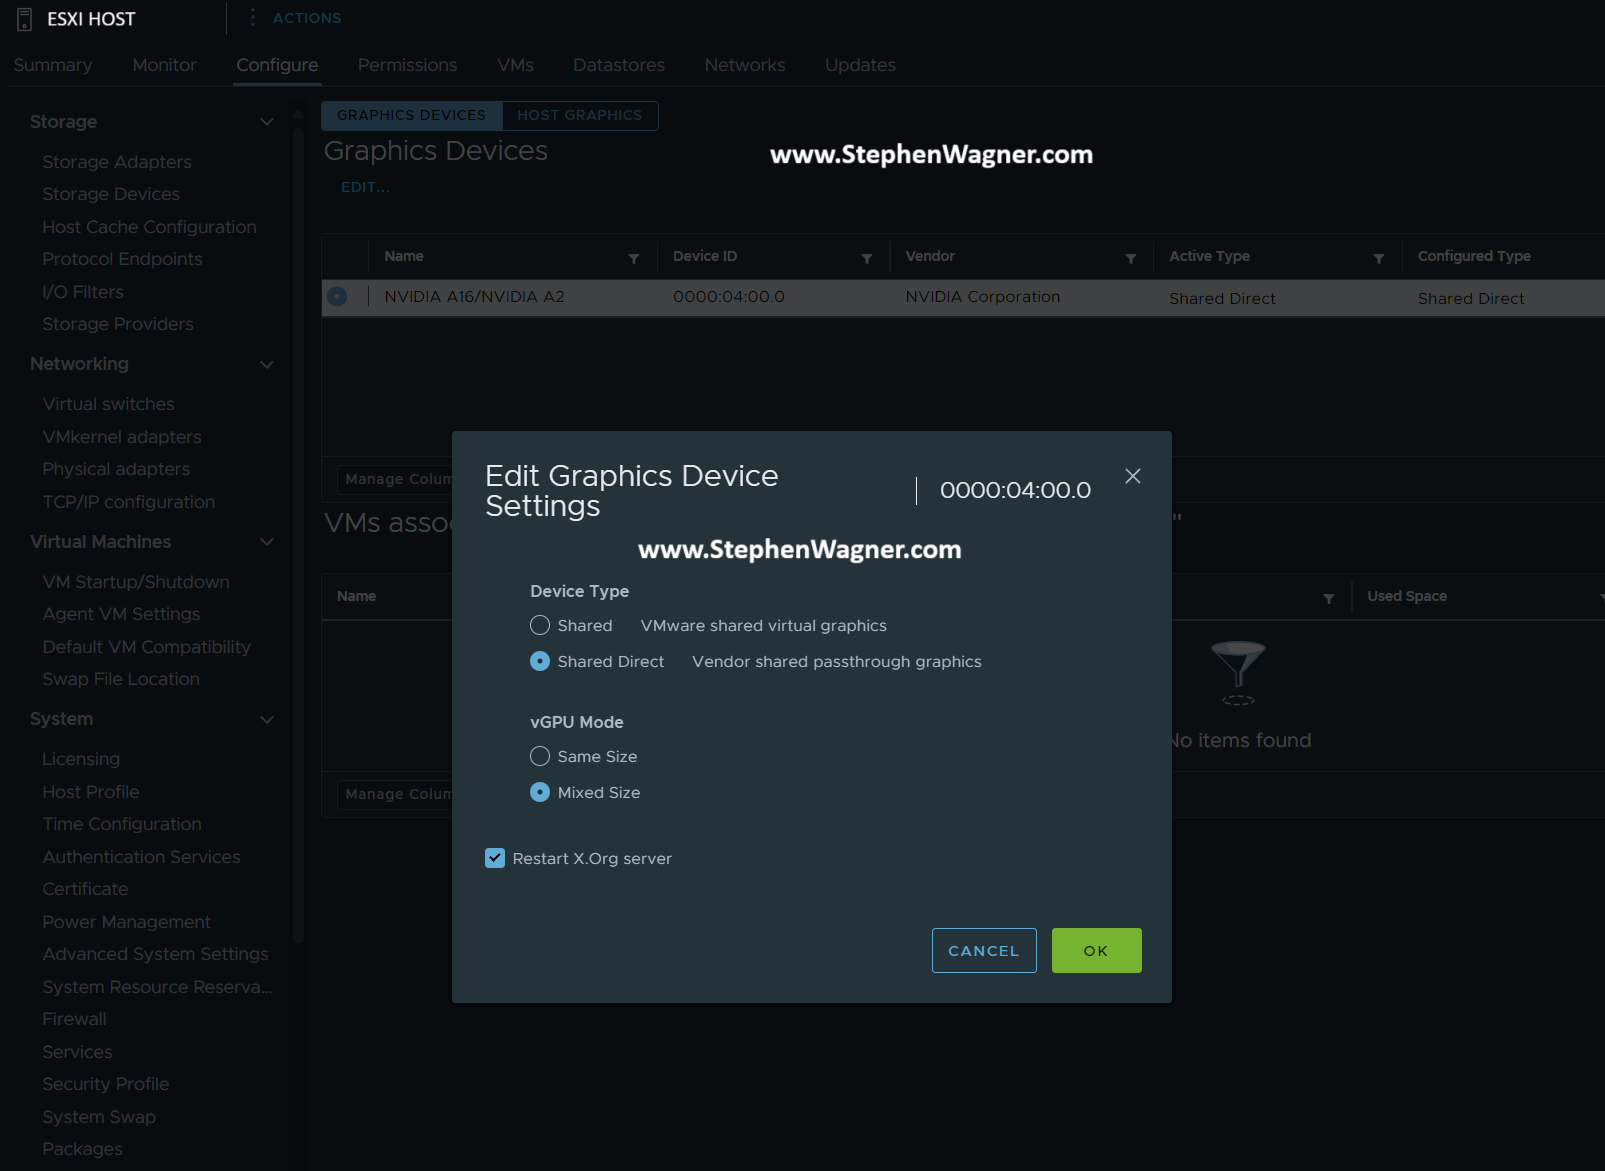
- Select the host in your inventory
- Select the “Configure” tab on the selected host
- Navigate to “Graphics” under “Hardware”
- Select the GPU from the list, click “Edit”, and change the “vGPU Mode” to “Mixed Size”
Once you configure this, you can now deploy mixed-size vGPU profiles.
When you SSH in to your host, you can query to confirm it’s configured:
[root@ESXi-HOST:~] nvidia-smi -q

    vGPU Device Capability
        Fractional Multi-vGPU             : Supported
        Heterogeneous Time-Slice Profiles : Supported
        Heterogeneous Time-Slice Sizes    : Supported
        vGPU Heterogeneous Mode           : Enabled
It’s supported, and enabled!
Additional Notes
Please note the following:
- When restarting your hosts, resetting the GPU, and/or restarting the vGPU Manager daemon, the ESXi host will change back to it’s default “Same Size” mode. You will need to manually change it back to “Mixed Mode”.
- When enabling mixed-size vGPU types, the number of some types of vGPU profiles may be reduced vs running the GPU in equal-size mode (to allow other profile types). Please see the additional links for information on Mixed-Size vGPU types inside the “Virtual GPU Types for Supported GPUs” link.
- Only “Best Effort and “Equal Share” schedulers are supported with mixed mode vGPU. Fixed Share scheduling is not supported.
Additional Links