You may notice a frozen session or frozen screen with NVIDIA vGPU, Windows 11, and Omnissa Horizon (formerly VMware Horizon) in your VDI environment.
While I’ve mostly observed this issue using non-persistent Instant Clones with vGPU on Windows 11 23H2, I have also noticed issues and anomalies with persistent VMs as well.
I’ve noticed this issue across multiple customer environments, and was able to replicate it in my own environment. I’ll go over the problem and solution below.
The Problem
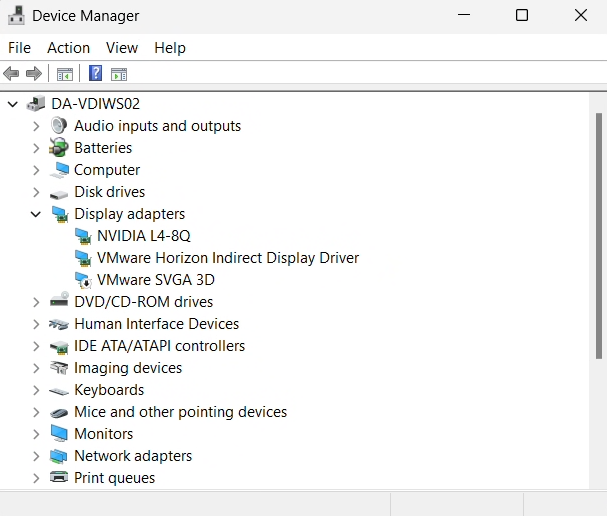
This issue occurs due to the combination of hardware being used, the VMware SVGA driver, a secondary “Virtual Display”, and the resolution being set during logon and initialization of the VMware Horizon VDI session.
When a user logs on, the resolutions are set across all virtual displays. There is an issue where due to a timeout (observed in log files), the resolution cannot be set, resulting in a session that either appears to be frozen, or if active, the interactive cursor is actually off-set from the visible display (your mouse is somewhere else, other than where it’s being displayed).
The Solution
In my troubleshooting, I’ve identified the following solutions:
Solution #1
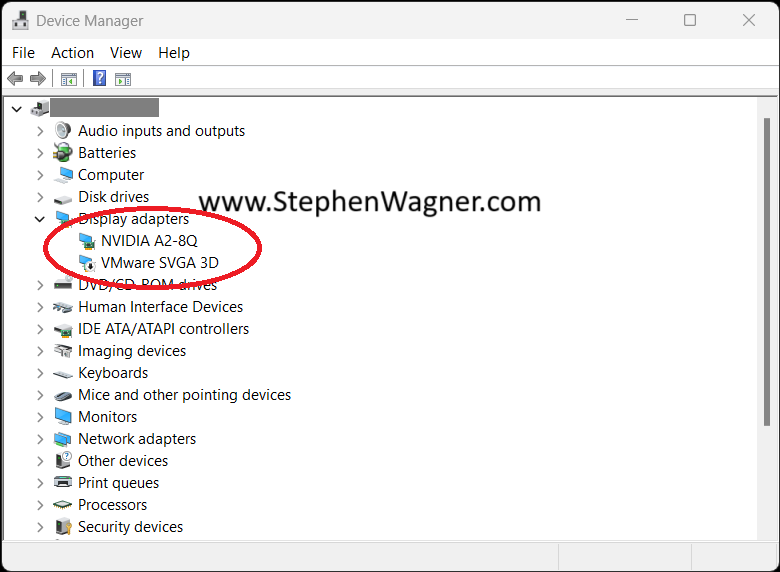
To resolve this issue, disable the “VMware SVGA 3D” Display Adapter in the Windows Explorer (as shown below). Simply right-click on “VMware SVGA 3D” and set to Disabled.
After disabling this Display Adapter, you’ll noticed the issue will be resolved, and you’ll also notice your VDI sessions are established very quickly (including initializing the resolutions with vGPU).
If you’re using non-persistent VDI (VMware Horizon Instant Clones), you’ll need to perform this on your base image.
Note: By disabling this adapter, you will lose the ability to use the VMware Console on VMware vSphere vCenter. To gain console access, you’ll either need to enable the VMware SVGA 3D adapter in a VDI session, or remove the vGPU adapter.
Solution #2
Another solution is to force the VDI session to use the VMware Horizon Indirect Display Driver.
Open Windows Registry and navigate to the following location: HKLM\Software\Policies\VMware, Inc.\VMware Blast\Config
Create a new Registry String (REG_SZ) called “PixelProviderForceViddCapture” and set it to: 1
Note: If you force the use of the VMware Horizon Indirect Display Driver as your Primary Display Driver, you may run in to GPU issues with the VMware Horizon Indirect Display Driver where the capabilities of your NVIDIA vGPU may not be detected by your applications that require the features and capabilities that come from an NVIDIA GPU.
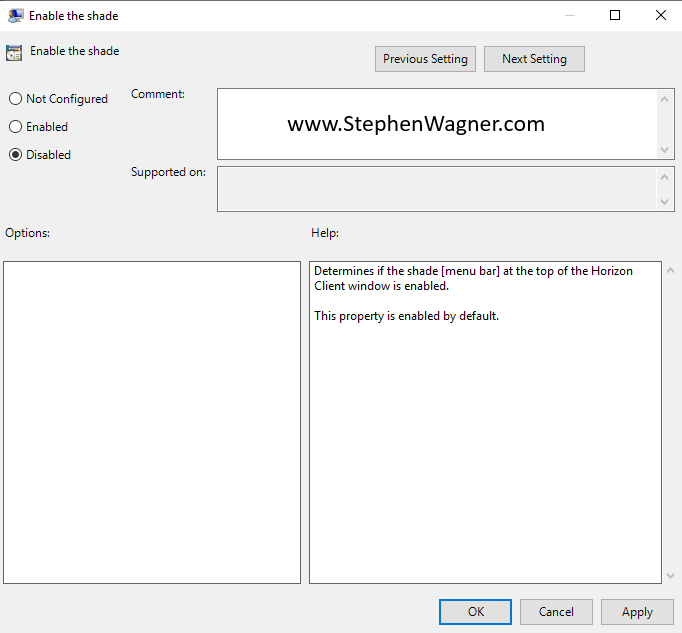
This guide will outline the instructions to Disable the Omnissa Horizon (formerly VMware Horizon) Session Bar. These instructions can be used to disable the Horizon Session Bar (also known as the Horizon Client Menu Bar or Shade Bar) for full screen Horizon VDI sessions.
Horizon Client Menu Bar (Shade)
The Horizon Client Menu Bar, or “Shade”, is the Session bar at the top of full screen VMware Horizon VDI Sessions.
This Menu Bar provides information on the connection, ability to send key sequences, connect USB devices, restart a VDI guest VM and more.
In same cases, users or administrators may want to disable the Shade.
Disable the Horizon Client Menu Bar (Shade)
There are multiple ways that you can disable the shade including using GPOs as well as the registry on client systems. Please note that if you are setting up clients in Kiosk mode, the shade will be automatically disabled and these instructions aren’t required.
Disable Horizon Shade using GPO
To disable the Shade with GPOs, create a Group Policy Object (or edit the local group policy on the client system), and navigate to the following location:
You may experience GPU issues with the VMware Horizon Indirect Display Driver in your environment when using 3rd party applications which incorrectly utilize the incorrect display adapter. This results with the inability to use and/or run GPU accelerated workloads including VDI, AI, and ML.
This issue effects NVIDIA vGPU (both vGPU and vDGA passthrough), AMD MxGPU, and Intel Data Center GPU Flex GPUs using SR-IOV, in any deployment where the VMware Indirect Display Driver is installed.
When this issue occurs, the application will incorrectly query the capabilities of the VMware Indirect Display Adapter instead of the GPU that is presented to the VM, resulting in a scenario where the application isn’t aware of the capabilities of the GPU you are utilizing, failing to utilize the GPU, and hardware acceleration, such as hardware encoding (NVENC) and hardware decoding.
What is the VMware Horizon Indirect Display Driver
The VMware Horizon Indirect Display Driver, also known as the VMware Indirect Display Driver, is a “virtual” display driver that isn’t bound to a specific hypervisor, and works with many deployments because of the lack of that limitation.
GPU Issues with the VMware Horizon Indirect Display Driver Enabled
This driver is installed with the VMware Horizon agent, and can work in conjunction with hardware acceleration, including GPUs (such as NVIDIA vGPU, AMD MxGPU, and Intel Data Center GPUs using SR-IOV).
Under normal circumstances, the VMware Horizon Indirect Display Driver is prioritized as a fallback driver for remoting protocols, except in environments where no hypervisor or GPU display drivers are available (like Horizon Cloud on Azure) in which case it would become the priority.
The Problem
Applications designed to use a GPU, may not be able to correctly identify which display adapter to use on the VM. While you may have a GPU, vGPU, or 3D acceleration in your environment, the application may be unaware of the device and/or its capabilities.
This is caused by the application either not correctly using the preferred primary display adapter (GPU and/or vGPU), or not being designed to handle multiple display adapters (and drivers).
Example Scenario:
When using CyberLink PowerDirector 360 in a VMware Horizon environment with an NVIDIA vGPU, the application will query the VM’s Windows instance for hardware acceleration capabilities, specifically hardware encoding, hardware decoding, and use of APIs like NVIDIA’s NVENC encoder. In this scenario, while the VM does have an NVIDIA vGPU workstation profile attached with a valid NVIDIA RTX Virtual Workstation (vWS) license, the application is only aware of the VMware Indirect Display Driver and it’s capabilities. This results in all hardware accelerated encoding and decoding capabilities to be disabled.
Example Symptoms
3D Acceleration not detected by application
CUDA Cores not available for application
OpenCL not available
DirectX and Direct3D usage unavailable
In all scenarios, the VM will appear to have 3D acceleration, however one or multiple applications won’t have access.
The Solution
Thanks to the design of the VMware Indirect Display Driver, it should be prioritized in a fashion that it’s used only when other display drivers aren’t available (including NVIDIA vGPU), or system resources aren’t available; however, some 3rd party application may not be able to reference the prioritization, or support multi-GPU (multi display driver), resulting in the incorrect display adapter being used.
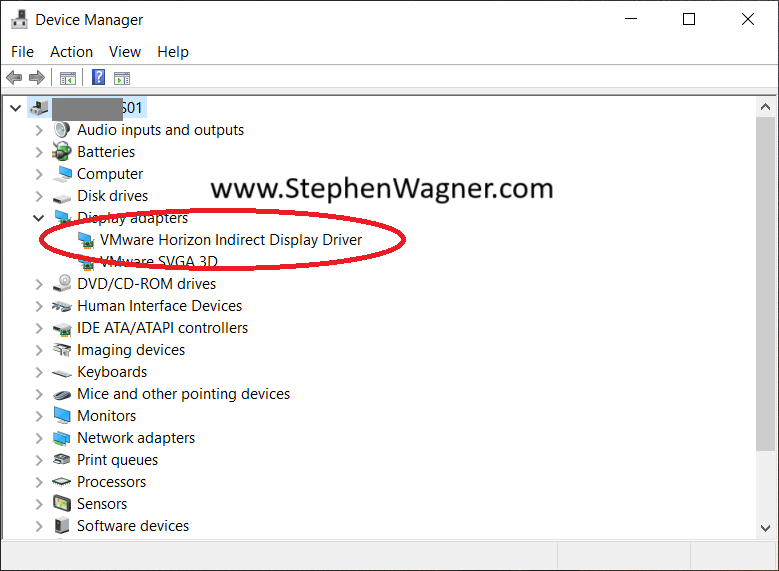
As a workaround, you can remove the VMware Indirect Display Driver from the Windows instance running in the VM.
NVIDIA vGPU with VMware Horizon Indirect Display Driver Removed
Please note that simply disabling the “VMware Horizon Indirect Display Driver” will not suffice. A full removal (Right Click, “Uninstall Device”) is required to workaround this issue. Additionally, upgrading or re-installing the VMware Horizon Agent will re-install the VMware Indirect Display Driver.
In this guide we will deploy and install the new Microsoft Teams for VDI (Virtual Desktop Infrastructure) client, and enable Microsoft Teams Media Optimization on Omnissa Horizon (formerly VMware Horizon).
This guide replaces and supersedes my old guide “Microsoft (Classic) Teams VDI Optimization for VMware Horizon” which covered the old Classic Teams client and VDI optimizations. The new Microsoft Teams app requires the same special considerations on VDI, and requires special installation instructions to function Omnissa Horizon and other VDI environments.
You can run the old and new Teams applications side by side in your environment as you transition users.
Switch between New Teams and old Teams on VDI
Let’s cover what the new Microsoft Teams app is about, and how to install it in your VDI deployment.
New Microsoft Teams app VDI optimized with Toggle for new/old version
Ultimately, it’s way faster, and consumes way less memory. And fortunately for us, it supports media optimizations for VDI environments.
My close friend and colleague, mobile jon, did a fantastic in-depth Deep Dive into the New Microsoft Teams and it’s inner workings that I highly recommend reading.
Interestingly enough, it uses the same media optimization channels for VDI as the old client used, so enablement and/or migrating from the old version is very simple if you’re running Omnissa Horizon, Citrix, AVD, and/or Windows 365.
Install New Microsoft Teams for VDI
While installing the new Teams is fairly simple for non-VDI environment (by simply either enabling the new version in the Teams Admin portal, or using your application manager to deploy the installer), a special method is required to deploy on your VDI images, whether persistent or non-persistent.
Do not include and bundle the Microsoft Teams install with your Microsoft 365 (Office 365) deployment as these need to be installed separately.
Please Note: If you have deployed non-persistent VDI (Instant Clones), you’ll want to make sure you disable auto-updates, as these should be performed manually on the base image. For persistent VDI, you will want auto updates enabled. See below for more information on configurating auto-updates.
You will also need to enable Microsoft Teams Media Optimization for the VDI platform you are using (in my case and example, Omnissa Horizon).
New Teams client app uses the same VDI media optimization channels as the old teams (for Omnissa Horizon, Citrix, AVD, and W365)
If you have already enabled Media Optimization for Teams on VDI for the old version, you can simply install the client using the special bulk installer for all users as shown below, as the new client uses the existing media optimizations.
While it is recommended to uninstall the old client and install the new client, you can choose to run both versions side by side together, providing an option to your users as to which version they would like to use.
Enable Media Optimization for Microsoft Teams on VDI
If you haven’t previously for the old client, you’ll need to enable the Teams Media Optimizations for VDI for your VDI platform.
For Omnissa Horizon, we’ll create a GPO and set the “Enable HTML5 Features” and “Enable Media Optimization for Microsoft Teams”, to “Enabled”. If you have done this for the old Teams app, you can skip this.
Computer Configuration -> Policies -> Administrative Templates -> Omnissa View Agent Configuration -> Omnissa HTML5 Features -> Omnissa WebRTC Redirection Features -> Enable Media Optimization for Microsoft Teams
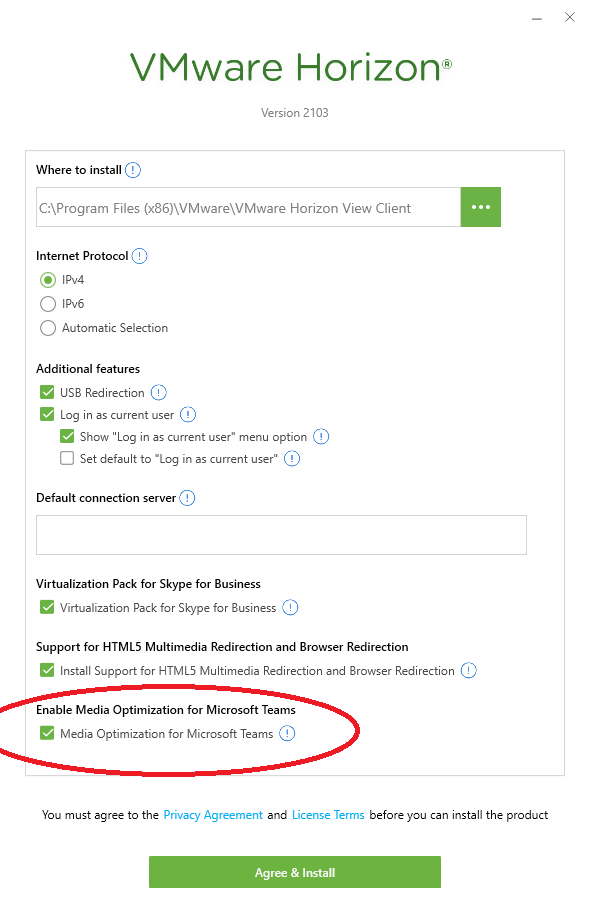
When installing the Omnissa Horizon client on Windows computers, you’ll need to make sure you check and enable the “Media Optimization for Microsoft Teams” option on the installer if prompted. Your install may automatically include Teams Optimization and not prompt.
Omnissa Horizon Client Install with Media Optimization for Microsoft Teams
If you are using a thin client or zero client, you’ll need to make sure you have the required firmware version installed, and any applicable vendor plugins installed and/or configurables enabled.
Install New Microsoft Teams client on VDI
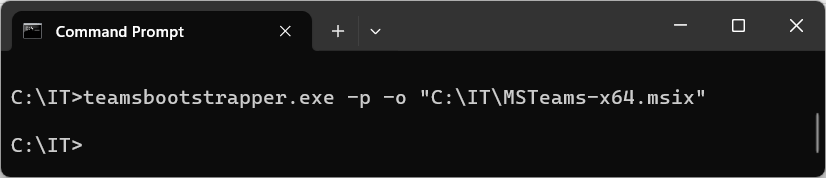
At this time, we will now install the new Teams app on to both non-persistent images, and persistent VDI VM guests. This method performs a live download and provisions as Administrator. If running this un-elevated, an elevation prompt will appear:
New Teams admin provisioned offline install for VDI
For the offline installation, you’ll need to download the appropriate MSI-X file in additional to the bootstrapper above. See below for download links:
For non-persistent environments, you’ll want to disable the auto update feature and install updates manually on your base image.
To disable auto-updates for the new Teams client, configure the registry key below on your base image:
HKEY_LOCAL_MACHINE\SOFTWARE\Microsoft\Teams
Create a DWORD value called “disableAutoUpdate”, and set to value of “1”.
New Teams app disappears after Optimization with OSOT
If you are using the Omnissa Operating System Optimization Tool (OSOT), you may notice that after installing New Teams in your base or golden image, that it disappears when publishing and pushing the image to your desktop pool.
The New Teams application is a Windows Store app, and organizations commonly choose to remove all Windows Store apps inside the golden image using the OSOT tool when optimizing the image. Doing this will remove New Teams from your image.
To workaround this issue, you’ll need to choose “Keep all Windows Store Applications” in the OSOT common options, which won’t remove Teams.
Using New Microsoft Teams with FSLogix Profile Containers
When using the new Teams client with FSLogix Profile Containers on non-persistent VDI, you must upgrade to FSLogix version 2.9.8716.30241 to support the new teams client.
Confirm New Microsoft Teams VDI Optimization is working
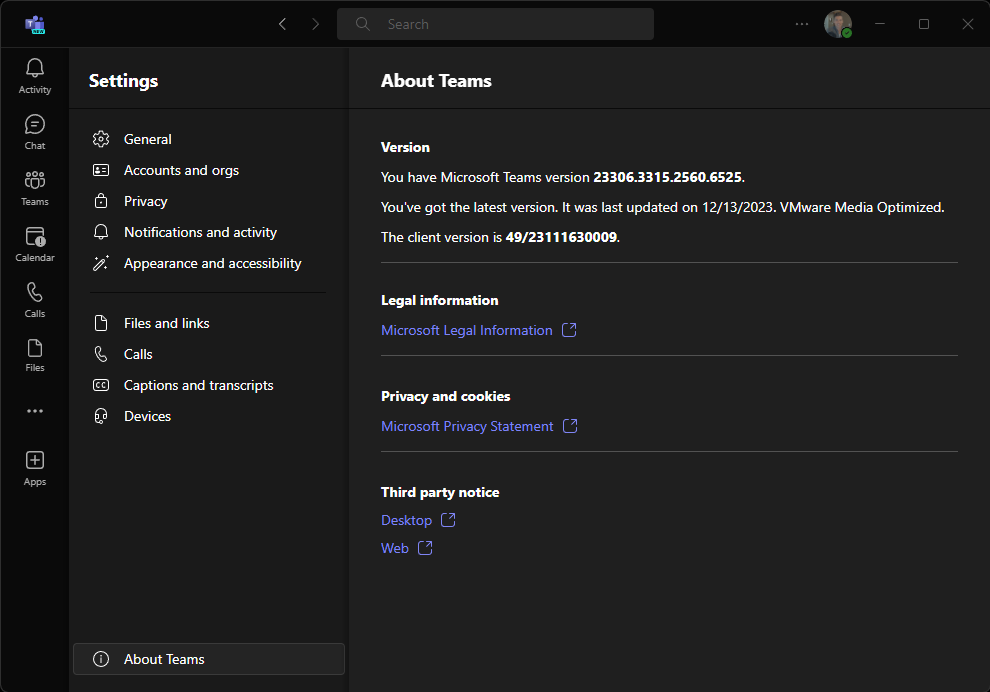
To confirm that VDI Optimization is working on New Teams, open New Teams, click the “…” in the top right next to your user icon, click “Settings”, then click on “About Teams” on the far bottom of the Settings menu.
New Teams showing “Omnissa Media Optimized”
You’ll notice “Omnissa Media Optimized” which indicates VDI Optimization for Omnissa Horizon is functioning. The text will reflect for other platforms as well.
Uninstall New Microsoft Teams on VDI
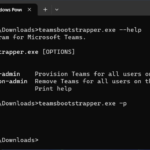
The Teams Boot Strap utility can also remove teams for all users on this machine as well by using the “-x” flag. Please see below for all the options for “teamsbootstrapper.exe”:
C:\Users\Administrator.DOMAIN\Downloads>teamsbootstrapper.exe --help
Provisioning program for Microsoft Teams.

Usage: teamsbootstrapper.exe [OPTIONS]

Options:
  -p, --provision-admin    Provision Teams for all users on this machine.
  -x, --deprovision-admin  Remove Teams for all users on this machine.
  -h, --help               Print help
Install New Microsoft Teams on Omnissa App Volumes / Citrix App Layering
Previously, using the New Teams bootstrapper, it appeared that it evaded and didn’t work with App Packaging and App attaching technologies such as Omnissa App Volumes and Citrix Application layering, however following the instructions on KB97141 will work.
The New Teams bootstrapper downloads and installs an MSIX app package to the computer running the bootstrapper.
Conclusion
It’s great news that we finally have a better performing Microsoft Teams client that supports VDI optimizations. With new Teams support for VDI reaching GA, and with the extensive testing I’ve performed in my own environment, I’d highly recommend switching over at your convenience!
With the release of VMware Horizon 2303, VMware Horizon now supports Hybrid Azure AD Join with Azure AD Connect using Instant Clones and non-persistent VDI.
So what exactly does this mean? It means you can now use Azure SSO using PRT (Primary Refresh Token) to authenticate and access on-premise and cloud based applications and resources.
What else? It allows you to use conditional access!
What is Hybrid Azure AD Join, and why would we want to do it with Azure AD Connect?
Historically, it was a bit challenging when it came to Understanding Microsoft Azure AD SSO with VDI (click to read the post and/or see the video), and special considerations had to be made when an organization wished to implement SSO between their on-prem non-persistent VDI deployment and Azure AD.
Hybrid Azure AD Joined Login
Azure AD SSO, the old way
The old way to accomplish this was to either implement Azure AD with ADFS, or use Seamless SSO. ADFS was bulky and annoying to manage, and Seamless SSO was actually intended to enable SSO on “downlevel devices” (older operating systems before Windows 10).
For customers without ADFS, I would always recommend using Seamless SSO to enable SSO on non-persistent VDI Instant Clones, until now!
Azure AD SSO, the new way with Azure AD Connect and Azure SSO PRTs
Hybrid Azure Active Directory for SSO is now supported on instant clone desktop pools. See KB 89127 for details.
This means we can now enable and use Azure SSO with PRTs (Primary Refresh Tokens) using Azure AD Connect and non-persistent VDI Instant Clones.
Azure SSO with PRT and Non-Persistent VDI
This is actually a huge deal because not only does it allow us to use the preferred method for performing SSO with Azure, but it also allows us to start using fancy Azure features like conditional access!
Requirements for Hybrid Azure AD Join with non-persistent VDI and Azure AD Connect
In order to utilize Hybrid Join and PRTs with non-persistent VDI on Horizon, you’ll need the following:
VMware Horizon 2303 (or later)
Active Directory
Azure AD Connect (Implemented, Configured, and Functioning)
Azure AD Hybrid Domain Join must be enabled
OU and Object filtering must include the non-persistent computer objects and computer accounts
Create a VMware Horizon Non-Persistent Desktop Pool for Instant Clones
“Allow Reuse of Existing Computer Accounts” must be checked
When you configure this, you’ll notice that after provisioning a desktop pool (or pushing a new snapshot), that there may be a delay for PRTs to be issued. This is expected, however the PRT will be issued eventually, and subsequent desktops shouldn’t experience issues unless you have a limited number available.
*Please note: VMware still notes that ADFS is the preferred way for fast issuance of the PRT.
While VMware does recommend ADFS for performance when issuing PRTs, in my own testing I had no problems or complaints, however when deploying this in production I’d recommend that because of the PRT delay after deploying the pool or a new snapshot, to do this after hours or SSO will not function for some users who immediately get a new desktop.
Additional Considerations
Please note the following:
When switching from ADFS to Azure AD Connect, the sign-in process may change for users.
You must prepare the users for the change.
When using locally stored identifies and/or cached credentials, enabling Azure SSO may change the login process, or cause issues for users signing in.
You may have to delete saved credentials in the users persistent profile
You may have to adjust GPOs to account for Azure SSO
You may have to modify settings in your profile persistent solution
Example: “RoamIdentity” on FSLogix
I recommend testing before implementing
Test Environment
Test with new/blank user profiles
Test with existing users
If you’re coming from an environment that was previously using Seamless SSO for non-persistent VDI, you can create new test desktop pools that use newly created Active Directory OU containers and adjust the OU filtering appropriately to include the test OUs for synchronization to Azure AD with Azure AD Connect. This way you’re only syncing the test desktop pool, while allowing Seamless SSO to continue to function for existing desktop pools.
How to test Azure AD Hybrid Join, SSO, and PRT
To test the current status of Azure AD Hybrid Join, SSO, and PRT, you can use the following command:
dsregcmd /status
To check if the OS is Hybrid Domain joined, you’ll see the following:
+----------------------------------------------------------------------+
| Device State                                                         |
+----------------------------------------------------------------------+

             AzureAdJoined : YES
          EnterpriseJoined : NO
              DomainJoined : YES
                DomainName : DOMAIN
As you can see above, “AzureADJoined” is “YES”.
Further down the output, you’ll find information related to SSO and PRT Status:
+----------------------------------------------------------------------+
| SSO State                                                            |
+----------------------------------------------------------------------+

                AzureAdPrt : YES
      AzureAdPrtUpdateTime : 2023-07-23 19:46:19.000 UTC
      AzureAdPrtExpiryTime : 2023-08-06 19:46:18.000 UTC
       AzureAdPrtAuthority : https://login.microsoftonline.com/XXXXXXXX-XXXX-XXXXXXX
             EnterprisePrt : NO
    EnterprisePrtAuthority :
                 OnPremTgt : NO
                  CloudTgt : YES
         KerbTopLevelNames : XXXXXXXXXXXXX
Here we can see that “AzureAdPrt” is YES which means we have a valid Primary Refresh Token issued by Azure AD SSO because of the Hybrid Join.
This website uses cookies to improve your experience. We'll assume you're ok with this, but you can opt-out if you wish.
Do you accept the use of cookies and accept our privacy policy? AcceptRejectCookie and Privacy Policy
Privacy & Cookies Policy
Privacy Overview
This website uses cookies to improve your experience while you navigate through the website. Out of these cookies, the cookies that are categorized as necessary are stored on your browser as they are essential for the working of basic functionalities of the website. We also use third-party cookies that help us analyze and understand how you use this website. These cookies will be stored in your browser only with your consent. You also have the option to opt-out of these cookies. But opting out of some of these cookies may have an effect on your browsing experience.