I’m happy to announce today that you can now deploy vGPU Mixed Size Virtual GPU types with VMware vSphere 8U3, also known as “Heterogeneous Time-Slice Sizes” or “Heterogeneous vGPU types”.
VMware vSphere 8U3 was released yesterday (June 26th, 2024), and brought with it numerous new features and functionality. However, mixed vGPU types deserves it’s own blog post as it’s a major game-changer for those who use NVIDIA vGPU for AI and VDI workloads, including Omnissa Horizon.
NVIDIA vGPU (Virtual GPU) Types
When deploying NVIDIA vGPU, you configure Virtual GPU types that provide Workstation RTX (vWS Q-Series), Virtual PC (vPC B-Series), or Virtual Apps (vApps A-Series) class capabilities to virtual machines.
On top of the classifications above, you also needed to configure the Framebuffer memory size (or VRAM/Video RAM) allotted to the vGPU.
Historically, when you powered the first VM, the physical GPU that provides vGPU, would then only be able to serve that Virtual GPU type (class and Framebuffer size) to other VMs, locking all the VMs on running on that GPU to same vGPU type. If you had multiple GPUs in a server, you could run different vGPU types on the different physical GPU, however each GPU would be locked to the vGPU type of the first VM started with it.
NVIDIA Mixed Size Virtual GPU Type functionality
Earlier this year, NVIDIA provided the ability to deploy heterogeneous mixed vGPU types through the vGPU drivers, first starting with the ability to run different classifications (you could mix vWS and vPC), and the later adding support for mixed-size frame buffers (example, mixing a 4Q and 8Q profile on the same GPU).
While the NVIDIA vGPU solution supported this, VMware vSphere did not immediately add support so it couldn’t take advantage of this until the new release of VMware vSphere 8U3, VMware vCenter 8U3, and VMware ESXi 8U3.
To configure different classifications (vWS mixed with vPC), it requires no configuration other than using a host-driver and guest-driver that support it, however to use different sized framebuffers, it needs to be enabled on the host.
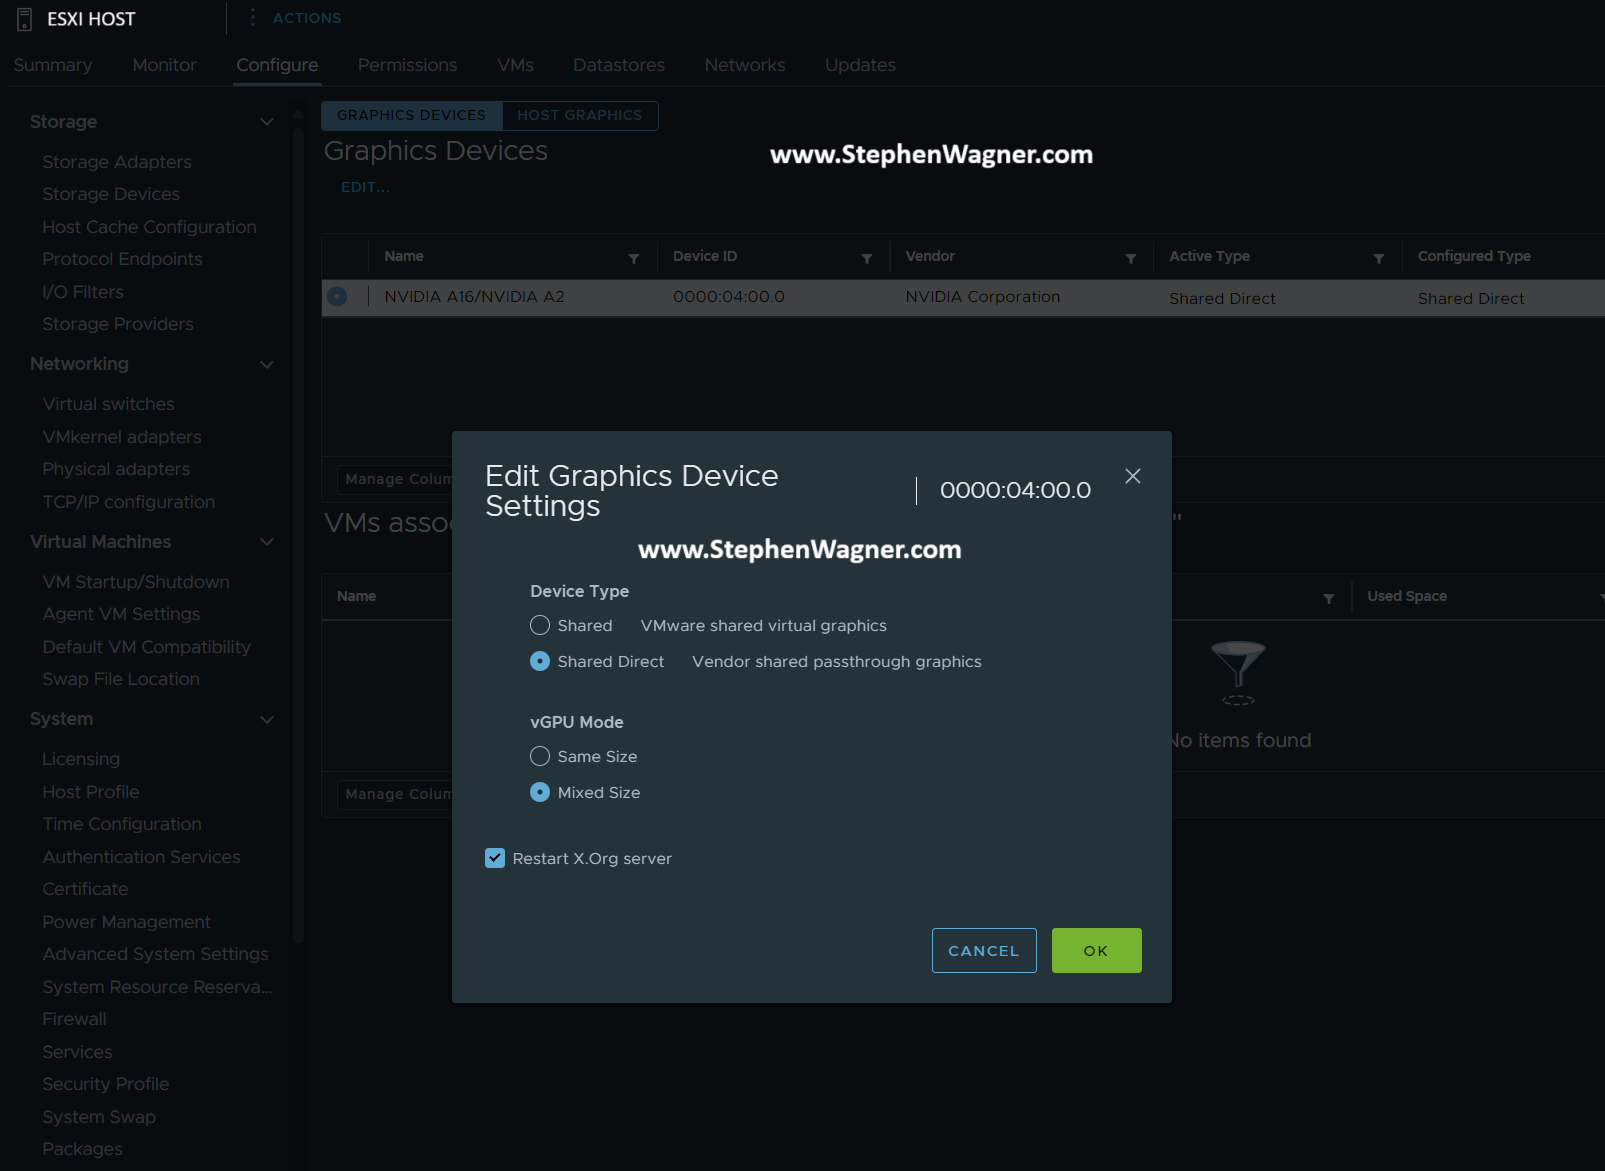
To Enable vGPU Mixed Size Virtual GPU types:
Log on to VMware vCenter
Confirm all vGPU enabled Virtual Machines are powered off
Select the host in your inventory
Select the “Configure” tab on the selected host
Navigate to “Graphics” under “Hardware”
Select the GPU from the list, click “Edit”, and change the “vGPU Mode” to “Mixed Size”
Once you configure this, you can now deploy mixed-size vGPU profiles.
When you SSH in to your host, you can query to confirm it’s configured:
When restarting your hosts, resetting the GPU, and/or restarting the vGPU Manager daemon, the ESXi host will change back to it’s default “Same Size” mode. You will need to manually change it back to “Mixed Mode”.
When enabling mixed-size vGPU types, the number of some types of vGPU profiles may be reduced vs running the GPU in equal-size mode (to allow other profile types). Please see the additional links for information on Mixed-Size vGPU types inside the “Virtual GPU Types for Supported GPUs” link.
Only “Best Effort and “Equal Share” schedulers are supported with mixed mode vGPU. Fixed Share scheduling is not supported.
Here’s a fun quick VDI Gaming Demo with NVIDIA vGPU and Omnissa Horizon 8, using an NVIDIA L4 GPU and the L4-12Q Profile.
This video is just for fun, and is just to show some of the capabilities of the technology, hardware, and software, in this case, with Cloud Gaming.
The NVIDIA vGPU solution provides the ability to “slice” and create multiple Virtual GPU (vGPU) devices for your Virtual Machines and Virtual workloads.
In this video:
Quick Introduction to NVIDIA vGPU with Omnissa Horizon 8
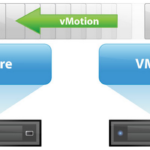
Normally, any VMs that are NVIDIA vGPU enabled have to be manually migrated with manual vMotion if a host is placed in to maintenance mode, to evacuate the host. While we may have grown accustomed to this, there is a better way, with vGPU Enabled VM DRS Evacuation during Maintenance mode!
A new feature that was introduced with vSphere 7.0 U3f, was the ability to configure and allow automatic vMotion of VMs with vGPUs, meaning that DRS can now migrate your VDI and AI/ML vGPU enabled workloads when hosts are placed in to maintenance mode. This also allows you to streamline remediation with vLCM when updating vGPU enabled hosts running vGPU enabled VMs.
Additionally, as of vSphere 8.0 U2, DRS can now estimate the STUN times required for vMotion of vGPU enabled VMs, and control whether automatic DRS vMotion’s are allowed. This STUN time limit can be set buy an administrator.
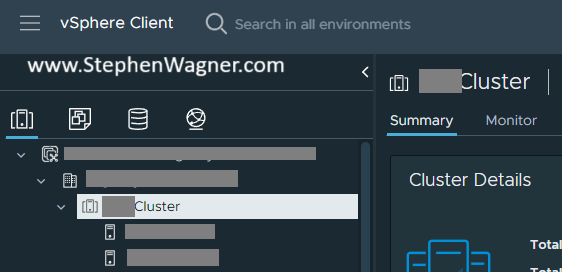
Enable automatic vMotion evacuation of vGPU enabled VMs
To enable the automatic vMotion of vGPU enabled VMs on your vSphere Cluster:
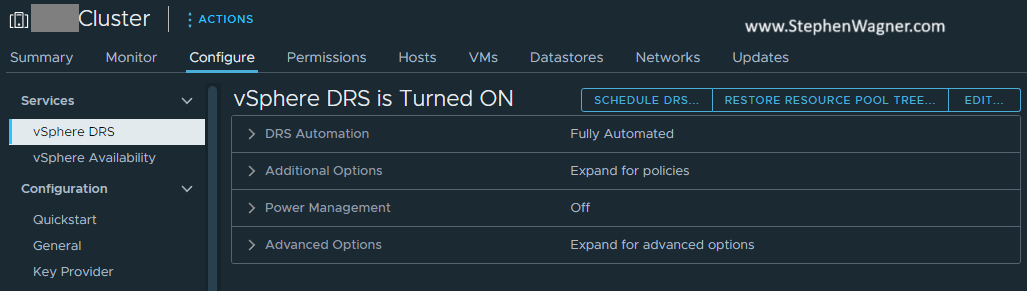
Navigate to your vSphere Cluster.
Click on the “Configure” Tab, and then select “vSphere DRS”, and click “Edit”.
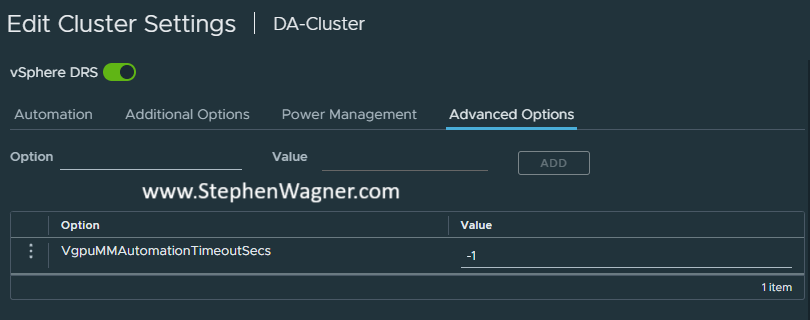
Navigate to the “Advanced Options” tab.
Add “VgpuMMAutomationTimeoutSecs” and set to “-1”.
After performing the above, when you place a host with vGPU enabled Virtual Machines in to Maintenance Mode, vSphere DRS will evacuate and migrate the VMs to other hosts in the cluster that have the required hardware.
If you attempt to place a host in to Maintenance Mode without enabling automatic vMotion of vGPU enabled VMs, it will fail with the error: “DRS failed to generate a vMotion recommendation for a virtual machine on a host entering Maintenance Mode“.
Enable and Configure vGPU STUN Time Estimate and Limits
If you are running vSphere 8U2 or higher, you can enable vGPU STUN time estimation and limits for DRS on the vGPU enabled cluster. Similar to the instructions above, we can add and configure two variables to the vSphere DRS cluster “Advanced Options”.
To enable STUN time estimation, add PassthroughDrsAutomation and set to “1”.
To override the default vMotion STUN time limit of 100 seconds, add VmDevicesStunTimeTolerated and set it to your preferred maximum number of seconds. Alternatively, you can set this limit Per VM by navigating to the VM in vSphere and adding this variable under the “VM Options” “Advanced Settings” section.
You may experience GPU issues with the VMware Horizon Indirect Display Driver in your environment when using 3rd party applications which incorrectly utilize the incorrect display adapter. This results with the inability to use and/or run GPU accelerated workloads including VDI, AI, and ML.
This issue effects NVIDIA vGPU (both vGPU and vDGA passthrough), AMD MxGPU, and Intel Data Center GPU Flex GPUs using SR-IOV, in any deployment where the VMware Indirect Display Driver is installed.
When this issue occurs, the application will incorrectly query the capabilities of the VMware Indirect Display Adapter instead of the GPU that is presented to the VM, resulting in a scenario where the application isn’t aware of the capabilities of the GPU you are utilizing, failing to utilize the GPU, and hardware acceleration, such as hardware encoding (NVENC) and hardware decoding.
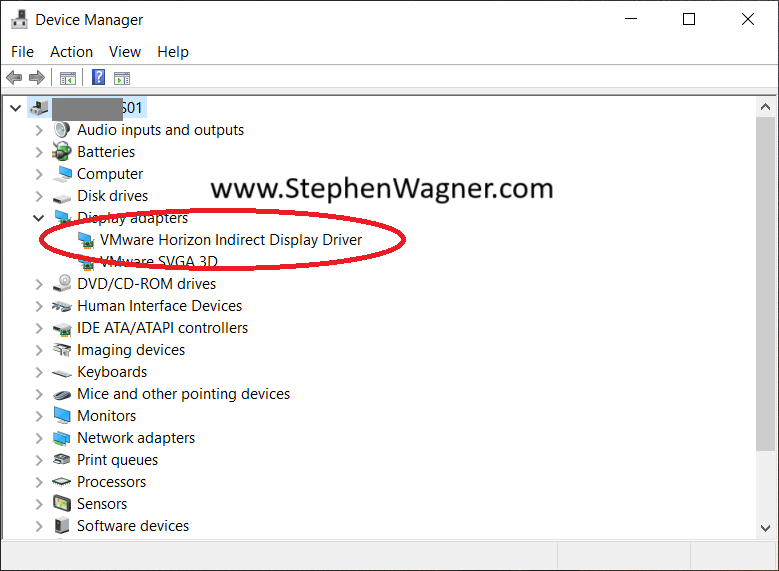
What is the VMware Horizon Indirect Display Driver
The VMware Horizon Indirect Display Driver, also known as the VMware Indirect Display Driver, is a “virtual” display driver that isn’t bound to a specific hypervisor, and works with many deployments because of the lack of that limitation.
GPU Issues with the VMware Horizon Indirect Display Driver Enabled
This driver is installed with the VMware Horizon agent, and can work in conjunction with hardware acceleration, including GPUs (such as NVIDIA vGPU, AMD MxGPU, and Intel Data Center GPUs using SR-IOV).
Under normal circumstances, the VMware Horizon Indirect Display Driver is prioritized as a fallback driver for remoting protocols, except in environments where no hypervisor or GPU display drivers are available (like Horizon Cloud on Azure) in which case it would become the priority.
The Problem
Applications designed to use a GPU, may not be able to correctly identify which display adapter to use on the VM. While you may have a GPU, vGPU, or 3D acceleration in your environment, the application may be unaware of the device and/or its capabilities.
This is caused by the application either not correctly using the preferred primary display adapter (GPU and/or vGPU), or not being designed to handle multiple display adapters (and drivers).
Example Scenario:
When using CyberLink PowerDirector 360 in a VMware Horizon environment with an NVIDIA vGPU, the application will query the VM’s Windows instance for hardware acceleration capabilities, specifically hardware encoding, hardware decoding, and use of APIs like NVIDIA’s NVENC encoder. In this scenario, while the VM does have an NVIDIA vGPU workstation profile attached with a valid NVIDIA RTX Virtual Workstation (vWS) license, the application is only aware of the VMware Indirect Display Driver and it’s capabilities. This results in all hardware accelerated encoding and decoding capabilities to be disabled.
Example Symptoms
3D Acceleration not detected by application
CUDA Cores not available for application
OpenCL not available
DirectX and Direct3D usage unavailable
In all scenarios, the VM will appear to have 3D acceleration, however one or multiple applications won’t have access.
The Solution
Thanks to the design of the VMware Indirect Display Driver, it should be prioritized in a fashion that it’s used only when other display drivers aren’t available (including NVIDIA vGPU), or system resources aren’t available; however, some 3rd party application may not be able to reference the prioritization, or support multi-GPU (multi display driver), resulting in the incorrect display adapter being used.
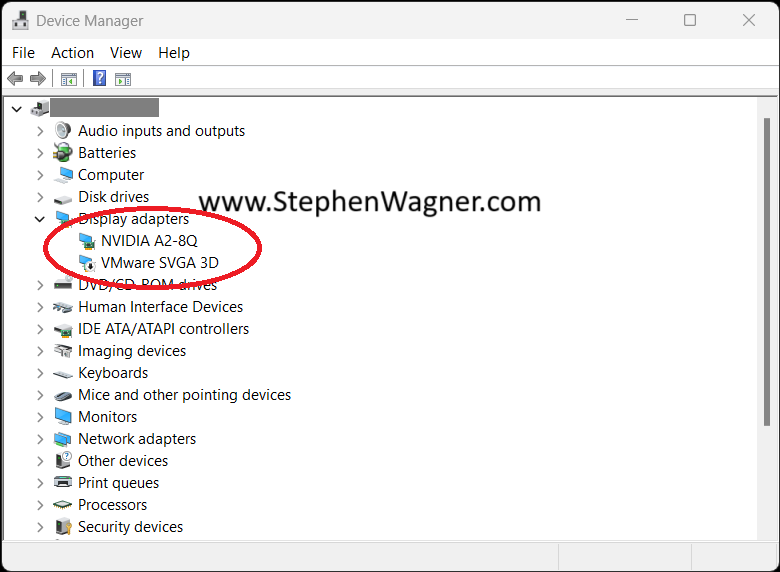
As a workaround, you can remove the VMware Indirect Display Driver from the Windows instance running in the VM.
NVIDIA vGPU with VMware Horizon Indirect Display Driver Removed
Please note that simply disabling the “VMware Horizon Indirect Display Driver” will not suffice. A full removal (Right Click, “Uninstall Device”) is required to workaround this issue. Additionally, upgrading or re-installing the VMware Horizon Agent will re-install the VMware Indirect Display Driver.
In May of 2023, NVIDIA released the NVIDIA GPU Manager for VMware vCenter. This appliance allows you to manage your NVIDIA vGPU Drivers for your VMware vSphere environment.
Since the release, I’ve had a chance to deploy it, test it, and use it, and want to share my findings.
In this post, I’ll cover the following (click to skip ahead):
The NVIDIA GPU Manager is an (OVA) appliance that you can deploy in your VMware vSphere infrastructure (using vCenter and ESXi) to act as a driver (and update) repository for vLCM (vSphere Lifecycle Manager).
In addition to acting as a repo for vLCM, it also installs a plugin on your vCenter that provides a GUI for browsing, selecting, and downloading NVIDIA vGPU host drivers to the local repo running on the appliance. These updates can then be deployed using LCM to your hosts.
In short, this allows you to easily select, download, and deploy specific NVIDIA vGPU drivers to your ESXi hosts using vLCM baselines or images, simplifying the entire process.
Supported vSphere Versions
The NVIDIA GPU Manager supports the following vSphere releases (vCenter and ESXi):
VMware vSphere 8.0 (and later)
VMware vSphere 7.0U2 (and later)
The NVIDIA GPU Manager supports vGPU driver releases 15.1 and later, including the new vGPU 16 release version.
How to deploy and configure the NVIDIA GPU Manager for VMware vCenter
To deploy the NVIDIA GPU Manager Appliance, we have to download an OVA (from NVIDIA’s website), then deploy and configure it.
See below for the step by step instructions:
Download the NVIDIA GPU Manager
Log on to the NVIDIA Application Hub, and navigate to the “NVIDIA Licensing Portal” (https://nvid.nvidia.com).
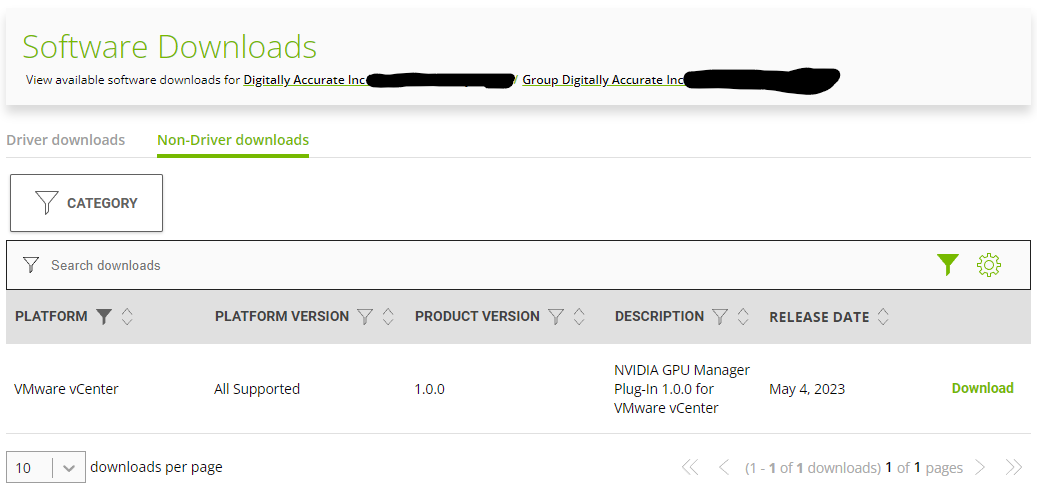
Navigate to “Software Downloads” and select “Non-Driver Downloads”
Change Filter to “VMware vCenter” (there is both VMware vSphere, and VMware vCenter, pay attention to select the correct).
To the right of “NVIDIA GPU Manager Plug-in 1.0.0 for VMware vCenter”, click “Download” (see below screenshot).
NVIDIA GPU Manager Download Page
After downloading the package and extracting, you should be left with the OVA, along with Release Notes, and the User Guide. I highly recommend reviewing the documentation at your leisure.
Deploy and Configure the NVIDIA GPU Manager
We will now deploy the NVIDIA GPU Manager OVA appliance:
Deploy the OVA to either a cluster with DRS, or a specific ESXi host. In vCenter either right click a cluster or host, and select “Deploy OVF Template”. Choose the GPU Manager OVA file, and continue with the wizard.
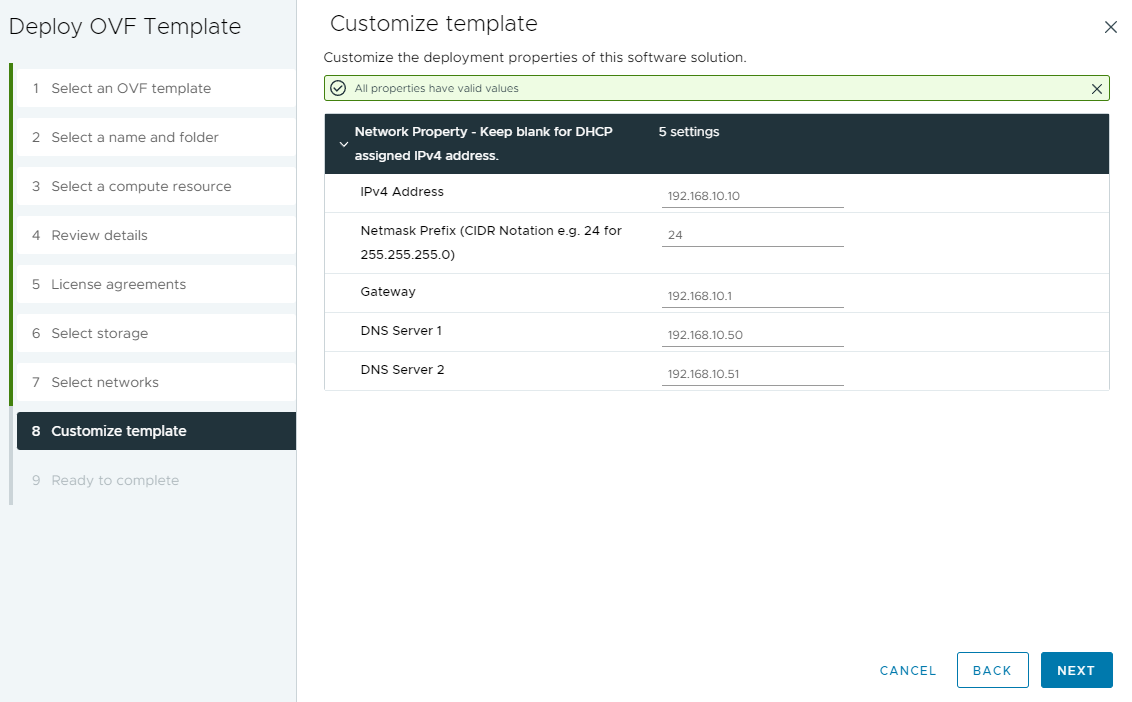
Configure Networking for the Appliance
You’ll need to assign an IP Address, and relevant networking information.
I always recommend creating DNS (forward and reverse entries) for the IP.
Finally, power on Appliance.
We must now create a role and service account that the GPU Manager will use to connect to the vCenter server.
While the vCenter Administrator account will work, I highly recommend creating a service account specifically for the GPU Manager that only has the required permissions that are necessary for it to function.
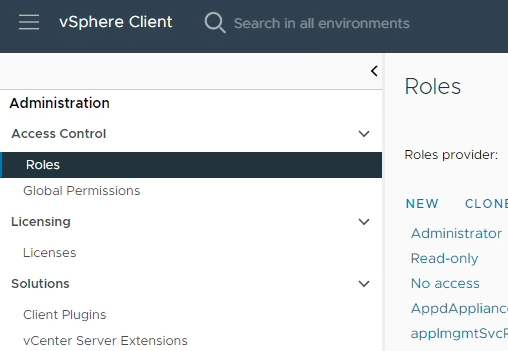
Log on to your vCenter Server
Click on the hamburger menu item on the top left, and open “Administration”.
Under “Access Control” select Roles.
Select New to create a new role. We can call it “NVIDIA Update Services”.
***PLEASE NOTE: The above permissions were provided in the documentation and did not work for me (resulted in an insufficient privileges error). To resolve this, I chose “Select All” for “VMware vSphere Lifecycle Manager”, which resolved the issue.***
Save the Role
On the left hand side, navigate to “Users and Groups” under “Single Sign On”
Change the domain to your local vSphere SSO domain (vsphere.local by default)
Create a new user account for the NVIDIA appliance, as an example you could use “nvidia-svc”, and choose a secure password.
Navigate to “Global Permissions” on the left hand side, and click “Add” to create a new permission.
Set the domain, and choose the new “nvidia-svc” service account we created, and set the role to “NVIDIA Update Services”, and check “Propagate to Children”.
You have now configured the service account.
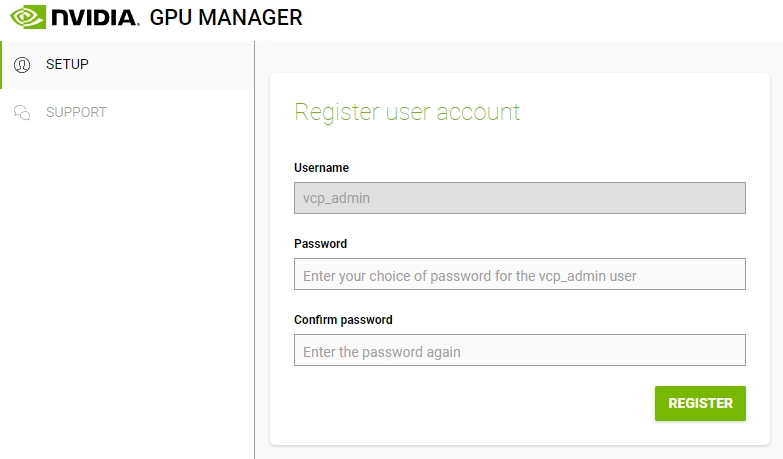
Now, we will perform the initial configuration of the appliance. To configure the application, we must do the following:
Access the appliance using your browser and the IP you configured above (or FQDN)
Create a new password for the administrative “vcp_admin” account. This account will be used to manage the appliance.
A secret key will be generated that will allow the password to be reset, if required. Save this key somewhere safe.
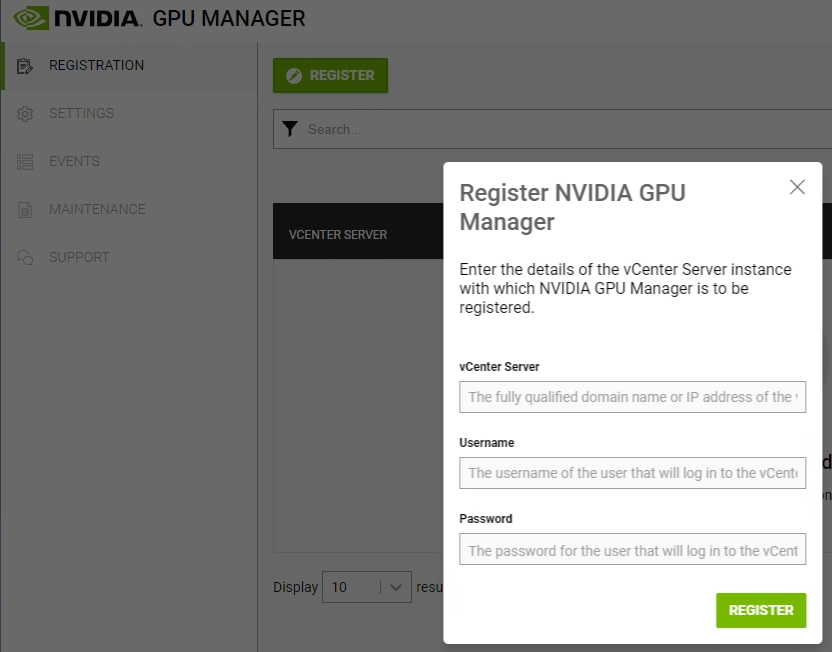
We must now register the appliance (and plugin) with our vCenter Server. Click on “REGISTER”.
Enter the FQDN or IP of your vCenter server, the NVIDIA Service account (“nvidia-svc” from example), and password.
Once the GPU Manager is registered with your vCenter server, the remainder of the configuration will be completed from the vCenter GPU.
The registration process will install the GPU Manager Plugin in to VMware vCenter
The registration process will also configure a repository in LCM (this repo is being hosted on the GPU manager appliance).
We must now configure an API key on the NVIDIA Licensing portal, to allow your GPU Manager to download updates on your behalf.
Open your browser and navigate to https://nvid.nvidia.com. Then select “NVIDIA LICENSING PORTAL”. Login using your credentials.
On the left hand side, select “API Keys”.
On the upper right hand, select “CREATE API KEY”.
Give the key a name, and for access type choose “Software Downloads”. I would recommend extending the key validation time, or disabling key expiration.
The key should now be created.
Click on “view api key”, and record the key. You’ll need to enter this in later in to the vCenter GPU Manager plugin.
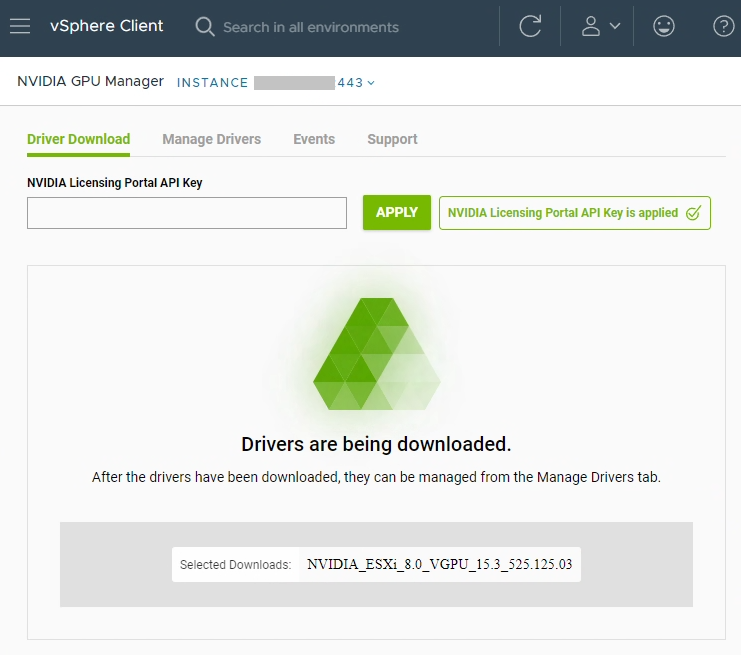
And now we can finally log on to the vCenter interface, and perform the final configuration for the appliance.
Log on to the vCenter client, click on the hamburger menu, and select “NVIDIA GPU Manager”.
Enter the API key you created above in to the “NVIDIA Licensing Portal API Key” field, and select “Apply”.
The appliance should now be fully configured and activated.
Configuration is complete.
We have now fully deployed and completed the base configuration for the NVIDIA GPU Manager.
Using the NVIDIA GPU Manager to manage, update, and deploy vGPU drivers to ESXi hosts
In this section, I’ll be providing an overview of how to use the NVIDIA GPU Manager to manage, update, and deploy vGPU drivers to ESXi hosts. But first, lets go over the workflow…
The workflow is a simple one:
Using the vCenter client plugin, you choose the drivers you want to deploy. These get downloaded to the repo on the GPU Manager appliance, and are made available to Lifecycle Manager.
You then use Lifecycle Manager to deploy the vGPU Host Drivers to the applicable hosts, using baselines or images.
As you can see, there’s not much to it, despite all the configuration we had to do above. While it is very simple, it simplifies management quite a bit, especially if you’re using images with Lifecycle Manager.
To choose and download the drivers, load up the plugin, use the filters to filter the list, and select your driver to download.
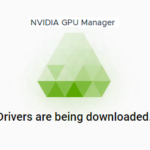
NVIDIA GPU Manager downloading vGPU Driver
As you can see in the example, I chose to download the vGPU 15.3 host driver. Once completed, it’ll be made available in the repo being hosted on the appliance.
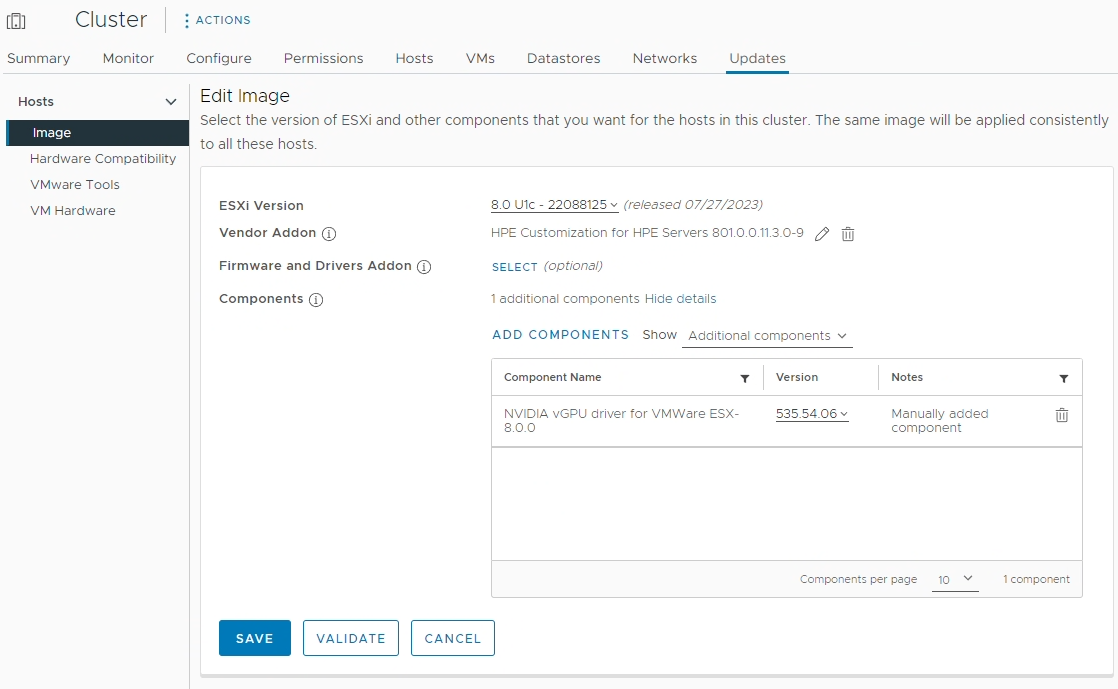
Once LCM has a changed to sync with the updated repos, the driver is then made available to be deployed. You can then deploy using baselines or host images.
LCM Image Update with NVIDIA vGPU Driver from NVIDIA GPU Manager
In the example above, I added the vGPU 16 (535.54.06) host driver to my clusters update image, which I will then remediate and deploy to all the hosts in that cluster. The vGPU driver was made available from the download using GPU Manager.
This website uses cookies to improve your experience. We'll assume you're ok with this, but you can opt-out if you wish.
Do you accept the use of cookies and accept our privacy policy? AcceptRejectCookie and Privacy Policy
Privacy & Cookies Policy
Privacy Overview
This website uses cookies to improve your experience while you navigate through the website. Out of these cookies, the cookies that are categorized as necessary are stored on your browser as they are essential for the working of basic functionalities of the website. We also use third-party cookies that help us analyze and understand how you use this website. These cookies will be stored in your browser only with your consent. You also have the option to opt-out of these cookies. But opting out of some of these cookies may have an effect on your browsing experience.