Aug 222018
 

HPE Moonshot

I had the pleasure of playing with a fully loaded HPE Moonshot 1500 Chassis, and an HPe Edgeline EL4000 Converged Edge System last month during my visit to HPe Headquarters in Toronto, Ontario. I like to think of this thing as the answer for high-density anything and everything!

HPE Moonshot 1500 Chassis

I’ve known about the HPE Moonshot portfolio for some time, however I didn’t understand how mammoth one of these chassis’ are until I saw it performing in real life.

HPe Moonshot 1500 Chassis with 45 Cartridges

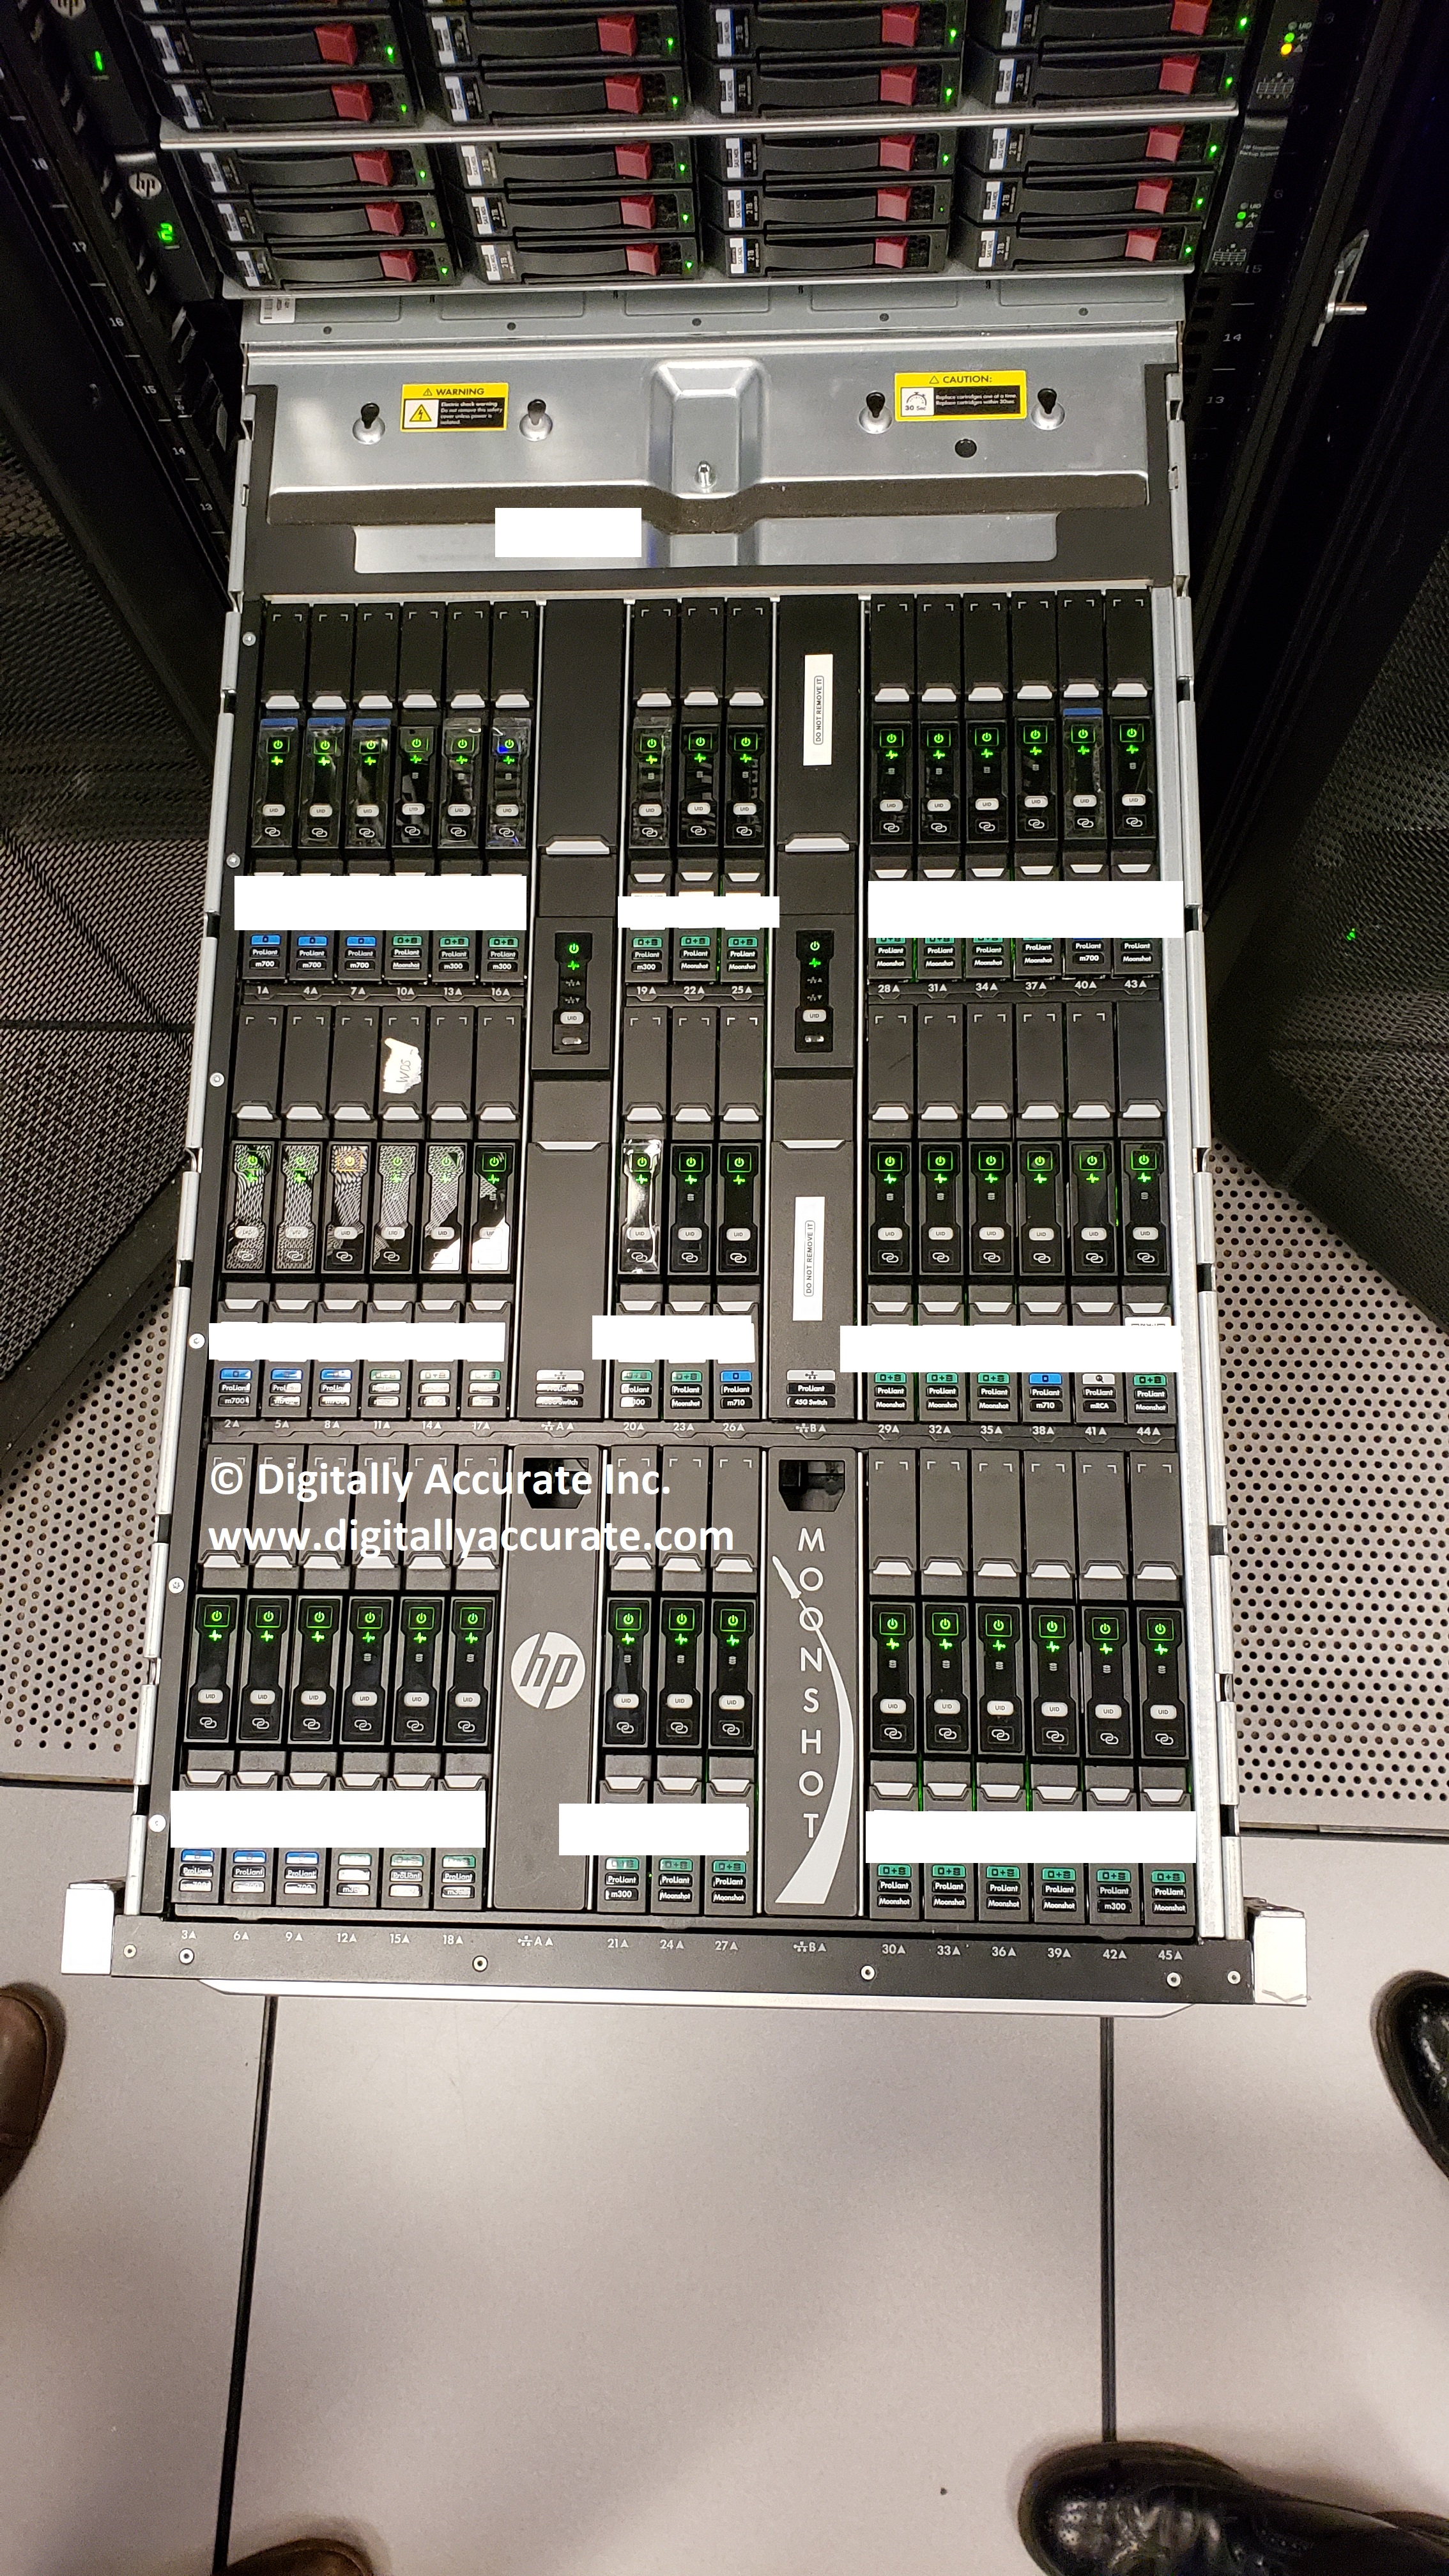
HPE Moonshot 1500 Chassis with 45 Cartridges

The HPE Moonshot 1500 Chassis supports up to 45 cartridges, and up to 4 SoC (System on Chip) OS instances per cartridge for a total of 180 OS instances in a 4.3U (5U for 1 x 1500 Chassis or 13U for 3 x 1500 Chassis) sized footprint. The chassis also supports up to 2 switches and 2 uplink modules in addition to the 45 cartridges.

Prime uses for HPE Moonshot 1500 (remember, high-density everything):

  • VDI (Virtual Desktop Infrastructure via VMware or Microsoft)
  • HDI (Hosted Desktop Infrastructure via Citrix Provisioning Server)
  • Server consolidation and Virtualization
  • SDDC (Software Defined Data Center)
  • HPC (High Performance Computing, both Virtualized and Non-Virtualized workloads)
  • Energy Efficient Compute
  • EUC (End User Computing – Software defined end user desktops without virtualization)
  • Video Transcoding
  • Analytics and Interpritation
  • IoT and AI
  • Custom workloads

As you can see, you can virtually load up whatever you’d like on it that requires a CPU (HPE Moonshot can run both x86 and ARM architectures depending on which cartridges are utilized).

The chassis is monitored and managed via the HPE Moonshot 1500 Chassis Management module and the HPE Moonshot Provisioning Manager.

HPE Edgeline EL4000 Converged Edge System

The HPE Edgeline EL4000 was designed (you probably guessed it) for the edge. Whether it be the enterprise edge, media edge, or IoT edge, the EL4000 is a perfect fit.

HPe Edgeline EL4000 Converged Edge System

HPE Edgeline EL4000 Converged Edge System

This bad boy supports up to 4 HPE Proliant Server Cartridge (m510 or m710x) compute nodes in a 1U package. It also supports up to 4 PCIe cards, or 4 PXIe modules assignable to any of the compute modules.

Prime uses for the HPE Edgeline EL4000:

  • Edge Computing (AI, IoT EDGE)
  • ROBO (Remote Office Branch Office)
  • Server Consolidation and Virtualization (ROBO)
  • VDI (Virtual Desktop Infrastructure)
  • HDI (Hosted Desktop Infrastructure)
  • Video Transcoding
  • Industrial applications (Machine monitoring, Condition Monitoring)
  • Edgeline data analytics
  • Industrial/Manufacturing Quality Control and Quality Assurance (Video Analytics and Interpretation)
  • SMB Applications

The El4000 has iLo (Integrated Lights Out) built in, and provides management and monitoring. This unit also supports GPU accelerator/compute cards such as the Nvidia P4 Graphics Accelerator (specifically an Nvidia Tesla P4 8GB Computational PCIe card).

HPE Moonshot Cartridges

With the flexibility of different cartridges, along with Moonshot being software defined, you can highly customize whatever workload you may be running.

HPe Proliant m800 Moonshot Cartridge Front View

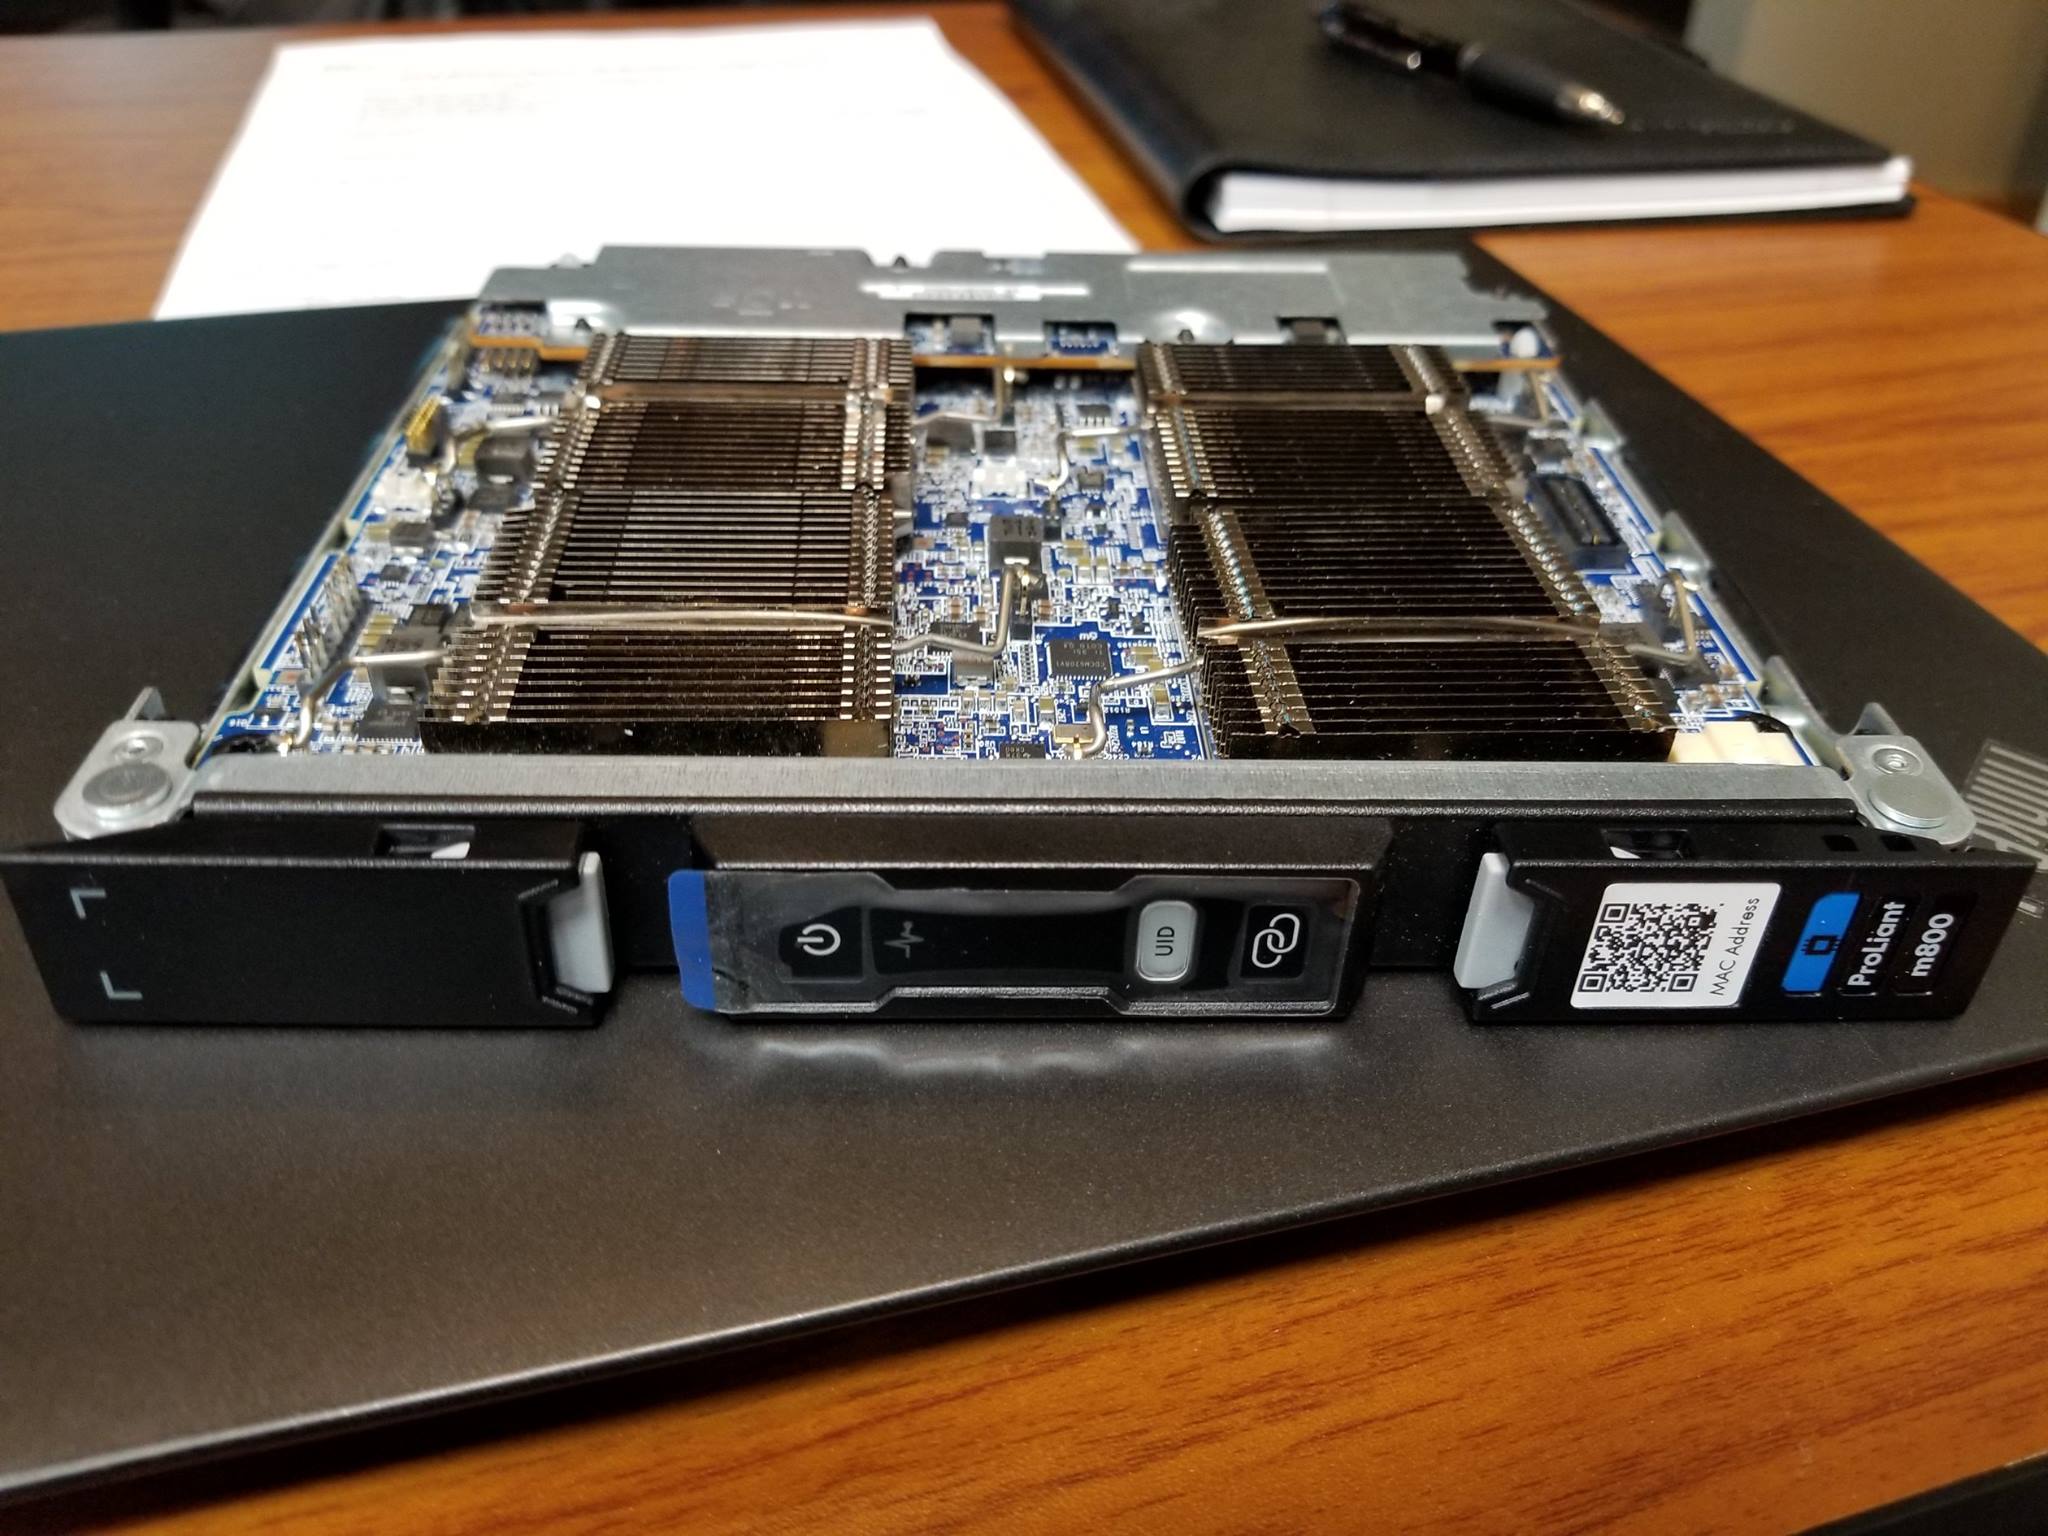
HPE Proliant m800 Moonshot Cartridge Front View

HPe Proliant m800 Moonshot Cartridge Side View

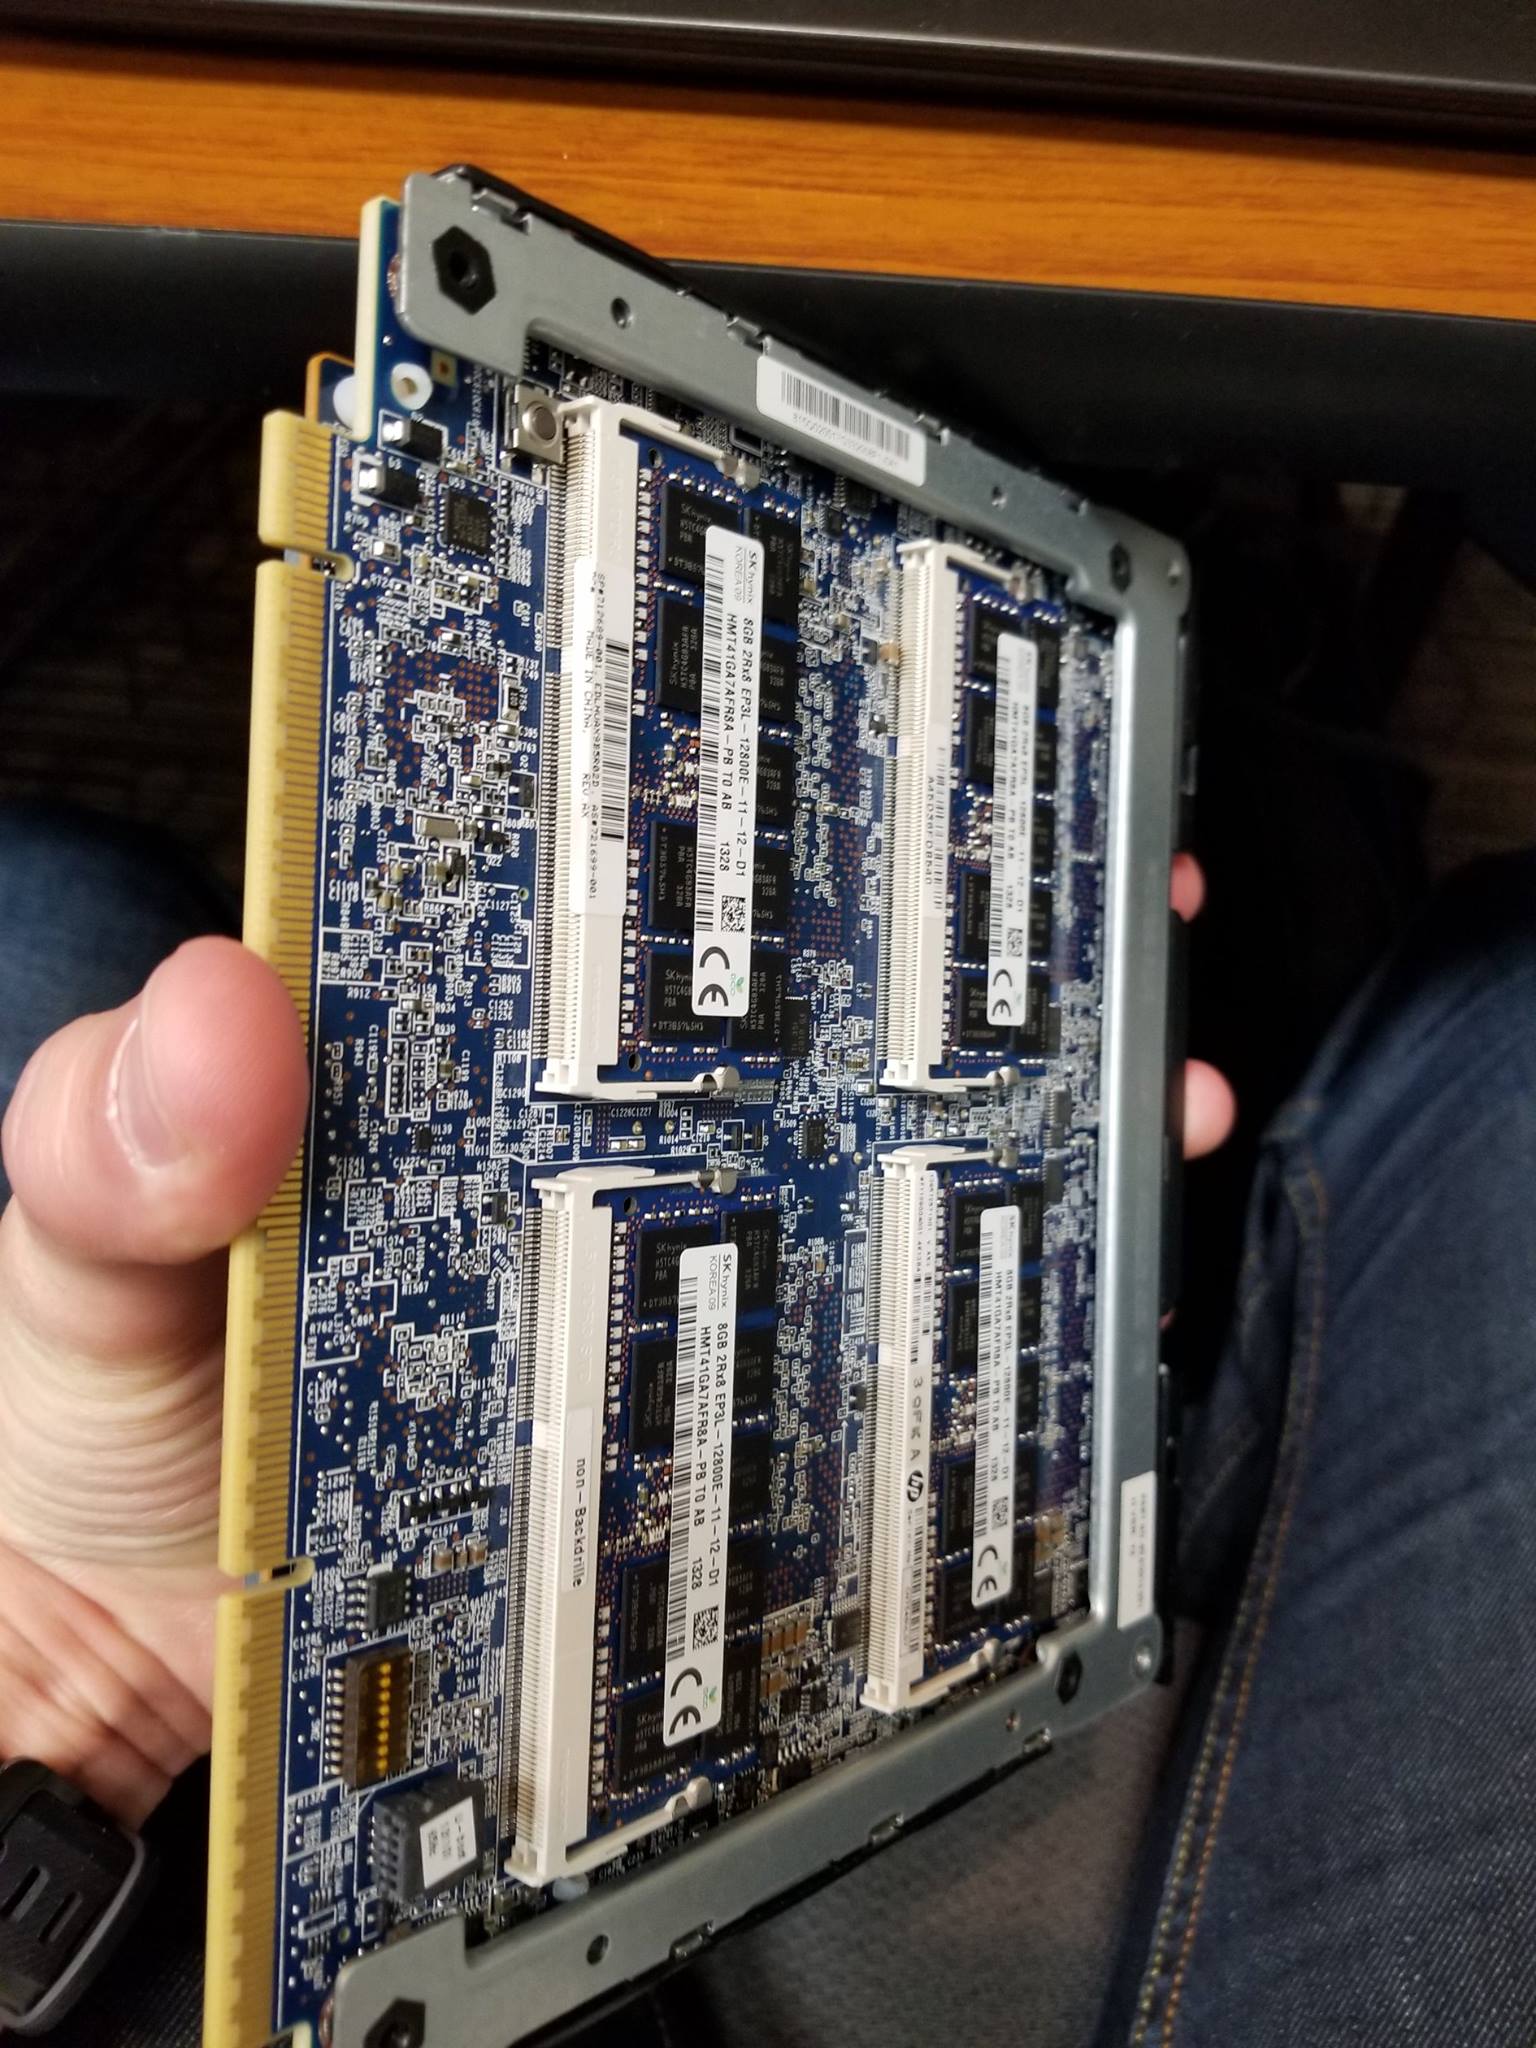
HPE Proliant m800 Moonshot Cartridge Side View

The following cartridges are currently available for the HPE Moonshot platform:

  • HPE Proliant m710p – Server or Desktop Virtualization, includes Intel Iris Pro P6300 graphics for VDI deployments (supported by VMware vSphere for vDGA passthrough and vSGA) or video transcoding.
  • HPE Proliant m710x – Server or Desktop Virtualization, includes Intel Iris Pro P580 graphics for VDI deployments (supported by VMware vSphere for vDGA passthrough and vSGA) or video transcoding.
  • HPE Proliant m700p – Designed for high-performance Citrix Mobile Workspaces (high-density EUC) for 4 desktops per cartridge with AMD Radeon HD 8000 graphics.
  • HPE Proliant m510 – Features the Xeon D processor targeting high performance, AI, analytics, machine learning, and IoT workloads.

As you can see there is quite some flexibility as far as the cartridges you can roll out. I get really excited when I think of VDI with Moonshot just because of the fact that the Intel Iris Pro P580, and P6300 are fully supported on VMware’s HCL for vDGA and vSGA graphics for vSphere 6.5 and 6.7.

There are also retired/discontinued cartridges (such as the HPE Proliant m800) which are beyond the scope of this blog post.

HPE Moonshot Networking

On the HPe Moonshot 1500 Chassis, networking is handled inside of the chassis via 1 or 2 network switch modules and uplink modules. You’ll then connect the uplinks from the uplink modules to your real physical network. You can connect to your network via QSFP+ or SFP+ connections using DAC (direct attached cables) or fiber cables with transceivers at speeds of 40Gb or 10Gb.

The Moonshot 1500 chassis supports the following switch modules:

  • Moonshot-45Gc Switch – 1Gb Switch connectivity for m510, m510-16c, m710x cartridges and works with the Moonshot 6 x SFP+ Uplink Module
  • Moonshot-45XGc Switch – 1Gb or 10Gb Switch connectivity for m510, m510-16c, m710x cartridges and works with the Moonshot 16 x SFP+ Uplink Module or the 4 QSFP+ Uplink Module
  • Moonshot-180XGc Switch – 1Gb or 10Gb Switch connectivity for m510, m510-16c, m710x cartridges, and 1Gb Switch connectivity for m700p and works with the Moonshot 16 x SFP+ Uplink Module or the 4 QSFP+ Uplink Module

On the HPE Edgeline EL4000, networking is handled via 2 x 10Gb SFP+ switched version, or a 8 x 10Gb QSFP+ pass-thru version. The unit also has a dedicated 1Gb RJ45 port for HPE iLo connectivity.

HPE Moonshot Storage

Each cartridge can contain it’s own dedicated storage up to 2TB. This is perfect for a HPE StoreVirtual VSA deployment or even basic direct attached storage. You can also connect HPE Moonshot to an HPE 3PAR SAN or an HPE Apollo 4500 storage system via the 10Gb network Fabric.

There’s a few options as to how you can plan your storage deployment with Moonshot:

  • DAS – Direct Attached Storage (in cartridge)
  • HPE 3PAR SAN or HPE Apollo 4500 Storage System
  • iSCSI/NFS (May or may not be supported depending on your workload)
  • VMware vSAN (May or may not be supported/certified)

As you can see, there’s quite a few options and possibilities as far as your storage deployment goes.

HPE Moonshot Pictures

Here’s some additional photos of the unit.

HPe Moonshot at HPe Center of Excellence

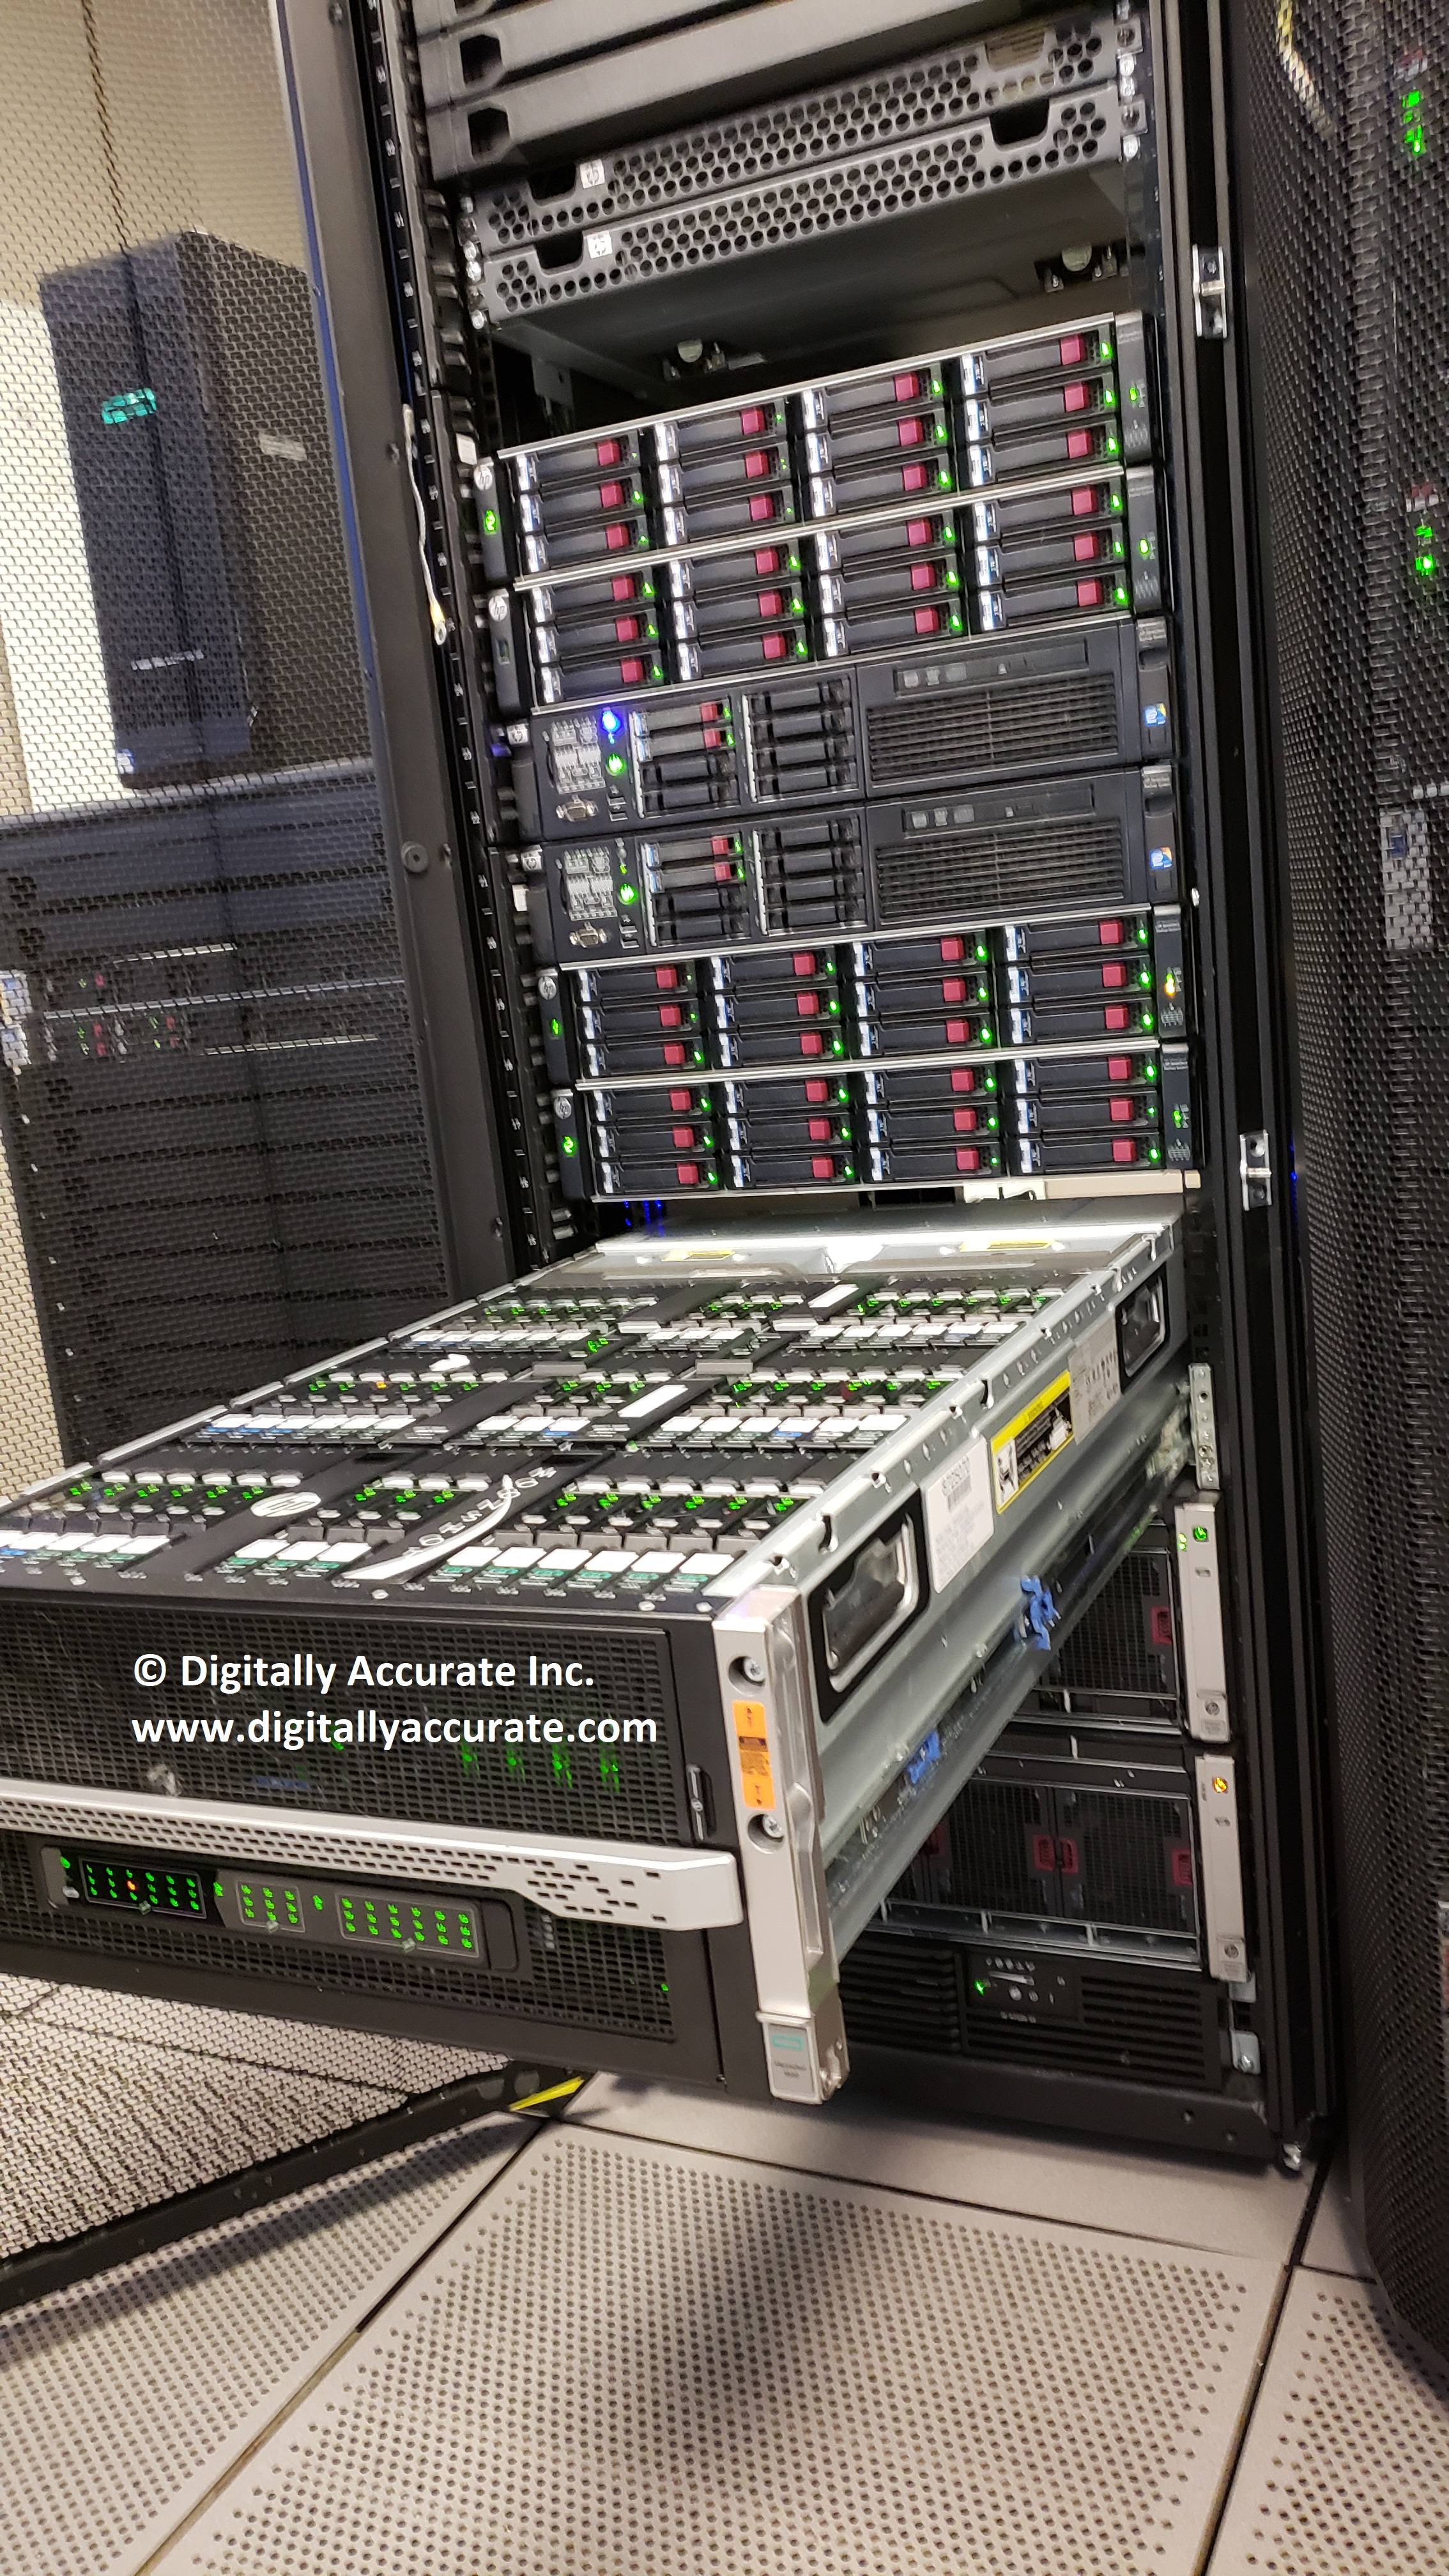
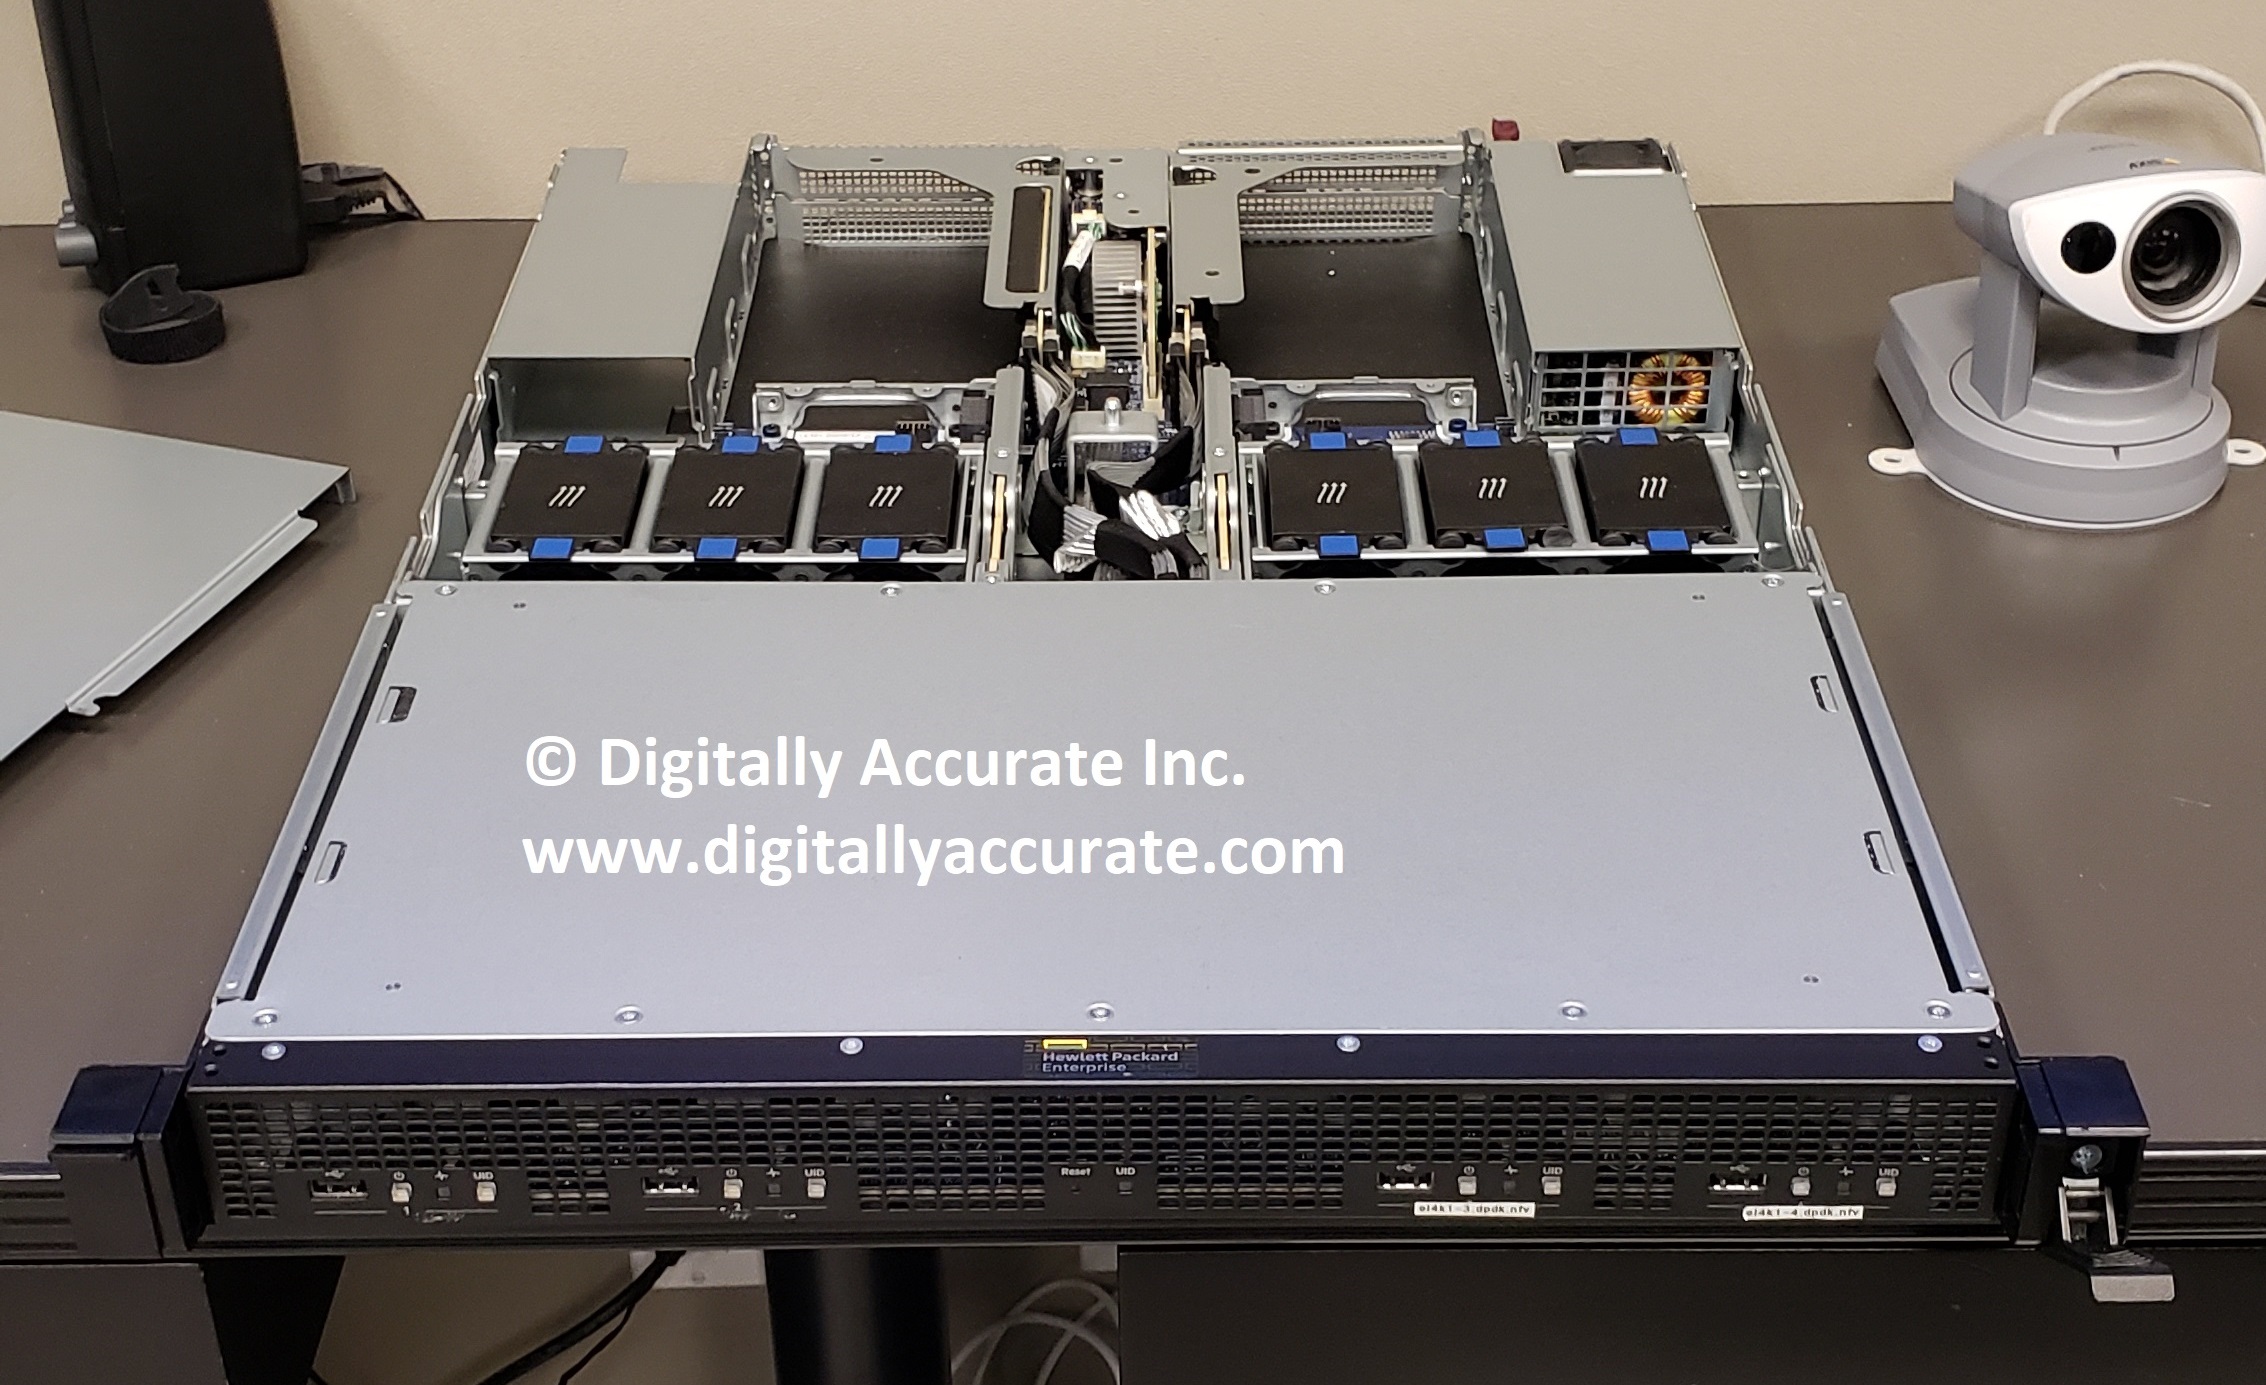
HPE Moonshot 1500 Chassis opened and running

HPe Moonshot 1500 Chassis with Cartridges

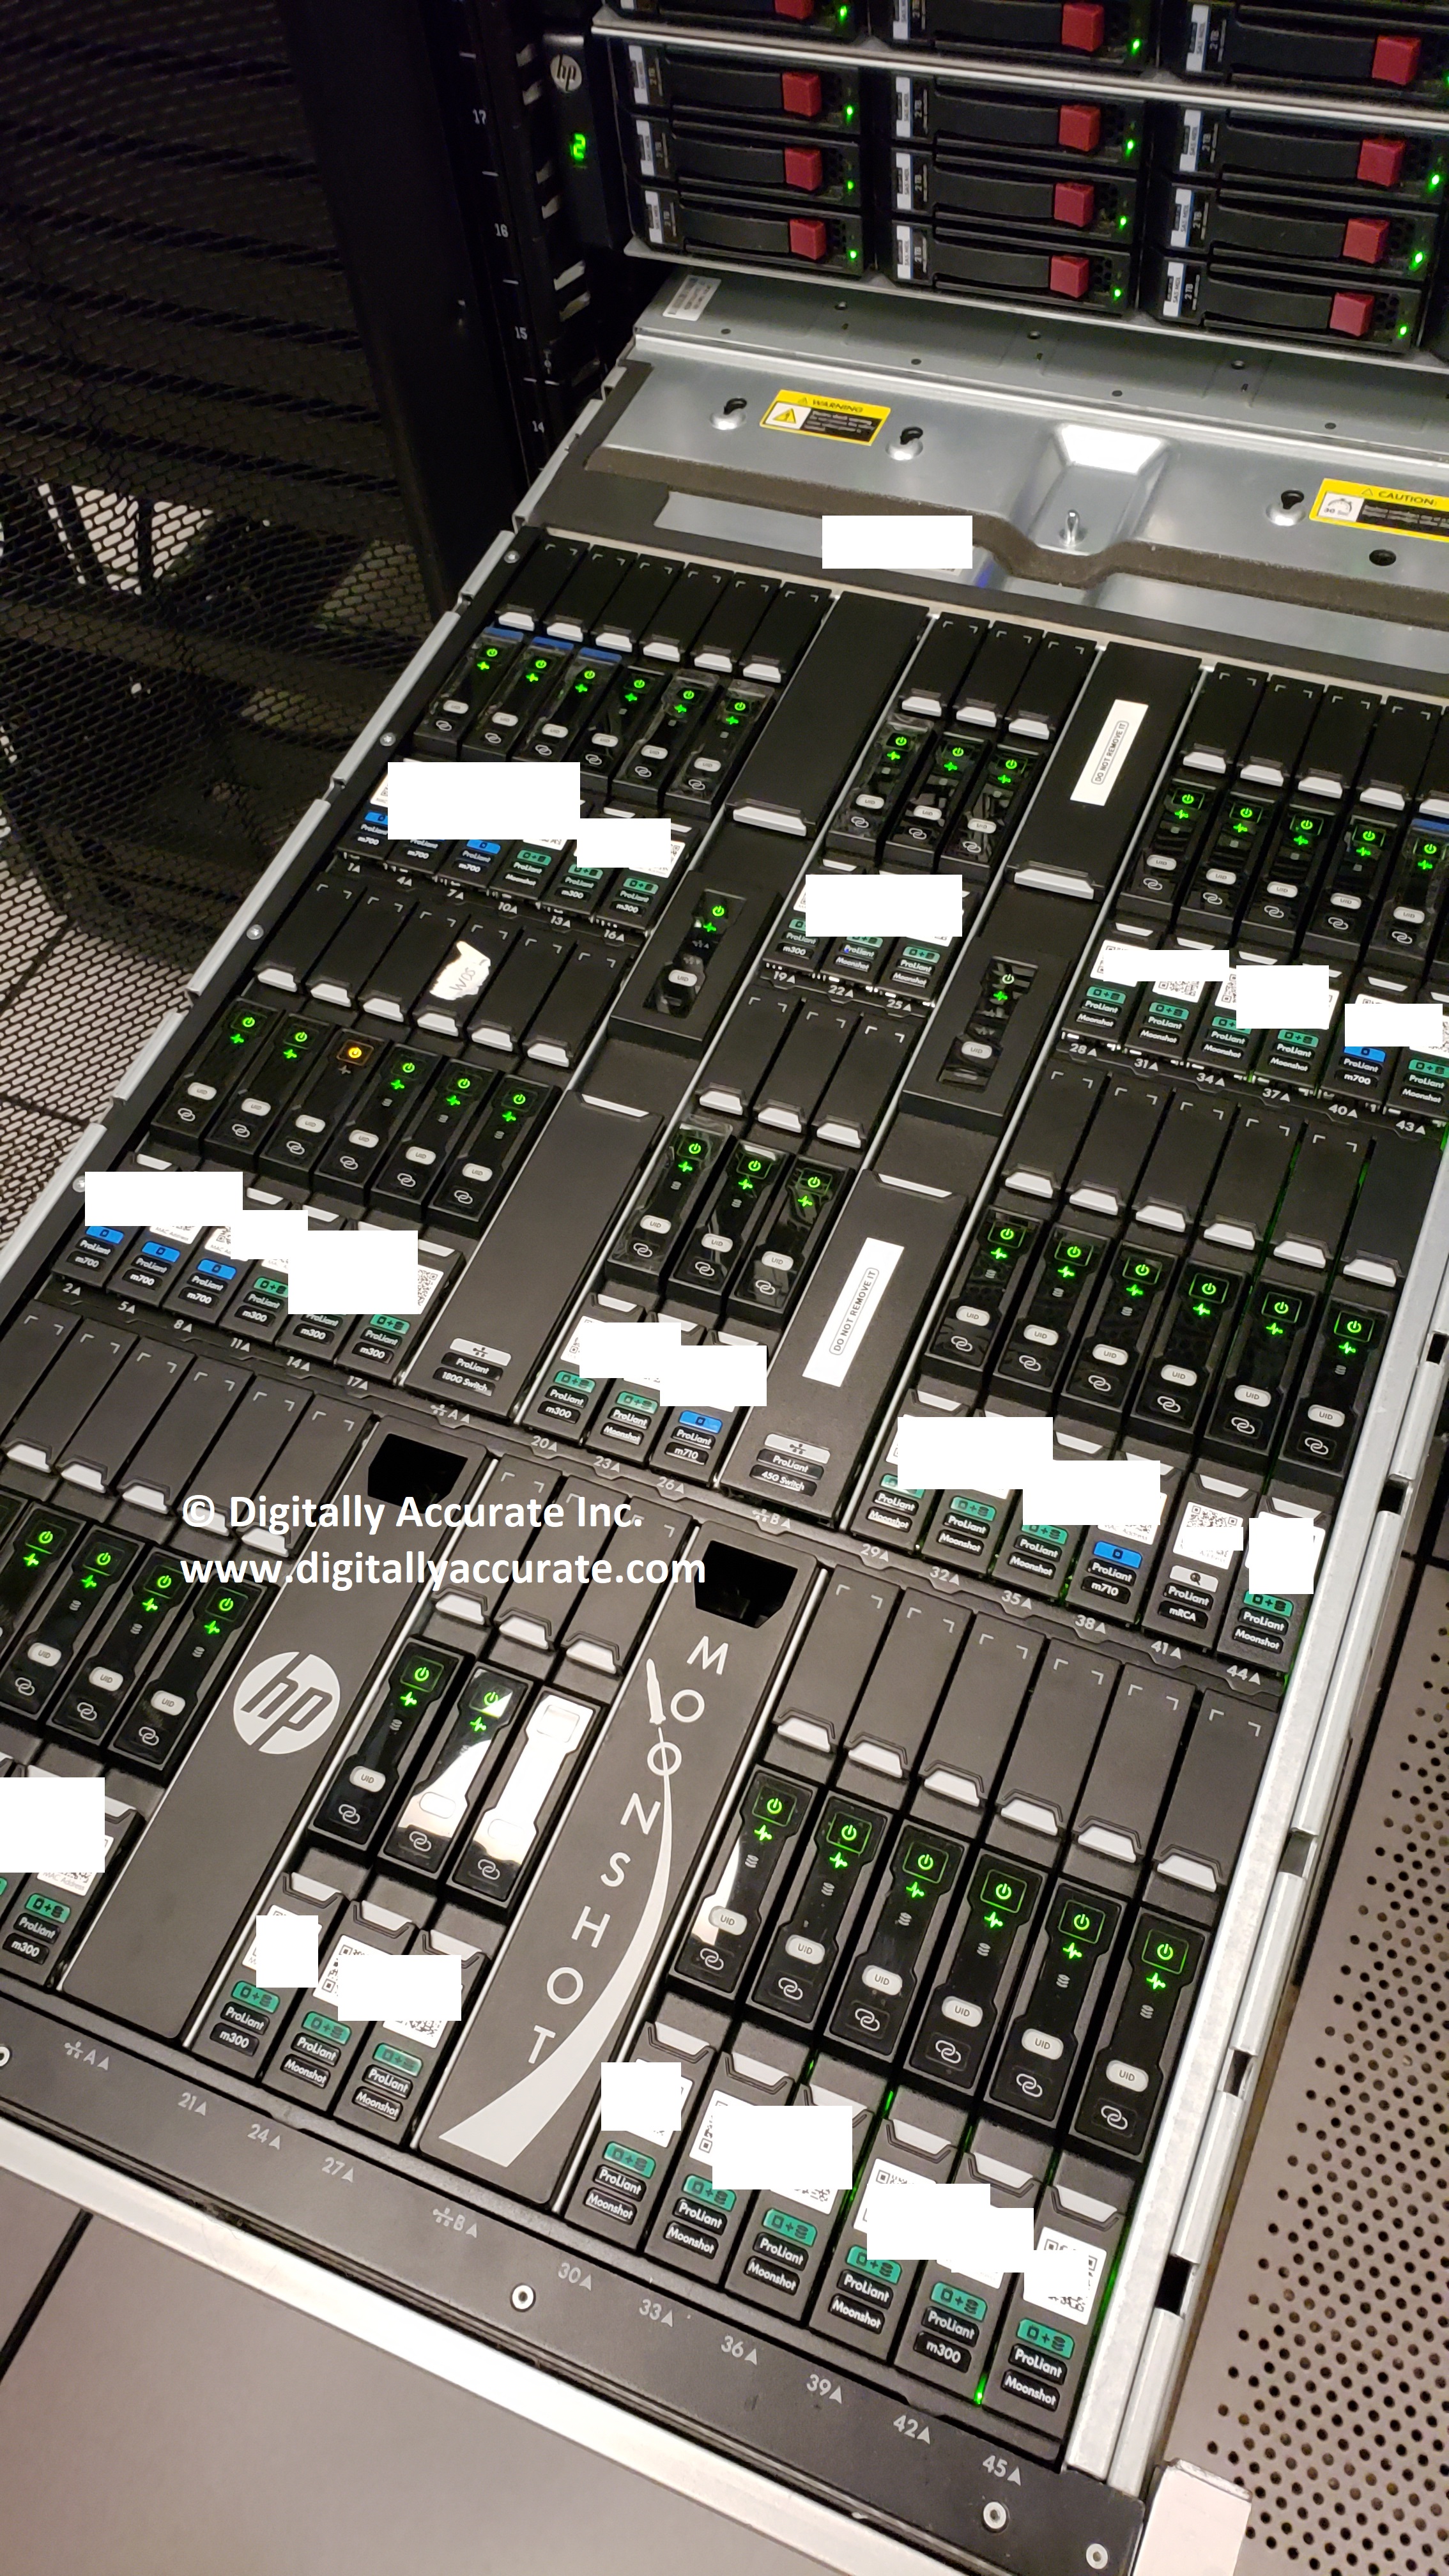
HPE Moonshot 1500 Chassis with Cartridges

And remember, if you’re interested in the HPE Moonshot product or any other products or solutions in HPE’s portfolio, please don’t hesitate to reach out to me or my company (Digitally Accurate Inc.) for more information as we are an HPE partner and design/configure/sell HPE solutions!

Aug 212018
 
Microsoft .NET Framework

You may notice on Windows Server 2012 R2, when applying Windows Updates that one or more .NET updates may fail with error code 0x80092004. This issue may affect all, or only some of your Windows Server 2012 R2 servers.

When troubleshooting this, you may notice numerous specific errors such as “Couldn’t find the hash of component: NetFx4-PenIMC”, or errors with a CAB file. These errors will probably come from update KB4054566 and KB4340558.

The Fix

To resolve this, we are going to download the updates MSU files from the Microsoft Update Catalog, and fully uninstall, then re-install the problematic updates.

Please Note: Always make sure you have a full backup before making modifications to your servers.

Please follow the instructions below:

  1. Create a folder called “updatefix” on the root of your C drive on the server
  2. Navigate to the Windows Update catalog at: https://www.catalog.update.microsoft.com/
  3. Search for KB4054566 and download the file for “Windows Server 2012 R2”, save it to the folder you created above called “updatefix” on the root of your C Drive. There should be one file in the download.
  4. Search for KB4340558 and download the files for “Windows Server 2012 R2”, save it to the folder you created above called “updatefix” on the root of your C Drive. There should be a total of 3 files in this download.
  5. Create a folder in the “updatefix” folder called “expanded”.
  6. Open an elevated command prompt, and run the following commands to extract the updates CAB files:
    expand -f:* "C:\updatefix\windows8.1-kb4338415-x64_cc34d1c48e0cc2a92f3c340ad9a0c927eb3ec2d1.msu" C:\updatefix\expanded\
    expand -f:* "C:\updatefix\windows8.1-kb4338419-x64_4d257a38e38b6b8e3d9e4763dba2ae7506b2754d.msu" C:\updatefix\expanded\
    expand -f:* "C:\updatefix\windows8.1-kb4338424-x64_e3d28f90c6b9dd7e80217b6fb0869e7b6dfe6738.msu" C:\updatefix\expanded\
    expand -f:* "C:\updatefix\windows8.1-kb4054566-x64_e780e6efac612bd0fcaf9cccfe15d6d05c9cc419.msu" C:\updatefix\expanded\
  7. Now let’s uninstall the problematic updates. Some of these commands may fail depending on which updates you have successfully installed. Run the following commands individually to remove the updates:
    dism /online /remove-package /packagepath:C:\updatefix\expanded\Windows8.1-KB4338424-x64.cab
    dism /online /remove-package /packagepath:C:\updatefix\expanded\Windows8.1-KB4338419-x64.cab
    dism /online /remove-package /packagepath:C:\updatefix\expanded\Windows8.1-KB4338415-x64.cab
    dism /online /remove-package /packagepath:C:\updatefix\expanded\Windows8.1-KB4054566-x64.cab
  8. Reboot your server.
  9. Now let’s cleanly install the updates. All of these commands should be successful when running. Run the following commands individually to install the updates:
    dism /online /add-package /packagepath:C:\updatefix\expanded\Windows8.1-KB4054566-x64.cab
    dism /online /add-package /packagepath:C:\updatefix\expanded\Windows8.1-KB4338415-x64.cab
    dism /online /add-package /packagepath:C:\updatefix\expanded\Windows8.1-KB4338419-x64.cab
    dism /online /add-package /packagepath:C:\updatefix\expanded\Windows8.1-KB4338424-x64.cab
  10. Reboot your server.
  11. You have now fixed the issue and all updates should now be cleanly installing via Windows Updates!

Leave a comment and let me know if this worked for you!

Aug 212018
 
VMware Horizon View Logo

Well, after using the VMware Horizon Client mobile app (for Android) for a year, I finally decided to do a little write up and review. I use the android client regularly on my Samsung Tab E LTE tablet, and somewhat infrequently on my Samsung Galaxy S9+ mobile phone (due to the smaller screen).

Let’s start off by briefly explaining what VMware Horizon View is, what the client does, and finally the review. I’ll be including a couple screenshots as well to give an idea as to how the interface and resolution looks on the tablet itself.

The VMware Horizon Client mobile app for android is available at: https://play.google.com/store/apps/details?id=com.vmware.view.client.android

What is VMware Horizon View

VMware Hoirzon View is a product and solution that enables VDI technology for a business. VDI stands for Virtual Desktop Infrastructure. When a business uses VDI, they virtualize their desktops and use either thin clients, zero clients, or the view client to access these virtualized desktops. This allows the business to utilize all the awesome technologies that virtualization brings (DRS, High Availability, Backup/DR, high performance, reduced hardware costs) and provide rich computing environments to their users. The technology is also particularly interesting in the fact that it provides amazing remote access capabilities as one can access their desktop very easily with the VMware View Client.

When you tie this on to an advanced security technology such as Duo’s MFA product, you can’t go wrong!

In special case or large environments, enormous cost savings can be realized when implementing VDI.

What is the VMware Horizon View Mobile client for Android

As mentioned above, to access one’s virtualized desktop a client is needed. While a thin client or zero client can be used, this is beyond the scope of this post as here we are only discussing the VMware View client for Android.

You can download the VMware View client for Android from the App store (link here).

The VMware Horizon View Mobile client for Android allows you to connect to your VDI desktop remotely using your Android based phone or tablet. Below is a screenshot I took with my Samsung Tab E LTE tablet (with the side bar expanded):

VMware Horizon View Client on Android Tablet

VMware Horizon View Client on Android Tablet

VMware Horizon View Mobile Client for Android Experience

Please Note: There is more of the review below the screenshots. Scroll down for more!

The app appears to be very lightweight, with an easy interface. Configuration of View Connections Servers, or UAG’s (Unified Access Gateways) is very simple. The login process performs with RADIUS and/or MFA as the desktop client would. In the examples below, you’ll notice I use Duo’s MFA/2FA authentication solution in combination with AD logins.

VMware Horizon View Mobile Client Android Server List

VMware Horizon View Mobile Client Android Server List

The interface is almost identical to the desktop client with very little differences. The configuration options are also very similar and allow customization of the app, with options for connection quality as an example.

VMware Horizon View Mobile Client Android Server Login

VMware Horizon View Mobile Client Android Server Login

VMware Horizon View Mobile Client Android Login Duo MFA

VMware Horizon View Mobile Client Android Login Duo MFA

As you can see above, the RADIUS and Duo Security Login prompts are fully functional.

VMware Horizon View Mobile Client Android Server List

VMware Horizon View Mobile Client Android Server List

VMware Horizon View Mobile Client Android Windows 10 VDI Desktop

VMware Horizon View Mobile Client Android Windows 10 VDI Desktop

The resolution is perfect for the tablet, and is very usable. The touch interface works extremely well, and text input works as good as it can. While this wouldn’t be used as a replacement for the desktop client, or a thin/zero client, it is a valuable tool for the mobile power user.

With how lightweight and cheap tablets are now, you could almost leave your tablet in your vehicle (although I wouldn’t recommend it), so that in the event of an emergency where you need to access your desktop, you’d be able to using the app.

Pros:

  • Fluid interface
  • Windows 10 touch functionality works great
  • Resolution Support
  • Samsung Dex is fully supported
  • Webcam redirection works
  • Works on Airplanes using in flight WiFi

Cons:

  • Bandwidth usage
  • Saving credentials via Fingerprint Scanner would be nice (on the S8+ and S9+)

My Usage

Being in IT, I’ve had to use this many times to log in and manage my vSphere cluster, servers, HPE iLo, check temperatures, and log in to customer environments (I prefer to log in using my VDI desktop, instead of saving client information on the device I’m carrying with me). It’s perfect for these uses.

I also regularly use VDI over LTE. Using VDI over mobile LTE connections works fantastic, however you’ll want to make sure you have an adequate data plan as the H.264 video stream uses a lot of bandwidth. Using this regularly over LTE could cause you to go over your data limits and incur additional charges.

Additional Information

Samsung Dex

The VMware Horizon View Mobile Client for Android also supports Samsung Dex. This means that if you have a Dex dock or the Dex pad, you can use the mobile client to provide a full desktop experience to a monitor/keyboard/mouse using your Samsung Galaxy phone. I’ll be doing a write up later to demo this (it works great).

VMware Horizon Client for Chrome OS

VMware also has a client for Chrome OS, so that you can use your Chromebook to connect to your VDI desktop. You can download VMware Horizon Client for Chrome OS here: https://chrome.google.com/webstore/detail/vmware-horizon-client-for/ppkfnjlimknmjoaemnpidmdlfchhehel

Aug 202018
 

An all too common problem is when users report e-mail delays ranging from 5 to 15 minutes. When troubleshing these types of issues, you’ll notice this commonly occurs when receiving e-mails from organizations that use Office 365. Specifically this occurs due to greylisting.

Why does this happen

You’re organization is using greylisting on your e-mail proxy/SMTP relay to reduce spam. Greylisting temporarily rejects the first send of an e-mail and waits for the sending server to re-transmit the message. This process usually takes around 5-15 minutes to complete. Greylisting is used because spammers won’t re-transmit the message, which leads to a massive reduction of spam messages coming through.

Once the sending server retransmits, the sending server IP address is added to your firewalls “safe senders” whitelist. From this point on the IP address (or server) will not be subject to greylisting (and any subsequent e-mails).

Office 365 has hundreds, if not thousands (possibly 10’s of thousands) of servers they use to transmit e-mail. The chance of multiple e-mails being sent from a single server is very slim, therefor greylisting is applied to every IP (server) that is sending e-mail because it’s different. Each e-mail from an Office 365 user can take 5-15 minutes, since a new server is used every time.

How to resolve

You’ll need to configure and add an exception to your e-mail proxy/SMTP relay/firewall. This exception can be based off domain, DNS name of sending server, or IP address ranges.

Scroll down for instructions on how to create an exception on a Sophos UTM.

Domain Exception

If you use domain based exceptions, you’ll need to configure these manually for each sending domain that you want your firewall to skip greylist checking. This is a very manual process, which requires lots of human intervention to continuously update your greylist exception.

DNS FQDN of MX Server

This method is the easiest, however most firewall or UTM’s will now allow these types of exceptions since a number of DNS queries will be needed everytime an e-mail comes in. One DNS query on the MX record, and then another DNS query on the DNS host contained in the MX record. If you can configure this type of exception, you’ll want to configure it as below:

*-com.mail.protection.outlook.com

IP Address Range

This is the best method. To create an IP address range exception, we’ll need a copy of all the IP address ranges or IP address spaces that Office 365 uses to send mail. This list can be found at: https://docs.microsoft.com/en-us/microsoft-365/enterprise/urls-and-ip-address-ranges?view=o365-worldwide.

We’ll need to create an exception that skips greylist checking on the IP addresses outlined in the above link. This will stop any greylist checking on e-mails from Office 365 servers.

In my case, I use a Sophos UTM firewall, and to create an exception I had to do the following:

  1. Log on to the Webmin interface.
  2. Select “Email Protection”, then “STMP” on the left hand side, then “Exceptions” tab at the top.

    Sophos UTM E-Mail and SMTP Exception List

    Sophos UTM E-Mail and SMTP Exception List

  3. Create a “New Exception List” and call it “Office 365 GreylistWhitelist”.
  4. Check the “Greylisting” box under “Antispam”, and then check the “For these source hosts/networks”.

    Sophos UTM SMTP Create Exception

    Sophos UTM SMTP Create Exception

  5. Click the “+” button, and call the Network Definition “Exchange365-EOP-Group”. Change the type to “Network Group”.
  6. Click the “+” button in the members section, and start adding the IP spaces. Repeat this for each IP space (in total I added 23). Each network name (IP address space) requires a unique name, I named mine “Exchange365-EOP1” through “Exchange365-EOP23”.

    Sophos UTM SMTP Configure Exception

    Sophos UTM SMTP Configure Exception

  7. Click Save on the Network Group, and click Save on the exception.
  8. Enable the Exception

    Sophos UTM SMTP Exception Rule

    Sophos UTM SMTP Exception Rule

  9. Completed! You’ve now made the exception and delays should no longer occur.
Aug 192018
 

I finally got around to mounting my Wilson weBoost Home 4G Cell Phone Booster Antenna on the roof. Here’s some pictures of the completed install. I’ve had this booster for a while and it’s worked great, however some new cell towers went up in the area, and I wanted to stop using the window mount and re aim the antenna.

Wilson weBoost Home 4G Cell Phone Booster Roof Outdoor Antenna

Wilson weBoost Home 4G Cell Phone Booster Roof Outdoor Antenna

For those of you wanting to read my original post on the Wilson weBoost Home 4G Cell Phone Booster Kit, installation, and a review, you can find it at https://www.stephenwagner.com/2017/06/01/cellmobile-phone-reception-issues-resolve-with-a-wilson-amplifier-cell-booster/.

The house that I live in, actually had a roof mounted satellite dish that was no longer in use (used before the provider ran coax in the area). The dish, roof mount, and coax were all in place, however the coax was cut so I couldn’t re-use it.

I was able to remove 2 of the bolts on the satelite dish to remove it from the pole mount, and proceeded to install the antenna on the pole using the outdoor mounting kit included with the cell booster. I was extremely pleased with the install.

See below for more pics:

Roof mounted Wilson weBoost Home 4G Cell Phone Booster Kit

Roof mounted Wilson weBoost Home 4G Cell Phone Booster Kit

Roof mounted Wilson weBoost Home 4G Cell Phone Booster Kit Cabling

Roof mounted Wilson weBoost Home 4G Cell Phone Booster Kit Cabling

Roof mounted Antenna pole mount

Roof mounted Antenna pole mount

The cabling goes through the pole, down to the eavestrough where I have it zip-stripped (yet elevated) along the roof until I get to the house’s siding. I was able to tuck it in the corner siding down to the wiring access panel for the house, then into the house through the hole.

After mounting it, it took around 30 minutes to aim it with the assistance of the “LTE Discover” Android app (available at https://play.google.com/store/apps/details?id=net.simplyadvanced.ltediscovery). Remember, when aiming your antenna, it’s important to unplug your booster for 5-10 seconds for it to fully reset for it to function with the new antenna position.

Again, make sure you check out my original post and review at https://www.stephenwagner.com/2017/06/01/cellmobile-phone-reception-issues-resolve-with-a-wilson-amplifier-cell-booster/!

Update – July 28th, 2019 – So here I am two years later. I live and swear by this signal booster. Since the original post, new towers have been erected in the area, however the coverage is still minimal and non-existant in the house. The roof mount (as discussed in the update above), as well as the signal booster provides me 100% full reception. The only issue I had is the power adapter (transformer) fried one day during a lightning storm. Replacing the power adapter resolved the issue and was an easy fix. For the 2 days I waited for the power adapter, I had no reception.