Jun 032012
 

Well, for the longest time I have been running a vSphere 4.x cluster (1 X ML350 G5, 2 X DL360 G5) off of a pair of HP MSA20’s connected to a SuperMicro server running Lio-Target as a iSCSI Target on CentOS 6.

This configuration has worked perfectly for me for almost a year, requiring absolutely no maintenance/work at all.

Recently I moved, so I had to move all my servers, storage units, etc… When I got in to the new place, and went to power everything up, I noticed that my first drive had failed upon initializing one of the MSA20 units.. I replaced this drive, let it rebuild, and thought this would be the end of the issue, but I was incorrect. (Just so everyone knows, these units had been on continuously for 8+ months before turning them off to move).

For months since this happened and a successful rebuild, at times of high I/O (backing up to a NFS share using GhettoVCB), the logical drive in the array just disappears. I have each MSA20 connected to it’s own HP SmartArray 6400/6402 controller. When the logical drive disappears, I notice that the “Drive Failure” LED on the SA 640x controller illuminates. When this happens, I have to shut off all physical servers, the storage server (running Lio-Target), and the MSA’s, and restart everything.

Sometimes it is worse than others (example I’ve been dealing with this issue non-stop all weekend with no sleep). Even under low I/O I’ll be starting the VMs and it will just lose it again. While other times, I can run it for weeks as long as I keep the I/O to a minimum.

I’ve read numerous other articles and posts of other people having the same issue. These people have had HP replace every single item inside of the MSA20 unit (except the drives) and the issue still occurs. This made me start thinking.

This weekend, I NEEDED to get a backup done. While doing this, the issue occurred, and it got to the point where I couldn’t even start the VMs, let alone back them up. I figured that since other people have had this issue, and since replacing all hardware hasn’t fixed it (I even moved a RAID array from one MSA20 to the other I have with no affect), then it has to be the drives themselves.

There are two possibilities, either the drives are failed, and the MSA20 isn’t reporting them as failed (which I’ve seen happen), or the way the MSA20 creates the RAID array has issues. I ran a ADU report and carefully read the entire report. Absolutely no issues reading/writing to the drives, and the MSA20 has no events in it’s log. It HAS to be the way the RAID array is created on the disks.

Please do not try this unless you know exactly what you’re doing. This is very dangerous and you can lose all your data. This is just me reporting on my experience and usage.

In desperation I thought to myself this all happened when a drive failed and I put a new disk in the array. Since I couldn’t back any of my data up, or let alone even start the VMs, I decided to start behaving dangerously. I kept all my vSphere hosts offline, and just turned on the MSA20 units and the SuperMicro server that is attached to them. I then proceeded to remove a drive, re-insert it, let it rebuild over 3 hours, then when healthy and rebuilt, do it to the next drive. I have a RAID 5 Array containing 4 X 500GB disks, so this actually took me a day to do (had to remove/re-insert, rebuild, then next drive).

After finally removing and rebuilding each drive in the array, I finally decided to boot up the vSphere servers, and run a backup of my 12 VMs. Not only did everything seem faster, but I completed the backup without any problems. This shows that there’s a very high chance that the RAID stuff on the drives is either corrupt, damaged, or just wasn’t implemented very nicely. Rebuilding each drive seemed to fix this. I’ll report in a few weeks to let you know for sure that it’s resolved!


Hope this helps someone out there!
May 112012
 

For the longest time I’ve been dealing with a server that hasn’t been playing nice. Regularly the server will freeze when either creating VSS snapshots, or deleting them!

These usually happen at 6:00AM or 12:00PM (when I have them scheduled) and can sometimes lock the server up for close to 30 minutes. I’ve spent HOURS investigating this, resulting with absolutely no errors, no nothing, except for that some services might fail due to the freeze if I’m actually logged in to the server.

Typically, this behavior only starts happening 1-2 weeks after a fresh reboot. Rebooting the server stops this issue for 1-2 weeks. And keep in mind, as I said absolutely no errors in the event log that point to what is causing this.

The Server runs fully updated/patched Windows Server 2008, has 16GB of RAM, 2 X 6-core processors and SAS disks, so it’s nothing related to performance.

Finally after months I have found out what the culprit is in my case: Turns out that Symantec Endpoint Manager (not the anti-virus, but the management software) was actually causing or agitating this issue. When logging in, I noticed that Symantec Endpoint Protection Manager was somewhat sluggish, and not functioning properly, I restarted the services, and BAM out of nowhere VSS process decides to deleted the oldest snapshot for C:. When this happened the server freezed. I repeated this 4 times to confirm, all in the same morning. I’m not sure why it was triggering snapshot removal, but it was odd.

I proceed to upgrade Symantec Endpoint Protection Manager on that server later that week. During the upgrade (I upgraded to a new 11.x released, then later to 12.x), I noticed that every time the services were restarted automatically as part of the database upgrade process, that the VSS issue would occur and the server would become unresponsive.

We are now running at 12.x on that system, and have not had any reported freeze-ups. It’s been over a week and a half, and it looks like the issue is resolved.

Apr 142012
 

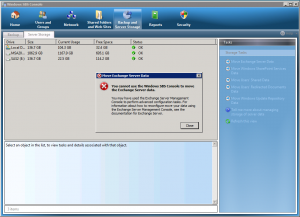
The other day I received a notification that one of my clients were running out of space on their SAS RAID Array which contained their Exchange 2007 mailbox data store database. While I have every plan to increase the size of this partition, I still have to temporarily fix things so we don’t run out of space. Technically, to put a temporary fix on this, I had to move the Exchange Server Data to another partition on the server which had plenty of space. Typically, this is very easy on Microsoft Small Business Server 2008. However, in this specific scenario we were getting an error when trying to run the wizard to move the data:


Move Exchange Data Error Message

You cannot use the Windows SBS Console to move the Exchange Server data. – You may have used the Exchange Server Management Console to perform advanced configuration tasks. For information about how to reconfigure move your data using the Exchange Server Management Console, see the documentation for Microsoft Exchange Server


After receiving this error I went ahead and looked for the logs pertaining to the move wizards. The error log mentioned that configuration was altered from the default (which is acceptable since we have done some modifications to our Exchange config), and I also believe this is occurred due to both our “First Storage Group” and “Second Storage Group” already being hosted on different logical partitions. From what I have read, you cannot modify your Exchange configuration too heavily, nor have your different storage groups on different partitions for the wizard to work.

Since this happened, we have to move the Exchange data manually using the Exchange Management Console. These instructions will work for both Microsoft Windows Small Business Server 2008, and also Microsoft Exchange 2007 running on a standard Microsoft Windows Server (only if your not using any replication to other Exchange Servers). Please note that during this move, all move functions will require the database to be dismounted from the information store. Only Exchange 2010 (or later) supports live moving.

Instructions to move the Exchange database (First Storage Group – Mailbox Database):

Important: Always back up your server before doing heavy operations like this in case something goes wrong. To back Microsoft Exchange up, you have to have backup software that is “Exchange Aware” and can properly back it up.


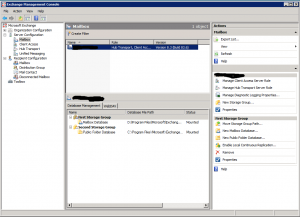
1) Launch the Microsoft Exchange Management Console and locate the Database Management information – You should be able to find the Exchange Management console in your start menu. When opening it should prompt for a UAC (run as Administrator) privileges, grant it. If it does not prompt you to run as Administrator, right click on “Exchange Management Console” and select “Run as Administrator”. Once you have opened the console, expand “Server Configuration” and “Mailbox”.

Exchange Server 2007 Management Console

Server Configuration -> Mailbox


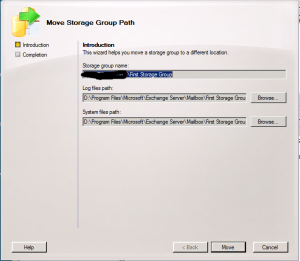
2) Move Storage Group Path -First we need to move the “Storage Group Path” for the “First Storage Group” (which contains our Exchange Mailboxes). This will move the files that are related to logs, transaction files, etc… To do this, right click on “First Storage Group”, and select “Move Storage Group Path…”. Follow the wizard. Inside of the wizard, you will choose the new location in both the “Log files path” and “System files path”. Finally after you have specified the location, it will dismount the database and perform the move function.

Move Storage Group Path Wizard

Move Storage Group Path Wizard


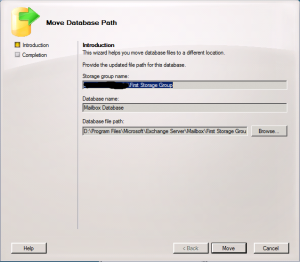
3) Move Database Path – Now we need to move the actual database path of the “Mailbox Database”. This will actually move the Exchange mailboxes on our server to a new location. To do this, right click on “Mailbox Database” and select “Move database path…”. Follow the wizard. Inside of the wizard, you will choose the new location for the “Database file path”. Finally after you have specified the location, it will dismount the database and perform the move function.

Move Database Path Wizard

Move Database Path Wizard


4) Move Public Folders (If desired) – If you desire, you can also move your “Public Folders” by performing the same steps for the “Second Storage Group” and the “Public Folder Database”. In my case, our public folders are very small, so I didn’t bother.


You have now moved your Exchange 2007 mailbox database.

If you need any assistance or help with SBS, please don’t hesitate to reach out. I provide SBS Consulting Services, more information can be found here: https://www.stephenwagner.com/2020/02/28/microsoft-small-business-server-migration-upgrade/.

Mar 112012
 

For the past 2 weeks I’ve been receiving notifications reporting that one of my clients SBS 2008 environments is about to have some Exchange certificates expire.

Please Note, I provide Small Business Server consulting services, more information is available here!

Below is an example of the event log:

Source: MSExchangeTransport
Category: TransportService
Event ID: 12017
User (If Applicable): N/A
Computer: server.domain.local  Event Description: An internal transport certificate will expire soon. Thumbprint:ZOMGZOMGZOMGZAOMGZOMGZOMGZOM, hours remaining: 46  Event Log Name: Application  Event Log Type: warning  Event Log Date Time: 2012-03-08 13:15:36

Now upon initial research, apparently we were supposed to just be able to run the “Fix My Network” wizard inside of the SBS Console. Running this during the warnings, and after the certificate actually expired did absolutely nothing. The wizard was unable to detect the certificate had expired. It did report something to do with issues with an SMTP connector, however everything was working, and when trying to fix that, the wizard errored out and could not complete. I also read another article that running the “Setup my internet address” my fix the issue, but however it did not.

I decided to take a look at all the certificates currently install and also in use. To view the certificates installed, go to “Start”, then “Run”, type in “mmc.exe” and hit OK. Click on “File”, then “Add/Remove Snap-in”. Inside of this window, highlight “Certificates” and move to the right (hit the button with the arrow). Another window should open, select “Computer Account”, and follow through with the wizard. Once the certificates open, expand “Personal” and “Certificates” underneath it.

In my environment I noticed that there were two certificates that were identical, only difference being expiration. I had a feeling that the proper certificate existed on the server, however for some reason it was using an older one that it should not be. Keep in mind, this specific server was migrated from another (SBS 2008 to SBS 2008 Migration to new hardware).

To confirm they were identical, I opened up a Exchange Shell (find it in the start menu, and right click and “Run As Administrator”). I typed in “Get-ExchangeCertificate | FL”. The output confirmed that the certificates were the same and performed the same function.

ONLY PERFORM THIS if exchange is using the wrong certificate and you have two certificates which are the same, only with different expiration dates. If you do not, you are experiencing another problem and these instruction either won’t help you, or make your problem worse.

I decided to switch Exchange over to the new certificate:

1) Get the thumbprint of the newer certificate, it will be provided when you run “Get-ExchangeCertificate | FL”. Make sure the services and information match the certificate that is about to expire.

2) With the Exchange Shell still open type in “Enable-ExchangeCertificate thumbprint -Services SMTP,POP,IMAP” (sub in the thumbprint where it says thumbprint).

3) It will ask you to confirm, click ok.

4) Delete the old certificate, but make sure you back it up first. Export the old expiring certificate using the Certificate view inside of mmc.exe (what we did above). Export it (with extended data) so it can easily be re-imported if any issues occur. If you do need to restore it, inside of the Certificate view in mmc.exe, simply right click, re-import, and use the “Enable-ExchangeCertificate” (shown above) to re-activate it.

Hope this helps!

Mar 102012
 

Wow, what a horrible weekend it has been dealing with all these certificate expirations (both clients, and my own). Ton’s of articles on the internet, however tons don’t cover what you do if you have your own certificate authority and DON’T want to use a self-signed certificate. Also, all the tutorials on the net use the Shell, I rather use the GUI…

When it comes time to renew your certificate, you’ll be seeing these in your Event Viewer:

Source: MSExchangeTransport
Category: TransportService
Event ID: 12018
User (If Applicable): N/A
Computer: server.domain.com  Event Description: The STARTTLS certificate will expire soon: subject: server.domain.com, thumbprint: ZOMGZOMGZOMGZOMGZOMGZOMGZOMGZOMG, hours remaining: 664. Run the New-ExchangeCertificate cmdlet to create a new certificate.


Source: MSExchangeTransport
Category: TransportService
Event ID: 12017
User (If Applicable): N/A
Computer: server.domain.com  Event Description: An internal transport certificate will expire soon. ZOMGZOMGZOMGZOMGZOMGZOMGZOMGZOMG, hours remaining: 664  Event Log Name: Application  Event Log Type: error

Anyways, first off, DO NOT use this tutorial if your running “Microsoft Small Business Server”, there is a better, easier, and more automated way to perform this on SBS (I won’t be covering that in this blog post, I will however make another one to explain the procedure). Depending on you’re environment, this may or may not be the best way or the right way to do this. In my environment, I have 1 server that acts as a Domain Controller and a Certificate authority, and a second server that is running Microsoft Exchange 2010.

You take your own risk if you perform the instruction in this blog post.


1) Start the renewal process

We need to generate a renewal request. Load up the Exchange Console, and select the “Server Configuration” on the left. It should load up your Exchange Certificates on the lower half of your screen. Look for your certificate that is about to expire. To get the details on the certificates, simply double click and it will load the info, if you’re unsure of which certificate it is, use the thumbprint provided in the Event viewer, and compare it to the Thumbprint on the “Details” tab of the certificate. Once you find it, highlight it and select “Renew Exchange Certificate…” on the action pain to the right.

Renew Exchange Certificate


2) Create renewal request Wizard

This will open the certificate renewal request wizard (as shown below):

Certificate Renewal Request Wizard


Simply choose a file name and location to save the request. It’s easiest just to save it on your desktop. After, hit “Renew”. This will generate the certificate renewal request.


3) Copy certificate request to clipboard

Locate the file you created above inside of Windows Explorer. Right click on this file and select “Open”, or “Open With”. When prompted, uncheck the “Always use the selected program to open this kind of file” option, and select “Notepad” as the program to open the file with. Example below:

Open with Notepad

Open with Notepad


This will open the certificate request. Now highlight all the text and copy it to your clipboard. Example below:

Certificate request in Notepad

Certificate request in Notepad


4) Submit certificate request to certificate authority using web interface

Now we submit the request! Log on to your certificate authority web interface. On the first screen, we will select “Request a certificate”, as shown below:

Request

Request


Then select “advanced certificate request”, as shown below:

Advanced certificate request

Advanced certificate request


And now, choose “Submit a certificate request by using a base-64 encoded CMC or PKCS #10 file, or submit a renewal request by using a base-64-encoded PKCS #7 file.”, again example below:


Finally, we are going to populate the request. Inside of the “Saved Request:” text box, paste your request from your clipboard (which we copied to your clipboard above), then for “Certificate Template:” choose “Web Server”. Example is below:


Now select Submit! On the next page that loads, simply select “Download certificate” and save it to a location you’ll remember.


5) Install certificate on Exchange

We now have a certificate that’s ready to be installed. Go back to the Exchange console where we left off. Inside of the certificate list, you should see an item that has a status that says something about a pending request. Highlight this request, and on the Action Pane, select “Complete request”. I could be wrong on what this says as I can’t remember and did not take screenshots.

A wizard should open up, in this wizard simply point it to the new certificate (the file we just saved at the end of step 4, shown above). Follow the instructions.


6) Assign Services to Certificate

Now that the certificate is installed, we need to assign which services will use it. The new certificate should also now be in the list of certificates inside of Exchange. Highlight the new certificate, right click, and select “Assign Services to Certificate”. Example below:

Assign Services to Certificate

Assign Services to Certificate


Once the wizard opens up, follow through and when actually prompted for the services check everything except for “Unified Messaging”. Finish the wizard.


7) Delete old certificate

Now we are almost done. Go back to the certificate list inside of Exchange and look for the old certificate that is going to expire. Highlight it, right click, and select “Remove”.


You’re Done!