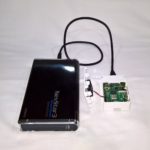
The Raspberry Pi 4 is a super neat little device that has a whole bunch of uses, and if there isn’t for something you’re looking for you can make one! As they come out with newer and newer generations of the Raspberry Pi, the hardware gets better, faster, and the capabilities greatly improve.
I decided it was time with the newer and powerful Raspberry Pi 4, to try and turn it in to an iSCSI SAN! Yes, you heard that right!
With the powerful quad core processor, mighty 4GB of RAM, and USB 3.0 ports, there’s no reason why this device couldn’t act as a SAN (in the literal sense). You could even use mdadm and configure it as a SAN that performs RAID across multiple drives.
In this article, I’m going to explain what, why, and how to (with full instructions) configure your Raspberry Pi 4 as an iSCSI SAN, an iSCSI Target.
Please Note: these instructions also apply to standard Linux PCs and Servers as well, but I’m putting emphasis that you can do this on SBCs like the Raspberry Pi.
A little history…
Over the years on the blog, I’ve written numerous posts pertaining to virtualization, iSCSI, storage, and other topics because of my work in IT. On the side as a hobby I’ve also done a lot of work with SBC (Single Board Computers) and storage.
Some of the most popular posts, while extremely old are:
- Raspberry Pi as iSCSI Target (iSCSI Server) Proof of Concept – Overview – This was a proof of concept that discussed the idea, but didn’t provide instructions.
- Fedora 17 ARM for Raspberry Pi – Compile your own kernel – This post was originally to compile a kernel to be used with the Lio-Target iSCSI target.
- Lio-Target running on Soekris Net4801 – Proof of concept, instructions, and information on setting up the Soekris Net4801 as an iSCSI Target.
You’ll notice I put a lot of effort specifically in to “Lio-Target”…
When deploying or using Virtualization workloads and using shared iSCSI storage, the iSCSI Target must support something called SPC-3/SPC-4 Reservations.
SPC-3 and SPC-4 reservations allow a host to set a “SCSI reservation” and reserve the blocks on the storage it’s working with. By reserving the storage blocks, this allows numerous hosts to share the storage. Ultimately this is what allows you to have multiple hosts accessing the same volume. Please keep in mind both the iSCSI Target and the filesystem must support clustered filesystems and multiple hosts.
Originally, most of the open source iSCSI targets including the one that was built in to the Linux kernel did not support SCSI reservations. This resulted in volume and disk corruption when someone deployed a target and connected with multiple hosts.
Lio-Target specifically supported these reservations and this is why it had my focus. Deploying a Lio-target iSCSI target fully worked when using with VMware vSphere and VMware ESXi.
Ultimately, on January 15th, 2011 the iSCSI target in the Linux kernel 2.6.38 was replaced with Lio-target. All new Linux kernels use the Lio-Target as it’s iSCSI target.
What is an iSCSI Target?
An iSCSI target is a target that contains LUNs that you connect to with an iSCSI initiator.
The Target is the server, and the client is the initiator. Once connected to a target, you can directly access volumes and LUNs using iSCSI (SCSI over Internet).
What is it used for?
iSCSI is mostly used as shared storage for virtual environments like VMware vSphere (and VMware ESXi), as well as Hyper-V, and other hypervisors.
It can also be used for containers, file storage, remote access to drives, etc…
Why would I use or need this on the Raspberry Pi 4?
Some users are turning their Raspberry Pi’s in to NAS devices, whynot turn it in to a SAN?
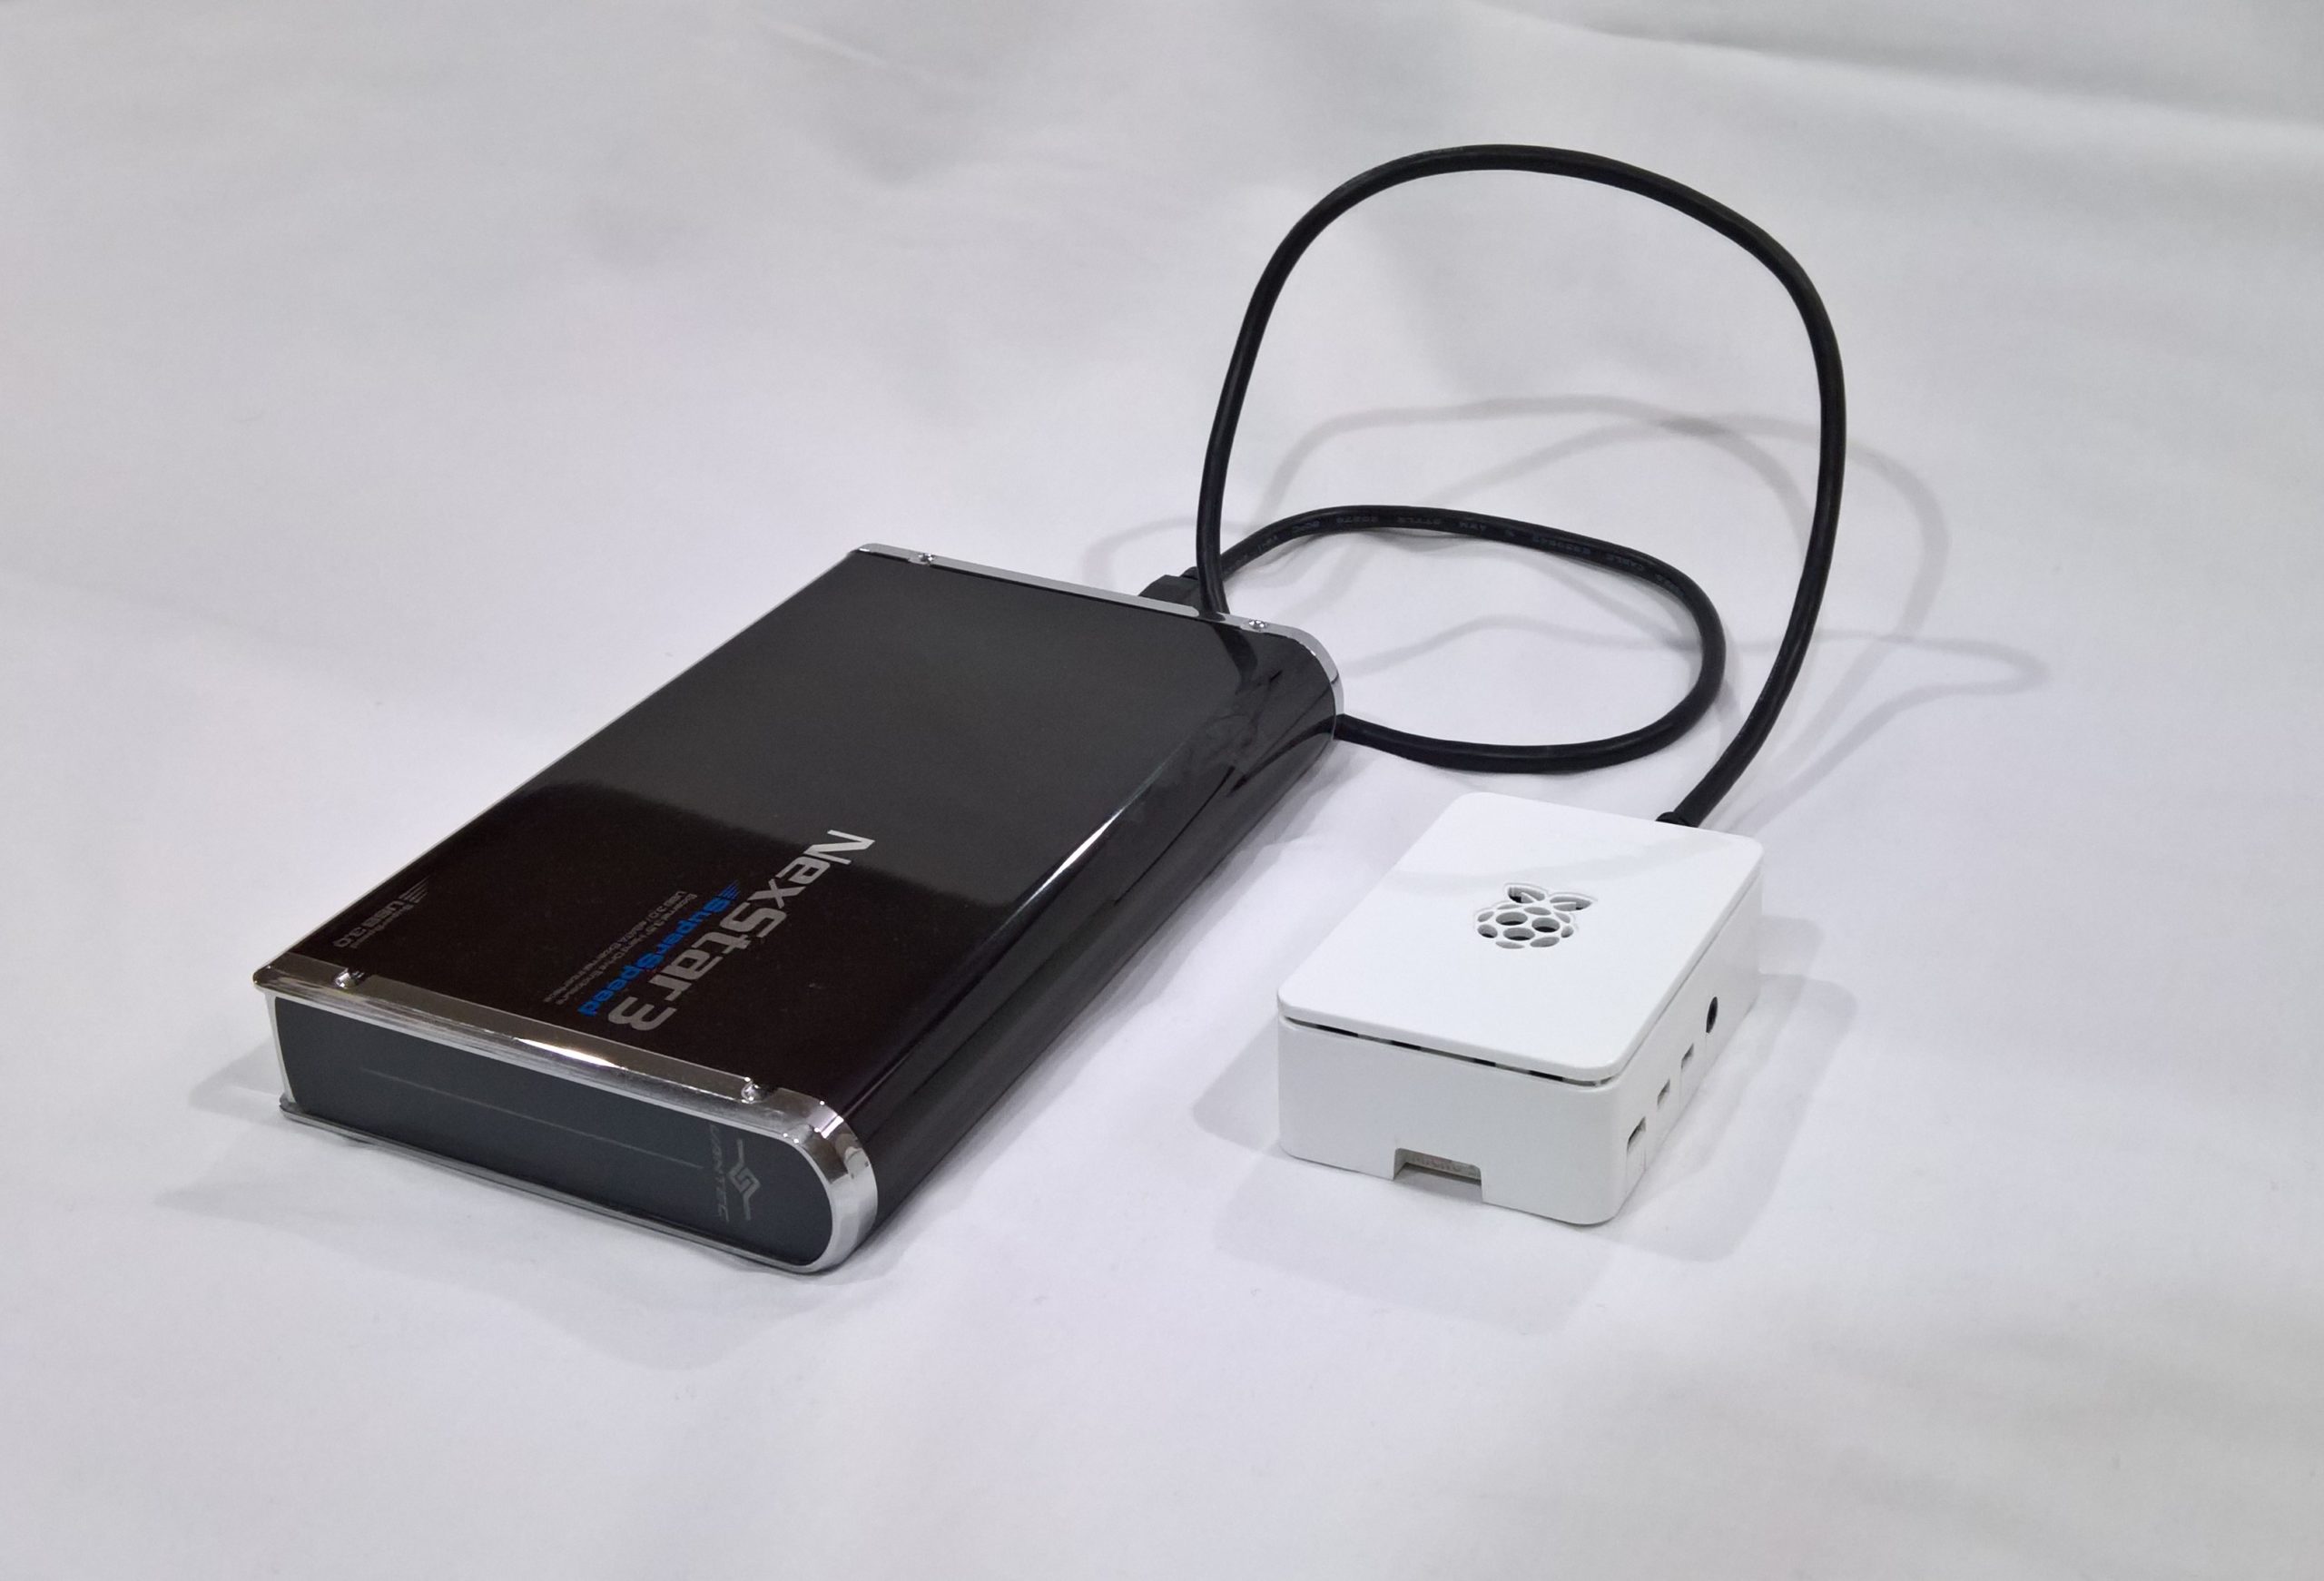
With the powerful processor, 4GB of RAM, and USB 3.0 ports (for external storage), this is a perfect platform to act as a testbed or homelab for shared storage.
For virtual environments, if you wanted to learn about shared storage you could deploy the Raspberry Pi iSCSI target and connect to it with one or more ESXi hosts.
Or you could use this to remotely connect to a disk on a direct block level, although I’d highly recommend doing this over a VPN.
How do you connect to an iSCSI Target?
As mentioned above, you normally connect to an iSCSI Target and volume or LUN using an iSCSI initiator.
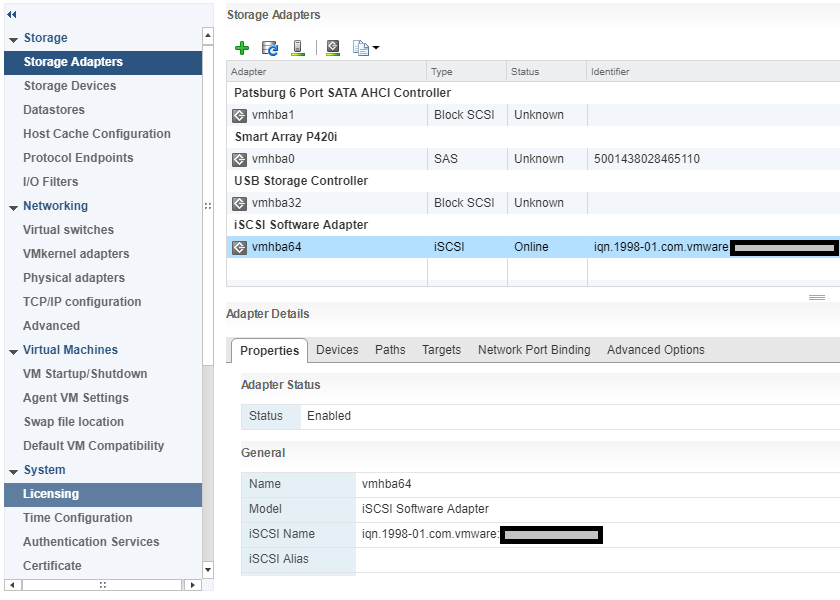
Using VMware ESXi, you’d most likely use the “iSCSI Software Adapter” under storage adapters. To use this you must first enable and configure it under the Host -> Configure -> Storage Adapters.
Using Windows 10, you could use the iSCSI initiator app. To use this simply search for “iSCSI Initiator” in your search bar, or open it from “Administrative Tools” under the “Control Panel”.
There is also a Linux iSCSI initiator that you can use if you want to connect from a Linux host.
What’s needed to get started?
To get started using this guide, you’ll need the following:
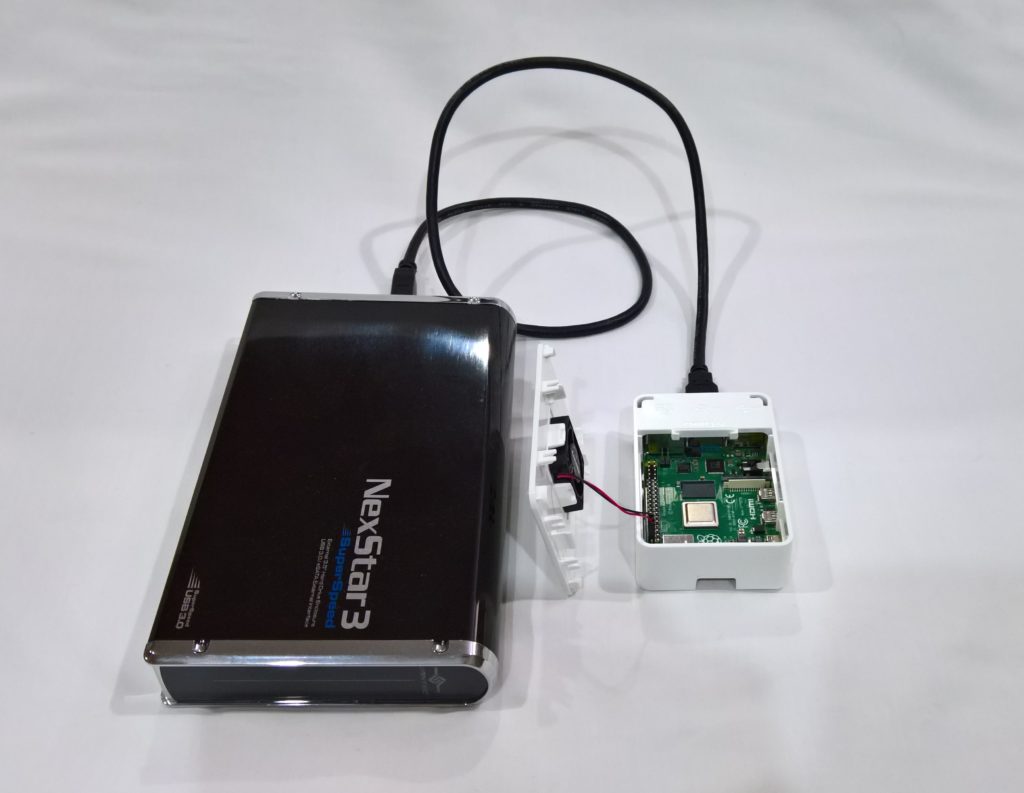
- Raspberry Pi 4
- Ubuntu Server for Raspberry Pi or Raspbian
- USB Storage (External HD, USB Stick, preferably USB 3.0 for speed)
- A client device to connect (ESXi, Windows, or Linux)
- Networking gear between the Raspberry Pi target and the device acting as the initiator
Using this guide, we’re assuming that you have already installed, are using, and have configured linux on the Raspberry Pi (setup accounts, and configured networking).
The Ubuntu Server image for Raspberry Pi comes ready to go out of the box as the kernel includes modules for the iSCSI Target pre-built. This is the easier way to set it up.
These instructions can also apply to Raspbian Linux for Raspberry Pi, however Raspbian doesn’t include the kernel modules pre-built for the iSCSI target and there are minor name differences in the apps. This is more complex and requires additional steps (including a custom kernel to be built).
Let’s get started, here’s the instructions…
If you’re running Raspbian, you need to compile a custom kernel and build the iSCSI Target Core Modules. Please follow my instructions (click here) to compile a custom kernel on Raspbian or Raspberry Pi. When you’re following my custom kernel build guide, in addition after running “make menuconfig”:
- Navigate to “Device Drivers”.
- Select (using space bar) “Generic Target Core Mod (TCM) and ConfigFS Infrastructure” so that it has an <M> (for module) next to it. Then press enter to open it. Example below.
<M> Generic Target Core Mod (TCM) and ConfigFS Infrastructure
- Select all the options as <M> so that they compile as a kernel module, as shown below.
 --- Generic Target Core Mod (TCM) and ConfigFS Infrastructure
<M>   TCM/IBLOCK Subsystem Plugin for Linux/BLOCK
<M>   TCM/FILEIO Subsystem Plugin for Linux/VFS
<M>   TCM/pSCSI Subsystem Plugin for Linux/SCSI
<M>   TCM/USER Subsystem Plugin for Linux
<M>   TCM Virtual SAS target and Linux/SCSI LDD Fabcric loopback module
<M> Linux-iSCSI.org iSCSI Target Mode Stack - Save the kernel config and continue following the “compile a custom raspberry pi kernel” guide steps.
If you’re running Ubuntu Server, the Linux kernel was already built with these modules so the action above is not needed.
We’re going to assume that the USB drive or USB stick you’ve installed is available on the system as “/dev/sda” for the purposes of this guide. Also please note that when using the create commands in the entries below, it will create it’s own unique identifiers on your system different from mine, please adjust your commands accordingly.
Let’s start configuring the Raspberry Pi iSCSI Target!
- First we need to install the targetcli interface to configure the target.
As root (or use sudo) run the following command if you’re running Ubuntu Server.apt install targetcli-fb
As root (or use sudo) run the following command if you’re running Raspbian.apt install targetcli
- As root (or using sudo) run “targetcli”.
targetcli
- Create an iSCSI Target and Target Port Group (TPG).
cd iscsi/
create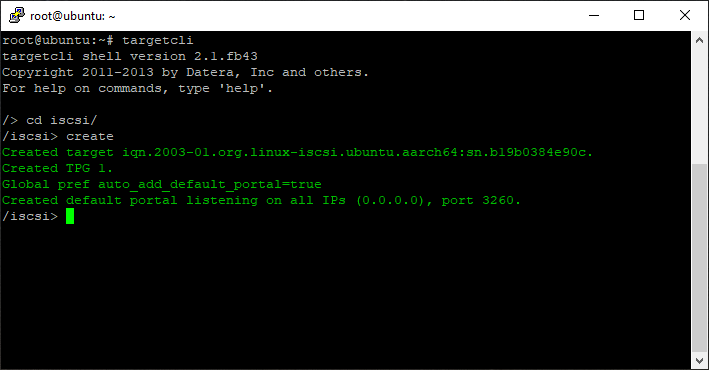
- Create a backstore (the physical storage attached to the Raspberry Pi).
cd /backstores/block
create block0 /dev/sda
- Create an Access Control List (ACL) for security and access to the Target.
cd /iscsi/iqn.2003-01.org.linux-iscsi.ubuntu.aarch64:sn.eadcca96319d/tpg1/acls
create iqn.1991-05.com.microsoft:your.iscsi.initiator.iqn.com
- Add, map, and assign the backstore (block storage) to the iSCSI Target LUN and ACL.
cd /iscsi/iqn.2003-01.org.linux-iscsi.ubuntu.aarch64:sn.eadcca96319d/tpg1/luns
create /backstores/block/block0
- Review your configuration.
cd /
ls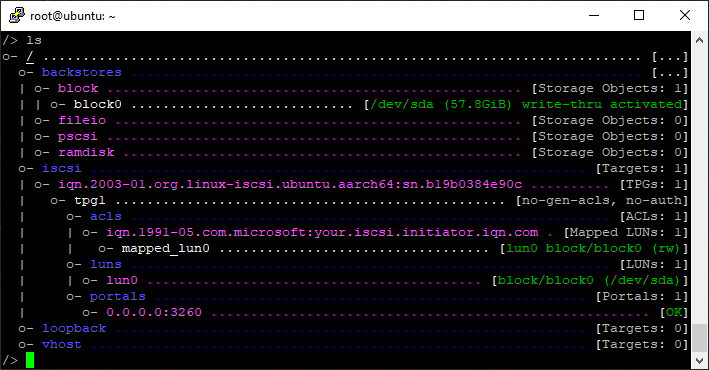
- Save your configuration and exit.
saveconfig
exit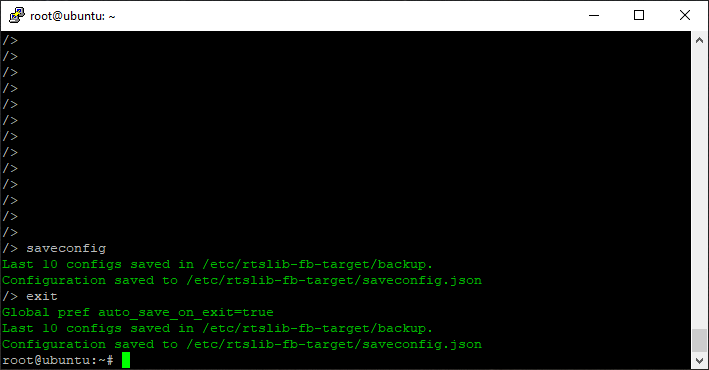
That’s it, you can now connect to the iSCSI target via an iSCSI initiator on another machine.
For a quick example of how to connect, please see below.
Connect the ESXi Initiator
To connect to the new iSCSI Target on your Raspberry Pi, open up the configuration for your iSCSI Software Initiator on ESXi, go to the targets tab, and add a new iSCSI Target Server to your Dynamic Discovery list.
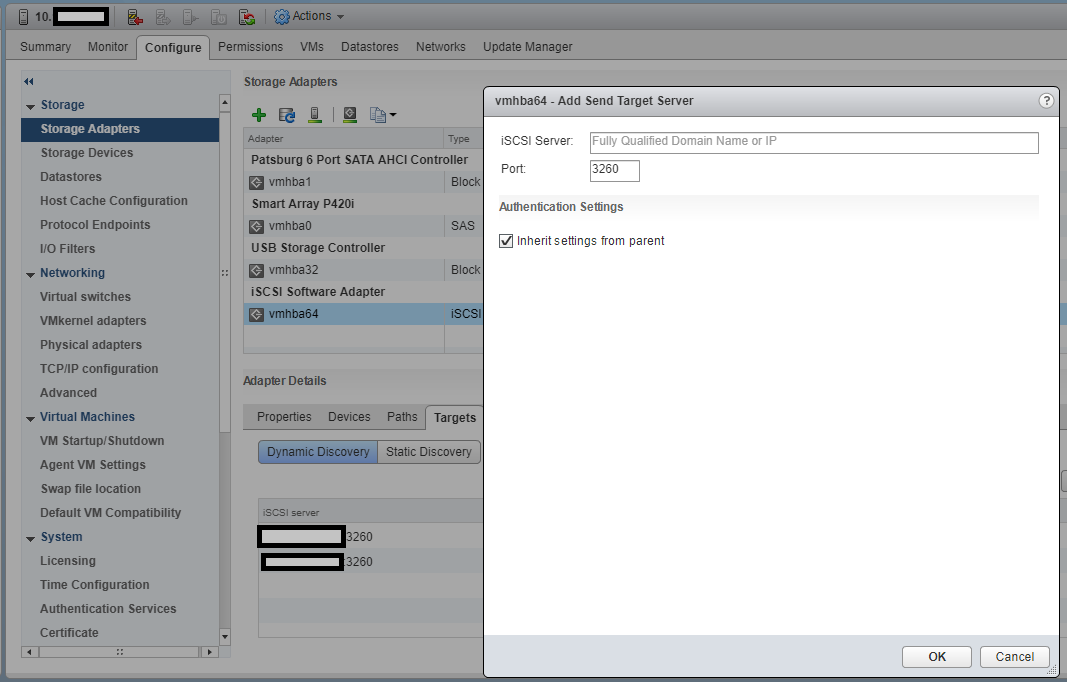
Once you do this, rescan your HBAs and the disk will now be available to your ESXi instance.
Connect the Windows iSCSI Initiator
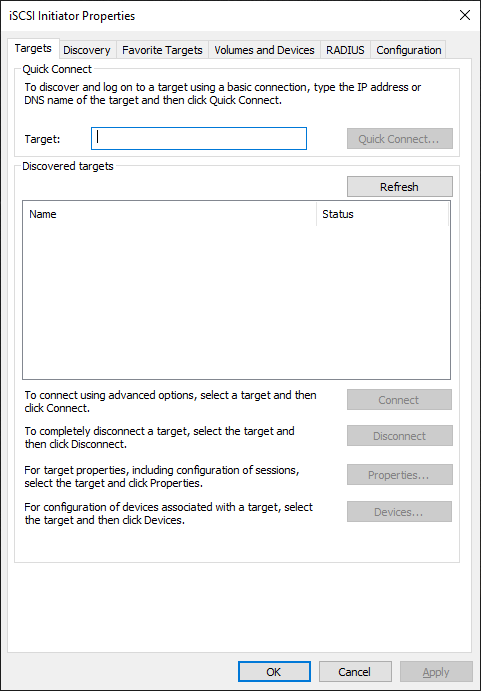
To connect to the new iSCSI Target on Windows, open the iSCSI Initiator app, go to the “Discovery” tab, and click on the “Discover Portal” button.
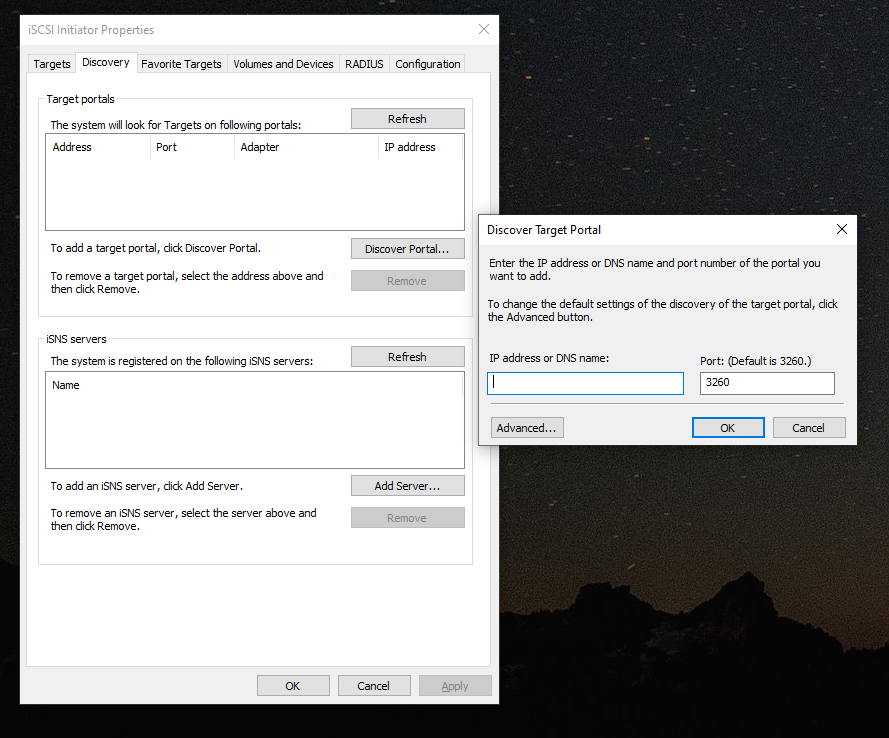
In the new window, add the IP address of the iSCSI Target (your Raspberry Pi), and hit ok, then apply.
Now on the “Targets” tab, you’ll see an entry for the discovered target. Select it, and hit “Connect”.
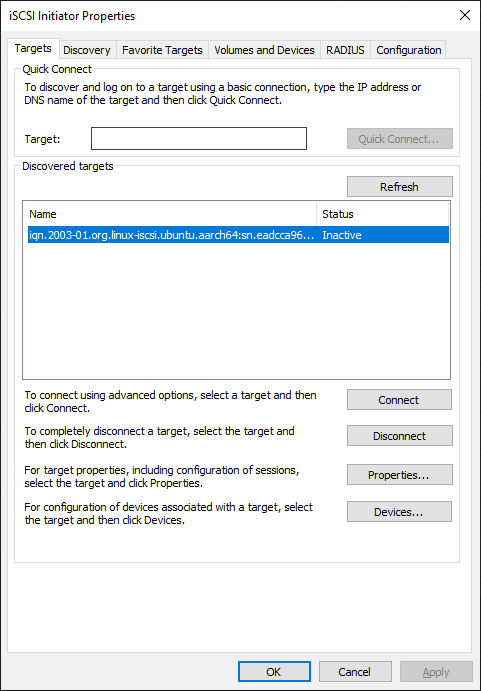
You’re now connected! The disk will show up in “Disk Management” and you can now format it and use it!
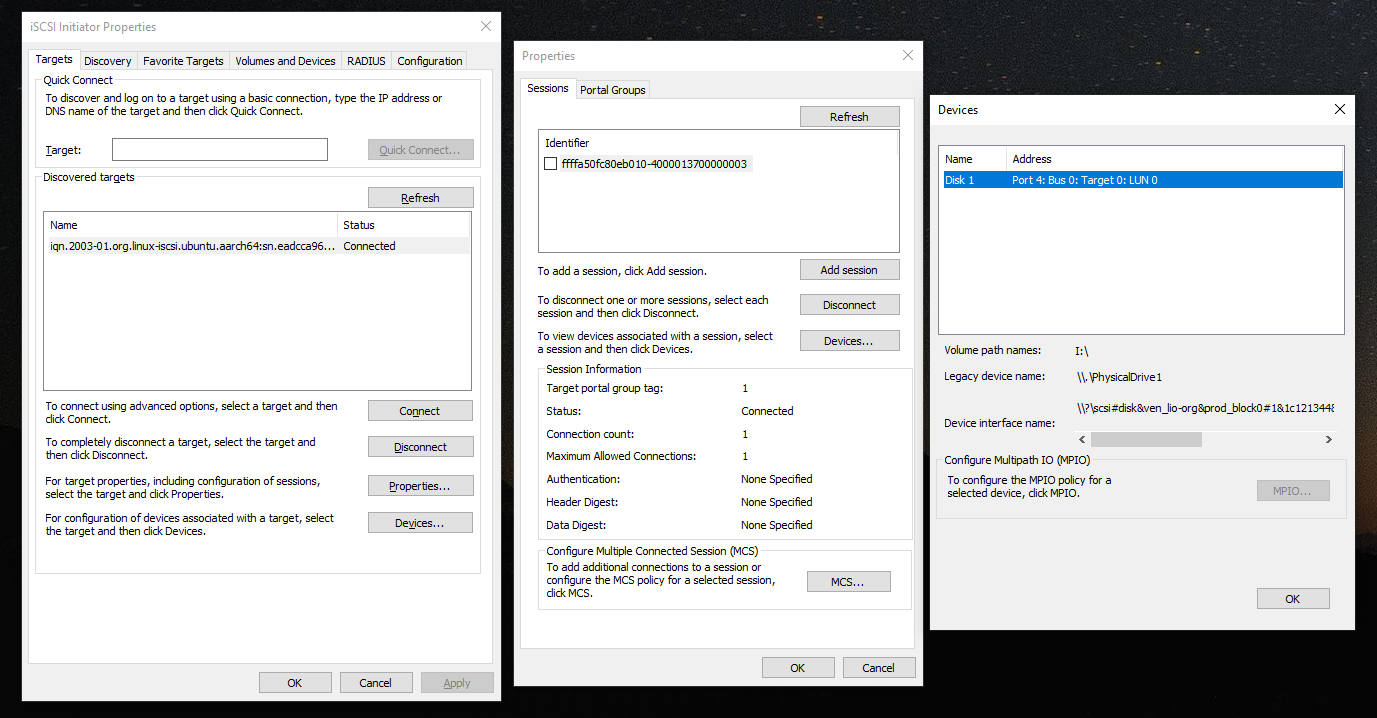
Here’s what an active connection looks like.
That’s all folks!
Conslusion
There you have it, you now have a beautiful little Raspberry Pi 4 acting as a SAN and iSCSI Target providing LUNs and volumes to your network!
Leave a comment and let me know how you made out or if you have any questions!
[…] An updated post on setting up a Raspberry Pi as an iSCSI Target can be found here! […]
[…] order to configure the Linux kernel iSCSI target, you need the “targetcli” […]
I have completed the install as detailed above and am able to connect from a vmware host as the initiator. It connects and is online, but it does not see any devices. Is there a secret on how to setup the disks? I fdisk 2 disks, pvcreate, vgcreate, and lvcreate. I did not make any filesystem since it should be a block device. Both external drives are spindle drives. Is the raspberry
As long as you called out to the proper devices while following the instructions it should work.
If you want, copy/paste your config and I’ll take a quick peak.
Also, keep in mind that you should only be using this for testing/learning with VMware, as the Pi probably won’t have the power or performance to be a datastore for VMware.
Cheers,
Stephen
/> ls
o- / …………………………………………………………………………………………………………. […]
o- backstores ……………………………………………………………………………………………….. […]
| o- fileio ……………………………………………………………………………………… [0 Storage Object]
| o- iblock …………………………………………………………………………………….. [2 Storage Objects]
| | o- disk1 ……………………………………………………………………….. [/dev/mapper/vg01-lvol01, in use]
| | o- disk2 ……………………………………………………………………….. [/dev/mapper/vg02-lvol01, in use]
| o- pscsi ………………………………………………………………………………………. [0 Storage Object]
| o- rd_mcp ……………………………………………………………………………………… [0 Storage Object]
o- iscsi ……………………………………………………………………………………………….. [1 Target]
| o- iqn.2020-05.net.silverwolf78621:raspberrypi ………………………………………………………………. [1 TPG]
| o- tpg1 ……………………………………………………………………………………………… [enabled]
| o- acls …………………………………………………………………………………………….. [2 ACLs]
| | o- iqn.1998-01.com.vmware:elgin6-18a8ced0 ………………………………………………………. [2 Mapped LUNs]
| | | o- mapped_lun0 ………………………………………………………………………………… [lun0 (rw)]
| | | o- mapped_lun1 ………………………………………………………………………………… [lun1 (rw)]
| | o- iqn.1998-01.com.vmware:esxi6-08eed7d1 ……………………………………………………….. [2 Mapped LUNs]
| | o- mapped_lun0 ………………………………………………………………………………… [lun0 (rw)]
| | o- mapped_lun1 ………………………………………………………………………………… [lun1 (rw)]
| o- luns …………………………………………………………………………………………….. [2 LUNs]
| | o- lun0 ………………………………………………………………. [iblock/disk1 (/dev/mapper/vg01-lvol01)]
| | o- lun1 ………………………………………………………………. [iblock/disk2 (/dev/mapper/vg02-lvol01)]
| o- portals ………………………………………………………………………………………… [1 Portal]
| o- 0.0.0.0:3260 ………………………………………………………………………….. [OK, iser disabled]
o- loopback ……………………………………………………………………………………………. [0 Targets]
HI Richard,
That looks like it should be working.
On the ESXi side, when you rescan the HBA it doesn’t show the disks? Does it show any LUNs on the HBA?
Stephen
No, It does not. It show now paths and no devices. I have tried to connect using both using the static and dynamic method. Both work as far as connecting, but sill shows no devices. I have even tried connecting directly from the Pi to the ESX Host. When opening the iSCSI initiator window, under the network config tab, it is showing the port group as not used.
Do you have an example connecting from another Pi running ubuntu? Going through open-scsi, it seems to want a uname/password.
Hello there.
I’ve followed the steps, but I am stuck cause I can’t find the ‘Device Drivers’ section in the menuconfig. Is there a specific version to use? Any pointers on what am I doing something wrong?
Hi Alisio,
It should be right there once the big blue menu opens up!
Cheers,
Stephen
Were you able to run an entire lab say 2 esxi hosts with this configuration . i was planning a 2 node setup to boot via usb and use a rpi with iscsi for storage
Hi gcp,
I’ve done this in the past way back with the 1st generation Raspberry Pi. You should be able to do this no problem! 🙂
Cheers
Morning,
I wanted to say thank you for this tutorial, I got this working first try thanks to your instructions!
But now I’ve run into a snag, I booted up my Raspberry Pi 4 this morning,and tried to get my Windows 2016 servers to connect to it, but I keep getting ‘Target Error’ I know the machine is live because I can ping it and I’ve got a monitor connected. The IPs are all correct.
when I run the command systemctl status open-iscsi I get this:
open-iscsi.service – Login to default iSCSI targets
Loaded: loaded (/lib/systemd/system/open-iscsi.service; enabled; vendor preset: enabled)
Active: inactive (dead)
Condition: start condition failed at Sun 2020-07-26 08:49:39 BST; 33min ago
├─ ConditionDirectoryNotEmpty=|/etc/iscsi/nodes was not met
└─ ConditionDirectoryNotEmpty=|/sys/class/iscsi_session was not met
Docs: man:iscsiadm(8)
man:iscsid(8)
Jul 26 08:49:39 ubuntu systemd[1]: Condition check resulted in Login to default iSCSI targets being skipped.
can you advise on how I can get this working again please?
Sincere thanks
David Kernaghan
Hi David,
Glad the post helped. Did the issues start on restart, or did it occur after updates.
If it occurred on restart, either the config wasn’t saved, or the kernel modules may not be loaded.
If it occurred after updating your Pi, there’s a chance that the Pi installed an update for the kernel and is booting the new kernel instead of the custom one with the iSCSI target modules.
I’m thinking it’s probably an update and different kernel, so you’ll need to specify to boot the custom one you built instead.
Cheers,
Stephen
Stephen,
it happened on a reboot, or rather a power-down.
I did all the updates on Ubuntu Server LTS 20.04 before starting the iscsi instructions.
I’ll try again and see where it gets to.
Thanks
David
I have got the same issue that LUN cannot be detected and listed by ESXi. Finally I found there were 2 reasons, one is CHAP failure, the other is LUN write-protect. To resolve it, make sure to double check the following 4 attributes under the /iscsi/iqn…../tpg1 folder.
/iscsi/iqn.20…213234f2/tpg1> set attribute authentication=0 demo_mode_write_protect=0 generate_node_acls=1 cache_dynamic_acls=1
Parameter authentication is now ‘0’.
Parameter demo_mode_write_protect is now ‘0’.
Parameter generate_node_acls is now ‘1’.
Parameter cache_dynamic_acls is now ‘1’.
Furthermore, the above settings might not take effective by targetcli, then you have to save config first and then vim the configuration file for the 4 settings as below.
# vi /etc/rtslib-fb-target/saveconfig.json. –> targets –> tpgs –> attributes –> the 4 settings.
Last, you have to reload the new settings from the configure file
# targetctl restore /etc/rtslib-fb-target/saveconfig.json.
Hope above can help someone and save time, good luck!
Hi Tower,
If the instructions are followed and the ACL is created properly and full read/write should be provided.
However, I appreciate you posted those instructions on how to manually modify the ACLs and access. The more info, the better!!! 🙂
Thanks and Happy Holidays!
Hello,
I’ve a weird issue with VMWare… everytime my ESX tries to connect it end up in timeout because raspberry loses network (wireless AND cable). It’s not happening if nothing is trying to connect on iSCSI.
What would cause this ?
Hello,
I would check to make sure that there’s no networking service that’s resetting the network connection.
Also you mention wireless and wired? You should only be using wired for optimum speed. If you have both connections on the same subnet, it could be causing issues. I’d recommend disabling the wireless and make sure you don’t have a network connection services managing your networking connections.
Cheers,
Stephen
Hello Stephen,
Thanks for the reply.
I use wireless as backup connection, it’s not on the subnet neither the same VLAN. However, it’s OK to disable it.
Also, no network connection services is managing my network apart from builtin netplan.
Weird thing is that it’s working with a Windows 10 Computer..
That’s good to know. You don’t have the Windows 10 machine accessing the LUN at the same time as the ESXi hosts, do you?
Only the ESXi hosts should be connected, as having non-ESXi systems accessing it concurrently can cause corruption.
No, I don’t, this was just as testing purpose.
Would it be possible connect directly from rpi ethernet to a free esxi nic ? But then I wouldnt be able to set up network, do I ? Since there wouldnt be any router inbetween.
Is there a router between? For iSCSI, you shouldn’t have anything between the storage device and the ESXi host, except for switching fabric.
Yes I have a router between.
It’s like:
ESXis — Switch (connected itself to a router) –RPI — USB — Storage
Do you mean I should have :
ESXis — Switch (alone) –RPI — USB — Storage
How would I set up the network then ?
Oh sorry, I misunderstood. I thought you meant the connection was routed. You should be fine.
I’ve set up a new distributed vSwitch to isolate (still going to the same hardware switch and router tho) as possible, but it’s still the same. When I run the format it doesnt go through and it end up with Operational State of “Dead or Error” and it’s not possible to do anything else.
This is weird as it’s supposed to be working fine..
Did you add the ESXi initiator ACL?
Yup, this permits to see my iSCSI before it crashed when I format to VMFS.
I’ve seen this log on rpi before it crashes:
Message from syslogd … kernel:[ 135.261709] Internal error: Oops: 96000004 [#1] PREEMPT SMP Message from syslogd … kernel:[ 135.477438] Code: 9278dc16 f27e001f 9a9f12d6 b94012a0 (f94006c1)
What distribution are you using? I’d recommend using Ubuntu server if possible.
Ubuntu Server 20.04.1 LTS
Hmm, I’m sorry but Im not sure what’s causing the issues… Try reducing your RAM usage, run as little amount of services as possible.
Maybe this can lead to somewhere…:
Jan  8 17:32:49 rpi-iscsi kernel: [  766.245188] ABORT_TASK: Found referenced iSCSI task_tag: 2209

Jan  8 17:32:59 rpi-iscsi kernel: [  776.245936] ABORT_TASK: Found referenced iSCSI task_tag: 2209

Jan  8 17:32:59 rpi-iscsi kernel: [  776.245986] ------------[ cut here ]------------

Jan  8 17:32:59 rpi-iscsi kernel: [  776.246047] WARNING: CPU: 0 PID: 2055 at drivers/target/target_core_transport.c:2684 target_put_cmd_and_wait+0x88/0x98 [target_core_mod]

Jan  8 17:32:59 rpi-iscsi kernel: [  776.246051] Modules linked in: target_core_user target_core_pscsi target_core_file target_core_iblock iscsi_target_mod target_core_mod dm_multipath scsi_dh_rdac scsi_dh_emc scsi_dh_alua btsdio bluetooth ecdh_generic ecc brcmfmac bcm2835_isp(CE) bcm2835_codec(CE) brcmutil bcm2835_v4l2(CE) bcm2835_mmal_vchiq(CE) v4l2_mem2mem cfg80211 videobuf2_vmalloc videobuf2_dma_contig videobuf2_memops videobuf2_v4l2 videobuf2_common videodev snd_bcm2835(CE) mc snd_pcm raspberrypi_hwmon snd_timer vc_sm_cma(CE) snd rpivid_mem uio_pdrv_genirq uio sch_fq_codel 8021q garp mrp stp llc drm ip_tables x_tables autofs4 btrfs zstd_compress raid10 raid456 async_raid6_recov async_memcpy async_pq async_xor async_tx xor xor_neon raid6_pq libcrc32c raid1 raid0 multipath linear crct10dif_ce spidev phy_generic uas usb_storage aes_neon_bs aes_neon_blk crypto_simd cryptd

Jan  8 17:32:59 rpi-iscsi kernel: [  776.246163] CPU: 0 PID: 2055 Comm: kworker/0:2 Tainted: G         C  E     5.4.0-1026-raspi #29-Ubuntu

Jan  8 17:32:59 rpi-iscsi kernel: [  776.246167] Hardware name: Raspberry Pi 4 Model B Rev 1.4 (DT)

Jan  8 17:32:59 rpi-iscsi kernel: [  776.246212] Workqueue: events target_tmr_work [target_core_mod]

Jan  8 17:32:59 rpi-iscsi kernel: [  776.246220] pstate: 60400005 (nZCv daif +PAN -UAO)

Jan  8 17:32:59 rpi-iscsi kernel: [  776.246260] pc : target_put_cmd_and_wait+0x88/0x98 [target_core_mod]

Jan  8 17:32:59 rpi-iscsi kernel: [  776.246297] lr : core_tmr_abort_task+0xf4/0x188 [target_core_mod]

Jan  8 17:32:59 rpi-iscsi kernel: [  776.246301] sp : ffff800010d7bcc0

Jan  8 17:32:59 rpi-iscsi kernel: [  776.246305] x29: ffff800010d7bcc0 x28: ffffd4db1fc07000

Jan  8 17:32:59 rpi-iscsi kernel: [  776.246312] x27: ffffd4dac9771f98 x26: ffff00007b0a5698

Jan  8 17:32:59 rpi-iscsi kernel: [  776.246318] x25: 0000000000000000 x24: ffff00007ab2b080

Jan  8 17:32:59 rpi-iscsi kernel: [  776.246324] x23: ffff00007b0a5600 x22: 00000000000008a1

Jan  8 17:32:59 rpi-iscsi kernel: [  776.246330] x21: ffff800010d7bcf8 x20: ffff00007d288000

Jan  8 17:32:59 rpi-iscsi kernel: [  776.246335] x19: ffff000079d94170 x18: 0000000000000000

Jan  8 17:32:59 rpi-iscsi kernel: [  776.246341] x17: 0000000000000000 x16: ffffd4db1f1bac98

Jan  8 17:32:59 rpi-iscsi kernel: [  776.246346] x15: ffff00007d288530 x14: ffffffffffffffff

Jan  8 17:32:59 rpi-iscsi kernel: [  776.246352] x13: 0000000000000000 x12: ffffd4db1fd3f000

Jan  8 17:32:59 rpi-iscsi kernel: [  776.246358] x11: ffffd4db1fc2c000 x10: ffffd4db1fd3fa80

Jan  8 17:32:59 rpi-iscsi kernel: [  776.246363] x9 : 0000000000000000 x8 : 0000000000000004

Jan  8 17:32:59 rpi-iscsi kernel: [  776.246369] x7 : 0000000000000000 x6 : 0000000000000000

Jan  8 17:32:59 rpi-iscsi kernel: [  776.246374] x5 : ffffd4db1fc0a000 x4 : ffff800010d7c000

Jan  8 17:32:59 rpi-iscsi kernel: [  776.246380] x3 : ffffd4db1fc0a138 x2 : 0000000000000000

Jan  8 17:32:59 rpi-iscsi kernel: [  776.246385] x1 : ffff800010dc3cf8 x0 : ffff800010d7bd08

Jan  8 17:32:59 rpi-iscsi kernel: [  776.246391] Call trace:

Jan  8 17:32:59 rpi-iscsi kernel: [  776.246429]  target_put_cmd_and_wait+0x88/0x98 [target_core_mod]

Jan  8 17:32:59 rpi-iscsi kernel: [  776.246466]  core_tmr_abort_task+0xf4/0x188 [target_core_mod]

Jan  8 17:32:59 rpi-iscsi kernel: [  776.246502]  target_tmr_work+0xe0/0x138 [target_core_mod]

Jan  8 17:32:59 rpi-iscsi kernel: [  776.246514]  process_one_work+0x1c4/0x460

Jan  8 17:32:59 rpi-iscsi kernel: [  776.246519]  worker_thread+0x54/0x428

Jan  8 17:32:59 rpi-iscsi kernel: [  776.246527]  kthread+0x150/0x170

Jan  8 17:32:59 rpi-iscsi kernel: [  776.246534]  ret_from_fork+0x10/0x18

Jan  8 17:32:59 rpi-iscsi kernel: [  776.246539] ---[ end trace 5ed6cf1e80e8aeb1 ]---

Jan  8 17:33:09 rpi-iscsi kernel: [  786.247146] ABORT_TASK: Found referenced iSCSI task_tag: 2209

Jan  8 17:33:10 rpi-iscsi kernel: [  787.445172] sd 0:0:0:0: [sda] tag#28 uas_eh_abort_handler 0 uas-tag 9 inflight: CMD IN

Jan  8 17:33:10 rpi-iscsi kernel: [  787.445188] sd 0:0:0:0: [sda] tag#28 CDB: Read(10) 28 00 00 00 d8 80 00 00 80 00

Jan  8 17:33:10 rpi-iscsi kernel: [  787.445429] sd 0:0:0:0: [sda] tag#27 uas_eh_abort_handler 0 uas-tag 5 inflight: CMD IN

Jan  8 17:33:10 rpi-iscsi kernel: [  787.445438] sd 0:0:0:0: [sda] tag#27 CDB: Read(10) 28 00 00 00 dd 00 00 01 00 00

Jan  8 17:33:10 rpi-iscsi kernel: [  787.445746] sd 0:0:0:0: [sda] tag#26 uas_eh_abort_handler 0 uas-tag 8 inflight: CMD IN

Jan  8 17:33:10 rpi-iscsi kernel: [  787.445754] sd 0:0:0:0: [sda] tag#26 CDB: Read(10) 28 00 00 00 e0 00 00 01 00 00

Jan  8 17:33:10 rpi-iscsi kernel: [  787.446047] sd 0:0:0:0: [sda] tag#25 uas_eh_abort_handler 0 uas-tag 7 inflight: CMD IN

Jan  8 17:33:10 rpi-iscsi kernel: [  787.446056] sd 0:0:0:0: [sda] tag#25 CDB: Read(10) 28 00 00 00 df 00 00 01 00 00

Jan  8 17:33:10 rpi-iscsi kernel: [  787.446360] sd 0:0:0:0: [sda] tag#24 uas_eh_abort_handler 0 uas-tag 6 inflight: CMD IN

Jan  8 17:33:10 rpi-iscsi kernel: [  787.446368] sd 0:0:0:0: [sda] tag#24 CDB: Read(10) 28 00 00 00 de 00 00 01 00 00

Jan  8 17:33:10 rpi-iscsi kernel: [  787.446665] sd 0:0:0:0: [sda] tag#23 uas_eh_abort_handler 0 uas-tag 4 inflight: CMD IN

Jan  8 17:33:10 rpi-iscsi kernel: [  787.446673] sd 0:0:0:0: [sda] tag#23 CDB: Read(10) 28 00 00 00 dc 00 00 01 00 00

Jan  8 17:33:10 rpi-iscsi kernel: [  787.446977] sd 0:0:0:0: [sda] tag#22 uas_eh_abort_handler 0 uas-tag 1 inflight: CMD IN

Jan  8 17:33:10 rpi-iscsi kernel: [  787.446985] sd 0:0:0:0: [sda] tag#22 CDB: Read(10) 28 00 00 00 e1 80 00 01 00 00

Jan  8 17:33:10 rpi-iscsi kernel: [  787.447285] sd 0:0:0:0: [sda] tag#21 uas_eh_abort_handler 0 uas-tag 3 inflight: CMD IN

Jan  8 17:33:10 rpi-iscsi kernel: [  787.447293] sd 0:0:0:0: [sda] tag#21 CDB: Read(10) 28 00 00 00 db 00 00 01 00 00

Jan  8 17:33:10 rpi-iscsi kernel: [  787.447595] sd 0:0:0:0: [sda] tag#20 uas_eh_abort_handler 0 uas-tag 2 inflight: CMD IN

Jan  8 17:33:10 rpi-iscsi kernel: [  787.447602] sd 0:0:0:0: [sda] tag#20 CDB: Read(10) 28 00 00 00 e2 80 00 01 00 00

Jan  8 17:33:10 rpi-iscsi kernel: [  787.447904] sd 0:0:0:0: [sda] tag#4 uas_eh_abort_handler 0 uas-tag 14 inflight: CMD IN

Jan  8 17:33:10 rpi-iscsi kernel: [  787.447911] sd 0:0:0:0: [sda] tag#4 CDB: Read(10) 28 00 00 00 e1 00 00 00 60 00

Jan  8 17:33:10 rpi-iscsi kernel: [  787.448188] sd 0:0:0:0: [sda] tag#3 uas_eh_abort_handler 0 uas-tag 13 inflight: CMD IN

Jan  8 17:33:10 rpi-iscsi kernel: [  787.448196] sd 0:0:0:0: [sda] tag#3 CDB: Read(10) 28 00 00 00 e6 80 00 01 00 00

Jan  8 17:33:10 rpi-iscsi kernel: [  787.448331] sd 0:0:0:0: [sda] tag#2 uas_eh_abort_handler 0 uas-tag 12 inflight: CMD IN

Jan  8 17:33:10 rpi-iscsi kernel: [  787.448339] sd 0:0:0:0: [sda] tag#2 CDB: Read(10) 28 00 00 00 e5 80 00 01 00 00

Jan  8 17:33:10 rpi-iscsi kernel: [  787.448594] sd 0:0:0:0: [sda] tag#1 uas_eh_abort_handler 0 uas-tag 11 inflight: CMD IN

Jan  8 17:33:10 rpi-iscsi kernel: [  787.448601] sd 0:0:0:0: [sda] tag#1 CDB: Read(10) 28 00 00 00 e4 80 00 01 00 00

Jan  8 17:33:10 rpi-iscsi kernel: [  787.448901] sd 0:0:0:0: [sda] tag#0 uas_eh_abort_handler 0 uas-tag 10 inflight: CMD IN

Jan  8 17:33:10 rpi-iscsi kernel: [  787.448909] sd 0:0:0:0: [sda] tag#0 CDB: Read(10) 28 00 00 00 e3 80 00 01 00 00

Jan  8 17:33:11 rpi-iscsi kernel: [  788.277179] sd 0:0:0:0: [sda] tag#5 uas_eh_abort_handler 0 uas-tag 15 inflight: CMD IN

Jan  8 17:33:11 rpi-iscsi kernel: [  788.277193] sd 0:0:0:0: [sda] tag#5 CDB: Read(10) 28 00 00 00 ac 40 00 00 01 00

Jan  8 17:33:11 rpi-iscsi kernel: [  788.293156] scsi host0: uas_eh_device_reset_handler start

Jan  8 17:33:11 rpi-iscsi kernel: [  788.421930] usb 2-2: reset SuperSpeed Gen 1 USB device number 2 using xhci_hcd

Jan  8 17:33:11 rpi-iscsi kernel: [  788.446169] scsi host0: uas_eh_device_reset_handler success

Jan  8 17:33:36 rpi-iscsi kernel: [  813.801328] iSCSI Login timeout on Network Portal 0.0.0.0:3260
Hi Stephen,
First of all, thanks a lot for taking the time to put this together and share it. I tried multiple times to make a NAS work with a Pi4 and Open Media Vault as well as plain NFS config and I was getting DAVG in the range of 500000 ms on my ESXi (super micro E200-8D). With this option, the DAVG was around 25 but I still need to increase the buffer and MTU. I’m using a USB ethernet adapter with an static IP and hit this bug: https://bugs.launchpad.net/netplan/+bug/1724895. I’m working to fix that atm. Again, thanks for your time and effort.
Regards,
Rod.
Hi Rod,
Thanks for the comment, I hope the post helped! Please be aware that if you’re using a USB Ethernet Adapter on the Pi4, you’re adding a layer of complexity and also potential performance loss (adding the USB layer).
Or do you mean you’re using iSCSI MPIO and using multiple NICs and that’s why you’re using USB ethernet adapters?
Cheers,
Stephen
Hello Stephen,
Thanks for your response, I checked again and both Ubuntu 20.04 and 21.04 images for raspberry set a max MTU limit of 1500 on my USB ethernet adapter. I saw this with the command “ip -d link list” :
0 minmtu 0 maxmtu 1504
The USB ethernet adapter doesn’t seem to be an issue (yet) I’m testing with file uploads to my HDDs connected via a USB3 hub. So far, I’m still getting decent DAVG/cmd delays, (bellow 15 ms). This is way better that all the previous NFS attempts. I’ll stick with this config for now and will try to compile the kernel later on so I can use higher MTU and network interface buffers to improve performance.
Regards,
Rod Rojas
Stephen – Thanks for this very well-done information and how-to article on setting up a SAN on a RPi. I’ve been trying various NAS software on more powerful SBCs, but still find the full NAS implementation lacking and really not ready for prime time.
My question to you is… Do you have this article in pdf format that you could make available. I fine that when I print it out, the text is very light to see and read. I like to keep binders of tech articles discussing new projects for note taking, etc. It would be helpful. Many web-based articles have a print icon that makes this easier to accomplish. I didn’t notice one anywhere around your article.
Anyway, many thanks for a fine article and I look forward to possible setting this SAN arrangement up on an SBC.
Rick
Hi Rick,
Thanks for the comment and I’m super happy if you found the article useful!
And thank you for the feedback, that’s a great idea. I’ll see if I can find a plugin that will allow easy printing.
In the meantime, try viewing the AMP version of this post at https://www.stephenwagner.com/2020/03/18/how-to-raspberry-pi-4-as-an-iscsi-san-iscsi-target/amp/ .
It may be more easy to read, and it might also be printer friendly! 🙂
Let me know if you get a chance to try!
Cheers,
Stephen
Hi Stephen,
Thanks for the article! I managed to get this working on my Pi 4, but I seem to be stuck with speeds around 60 Megabytes/s (read/write) from my gig-wired Windows machine. I know the machine/disk can go faster; SMB is able to push closer to 100Megabytes/s. Ethernet usage seems to be steady around 490mbps, have you managed to get results faster than this?
Thanks again,
Alan
Hello stephen
I been looking for iscsi on the rpi4 and im baffled its not in the original kernel for raspberry pi os. Good stuff you found it here on ubuntu.
amazing stuff good speeds and works nice. i tossed my hp 25x sas sans over rpi4 sans :O more energi efficient 😀
Hi!
When launching targetcli I can enter “cd iscsi/”, but when entering “create” I get the following message: b’modprobe: FATAL: Module iscsi_target_mod not found in directory /lib/modules/5.15.0-1005-raspi\n
I have no clue what is up and google is not helping me out atm. I am using Ubuntu 22.04 on RPI4 Model B 4GB
Any clue? Thank you!
Hi Simon, it sounds like the kernel you are using doesn’t have the proper modules loaded. You’ll need to build a custom kernel with the iSCSI target modules.
hi
thanks for the procedures on how to create an iSCSI initiator using Ubuntu 20.04 on Raspberry pi. However, is there a way to auto start and restore the config when the Raspberry pi is rebooted?
Whenever i reboot the raspberry pi, the mac OS iSCSI initiator cannot discover the iSCSI target until i have to manually start up using this command
sudo targetcli restoreconfig /etc/rtslib-fb-target/saveconfig.json
can advice?
Somehow i managed to find a solution for the targetcli to restore the config after reboot.
Can access this URL
https://forum.proxmox.com/threads/iscsi-lio-targetcli-no-config-after-reboot.52966/
To resolve:
1. Create the systemd unit file
nano /lib/systemd/system/target.service
Code:
[Unit]
Description=Restore LIO kernel target configuration
Requires=sys-kernel-config.mount
After=sys-kernel-config.mount network.target local-fs.target
[Service]
Type=oneshot
RemainAfterExit=yes
ExecStart=/usr/bin/targetctl restore
ExecStop=/usr/bin/targetctl clear
SyslogIdentifier=target
[Install]
WantedBy=multi-user.target
2. Copy the unit file to /etc/systemd/system
cp /lib/systemd/system/target.service /etc/systemd/system/target.service
3. Give the unit file permissions:
chmod 644 /etc/systemd/system/target.service
4. Start and Enable the Service
systemctl start target
systemctl enable target
5. Check the status of the service:
systemctl status target
6. Reboot system to verify
reboot
7. Verify ConfigFS load on startup
targetcli ls
Hi chris,
If my memory serves me right, once you do the config with targetcli-fb, you should be able to use “saveconfig” command to save the configuration as the default. Then set the services to auto-start and the configuration should be restored on services start.
On some distirbutions, targetcli was deprecated and replaced with targetcli-fb which has caused some issues for some users.
Cheers,
Stephen
Fascinating article, many thanks.
I’ve just tried this out using a RPI 4 and Ubuntu. I get all the way through to adding the iSCSI Target Server to a Windows iSCSI Initiator, however, when i connect it says Authorization Error. Any ideas? I cant see in your guide about anything to do with access etc.
Also, even though i definitely saved the configuration, on rebooting, the config is always lost…
Many thanks