During a previous project I needed to create a fresh and clean boot partition for a Raspberry Pi. I needed to create the partition layout required for the Raspberry Pi to see and boot a Linux kernel from.
There are many guides on the internet on how to write a Raspberry Pi image (which includes the system-boot partition), but I wanted a clean and fresh partition layout, without the additional partitions containing the Linux operating system.
I was creating a new Micro SD card with the purpose of using an NFS Root for the Raspberry Pi. For those of you that don’t know, you can boot a Raspberry Pi (or Linux computer) from local media, whether it’s a CD, USB Stick, Micro SD, or hard drive, and then have the actual operating system root file system be loaded via NFS. You can also use PXE to boot the kernel requiring no local storage, but that’s beyond the scope of this article.
Raspberry Pi default Partition layout
Below, we’ll look at the default partition layout you’d see on a Raspberry Pi using a prebuild linux image.
Disk /dev/sda: 59.6 GiB, 64021856256 bytes, 125042688 sectors
Units: sectors of 1 * 512 = 512 bytes
Sector size (logical/physical): 512 bytes / 512 bytes
I/O size (minimum/optimal): 512 bytes / 512 bytes
Disklabel type: dos
Disk identifier: 0x97709164
Device     Boot  Start       End   Sectors  Size Id Type
/dev/sda1         8192    532479    524288  256M  c W95 FAT32 (LBA)
/dev/sda2       532480 125042687 124510208 59.4G 83 Linux
I’m using a USB to Micro SD adapter to view the partitions on this card, so it’s being presented to the system as “/dev/sda”. On a normal computer “/dev/sda” is the first hard drive (usually the OS) so be careful when using these commands.
You’ll notice that “/dev/sda1” is the Raspberry Pi boot partition, with an Id of 3, and has the type of “W95 FAT32 (LBA)”.
The second partition which is the filesystem root (which I moved to NFS), is “/dev/sda2”, with an Id of 83, and has a type of “Linux”.
Creating a fresh partition layout with only the boot partition
In this guide we’re going to setup a Micro SD card with a fresh boot partition for the Raspberry Pi from scratch. We are not using an image and we are not using the expansion feature.
We’re going to assume that your destination SD card is empty. If it isn’t, you’ll need to delete all the partitions using “fdisk /dev/device”, and then deleted them with “d”.
Alternatively, to delete existing partition information you can wipe the MBR and partition table with the following command. Replace “/dev/device” with the actual device label for the card. Note that this will render existing data useless and unrecoverable.
dd if=/dev/zero of=/dev/DEVICE bs=512 count=1
Please Note: Make sure you are running this command on the right device. Afterwards, unplug and re-insert the SD card.
Creating the layout
On an empty Micro SD card:
- Open fdisk on your card.
fdisk /dev/sda
- Press “n” to create a partition.
- Press “p” to make it a primary partition.
- Press “1” to make it the first partition in the table.
- Press <enter> to accept the default on start sector.
- Type +size to choose the size. In my case I want 1GB, so I’ll type “+1G”.
- After it’s created, press “a” to make it bootable.
- Now we press “p” to print and view the partition table, as shown below.
Command (m for help): p
 Disk /dev/sda: 3.7 GiB, 3965190144 bytes, 7744512 sectors
 Geometry: 122 heads, 62 sectors/track, 1023 cylinders
 Units: sectors of 1 * 512 = 512 bytes
 Sector size (logical/physical): 512 bytes / 512 bytes
 I/O size (minimum/optimal): 512 bytes / 512 bytes
 Disklabel type: dos
 Disk identifier: 0x4eb27b84
 Device     Boot Start     End Sectors Size Id Type
/dev/sda1 * 2048 2099199 2097152 1G 83 Linux - Now we need to set the partition type. Press “t” to set a partition type, choose the partition, and type “c” for “W95 FAT32 (LBA)”.
- We’re now left with this partition table.
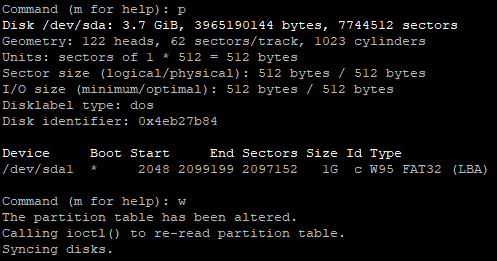
- Press “w” to write and save, and exit fdisk.
- We now need to format the partition. Run the following command on your device.
mkfs.vfat /dev/sda1
Finally, you can now set a label to the partition. Ubuntu uses the label “system-boot” whereas Raspbian uses “boot”. You can set it with the following command:
fatlabel /dev/device NEW_LABEL
You now have a clean partition layout that can be used to boot a Raspberry Pi. Remember that this is just the partition layout and the files are still needed from an image or your current running instance. These can simply be copied over.
In my case, I just mounted an old and the new partitions to directories and copied the data over. This allowed me to modify the new boot partition and ultimately make it boot in to an NFS root.
If you need just a simple boot partition, you don’t need to purchase large Micro SD cards.
[…] previously created a post to create a boot partition layout for a Raspberry Pi. Please follow those instructions to complete this […]
Thanks!
Your set of commands helped out a lot!