Looking at using SSD and NVMe with your FreeNAS or TrueNAS setup and ZFS? There’s considerations and optimizations that must be factored in to make sure you’re not wasting all that sweet performance. In this post I’ll be providing you with my own FreeNAS and TrueNAS ZFS optimizations for SSD and NVMe to create an NVMe Storage Server.
This post will contain observations and tweaks I’ve discovered during testing and production of a FreeNAS ZFS pool sitting on NVMe vdevs, which I have since upgraded to TrueNAS Core. I will update it with more information as I use and test the array more.
Considerations
It’s important to note that while your SSD and/or NVMe ZFS pool technically could reach insane speeds, you will probably always be limited by the network access speeds.
With this in mind, to optimize your ZFS SSD and/or NVMe pool, you may be trading off features and functionality to max out your drives. These optimizations may in fact be wasted if you reach the network speed bottleneck.
Some feature you may be giving up may actually help extend the life or endurance of your SSD such as compression and deduplication, as they reduce the number of writes performed on each of your vdevs (drives).
You may wish to skip these optimizations should your network be the limiting factor, which will allow you to utilize these features with no performance or minimal performance degradation to the final client. You should measure your network throughput to establish the baseline of your network bottleneck.
Deploying SSD and NVMe with FreeNAS or TrueNAS
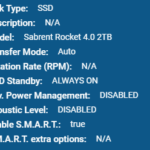
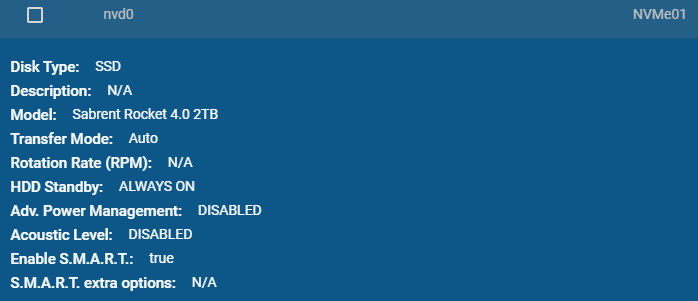
For reference, the environment I deployed FreeNAS with NVMe SSD consists of:
- 2 x HPE DL360p Gen8 Servers
- 1 x HPE ML310e Gen8 v2 Server
- 1 x IOCREST IO-PEX40152 PCIe to Quad NVMe
- 4 x 2TB Sabrent Rocket 4 NVMe SSD
- 1 x FreeNAS instance running as VM with PCI passthrough to NVMe
- 10Gb networking between DL360 Servers and network
- 1Gb network between ML310 and network
Update (May 1st, 2021): Since this blog post was created, I have since used what was learned in my new NVMe Storage Server Project. Make sure you check it out after reading this post!
As mentioned above, FreeNAS is virtualizatized on one of the HPE DL360 Proliant servers and has 8 CPUs and 32GB of RAM. The NVME are provided by VMware ESXi as PCI passthrough devices. There has been no issues with stability in the months I’ve had this solution deployed. It is also still working amazing since upgrading FreeNAS to TrueNAS core.
Important notes:
- VMXNET3 NIC is used on VMs to achieve 10Gb networking
- Using PCI passthrough, snapshots on FreeNAS VM are disabled (this is fine)
- NFS VM datastore is used for testing as the host running the FreeNAS VM has the NFS datastore store mounted on itself.
There are a number of considerations that must be factored in when virtualization FreeNAS and TrueNAS however those are beyond the scope of this blog post. I will be creating a separate post for this in the future.
Use Case (Fast and Risky or Slow and Secure)
The use case of your setup will depict which optimizations you can use as some of the optimizations in this post will increase the risk of data loss (such as disabled sync writes and RAIDz levels).
Fast and Risky
Since SSDs are more reliable and less likely to fail, if you’re using the SSD storage as temporary hot storage, you could simply using striping to stripe across multiple vdevs (devices). If a failure occurred, the data would be lost, however if you’re were just using this for “staging” or using hot data and the risk was acceptable, this is an option to drastically increase speeds.
Example use case for fast and risky
- VDI Pool for clones
- VMs that can be restored easily from snapshots
- Video Editing
- Temporary high speed data dump storage
The risk can be lowered by replicating the pool or dataset to slower storage on a frequent or regular basis.
Slow and Secure
Using RAIDz-1 or higher will allow for vdev (drive) failures, but with each level increase, performance will be lost due to parity calculations.
Example use case for slow and secure
- Regular storage for all VMs
- Database (SQL)
- Exchange
- Main storage
Slow and Secure storage is the type of storage found in most applications used for SAN or NAS storage.
SSD Endurance and Lifetime
Solid state drives have a lifetime that’s typically measured in lifetime writes. If you’re storing sensitive data, you should plan ahead to mitigate the risk of failure when the drive reaches it’s full lifetime.
Steps to mitigate failures
- Before putting the stripe or RAIDz pool in to production, perform some large bogus writes and stagger the amount of data written on the SSDs individually. While this will reduce the life counter on the SSDs, it’ll help you offset and stagger the lifetime of each drives so they don’t die at the same time.
- If using RAIDz-1 or higher, preemptively replace the SSD before the lifetime is hit. Do this well in advance and stagger it to further create a different between the lifetime of each drive.
Decommissioning the drives preemptively and early doesn’t mean you have to throw them away, this is just to secure the data on the ZFS pool. You can can continue to use these drives in other systems with non-critical data, and possibly use the drive well beyond it’s recommended lifetime.
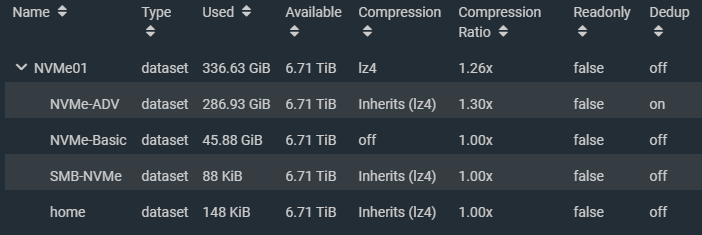
Compression and Deduplication
Using compression and deduplication with ZFS is CPU intensive (and RAM intensive for deduplication).
The CPU usage is negligible when using these features on traditional magnetic storage (traditional magentic platter hard drive storage) because when using traditional hard drives, the drives are the performance bottleneck.
SSD are a total different thing, specifically with NVMe. With storage speeds in the gigabytes per second, CPUs cannot keep up with the deduplication and compression of data being written and become the bottleneck.
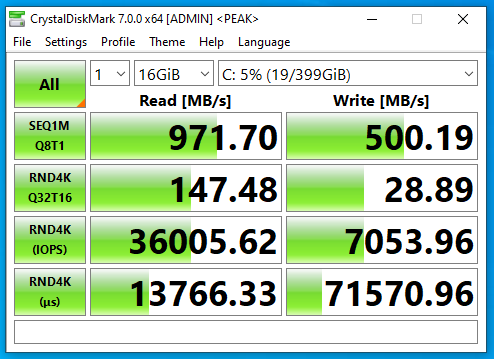
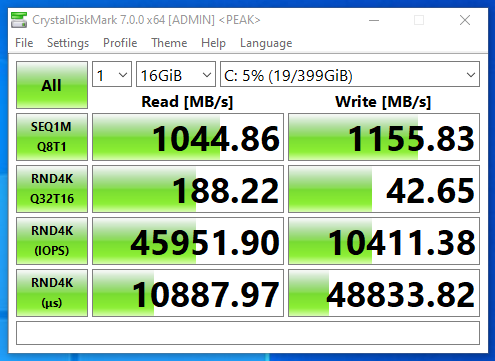
I performed a simple test comparing speeds with compression and dedupe with the same VM running CrystalDiskMark on an NFS VMware datastore running over 10Gb networking. The VM was configured with a single drive on a VMware NVME controller.
NVMe SSD with compression and deduplication
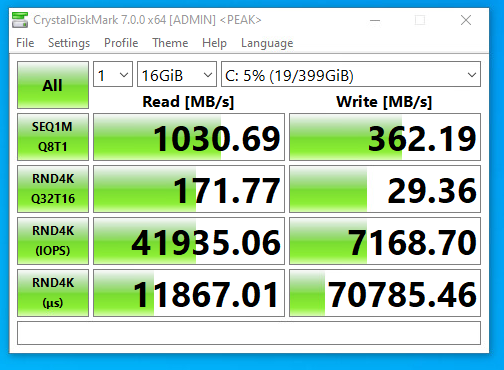
NVMe SSD with deduplication only
NVMe SSD with compression only
Now this is really interesting, that we actually see a massive speed increase with compression only. This is because I have a server class CPU with multiple cores and a ton of RAM. With lower performing specs, you may notice a decrease in performance.
NVMe SSD without compression and deduplication
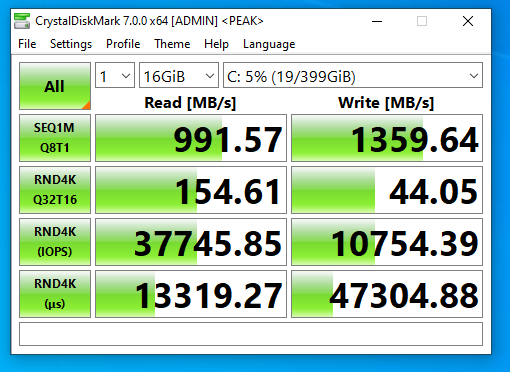
In my case, the 10Gb networking was the bottleneck on read operations as there was virtually no change. It was a different story for write operations as you can see there is a drastic change in write speeds. Write speeds are greatly increased when writes aren’t being compressed or deduped.
Note that on faster networks, read speeds could and will be affected.
If your network connection to the client application is the limiting factor and the system can keep up with that bottleneck then you will be able to get away with using these features.
Higher throughput with compression and deduplication can be reached with higher frequency CPUs (more Ghz), more cores (for more client connections). Remember that large amounts of RAM are required for deduplication.
Using compression and deduplication may also reduce the writes to your SSD vdevs, prolonging the lifetime and reducing the cost of maintaining the solution.
ZFS ZIL and SLOG
When it comes to writes on a filesystem, there a different kinds.
- Synchronous – Writes that are made to a filesystem that are only marked as completed and successful once it has actually been written to the physical media.
- Asynchronous – Writes that are made to a filesystem that are marked as completed or successful before the write has actually been completed and committed to the physical media.
The type of write performed can be requested by the application or service that’s performing the write, or it can be explicitly set on the file system itself. In FreeNAS (in our example) you can override this by setting the “sync” option on the zpool, dataset, or zvol.
Disabling sync will allow writes to be marked as completed before they actually are, essentially “caching” writes in a buffer in memory. See below for “Ram Caching and Sync Writes”. Setting this to “standard” will perform the type of write requested by the client, and setting to “always” will result in all writes being synchronous.
We can speed up and assist writes by using a SLOG for ZIL.
ZIL stands for ZFS Intent Log, and SLOG standards for Separated Log which is usually stored on a dedicated SLOG device.
By utilizing a SLOG for ZIL, you can have dedicated SSDs which will act as your intent log for writes to the zpool. On writes that request a synchronous write, they will be marked as completed when sent to the ZIL and written to the SLOG device.
Implementing a SLOG that is slower than the combined speed of your ZFS pool will result in a performance loss. You SLOG should be faster than the pool it’s acting as a ZIL for.
Implementing a SLOG that is faster than the combined speed of your ZFS pool will result in a performance gain on writes, as it essentially act as “write cache” for synchronous writes and will possibly even perform more orderly writes when it commits it to the actual vdevs in the pool.
If using a SLOG for ZIL, it is highly recommend to use an SSD that has PLP (power loss protection) as well as a mirrored set to avoid data loss and/or corruption in the event of a power loss, crash, or freeze.
RAM Caching and Sync Writes
In the event you do not have a SLOG device to provide a ZIL to your zpool, and you have a substantial amount of memory, you can disable sync writes on the pool which will drastically increase write operations as they will be buffered in RAM memory.
Disabling sync on your zpool, dataset, or zvol, will tell the client application that all writes has been complete and committed to disk (HD or SSD) before it has actually done so. This allows the system to cache writes in the system memory.
In the event of a power loss, crash, or freeze, this data will be lost and/or possibly result in corruption.
You would only want to do this if you had the need for fast storage where data loss would is acceptable (such as video editing, a VDI clone desktop pool, etc).
Utilizing a SLOG for ZIL is much better (and safer) then this method, however I still wanted to provide this for informational purposes as it does apply to some use cases.
SSD Sector Size
Traditional drives typically used 512k physical sector sizes. Newer hard drives and SSDs use 4k sectors, but often emulate 512k logical sectors (called 512e) for compatibility. SSD’s specifically sometimes ship with 512e to increase compatibility with operating systems and the ability to clone your old drive to the new SSD during migrations.
When emulating 512k logical sectors on an HD or SSD that uses 4k physical native sectors, an operation that writes 4k will result in 4 operations instead of 1. This increases overhead and could result in reduced IO and speed, as well as create more wear on the SSD when performing writes.
Some HDs and SSDs come with utilities or tools to change the sector size of the drive. I highly recommend changing it to it’s native sector size.
iSCSI vs NFS
Technically faster speeds should possible using iSCSI instead of NFS, however special care must be made when using iSCSI.
If you’re using iSCSI and the host that is virtualizing the FreeNAS instance is also mounting the iSCSI VMFS target that it’s presenting, you must unmount this iSCSI volume every time you go plan to shut down the FreeNAS instance, or the entire host that is hosting it. Unmounting the iSCSI datastore also means unregistering any VMs that reside on it.
If you simply shutdown the FreeNAS instance that’s hosting the iSCSI datastore, this will result in a improper unclean unmount of the VMFS volume and could lead to data loss, even if no VMs are running.
NFS provides a cleaner mechanism, as the FreeNAS handles the unmount of the base filesystem cleanly on shutdown and to the ESXi hosts it appears as an NFS disconnect. If VMs are not running (and no I/O is occuring) when the FreeNAS instance is shut down, data loss is not a concern.
iSCSI MPIO (Multipath I/O)
If your TrueNAS server isn’t virtualized, I’d recommend going with iSCSI because you can configure MPIO (Multipath I/O), which allows redundancy as well as round robin load balancing across multiple connections to the iSCSI target. For example, with 2 x 10Gbe NICs, you should be able to achieve redundancy/failover, as well as 20Gbe combined speeds. If you had 4 x 10Gbe, then you could achieve 40Gbps combined.
Never use LAG or LACP when you want fully optimized NFS, pNFS, or iSCSI MPIO.
Jumbo Frames
Since you’re pushing more data, more I/O, and at a faster pace, we need to optimize all layers of the solution as much as possible. To reduce overhead on the networking side of things, if possible, you should implement jumbo frames.
Instead of sending many smaller packets which independently require acknowledgement, you can send fewer larger packets. This significantly reduces overhead and allows for faster speed.
In my case, my FreeNAS instance will be providing both NAS and SAN services to the network, thus has 2 virtual NICs. On my internal LAN where it’s acting as a NAS (NIC 1), it will be using the default MTU of 1500 byte frames to make sure it can communicate with workstations that are accessing the shares. On my SAN network (NIC 2) where it will be acting as a SAN, it will have a configured MTU of 9000 byte frames. All other devices (SANs, client NICs, and iSCSI initiators) on the SAN network have a matching MTU of 9000.
Additional Notes
Please note that consumer SSDs usually do not have PLP (Power Loss Prevention). This means that in the event of a power failure, any data sitting on the write cache on the SSD may be lost. This could put your data at risk. Using enterprise solid state drives remedies this issue as they often come with PLP.
Conclusion
SSD’s are great for storage, whether it be file, block, NFS, or iSCSI! It’s in my opinion that NVMe and all flash arrays is where the future of storage is going.
I hope this information helps, and if you feel I left anything out, or if anything needs to be corrected, please don’t hesitate to leave a comment!
Thanks for a brilliant article and thanks for doing all the research/testing.
The reason I would be looking at SSDs over discs is because of power consumption. My use case is a high reliability always on low power setup, essentially to replace the RPi system I cobbled together a few years ago. I have low TB requirements (barely any movies/music), low cpu requirement (never transcode), and do not need speed either – 4 users max. This is really for family photos and work/school docs. I just don’t want to be using the data recovery services one city over like I did a few years ago. For a high reliability, failure safe, low power system, I gather a bunch of SSDs would be lower watts than the same number of solid discs. If you were planning a lower power, high reliability system – is freenas on SSDs the right tool?
thanks
Hi Chris,
I’m glad if the post helped! 🙂
FreeNAS would be great for you! You could build a low power system and use SATA SSDs or NVME SSDs for disks. If you don’t require much space, you could simply setup a mirror pool (the data is duplicated and mirrored across 2 disks), and you’d be good to go. FreeNAS can provide SMB (Windows network share) access. If it’s in your budget, you could purchase SSDs that have PLP (Power Loss Prevention) that will protect them from corruption in the event of a power failure or drop.
If you end up building a system out, report back here and leave a comment when you’re done. Let us know how it worked out! 🙂
Cheers,
Stephen
Greetings
Truly a great job . Im trying to replicate your findings. I have Supermicro storage server with 2 x Xeon E5-2667V4 CPUs, 128 GB RAM, LIS 9300 HBA, 8x10TB HD. 1TB Samsung nvme, 2x1TB Cruical nVME. Tried different vDEV configurations. I can saturate the 10Gb NIC during write but I can’t get read more than 300-400 MB/s. I disabled Sync during testing just to establish a baseline. Any suggestions how to improve read speed. Once all sorted out I will use a 40Gb Mellonix card and try to saturate the 40Gb link.
regards
Hi Yacoub,
Are you having the speed issues with the HD storage or the SSD storage?
Also, what de-dupe and compression settings have you tried? Does anything change when modifying them?
Cheers
Stephen
This post helped me determine what way I was going to go with my FreeNAS Setup. I’m running it on a Dual Xeon R620 with 128GBs of Memory. I was using it with some regular SSDs in a z1 configuration and after seeing your post I turned off Compression and Dedup and my speeds doubled and tripled.
Since I have two different iSCSI paths, I set them up in Round Robin and changed the iops to 1 and I bumped my write speeds to 2100MB/s. Which is getting close to the throughput maximum. I will probably end up getting some NVMe drives in my system as well.
Thanks again!
Hi Lee,
Glad the post helped and happy to hear you’re getting the speeds you want!
Cheers,
Stephen
Interesting post, friend! Im running a TrueNAS with 4 HDD of 2TB on a RaidZ on my home network. I have the feeling that its pretty slow on moving files over the network due the 4HDD are not SSD.
I would like to add a cache disc. What is your advice? a SSD (500Gb?), or a USB disk?
Thank you friend!
I am trying to optimize truenas core 12 for smb throughput in a 100Gbps network. from your post, it seems like striping will be required. Do you know if it is possible to check/change the sector size of the drives generically from within truenas? what should we set the sector size on all of the drives? Do you know what the throughput limitations of 8 channel 3200mhz ram is? I am assuming that from a performance bottleneck, it would be hitting the ram first, then any sort of cache (optane 5800x), then the striped m.2 (4x pny xlr8 nvme pcie 4.0 (newest controller)). Or would the striped m.2 start to outperform the ram at some point? thanks for any suggestions.
Hi Joseph,
I would recommend using RAM over Optane caching. RAM is WAY faster and will keep up better. It’s also very cheap.
I chose striping for speed, and I don’t care about data loss (my storage is being used for VDI, video editing, etc.). So it’s not the central point for storage, only for editing, short term use, etc…
If you’re storing important data and it’s the central point, I would recommend against striping.
I think you can check the sector size, but not change. In my case, I had to use the Sabrent utility to change the sector size on the NVMe drives.
I don’t know what the limitation of 8 channel 3200mhz RAM is.
If you already have an optane and it’s being used, it could be the bottleneck, I’d recommend removing it.
It’s unlikely that the NVME will outperform the RAM because it has direct access to the CPU. Depending on your setup, your NVMe may or may not have direct access to the CPU.
Cheers,
Stephen
thanks for the quick reply (even on a Sunday!) I also do not care about the type of workloads having resiliency. I am just trying to do some R&D to see how close to 100Gbps we can get the storage network to perform. You mentioned that you can check but not change sector size. You then mentioned that you used the sabrent utility to change the sector size. What was the sector size originally set to on the sabrent m.2 drives? what did you change the to? Is there anyway to query the drives being used in truenas to see what they are set to? I also have some samsung enterprise nvme pci ssds (pm1735) and was hoping to at least find a way to see what their sector size was set to. It would be good to see if there is some truenas cli command that could query/set this setting as well.
Hi Joseph,
My pleasure! 🙂
On my NVMe drives, Sabrent ships them as 512e. Using a utility, you can change the sector size to the native format of 4k.
For checking, I don’t know if there’s a better way to do this, but I ran the following command. You might want to Google to see what the command is to pull it from the device exactly. I tried this command:
smartctl -a /dev/nvme0Which contained the following:
Namespace 1 Formatted LBA Size: 4096That shows the formatted size is 4k, however this might not reflect the actual hardware, but rather the formatted size.
Hope that helps.
Stephen
[…] already done some testing and created a guide on FreeNAS and TrueNAS ZFS Optimizations and Considerations for SSD and NVMe, so I made sure to use what I learned in this version of the […]
Hi,
really good GMP-Document! I wished, i would find it earlier! 😀 – After my first “playaround” with an virtualized TrueNAS installation on my 3 node vSphere Cluster, I exactly trapped into “If you simply shutdown the FreeNAS instance that’s hosting the iSCSI datastore, this will result in a improper unclean unmount of the VMFS volume and could lead to data loss, even if no VMs are running.” 😀 – Long Story short was a heavy Data loss on the vSAN for the first time. This was the point I’ve ordered an additional HPE DL380p Gen8 (:p) including 12 HotSwap Bays for my HDDs and around 96GB RAM.
Meanwhile I’ve waited on the shipment of the DL380p, I’ve used the time, to redesign my whole Infrastructure. I would ZRAIDv2, iSCSI MPIO, Flash-Only vSAN, clean Network Segmentation with the 2 new Unifi 24 Pro Switches (80 GBit/s Switching-power with nonblocking Throughput was the Argument for it) and last but not least a automated clean 3-2-1 Backup Strategy with a Multi cloud environment.
As you can see, if i found this Site earlier, would save some brain-cooking time 😀 – Our Solutions have the same Base :D.
Therefore I need to warn you! …
I’ve bookmarked this Page now :p 😀 😀
Good Paper you did here!
Greets from AT/Europe,
Tim
This article halped me on my TrueNAS configuration which i’ll use as NFS datastore for my vmware hosts.
Thank you a lot Stephen!
Great article.
From a new user perspective, I have a question whether using Qnap Nas, which I know is not what is discussed here but the latest Qnap system uses ZFS.
My question is what is the best practice for NVMe vs. SATA SSD. Which one should be Cache and which one should be system storage pool?
NVMe clearly outperforms on SATA SSD but having only 2 NVMe slots on my unit, I wonder whether I should use it for SSD cache or System Vdev, and use SATA SSD in Raid 1 or 0 for System Vdev or cache.
Mugen,
Head over to the FreeNAS sight and check out the ZFS Primer. It should answer most of your questions.
https://www.ixsystems.com/documentation/freenas/11.2/zfsprimer.html
A thought.. something being discussed in the pfSense forum:
For ZFS on SSD with logfile handling — growing files with small/frequent writes — it may provide huge benefit to reduce the max zfs block size for that filesystem, because of the amount of re-write overhead involved.
I’ve not seen this tested or verified to date…
Hi Pete,
Interesting note! I’ll do some digging and maybe possibly test this when I get time!
Thanks!
Hey Stephen,
One interesting thing to note, and possibly something to do an article on is the speed difference between Core and Scale. I migrated to Scale last year when it was first fully released. After about 6 months, I did a DiskMark and noticed my speeds were down to about 1000 MB/s for read and writes. Last night I reinstalled Core and imported the pools and reconfigured all iSCSI settings and did another test from the same machine on the same ESXi datastore and read and writes doubled. Kind of weird that Scale caused such a significant slowdown. Albeit, I never really noticed the slowdown, it was more of a curiosity as I added more drives in my pool.
LZ4 isn’t CPU heavy. You’ve written ‘512k’ when you mean ‘512 byte’. SLOG by default only caches synchronous writes, the way you’ve written it implies otherwise. There are other errors besides. This needs a rewrite and I’d suggest people landing here look at the resources zfs provides for clearer advice.
Hello,
That is correct, LZ4 isn’t very CPU heavy, but in high speed NVME SSD operations may provide a bottleneck. This would be more apparent with NVME vs SSD.