When attempting to log in to your VMware vCenter using the HPE Simplivity Upgrade Manager to perform an upgrade on your Simplivity Infrastructure, the login may fail with Access Denied, Incorrect Credentials, or Incorrect Username and Password.
Despite confirming that the credentials are correct (logging in to the vCenter UI, as well as the vCSA console via SSH), the HPE Simplivity Upgrade Manager will continue to fail on connection.
The Problem
During the login process, the HPE Simplivity Upgrade Manager will not only check the credentials and attempt to logon to the vCenter server, but it will also attempt to pull and validate the SSL certificates (whether trusted or not) on the vCenter server.
During the typical login process, after entering the credentials and clicking “Connect”, the user will be prompted with the SSL certificate information asking to approve the connection. In this specific circumstance the SSL window is not presented.
HPE Simplivity Upgrade Manager Login Failed
Because of the SSL check not being presented, I thought there may have been a chance with trusting the connection, and possibly HPE Simplivity wasn’t able to show the error specific to the SSL check failing.
vCenter Download Trusted Root CA Certificates
When clicking on this, I was presented with an HTTP 404 error (File not found), meaning the certficiates weren’t present, which I felt may be contributing or causing this problem.
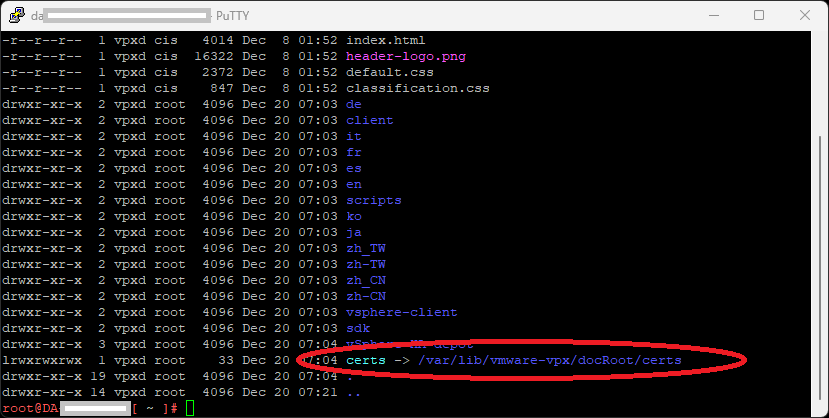
Logging in to the vCSA appliance, I was able to determine that the appliance was missing the certificate symlink to allow the certificate download by running this command:
ls -ltra /etc/vmware-vpx/docRoot
Inside of the directory listing, there was no symlink for certs, which should point to “/var/lib/vmware-vpx/docRoot/certs”.
I went ahead and created the symlink using the following command:
When using the “ls -ltra /etc/vmware-vpx/docRoot” command from above, I was now able to verify that the symlink existed:
vCenter DocRoot showing “certs” symbolic link
After creating the symlink, I was able to download the Trusted Root CA zip file (you don’t need to do anything with this file as the download was just a test).
I now went back to the Upgrade Manager to attempt to login, and it was successful.
When using VMware vSAN 7.0 Update 3 (7U3) and using the graceful shutdown (and restart) of your entire vSAN cluster, you may experience an issue resulting with all VMs inaccessible after everything has been powered back on and the hosts taken out of maintenance mode.
If you experience this issue, you will also notice that your vSAN datastore appears to be empty (files and VMs), however you can see that there is data used on the datastore (data usage calculation).
The Problem
As of vSAN 7.0 Update 3, users can now gracefully shutdown and restart their entire vSAN cluster from the GUI instead of having to use the CLI/SSH. While you can still Manually Shut Down and Restart the vSAN Cluster, as one can expect if there’s any easy way to do it via the GUI, it’ll get used.
Last night I had a customer call who used this feature, and when bringing up their cluster, all the VMs were marked as inaccessible and the datastore appeared to be empty. What was even more odd is that all the vSAN health information pertaining to the disks looked good.
Connecting to troubleshoot this (with my limited experience with vSAN), I attempted the following:
Restart vSAN Management Services on all ESXi Hosts
Restart vSAN Health Services on the vCenter vCSA (then wait 15 minutes and restart ESXi vSAN Manage Services)
Restart one of the ESXi hosts (to troubleshoot quorum)
Troubleshoot Networking (Issues occurred after physical maintenance)
Check MTUs
Check LAGs (for vSAN Storage Network)
Check Communication and Traffic
After doing all of the above, the VMs still were not accessible.
I had a feeling that this was related to the shutdown and restart (power on) process, so tried to manually start the vSAN cluster using the following command:
I was convinced this would help our issue, however the KB didn’t exactly describe the symptoms and errors we had. Scenario 3 was close, but symptoms were not exact.
At this point, I initiated a VMware Support ticket with VMware GSS, who after checking, confirmed it was the issue in the KB.
The Shutdown script sets “DOMPauseAllCCPs” to 1 (pausing all functions), and “IgnoreClusterMemberListUpdates” to 1. When you choose to Restart and Power on the cluster, these get set back to 0.
In our case, “IgnoreClusterMemberListUpdates” was set back to 0 during the restart and power on, however “DOMPauseAllCCPs” was still set to 1.
After setting DOMPauseAllCCPs” to “0” on all hosts, the VM’s were immediately accessibly, and the issue was resolved.
Today I want to talk about Memory Deduplication on ESXi with Transparent Page Sharing (TPS). This is a technology that isn’t widely known about, even amongst IT professionals with significant experience with VMware products.
And you may ask “Memory Deduplication, why aren’t we using this?!?” as it sounds like a pretty cool piece of technology… Well, I’m about to tell you why you’re not (Inter-VM), and share a few examples of where you would want to enable this.
I also want to show you how to enable TPS globally (Inter-VM), and also discuss TPS being used with VMware Horizon and VDI.
What is Transparent Page Sharing (TPS)?
Transparent Page Sharing is the process in which ESXi can provide memory deduplication by storing duplicate memory pages as a single page on the physical memory of the host. This process stops the system from storing redundant memory pages, and thus frees up physical memory for other uses.
If my memory serves me right, this was originally enabled by default in ESX/ESXi version 5, but was later globally disabled due to security vulnerabilities and concerns.
Note, that TPS is still enabled by default from within the same VM, even today with ESXi 8.
Security Concerns
I recall two potential scenarios and security concerns which led to VMware changing the original default behavior for TPS.
Scenario 1 included a concern about an attacker gaining access to a VM, and then having the ability to modify the memory contents of another VM.
Scenario 2 included a concern where an attacker may be able to get access to encryption keys used on another system.
With that being said, it sounds like this would be an extremely difficult attack that requires systems to be configured in a non-standard way.
Current status of TPS
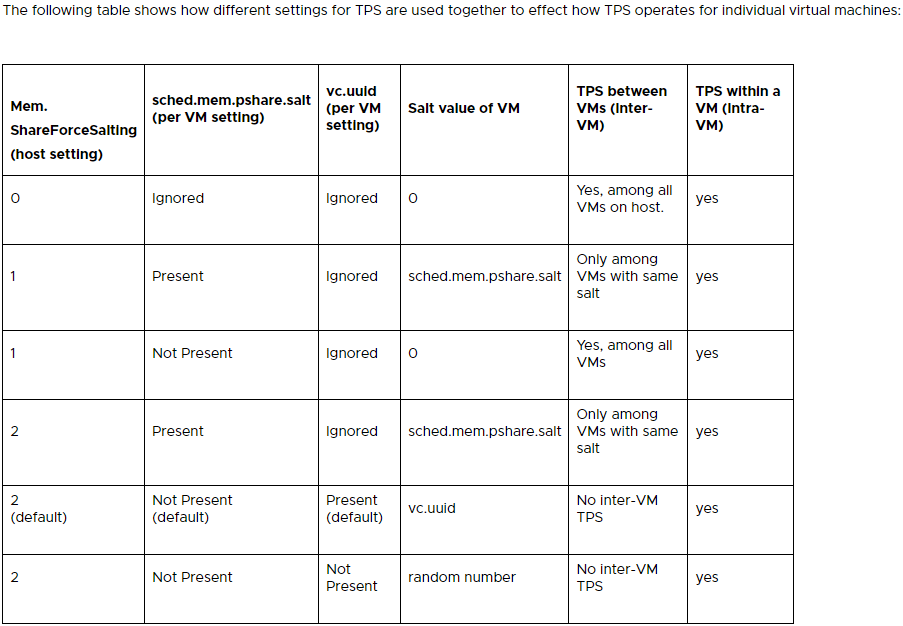
Believe it or not, TPS and memory deduplication is still enabled, however it’s only deduplicating pages from within the same VM. TPS is not deduplicating pages from multiple VMs.
Additionally, VMware has given us controls to configure TPS to allow it amongst multiple VMs, or even enable it globally across the ESXi host.
See below for the settings to configure TPS on ESXi via “Advanced Settings”:
Transparent Page Sharing (TPS) Settings for ESXi Host
In short, you could enable TPS globally (Inter-VM) by setting “Mem.ShareForceSalting” in “Advanced Settings”, to a value of “0”. You can also use the salting to configure groups of VMs that are allow to share memory pages.
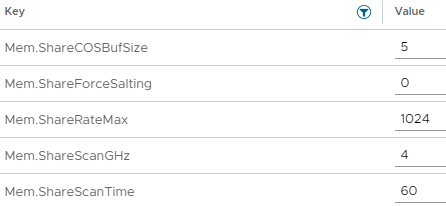
Additionally, you can tweak the behavior of TPS by modifying some of the settings shown below:
TPS Memory Sharing Settings
As you can see you can configure things like the scanning occurrence (Mem.ShareScanTime) of how often the system will check for memory pages that can be shared/deduplicated and other settings.
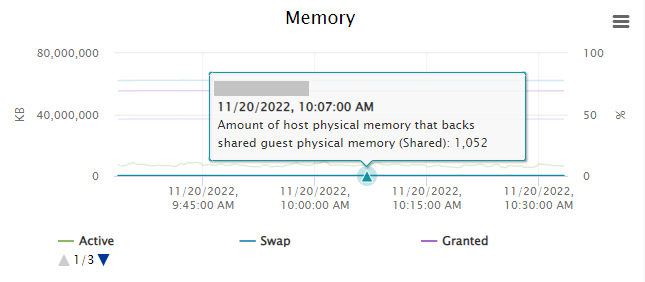
TPS is enabled, but not working
So, you may have decided to enable TPS in your environment, but you’re noticing that either no, or very little memory pages are being marked as shared.
TPS Memory Deduplication – Amount of host physical memory that backs shared guest physical memory
In the example above, you’ll notice that on a loaded host, with TPS enabled globally (Inter-VM, amongst all VMs), that the host is only deduplicating 1,052KB of memory.
This is because you will most often only see TPS being heavily utilized on an ESXi host that has over-committed memory, there’s also a chance that you simply don’t have enough memory pages that can be duplicated.
Memory Deduplication, TPS, and VMware Horizon VDI
Because VMware Horizon utilizes the “vmfork” with “Just-in-Time” desktop delivery, non-persistent VDI will benefit from some level of memory deduplication by default when using Instant Clones with non-persistent VDI. This is because non-persistent VDI guests are spawned from a running base image.
Additionally, you can further implement, enable, and configure TPS by configuring some Transparent Page Sharing options inside of the VMware Horizon Administration console.
When creating a Desktop Pool, you can set the “Transparent Page Sharing” open to “Virtual Machine” (Memory dedupe inside of the VM only), “Pool” (Memory dedupe across the Desktop Pool), “Pod” (Dedupe across the pod), or “Global” (Full Inter-VM memory deduplication across the ESXi host).
If you enabled TPS on the ESXi host globally, these settings are null and not used.
TPS Use Cases
So you might be asking when it’s a good time to use TPS?
The Homelab – When is a homelab not a good reason to try something? Looking to save some memory and overcommit memory resources? Implement TPS.
VDI Environments – On highly dense hosts, you may consider implementing TPS at some level to maximize the utilization of resources, however you must be aware of the security consequences and factor this in when configuring TPS.
Environments with no Sensitive Information – It’s hard to imagine, but if you have an environment that doesn’t contain any sensitive information and doesn’t use any security keys, it would be suitable to enable TPS.
I’m sure there’s a number of other use cases, so leave a comment if you can think of one.
Conclusion
In my opinion Transparent Page Sharing is a technology that should not be forgotten and discarded. VMware admins should be aware of it, how to configure it, and what the implications are of using it.
If you are considering enabling TPS in your environment, you must factor in the potential security consequences of doing so.
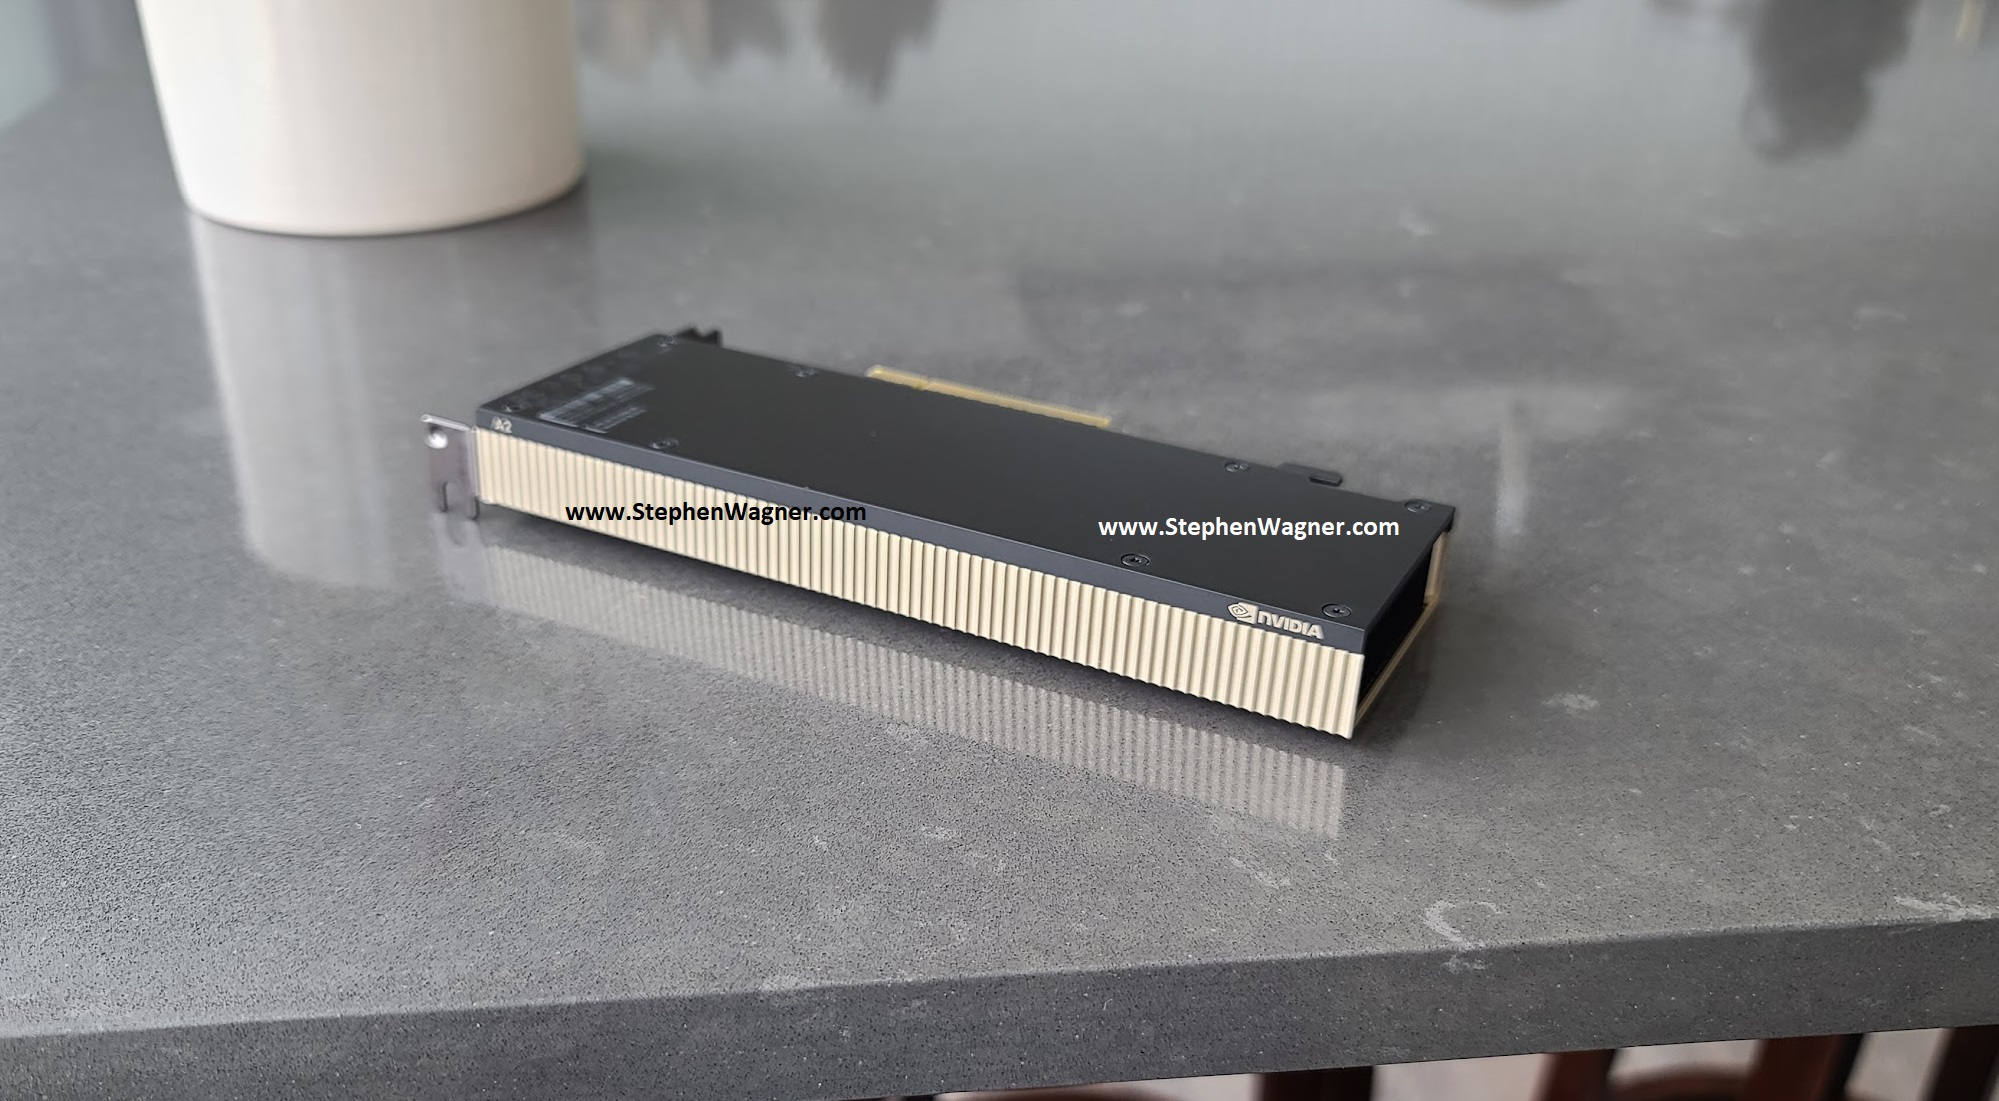
If you’re like me, you want to make sure that your environment is as optimized as possible. I recently noticed that my NVIDIA A2 vGPU was reporting the vGPU PCIe Link Speed and Generation that the card was using was below what it was supposed to be running at on my VMware vSphere ESXi host.
I needed to find out if this was being reported incorrectly, if there was an issue, or something else effecting this. In my case, the specific GPU I was using is supposed to support PCIe Gen4, and has a physical connector supporting 4x, my host has PCIe Gen3 slots, so I should at least be getting Gen3 speeds.
NVIDIA A2 vGPU
The Problem
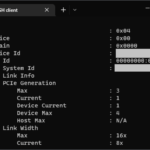
When running the command “nvidia-smi -q”, the GPU was reporting that it was only running at PCIe Gen 1 speeds, as shown below:
        GPU Link Info
            PCIe Generation
                Max                       : 3
                Current                   : 1
                Device Current            : 1
                Device Max                : 4
                Host Max                  : N/A
            Link Width
                Max                       : 16x
                Current                   : 8x
Something else worth noting, is that the card states that it supports a 16x interface, when it actually only physical has a 8x connector. I believe they use this chip on another board that has multiple GPUs on a single board that actually supports 16x.
You could say I was quite puzzled. Why would the card only be running at PCIe Generation 1 speeds? I thought it could be any of the scenarios below:
Dynamic mode that alternates when required (possibly for power savings)
Hardware issue
Hardware Limitation (I’m using this in an older server)
Software issues
Configuration issue
Unfortunately, when searching the internet, I couldn’t find many references to this metric, however I did find references from other user’s copy/pastes of “nvidia-smi -q” which had the same values (running PCIe Gen1), even with beefier and more high-end cards.
The Solution
After some more searching, I finally came across an NVIDIA technical document titled “Useful nvidia-smi Queries” that states that the current PCIe Generation Link speed “may be reduced when the GPU is not in use”. This confirms that it’s dynamic and adjusts when needed.
Finally, I decided to give some games a shot in a couple of the VMs, and to my surprise when running a game, the “Device Current” and “Current” PCIe Generation changed to PCIe Gen3 (note that my server isn’t capable of PCIe Gen4, which is the cards maximum), as shown below:
        GPU Link Info
            PCIe Generation
                Max                       : 3
                Current                   : 3
                Device Current            : 3
                Device Max                : 4
                Host Max                  : N/A
            Link Width
                Max                       : 16x
                Current                   : 8x
In conclusion, if you notice this in your environment, do not be alarmed as this is completely normal and expected behavior.
Today I’m going to show you the process to install Horizon Agent for Linux on Ubuntu 22.04 LTS. We’ll be installing the Horizon Agent for Linux from VMware Horizon 8 version 2209.
The official documentation from VMware is helpful, but unfortunately doesn’t provide all the information to get up and running quickly, which is why I’ve put together this guide as a “Quick Start”.
Please note, that this is just a guide to get to the point where you can install NVIDIA vGPU drivers and have installed the Horizon Agent for Linux on the VM. This will provide you with a persistent VM that you can use with Horizon, and the instructions can be adapted for use in a non-persistent instant clone environment as well.
Create a VM on your vCenter Server, attached the Ubuntu 22.04 LTS ISO, and install Ubuntu
Install any Root CA’s or modifications you need for network access (usually not needed unless you’re on an enterprise network)
Update Ubuntu as root apt update apt upgrade reboot
Install software needed for VMware Horizon Agent for Linux as root apt install make gcc libglvnd-dev open-vm-tools open-vm-tools-dev open-vm-tools-desktop
Install your software (Chrome, etc.)
Install NVIDIA vGPU drivers if you are using NVIDIA vGPU (this must be performed before install the Horizon Agent). Make sure the installer modifies and configures the X configuration files.
Add the Ubuntu 22.04 LTS VM to the manual desktop pool
Entitle the User account to the desktop pool and assign to the VM
Connect to the Ubuntu 22.04 Linux VDI VM from the VMware Horizon Client
You should now be able to connect to the Ubuntu Linux VDI VM using the VMware Horizon client. Additionally, if you installed the vGPU drivers for NVIDIA vGPU, you should have full 3D acceleration and functionality.
This website uses cookies to improve your experience. We'll assume you're ok with this, but you can opt-out if you wish.
Do you accept the use of cookies and accept our privacy policy? AcceptRejectCookie and Privacy Policy
Privacy & Cookies Policy
Privacy Overview
This website uses cookies to improve your experience while you navigate through the website. Out of these cookies, the cookies that are categorized as necessary are stored on your browser as they are essential for the working of basic functionalities of the website. We also use third-party cookies that help us analyze and understand how you use this website. These cookies will be stored in your browser only with your consent. You also have the option to opt-out of these cookies. But opting out of some of these cookies may have an effect on your browsing experience.