When performing a VMware vMotion on a Virtual Machine with an NVIDIA vGPU attached to it, the VM may freeze during migration. Additionally, when performing a vMotion on a VM without a vGPU, the VM does not freeze during migration.
So why is it that adding a vGPU to a VM causes it to become frozen during vMotion? This is referred to as the VM Stun Time.
I’m going to explain why this happens, and what you can do to reduce these STUN times.
VMware vMotion
First, let’s start with traditional vMotion without a vGPU attached.

vMotion allows us to live migrate a Virtual Machine instance from one ESXi host, to another, with (visibly) no downtime. You’ll notice that I put “visibly” in brackets…
When performing a vMotion, vSphere will migrate the VM’s memory from the source to destination host and create checkpoints. It will then continue to copy memory deltas including changes blocks after the initial copy.
Essentially vMotion copies the memory of the instance, then initiates more copies to copy over the changes after the original transfer was completed, until the point where it’s all copied and the instance is now running on the destination host.
VMware vMotion with vGPU
For some time, we have had the ability to perform a vMotion with a VM that as a GPU attached to it.
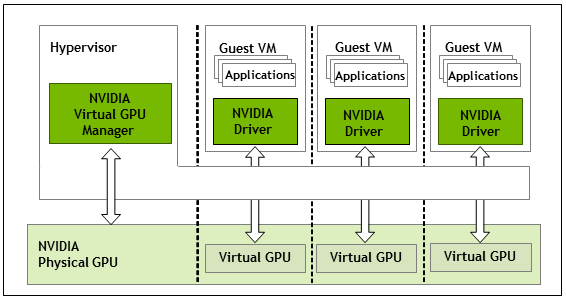
However, in this situation things work slightly different. When performing a vMotion, it’s not only the system RAM memory that needs to be transferred, but the GPU’s memory (VRAM) as well.
Unfortunately the checkpoint/delta transfer technology that’s used with then system RAM isn’t available to transfer the GPU, which means that the VM has to be stunned (frozen) to stop it so that the video RAM can be transferred and then the instance can be initialized on the destination host.
STUN Time
The STUN time is essentially the time it takes to transfer the video RAM (framebuffer) from one host to another.
When researching this, you may find examples of the time it takes to transfer various sizes of VRAM. An example would be from VMware’s documentation “Using vMotion to Migrate vGPU Virtual Machines“:
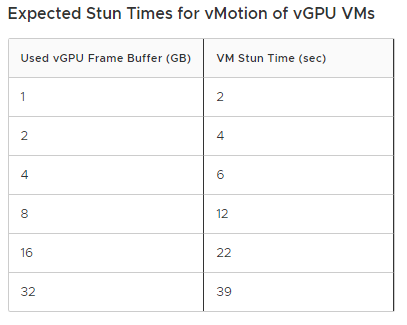
However, it will always vary depending on a number of factors. These factors include:
- vMotion Network Speed
- vMotion Network Optimization
- Multi-NIC vMotion to utilize multiple NICs
- Multi-vmk vMotion to optimize and saturate single NICs
- Server Load
- Network Throughput
- The number of VM’s that are currently being migrated with vMotion
As you can see, there’s a number of things that play in to this. If you have a single 10Gig link for vMotion and you’re migrating many VMs with a vGPU, it’s obviously going to take longer than if you were just migrating a single VM with a vGPU.
Optimizing and Minimizing vGPU STUN Time
There’s a number of things we can look at to minimize the vGPU STUN times. This includes:
- Upgrading networking throughput with faster NICs
- Optimizing vMotion (Configure multiple vMotion VMK adapters to saturate a NIC)
- Configure Multi-NIC vMotion (Utilize multiple physical NICs to increase vMotion throughput)
- Reduce DRS aggressiveness
- Migrate fewer VMs at the same time
All of the above can be implemented together, which I would actually recommend.
In short, the faster we migrate the VM, the less the STUN Time will be. Check out my blog post on Optimizing VMware vMotion which includes how to perform the above recommendations.
Hope this helps!