So, what happens in a worst-case scenario where your backup system fails, you don’t have any VM snapshots, and the last thing standing in the way of complete data loss is your SAN storage systems LUN snapshots?
Well, first you fire whoever purchased and implemented the backup system, then secondly you need to start restoring the VM (or VMs) from your SAN LUN snapshots.
While I’ve never had to do this in the past (all the disaster recovery solutions I’ve designed and sold have been tested and function), I’ve always been curious what the process is and would be like. Today I decided to try it out and develop a procedure for restoring a VM from SAN Storage LUN snapshot.
For this test I pretended a VM was corrupt on my VMware vSphere cluster and then restored it to a previous state from a LUN snapshot on my HPE MSA 2040 (identical for the HPE MSA 2050, and MSA 2052) Dual Controller SAN.
To accomplish the restore, we’ll need to create a host mapping on the SAN for the LUN snapshot to a new LUN number available to the hosts. We then need to add and mount the VMFS volume (residing on the snapshot) to the host(s) while assigning it a new signature and then vMotion the VM from the snapshot’s VMFS to original datastore.
Important Notes (Read first):
- When mounting a VMFS volume from a SAN snapshot, you MUST RE-SIGNATURE THE SNAPSHOT VMFS volume. Not doing so can cause problems.
- The snapshot cannot be mapped as read only, VMFS volumes must be marked as writable in order to be mounted on ESXi hosts.
- You must follow the proper procedure to gracefully dismount and detach the VMFS volume and storage device before removing the snapshot’s host mapping on the SAN.
- We use Storage vMotion to perform a high-speed move and recovery of the VM. If you’re not licensed for Storage vMotion, you can use the datastore file browser and copy/move from the snapshot VMFS volume to live production VMFS volume, however this may be slower.
- During this entire process you do not touch, modify, or change any settings on your existing active production LUNs (or LUN numbers).
- Restoring a VM from a SAN LUN snapshot will restore a crash consistent copy of the VM. The VM when recovered will believe a system crash occurred and power was lost. This is NOT a graceful application consistent backup and restore.
- Please read your SAN documentation for the procedure to access SAN snapshots, and create host mappings. With the MSA 2040 I can do this live during production, however your SAN may be different and your hosts may need to be powered off and disconnected while SAN configuration changes are made.
- Pro tip: You can also power on and initialize the VM from the snapshot before initiating the storage vMotion. This will allow you to get production services back online while you’re moving the VM from the snapshot to production VMFS volumes.
- I’m not responsible if you damage, corrupt, or cause any damage or issues to your environment if you follow these procedures.
We are assuming that you have already either deleted the damaged VM, or removed it from your inventory and renamed the VMs folder on the live VMFS datastore to change the name (example, renaming the folder from “SRV01” to “SRV01.bad”. If you renamed the damaged VM, make sure you have enough space for the new restored VM as well.
Procedure:
Mount the VMFS volume on the LUN snapshot to the ESXi host(s)
- Identify the VM you want to recover, write it down.
- Identify the datastore that the VM resides on, write it down.
- Identify the SAN and identify the LUN number that the VMFS datastore resides on, write it down.
- Identify the LUN Snapshot unique name/id/number and write it down, confirm the timestamp to make sure it will contain a valid recovery point.
- Log on to the SAN and create a host mapping to present the snapshot (you recorded above) to the hosts using a new and unused LUN number.
- Log on to your ESXi host and navigate to configuration, then storage adapters.
- Select the iSCSI initator and click the “Rescan Storage Adapters” button to rescan all iSCSI LUNs.
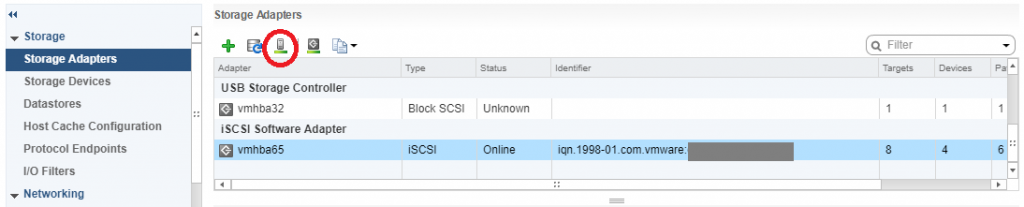
VMware ESXi Host Rescan Storage Adapter
- Ensure both check boxes are checked and hit “Ok”, wait for the scan to complete (as shown in the “Recent Tasks” window.
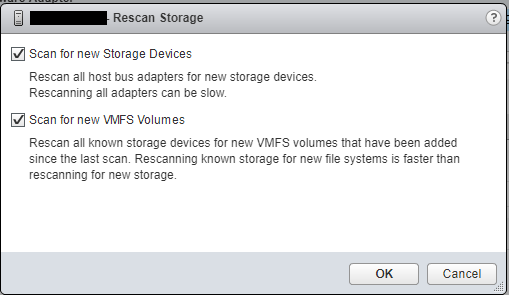
VMware ESXi Host Rescan Storage Adapter Window for VMFS Volume and Devices
- Now navigate to the “Datastores” tab under configuration, and click on the “Create a new Datastore” button as shown below.
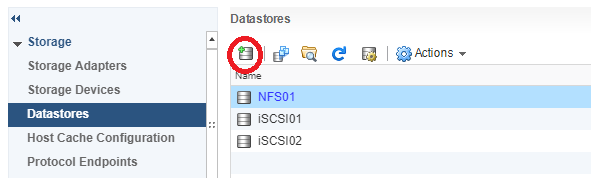
VMware ESXi Host Add Datastore Window
- Continue with “VMFS” selected and select continue.
- In the next window, you’ll see your existing datastores, as well as your new datastore (from the snapshot). You can leave the “Datastore name” as is since this value will be ignored. In this window you’re going to select the new VMFS datastore from the snapshot. Make sure you confirm this by looking at the LUN number, as well as the value under “SnapshotVolume”. It is critical that you select the snapshot in this window (it should be the new LUN number you added above).
- Select next and continue.
- On the next window “Mount Option”, you need to change the radio button to and select “Assign a new signature”. This is critical! This will assign a new signature to differentiate it from your existing real production datastore so that the ESXi hosts don’t confuse it.
- Continue with the wizard and complete the mount process. At this point ESXi will resignture the VMFS volume and rename it to “snap-OriginalVolumeNameHere”.
- You can now browse the VMFS datastore residing on the LUN snapshot and do anything you’d normally be able to do with a normal datastore.
Copy/Move/vMotion the VM from the snapshot VMFS volume to your production VMFS volume
Note: The next steps are only if you are licensed for storage vMotion. If you aren’t you’ll need to use the copy or move function in the file browsing area to copy or move the VMs to your live production VMFS datastores:
- Now we’ll go to the vCenter/ESXi host storage area in the web client, and using the “Files” tab, we’ll browse the snapshots VMFS datastore that we just mounted.
- Locate the folder for the VM(s) you want to recover, open the folder, right click on the vmx file for the VM and select “Register VM”. Repeat this for any of the VMs you want to recover from the snapshot. Complete the wizard for each VM you register and add it to a host.
- Go back to you “Hosts and VMs” view, you’ll now see the VMs are added.
- Select and right click on the VM you want to move from the snapshot datastore to your production live datastore, and select “Migrate”.
- In the vMotion migrate wizard, select “Change Storage only”.
- Continue to the wizard, and storage vMotion the VM from the snapshot VMFS to your production VMFS volume. Wait for the vMotion to complete.
- After the storage vMotion is complete, boot the VM and confirm everything is functioning.
Gracefully unmount, detach, and remove the snapshot VMFS from the ESXi host, and then remove the host mapping from the SAN
- On each of your ESXi hosts that have access to the SAN, go to the “Datastores” section under the ESXi hosts configuration, right click on the snapshot VMFS datastore, and select “Unmount”. You’ll need to repeat this on each ESXi host that may have automounted the snapshot’s VMFS volume.
- On each of your ESXi hosts that have access to the SAN, go to the “Storage Devices” section under the ESXi hosts configuration and identify (by LUN number) the “disk” that is the snapshot LUN. Select and highlight the snapshot LUN disk, select “All Actions” and select “Detach”. Repeat this on each host.
- Double check and confirm that the snapshot VMFS datastore (and disk object) have been unmounted and detached from each ESXi host.
- You can now log in to your SAN and remove the host mapping for the snapshot-to-LUN. We will not longer present the snapshot LUN to any of the hosts.
- Back to the ESXi hosts, navigate to “Storage Adapters”, select the “iSCSI Initiator Adapter”, and click the “Rescan Storage Adapters”. Repeat this for each ESXi host.
VMware ESXi Host Rescan Storage Adapter
- You’re done!