Run the command “paste <(cat /sys/class/thermal/thermal_zone/type) <(cat /sys/class/thermal/thermal_zone/temp) | column -s $’\t’ -t | sed ‘s/(.)..$/.\1°C/'” as root to get the CPU temperature on Ubuntu Server.
After installing the VMware Horizon Agent on a Physical PC, you may have noticed some issues with USB redirection, audio, and hardware redirection. These issues include not working, or not working in it’s entirety.
On a few occasions I’ve had readers reach out to inform me that they are experiencing these issues. Most recently a reader by the name of “Sascha” reached out and reported issues with audio, particularly the microphone not functioning or being redirected from the VMware Horizon View Client to the Physical PC.
The Fix
In Sascha’s case (along with the other readers), we troubleshot the issue and realized that in each and every case the problem was due to the use of a Windows 10 Profesional license being used. As per the VMware Horizon release notes, a Windows 10 Enterprise license must be used when installing the Horizon Agent on a Physical PC.
Once Sascha and the other users upgrades or installed a Windows 10 Enterprise license, the issues stopped immediately.
This is another reminder that you need an Windows 10 Enterprise license when installing the Horizon Agent on a Physical PC.
I’ve noticed in a few situations where an ESXi host is marked as “unresponsive” or “disconnected” inside of vCenter due to issues occurring on that host (or connected hardware). This recently happened again with a customer and is why I’m writing this article at this very moment.
In these situations, usually all normal means of managing, connecting, or troubleshooting the host are unavailable. Usually in cases like this ESXi administrators would simply reset the host.
However, I’ve found hosts can often be rescued without requiring an ungraceful restart or reset.
Observations
In these situations, it can be observed that:
The ESXi host is in a unresponsive to disconnected state to vCenter Server.
Connecting to the ESXi host directly does not work as it either doesn’t acknowledge HTTPS requests, or comes up with an error.
Accessing the console of the ESXi host isn’t possible as it appears frozen.
While the ESXi host is unresponsive, the virtual machines are still online and available on the network.
Troubleshooting
In the few situations I’ve noticed this occurring, troubleshooting is possible but requires patience. Consider the following:
When trying to access the ESXi console, give it time after hitting enter or selecting a value. If there’s issues on the host such as commands pending, tasks pending, or memory issues, the console may actually respond if you give it 30 seconds to 5 minutes after selecting an item.
With the above in mind, attempt to enable console access (preferably console and not SSH). The logins may take some time (30 seconds to 5 minutes after typing in the password), but you might be able to gain troubleshooting access.
Check the SAN, NAS, and any shared storage… In one instance, there were issues with a SAN and datastore that froze 2 VMs. The Queued commands to the SAN caused the ESXi host to become unresponsive.
There may be memory issues with the ESXi instance. The VMs are fine, however an agent, driver, or piece of software may be causing the hypervisor layer to become unresponsive.
If there are storage issues, do what you can. In one of the cases above, we had to access the ESXi console, issue a “kill -9” to the VM, and then restart the SAN. We later found out there was issues with the SAN and corrupted virtual machines. The moment the SAN was restarted, the ESXi host became responsive, connected to the vCenter server and could be managed.
In another instance, on an older version of ESXi there was an HPE agentless management driver/service that was consuming the ESXi hosts memory continuously causing the memory to overflow, the host to fill the swap and become unresponsive. Eventually after gracefully shutting down the VMs, I was able to access the console, kill the service, and the host become responsive.
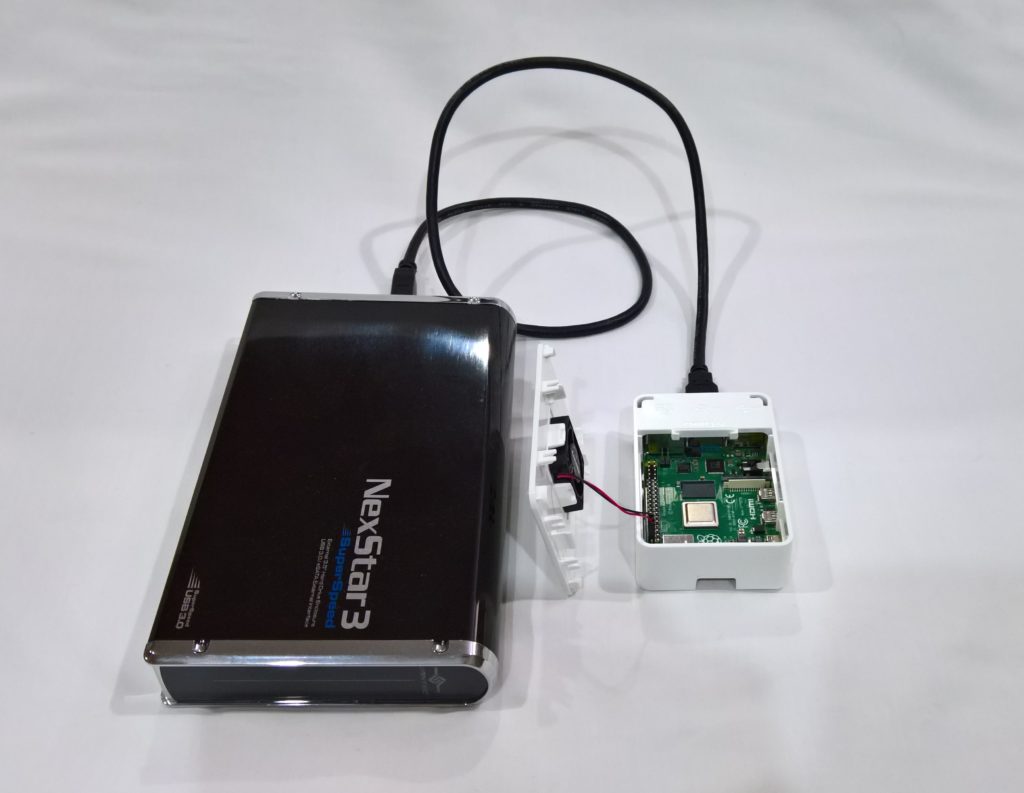
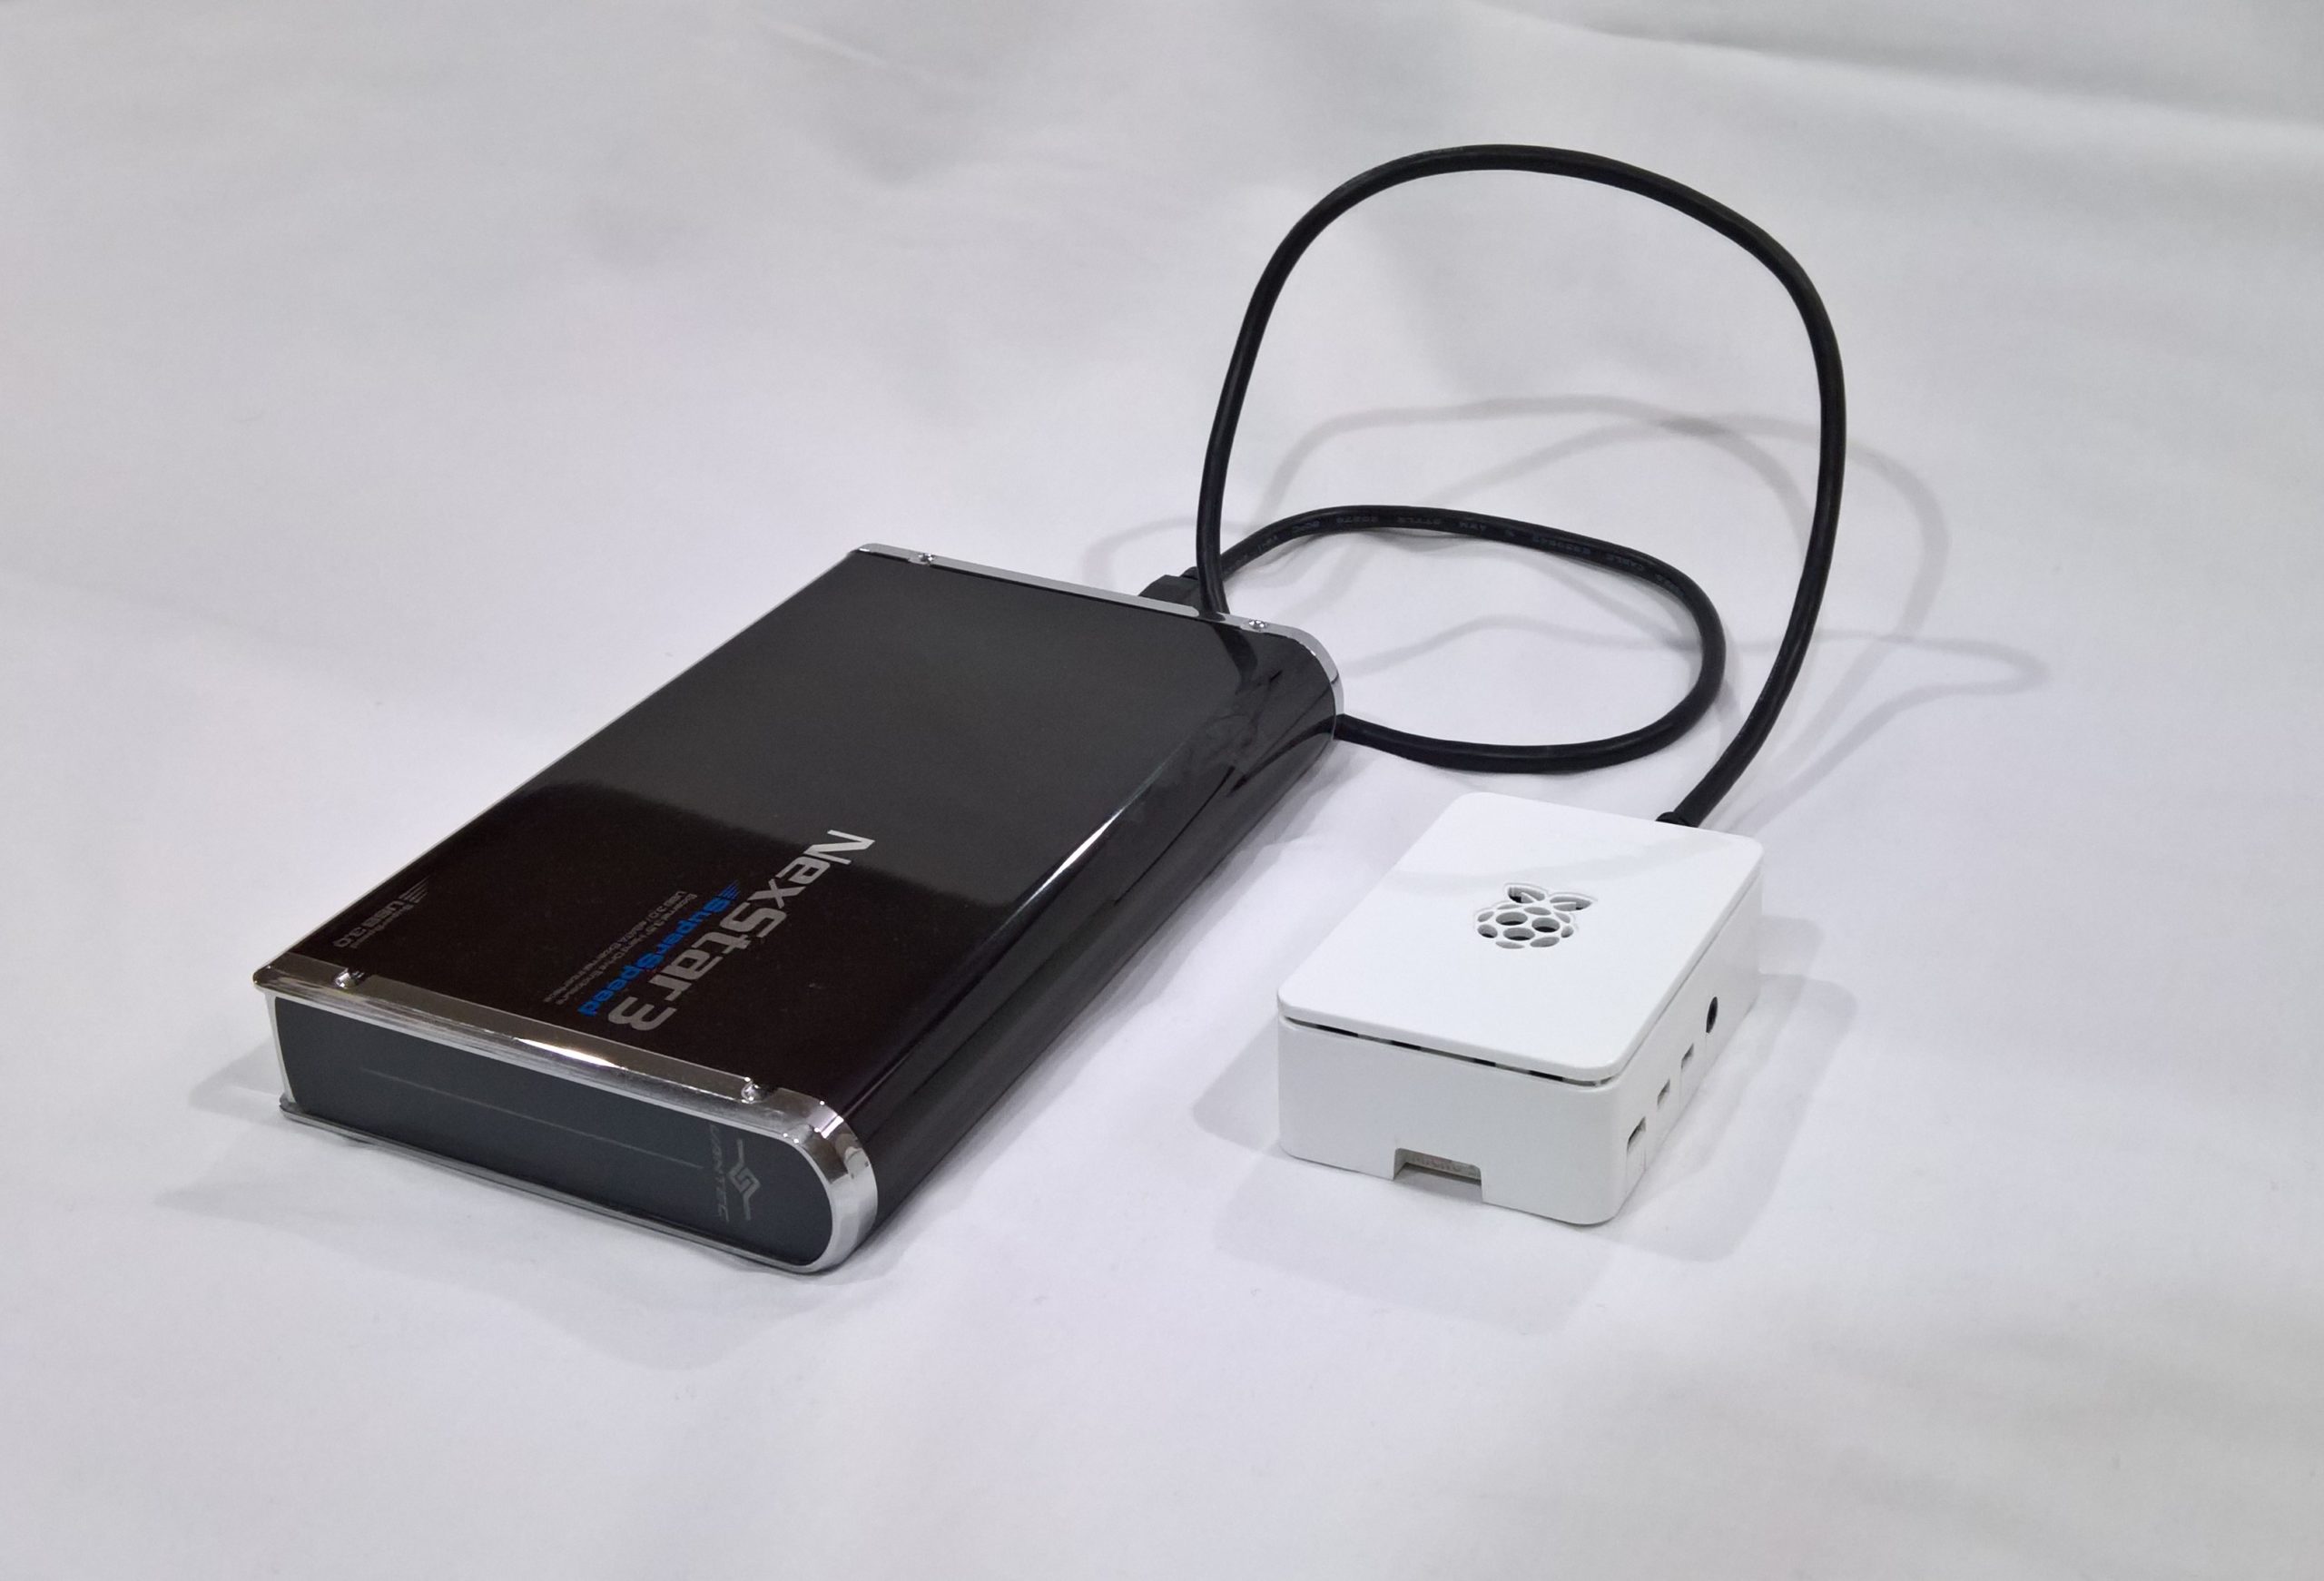
The Raspberry Pi 4 is a super neat little device that has a whole bunch of uses, and if there isn’t for something you’re looking for you can make one! As they come out with newer and newer generations of the Raspberry Pi, the hardware gets better, faster, and the capabilities greatly improve.
I decided it was time with the newer and powerful Raspberry Pi 4, to try and turn it in to an iSCSI SAN! Yes, you heard that right!
With the powerful quad core processor, mighty 4GB of RAM, and USB 3.0 ports, there’s no reason why this device couldn’t act as a SAN (in the literal sense). You could even use mdadm and configure it as a SAN that performs RAID across multiple drives.
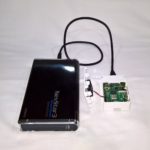
Raspberry Pi 4 with External USB 3 HD
In this article, I’m going to explain what, why, and how to (with full instructions)configure your Raspberry Pi 4 as an iSCSI SAN, an iSCSI Target.
Please Note: these instructions also apply to standard Linux PCs and Servers as well, but I’m putting emphasis that you can do this on SBCs like the Raspberry Pi.
A little history…
Over the years on the blog, I’ve written numerous posts pertaining to virtualization, iSCSI, storage, and other topics because of my work in IT. On the side as a hobby I’ve also done a lot of work with SBC (Single Board Computers) and storage.
Some of the most popular posts, while extremely old are:
You’ll notice I put a lot of effort specifically in to “Lio-Target”…
When deploying or using Virtualization workloads and using shared iSCSI storage, the iSCSI Target must support something called SPC-3/SPC-4 Reservations.
SPC-3 and SPC-4 reservations allow a host to set a “SCSI reservation” and reserve the blocks on the storage it’s working with. By reserving the storage blocks, this allows numerous hosts to share the storage. Ultimately this is what allows you to have multiple hosts accessing the same volume. Please keep in mind both the iSCSI Target and the filesystem must support clustered filesystems and multiple hosts.
Originally, most of the open source iSCSI targets including the one that was built in to the Linux kernel did not support SCSI reservations. This resulted in volume and disk corruption when someone deployed a target and connected with multiple hosts.
Lio-Target specifically supported these reservations and this is why it had my focus. Deploying a Lio-target iSCSI target fully worked when using with VMware vSphere and VMware ESXi.
Ultimately, on January 15th, 2011 the iSCSI target in the Linux kernel 2.6.38 was replaced with Lio-target. All new Linux kernels use the Lio-Target as it’s iSCSI target.
What is an iSCSI Target?
An iSCSI target is a target that contains LUNs that you connect to with an iSCSI initiator.
The Target is the server, and the client is the initiator. Once connected to a target, you can directly access volumes and LUNs using iSCSI (SCSI over Internet).
What is it used for?
iSCSI is mostly used as shared storage for virtual environments like VMware vSphere (and VMware ESXi), as well as Hyper-V, and other hypervisors.
It can also be used for containers, file storage, remote access to drives, etc…
Why would I use or need this on the Raspberry Pi 4?
Some users are turning their Raspberry Pi’s in to NAS devices, whynot turn it in to a SAN?
With the powerful processor, 4GB of RAM, and USB 3.0 ports (for external storage), this is a perfect platform to act as a testbed or homelab for shared storage.
For virtual environments, if you wanted to learn about shared storage you could deploy the Raspberry Pi iSCSI target and connect to it with one or more ESXi hosts.
Or you could use this to remotely connect to a disk on a direct block level, although I’d highly recommend doing this over a VPN.
How do you connect to an iSCSI Target?
As mentioned above, you normally connect to an iSCSI Target and volume or LUN using an iSCSI initiator.
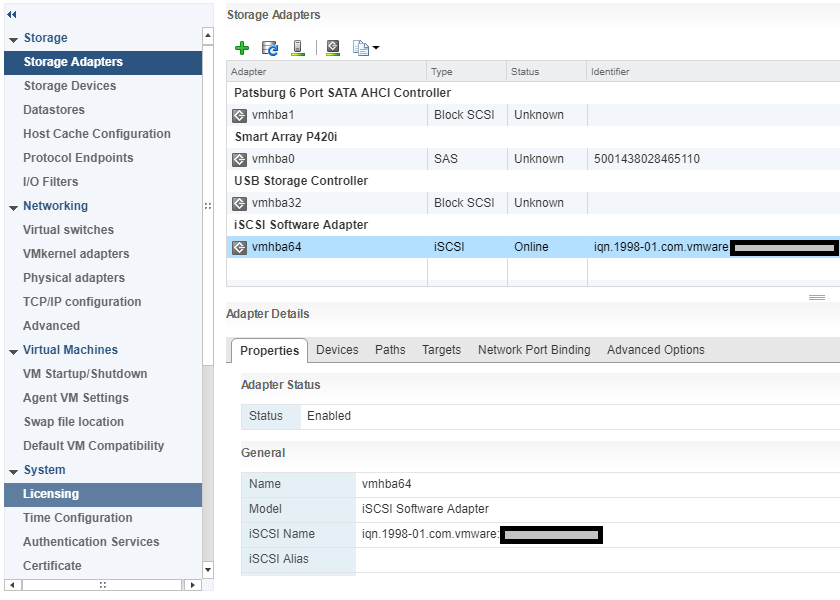
Using VMware ESXi, you’d most likely use the “iSCSI Software Adapter” under storage adapters. To use this you must first enable and configure it under the Host -> Configure -> Storage Adapters.
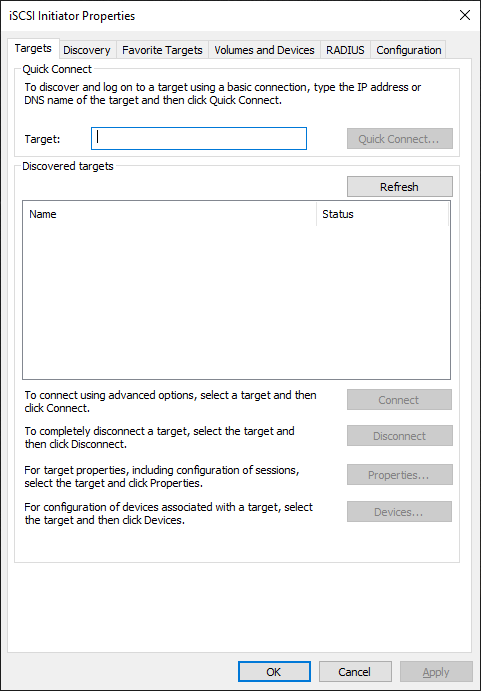
Using Windows 10, you could use the iSCSI initiator app. To use this simply search for “iSCSI Initiator” in your search bar, or open it from “Administrative Tools” under the “Control Panel”.
Windows 10 iSCSI Initiator (iSCSI Properties)
There is also a Linux iSCSI initiator that you can use if you want to connect from a Linux host.
What’s needed to get started?
To get started using this guide, you’ll need the following:
Raspberry Pi 4
Ubuntu Server for Raspberry Pi or Raspbian
USB Storage (External HD, USB Stick, preferably USB 3.0 for speed)
A client device to connect (ESXi, Windows, or Linux)
Networking gear between the Raspberry Pi target and the device acting as the initiator
Using this guide, we’re assuming that you have already installed, are using, and have configured linux on the Raspberry Pi (setup accounts, and configured networking).
The Ubuntu Server image for Raspberry Pi comes ready to go out of the box as the kernel includes modules for the iSCSI Target pre-built. This is the easier way to set it up.
These instructions can also apply to Raspbian Linux for Raspberry Pi, however Raspbian doesn’t include the kernel modules pre-built for the iSCSI target and there are minor name differences in the apps. This is more complex and requires additional steps (including a custom kernel to be built).
Select (using space bar) “Generic Target Core Mod (TCM) and ConfigFS Infrastructure” so that it has an <M> (for module) next to it. Then press enter to open it. Example below.
<M> Generic Target Core Mod (TCM) and ConfigFS Infrastructure
Select all the options as <M> so that they compile as a kernel module, as shown below.
 --- Generic Target Core Mod (TCM) and ConfigFS Infrastructure
<M>   TCM/IBLOCK Subsystem Plugin for Linux/BLOCK
<M>   TCM/FILEIO Subsystem Plugin for Linux/VFS
<M>   TCM/pSCSI Subsystem Plugin for Linux/SCSI
<M>   TCM/USER Subsystem Plugin for Linux
<M>   TCM Virtual SAS target and Linux/SCSI LDD Fabcric loopback module
<M>   Linux-iSCSI.org iSCSI Target Mode Stack
Save the kernel config and continue following the “compile a custom raspberry pi kernel” guide steps.
If you’re running Ubuntu Server, the Linux kernel was already built with these modules so the action above is not needed.
We’re going to assume that the USB drive or USB stick you’ve installed is available on the system as “/dev/sda” for the purposes of this guide. Also please note that when using the create commands in the entries below, it will create it’s own unique identifiers on your system different from mine, please adjust your commands accordingly.
Let’s start configuring the Raspberry Pi iSCSI Target!
First we need to install the targetcli interface to configure the target. As root (or use sudo) run the following command if you’re running Ubuntu Server.
apt install targetcli-fb
As root (or use sudo) run the following command if you’re running Raspbian.
apt install targetcli
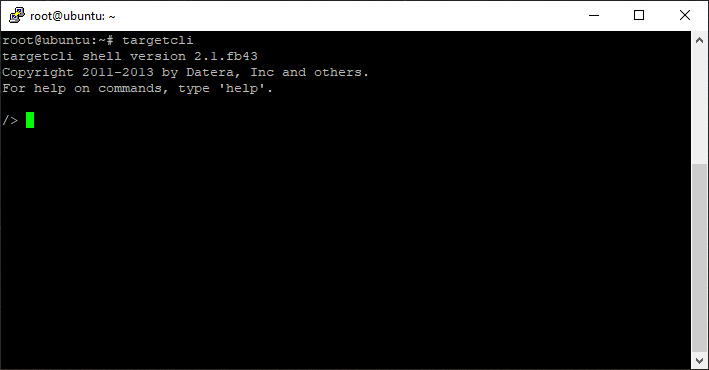
As root (or using sudo) run “targetcli”.
targetcli
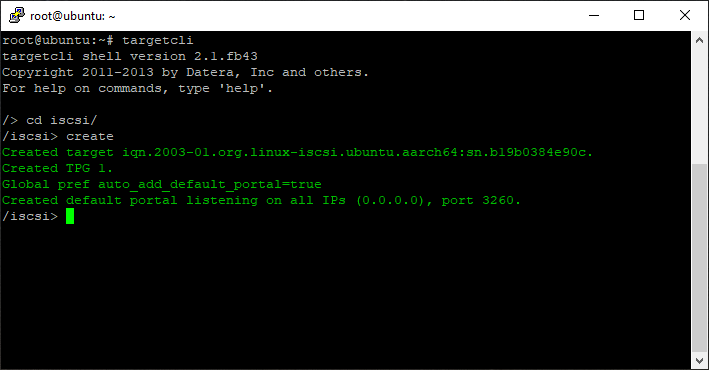
Create an iSCSI Target and Target Port Group (TPG).
cd iscsi/
create
Create a backstore (the physical storage attached to the Raspberry Pi).
cd /backstores/block
create block0 /dev/sda
Create an Access Control List (ACL) for security and access to the Target.
cd /iscsi/iqn.2003-01.org.linux-iscsi.ubuntu.aarch64:sn.eadcca96319d/tpg1/acls
create iqn.1991-05.com.microsoft:your.iscsi.initiator.iqn.com
Add, map, and assign the backstore (block storage) to the iSCSI Target LUN and ACL.
cd /iscsi/iqn.2003-01.org.linux-iscsi.ubuntu.aarch64:sn.eadcca96319d/tpg1/luns
create /backstores/block/block0
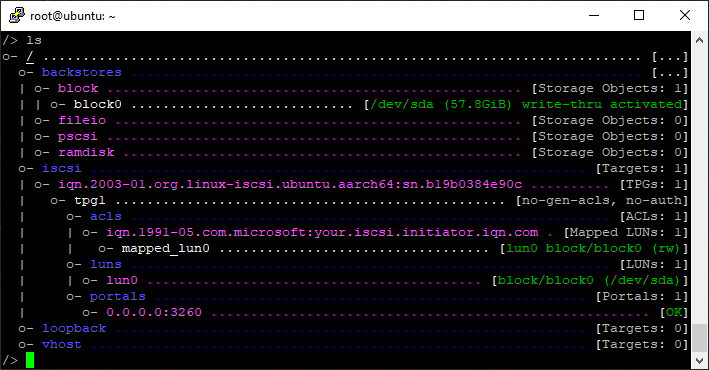
Review your configuration.
cd /
ls
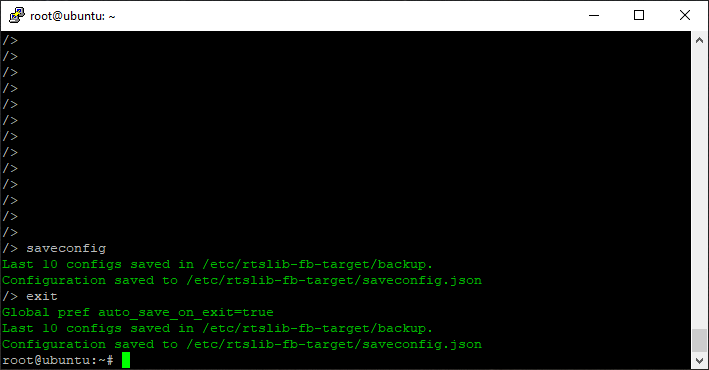
Save your configuration and exit.
saveconfig
exit
That’s it, you can now connect to the iSCSI target via an iSCSI initiator on another machine.
For a quick example of how to connect, please see below.
Connect the ESXi Initiator
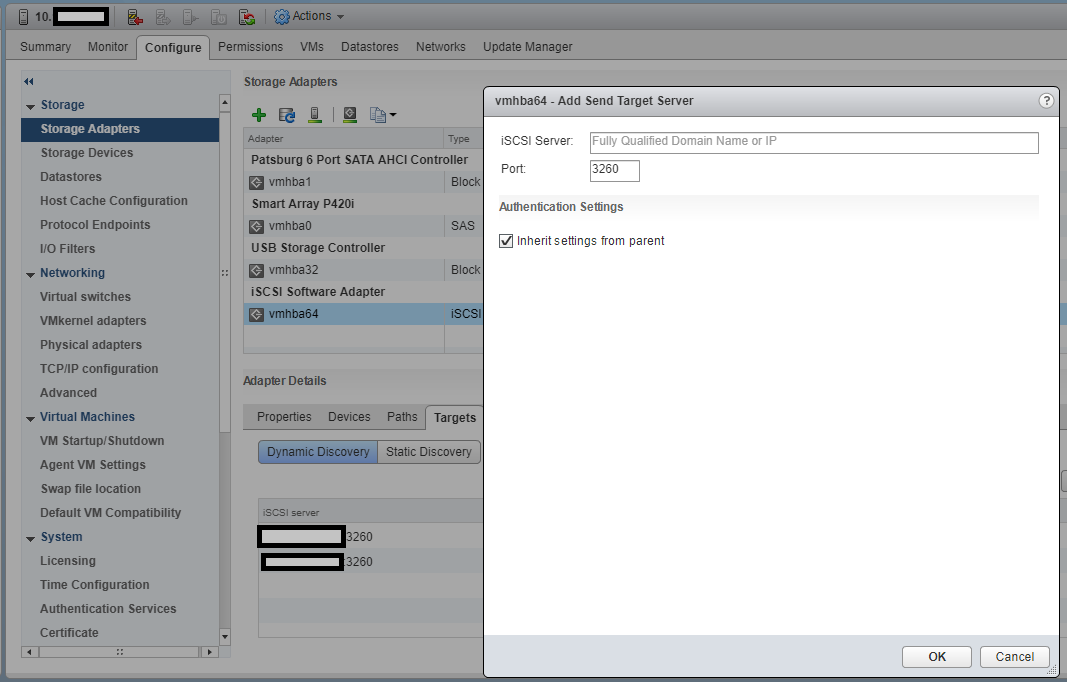
To connect to the new iSCSI Target on your Raspberry Pi, open up the configuration for your iSCSI Software Initiator on ESXi, go to the targets tab, and add a new iSCSI Target Server to your Dynamic Discovery list.
ESXi adding iSCSI Target Server (SAN) to iSCSI Software Initiator Dynamic Discovery
Once you do this, rescan your HBAs and the disk will now be available to your ESXi instance.
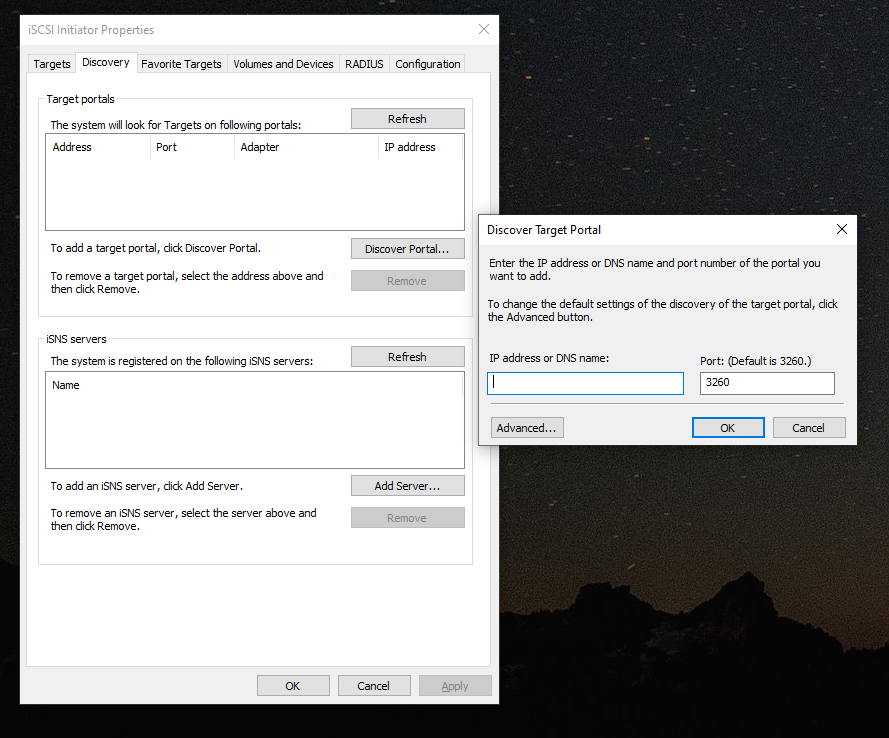
Connect the Windows iSCSI Initiator
To connect to the new iSCSI Target on Windows, open the iSCSI Initiator app, go to the “Discovery” tab, and click on the “Discover Portal” button.
Add iSCSI Target Server to Windows iSCSI Initiator
In the new window, add the IP address of the iSCSI Target (your Raspberry Pi), and hit ok, then apply.
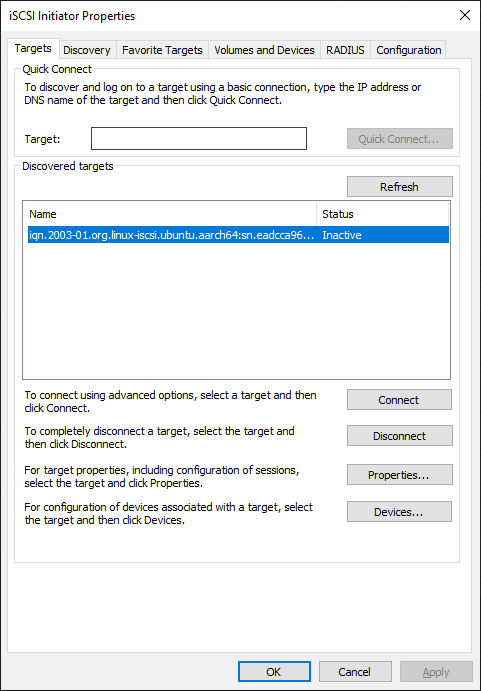
Now on the “Targets” tab, you’ll see an entry for the discovered target. Select it, and hit “Connect”.
Windows iSCSI Initiator Targets List
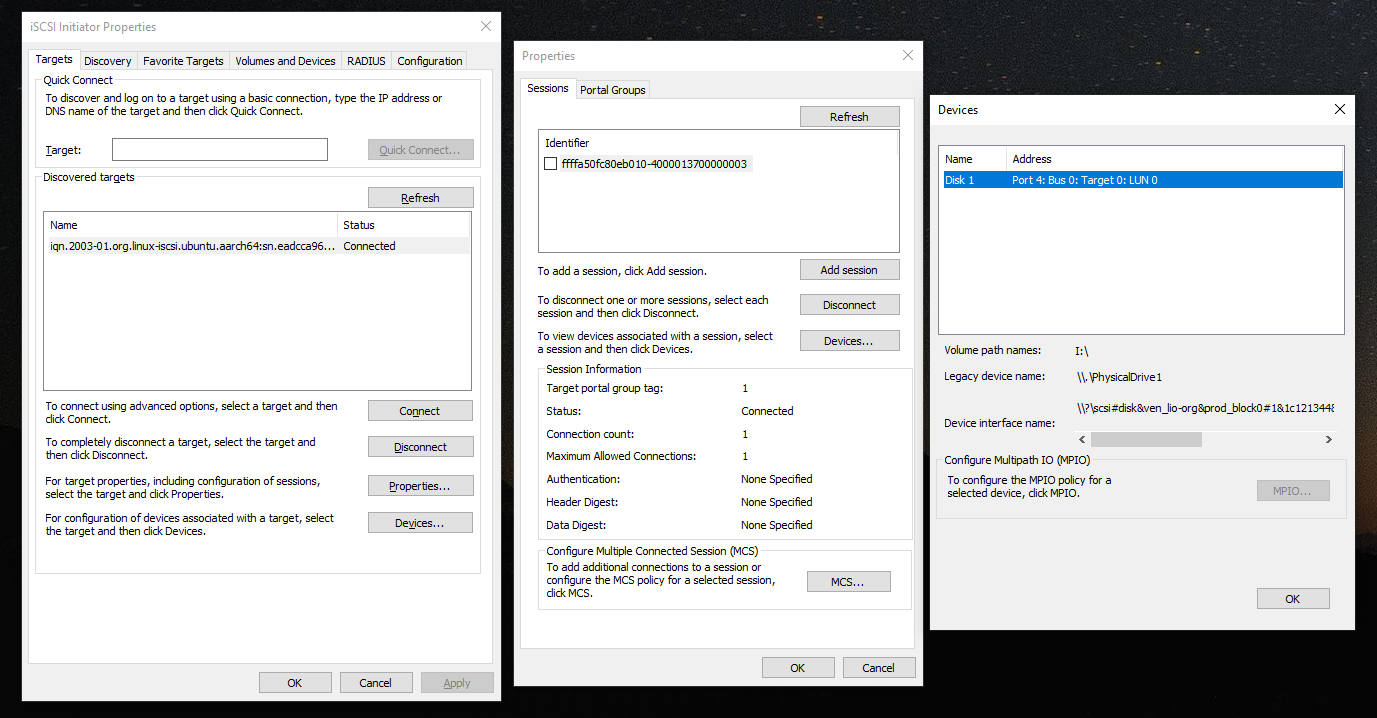
You’re now connected! The disk will show up in “Disk Management” and you can now format it and use it!
Here’s what an active connection looks like.
Windows 10 iSCSI Initiator connect to iSCSI Target presenting a disk
That’s all folks!
Conslusion
There you have it, you now have a beautiful little Raspberry Pi 4 acting as a SAN and iSCSI Target providing LUNs and volumes to your network!
Raspberry Pi 4 iSCSI Target with External USB 3 HD
Leave a comment and let me know how you made out or if you have any questions!
So you’ve got a shiny new Raspberry Pi 4 and you need to compile a fresh and custom Linux kernel on Raspbian. You might need some features, some kernel modules, or you just want to compile the latest version from source.
I’m doing various projects (and blog posts) and with one of the projects, I found I needed to compile and enable a kernel module that wasn’t built in to the latest Raspbian image for the Pi 4.
This guide is also great if you just want to learn how to compile the kernel yourself!
Instructions
You may find that this guide is slightly different that the guide on the Raspberry Pi website and other sites. I like to append a unique name to the kernel version so I don’t have to touch the existing kernels. This allows me to revert or run multiple different custom kernels and switch back and forth.
Please note: You must be using a 32-bit kernel (or the default Raspbian kernel) to compile a new 32-bit kernel. You will not be able to compile a new kernel (32-bit or 64-bit) if you have booted in to the 64-bit kernel using the “arm_64bit=1” switch in “config.txt”. I’ve tried to compile a 64-bit kernel on Raspbian, but have not yet been able to do so. I’ll update with a new post once I figure it out.
Configure the PI to boot using the new kernel by modifying and adding the below line to “/boot/config.txt”.
kernel=kernel-stephen.img
Reboot!
Bam! You’re now using your shiny new Linux kernel on the Raspberry Pi 4!
To rescue a failed build or if the Pi won’t boot
If for some reason the Pi won’t boot, you can recover the previous kernel since we used a new name with the new kernel.
To rescue the image you’ll need another Linux computer that can read the Micro-SD card.
Insert the Micro-SD Card in the computer.
Mount the /boot/ filesystem on the Micro SD card to a local directory.
Edit the “config.txt” file and remove the “kernel=kernel-name.img” line we made above, or alternatively comment it out by inserting a “#” before the line.
#kernel=kernel-stephen.img
Save the file.
Unmount the partition.
Insert in the Raspberry Pi and boot!
You should now be back up and running and should be able to try again!
Leave some feedback and let me know if it worked for you. In the future I’ll be doing another post on compiling a 64-bit kernel for the Raspberry Pi 4 on Raspbian.
This website uses cookies to improve your experience. We'll assume you're ok with this, but you can opt-out if you wish.
Do you accept the use of cookies and accept our privacy policy? AcceptRejectCookie and Privacy Policy
Privacy & Cookies Policy
Privacy Overview
This website uses cookies to improve your experience while you navigate through the website. Out of these cookies, the cookies that are categorized as necessary are stored on your browser as they are essential for the working of basic functionalities of the website. We also use third-party cookies that help us analyze and understand how you use this website. These cookies will be stored in your browser only with your consent. You also have the option to opt-out of these cookies. But opting out of some of these cookies may have an effect on your browsing experience.