When using VMware vSphere, you may notice vCenter OVF Import and Datastore File Access Issues, when performing various tasks with OVF Imports, as well as uploading and/or downloading files from datastores.
These issues can cause a number of symptoms including errors, unexpected status codes, and also just simply failing for an undetermined reason.
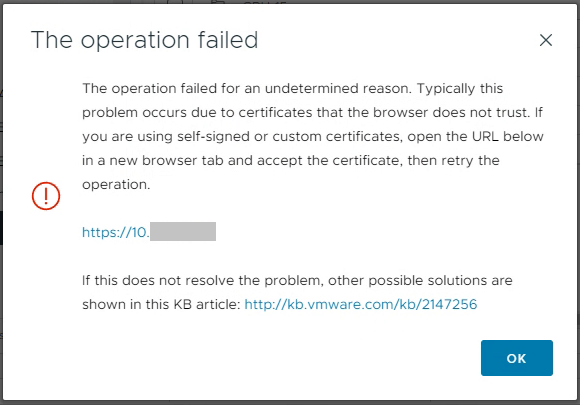
vCenter File Upload: The Operation failed.
The Problem
For this situation, the symptoms will occur when performing one of the following tasks:
Cannot Upload File to datastore
Cannot Download File from datastore
Cannot Import OVF Template
Cannot Export OVF Template
An example of errors that the user may see:
The operation failed for an undetermined reason.
The operation failed.
unexpectedStatusCode":0
unexpectedStatusCode (0)
HTTP 500 Error
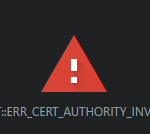
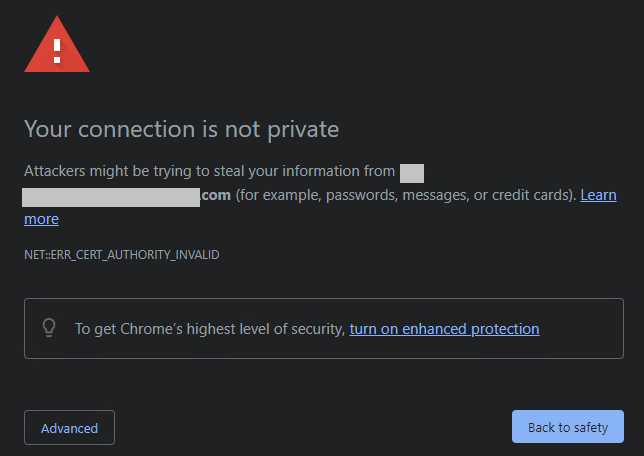
NET::ERR_CERT_AUTHORITY_INVALID
See below for some example screenshots of errors you may see.
The Operation failed: The Operation failed for an undetermined reason.
“NET::ERR_CERT_AUTHORITY_INVALID”
Please note, that this condition can cause other issues and errors as well.
The Solution
When using VMware vSphere, the vCenter server acts as it’s own Root Certification Authority, and uses SSL certificates to facilitate communication and encryption between various services in the solution, as well as the communication between the vCenter Server, ESXi hosts, and any client computers accessing vCenter via the web HTML5 interface.
This Root Certification Authority running on the vCenter Server creates and issues certificates to these services and hosts, which are issues under the Root CA Certificate.
While vCenter automatically handles the certificate trusts between the services, as well as the communicate between the vCenter Server and ESXi hosts (this is automatically setup when adding hosts to vCenter), it cannot automatically make your (client) computer trust the entire certificate authority, as well as all the child certificates.
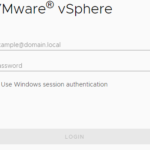
When attempting to log in to your VMware vCenter using the HPE Simplivity Upgrade Manager to perform an upgrade on your Simplivity Infrastructure, the login may fail with Access Denied, Incorrect Credentials, or Incorrect Username and Password.
Despite confirming that the credentials are correct (logging in to the vCenter UI, as well as the vCSA console via SSH), the HPE Simplivity Upgrade Manager will continue to fail on connection.
The Problem
During the login process, the HPE Simplivity Upgrade Manager will not only check the credentials and attempt to logon to the vCenter server, but it will also attempt to pull and validate the SSL certificates (whether trusted or not) on the vCenter server.
During the typical login process, after entering the credentials and clicking “Connect”, the user will be prompted with the SSL certificate information asking to approve the connection. In this specific circumstance the SSL window is not presented.
HPE Simplivity Upgrade Manager Login Failed
Because of the SSL check not being presented, I thought there may have been a chance with trusting the connection, and possibly HPE Simplivity wasn’t able to show the error specific to the SSL check failing.
vCenter Download Trusted Root CA Certificates
When clicking on this, I was presented with an HTTP 404 error (File not found), meaning the certficiates weren’t present, which I felt may be contributing or causing this problem.
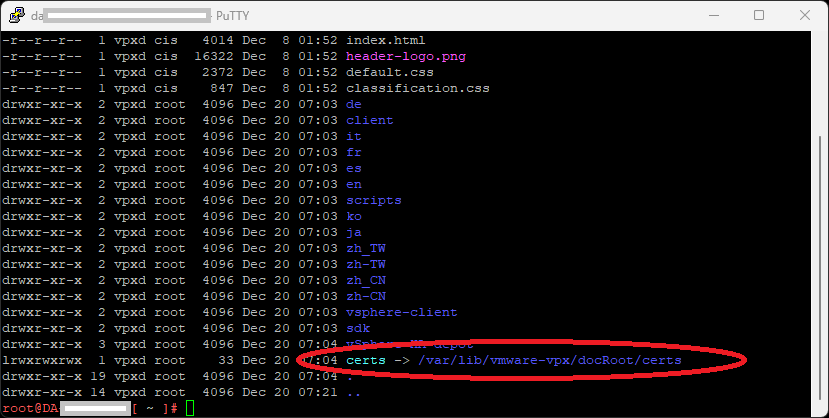
Logging in to the vCSA appliance, I was able to determine that the appliance was missing the certificate symlink to allow the certificate download by running this command:
ls -ltra /etc/vmware-vpx/docRoot
Inside of the directory listing, there was no symlink for certs, which should point to “/var/lib/vmware-vpx/docRoot/certs”.
I went ahead and created the symlink using the following command:
When using the “ls -ltra /etc/vmware-vpx/docRoot” command from above, I was now able to verify that the symlink existed:
vCenter DocRoot showing “certs” symbolic link
After creating the symlink, I was able to download the Trusted Root CA zip file (you don’t need to do anything with this file as the download was just a test).
I now went back to the Upgrade Manager to attempt to login, and it was successful.
In this post, I wanted to go over some Backup and Restore tips and tricks when it comes to VMware vCSA Updates and Upgrades.
We’ve almost all been there, performing an update or upgrade of the VMware vCenter Server Appliance when it fails, and we must restore from a backup. There’s also times where the update or upgrade has been successful, however numerous issues occur afterwards prompting for the requirement of a restore from backup.
In this post, I wanted to briefly go over the methods of backups (and restores) for the vCSA, as well as some Tips and Tricks which might help you out for avoiding failed updates or upgrades in the future!
We all want to avoid a failed update or upgrade! 🙂
vCSA Update Installation
VMware vCSA Update Tips and Tricks for Backup and Restore
Please enjoy this video version of the blog post:
vCSA Update and Upgrade – Tips and Tricks for Backup and Restore
vCSA Backup methods
There are essentially two backup methods for backing up the vCenter Server Appliance:
vCSA Management Interface Backup
vSphere/ESXi Virtual Machine Snapshot
vCSA Management Interface Backup
If you log in to the vCSA Management Interface, you can configure a scheduled backup that will perform a full backup of your vCSA (and vCenter Server) instance.
This backup can be automatically ran and saved to an HTTP, HTTPS, FTP, FTPS, SFTP, NFS, or SMB destination. It’s a no-brainer if you have a Windows File Server or an NFS datastore.
vCSA Backup
In the event of a failed update/upgrade or a disaster, this backup can be restored to a new vCSA instance to recover from the failure.
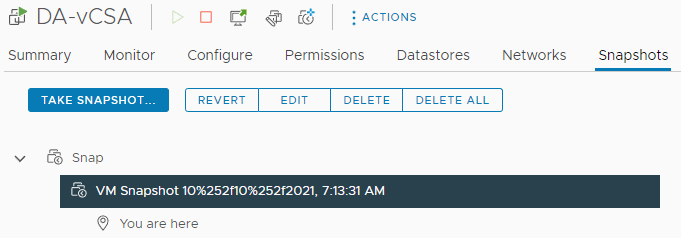
In addition to the scheduled automatic backups configured above, you should snapshot your vCSA appliance VM prior to initiating an update or upgrade. In the event of a failure, you can easily restore the vCSA VM snapshot to get back to a running state.
vCSA Snapshot
Only after you test and confirm the upgrade or update was successful should you delete the snapshot.
You should also have your Backup application or suite performing regularly snapshot based backups of your vCSA.
Additional Tips and Tricks
I have a few very important tips and tricks to share which may help you either avoid a failed update or upgrade, or increase the chances of a successful restore from backup.
Gracefully Shutdown and Restart the vCSA Appliance before Upgrading
Application Consistent Snapshot – Snapshot after graceful shutdown
Let’s dive in to these below.
Gracefully Shutdown and Restart the vCSA Appliance before Upgrading
I noticed that I significantly reduced the amount of failed upgrades by simply gracefully shutting down and restarting the vCenter Server Appliance prior to an upgrade.
This allows you to clear out the memory, virtual memory, and restart all vCenter services prior to starting the upgrade.
Please Note: Make sure that you give the vCSA appliance enough time to boot, start services, and let some of the maintenance tasks run before initiating an upgrade.
Application Consistent Snapshot – Snapshot after graceful shutdown
Most VMware System Administrators I have talked to, usually snapshot the running vCSA appliance and do not snapshot the memory. This creates a crash consistent snapshot.
If you follow my advice above and gracefully shutdown and restart the vCSA appliance, you can use this time to perform a VM snapshot after a graceful shutdown. This will provide you with an application consistent snapshot instead of a crash consistent snapshot.
If you perform an application consistent snapshot by gracefully shutting down the VM prior to creating the snapshot, the virtual machine and database inside of it will be in a cleaner state.
Conclusion
Some of the Tips and Tricks in this post definitely aren’t necessary, however they can help you increase the chance of a successful upgrade, and a successful restore in the event of a failed upgrade.
When updating VMware vCenter vCSA 7.0 U1 (Build 16858589) to vCSA 7.0 U1 (Build 17004997/17005016, Version 7.0.1.00100), you may notice that the update fails and reports issues with pre-update checks.
Pre-update checks done prior to the update will pass and allow you to proceed, however it’s the installation that will fail and crash reporting this error.
After the installation fails, you will no longer be able to log in to the vCSA VAMI reporting the error “Unable to Login” using the root account.
You are able to login via SSH. Resetting the root password via SSH will not resolve this issue.
The Problem
In the past, issues with the root password expiring have caused similar behavior on the vCSA VAMI. Changing the root password does not resolve this specific issue.
Further troubleshooting, it appears that special characters in the root password such as “!”, “.”, and “@” caused this issue to occur in my environment.
I was not able to fix the broken vCSA after the failed update. Access to the vCSA was not possible, however vCenter functions were still operating.
The Solution
To resolve this situation in my environment, I restored a snapshot of the vCSA taken prior to updating.
After restoring the snapshot, I changed the root password for VAMI and restarted the vCSA.
Another snapshot was taken prior to attempting the upgrade, which was now succesfull after removing special characters out of the root password.
When upgrading from any version of VMware vCSA to version 7.0, you may encounter a problem during the migration phase and be asked to specifiy a new “Export Directory”.
I’ve seen this occur on numerous upgrades and often find the same culprit causing the issue. I’ve found a very simple fix compared to other solutions online.
The full prompt for this issue is: “Enter a new export directory on the source machine below”
The Problem
When you upgrade the vCenter vCSA, the process migrates all data over from the source appliance, to the new vCSA 7 appliance.
This data can include the following (depending on your selection):
Configuration
Configuration and historical data (events and tasks)
Configuration and historical data (events, tasks, and performance metric)
This data can accumulate, especially the VMware vSphere Update Manager.
In the most recent upgrade I performed, I noticed that the smallest option (configuration only) was around 8GB, which is way over the 4.7GB default limit.
In my diagnosis, I logged in to the SSH console of the source appliance, and noticed that the partitions containing the VUM data (which includes update files) was around 7.4GB. This is the “/storage/updatemgr/” partition.
I wasn’t sure if this was included, but the 8GB of configuration, minus the 7.4GB of VUM data, could technically get me to around 0.6GB for migration if this was in fact included.
In my environment, I have the default (and simple) implementation of VUM with the only customization being the HPE VIBs depot. I figured maybe I should blast away the VUM and start from scratch on VMware vCSA 7.0 to see if this fixes the issue.
The Fix
To fix this issue, I simply completely reset the VMware Update Manager Database.
For details on this process and before performing these steps, please see VMware KB 2147284.
Let’s get to it:
Close the migration window (you can reopen this later)
Log in to your vCSA source appliance via SSH or console
Run the applicable steps as defined in the VMware KB 2147284 to reset VUM (WARNING: commands are version specific). In my case on vCSA 6.5 I ran the following commands:
Open your web broswer and navigate to https://new-vcsa-IP:5480 and resume the migration. You will now notice a significant space reduction and won’t need to specify a new mount point.
That’s it! You have a shiny new clean VUM instance, and can successfully upgrade to vCSA 7.0 without having to specify a new mount point.
To reconfigure and restore any old configuration to VUM, you’ll do so in the “VMware Lifecycle Management” section of the VMware vCenter Server Appliance interface.
Alternatively, in the rare event it’s not related to the VUM data, you can set the export directory to somewhere in “/tmp/” which is another workaround this issue which may allow you to continue.
This website uses cookies to improve your experience. We'll assume you're ok with this, but you can opt-out if you wish.
Do you accept the use of cookies and accept our privacy policy? AcceptRejectCookie and Privacy Policy
Privacy & Cookies Policy
Privacy Overview
This website uses cookies to improve your experience while you navigate through the website. Out of these cookies, the cookies that are categorized as necessary are stored on your browser as they are essential for the working of basic functionalities of the website. We also use third-party cookies that help us analyze and understand how you use this website. These cookies will be stored in your browser only with your consent. You also have the option to opt-out of these cookies. But opting out of some of these cookies may have an effect on your browsing experience.