Jan 082023
 
VMware vSAN All VMs Inaccessible

When using VMware vSAN 7.0 Update 3 (7U3) and using the graceful shutdown (and restart) of your entire vSAN cluster, you may experience an issue resulting with all VMs inaccessible after everything has been powered back on and the hosts taken out of maintenance mode.

If you experience this issue, you will also notice that your vSAN datastore appears to be empty (files and VMs), however you can see that there is data used on the datastore (data usage calculation).

The Problem

As of vSAN 7.0 Update 3, users can now gracefully shutdown and restart their entire vSAN cluster from the GUI instead of having to use the CLI/SSH. While you can still Manually Shut Down and Restart the vSAN Cluster, as one can expect if there’s any easy way to do it via the GUI, it’ll get used.

Last night I had a customer call who used this feature, and when bringing up their cluster, all the VMs were marked as inaccessible and the datastore appeared to be empty. What was even more odd is that all the vSAN health information pertaining to the disks looked good.

Connecting to troubleshoot this (with my limited experience with vSAN), I attempted the following:

  • Restart vSAN Management Services on all ESXi Hosts
  • Restart vSAN Health Services on the vCenter vCSA (then wait 15 minutes and restart ESXi vSAN Manage Services)
  • Restart one of the ESXi hosts (to troubleshoot quorum)
  • Troubleshoot Networking (Issues occurred after physical maintenance)
    • Check MTUs
    • Check LAGs (for vSAN Storage Network)
    • Check Communication and Traffic

After doing all of the above, the VMs still were not accessible.

I had a feeling that this was related to the shutdown and restart (power on) process, so tried to manually start the vSAN cluster using the following command:

python /usr/lib/vmware/vsan/bin/reboot_helper.py recover

This command returned numerous tracebacks, and ultimately timed out after reporting:

Recovery is not ready, retry after 10s...

The Solution

I was convinced this was related to a bug in the automated scripts, so after adjusting my searching, I came across a VMware KB providing information on How to handle inconsistent cluster power status in vSAN shutdown workflow.

I was convinced this would help our issue, however the KB didn’t exactly describe the symptoms and errors we had. Scenario 3 was close, but symptoms were not exact.

At this point, I initiated a VMware Support ticket with VMware GSS, who after checking, confirmed it was the issue in the KB.

The Shutdown script sets “DOMPauseAllCCPs” to 1 (pausing all functions), and “IgnoreClusterMemberListUpdates” to 1. When you choose to Restart and Power on the cluster, these get set back to 0.

In our case, “IgnoreClusterMemberListUpdates” was set back to 0 during the restart and power on, however “DOMPauseAllCCPs” was still set to 1.

After setting DOMPauseAllCCPs” to “0” on all hosts, the VM’s were immediately accessibly, and the issue was resolved.

To check these variables:

esxcfg-advcfg -g /VSAN/DOMPauseAllCCPs
esxcfg-advcfg -g /VSAN/IgnoreClusterMemberListUpdates

To set these variables (to undo what the shutdown script did):

esxcfg-advcfg -s 0 /VSAN/DOMPauseAllCCPs
esxcfg-advcfg -s 0 /VSAN/IgnoreClusterMemberListUpdates

When checking or setting these, you must do it on all vSAN nodes (ESXi hosts) in the vSAN Cluster.

Nov 202022
 

Today I want to talk about Memory Deduplication on ESXi with Transparent Page Sharing (TPS). This is a technology that isn’t widely known about, even amongst IT professionals with significant experience with VMware products.

And you may ask “Memory Deduplication, why aren’t we using this?!?” as it sounds like a pretty cool piece of technology… Well, I’m about to tell you why you’re not (Inter-VM), and share a few examples of where you would want to enable this.

I also want to show you how to enable TPS globally (Inter-VM), and also discuss TPS being used with VMware Horizon and VDI.

What is Transparent Page Sharing (TPS)?

Transparent Page Sharing is the process in which ESXi can provide memory deduplication by storing duplicate memory pages as a single page on the physical memory of the host. This process stops the system from storing redundant memory pages, and thus frees up physical memory for other uses.

If my memory serves me right, this was originally enabled by default in ESX/ESXi version 5, but was later globally disabled due to security vulnerabilities and concerns.

Note, that TPS is still enabled by default from within the same VM, even today with ESXi 8.

Security Concerns

I recall two potential scenarios and security concerns which led to VMware changing the original default behavior for TPS.

  • Scenario 1 included a concern about an attacker gaining access to a VM, and then having the ability to modify the memory contents of another VM.
  • Scenario 2 included a concern where an attacker may be able to get access to encryption keys used on another system.

A quick search led to a KB titled “Security considerations and disallowing inter-Virtual Machine Transparent Page Sharing (2080735)“, which outlines the details of scenario 2, along with stating “This technique works only in a highly controlled system configured in a non-standard way that VMware believes would not be recreated in a production environment”.

With that being said, it sounds like this would be an extremely difficult attack that requires systems to be configured in a non-standard way.

Current status of TPS

Believe it or not, TPS and memory deduplication is still enabled, however it’s only deduplicating pages from within the same VM. TPS is not deduplicating pages from multiple VMs.

Additionally, VMware has given us controls to configure TPS to allow it amongst multiple VMs, or even enable it globally across the ESXi host.

See below for the settings to configure TPS on ESXi via “Advanced Settings”:

A table providing configurable options for Transparent Page Sharing (TPS) on VMware vSphere ESXi
Transparent Page Sharing (TPS) Settings for ESXi Host

The above table was provided by VMware’s “Additional Transparent Page Sharing management capabilities and new default settings (2097593)” KB.

In short, you could enable TPS globally (Inter-VM) by setting “Mem.ShareForceSalting” in “Advanced Settings”, to a value of “0”. You can also use the salting to configure groups of VMs that are allow to share memory pages.

Additionally, you can tweak the behavior of TPS by modifying some of the settings shown below:

TPS Memory Sharing Settings

As you can see you can configure things like the scanning occurrence (Mem.ShareScanTime) of how often the system will check for memory pages that can be shared/deduplicated and other settings.

TPS is enabled, but not working

So, you may have decided to enable TPS in your environment, but you’re noticing that either no, or very little memory pages are being marked as shared.

ESXi Memory Graph showing Memory Deduplication from TPS
TPS Memory Deduplication – Amount of host physical memory that backs shared guest physical memory

In the example above, you’ll notice that on a loaded host, with TPS enabled globally (Inter-VM, amongst all VMs), that the host is only deduplicating 1,052KB of memory.

This is because you will most often only see TPS being heavily utilized on an ESXi host that has over-committed memory, there’s also a chance that you simply don’t have enough memory pages that can be duplicated.

Memory Deduplication, TPS, and VMware Horizon VDI

Because VMware Horizon utilizes the “vmfork” with “Just-in-Time” desktop delivery, non-persistent VDI will benefit from some level of memory deduplication by default when using Instant Clones with non-persistent VDI. This is because non-persistent VDI guests are spawned from a running base image.

Additionally, you can further implement, enable, and configure TPS by configuring some Transparent Page Sharing options inside of the VMware Horizon Administration console.

When creating a Desktop Pool, you can set the “Transparent Page Sharing” open to “Virtual Machine” (Memory dedupe inside of the VM only), “Pool” (Memory dedupe across the Desktop Pool), “Pod” (Dedupe across the pod), or “Global” (Full Inter-VM memory deduplication across the ESXi host).

If you enabled TPS on the ESXi host globally, these settings are null and not used.

TPS Use Cases

So you might be asking when it’s a good time to use TPS?

  • The Homelab – When is a homelab not a good reason to try something? Looking to save some memory and overcommit memory resources? Implement TPS.
  • VDI Environments – On highly dense hosts, you may consider implementing TPS at some level to maximize the utilization of resources, however you must be aware of the security consequences and factor this in when configuring TPS.
  • Environments with no Sensitive Information – It’s hard to imagine, but if you have an environment that doesn’t contain any sensitive information and doesn’t use any security keys, it would be suitable to enable TPS.

I’m sure there’s a number of other use cases, so leave a comment if you can think of one.

Conclusion

In my opinion Transparent Page Sharing is a technology that should not be forgotten and discarded. VMware admins should be aware of it, how to configure it, and what the implications are of using it.

If you are considering enabling TPS in your environment, you must factor in the potential security consequences of doing so.

Nov 092022
 
Windows 11 Logo

If you’re anything like me, you were excited to get your hands on the latest Windows 11 22H2 Feature Update after it was released on September 20th, 2022. However, while it was releassed, as with all feature upgrades, it is deployed on a slow basis and not widely immediately available for download. So you may be asking how to force Windows 11 22H2 Feature Update.

From what I understand, for most x86 users, the Windows 11 22H2 Feature Upgrade made itself available slowly over the months after it’s release, however there may be some of you who still don’t have access to it.

Additionally, there may be some of you who are using special hardware such as ARM64, like me with my Lenovo X13s Windows-on-ARM laptop, who haven’t been offered the update as I believe it’s being rolled out slower than its x86 counterpart.

Forcing the 22H2 Feature Update

If you’re using x86 architecture, you can simply use the Windows 11 Installation Assistant, or create/download the Windows 11 Installation Media (ISO).

However, if you’re using ARM64, you cannot use any of those above as they are designed for x86 systems. I waited some time, but decided I wanted to find a way to force this update.

Inside of WSUS, I tried to approve the Windows 11 22H2 Feature Update, however that had no success, as the system wasn’t checking for that update (it wasn’t “required”). I then tried to modify the local GPOs to force the feature update, which to my surprise worked!

Instructions to force the update

This should work on systems that are not domain joined, as well as systems that are domain joined, even with WSUS.

Please note that this will only force the update if your system is approved for the update. Microsoft has various safeguards in place for certain scenarios and hardware, to block the update. See below on how to disable safeguards for feature updates.

In order to Force Windows 11 22H2 Feature Update, follow the instructions below:

  1. Open the Local Group Policy via the start menu, or run “gpedit.msc”.
  2. Expand “Local Computer Policy\Computer Configuration\Administrative Templates\Windows Components\Windows Update\Manage updates offered from Windows Update”
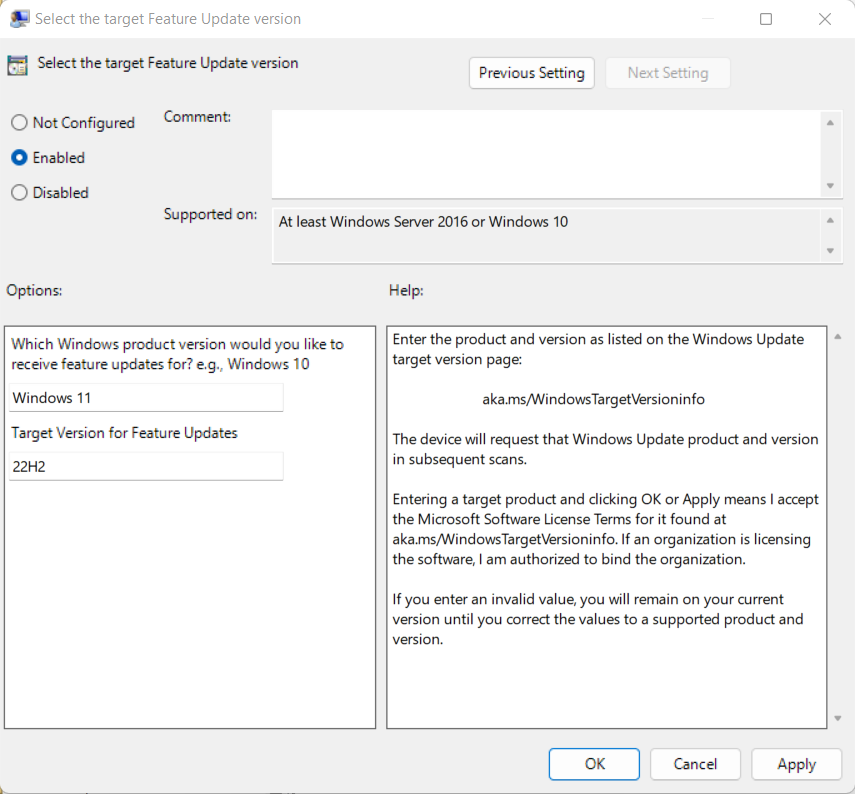
  3. Open “Select the target Feature Update version”
  4. Set the first field (Which Windows product version would you like to receive feature updates for), to “Windows 11”
  5. Set the second field (Target Version for Feature Updates) to “22H2”.
  6. Click Apply, Click Ok, close the windows.
  7. Either restart the system, or run “gpupdate /force” to force the system to see the settings.
  8. Check for Windows Update (From Microsoft Update if you’re using WSUS), you should now see the update available. You may need to check a few times and/or restart the system again.
  9. Install the Feature Upgrade, and then go back to the setting and set to “Not Configured” to ensure you receive future feature upgrades.

See below for a screenshot of the setting:

Group Policy Object to force Windows 11 22H2 Feature Update
Force Windows 11 22H2 Feature Update with Local Group Policy

For those with a domain and/or work environment, you could deploy this setting over a wide variety of computers using your Active Directory Domain’s Group Policy Objects.

Disable Safeguards for Feature Updates

If the above doesn’t work there is a chance that you may be blocked from upgrading due to safeguards put in place by Microsoft to protect you against known issues from the “Windows 11, version 22H2 known issues and notifications” page.

Keep in mind that these safeguards are in place to protect you and your system from experiencing issues, possibly even issues that could result in a unrecoverable situation. I do not recommend doing this unless you have a backup and know what you are doing.

To disable safeguards for features:

  1. Make sure you still have the “Local Group Policy” MMC still open on “Local Computer Policy\Computer Configuration\Administrative Templates\Windows Components\Windows Update\Manage updates offered from Windows Update”.
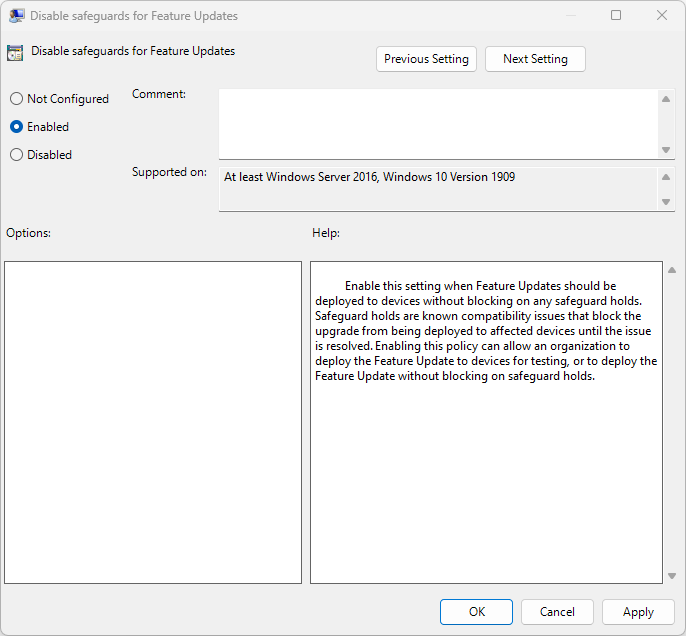
  2. Open “Disable Safeguards for Feature Updates”
  3. Set this option to “Enabled”, click Apply, and then OK.

See below for a screenshot of the setting:

Screenshot of Local Group Policy to Disable safeguards for Feature Updates
Disable Safeguards for Feature Updates

After applying this, you should now be able to upgrade to Windows 11, version 22H2.

Oct 302022
 
vGPU nvidia-smi GPU Link Info

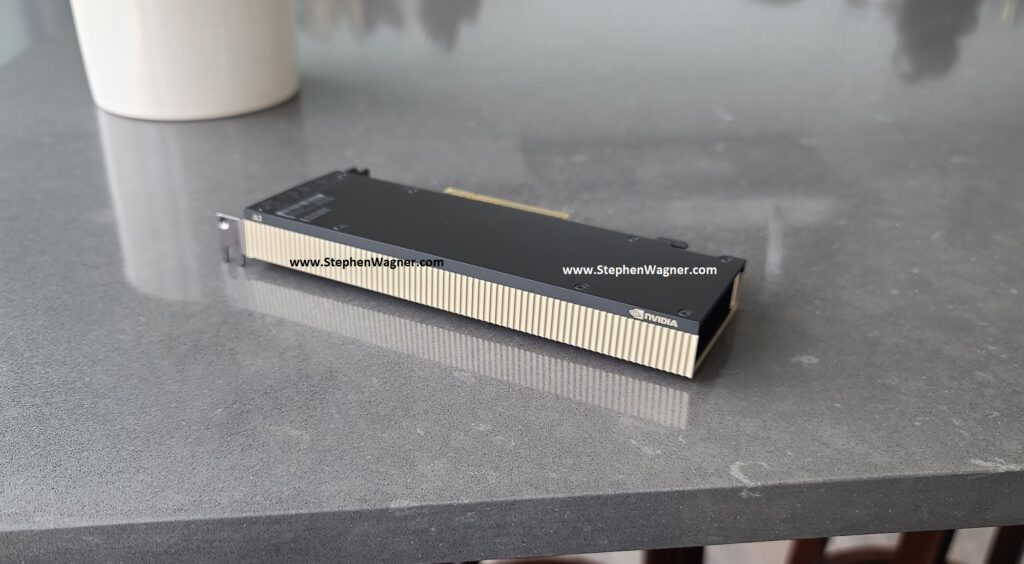
If you’re like me, you want to make sure that your environment is as optimized as possible. I recently noticed that my NVIDIA A2 vGPU was reporting the vGPU PCIe Link Speed and Generation that the card was using was below what it was supposed to be running at on my VMware vSphere ESXi host.

I needed to find out if this was being reported incorrectly, if there was an issue, or something else effecting this. In my case, the specific GPU I was using is supposed to support PCIe Gen4, and has a physical connector supporting 4x, my host has PCIe Gen3 slots, so I should at least be getting Gen3 speeds.

NVIDIA A2 vGPU

The Problem

When running the command “nvidia-smi -q”, the GPU was reporting that it was only running at PCIe Gen 1 speeds, as shown below:

        GPU Link Info
            PCIe Generation
                Max                       : 3
                Current                   : 1
                Device Current            : 1
                Device Max                : 4
                Host Max                  : N/A
            Link Width
                Max                       : 16x
                Current                   : 8x

Something else worth noting, is that the card states that it supports a 16x interface, when it actually only physical has a 8x connector. I believe they use this chip on another board that has multiple GPUs on a single board that actually supports 16x.

You could say I was quite puzzled. Why would the card only be running at PCIe Generation 1 speeds? I thought it could be any of the scenarios below:

  • Dynamic mode that alternates when required (possibly for power savings)
  • Hardware issue
  • Hardware Limitation (I’m using this in an older server)
  • Software issues
  • Configuration issue

Unfortunately, when searching the internet, I couldn’t find many references to this metric, however I did find references from other user’s copy/pastes of “nvidia-smi -q” which had the same values (running PCIe Gen1), even with beefier and more high-end cards.

The Solution

After some more searching, I finally came across an NVIDIA technical document titled “Useful nvidia-smi Queries” that states that the current PCIe Generation Link speed “may be reduced when the GPU is not in use”. This confirms that it’s dynamic and adjusts when needed.

Finally, I decided to give some games a shot in a couple of the VMs, and to my surprise when running a game, the “Device Current” and “Current” PCIe Generation changed to PCIe Gen3 (note that my server isn’t capable of PCIe Gen4, which is the cards maximum), as shown below:

        GPU Link Info
            PCIe Generation
                Max                       : 3
                Current                   : 3
                Device Current            : 3
                Device Max                : 4
                Host Max                  : N/A
            Link Width
                Max                       : 16x
                Current                   : 8x

In conclusion, if you notice this in your environment, do not be alarmed as this is completely normal and expected behavior.

Oct 252022
 
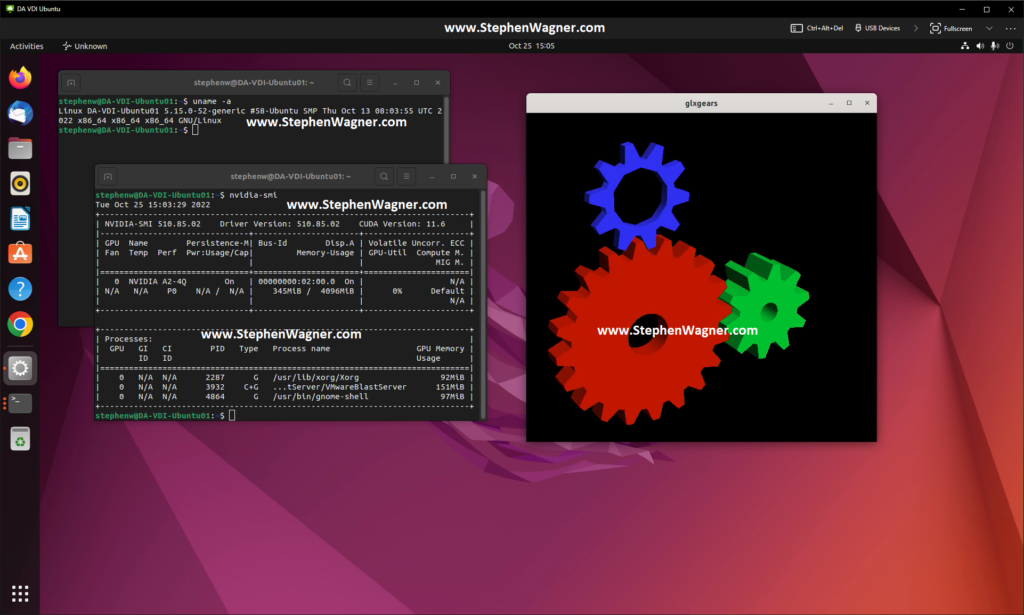
Screenshot of Horizon Agent for Linux on Ubuntu 22.04 LTS

Today I’m going to show you the process to install Horizon Agent for Linux on Ubuntu 22.04 LTS. We’ll be installing the Horizon Agent for Linux from VMware Horizon 8 version 2209.

The official documentation from VMware is helpful, but unfortunately doesn’t provide all the information to get up and running quickly, which is why I’ve put together this guide as a “Quick Start”.

Please note, that this is just a guide to get to the point where you can install NVIDIA vGPU drivers and have installed the Horizon Agent for Linux on the VM. This will provide you with a persistent VM that you can use with Horizon, and the instructions can be adapted for use in a non-persistent instant clone environment as well.

Screenshot of Horizon Agent for Linux on Ubuntu 22.04 LTS
Horizon Agent for Linux on Ubuntu 22.04 LTS

I highly recommend reading VMware’s documentation for Linux Desktops and Applications in Horizon.

Requirements

  • VMware Horizon 8 (I’m running VMware Horizon 8 2209)
  • Horizon Enterprise or Horizon for Linux Licensing
  • Ubuntu 22.04 LTS Installer ISO (download here)
  • Horizon Agent for Linux (download here)
  • Functioning internal DNS

Instructions

  1. Create a VM on your vCenter Server, attached the Ubuntu 22.04 LTS ISO, and install Ubuntu
  2. Install any Root CA’s or modifications you need for network access (usually not needed unless you’re on an enterprise network)
  3. Update Ubuntu as root
    apt update
    apt upgrade
    reboot
  4. Install software needed for VMware Horizon Agent for Linux as root
    apt install make gcc libglvnd-dev open-vm-tools open-vm-tools-dev open-vm-tools-desktop
  5. Install your software (Chrome, etc.)
  6. Install NVIDIA vGPU drivers if you are using NVIDIA vGPU (this must be performed before install the Horizon Agent). Make sure the installer modifies and configures the X configuration files.
  7. Install the Horizon Agent For Linux as root (accepting TOS, enabling audio, and disabling SSO).
    See Command-line Options for Installing Horizon Agent for Linux
    ./install_viewagent.sh -A yes -a yes -S no
  8. Reboot the Ubuntu VM
  9. Log on to your Horizon Connection Server
  10. Create a manual pool and configure it
  11. Add the Ubuntu 22.04 LTS VM to the manual desktop pool
  12. Entitle the User account to the desktop pool and assign to the VM
  13. Connect to the Ubuntu 22.04 Linux VDI VM from the VMware Horizon Client

You should now be able to connect to the Ubuntu Linux VDI VM using the VMware Horizon client. Additionally, if you installed the vGPU drivers for NVIDIA vGPU, you should have full 3D acceleration and functionality.

Oct 032022
 
NVIDIA A2 vGPU

When deploying automated desktop pools with NVIDIA vGPU on VMware Horizon with an NVIDIA A2 GPU, you may notice provisioning fails with an error.

Error during Provisioning Cloning of VM VM-NAME-01 has failed: Fault type is UNKNOWN_FAULT_FATAL - No GPU capable host available for provisioning VM-NAME-01 with profile nvidia_a2-4q. Please refer to VMware KB 59271 for more details.

Further, when visiting VMware KB 59271 and performing the instructions, provisioning still continues to fail.

Screenshot of error message Automated vGPU Desktop Pool fails to provision due to missing vGPU profiles
Automated vGPU Desktop Pool fails to provision due to missing vGPU profiles

Essentially, at present there is no “supported” to resolve this issue without applying the fix listed in this post. Additionally, if you’re a VMware customer with an active support agreement, I would recommend opening a ticket with VMware Support so that it can be addressed in a future release.

The Problem

The NVIDIA A2 GPU is fairly new, along with VMware vSphere support. Even newer, is the support for vGPU and VMware Horizon, requiring the latest drivers (vGPU Drivers versions 14.2 released August 2022) to enable vGPU profiles for the card.

After troubleshooting this, I noted that the “graphic-profiles.properties” file in “C:\Program Files\VMware\VMware View\Server\broker\conf” did not contain any NVIDIA A2 vGPU Profiles. Additionally, the file available on the VMware KB was also missing these profiles.

The Fix

To fix this, I referenced the NVIDIA vGPU User Guide to note the vGPU profiles allowed on the card, and created my own entries for the configuration file.

After adding these entries, restarting the server (or service), I was able to provision NVIDIA A2 enabled vGPU desktop pools.

To resolve this issue, add the following entries to your “graphic-profiles.properties” file in “C:\Program Files\VMware\VMware View\Server\broker\conf” (note, the contents of the file is case-sensitive):

# NVIDIA A2 Profiles
# Q-Series Virtual GPU Types for NVIDIA A2
nvidia_a2-16q=1
nvidia_a2-8q=2
nvidia_a2-4q=4
nvidia_a2-2q=8
nvidia_a2-1q=16

# B-Series Virtual GPU Types for NVIDIA A2
nvidia_a2-2b=8
nvidia_a2-1b=16

# C-Series Virtual GPU Types for NVIDIA A2
nvidia_a2-16c=1
nvidia_a2-8c=2
nvidia_a2-4c=4

# A-Series Virtual GPU Types for NVIDIA A2
nvidia_a2-16a=1
nvidia_a2-8a=2
nvidia_a2-4a=4
nvidia_a2-2a=8
nvidia_a2-1a=16

After restarting the server or services, you should now be able to use the NVIDIA A2 vGPU profiles with VMware Horizon automated (vGPU) desktop pools.

You should be able to use this fix for other new vGPU cards that have been recently released where the profiles have not been configured for Horizon. VMware is likely to fix this in future released of VMware Horizon.

Oct 022022
 
Veeam-SQL

So, there’s a common problem where when performing a backup, you’ll see it fail with Veeam Unable to Truncate Microsoft SQL Server transaction logs.

This is usually due to permission problems either with the account used for guest processing, or with permissions inside of your SQL database. Typically in most cases this can be resolved by referencing the appropriate Veeam KB article which outlines the permissions required for proper guest processing of Microsoft SQL servers.

However, in some rare cases you may have everything configured properly, however the backup may continue to present these warnings with where it’s unable to truncate Microsoft SQL Server transaction logs.

The Problem

I recently deployed an SQL Server in a domain, and of course made sure to setup the proper backup procedures as I’ve done a million times.

However, when performing a backup, the backup would present a warning with the following message:

Error message on Veeam backup, Unable to Truncate Microsoft SQL Server transaction logs
Veeam Backup Warning – Unable to Truncate Microsoft SQL Server transaction logs.
Unable to truncate Microsoft SQL Server transaction logs. Details: Failed to call RPC function 'Vss.TruncateSqlLogs': Error code: 0x80004005. Failed to invoke func [TruncateSqlLogs]: Unspecified error. Failed to process 'TruncateSQLLog' command. Failed to logon user [ReallyLongDomainName\Admin-Account]. Win32 error:The user name or password is incorrect. Code: 1326.

This was very odd as I configured everything properly, and even confirmed it when referring the Veeam KB listed above in this post.

So I decided to look at this as if it was something different, something with credentials, or a different problem.

I noticed that in this specific customer environment, that their FQDN for their domain was so long, that the NETBIOS domain name did not equal their FQDN domain name.

In this example, the following was observed:

FQDN: LongCompanyName.com
NETBIOS DOMAIN: LCNDOMAIN

Due to the length of the domain, they shortened the NETBIOS domain with abbreviated letters.

When configuring the Veeam credentials for guest processing, one would assume that when using the “AD Search” function, it would have pulled the “LCNDOMAIN\BackupAdminProcessing” account, however when using the check feature, it actually created an entry for “LongCompanyName\BackupAdminProcessing”, which was technically incorrect as it didn’t match the SAM logon format for the account.

The Fix

Because of the observation noted above, I created a manual credential entry for “LCNDOMAIN\BackupAdminProcessing”, reconfigured the backup job to use those new credentials, and it worked!

The issue is because when using the AD search function in the credential manager, Veeam doesn’t translate and pull the NETBIOS domain, but uses the SAM logon format and assumes the UPN Domain matches the NETBIOS domain name.

While this may hold true in most scenarios, there may be rare situations (like above) where the NETBIOS domain name does not match the domain used in the UPN suffix.

Sep 042022
 

When either directly passing through a GPU, or attaching an NVIDIA vGPU to a Virtual Machine on VMware ESXi that has more than 16GB of Video Memory, you may run in to a situation where the VM fails to boot with the error “Module ‘DevicePowerOn’ power on failed.”. Special considerations are required when performing GPU or vGPU Passthrough with 16GB+ of video memory.

This issue is specifically caused by memory mapping a GPU or vGPU device that has 16GB of memory or higher, and could involve both the host system (the ESXi host) and/or the Virtual Machine configuration.

In this post, I’ll address the considerations and requirements to passthrough these devices to virtual machines in your environment.

In the order of occurrence, it’s usually VM configuration related, however if the recommendations in the “VM Configuration Considerations” section do not resolve the issue, please proceed to reviewing the “ESXi Host Considerations” section.

Please note that if the issue is host related, other errors may be present, or the device may not even be visible to ESXi.

VM GPU and vGPU Configuration Considerations

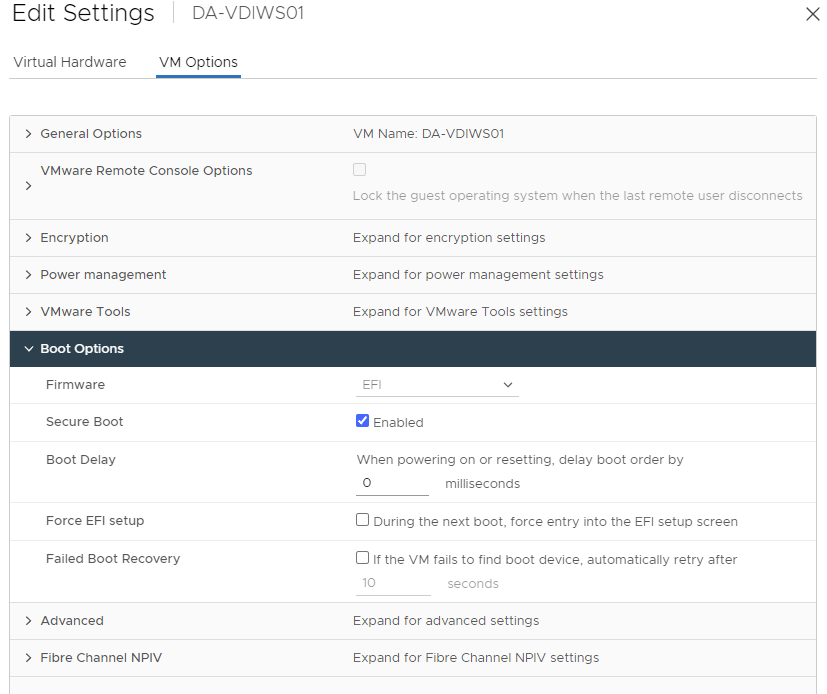
First and foremost, all new VMs should be created using the “EFI” Firmware type. EFI provides numerous advantages in device access and memory mapping versus the older style “BIOS” firmware types.

VM Firmware type EFI

To do this, create a new virtual machine, navigate to “VM Options”, expand “Boot Options”, and confirm/change the Firmware to “EFI”. I recommend this for all new VMs, and not only for VMs accessing GPUs or vGPUs with over 16GB of memory. Please note that you shouldn’t change an existing VM, and should do this on a fresh new VM.

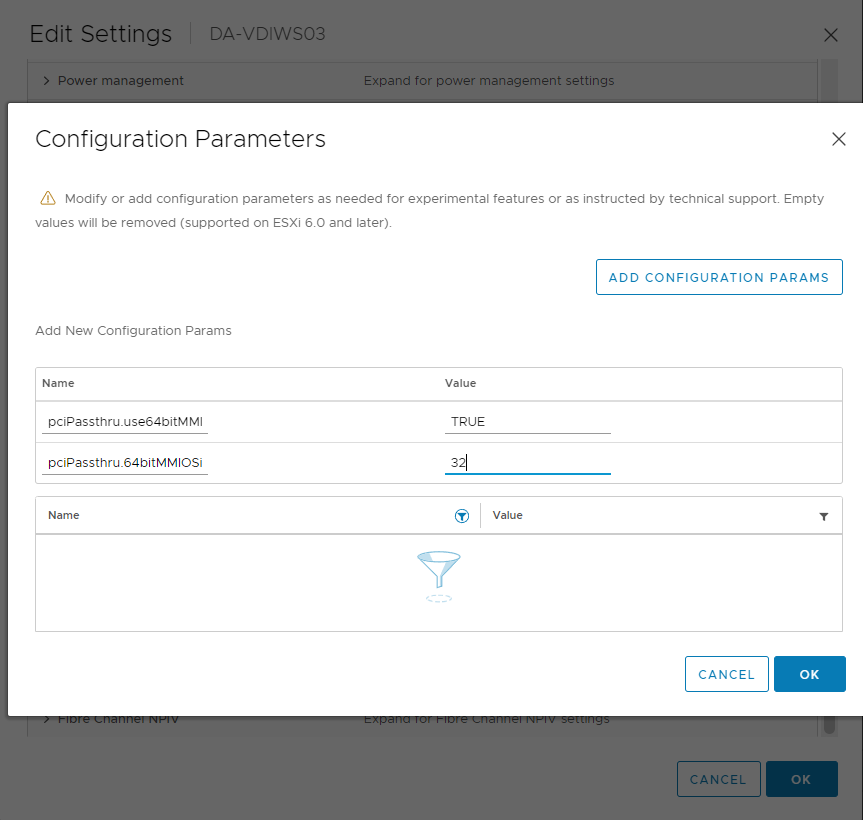
With performing GPU or vGPU Passthrough with 16GB+ of video memory, you’ll need to create a couple of entries under “Advanced” settings to properly configure access to these PCIe devices and provide the proper environment for memory mapping. The lack of these settings is specifically what causes the “Module ‘DevicePowerOn’ power on failed.” error.

Under the VM settings, head over to “VM Options”, expand “Advanced” and click on “Edit Configuration”, click on “Add Configuration Params”, and add the following entries:

pciPassthru.use64bitMMIO=”TRUE”
pciPassthru.64bitMMIOSizeGB=32

Example below:

VM GPU and vGPU Memory Settings for 16GB or higher memory mapping

You’ll notice that while our GPU or vGPU profile may have 16GB of memory, we need to double that value, and set it for the “pciPassthru.64bitMMIOSizeGB” variable. If your card or vGPU profile had 32GB, you’d set it to “64”.

Additionally if you were passing through multiple GPUs or vGPU devices, you’d need to factor all the memory being mapped, and double the combined amount.

ESXi GPU and vGPU Host Considerations

On most new and modern servers, the host level doesn’t require any special configuration as they are already designed to pass through such devices to the hypervisor properly. However in some special cases, and/or when using older servers, you may need to modify configuration and settings in the UEFI or BIOS.

If setting the VM Configuration above still results in the same error (or possibly other errors), than you most likely need to make modifications to the ESXi hosts BIOS/UEFI/RBSU to allow the proper memory mapping of the PCIe device, in our case being the GPU.

This is where things get a bit tricky because every server manufacturer has different settings that will need to be configured.

Look for the following settings, or settings with similar terminology:

  • “Memory Mapping Above 4G”
  • “Above 4G Decoding”
  • “PCI Express 64-Bit BAR Support”
  • “64-Bit IOMMU Mapping”

Once you find the correct setting or settings, enable them.

Every vendor could be using different terminology and there may be other settings that need to be configured that I don’t have listed above. In my case, I had to go in to a secret “SERVICE OPTIONS” menu on my HPE Proliant DL360p Gen8, as documented here.

After performing the recommendations in this guide, you should now be able to passthrough devices with over 16GB of memory.

Additional Resources:

Sep 042022
 

With VMware ESXi 6.5 and 6.7 going End of Life on October 15th, 2022, many of you are looking for options to update hosts in your homelab, especially in my case putting ESXi 7.0 on HP Proliant DL360p Gen8 servers.

As far as support goes, HPE last provided a custom installer for ESXi for versions 6.5 U3 which was released December of 2019. This was the “last Pre-Gen9 custom image” released, as ESXi 7.0 on the DL360p Gen8 is totally unsupported.

Update: Check out my post covering ESXi 8.0 on HPE Proliant DL360p Gen8 servers!

ESXi 6.7 or higher on the Gen8 Servers

The jump from 6.5 to 6.7 was a little easier, as you could use the 6.5 custom installer, and then upgrade to 6.7. For the most part, as long as the hardware itself was supported, you were in pretty good shape.

Additionally, with the HPE vibsdepot loaded in to VMware Update Manager (now known as Lifecycle Manager), you could also keep all the HPE drivers and agents up to date.

ESXi 7.0 on the Gen8 Servers

Some were lucky enough to upgrade their current installs to 7 with no or limited problems, however the general consensus online was to expect problems. There were some major driver changes, which I think at one point led to an advisory to perform a fresh install, even if you had a fully supported configuration with newer generation servers such as the Proliant Gen9 and Gen10 servers, when upgrading from older versions.

In my setup, I have the following:

  • 2 x HPE Proliant DL360p Gen8 Servers
    • Dual Intel Xeon E5-2660v2 Processors in each server
    • USB and/or SD for booting ESXi
    • No other internal storage
  • External SAN iSCSI Storage

Concerns and Considerations

My main concern is to not only have a stable and functioning ESXi 7 instance, but I also, if possible would like to have the HPE drivers, agents, and integrations with iLO.

You must consider that while this is completely unsupported, you do need to make sure that the components of your current configuration are supported, such as the processor and PCIe cards, even if the server as a whole is not supported.

Make sure you reference your hardware on the VMware Compatibility Guide (HCL).

In my case, my processors were supported, however my RAID controller was not. So theoretically, since I’m not using my RAID controllers, I should be fine.

The process – Installing ESXi 7.0

I was able to install ESXi 7.0 on my HPE Proliant Gen8 servers, by performing the following steps.

  1. Download the Generic ESXi installer from VMware directly.
    1. Link: Download VMware vSphere
  2. Download the “HPE Custom Addon for ESXi 7.0”.
    1. Link: HPE Custom Addon for ESXi 7.0 U3 for July 2022
  3. Boot server, install using the Generic Installer downloaded above.
  4. Mount NFS or iSCSI datastore.
  5. Copy HPE Custom Addon for ESXi zip file to datastore.
  6. Enable SSH on host (or use console).
  7. Place host in to maintenance mode.
  8. Run “esxcli software vib install -d /vmfs/volumes/datastore-name/folder-name/HPE-703.0.0.10.9.1.5-Jul2022-Addon-depot.zip” from the command line.
  9. The install will run and complete successfully.
  10. Restart your server as needed, you’ll now notice that not only were HPE drivers installed, but also agents like the Agentless management agent, and iLO integrations.

You’ll now have a functioning instance.

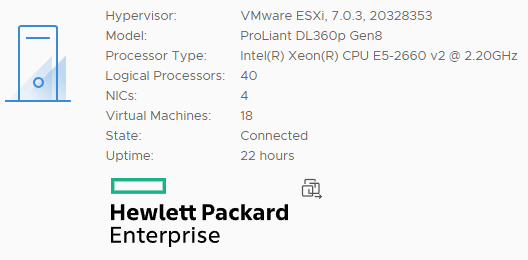
HP Proliant DL360p Gen8 running ESXi 7.0

In my case everything was working, except for the “Smart Array P420i” RAID Controller, which I don’t use anyways.

Additionally, if you have a vCenter instance running, make sure that you add the HPE vibsdepot repo to your Lifecycle Manager. After you add the repo, create a baseline, and attach the baseline to the host, go ahead and proceed to scan, stage, and remediate the server which will then further update all the HPE specific drivers and software.

Aug 142022
 
HP Printer on VDI

When it comes to troubleshooting login times with non-persistent VDI (VMware Horizon Instant Clones), I often find delays associated with printer drivers not being included in the golden image. In this post, I’m going to show you how to add a printer driver to an Instant Clone golden image!

Printing with non-persistent VDI and Instant Clones

In most environments, printers will be mapped for users during logon. If a printer is mapped or added and the driver is not added to the golden image, it will usually be retrieved from the print server and installed, adding to the login process and ultimately leading to a delay.

Due of the nature of non-persistent VDI and Instant Clones, every time the user goes to login and get’s a new VM, the driver will then be downloaded and installed each of these times, creating a redundant process wasting time and network bandwidth.

To avoid this, we need to inject the required printer drivers in to the golden image. You can add numerous drivers and should include all the drivers that any and all the users are expecting to use.

An important consideration: Try using Universal Print Drivers as much as possible. Universal Printer Drivers often support numerous different printers, which allows you to install one driver to support many different printers from the same vendor.

How to add a printer driver to an instant clone golden image

Below, I’ll show you how to inject a driver in to the Instant Clone golden image. Note that this doesn’t actually add a printer, but only installs the printer driver in to the Windows operating system so it is available for a printer to be configured and/or mapped.

Let’s get started! In this example we’ll add the HP Universal Driver. These instructions work on both Windows 10 and Windows 11 (as well as Windows Server operating systems):

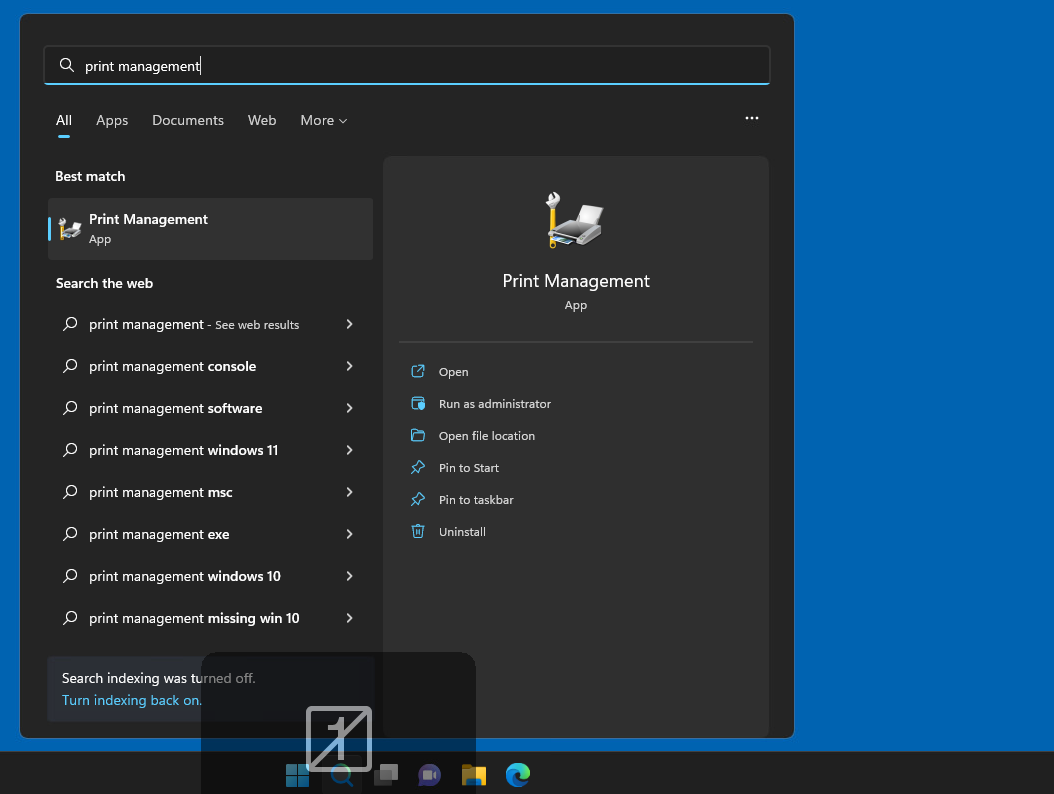
  1. Click Start, type in “Print Management” and open the “Print Management”. You can also click Start, Run, and type “printmanagement.msc”.
    Launch Print Management
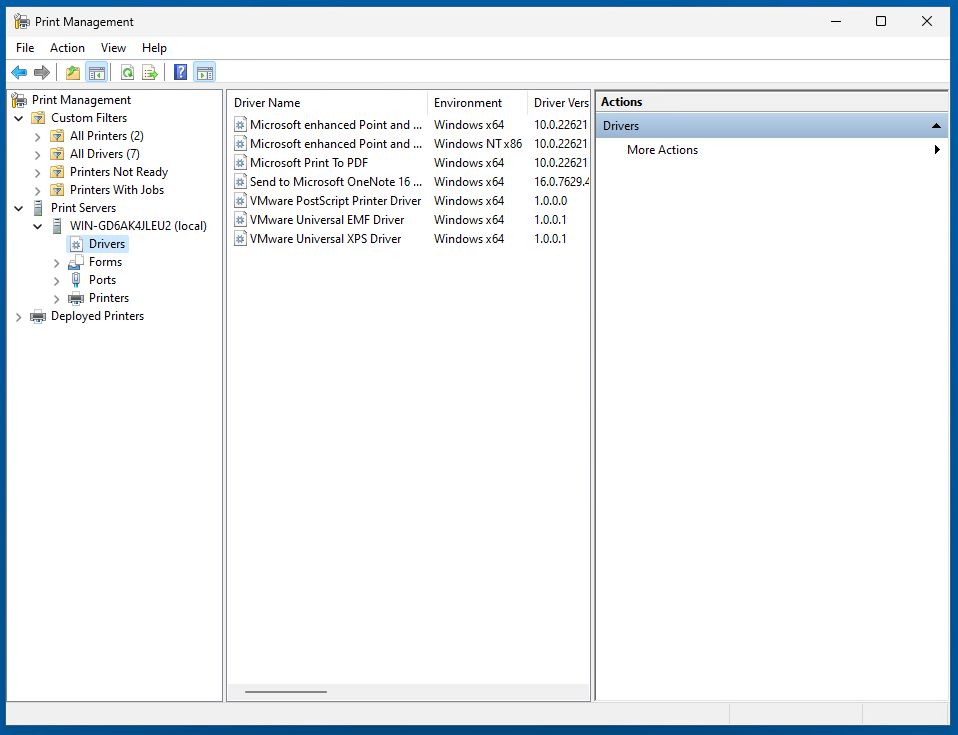
  2. On the left hand side, expand “Print Servers”, then expand your computer name, and select “Drivers”.
    Print Management Drivers
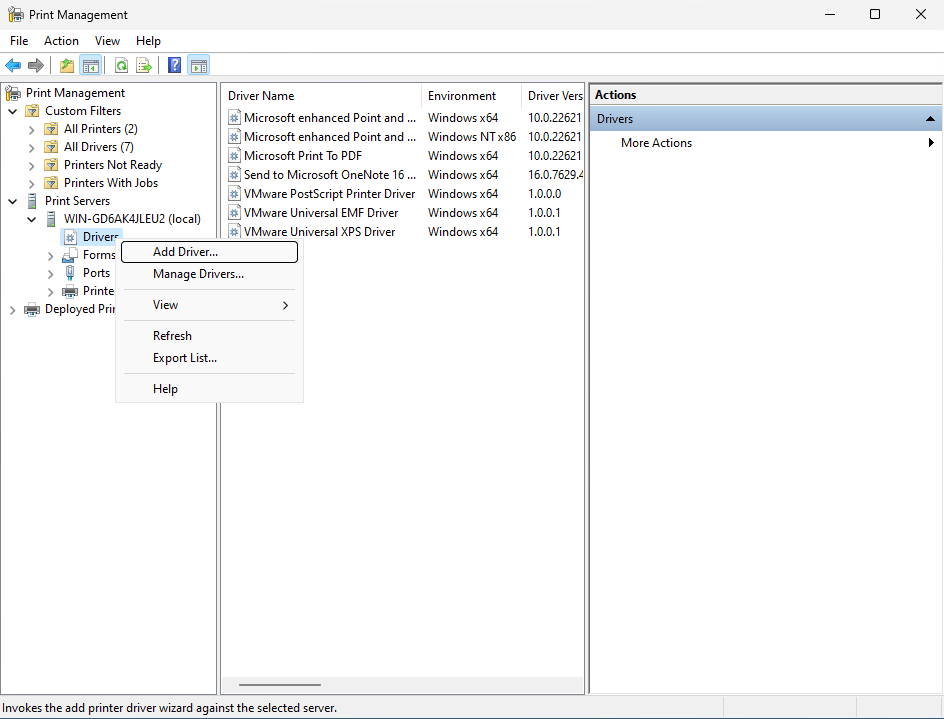
  3. Right click on “Drivers” and select “Add Driver”.
    Print Management Add Driver
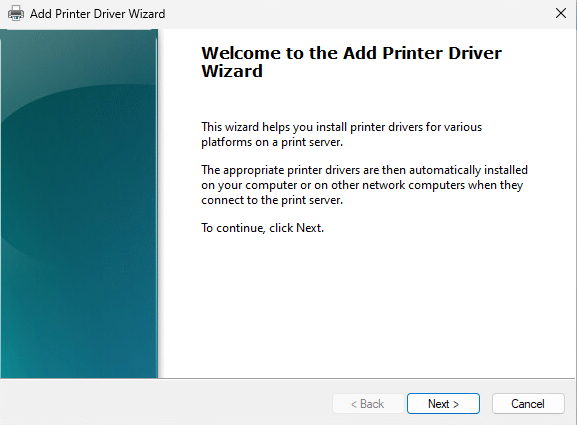
  4. When the “Welcome to the Add Printer Driver Wizard” opens, click Next.
    Add Printer Driver Wizard
  5. Leave the default for the architecture. It should default to the architecture of the golden image.
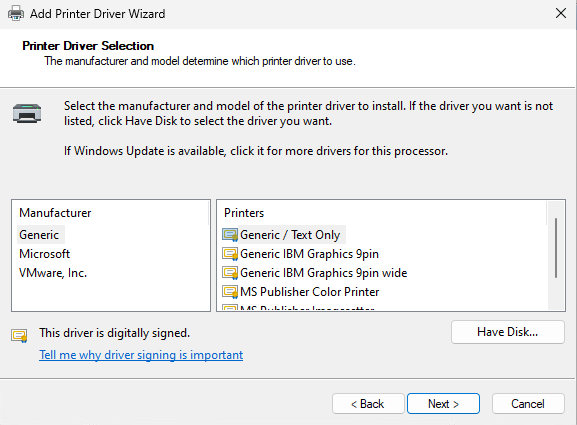
  6. When you are at the “Printer Driver Selection” stage, click on “Have Disk”.
    Print Management Add Printer Driver Location
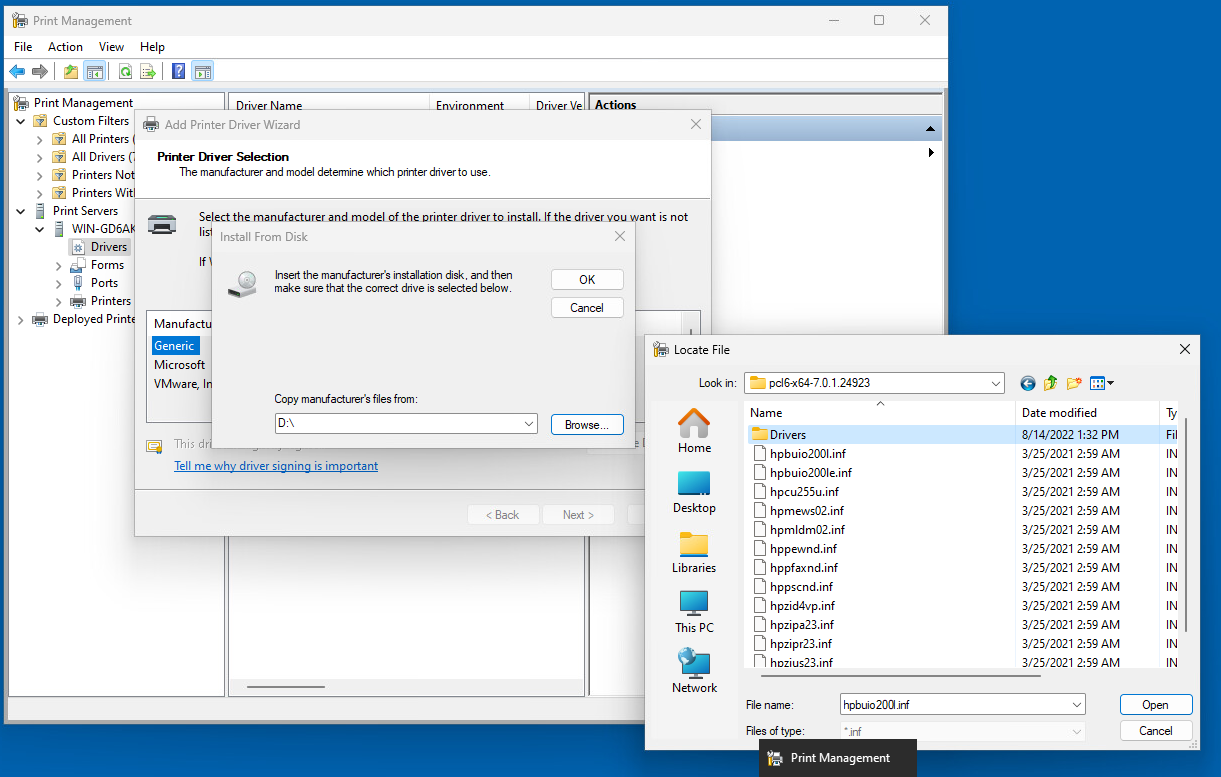
  7. Browse to the location of your printer driver. In this example, we navigate to the extracted HP Universal Print Driver.
    Browse Printer Driver Location
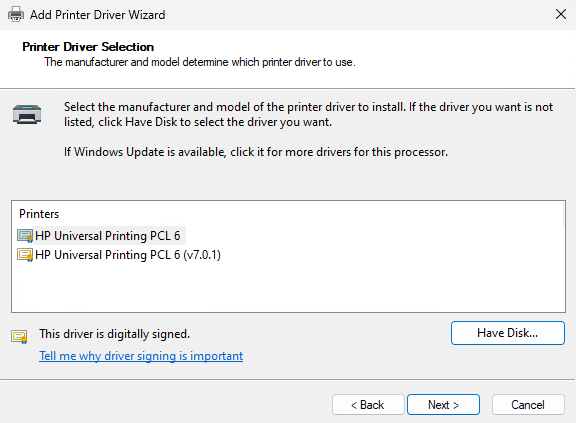
  8. Select the driver you want to install.
    VDI Select Printer Driver to Install
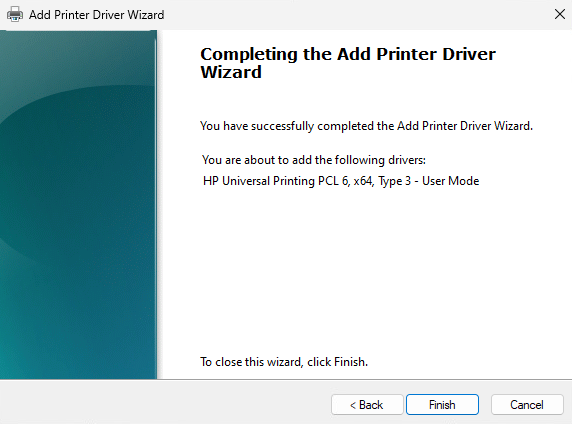
  9. Click on Finish to complete the driver installation.
    Finish installing Instant Clone Printer Driver

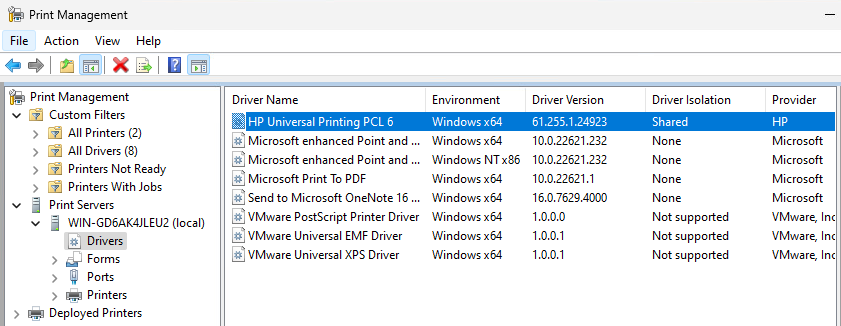
The driver you installed should now appear in the list as it has been installed in to the operating system and is now available should a user add a printer, or have a printer automatically mapped.

Screenshot of Printer Driver installed on non-persistent VDI Instant Clone golden image
Printer Driver installed on Non-Persistent Instance Clone Golden Image

Now seal, snap, and deploy your image, and you’re good to go!