You’re trying to install Ubuntu on your computer, but it freezes due to lack of resources, specifically memory. This can happen when you’re trying to re-purpose old laptops, netbooks, etc.
This recently happened to met as I tried to install Ubuntu on an old HP Netbook. Originally I used Fedora, but had to switch to Ubuntu due to library issues (I wanted to use the VMware Horizon Client on it).
Unfortunately, when I’d kick off the USB installer, the OS would completely freeze (mouse either unresponsive, or extremely glitchy).
The Fix – External SWAP File
In the ~5 minutes where the system is operable, I used the key sequence “CTRL + ALT + F2” to get to a text tty console session. From here I noticed the system eventually uses all the RAM and maxes out the memory. When this occurs, this is when the system becomes unresponsive.
Since this is a Live CD installer, there is no swap file for the system to use once the RAM has filled up.
To fix this and workaround the problem, I grabbed a second blank USB stick and used it as an external swap file. Using this allowed me to run the installer, complete the installer, and successfully install Ubuntu.
Please make sure you are choosing the right device names in the instructions below. Choosing the wrong device name can cause your to write to the wrong USB stick, or worse the hard drive of your system.
Instructions:
Attached USB Installer, boot system.
Once system has booted, press “CTRL + ALT + F2” to open a tty console session.
Login using user: “Ubuntu” with a blank password.
Type “sudo su” to get a root shell.
Type in “tail -f /var/log/kern.log” and connect your spare blank USB stick that you want to use for SWAP space. Note the device name, in my case it was “/dev/sdd”.
Press “CTRL + C” to stop tailing the log file, then run “fdisk /dev/sdd” and replace “/dev/sdd” with whatever your device was. PLEASE MAKE SURE YOU ARE CHOOSING THE RIGHT USB DEVICE NAME.
Use “n” to create a new partition, follow the prompts, when it asks for size I randomly chose “+2G” for a 2GB swap file. Use “w” to write the partition table and then quit the fdisk application.
Run “mkswap /dev/sdd1” and replace “sdd1” with the device and partition number of your USB Swap stick. This will format the partition and mark it as a SWAP filesystem.
Run “swapon /dev/sdd1” and replace “sdd1” with your swap partition you created. This will activate the external swap file on the USB stick.
Press “CTRL + ALT + F1” to return to the Ubuntu installation guide. Continue the install as normal.
This should also work for other Linux distributions, as I have also used this in the past with Fedora (on a Single Board Computer with almost no RAM).
During the install process where the Ubuntu installer formats your hard drive, the install will actually mount the hard drive swap file as well (it’ll use both). Once the installer is complete, shut down the system and remove the USB SWAP stick.
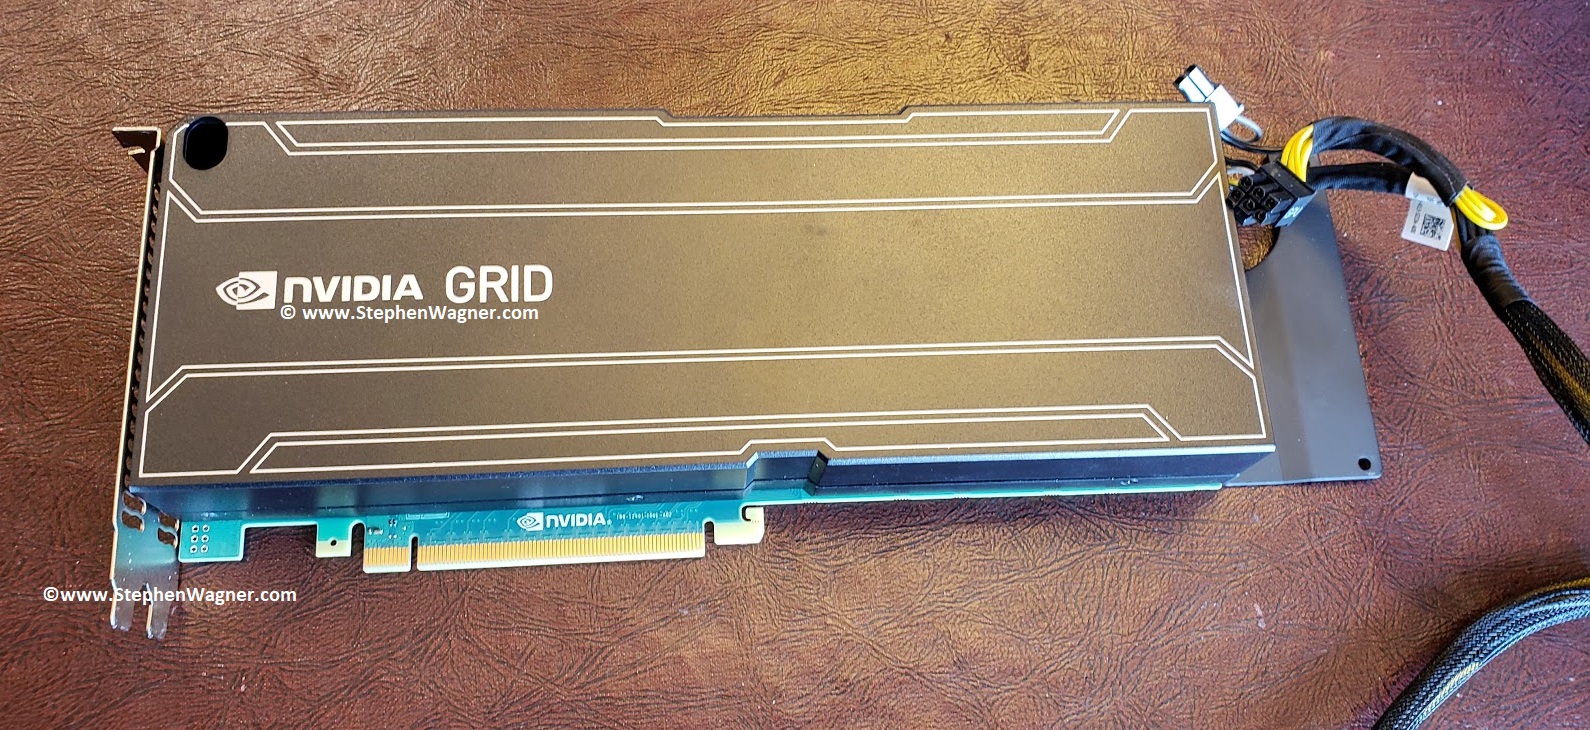
I can’t tell you how excited I am that after many years, I’ve finally gotten my hands on and purchased an Nvidia Quadro K1 GPU. This card will be used in my homelab to learn, and demo Nvidia GRID accelerated graphics on VMware Horizon View. In this post I’ll outline the details, installation, configuration, and thoughts. And of course I’ll have plenty of pictures below!
The focus will be to use this card both with vGPU, as well as 3D accelerated vSGA inside in an HPE server running ESXi 6.5 and VMware Horizon View 7.8.
Please Note: Some, most, or all of what I’m doing is not officially supported by Nvidia, HPE, and/or VMware. I am simply doing this to learn and demo, and there was a real possibility that it may not have worked since I’m not following the vendor HCL (Hardware Compatibility lists). If you attempt to do this, or something similar, you do so at your own risk.
For some time I’ve been trying to source either an Nvidia GRID K1/K2 or an AMD FirePro S7150 to get started with a simple homelab/demo environment. One of the reasons for the time it took was I didn’t want to spend too much on it, especially with the chances it may not even work.
Essentially, I have 3 Servers:
HPE DL360p Gen8 (Dual Proc, 128GB RAM)
HPE DL360p Gen8 (Dual Proc, 128GB RAM)
HPE ML310e Gen8 v2 (Single Proc, 32GB RAM)
For the DL360p servers, while the servers are beefy enough, have enough power (dual redundant power supplies), and resources, unfortunately the PCIe slots are half-height. In order for me to use a dual-height card, I’d need to rig something up to have an eGPU (external GPU) outside of the server.
As for the ML310e, it’s an entry level tower server. While it does support dual-height (dual slot) PCIe cards, it only has a single 350W power supply, misses some fancy server technologies (I’ve had issues with VT-d, etc), and only a single processor. I should be able to install the card, however I’m worried about powering it (it has no 6pin PCIe power connector), and having ESXi be able to use it.
Finally, I was worried about cooling. The GRID K1 and GRID K2 are typically passively cooled and meant to be installed in to rack servers with fans running at jet engine speeds. If I used the DL360p with an external setup, this would cause issues. If I used the ML310e internally, I had significant doubts that cooling would be enough. The ML310e did have the plastic air baffles, but only had one fan for the expansion cards area, and of course not all the air would pass through the GRID K1 card.
The Purchase
Because of a limited budget, and the possibility I may not even be able to get it working, I didn’t want to spend too much. I found an eBay user local in my city who had a couple Grid K1 and Grid K2 cards, as well as a bunch of other cool stuff.
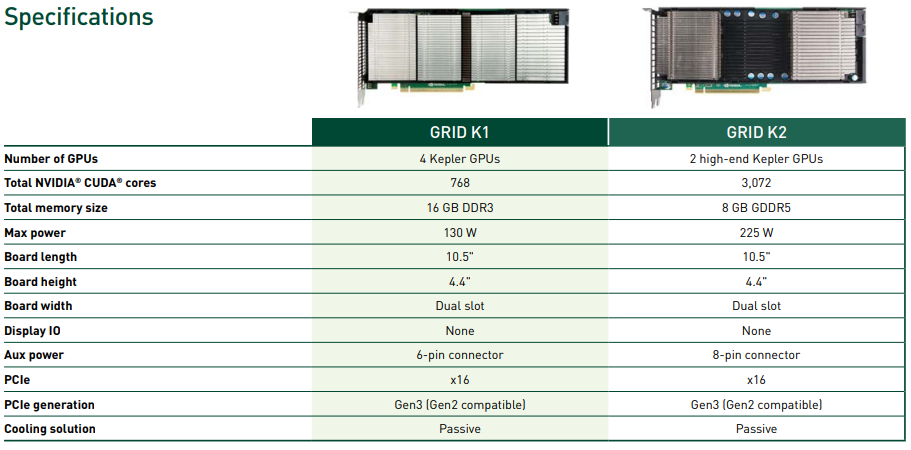
We spoke and he decided to give me a wicked deal on the Grid K1 card. I thought this was a fantastic idea as the power requirements were significantly less (more likely to work on the ML310e) on the K1 card at 130 W max power, versus the K2 card at 225 W max power.
We set a time and a place to meet. Preemptively I ran out to a local supply store to purchase an LP4 power adapter splitter, as well as a LP4 to 6pin PCIe power adapter. There were no available power connectors inside of the ML310e server so this was needed. I still thought the chances of this working were slim…
I also decided to go ahead and download the Nvidia GRID Software Package. This includes the release notes, user guide, ESXi vib driver (includes vSGA, vGPU), as well as guest drivers for vGPU and pass through. The package also includes the GRID vGPU Manager. The driver I used was from: https://www.nvidia.com/Download/driverResults.aspx/144909/en-us
To install, I copied over the vib file “NVIDIA-vGPU-kepler-VMware_ESXi_6.5_Host_Driver_367.130-1OEM.650.0.0.4598673.vib” to a datastore, enabled SSH, and then ran the following command to install:
The command completed successfully and I shut down the host. Now I waited to meet.
We finally met and the transaction went smooth in a parking lot (people were staring at us as I handed him cash, and he handed me a big brick of something folded inside of grey static wrap). The card looked like it was in beautiful shape, and we had a good but brief chat. I’ll definitely be purchasing some more hardware from him.
Hardware Installation
Installing the card in the ML310e was difficult and took some time with care. First I had to remove the plastic air baffle. Then I had issues getting it inside of the case as the back bracket was 1cm too long to be able to put the card in. I had to finesse and slide in on and angle but finally got it installed. The back bracket (front side of case) on the other side slid in to the blue plastic case bracket. This was nice as the ML310e was designed for extremely long PCIe expansion cards and has a bracket on the front side of the case to help support and hold the card up as well.
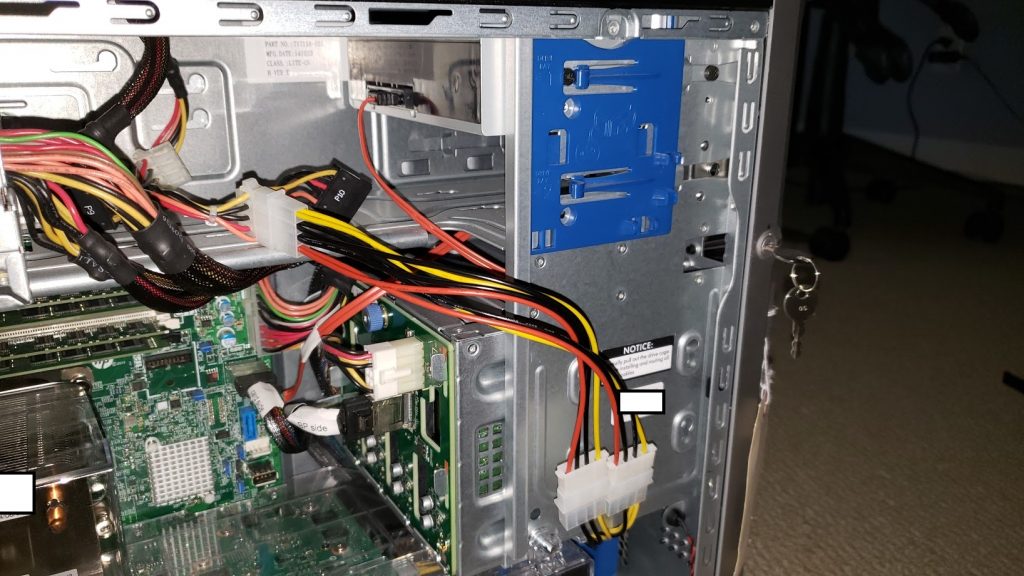
For power I disconnected the DVD-ROM (who uses those anyways, right?), and connected the LP5 splitter and the LP5 to 6pin power adapter. I finally hooked it up to the card.
I laid the cables out nicely and then re-installed the air baffle. Everything was snug and tight.
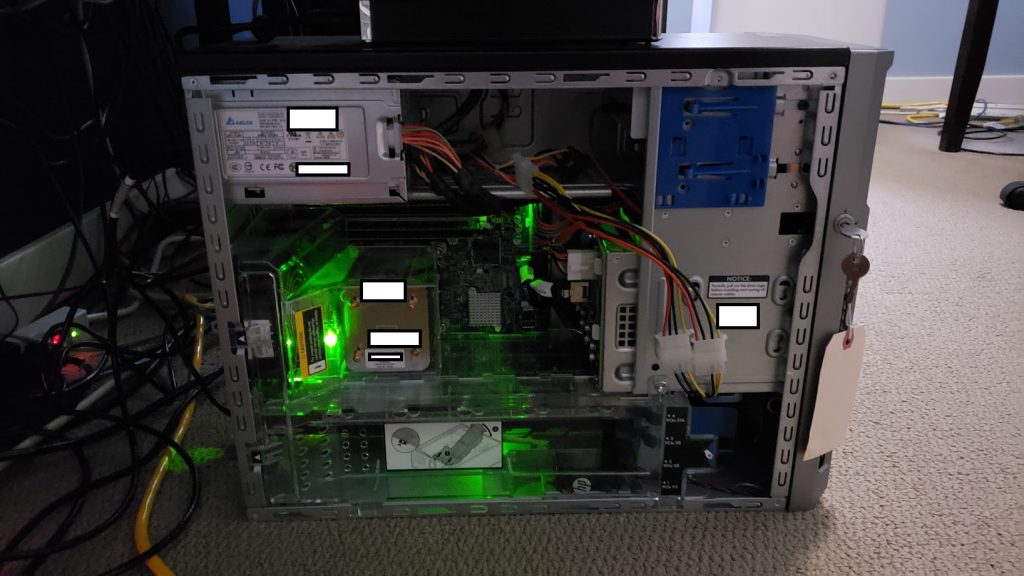
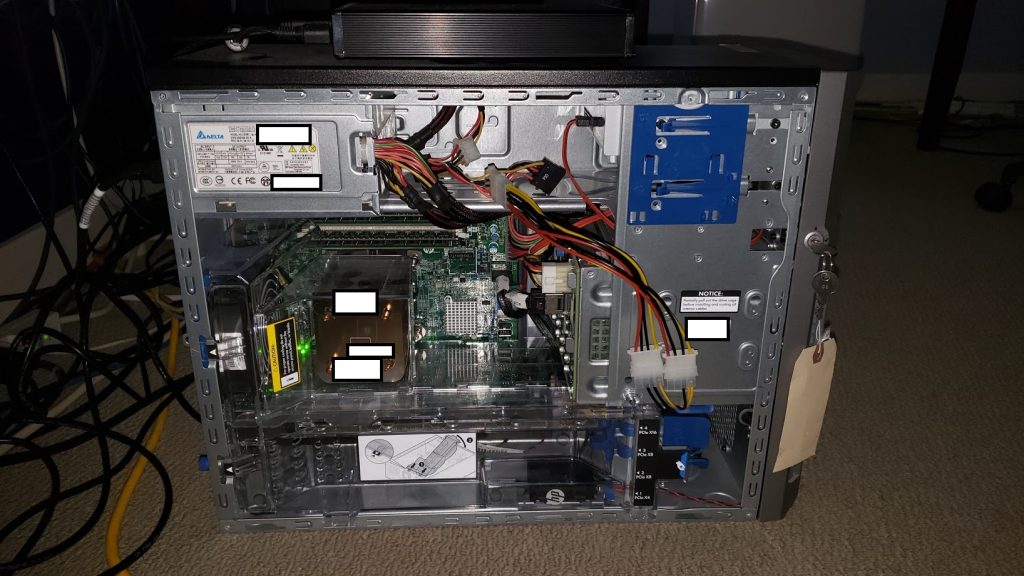
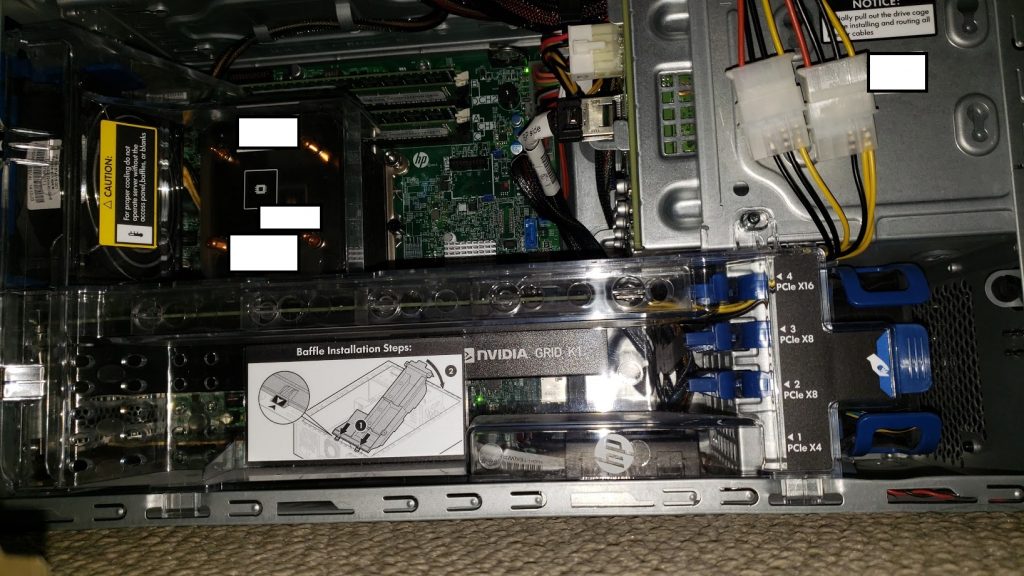
Please see below for pictures of the Nvidia GRID K1 installed in the ML310e Gen8 V2.
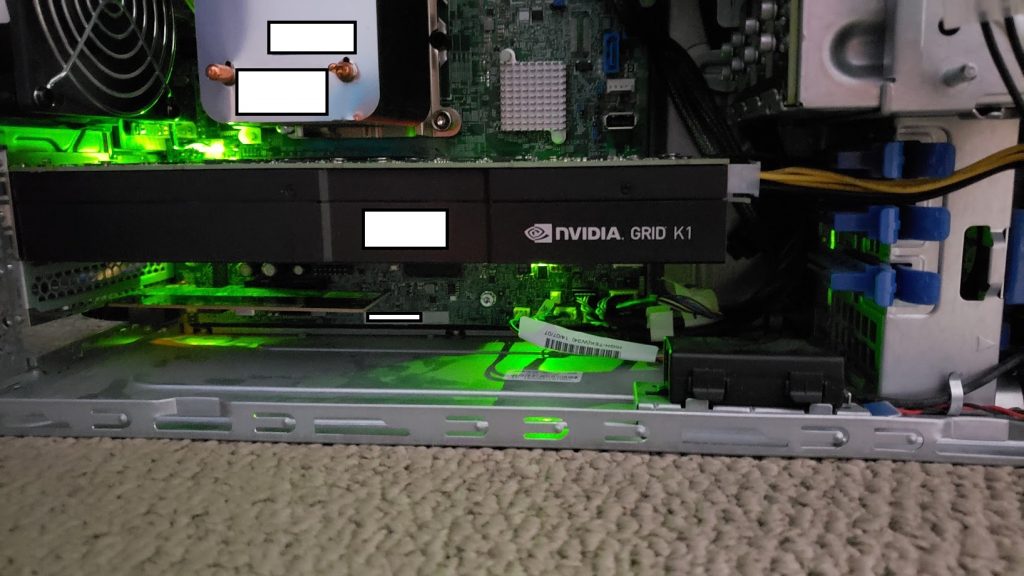
ML310e with GRID K1 Side Shot
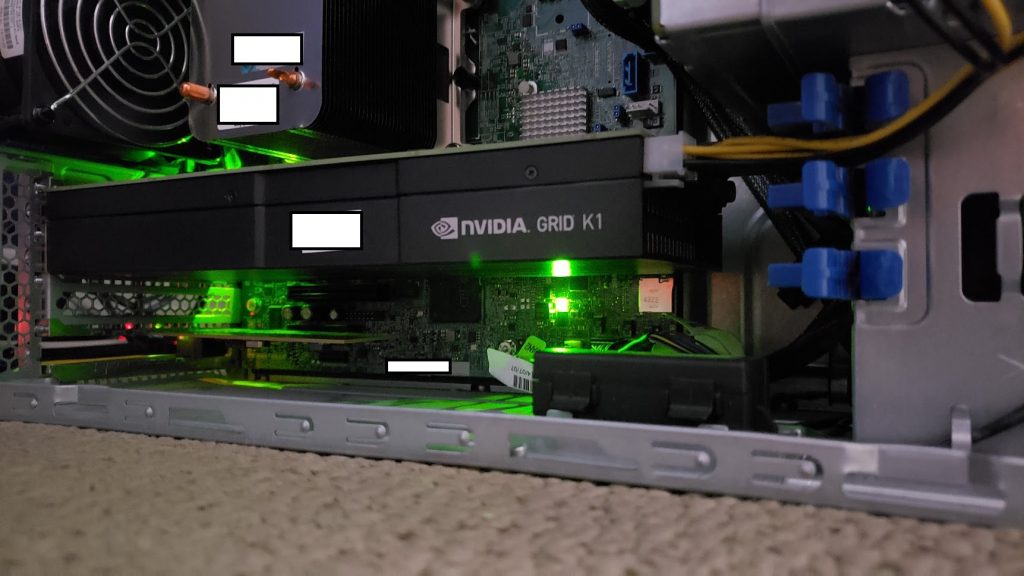
ML310e with GRID K1 Side Shot (with Flash)
ML310e w/ Air Baffle and cabling
ML310e LP4 Splitter for GRID K1
Nvidia GRID K1 in ML310e w/ Air Baffle
Nvidia GRID K1 Installed and Running
Nvidia GRID K1 in ML310e w/o Air Baffle
Host Configuration
Powering on the server was a tense moment for me. A few things could have happened:
Server won’t power on
Server would power on but hang & report health alert
Nvidia GRID card could overheat
Nvidia GRID card could overheat and become damaged
Nvidia GRID card could overheat and catch fire
Server would boot but not recognize the card
Server would boot, recognize the card, but not work
Server would boot, recognize the card, and work
With great suspense, the server powered on as per normal. No errors or health alerts were presented.
I logged in to iLo on the server, and watched the server perform a BIOS POST, and start it’s boot to ESXi. Everything was looking well and normal.
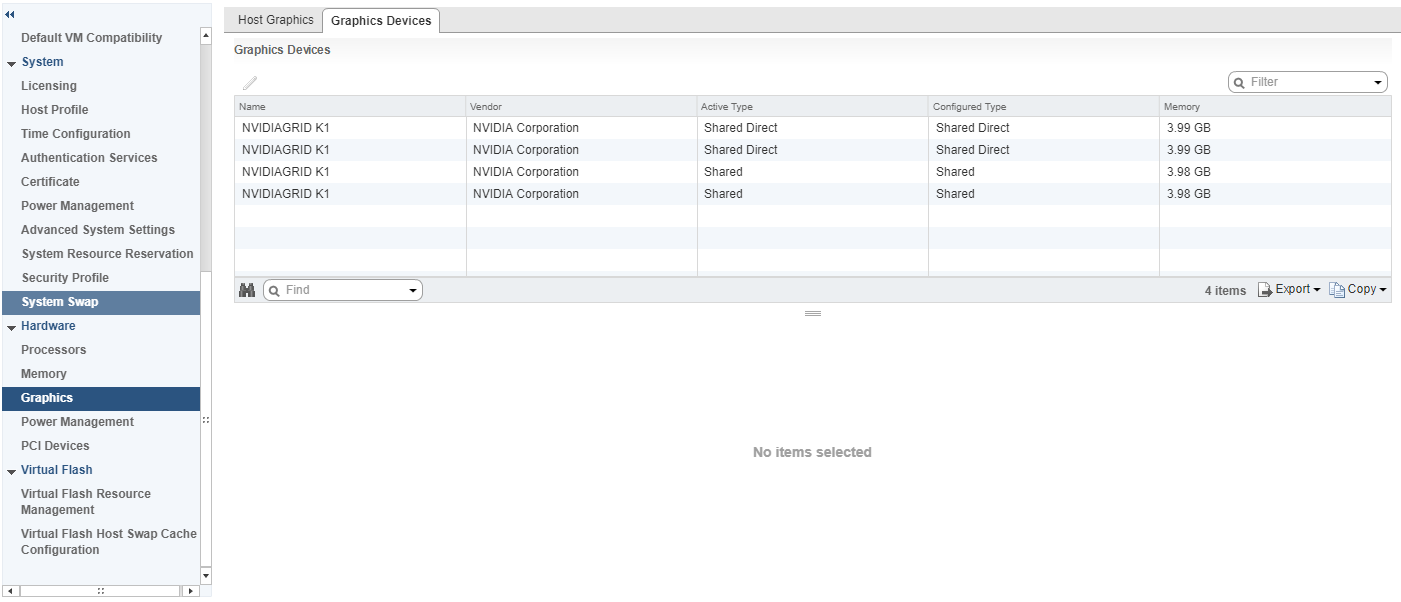
After ESXi booted, and the server came online in vCenter. I went to the server and confirmed the GRID K1 was detected. I went ahead and configured 2 GPUs for vGPU, and 2 GPUs for 3D vSGA.
ESXi Host Graphics Devices Settings
VM Configuration
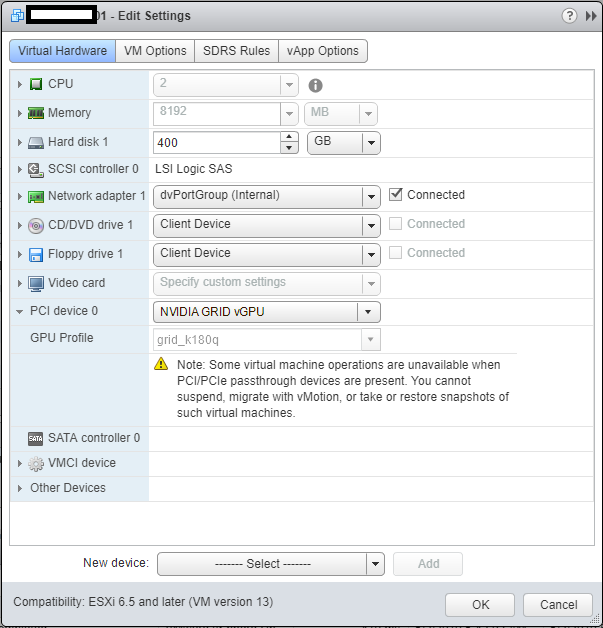
I restarted the X.org service (required when changing the options above), and proceeded to add a vGPU to a virtual machine I already had configured and was using for VDI. You do this by adding a “Shared PCI Device”, selecting “NVIDIA GRID vGPU”, and I chose to use the highest profile available on the K1 card called “grid_k180q”.
VM Settings to add NVIDIA GRID vGPU
After adding and selecting ok, you should see a warning telling you that must allocate and reserve all resources for the virtual machine, click “ok” and continue.
Power On and Testing
I went ahead and powered on the VM. I used the vSphere VM console to install the Nvidia GRID driver package (included in the driver ZIP file downloaded earlier) on the guest. I then restarted the guest.
After restarting, I logged in via Horizon, and could instantly tell it was working. Next step was to disable the VMware vSGA Display Adapter in the “Device Manager” and restart the host again.
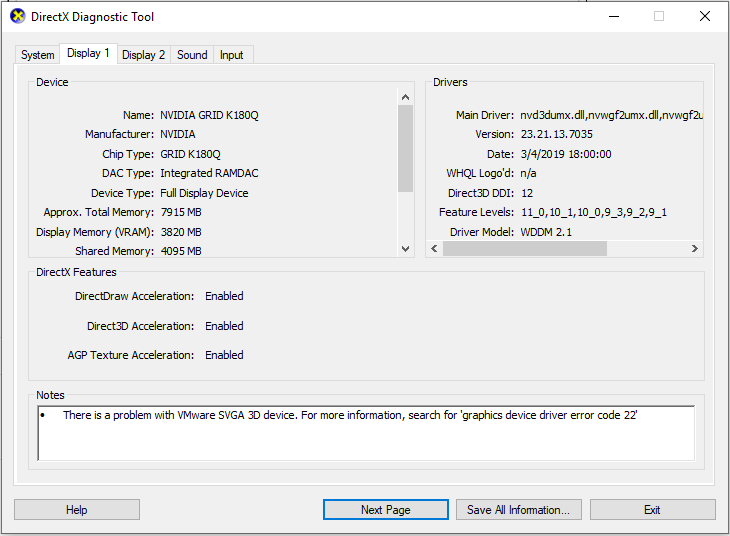
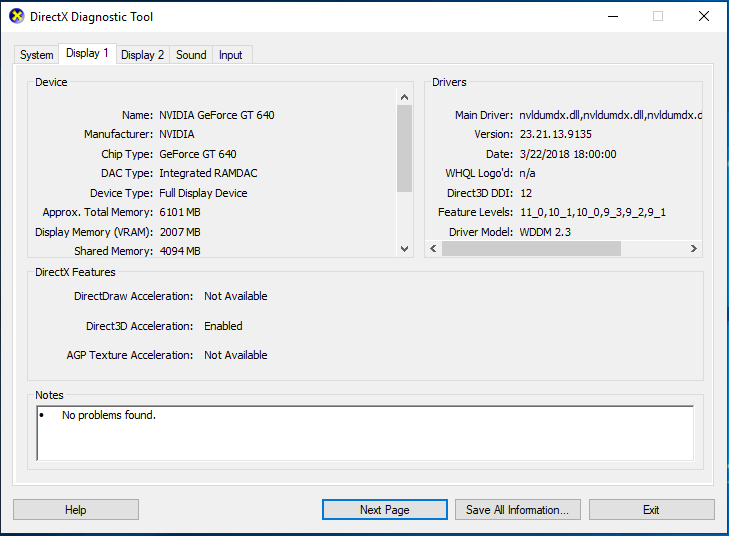
Upon restarting again, to see if I had full 3D acceleration, I opened DirectX diagnostics by clicking on “Start” -> “Run” -> “dxdiag”.
dxdiag on GRID K1 using k180q profile
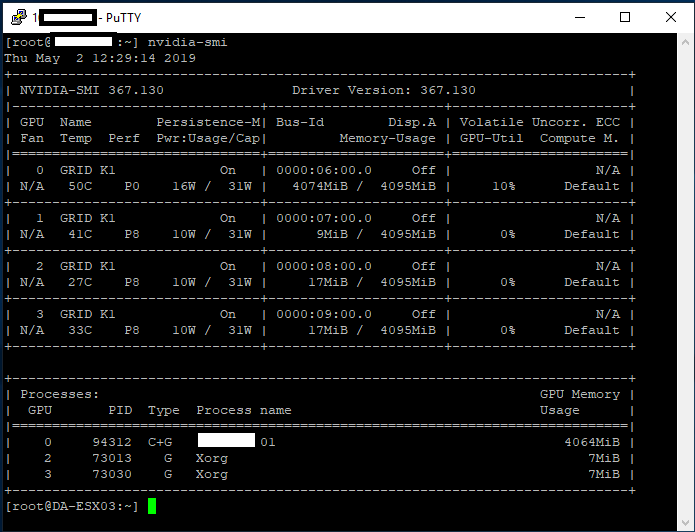
It worked! Now it was time to check the temperature of the card to make sure nothing was overheating. I enabled SSH on the ESXi host, logged in, and ran the “nvidia-smi” command.
“nvidia-smi” command on ESXi Host
According to this, the different GPUs ranged from 33C to 50C which was PERFECT! Further testing under stress, and I haven’t gotten a core to go above 56. The ML310e still has an option in the BIOS to increase fan speed, which I may test in the future if the temps get higher.
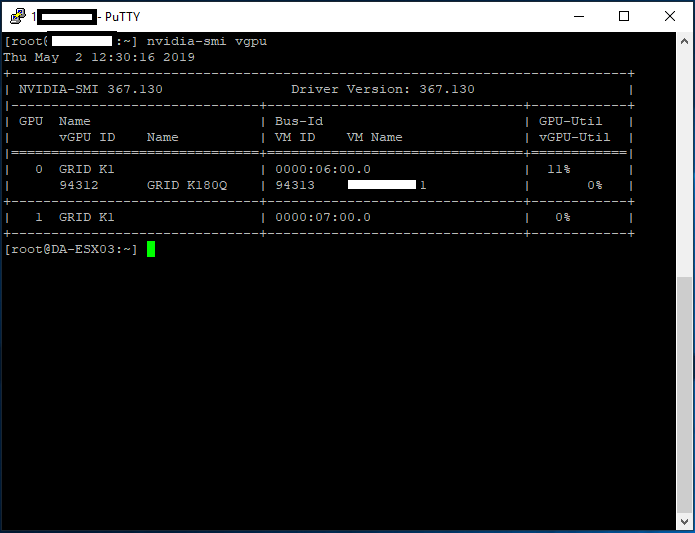
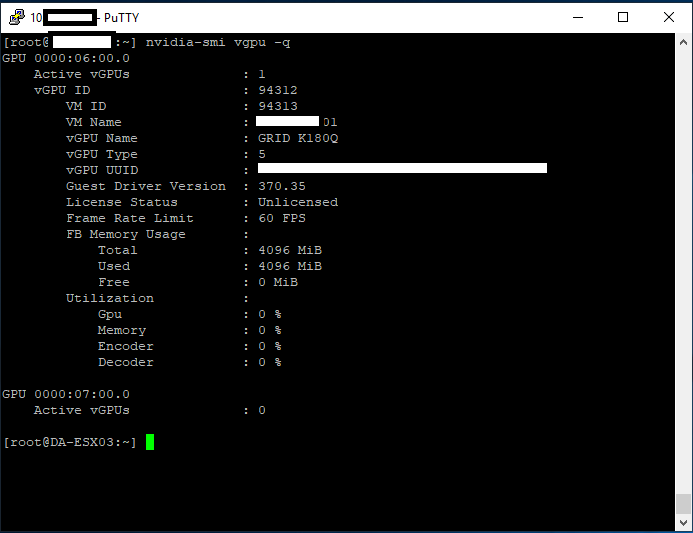
With “nvidia-smi” you can see the 4 GPUs, power usage, temperatures, memory usage, GPU utilization, and processes. This is the main GPU manager for the card. There are some other flags you can use for relevant information.
“nvidia-smi vgpu” for vGPU Information“nvidia-smi vgpu -q” to Query more vGPU Information
Final Thoughts
Overall I’m very impressed, and it’s working great. While I haven’t tested any games, it’s working perfect for videos, music, YouTube, and multi-monitor support on my 10ZiG 5948qv. I’m using 2 displays with both running at 1920×1080 for resolution.
I’m looking forward to doing some tests with this VM while continuing to use vGPU. I will also be doing some testing utilizing 3D Accelerated vSGA.
The two coolest parts of this project are:
3D Acceleration and Hardware h.264 Encoding on VMware Horizon
Getting a GRID K1 working on an HPE ML310e Gen8 v2
Highly recommend getting a setup like this for your own homelab!
Uses and Projects
Well, I’m writing this “Uses and Projects” section after I wrote the original article (it’s now March 8th, 2020). I have to say I couldn’t be impressed more with this setup, using it as my daily driver.
Since I’ve set this up, I’ve used it remotely while on airplanes, working while travelling, even for video editing.
Some of the projects (and posts) I’ve done, can be found here:
One really cool feature that was released in VMware Horizon View 7.7 (and Horizon 8), is the ability to install the Horizon Agent on to a Physical PC or Physical Workstation and use the Blast Extreme protocol. It even supports 3D Acceleration via a GPU and the direct-connect plugin (so you don’t need to have/use a View Connection Server)!
Update July 20, 2022: With the release of Horizon 8 2206, you can now install the Horizon agent on Windows 10 Pro, and Edu editions. Previous versions of Horizon required Windows 10 Enterprise.
As a system admin, I see value in having some Physical PCs managed by the View connection server. Also, if you have the licensing, this will allow you to set this up as a remote access solution for your business and employees.
I’ll be detailing some information about doing this, what’s required, what works, and what doesn’t below…
Physical PCs and workstations with Windows 10 1803 Enterprise or higher can be brokered through Horizon 7 via Blast Extreme protocol.
Requirements
So here’s what’s required to get going:
Windows 10 Enterprise (for Horizon versions before Horizon 8 2206)
Windows 10 Pro or Edu (for Horizon 8 2206 and later)
Physical PC or Workstation
VMware Horizon Licensing
VMware Horizon 7.7 or higher (and Horizon 8) Connection Server
VMware Horizon 7.7 or higher (and Horizon 8) Agent on Physical PC/Workstation
Manual Desktop Pool (Manual is required for Physical PCs to be added)
What Works
Blast Extreme
3D Acceleration (via GPU with drivers)
3D Acceleration with Consumer GPUs
Multiple Displays
Multiple GPUs
VMware View Agent Direct-Connection Plug-In
What Doesn’t Work
GPU Hardware h.264 encoding on consumer GPUs (h.264 encoding is still handled by the CPU)
GPU Hardware h.264/h.265 offload may work in later versions (I still need to test this)
Thoughts
I’ve been really enjoying this feature. Not only have I moved my desktop in to my server room and started remoting in using Blast, but I can think of many use cases for this (machines shops, sharing software licenses, remote access, etc.).
I’ve had numerous discussions with customers of mine who also say they see tremendous value in this after I brought it to their attention. I’ll update this post later on once I hear back about how some of my customers have deployed it.
Update – March 14th 2020 – I’ve been using this on 3 different systems since I wrote this article and love this feature!
3D Acceleration
One thing that is really cool, is the fact that 3D acceleration is enabled and working if the computer has a GPU installed (along with drivers). And no, you don’t need a fancy enterprise GPU. In my setup I’m running a GeForce 550 GTX TI, and a GeForce 640.
Horizon 3D Acceleration Enabled via dxdiag
While 3D acceleration is working, I have to note that the h.264 encoding for the Blast Extreme session is still being handled by the CPU. So while you are getting some great 3D accelerated graphics, depending on your CPU and screen resolution, you may be noticing some choppiness. If you have a higher end CPU, you should be able to get some pretty high resolutions. I’m currently running 2 displays at 1920×1080 on an extremely old Core 2 Quad processor.
H.264 encoding
I spent some time trying to enable the hardware h.264 encoder on the GPUs. Even when using the “NvFBCEnable.exe” (located in C:\Program Files\VMware\VMware Blast\) application to enable hardware encoding, I still notice that the encoding is being done on the CPU. I’m REALLY hoping they change this in future releases.
Hacks?
Another concept that this opens the door for is consumer GPUs providing 3D acceleration without all the driver issues. Technically you could use the CPU settings (to hide the fact the VM is being virtualized), and then install the Horizon Agent as a physical PC (even though it’s being virtualized). This should allow you to use the GPU that you’re passing through, but you still won’t get h.264 encoding on the GPU. This should stop the pesky black screen issue that’s normally seen when using this work around.
Bugs
When upgrading to Horizon View 8 or higher, as part of the process to upgrade the agent on the physical machine, you may notice this functionality stops working. To resolve this, simply uninstall the agent and then re-install it.
Also, on a final note… I did find a bug where if any of the physical PCs are powered down or unavailable on the network, any logins from users entitled to that pool will time out and not work. When this issue occurs, a WoL (Wake on LAN) packet is sent to the desktop during login, and the login will freeze until the physical PC becomes available. This occurs during the login phase, and will happen even if you don’t plan on using that pool. More information can be found here: https://www.stephenwagner.com/2019/03/19/vmware-horizon-view-stuck-authenticating-logging-in/
We all want to make sure our accounting (or clients accounting) data is always backed up, and available for restore in the event of data loss, corruption, or damage. Using QuickBooks desktop, this was easy as you could either use Windows Volume Shadow Services along with your backup and disaster recovery infrastructure, or manual/automatic backups inside of the QuickBooks Desktop application itself.
We traditionally saw IT use the former, and accounting staff using the latter.
Many companies have since migrated from QuickBooks Desktop to QuickBooks online, in an effort to utilize simpler multi-user access, access to your books from anywhere, features and functionality that only come with QBO, app integration and more.
I was one of those people running an extremely old version of QuickBooks, and I needed to upgrade. To keep costs low, and take advantage of some app integration that were available, I decided to upgrade to QuickBooks online.
Overall the upgrade went smooth, however I wanted to make sure that I could backup my data now that I’ve fully migrated over, this is where things got complicated…
QuickBooks Online Protection
Looking through QuickBooks online for some type of backup or export feature, I was unable to find one. I decided to do a google search, and came up with a few documents.
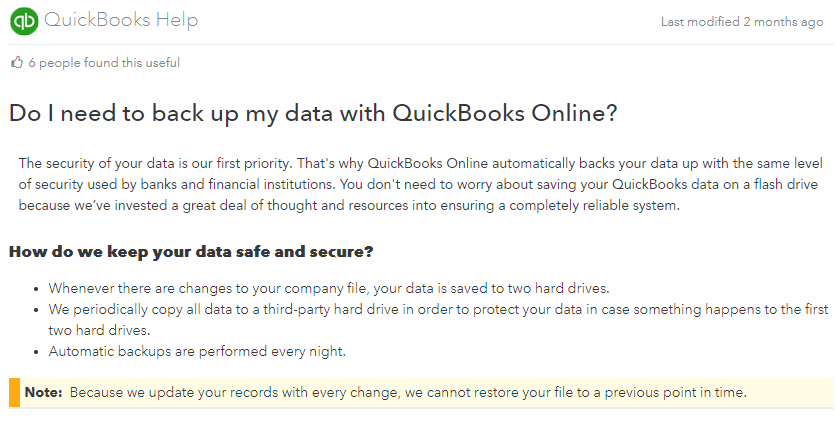
The above link explains Intuit’s backup and disaster recovery strategy in simple terms for customers. A screenshot below:
According to this page, Intuit backs up our data everynight, stores it on 2 hard drives every change, and copy all data to a third-party hard drive (assuming to take it off-site).
So we know something is being done for protection… It’s a bit scary that a third-party has a copy of the data, but we probably agreed to this when accepting the EULA. There’s still nothing about how we can backup our data.
QuickBooks Online Backup and Export
Doing some further searching, I came across another article.
Now we’re talking! According to this article, you can use the data export tool to move your QuickBooks Online data and information to another version of QuickBooks. You could use this not only as a means to export the data, but also to have a backup/copy for yourself (for pease of mind).
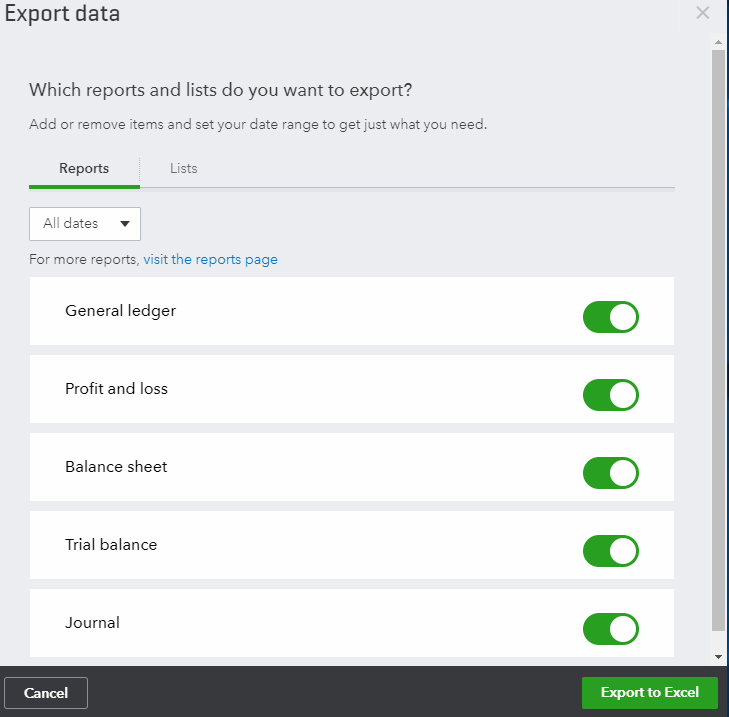
I started to follow the instructions in this document, however I quickly noticed that some options that should be available, didn’t show up in my QuickBooks Online interface.
It appeared that I was missing the option to “Download Company Data” under “Moving to QuickBooks Desktop”. I could only export Reports and Lists.
I was wondering if something was wrong with my account because it was brand new, or if I had to enable this feature somewhere.
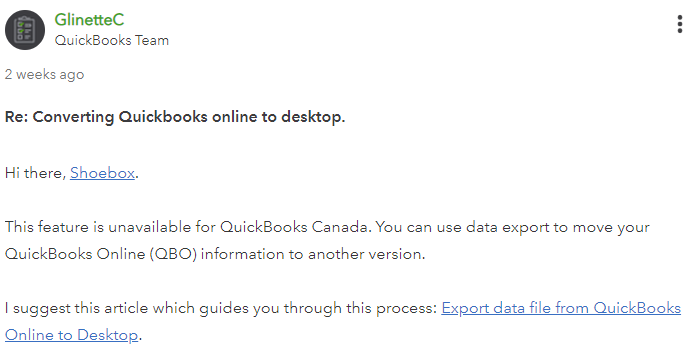
It turns out that if you are a Canadian QuickBooks Online customer, you do not have access to export or backup your file. You can only export Reports and Lists to Excel. The QuickBooks Online company file export feature is only available on the QuickBooks Online USA (American) version.
Hopefully in the future, Intuit will add this functionality to QuickBooks Online Canadian version. Until then, you might be able to try some 3rd party apps, but I haven’t tested or verified any of these.
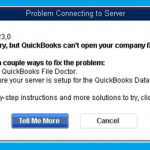
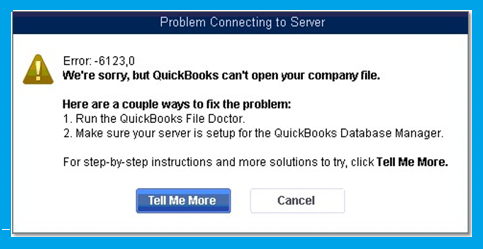
During an upgrade from an extremely old version of QuickBooks to a newer version of QuickBooks, opening the file to upgrade may fail with the following error message:
Error: -6123,0
We're sorry, but QuickBooks can't open your company file.
This specifically occurred with me when I was upgrading from QuickBooks 2008 to Quickbooks 2019 (trial), so I could then migrate my datafile to QuickBooks Online.
The Problem
During most (if not all) upgrades and updates, Intuit makes changes to the datafile format for new features, optimizations, or bug fixes. Sometimes these changes can actually be very drastic and intensive, especially if you have a large datafile. Keep in mind that forms and templates may also require upgrades or changes.
When jumping multiple versions, all of these changes must occur in a single swipe.
To make this problem even worse, I believe that there are major (massive, larger than usual) changes done every few upgrades.
Troubleshooting
To troubleshoot this problem, I followed all of QuickBooks documentation on the process but didn’t have any luck. I tried:
Upgrading the datafile directly
Removing it off the network and upgrading directly
Creating a backup using the older version, and restoring with the newer version
Using the “Restore older version from backup” feature in “Utilities”
All of these had no effect.
Solution
I finally came across an article that talked about restoring backups and upgrade issues, and as a last attempt recommended creating a portable file on the old version and restoring it to the new version.
Keep in mind that customization will be lost, such as Invoice formats, templates, and other things.
I went ahead and tried this, and to my surprise it worked. I was able to upgrade from QuickBooks 2008 to QuickBooks 2019, and was then able to export and import the datafile in to QuickBooks online.
My 2008 datafile was ~48MB, and took around an hour to convert (I was actually surprised at first, but realized I was performing 11 versions of upgrades to the file).
As always you should confirm that the data is valid. I compared my chart of accounts, profit and loss statements, and trial balance reports, from the old to the new, and all looked good!
This website uses cookies to improve your experience. We'll assume you're ok with this, but you can opt-out if you wish.
Do you accept the use of cookies and accept our privacy policy? AcceptRejectCookie and Privacy Policy
Privacy & Cookies Policy
Privacy Overview
This website uses cookies to improve your experience while you navigate through the website. Out of these cookies, the cookies that are categorized as necessary are stored on your browser as they are essential for the working of basic functionalities of the website. We also use third-party cookies that help us analyze and understand how you use this website. These cookies will be stored in your browser only with your consent. You also have the option to opt-out of these cookies. But opting out of some of these cookies may have an effect on your browsing experience.