Looking at setting up Zoom for VDI in your Virtual Desktop Infrastructure?
In this post, I will guide you on how to deploy Zoom for VDI and the Zoom VDI Plugin in your VMware Horizon View VDI Infrastructure. There is also a Zoom VDI Plugin for Citrix XenDesktop and WVD (Windows Virtual Desktop) in addition to VMware Horizon.
While these instructions are targeted for VMware Horizon VDI environments, the process is very similar for Citrix XenDesktop.
VMware Horizon client on Windows or compatible Thin Client
VDI Desktop or Base Image
Endpoints must have internet access
Background
Just like with Microsoft Teams, before Zoom’s VDI client, VMware’s RTAV (Real-time Audio-Video) was used to handle multimedia. This offloaded audio and video to the VMware Horizon Client utilizing a dedicated channel over the connection to optimize the data exchange. With minor tweaks (check out my post on enhancing RTAV webcam with VMware Horizon), this actually worked quite well with the exception of microphone quality on the end-users side, and high bandwidth requirements.
Using Zoom for VDI and the Zoom VDI Plugin, Zoom will offload (and a more optimized way than RTAV) video encoding and decoding from the VDI Virtual Machine and the endpoint will directly communicate with Zoom’s infrastructure. And, just like Microsoft Teams Optimization, this is one less hop for data, one less processing point, and one less load off your server infrastructure.
There are two components involved in deploying Zoom for VDI.
Zoom for VDI Application on VDI Virtual Machine (or Image)
Zoom VDI Plugin installed on the client system connecting to the VDI session (Computer, Thin Client, Zero Client)
It’s pretty straight forward. We just need to have the Zoom for VDI application installed on the VDI Virtual Machine (and/or base image), and have the plugin installed on the computer or thin client that we are connecting with.
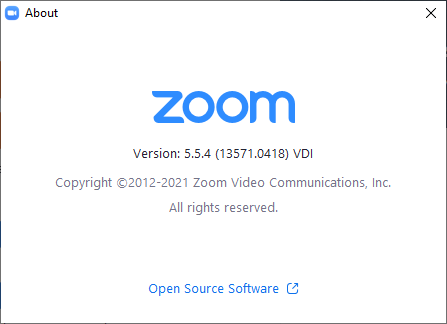
Zoom for VDI About Screenshot
Zoom is highly configurable both with a GPO (Group Policy Object) and registry settings. Please make sure you load up the Zoom Active Directory ADMX Templates and configure them appropriately for your environment and deployment.
These GPOs are needed especially for non-persistent VDI (Instant Clones) for autoconfiguration and SSO (Single Sign On) when the user opens the application and to tweak numerous other configurables.
Zoom for VDI Application Installation on VDI VM or Base Image
For the first part of deployment, we’ll need to install the Zoom for VDI application inside of our VDI VM or bundle it inside of our Base Image (if you’re using instant clones).
To deploy in your existing infrastructure using persistent desktop pools, you can deploy the MSI via Group Policy Objects.
To deploy in your existing infrastructure using non-persistent desktop pools (Instant Clones), you can install Zoom for VDI in your base image, and then re-push the image/snapshot.
To manually install on an existing VDI Virtual Machine, you can double click the MSI, or run the following command:
msiexec /package ZoomInstallerVDI.msi
And that’s it! Make sure you have your Zoom GPO and/or registry settings configured as well.
Zoom VDI Plugin Installation on Client Computer or Thin Client
For the second part of deployment, we need to load the Zoom VDI Plugin on the connecting client computer and/or thin client.
The Zoom for VDI plugin is available for numerous different operating system and thin clients such as Windows, Mac, Mac (ARM), Linux (CentOS, Ubuntu), HP ThinPro Thin clients, Dell ThinOS Thin clients, and more!
Client Plugin Installation
The steps will vary depending on the computer or device you’re connecting with so you’ll want to download the appropriate plugin and install it.
As an example, to install the Zoom VDI Plugin manually on a Windows Client running VMware Horizon View Client:
Download the appropriate Zoom for VDI plugin
Install
Restart
It’s actually that easy. You can also deploy the MSI file via Active Directory GPO or your application and infrastructure management platform if you’re installing it on to a large number of systems.
Conclusion
As you can see, it’s pretty easy to get up and running with Zoom for VDI. When deploying VDI, make sure you give your users the tools and applications they need to be productive. Including Zoom for VDI in your deployment is a no-brainer!
One last thing I want to mention is that you can have both the traditional Zoom Desktop and Zoom for VDI application installed at the same time. In my own high performance environment, I chose to have and use both due to the limitation of the Zoom for VDI application. When using the traditional Zoom Desktop application, VMware RTAV will be used if configured, and still works great!
This guide will show you to install Microsoft (Classic) Teams and deploy Microsoft Teams VDI Optimization on VMWare Horizon for Manual Pools, Automated Pools, and Instant Clone Pools, for use with both persistent and non-persistent VDI. This guide works for Microsoft Teams on Windows 10 and Windows 11, including the new Windows 11 22H2.
Please see my post Deploy and install the New Teams for VDI to learn how to deploy the new Teams client for VDI. The Classic client will go end of support on June 30, 2024.
Before Microsoft Teams VDI Optimization, VMware’s RTAV (Real-Time Audio-Video) was generally used. This offloaded audio and video to the VMware Horizon Client utilizing a dedicated channel over the connection to optimize the data exchange. With minor tweaks (check out my post on enhancing RTAV webcam with VMware Horizon), this actually worked quite well with the exception of microphone quality on the end-users side, and high bandwidth requirements.
Starting with Horizon View 7.13 and Horizon View 8 (2006), VMware Horizon now supports Microsoft Teams Optimization. This technology offloads the Teams call directly to the endpoint (or client device), essentially drawing over the VDI VM’s Teams visual interface and not involving the VDI Virtual Machine at all. The client application (or thin client) handles this and connects directly to the internet for the Teams Call. One less hop for data, one less processing point, and one less load off your server infrastructure.
Microsoft Teams Optimization uses WebRTC to function.
Deploying Microsoft Teams Optimization on VMware Horizon VDI
There are two components required to deploy Microsoft Teams Optimization for VDI.
Microsoft Specific Setup and Configuration of Microsoft Teams
VMware Specific Setup and Configuration for Microsoft Teams
We’ll cover both in this blog post.
Microsoft Specific Setup and Configuration of Microsoft Teams Optimization
First and foremost, do NOT bundle the Microsoft Teams install with your Microsoft 365 (Office 365) deployment, they should be installed separately.
We’re going to be installing Microsoft Teams using the “per-machine” method, where it’s installed in the Program Files of the OS, instead of the usual “per-user” install where it’s installed in the user “AppData” folder.
Non-persistent (Instant Clones) VDI requires Microsoft Teams to be installed “Per-Machine”, whereas persistent VDI can use both “Per-Machine” and “Per-User” for Teams. I use the “Per-Machine” for almost all VDI deployments. This allows you to manage versions utilizing MSIs and GPOs.
Please Note that when using “Per-Machine”, automatic updates are disabled. In order to upgrade Teams, you’ll need to re-install the newer version. Take this in to account when planning your deployment. If you use the per-user, it will auto-update.
For Teams Optimization to work, your endpoints and/or clients MUST have internet access.
Let’s Install Microsoft Teams (VDI Optimized)
For Per-Machine (Non-Persistent Desktops) Install, use the following command:
And that’s it for the Microsoft Specific side of things!
VMware Specific Setup and Configuration for Microsoft Teams Optimization
When it comes to the VMware Specific Setup and Configuration for Microsoft Teams Optimization, it’s a little bit more complex.
VMware Horizon Client Installation
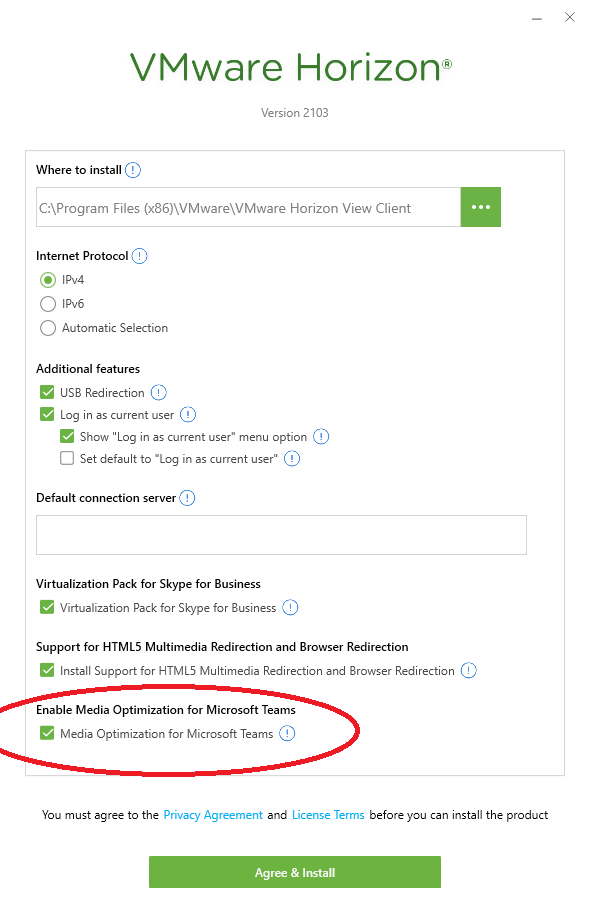
When installing the VMware Horizon Client, the Microsoft Teams optimization feature should be installed by default. However, doing a custom install, make sure that “Media Optimization for Microsoft Teams” is enabled (as per the screenshot below):
VMware View Client Install with Microsoft Teams Optimization
Group Policy Object to enable WebRTC and Microsoft Teams Optimization
You’ll only want to configure GPOs for those users and sessions where you plan on actually utilizing Microsoft Teams Optimization. Do not apply these GPOs to endpoints where you wish to use RTAV and don’t want to use Teams optimization, as it will enforce some limitations that come with the technology (explained in Microsoft’s documentation).
We’ll need to enable VMware HTML5 Features and Microsoft Teams Optimization (WebRTC) inside of Group Policy. Head over and open your existing VDI GPO or create a new GPO. You’ll need to make sure you’ve installed the latest VMware Horizon GPO Bundle. There are two switches we need to set to “Enabled”.
Expand the following, and set “Enable HTML5 Features” to “Enabled”:
Next, we’ll set “Enable Media Optimization for Microsoft Teams” to “Enabled”. You’ll find it in the following:
Computer Configuration -> Policies -> Administrative Templates -> VMware View Agent Configuration -> VMware HTML5 Features -> VMware WebRTC Redirection Features -> Enable Media Optimization for Microsoft Teams
And that’s it, you’re GPOs are now configured.
If you’re running a persistent desktop, run “gpupdate /force” in an elevated command prompt to grab the updated GPOs. If you’re running a non-persistent desktop pool, you’ll need to push the base image snapshot again so your instant clones will have the latest GPOs.
Confirming Microsoft Teams Optimization for VDI
There’s a simple and easy way to test if you’re currently running Microsoft Teams Optimized for VDI.
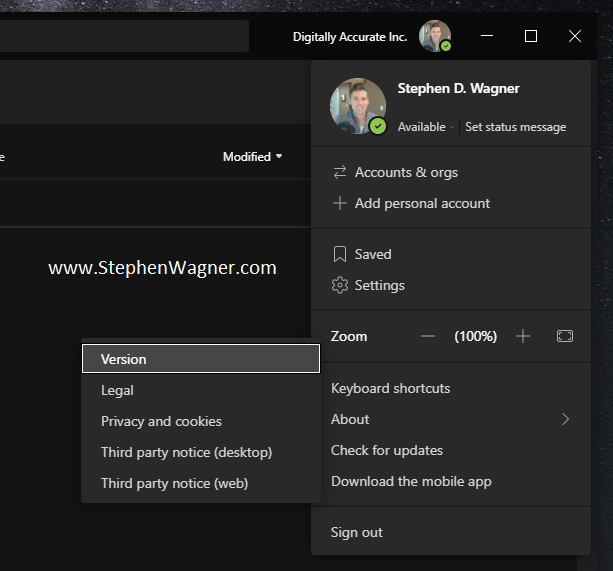
Open Microsoft Teams
Click on your Profile Picture to the right of your Company Name
Expand “About”, and select “Version”
Microsoft Teams – About and Version to check Teams Optimization for VDI
After selecting this, you’ll see a toolbar appear horizontally underneath the search, company name, and your profile picture with some information. Please see the below examples to determine if you’re running in 1 of 3 modes.
The following indicates that Microsoft Teams is running in normal mode (VDI Teams Optimization is Disabled). If you have configured VMware RTAV, then it will be using RTAV.
Microsoft Teams VDI Optimization disabled
The following indicates that Microsoft Teams is running in VDI Optimized mode (VDI Teams Optimization is Enabled showing “VMware Media Optimized”).
Microsoft Teams VDI Optimization enabled
The following indicates that Microsoft Teams is configured for VDI Optimization, however is not functioning and running in fallback mode. If you have VMware RTAV configured, it will be falling back to using RTAV. (VDI Teams Optimization is Enabled but not working showing “VMware Media Not Connected”, and is using RTAV if configured).
Microsoft Teams VDI Optimization Fallback
If you’re having issues or experiencing unexpected results, please go back and check your work. You may also want to review Microsoft’s and VMware’s documentation.
Conclusion
This guide should get you up and running quickly with Microsoft Teams Optimization for VDI. I’d recommend taking the time to read both VMware’s and Microsoft’s documentation to fully understand the technology, limitations, and other configurables that you can use and fine-tune your VDI deployment.
In this post, I’m going to provide instructions and a guide on how to install the Horizon Agent for Linux on Ubuntu 20.04 LTS. This will allow you to run and connect to an Ubuntu VDI VM with VMware Horizon View.
In the past I’ve created instructions on how to do this on earlier versions of Ubuntu, as well as RedHat Linux, but it’s getting easier than ever and requires less steps than previous guides.
I decided to create the updated tutorial after purchasing an AMD S7150 x2 and wanted to get it up and running with Ubuntu 20.04 LTS and see if it works.
Create a VM on your vCenter Server, attached the Ubuntu 20.04 LTS ISO, and install Ubuntu
Install any Root CA’s or modifications you need for network access (usually not needed unless you’re on an enterprise network)
Update Ubuntu as root apt update apt upgrade
Install software needed for VMware Horizon Agent for Linux as root apt install openssh-server python python-dbus python-gobject open-vm-tools-desktop
Install your software (Chrome, etc.)
Install any vGPU or GPU Drivers you need before installing the Horizon Agent
Install the Horizon Agent For Linux as root (Enabling Audio, Disabling SSO) ./install_viewagent.sh -a yes -S no
Reboot the Ubuntu VM
Log on to your Horizon Connection Server
Create a manual pool and configure it
Add the Ubuntu 20.04 LTS VM to the manual desktop pool
Entitle the User account to the desktop pool and assign to the VM
Connect to the Ubuntu 20.04 Linux VDI VM from the VMware Horizon Client
And that’s it, you should now be running.
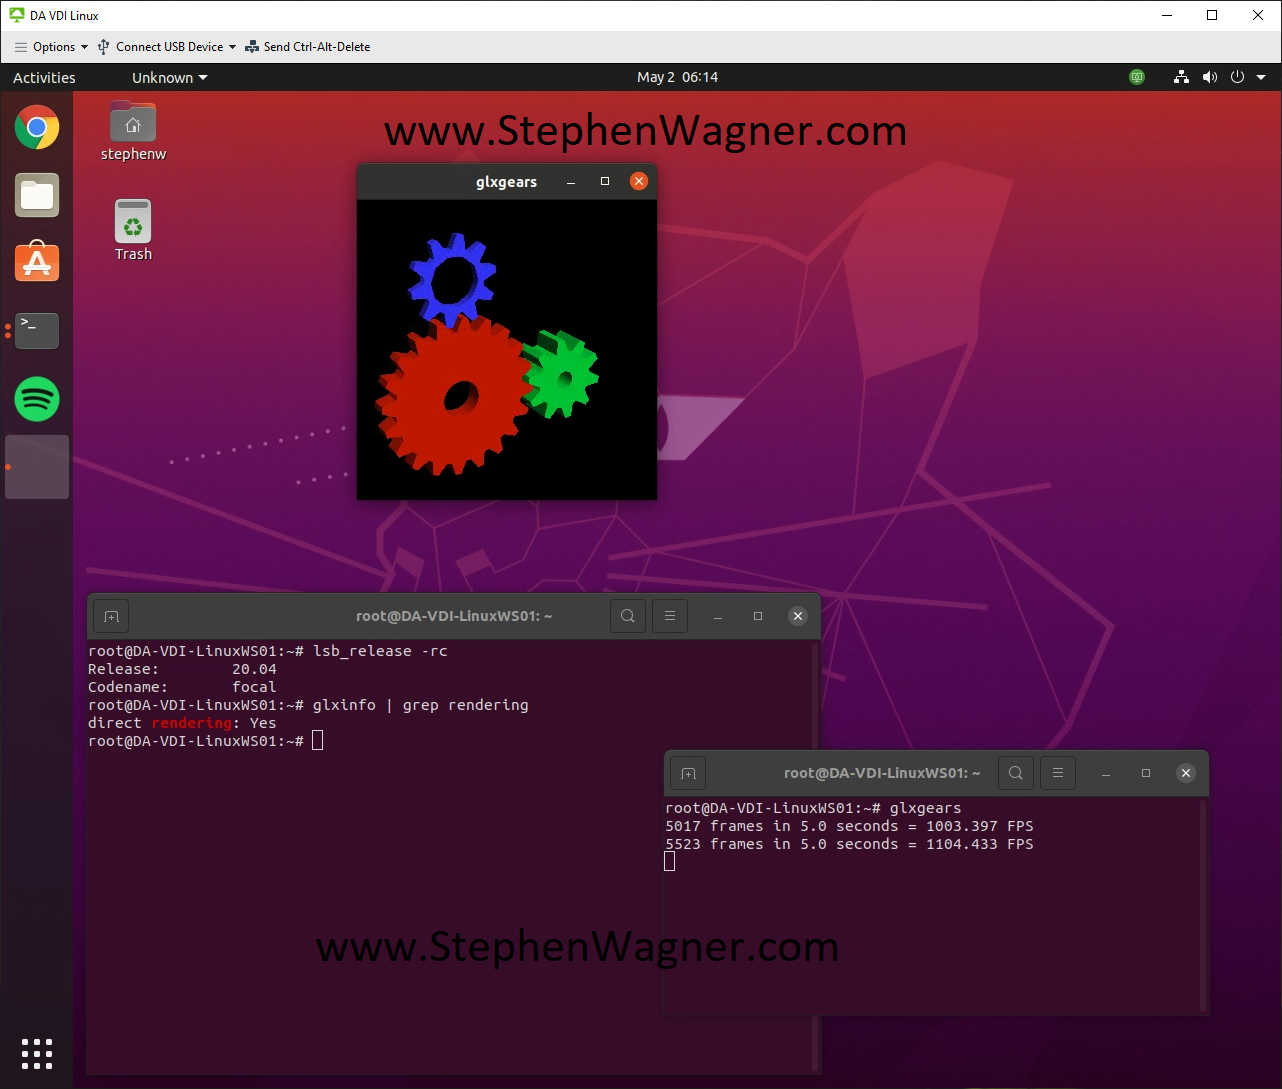
As for the AMD S7150 x2, I noticed that Ubuntu 20.04 LTS came with the drivers for it called “amdgpu”. Please note that this driver does not work with VMware Horizon View. After installing “mesa-utils”, running “glxgears” and “glxinfo” it did appear that 3D Acceleration was working, however after further investigation it turned out this is CPU rendering and not using the S7150 x2 GPU.
You now have a VDI VM running Ubuntu Linux on VMware Horizon View.
Do you have a VMware Horizon View VDI environment and some power users you’d like to optimize? I’ve got some optimizations that you can easily apply via the VMware Horizon GPO (Group Policy Object) bundle.
These are performance optimizations and configurations that I have rolled out for my own persistent desktop to optimize the experience for myself. These optimizations may use more resources to provide a better experience for power users.
Please note that these optimizations are not meant to be deployed for large numbers of users unless you have the resources to handle it. Always test these settings before rolling out in to production.
VMware Horizon GPO Bundle
As part of any VMware Horizon View deployment, you should have installed the VMware Horizon GPO Bundle. This is a collection of ADMX GPO (Group Policy Object) templates that you can upload to your domain controllers and use to configure various aspects of your VMware Horizon deployment.
These GPOs can be used to configure both the server, VDI VMs, VMware Horizon Clients, and various configurables with the protocols (including VMware Blast) being used in your deployment such as VMware BLAST, PCoIP, and RDP.
Below, you’ll find some of my favorite customizations and optimizations that I use in my own environment to enhance my experience.
Do you have a GPU for your VDI session and extra bandwidth? If so, let’s crank that framerate up for a smoother experience! Configuring this variable will increase the default framerate to 60 fps (frames per second).
There are two values for this setting, “H. 264 Maximum QP” and “H. 264 Minimum QP”. These control how much processing and compression is used on the VMware Blast h. 264 session.
To increase the quality (and bandwidth usage) of the session, you can decrease these to reduce the amount of compression. In my case I reduced both by “5” from their default values which made a big change.
VMware Blast: Max Session Bandwidth kbit/s Megapixel Slope
This setting will increase the amount of available bandwidth for the Horizon Blast h.264 video stream.
The default is “6200” and I recommend playing with this a little to find out what suits you best depending on the other changes you made, especially with the 2 items above.
You can try doubling, tripling, or quadrupling this value depending on what’s required and how much available bandwidth you have.
Users are usually connecting from all sorts of devices, including laptops, tablets, and more. When connecting to a VDI session with a laptop or tablet that is using display scaling because it has a high native resolution, it may be extremely difficult to read any text because scaling is disabled on the VDI session.
To allow display scaling in the VDI session, we need to enable it via GPO on both the “Computer Configuration” and “User Configuration”.
And we’ll also set that “Allow Display Scaling” to “Enabled”.
Configuring this will allow you to configure display scaling on the VMware Horizon View client. After enabling this, it automatically configures scaling to match what I have configured on my connecting workstation (such as my Microsoft Surface Tablet, or my Lenovo X1 Carbon laptop). You also have the ability to manually configure the scaling on the session.
VMware Horizon Client Configuration/View USB Configuration: Allow keyboard and Mouse Devices
While you never want to use USB Redirection for keyboards and mice, you may need to use USB redirection for various HID (Human Interface Devices) that appear as keyboards or mice. You may need to enable this to make the following devices work:
2FA/MFA Security Tokens
Security Keys
One Touch Tokens
In my case, I had a Yubico Yubikey security key that I needed passed through using USB Redirection (more on that here) to authenticate 2FA sessions inside of my VDI session.
To enable the passthrough of keyboards and mice (HID) devices, change the following.
Using a webcam with VMware Horizon and RTAV (Real Time Audio Video), you may notice a slow frame rate and low resolution on your webcam going through the VDI session.
Here, we’re going to increase the fps (frames per second) and resolution of RTAV for VMware Horizon.
We’re going to “Enable” the following and set the values below:
Max frames per second = 25
Resolution - Default image resolution height in pixels = 600
Resolution - Default image resolution width in pixels = 800
Resolution - Max image height in pixels = 720
Resolution - Max image width in pixels = 1280
You’ll now notice a clearer and higher resolution webcam running at a faster framerate.
VMware View Agent Configuration/VMware HTML5 Features/Enable VMware HTML5 Features
There’s numerous HTML5 optimizations that VMware has incorporated in to the latest versions of VMware Horizon View. These include, but are not limited to:
HTML5 Multimedia Redirection
Geolocation Redirection
Browser Redirection
Media Optimization for Microsoft Teams
We want all this good stuff, so we’ll head over to the following:
So there’s this little thing called “HTML5 Multimedia Redirection”, where when configured and the plugins are installed, VMware Horizon will essentially redirect HTML5 based multimedia from the VDI session to your local system to handle.
This offload makes video extremely crisp and smooth, however comes with some concerns, security risks, and learning on your part. When you enable this, you only want to do so for trusted websites.
In this location, we need to set “Enable VMware HTML5 Multimedia Redirection” to “Enabled”. After this, we need to configure the URL list for domains and websites that we will allow HTML5 Multimedia Redirection to work with.
To do this, we’ll set “Enable URL list for VMware HTML5 Multimedia Redirection” to “Enabled”, and then add YouTube to the exception list to allow HTML5 Multimedia Redirection for YouTube. In the URL list, we will add:
https://www.youtube.com/*
And that’s it!
VMware View Agent Configuration/VMware HTML5 Features/VMware WebRTC Redirection Features
We’re all using Microsoft Teams these days, and while Microsoft Teams does have VDI optimization, you need to enable what’s needed on the VMware Horizon side of things to make it work.
We’ll set “Enable Media Optimization for Microsoft Teams” to “Enabled”.
In order for Microsoft Teams VDI optimization to function, there are steps involved with the installation which aren’t covered in this post. For these steps, make sure you check out my guide on Microsoft Teams VDI Optimization for VMware Horizon.
Conclusion
Leave a comment and let me know if these helped you, or if you have any optimizations or tweaks you’d like to share with the community!
For over a year and a half I have been working on building a custom NVMe Storage Server for my homelab. I wanted to build a high speed storage system similar to a NAS or SAN, backed with NVMe drives that provides iSCSI, NFS, and SMB Windows File Shares to my network.
The computers accessing the NVMe Storage Server would include VMware ESXi hosts, Raspberry Pi SBCs, and of course Windows Computers and Workstations.
The focus of this project is on high throughput (in the GB/sec) and IOPS.
The current plan for the storage environment is for video editing, as well as VDI VM storage. This can and will change as the project progresses.
The History
More and more businesses are using all-flash NVMe and SSD based storage systems, so I figured there’s no reason why I can’t have build and have my own budget custom all NVMe flash NAS.
This is the story of how I built my own NVMe based Storage Server.
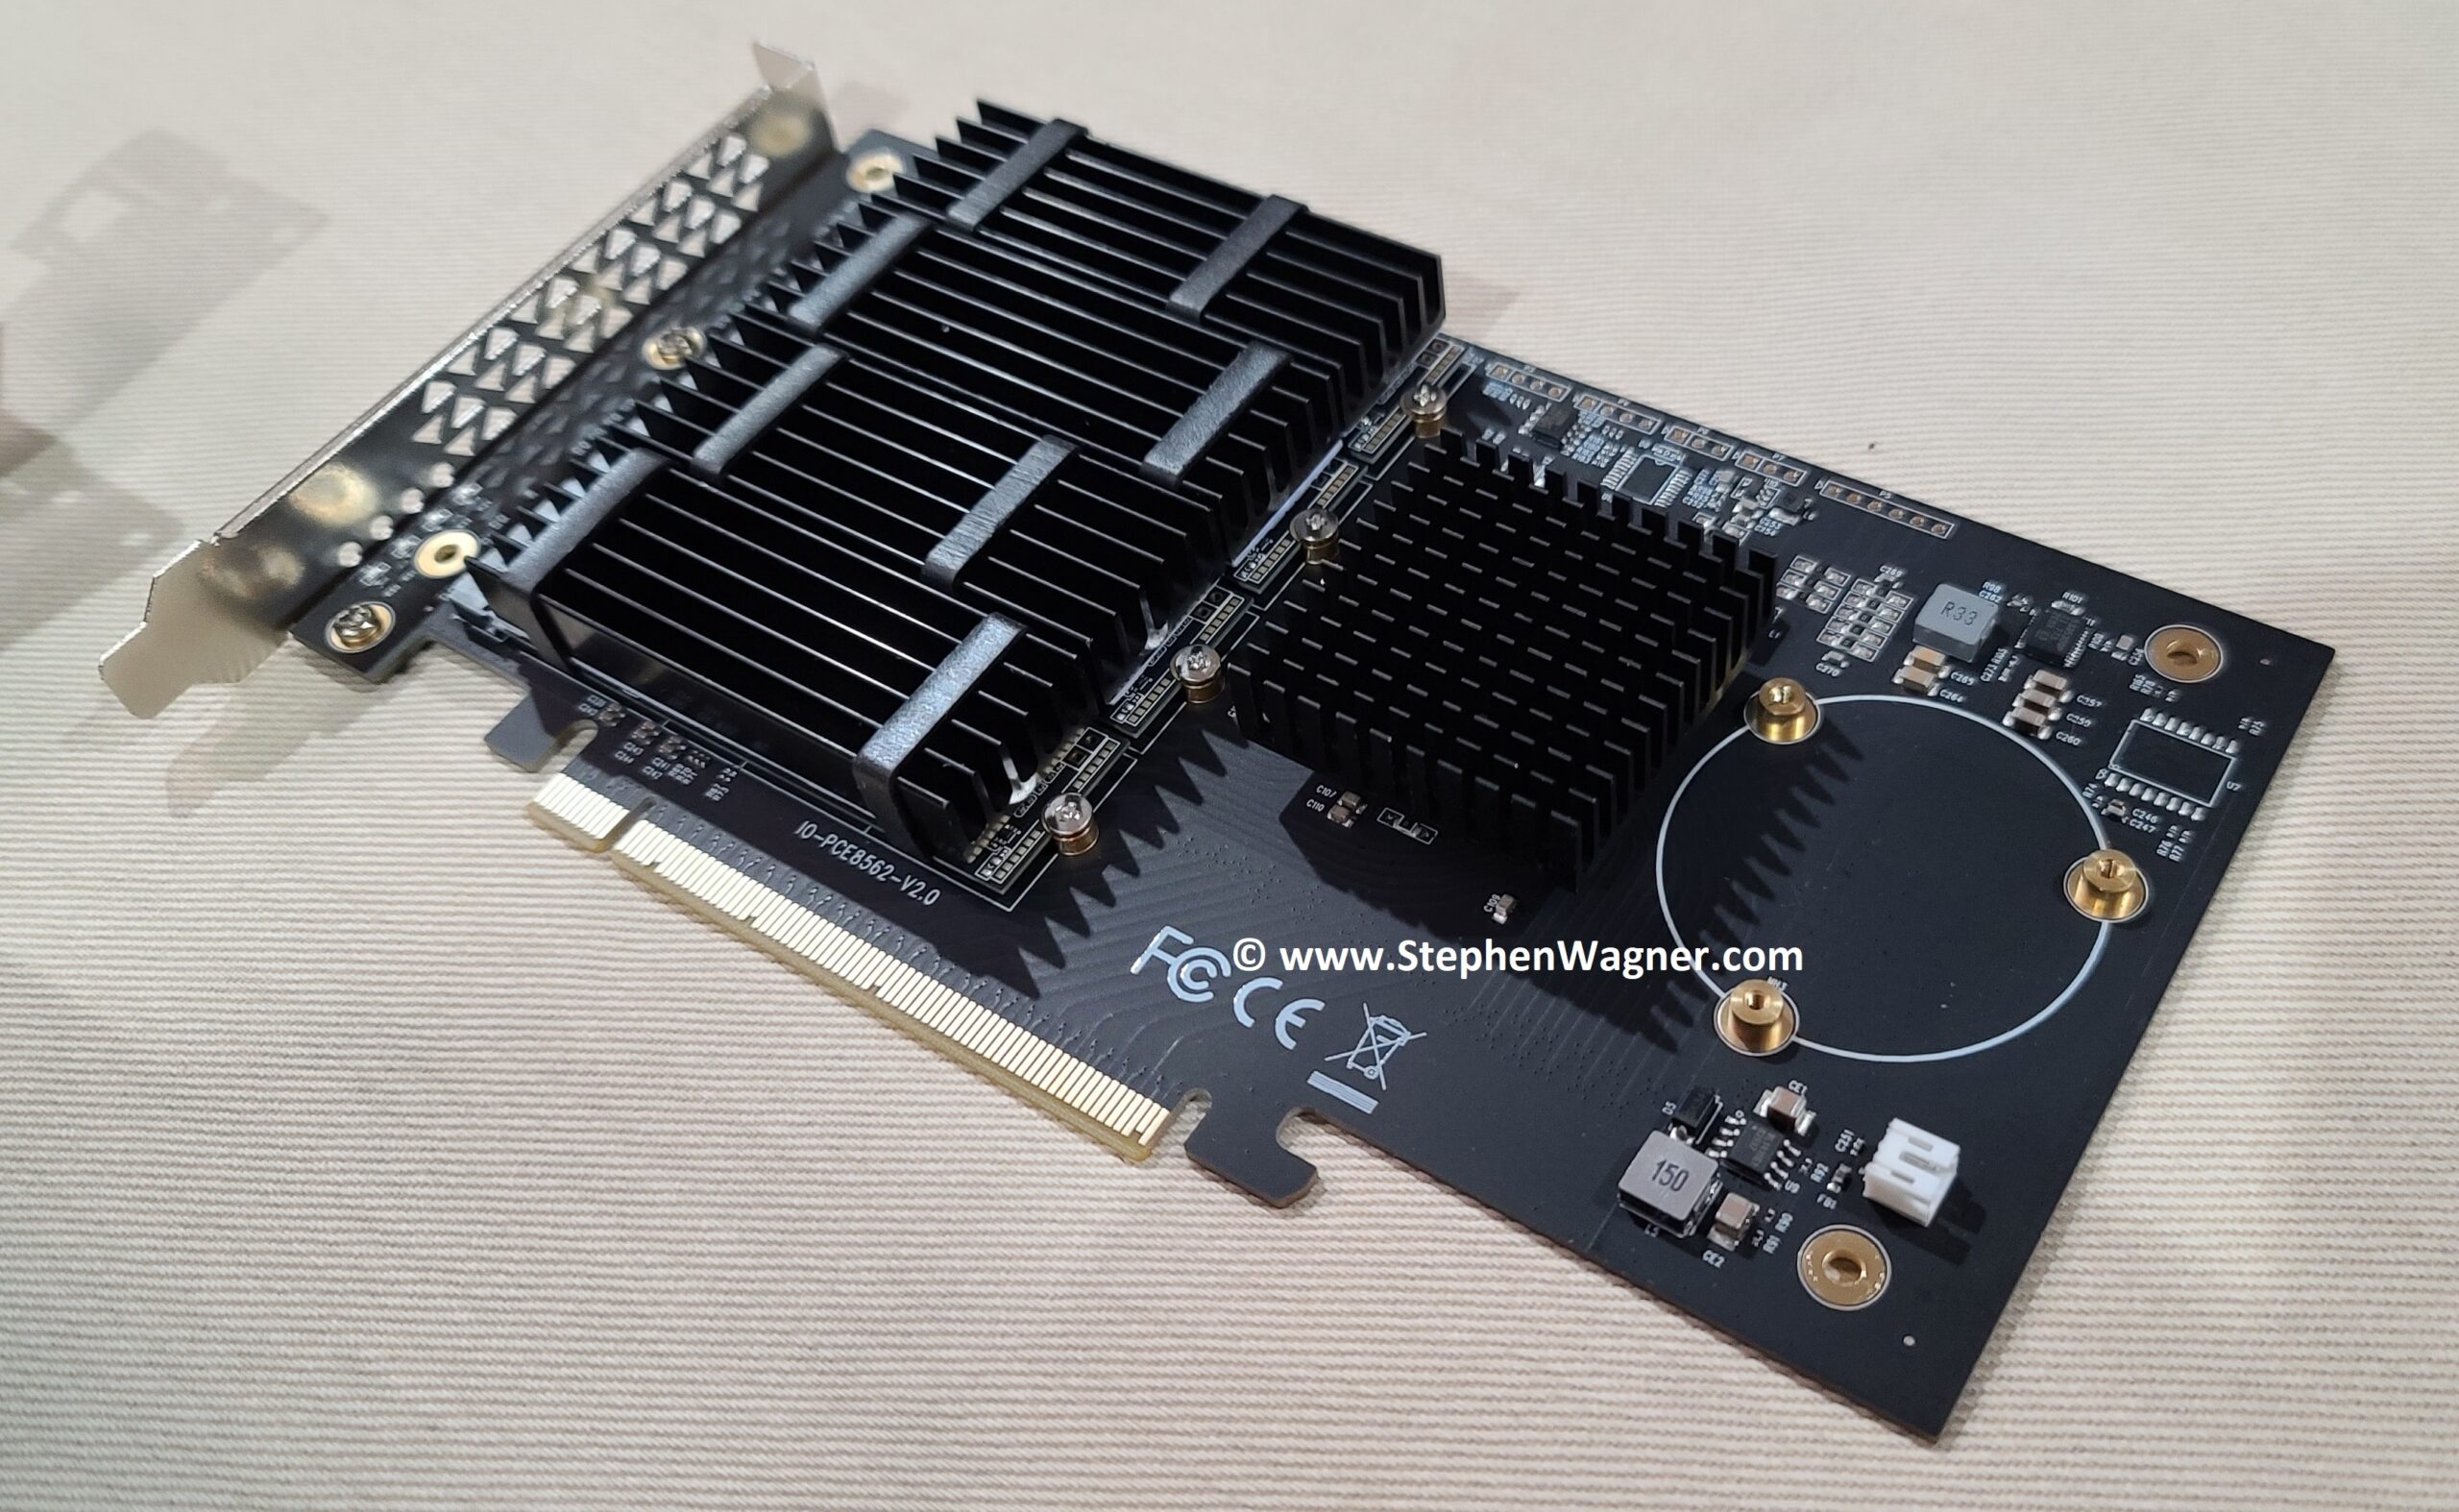
The first version of the NVMe Storage Server consisted of the IO-PEX40152 card with 4 x 2TB Sabrent Rocket 4 NVMe drives inside of an HPE Proliant DL360p Gen8 Server. The server was running ESXi with TrueNAS virtualized, and the PCIe card passed through to the TrueNAS VM.
The results were great, the performance was amazing, and both servers had access to the NFS export via 2 x 10Gb SFP+ networking.
There were three main problems with this setup:
Virtualized – Once a month I had an ESXi PSOD. This was either due to overheating of the IO-PEX40152 card because of modifications I made, or bugs with the DL360p servers and PCIe passthrough.
NFS instead of iSCSI – Because TrueNAS was virtualized inside of the host that was using it for storage, I had to use NFS since the host virtualizing TrueNAS would also be accessing the data on the TrueNAS VM. When shutting down the host, you need to shut down TrueNAS first. NFS disconnects are handled way healthier than iSCSI disconnects (which can cause corruption even if no files are being used).
CPU Cores maxed on data transfer – When doing initial testing, I was maxing out the CPU cores assigned to the TrueNAS VM because the data transfers were so high. I needed a CPU and setup that was better fit.
Version 1 went great, but you can see some things needed to be changed. I decided to go with a dedicated server, not virtualize TrueNAS, and go for a newer CPU with a higher Ghz speed.
And so, version 2 was born (built). Keep reading and scrolling for pictures!
The Hardware
On version 2 of the project, the hardware includes:
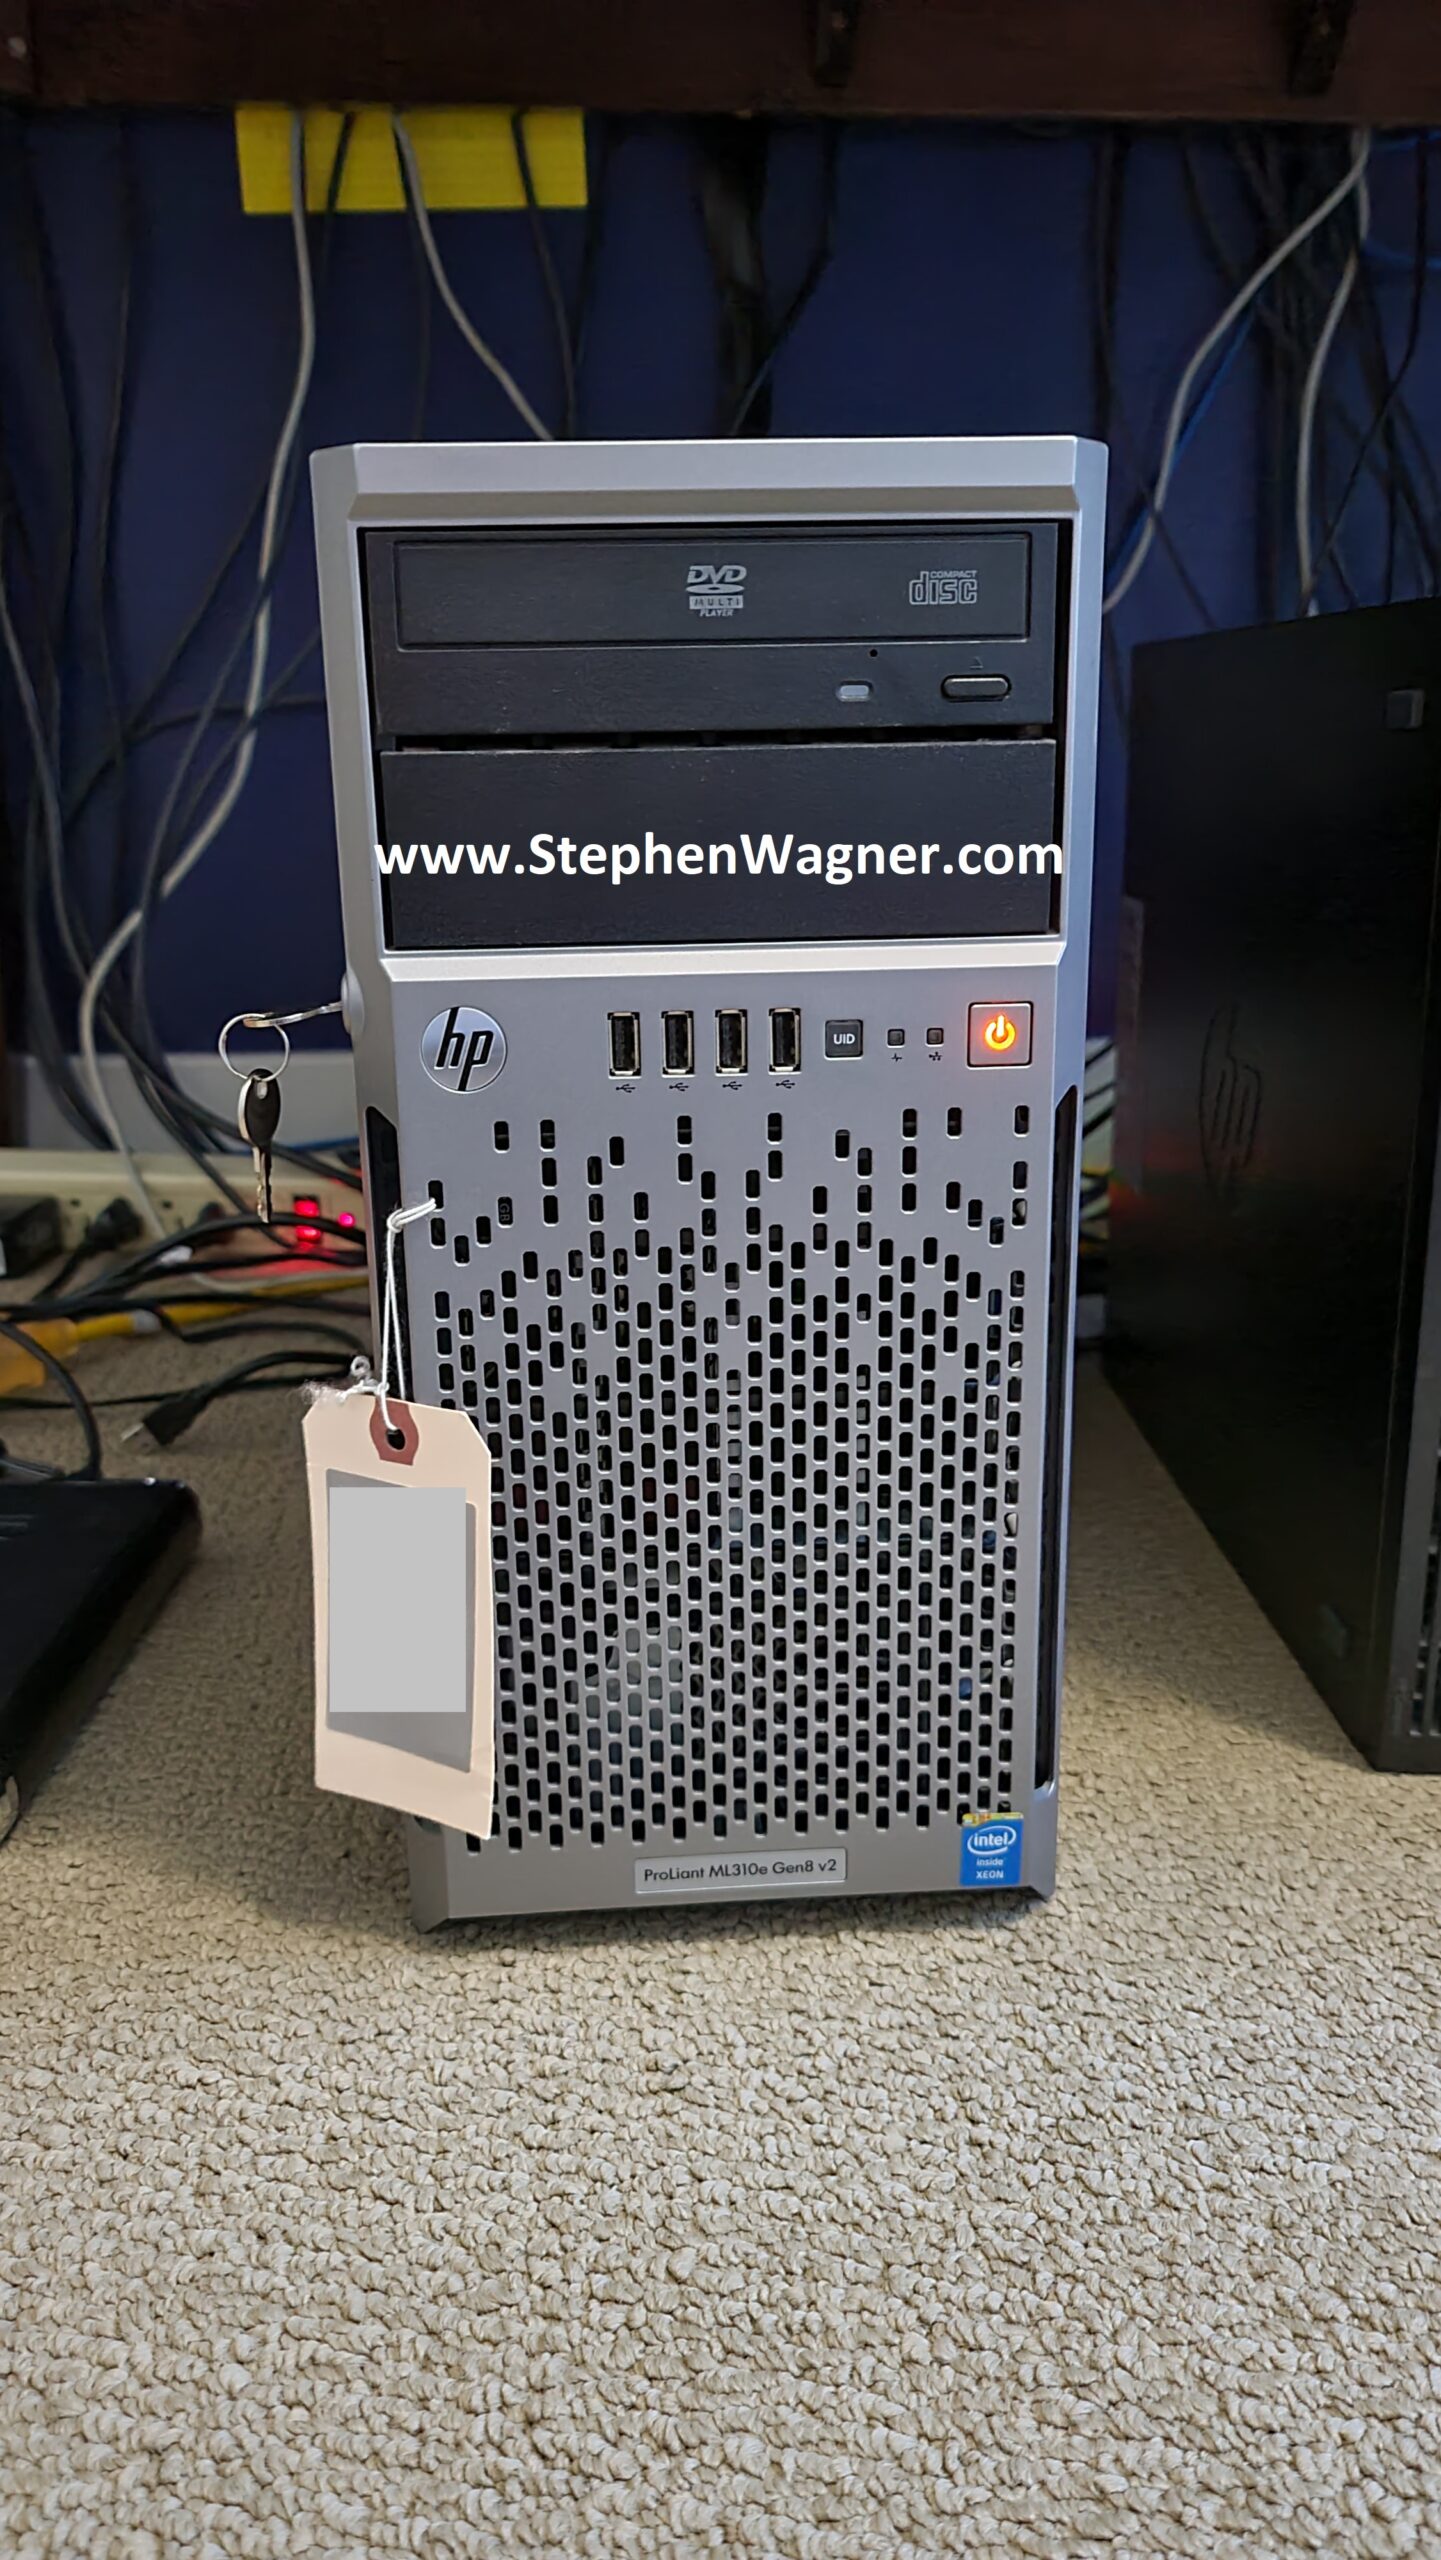
While the ML310e Gen8 v2 server is a cheap low entry server, it’s been a fantastic team member of my homelab.
HPE Dual 10G Port 560SFP+ adapters can be found brand new in unsealed boxes on eBay at very attractive prices. Using HPE Parts inside of HPE Servers, avoids the fans from spinning up fast.
The ML310e Gen8 v2 has some issues with passing through PCIe cards to ESXi. Works perfect when not passing through.
The new NVMe Storage Server
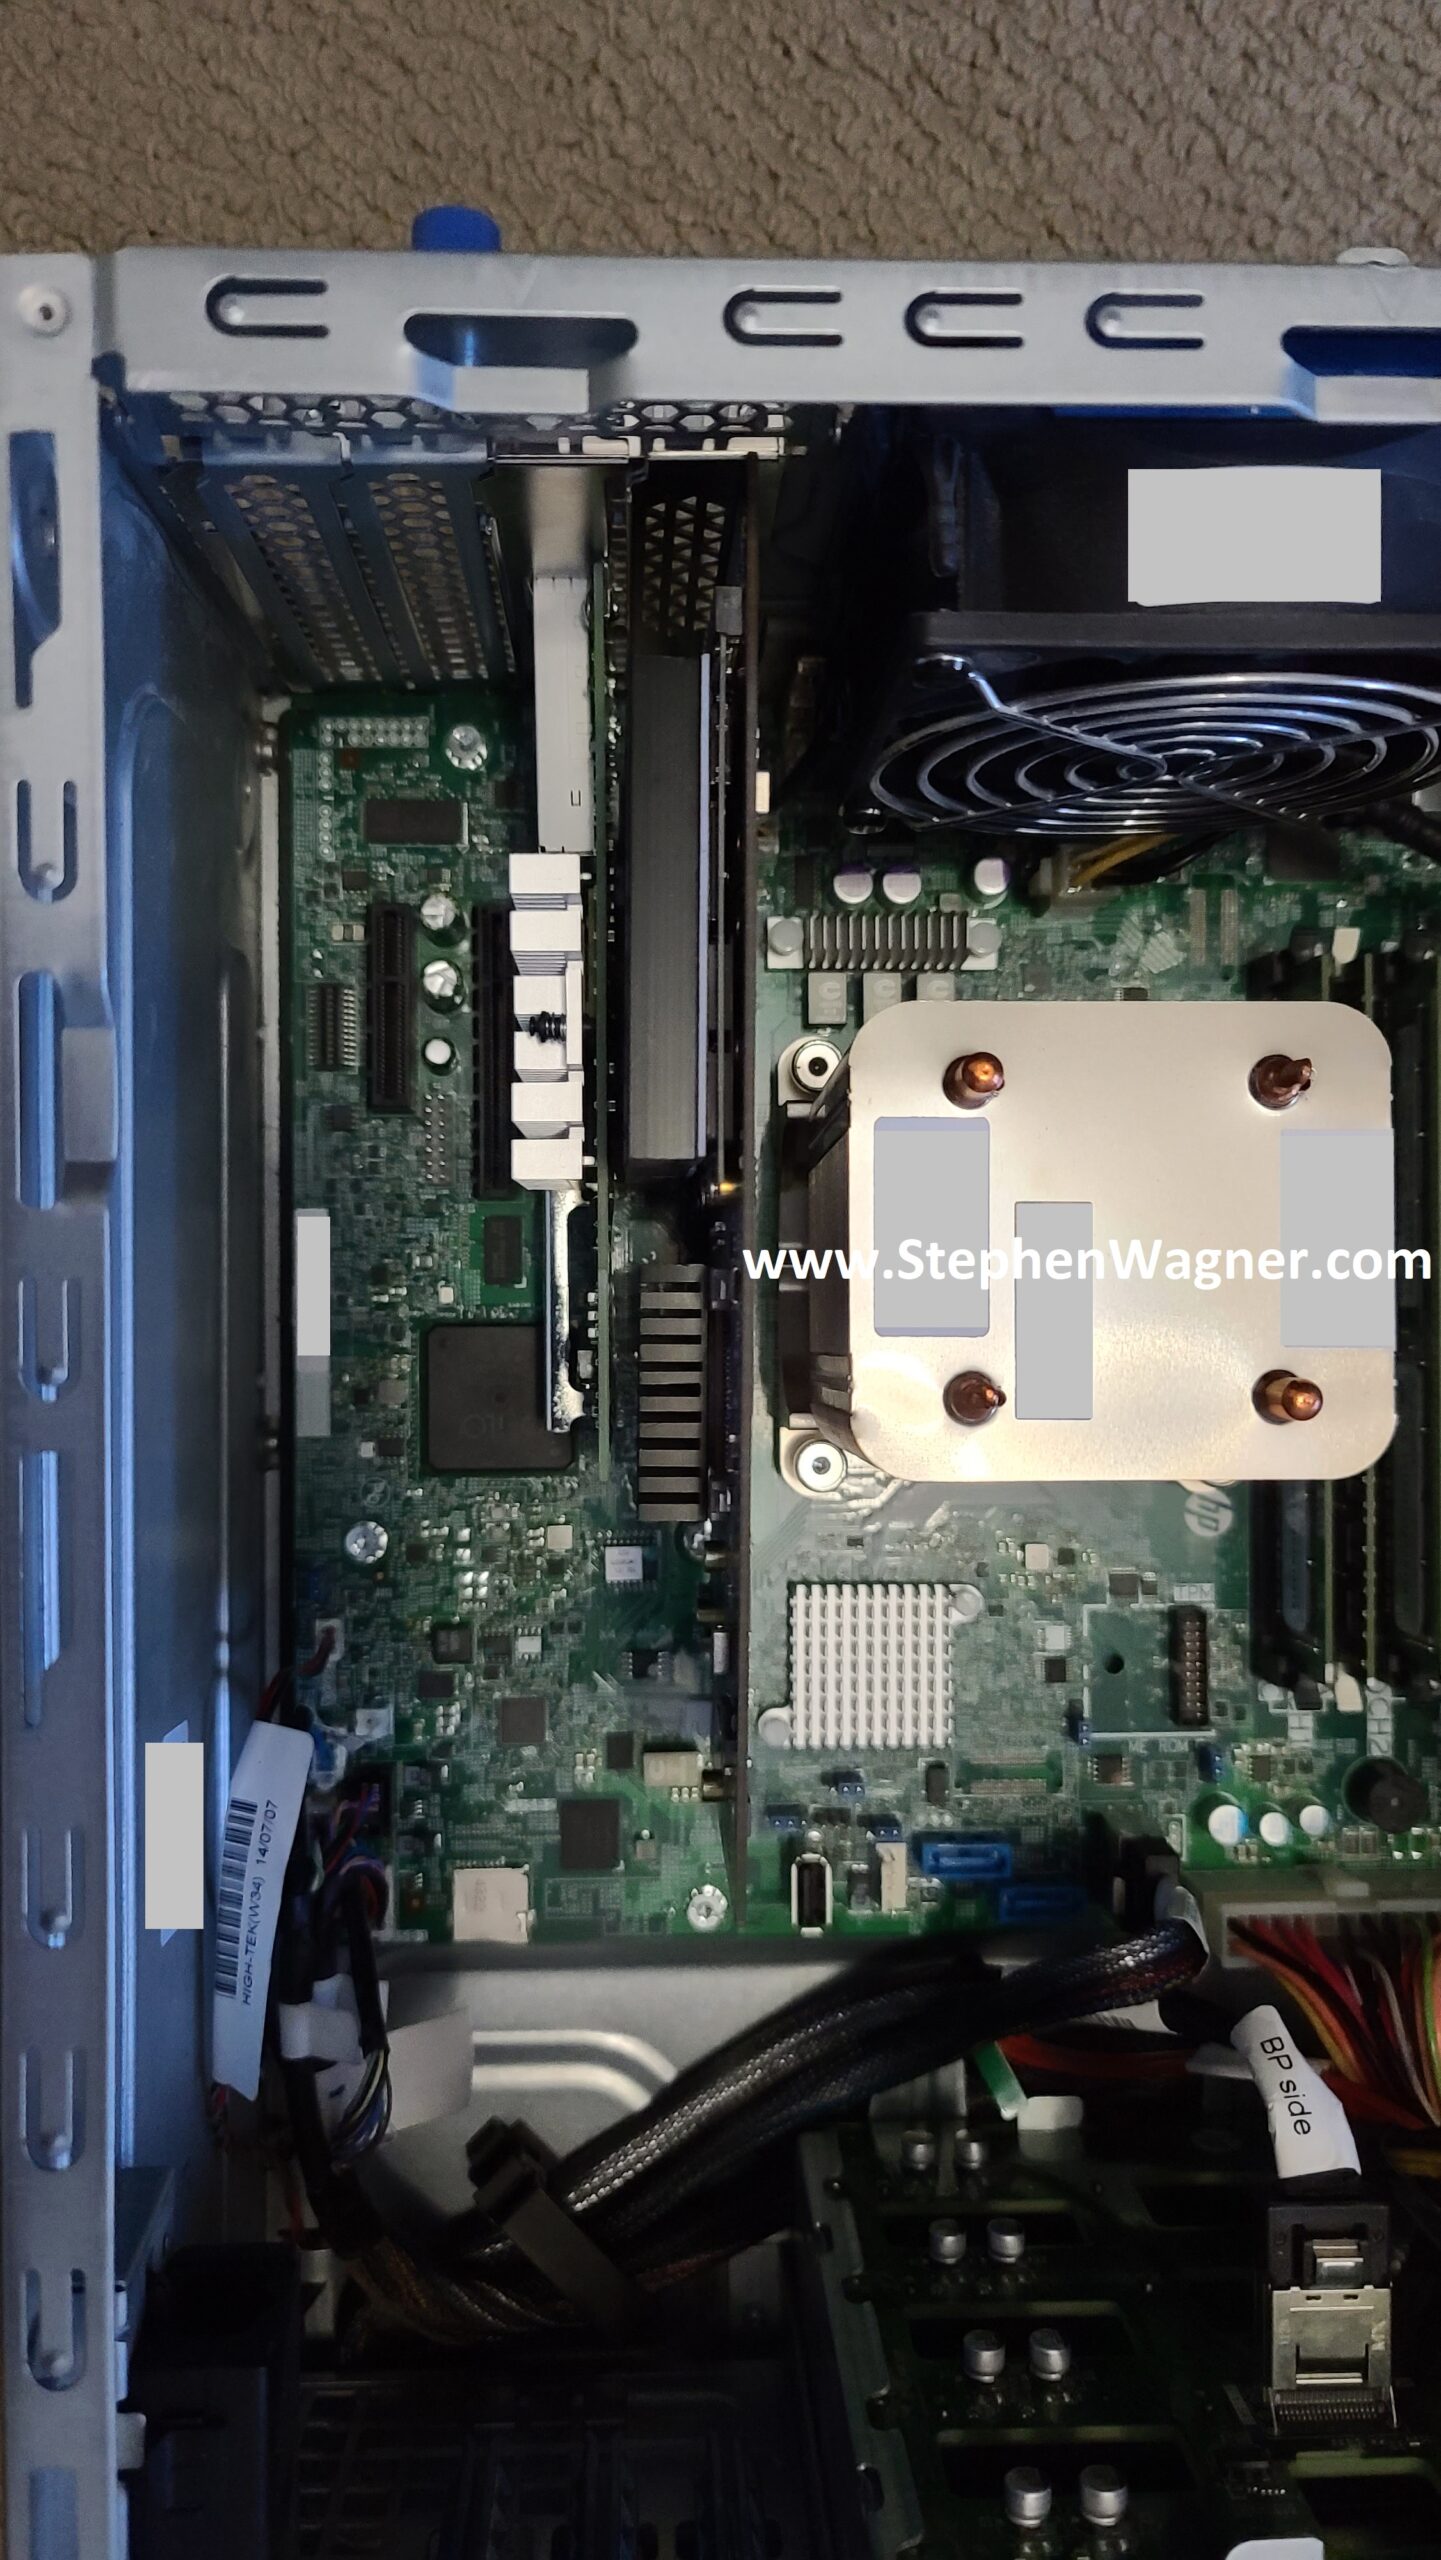
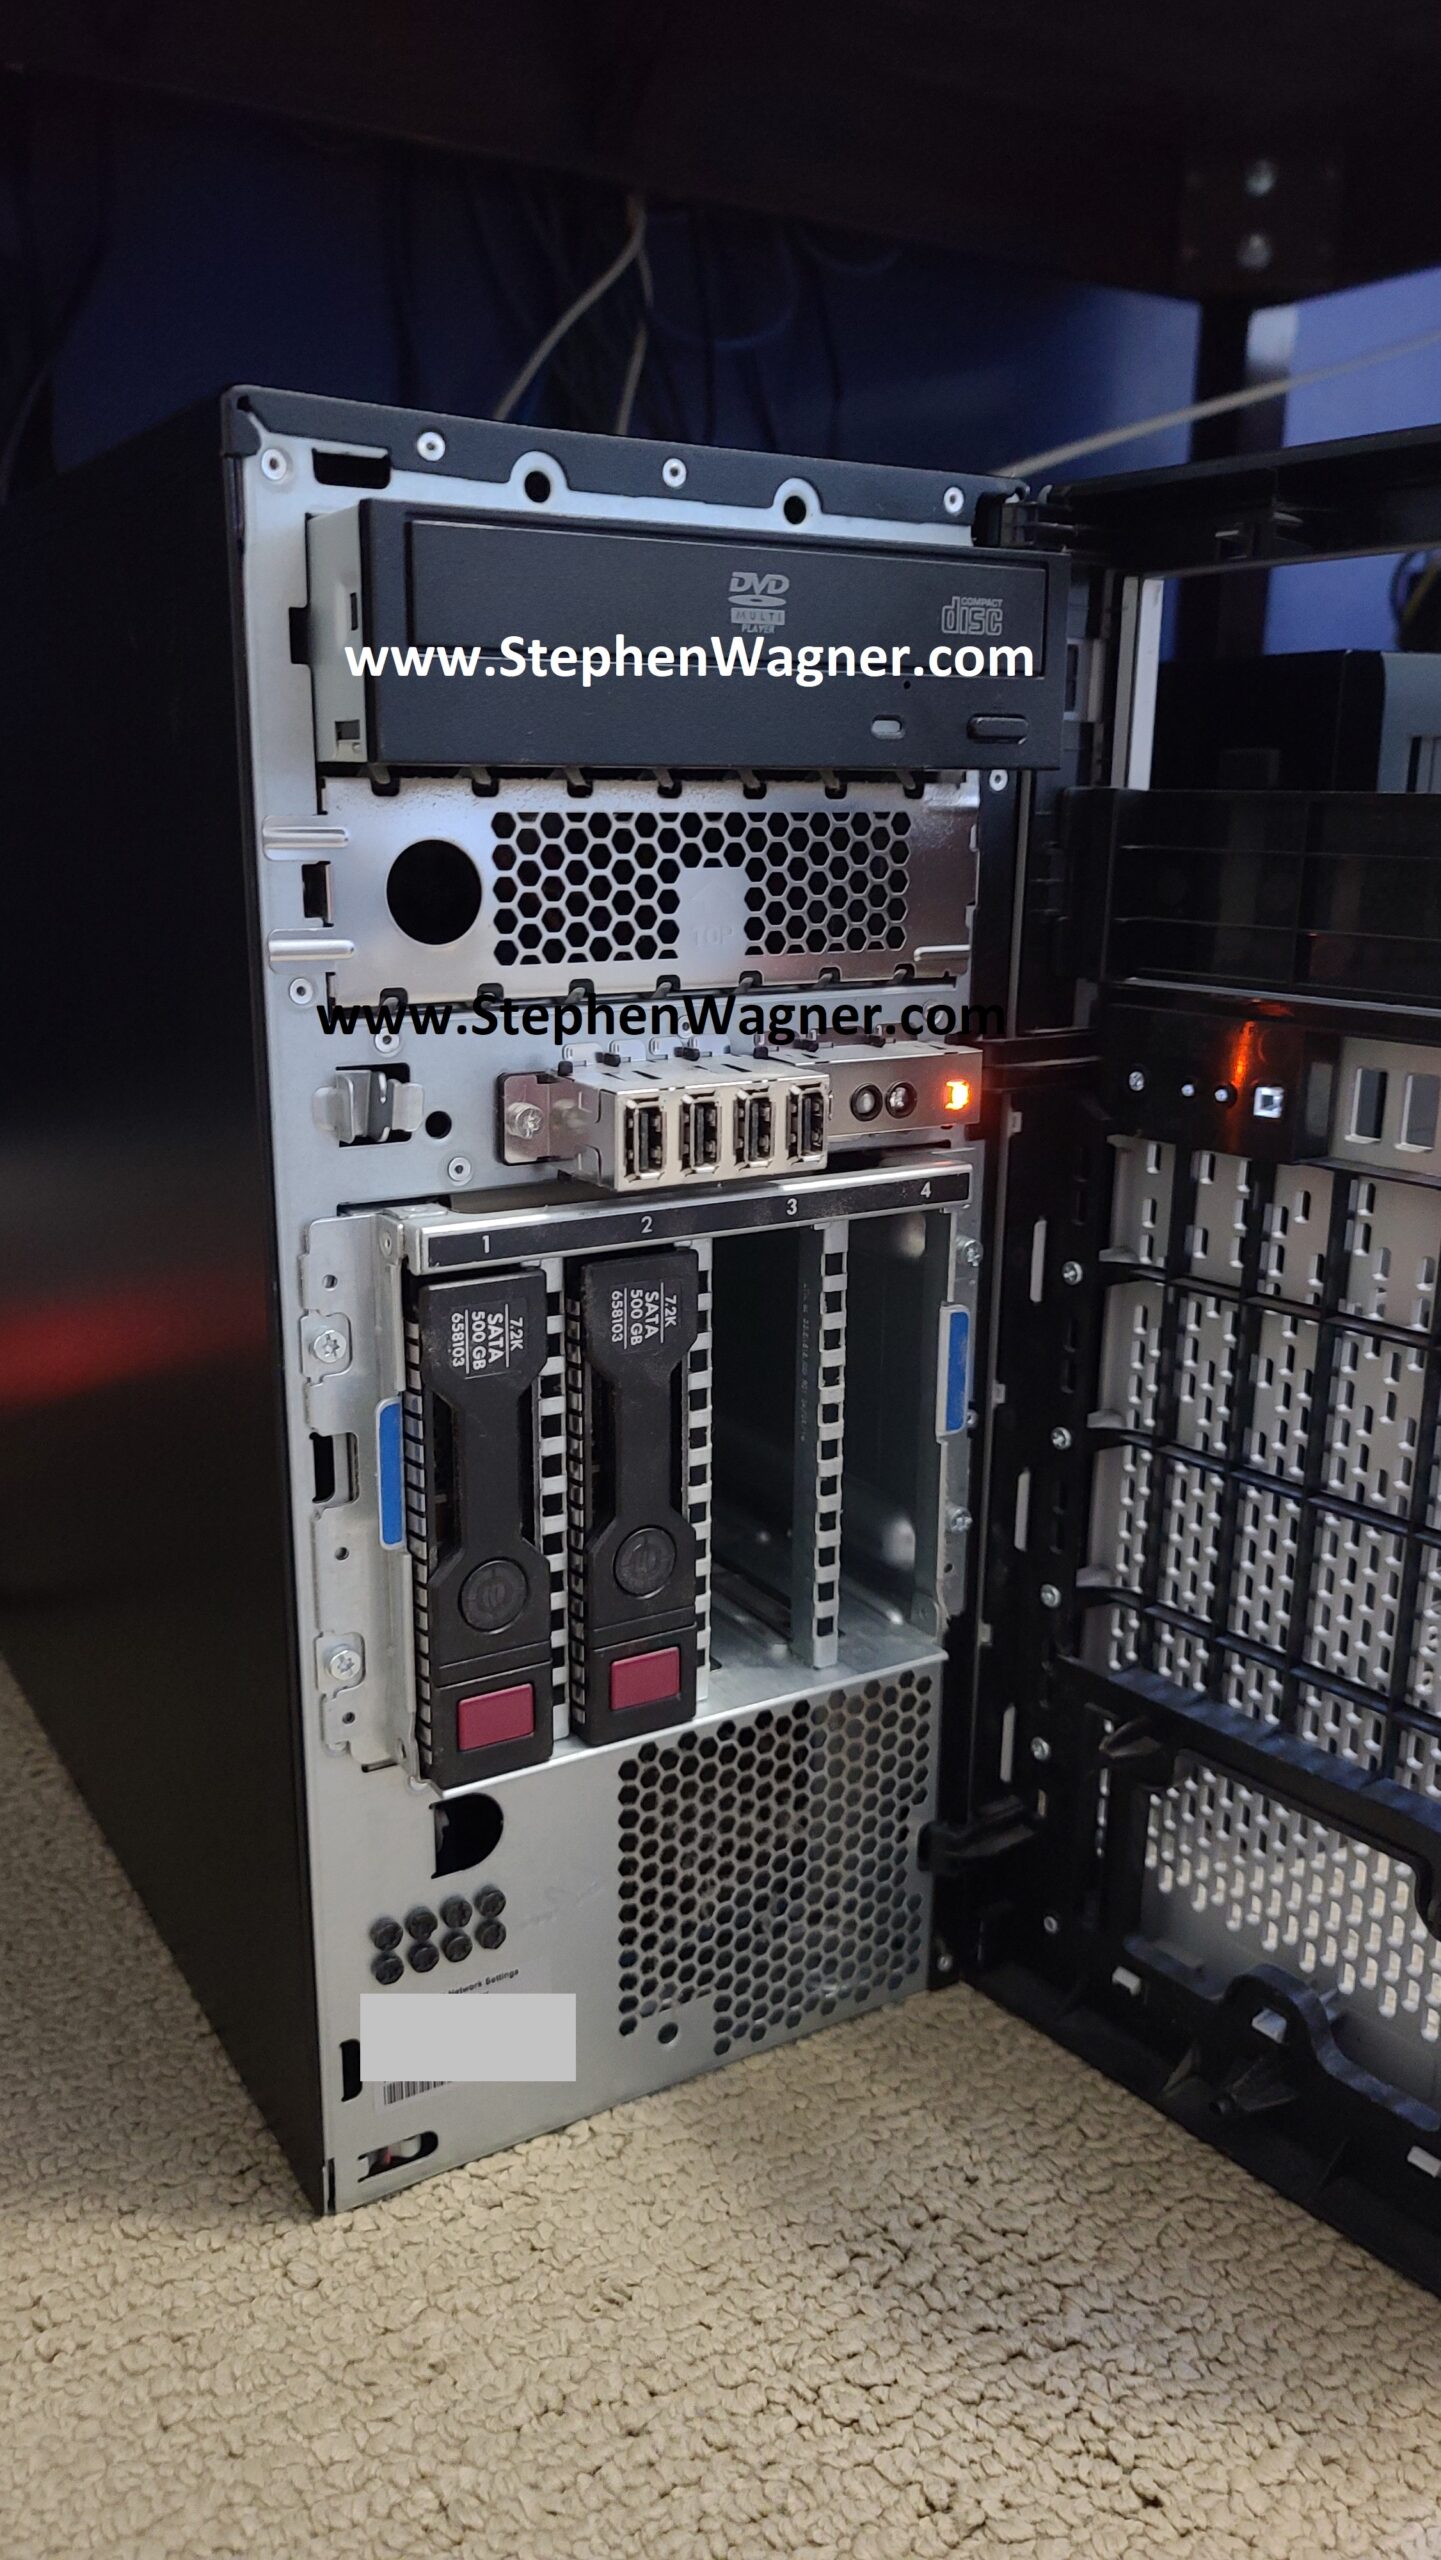
I decided to repurpose an HPE Proliant ML310e Gen8 v2 Server. This server was originally acting as my Nvidia Grid K1 VDI server, because it supported large PCIe cards. With the addition of my new AMD S7150 x2 hacked in/on to one of my DL360p Gen8’s, I no longer needed the GRID card in this server and decided to repurpose it.
HPe ML310e Gen8 v2 with NVMe Storage
I installed the IOCREST IO-PEX40152 card in to the PCIe 16x slot, with 4 x 2TB Sabrent Rocket 4 NVME drives.
IOCREST IO-PEX40152 with GLOTRENDS M.2 NVMe SSD Heatsink on Sabrent Rocket 4 NVME
While the server has a PCIe 16x wide slot, it only has an 8x bus going to the slot. This means we will have half the capable speed vs the true 16x slot. This however does not pose a problem because we’ll be maxing out the 10Gb NICs long before we max out the 8x bus speed.
HPE ML310e Gen8 v2 with IOCREST IO-PEX40152HPE ML310e Gen8 v2 with IOCREST IO-PEX40152
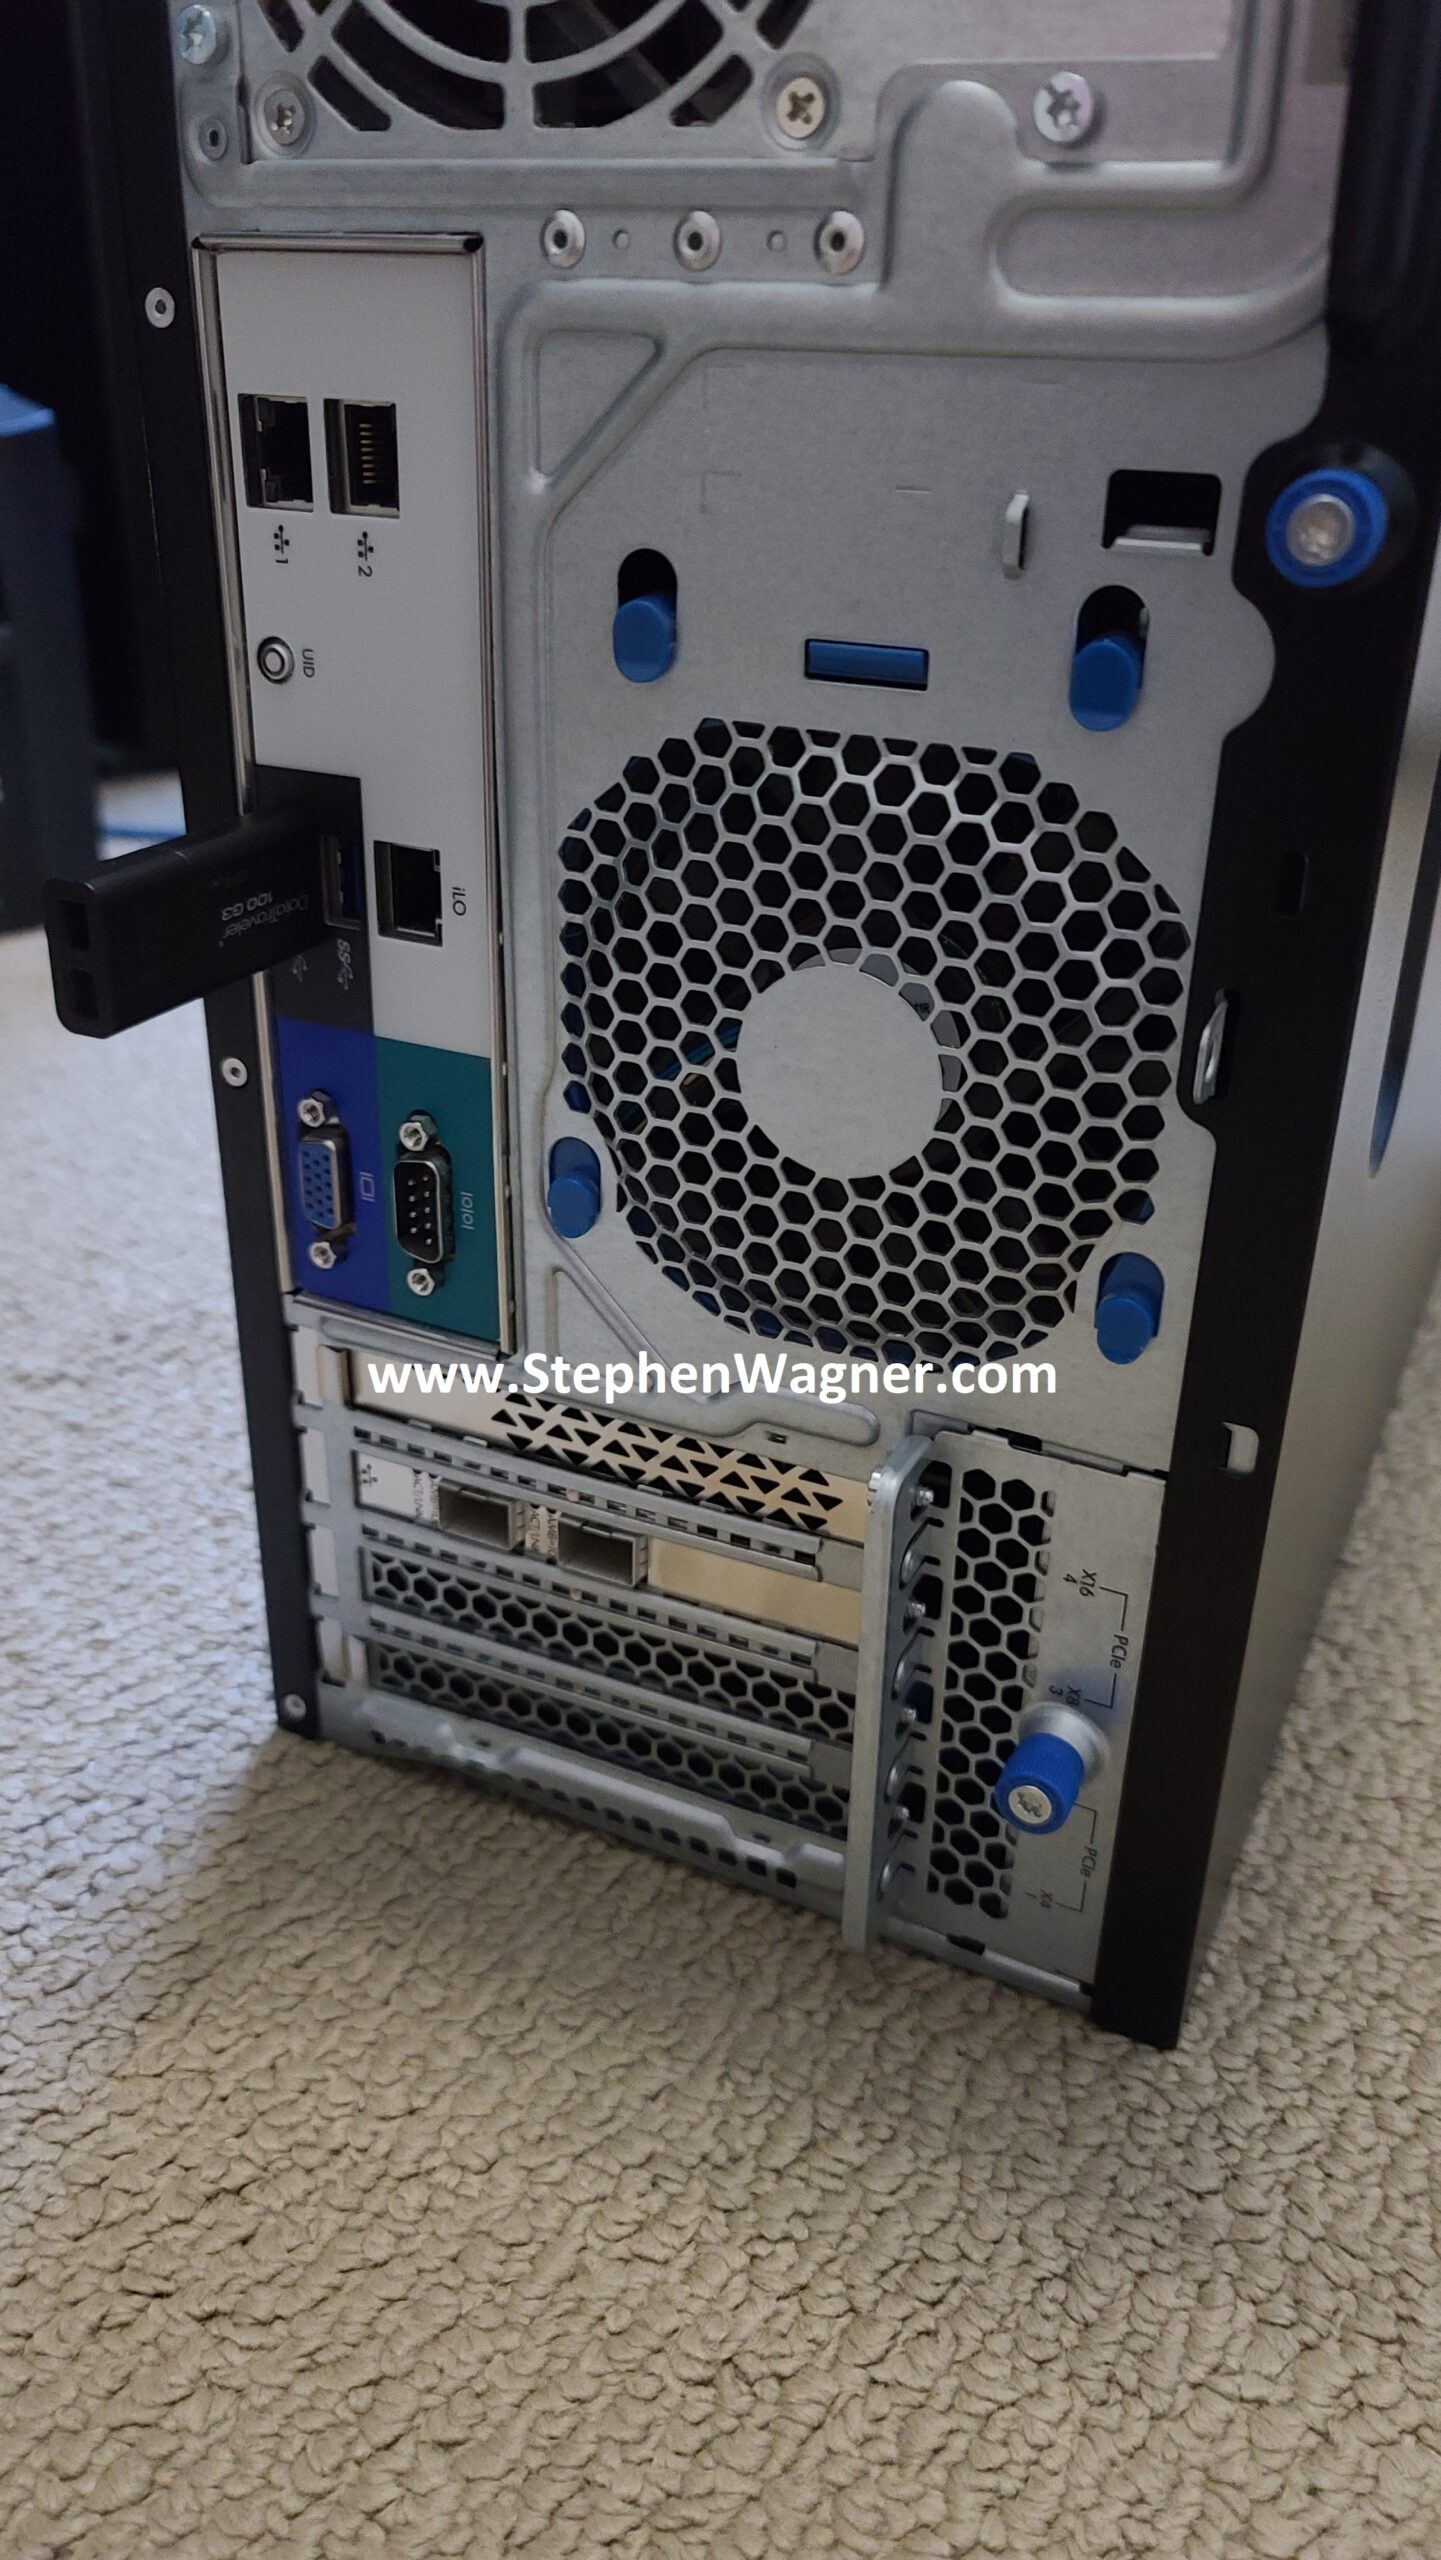
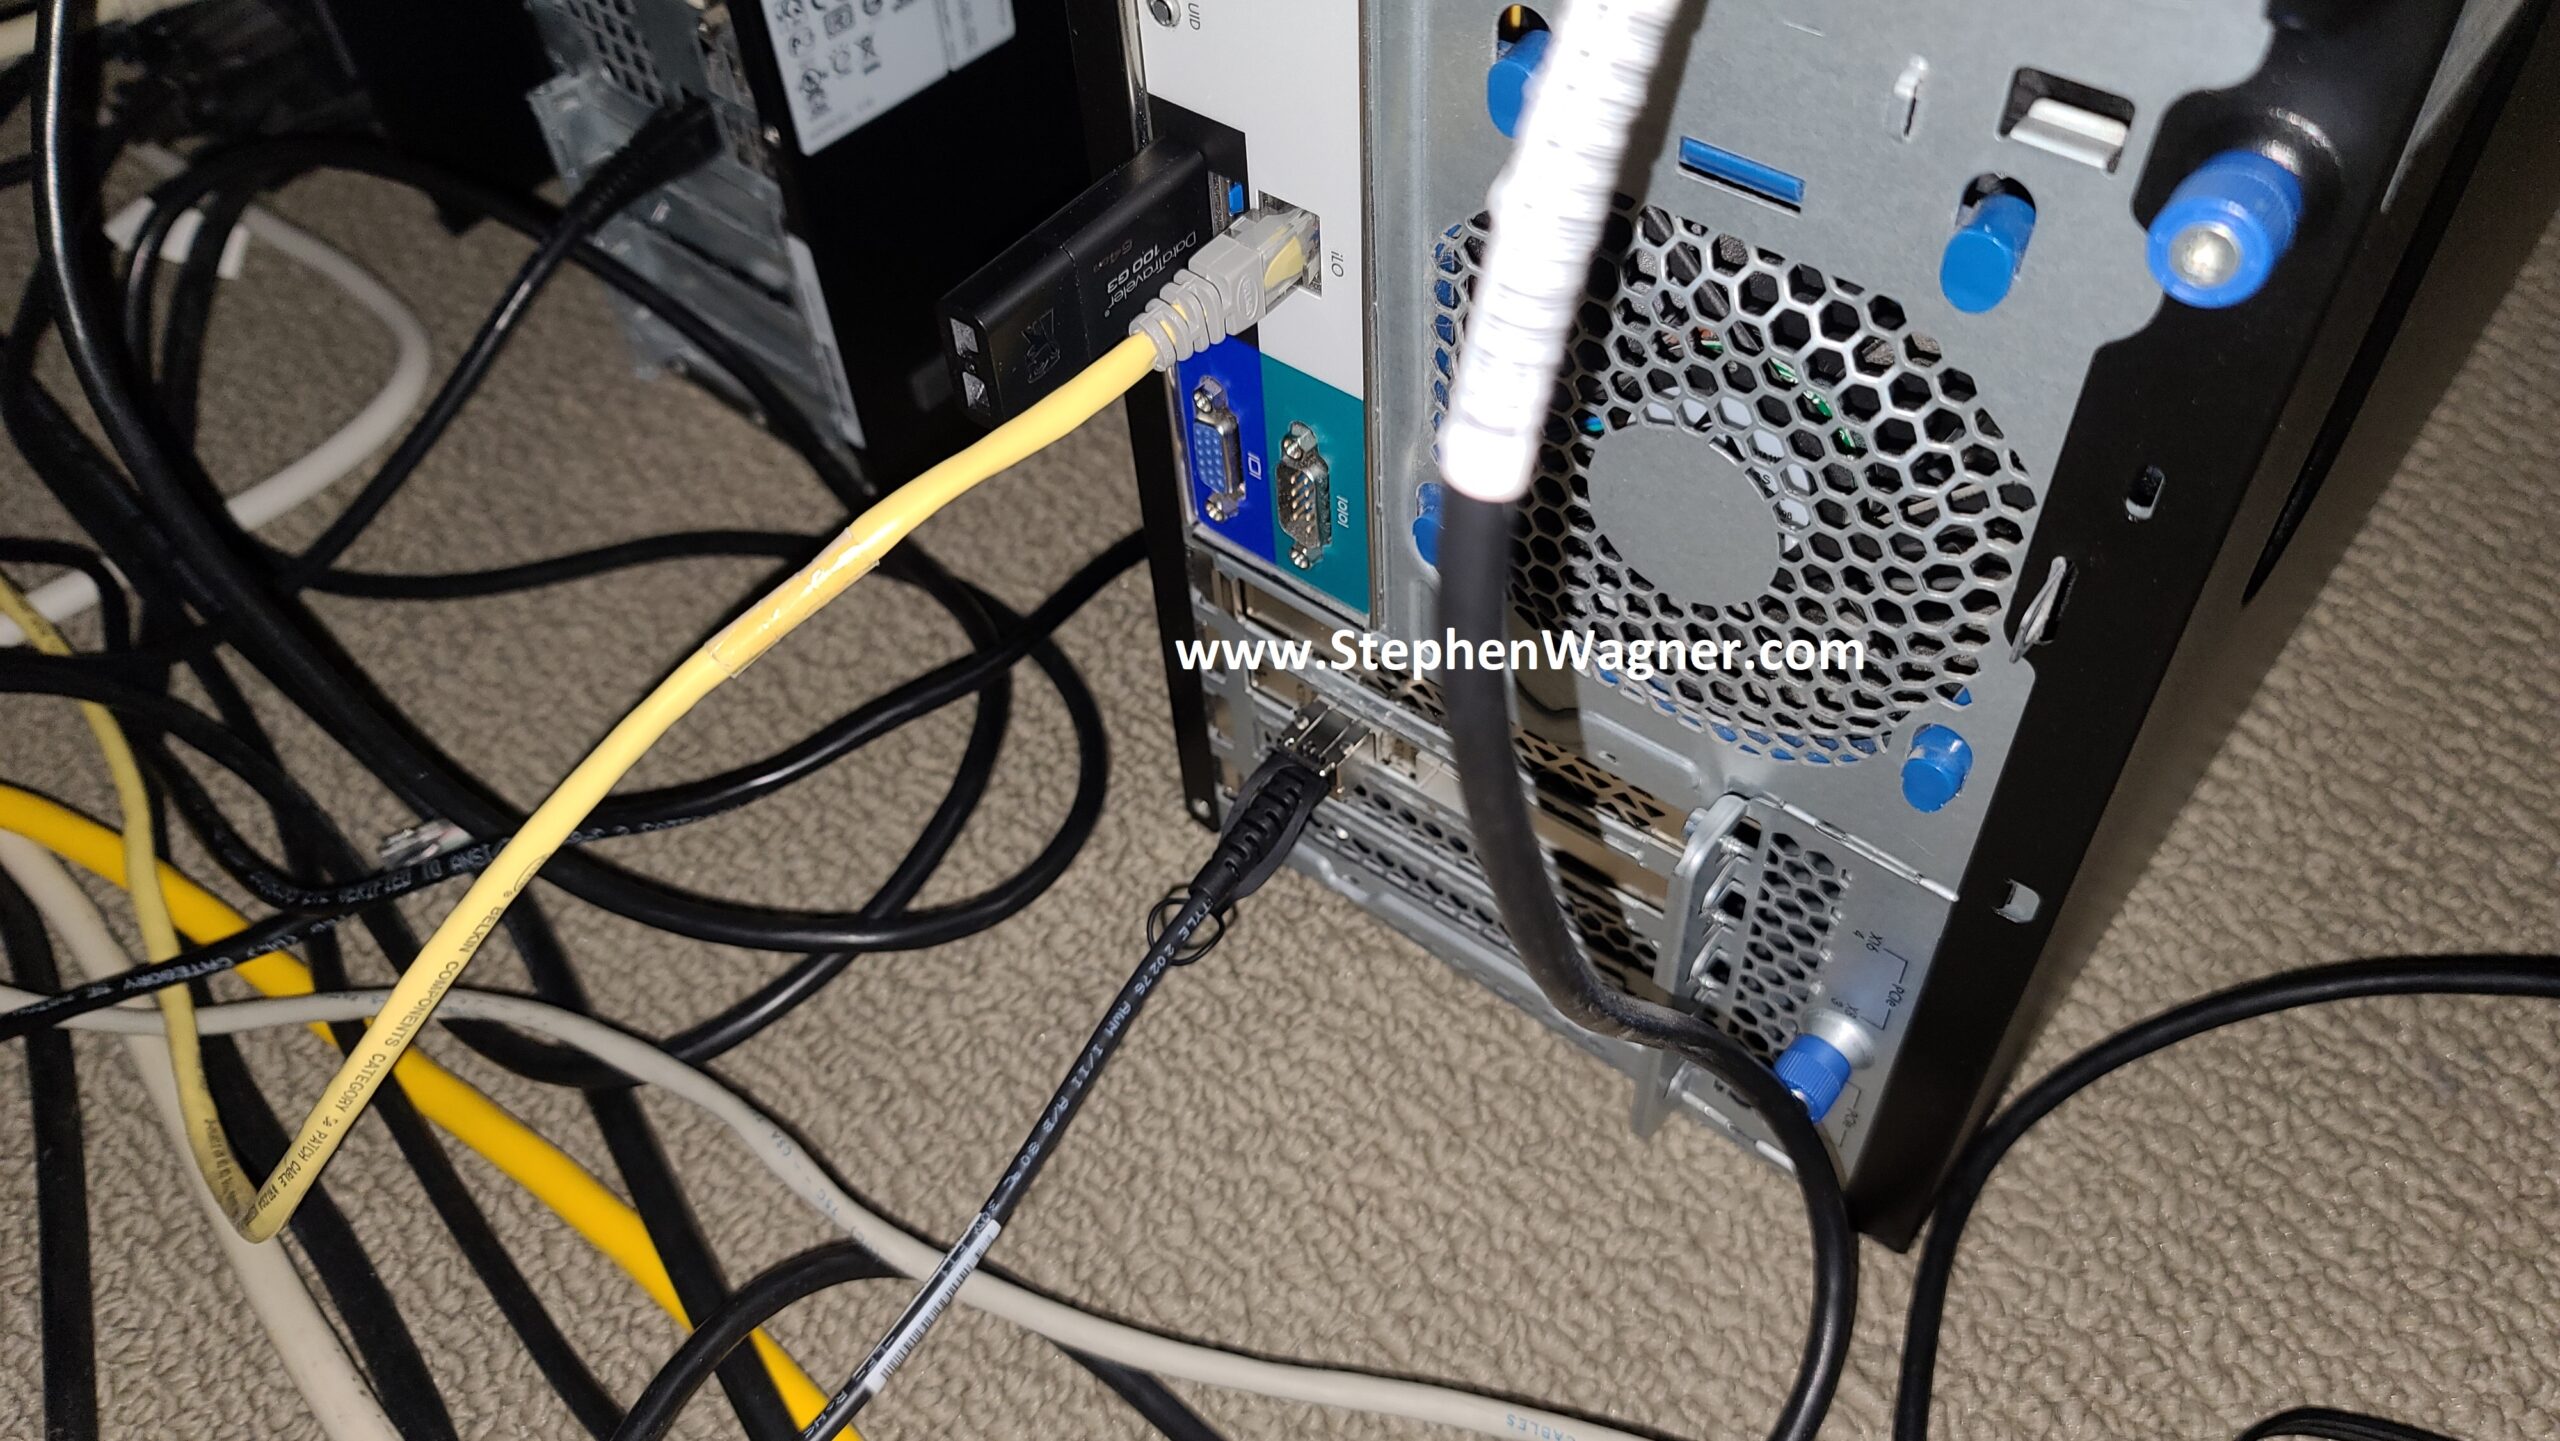
I also installed an HPE Dual Port 560SFP+ NIC in to the second slot. This will allow a total of 2 x 10Gb network connections from the server to the Ubiquiti UniFi US-16-XG 10Gb network switch, the backbone of my network.
HPE ML310e Gen8 v2 with HPE 560SFP+ and 10Gig DACHPE ML310e Gen8 v2 with HPE 560SFP+ and 10Gig DAC
The Server also have 4 x Hot Swappable HD bays on the front. When configured in HBA mode (via the BIOS), these are accessible by TrueNAS and can be used. I plan on populating these with 4 x 4TB HPE MDL SATA Hot Swappable drives to act as a replication destination for the NVMe pool and/or slower magnetic long-term storage.
HPE ML310e Gen8 v2 with Hotswap Drive bays
I may also try to give WD RED Pro drives a try, but I’m not sure if they will cause the fans to speed up on the server.
TrueNAS Installation and Configuration
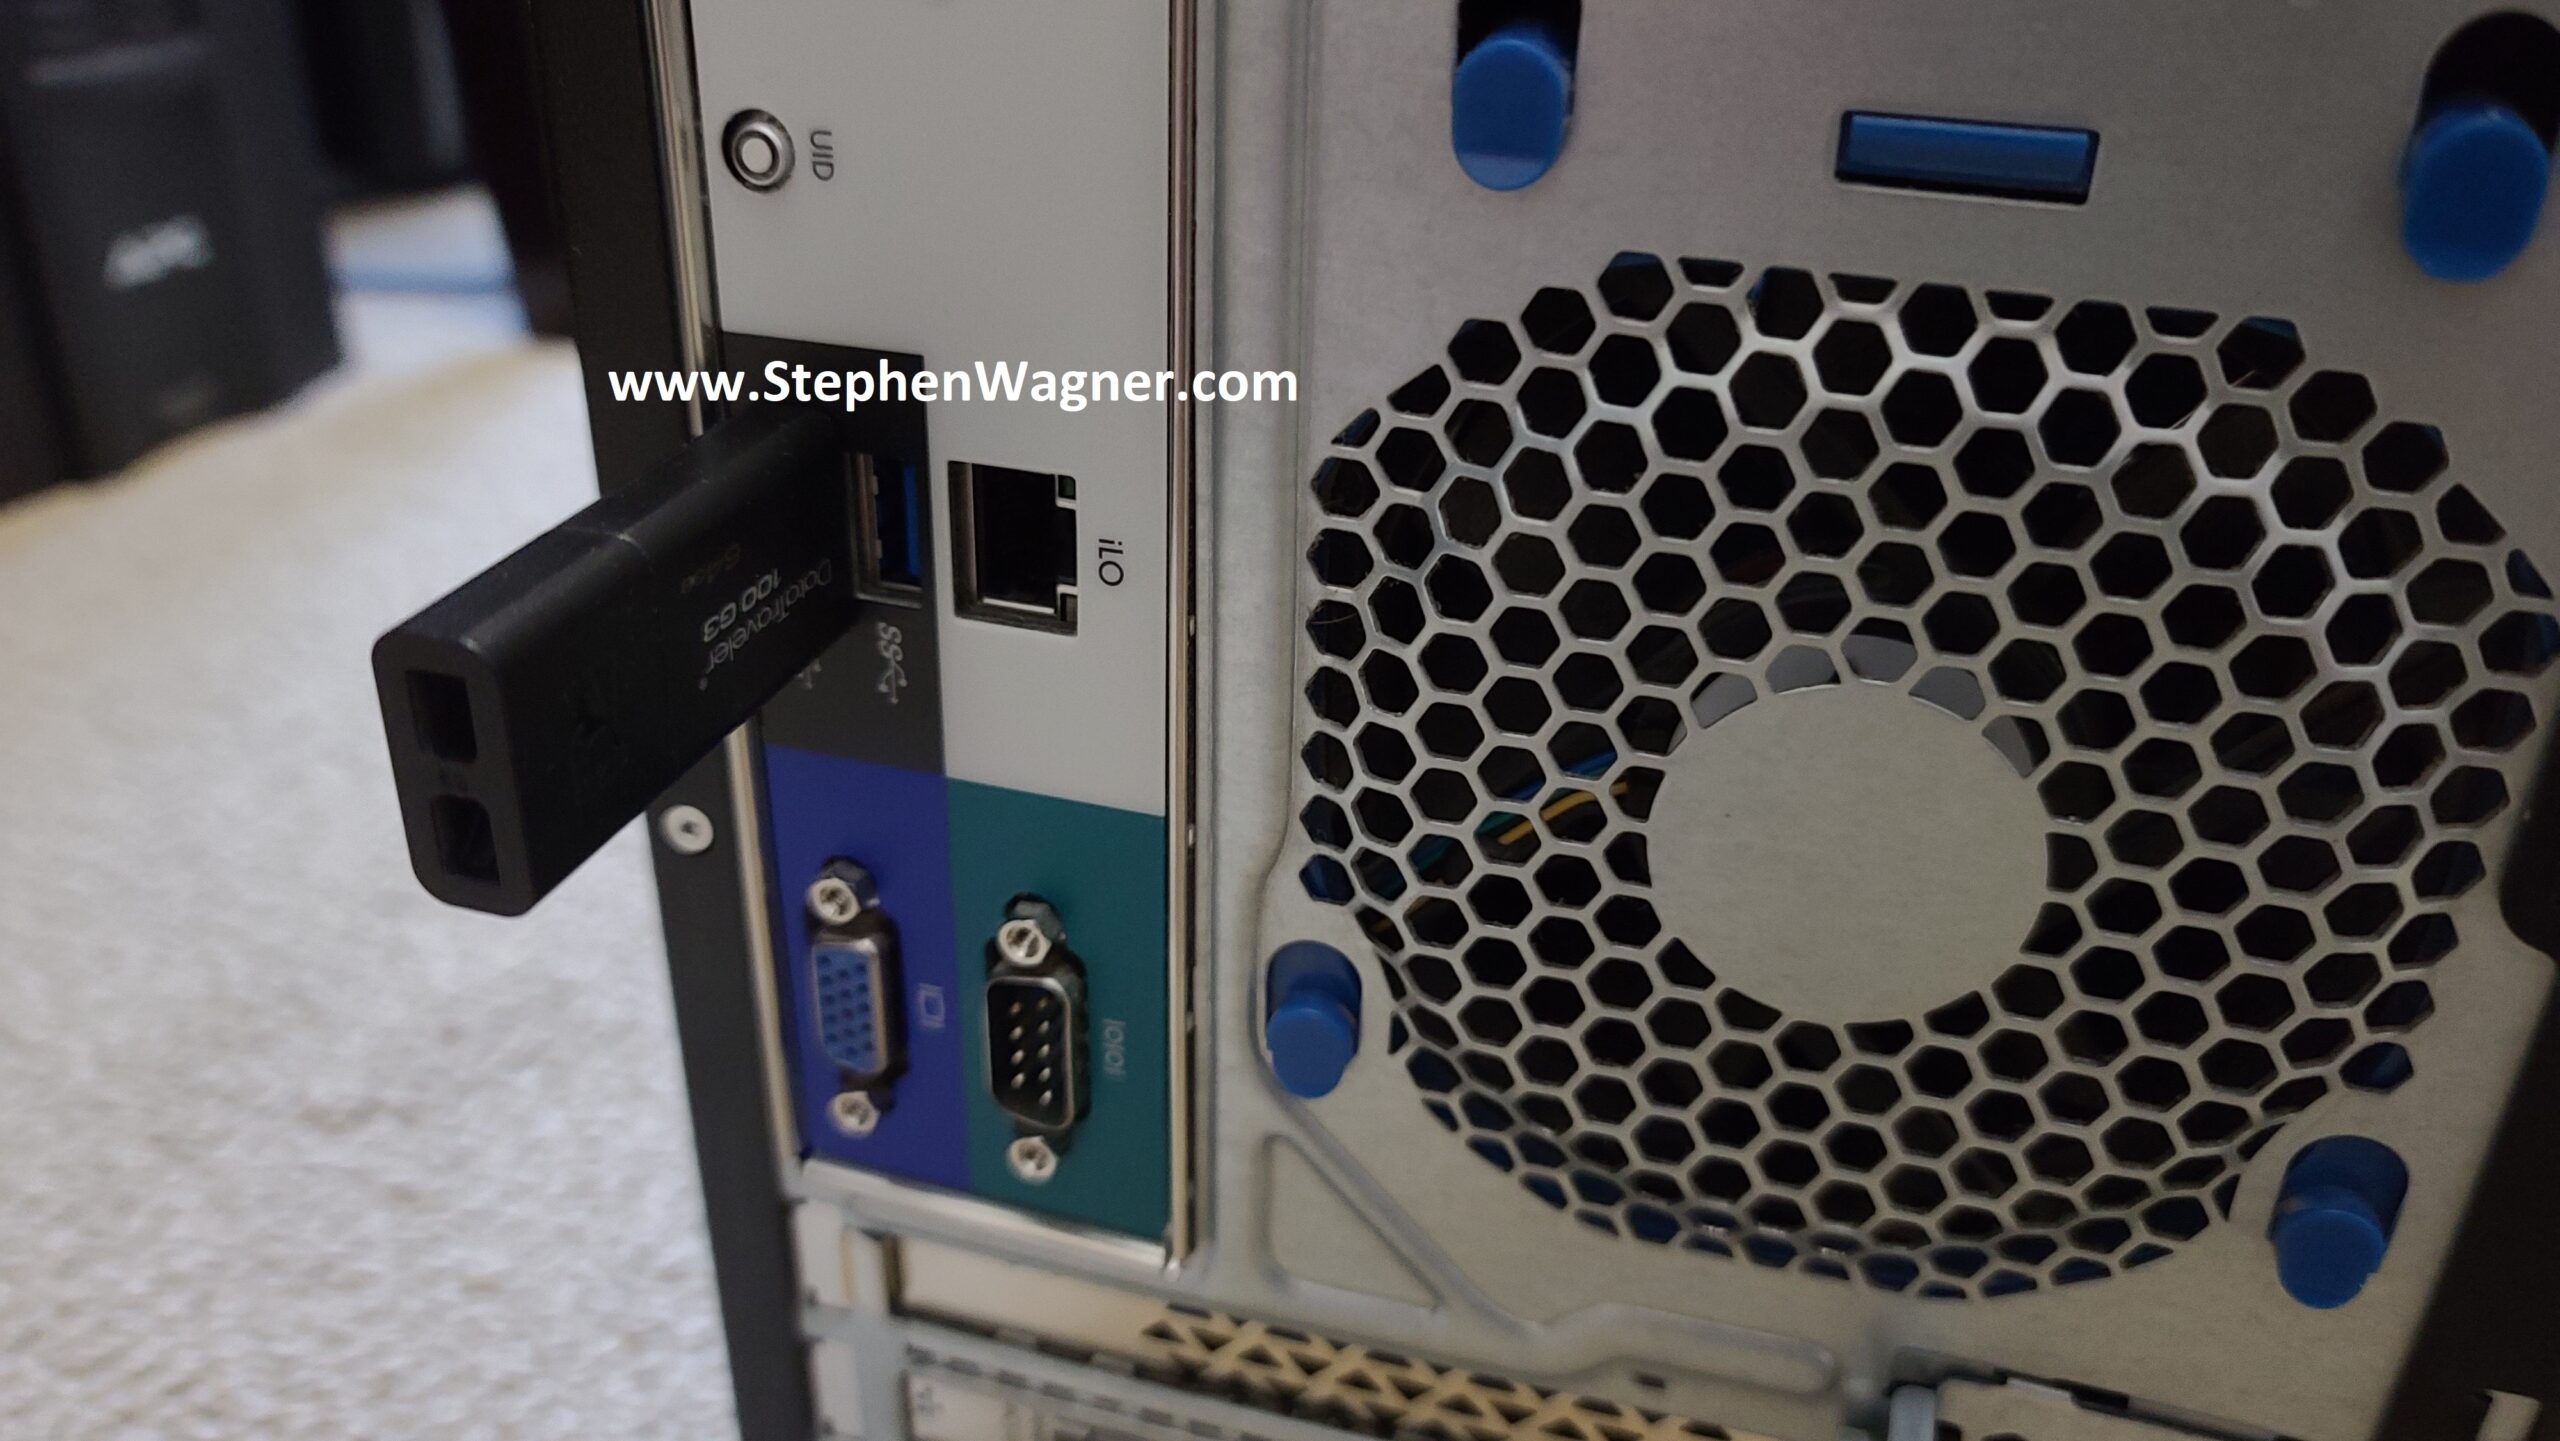
For the initial Proof-Of-Concept for version 2, I decided to be quick and dirty and install it to a USB stick. I also waited until I installed TrueNAS on to the USB stick and completed basic configuration before installing the Quad NVMe PCIe card and 10Gb NIC. I’m using a USB 3.0 port on the back of the server for speed, as I can’t verify if the port on the motherboard is USB 2 or USB 3.
TrueNAS USB Stick on HPE ML310e Gen8 v2
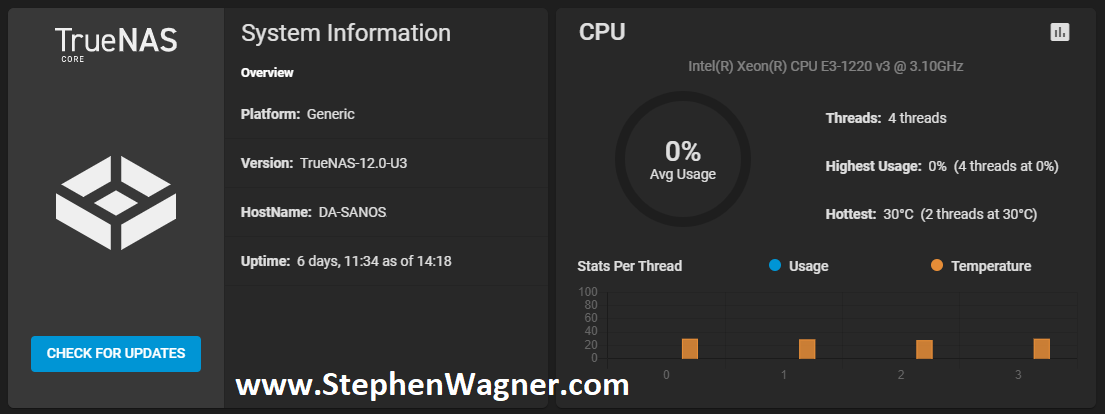
TrueNAS installation worked without any problems whatsoever on the ML310e. I configured the basic IP, time, accounts, and other generic settings. I then proceeded to install the PCIe cards (storage and networking).
TrueNAS Installed on NVMe Storage Server
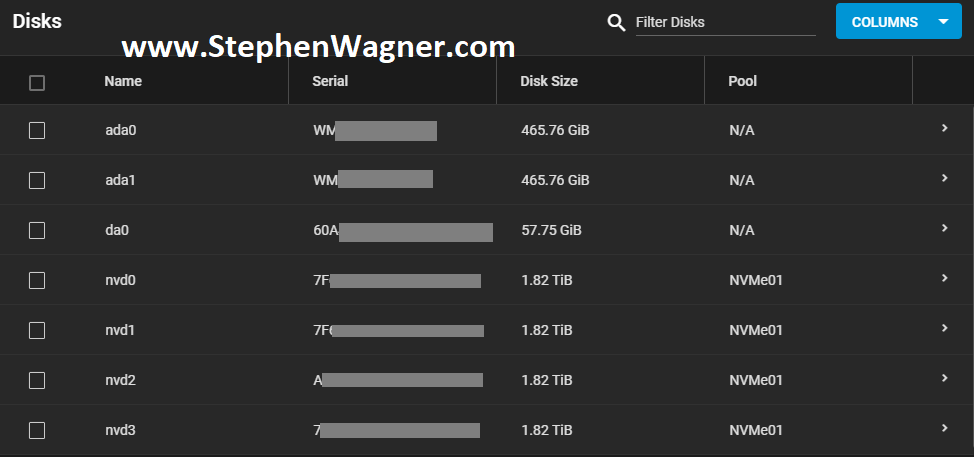
All NVMe drives were recognized, along with the 2 HDDs I had in the front Hot-swap bays (sitting on an HP B120i Controller configured in HBA mode).
TrueNAS NVMe Disks
The 560SFP+ NIC also was detected without any issues and available to configure.
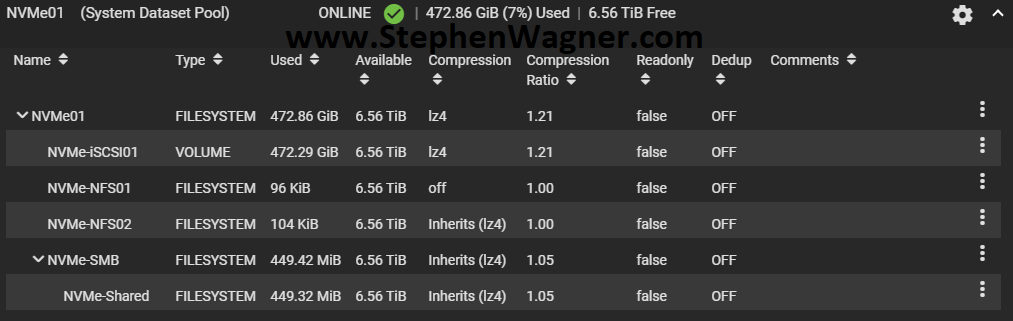
I created a striped pool (no redundancy) of all 4 x 2TB NVMe drives. This gave us around 8TB of usable high speed NVMe storage. I also created some datasets and a zVOL for iSCSI.
NVMe TrueNAS Storage Pool with Datasets and zVol
I chose to go with the defaults for compression to start with. I will be testing throughput and achievable speeds in the future. You should always test this in every and all custom environments as the results will always vary.
Network Configuration
Initial configuration was done via the 1Gb NIC connection to my main LAN network. I had to change this as the 10Gb NIC will be directly connected to the network backbone and needs to access the LAN and Storage VLANs.
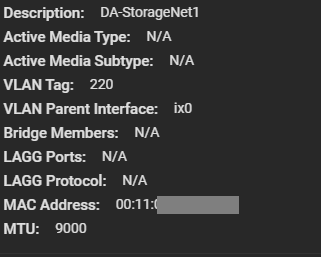
I went ahead and configured a VLAN Interface on VLAN 220 for the Storage network. Connections for iSCSI and NFS will be made on this network as all my ESXi servers have vmknics configured on this VLAN for storage. I also made sure to configure an MTU of 9000 for jumbo frames (packets) to increase performance. Remember that all hosts must have the same MTU to communicate.
10Gb NIC on Storage VLAN
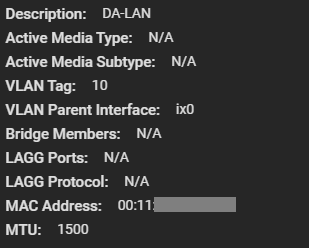
Next up, I had to create another VLAN interface for the LAN network. This would be used for management, as well as to provide Windows File Share (SMB/Samba) access to the workstations on the network. We leave the MTU on this adapter as 1500 since that’s what my LAN network is using.
10Gb NIC on LAN VLAN
As a note, I had to delete the configuration for the existing management settings (don’t worry, it doesn’t take effect until you hit test) and configure the VLAN interface for my LANs VLAN and IP. I tested the settings, confirmed it was good, and it was all setup.
At this point, only the 10Gb NIC is now being used so I went ahead and disconnected the 1Gb network cable.
Sharing Setup and Configuration
It’s now time to configure the sharing protocols that will be used. As mentioned before, I plan on deploying iSCSI, NFS, and Windows File Shares (SMB/Samba).
iSCSI and NFS Configuration
Normally, for a VMware ESXi virtualization environment, I would always usually prefer iSCSI based storage, however I also wanted to configure NFS to test throughput of both with NVMe flash storage.
Earlier, I created the datasets for all my my NFS exports and a zVOL volume for iSCSI.
Note, that in order to take advantage of the VMware VAAI storage directives (enhancements), you must use a zVOL to present an iSCSI target to an ESXi host.
For NFS, you can simply create a dataset and then export it.
For iSCSI, you need to create a zVol and then configure the iSCSI Target settings and make it available.
SMB (Windows File Shares)
I needed to create a Windows File Share for file based storage from Windows computers. I plan on using the Windows File Share for high-speed storage of files for video editing.
Using the dataset I created earlier, I configured a Windows Share, user accounts, and tested accessing it. Works perfect!
Connecting the host
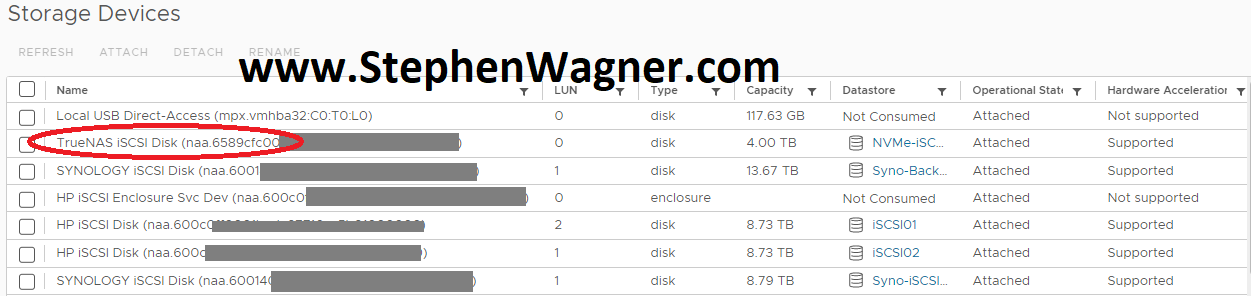
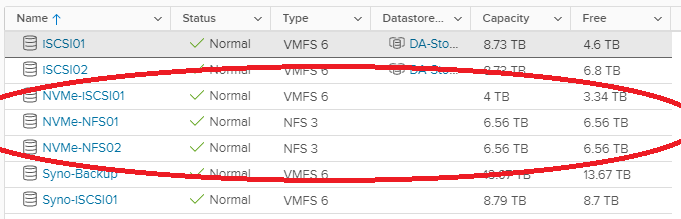
Connecting the ESXi hosts to the iSCSI targets and the NFS exports is done in the exact same way that you would with any other storage system, so I won’t be including details on that in this post.
We can clearly see the iSCSI target and NFS exports on the ESXi host.
TrueNAS NVMe iSCSI Target on VMware ESXi Host
NVMe iSCSI and NFS ESXi Datastores
To access Windows File Shares, we log on and map the network share like you would normally with any file server.
Testing
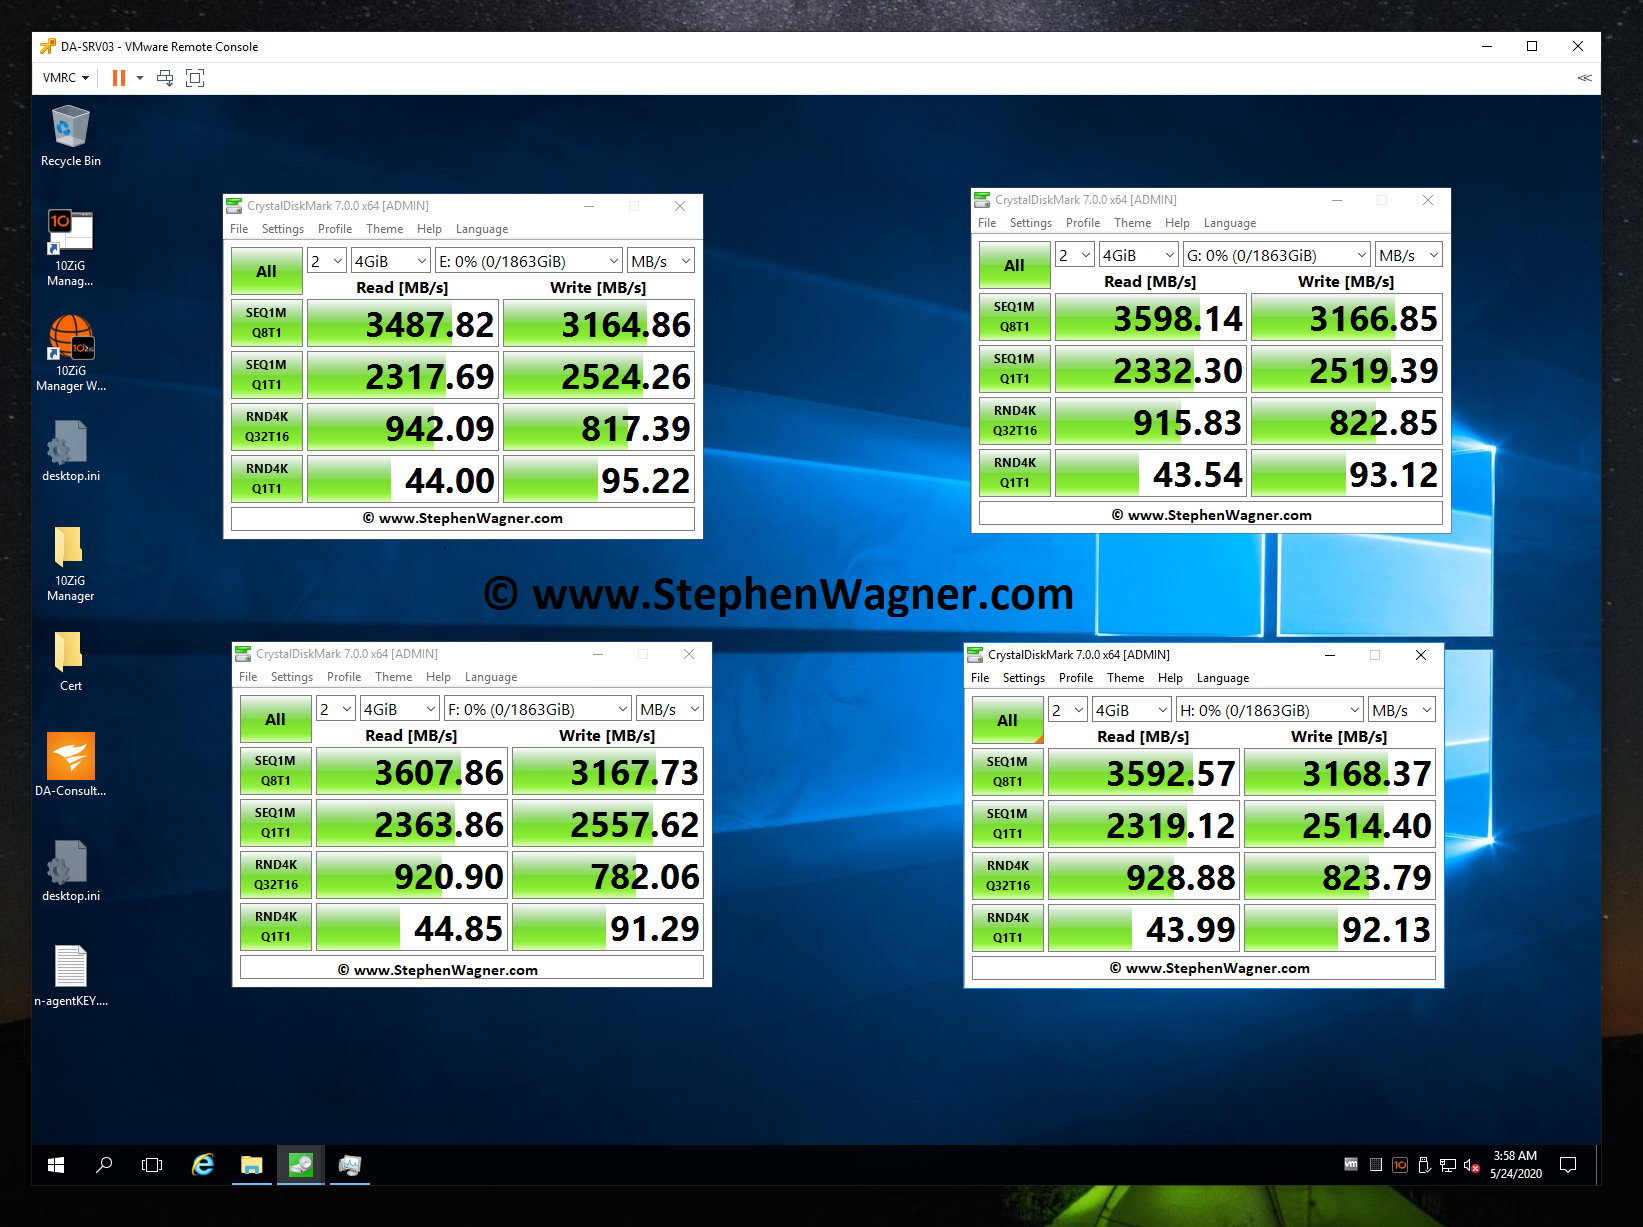
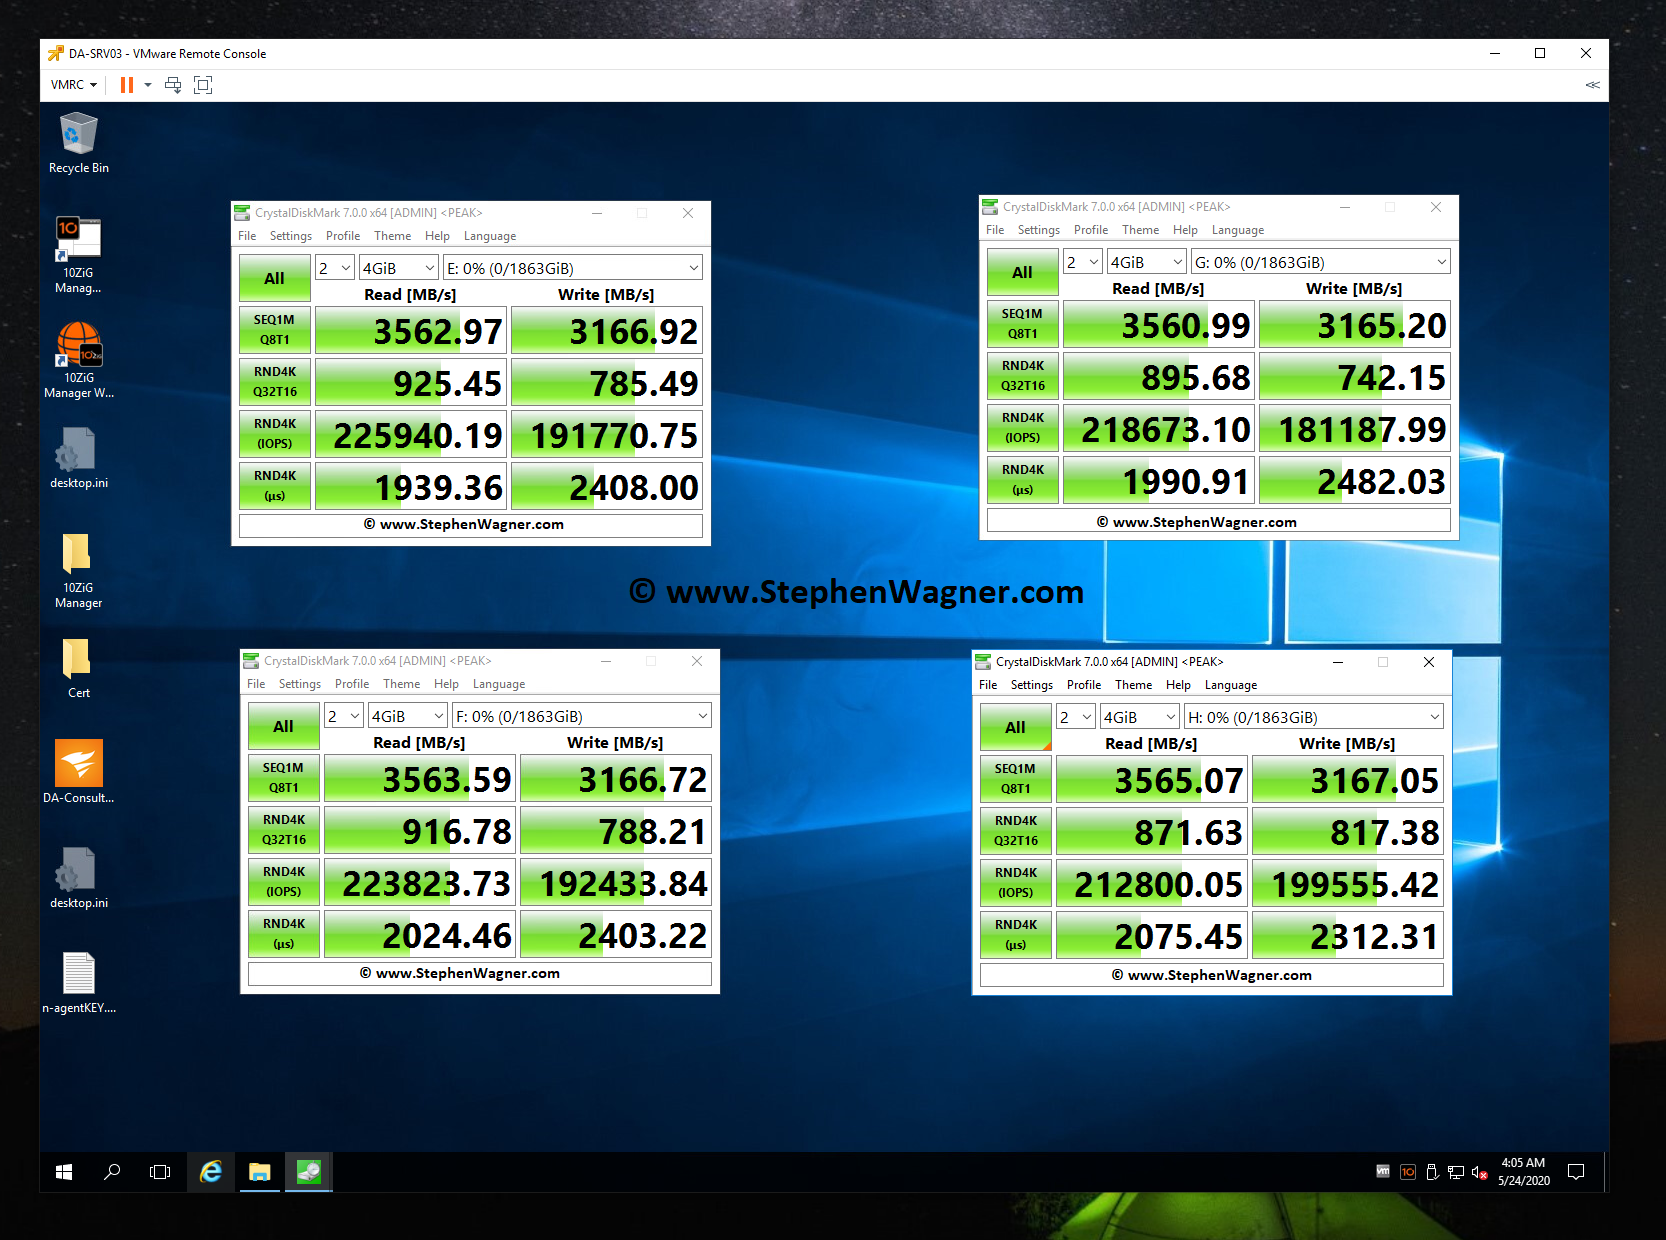
For testing, I moved (using Storage vMotion) my main VDI desktop to the new NVMe based iSCSI Target LUN on the NVMe Storage Server. After testing iSCSI, I then used Storage vMotion again to move it to the NFS datastore. Please see below for the NVMe storage server speed test results.
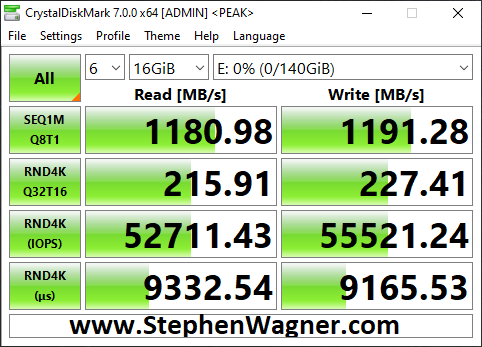
CrystalDiskMark testing an IOCREST IO-PEX40152 and Sabrent Rocket 4 NVME SSD
CrystalDiskMark testing IOPS on an IOCREST IO-PEX40152 and Sabrent Rocket 4 NVME SSD
Note, that when I performed these tests, my CPU was maxed out and limiting the actual throughput. Even then, these are some fairly impressive speeds. Also, these tests were directly testing each NVMe drive individually.
Moving on to the NVMe Storage Server, I decided to test iSCSI NVMe throughput and NFS NVMe throughput.
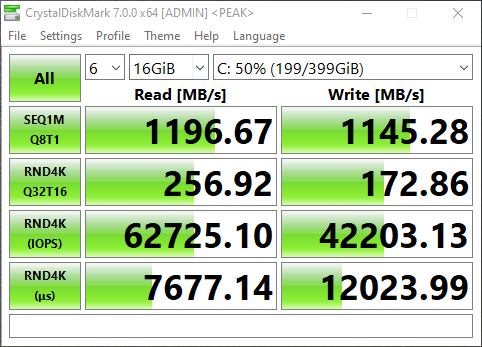
I opened up CrystalDiskMark and started a generic test, running a 16GB test file a total of 6 times on my VDI VM sitting on the iSCSI NVMe LUN.
NVMe Storage Server iSCSI Benchmark with CrystalDiskMark
You can see some impressive speeds maxing out the 10Gb NIC with crazy performance of the NVME storage:
1196MB/sec READ
1145.28MB/sec WRITE (Maxing out the 10GB NIC)
62,725.10 IOPS READ
42,203.13 IOPS WRITE
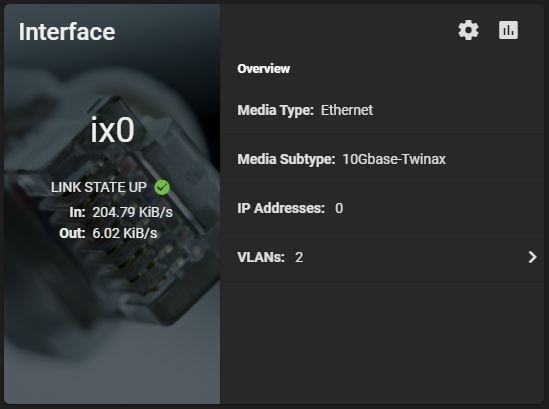
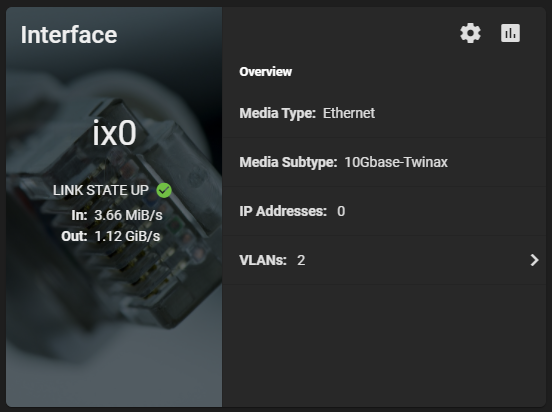
Additionally, here’s a screenshot of the ix0 NIC on the TrueNAS system during the speed test benchmark: 1.12 GiB/s.
TrueNAS NVME Maxing out 10Gig NIC
And remember this is with compression. I’m really excited to see how I can further tweak and optimize this, and also what increases will come with configuring iSCSI MPIO. I’m also going to try to increase the IOPS to get them closer to what each individual NVMe drive can do.
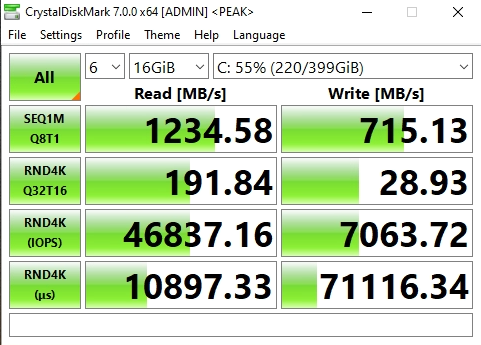
Now on to NFS, the results were horrible when moving the VM to the NFS Export.
NVMe Storage Server NFS Benchmark with CrystalDiskMark
You can see that the read speed was impressive, but the write speed was not. This is partly due to how writes are handled with NFS exports.
Clearly iSCSI is the best performing method for ESXi host connectivity to a TrueNAS based NVMe Storage Server. This works perfect because we’ll get the VAAI features (like being able to reclaim space).
iSCSI MPIO Speed Test
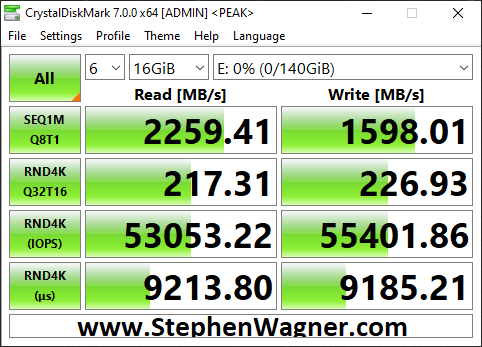
This is more of an update… I was finally able to connect, configure, and utilize the 2nd 10Gbe port on the 560SFP+ NIC. In my setup, both hosts and the TrueNAS storage server all have 2 connections to the switch, with 2 VLANs and 2 subnets dedicated to storage. Check out the before/after speed tests with enabling iSCSI MPIO.
TrueNAS NVME iSCSI MPIO BeforeTrueNAS NVME iSCSI MPIO AfterBefore and After enabling iSCSI MPIO on TrueNAS with NVME Storage
As you can see I was able to essentially double my read speeds (again maxing out the networking layer), however you’ll notice that the write speeds maxed out at 1598MB/sec. I believe we’ve reached a limitation of the CPU, PCIe bus, or something else inside of the server. Note, that this is not a limitation of the Sabrent Rocket 4 NVME drives, or the IOCREST NVME PCIe card.
Moving Forward
I’ve had this configuration running for around a week now with absolutely no issues, no crashes, and it’s been very stable.
Using a VDI VM on NVMe backed storage is lightning fast and I love the experience.
I plan on running like this for a little while to continue to test the stability of the environment before making more changes and expanding the configuration and usage.
Future Plans (and Configuration)
Drive Bays
I plan to populate the 4 hot-swappable drive bays with HPE 4TB MDL drives. Configured with RaidZ1, this should give me around 12TB usable storage. I can use this for file storage, backups, replication, and more.
NVMe Replication
This design was focused on creating non-redundant extremely fast storage. Because I’m limited to a total of 4 NVMe disks in this design, I chose not to use RaidZ and striped the data. If one NVMe drive is lost, all data is lost.
I don’t plan on storing anything important, and at this point the storage is only being used for VDI VMs (which are backed up), and Video editing.
If I can populate the front drive bays, I can replicate the NVMe storage to the traditional HDD storage on a frequent basis to protect against failure to some level or degree.
Version 3 of the NVMe Storage Server
More NVMe and Bigger NVMe – I want more storage! I want to test different levels of RaidZ, and connect to the backbone at even faster speeds.
NVME Drives with PLP (Power Loss Prevention) for data security and protection.
Dual Power Supply
Let me know your thoughts and ideas on this setup!
This website uses cookies to improve your experience. We'll assume you're ok with this, but you can opt-out if you wish.
Do you accept the use of cookies and accept our privacy policy? AcceptRejectCookie and Privacy Policy
Privacy & Cookies Policy
Privacy Overview
This website uses cookies to improve your experience while you navigate through the website. Out of these cookies, the cookies that are categorized as necessary are stored on your browser as they are essential for the working of basic functionalities of the website. We also use third-party cookies that help us analyze and understand how you use this website. These cookies will be stored in your browser only with your consent. You also have the option to opt-out of these cookies. But opting out of some of these cookies may have an effect on your browsing experience.