When either directly passing through a GPU, or attaching an NVIDIA vGPU to a Virtual Machine on VMware ESXi that has more than 16GB of Video Memory, you may run in to a situation where the VM fails to boot with the error “Module ‘DevicePowerOn’ power on failed.”. Special considerations are required when performing GPU or vGPU Passthrough with 16GB+ of video memory.
This issue is specifically caused by memory mapping a GPU or vGPU device that has 16GB of memory or higher, and could involve both the host system (the ESXi host) and/or the Virtual Machine configuration.
In this post, I’ll address the considerations and requirements to passthrough these devices to virtual machines in your environment.
In the order of occurrence, it’s usually VM configuration related, however if the recommendations in the “VM Configuration Considerations” section do not resolve the issue, please proceed to reviewing the “ESXi Host Considerations” section.
Please note that if the issue is host related, other errors may be present, or the device may not even be visible to ESXi.
VM GPU and vGPU Configuration Considerations
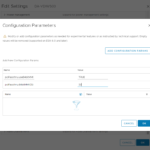
First and foremost, all new VMs should be created using the “EFI” Firmware type. EFI provides numerous advantages in device access and memory mapping versus the older style “BIOS” firmware types.
To do this, create a new virtual machine, navigate to “VM Options”, expand “Boot Options”, and confirm/change the Firmware to “EFI”. I recommend this for all new VMs, and not only for VMs accessing GPUs or vGPUs with over 16GB of memory. Please note that you shouldn’t change an existing VM, and should do this on a fresh new VM.
With performing GPU or vGPU Passthrough with 16GB+ of video memory, you’ll need to create a couple of entries under “Advanced” settings to properly configure access to these PCIe devices and provide the proper environment for memory mapping. The lack of these settings is specifically what causes the “Module ‘DevicePowerOn’ power on failed.” error.
Under the VM settings, head over to “VM Options”, expand “Advanced” and click on “Edit Configuration”, click on “Add Configuration Params”, and add the following entries:
pciPassthru.use64bitMMIO=”TRUE”
pciPassthru.64bitMMIOSizeGB=32
Example below:
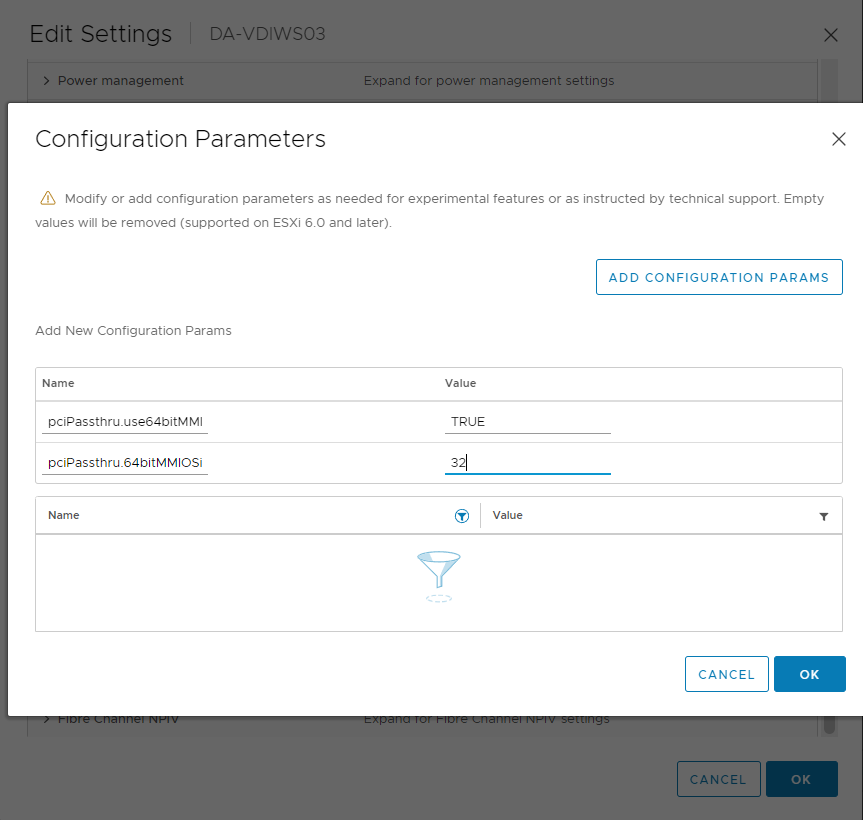
You’ll notice that while our GPU or vGPU profile may have 16GB of memory, we need to double that value, and set it for the “pciPassthru.64bitMMIOSizeGB” variable. If your card or vGPU profile had 32GB, you’d set it to “64”.
Additionally if you were passing through multiple GPUs or vGPU devices, you’d need to factor all the memory being mapped, and double the combined amount.
ESXi GPU and vGPU Host Considerations
On most new and modern servers, the host level doesn’t require any special configuration as they are already designed to pass through such devices to the hypervisor properly. However in some special cases, and/or when using older servers, you may need to modify configuration and settings in the UEFI or BIOS.
If setting the VM Configuration above still results in the same error (or possibly other errors), than you most likely need to make modifications to the ESXi hosts BIOS/UEFI/RBSU to allow the proper memory mapping of the PCIe device, in our case being the GPU.
This is where things get a bit tricky because every server manufacturer has different settings that will need to be configured.
Look for the following settings, or settings with similar terminology:
- “Memory Mapping Above 4G”
- “Above 4G Decoding”
- “PCI Express 64-Bit BAR Support”
- “64-Bit IOMMU Mapping”
Once you find the correct setting or settings, enable them.
Every vendor could be using different terminology and there may be other settings that need to be configured that I don’t have listed above. In my case, I had to go in to a secret “SERVICE OPTIONS” menu on my HPE Proliant DL360p Gen8, as documented here.
After performing the recommendations in this guide, you should now be able to passthrough devices with over 16GB of memory.
Additional Resources: