Aug 272018
 
Right side of MSA 2040

So, what happens in a worst-case scenario where your backup system fails, you don’t have any VM snapshots, and the last thing standing in the way of complete data loss is your SAN storage systems LUN snapshots?

Well, first you fire whoever purchased and implemented the backup system, then secondly you need to start restoring the VM (or VMs) from your SAN LUN snapshots.

While I’ve never had to do this in the past (all the disaster recovery solutions I’ve designed and sold have been tested and function), I’ve always been curious what the process is and would be like. Today I decided to try it out and develop a procedure for restoring a VM from SAN Storage LUN snapshot.

For this test I pretended a VM was corrupt on my VMware vSphere cluster and then restored it to a previous state from a LUN snapshot on my HPE MSA 2040 (identical for the HPE MSA 2050, and MSA 2052) Dual Controller SAN.

To accomplish the restore, we’ll need to create a host mapping on the SAN for the LUN snapshot to a new LUN number available to the hosts. We then need to add and mount the VMFS volume (residing on the snapshot) to the host(s) while assigning it a new signature and then vMotion the VM from the snapshot’s VMFS to original datastore.

Important Notes (Read first):

  • When mounting a VMFS volume from a SAN snapshot, you MUST RE-SIGNATURE THE SNAPSHOT VMFS volume. Not doing so can cause problems.
  • The snapshot cannot be mapped as read only, VMFS volumes must be marked as writable in order to be mounted on ESXi hosts.
  • You must follow the proper procedure to gracefully dismount and detach the VMFS volume and storage device before removing the snapshot’s host mapping on the SAN.
  • We use Storage vMotion to perform a high-speed move and recovery of the VM. If you’re not licensed for Storage vMotion, you can use the datastore file browser and copy/move from the snapshot VMFS volume to live production VMFS volume, however this may be slower.
  • During this entire process you do not touch, modify, or change any settings on your existing active production LUNs (or LUN numbers).
  • Restoring a VM from a SAN LUN snapshot will restore a crash consistent copy of the VM. The VM when recovered will believe a system crash occurred and power was lost. This is NOT a graceful application consistent backup and restore.
  • Please read your SAN documentation for the procedure to access SAN snapshots, and create host mappings. With the MSA 2040 I can do this live during production, however your SAN may be different and your hosts may need to be powered off and disconnected while SAN configuration changes are made.
  • Pro tip: You can also power on and initialize the VM from the snapshot before initiating the storage vMotion. This will allow you to get production services back online while you’re moving the VM from the snapshot to production VMFS volumes.
  • I’m not responsible if you damage, corrupt, or cause any damage or issues to your environment if you follow these procedures.

We are assuming that you have already either deleted the damaged VM, or removed it from your inventory and renamed the VMs folder on the live VMFS datastore to change the name (example, renaming the folder from “SRV01” to “SRV01.bad”. If you renamed the damaged VM, make sure you have enough space for the new restored VM as well.

Procedure:

Mount the VMFS volume on the LUN snapshot to the ESXi host(s)
  1. Identify the VM you want to recover, write it down.
  2. Identify the datastore that the VM resides on, write it down.
  3. Identify the SAN and identify the LUN number that the VMFS datastore resides on, write it down.
  4. Identify the LUN Snapshot unique name/id/number and write it down, confirm the timestamp to make sure it will contain a valid recovery point.
  5. Log on to the SAN and create a host mapping to present the snapshot (you recorded above) to the hosts using a new and unused LUN number.
  6. Log on to your ESXi host and navigate to configuration, then storage adapters.
  7. Select the iSCSI initator and click the “Rescan Storage Adapters” button to rescan all iSCSI LUNs.

    VMware ESXi Host Rescan Storage Adapter

    VMware ESXi Host Rescan Storage Adapter

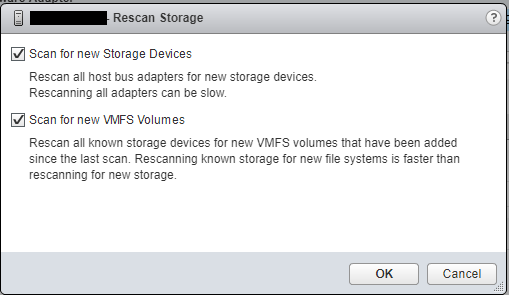
  8. Ensure both check boxes are checked and hit “Ok”, wait for the scan to complete (as shown in the “Recent Tasks” window.

    VMware ESXi Host Rescan Storage Adapter Window for VMFS Volume and Devices

    VMware ESXi Host Rescan Storage Adapter Window for VMFS Volume and Devices

  9. Now navigate to the “Datastores” tab under configuration, and click on the “Create a new Datastore” button as shown below.

    VMware ESXi Host Add Datastore Window

    VMware ESXi Host Add Datastore Window

  10. Continue with “VMFS” selected and select continue.
  11. In the next window, you’ll see your existing datastores, as well as your new datastore (from the snapshot). You can leave the “Datastore name” as is since this value will be ignored. In this window you’re going to select the new VMFS datastore from the snapshot. Make sure you confirm this by looking at the LUN number, as well as the value under “SnapshotVolume”. It is critical that you select the snapshot in this window (it should be the new LUN number you added above).
  12. Select next and continue.
  13. On the next window “Mount Option”, you need to change the radio button to and select “Assign a new signature”. This is critical! This will assign a new signature to differentiate it from your existing real production datastore so that the ESXi hosts don’t confuse it.
  14. Continue with the wizard and complete the mount process. At this point ESXi will resignture the VMFS volume and rename it to “snap-OriginalVolumeNameHere”.
  15. You can now browse the VMFS datastore residing on the LUN snapshot and do anything you’d normally be able to do with a normal datastore.
Copy/Move/vMotion the VM from the snapshot VMFS volume to your production VMFS volume

Note: The next steps are only if you are licensed for storage vMotion. If you aren’t you’ll need to use the copy or move function in the file browsing area to copy or move the VMs to your live production VMFS datastores:

  1. Now we’ll go to the vCenter/ESXi host storage area in the web client, and using the “Files” tab, we’ll browse the snapshots VMFS datastore that we just mounted.
  2. Locate the folder for the VM(s) you want to recover, open the folder, right click on the vmx file for the VM and select “Register VM”. Repeat this for any of the VMs you want to recover from the snapshot. Complete the wizard for each VM you register and add it to a host.
  3. Go back to you “Hosts and VMs” view, you’ll now see the VMs are added.
  4. Select and right click on the VM you want to move from the snapshot datastore to your production live datastore, and select “Migrate”.
  5. In the vMotion migrate wizard, select “Change Storage only”.
  6. Continue to the wizard, and storage vMotion the VM from the snapshot VMFS to your production VMFS volume. Wait for the vMotion to complete.
  7. After the storage vMotion is complete, boot the VM and confirm everything is functioning.
Gracefully unmount, detach, and remove the snapshot VMFS from the ESXi host, and then remove the host mapping from the SAN
  1. On each of your ESXi hosts that have access to the SAN, go to the “Datastores” section under the ESXi hosts configuration, right click on the snapshot VMFS datastore, and select “Unmount”. You’ll need to repeat this on each ESXi host that may have automounted the snapshot’s VMFS volume.
  2. On each of your ESXi hosts that have access to the SAN, go to the “Storage Devices” section under the ESXi hosts configuration and identify (by LUN number) the “disk” that is the snapshot LUN. Select and highlight the snapshot LUN disk, select “All Actions” and select “Detach”. Repeat this on each host.
  3. Double check and confirm that the snapshot VMFS datastore (and disk object) have been unmounted and detached from each ESXi host.
  4. You can now log in to your SAN and remove the host mapping for the snapshot-to-LUN. We will not longer present the snapshot LUN to any of the hosts.
  5. Back to the ESXi hosts, navigate to “Storage Adapters”, select the “iSCSI Initiator Adapter”, and click the “Rescan Storage Adapters”. Repeat this for each ESXi host.

    VMware ESXi Host Rescan Storage Adapter

    VMware ESXi Host Rescan Storage Adapter

  6. You’re done!
Aug 182018
 
VMware vSphere Mobile Watchlist Logo

Did you know that you can monitor and manage your VMware vSphere environment (ESXi hosts, cluster, and VMs) remotely with the “VMware vSphere Mobile Watchlist” app on your Android phone? Well, you can!

Download link: https://play.google.com/store/apps/details?id=com.vmware.beacon

Please note, shortly after this post, VMware removed the availability of this app. If you had it installed prior, you may continue to use it.

Update – June 12th, 2019: VMware released a new vSphere Mobile Client in alpha. For more information, see my new post at: https://www.stephenwagner.com/2019/06/12/vsphere-mobile-client-android-mobile-devices/

The VMware vSphere Mobile Watchlist (VMware Watchlist) Android App

For some time now, I’ve been using this neat little app from VMware (available for download here) to monitor and manage my vSphere cluster remotely. You can use the app while directly on your LAN, or via VPN (I use it with OpenVPN to connect to my Sophos UTM). I’ve even used it while on airplanes using the on board in-flight WiFi.

The reason why I’m posting about this, is because I’ve never actually heard anyone talk about the app (which I find strange), so I’m assuming others aren’t aware of it’s existence as well.

The app runs extremely well on my Samsung S8+, Samsung S9+, and Samsung Tab E LTE tablet. I haven’t run in to any issues or app crashes.

Let’s take a look at the app

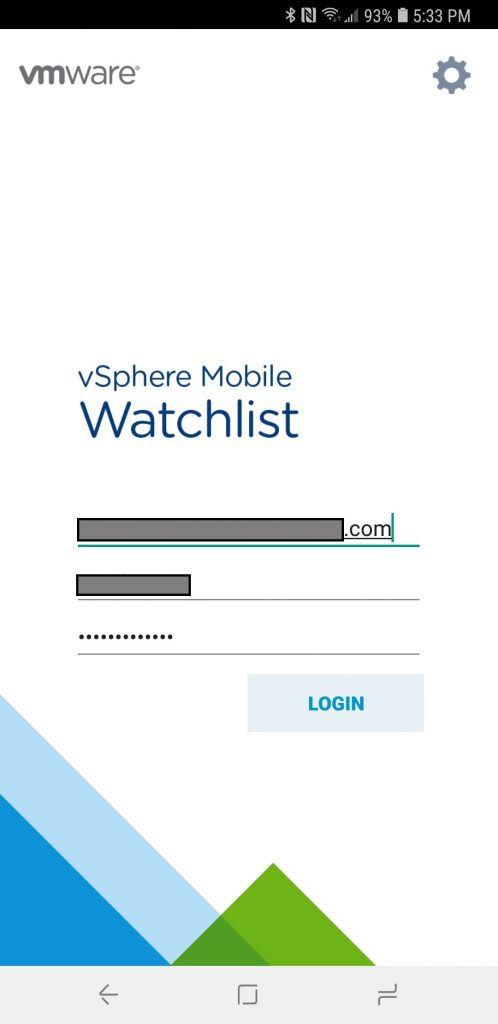
vSphere Mobile Watchlist Login Prompt

vSphere Mobile Watchlist Login Prompt

The above screen is where you initially log in. I use my Active Directory credentials (since I have my vCenter server integrated with AD).

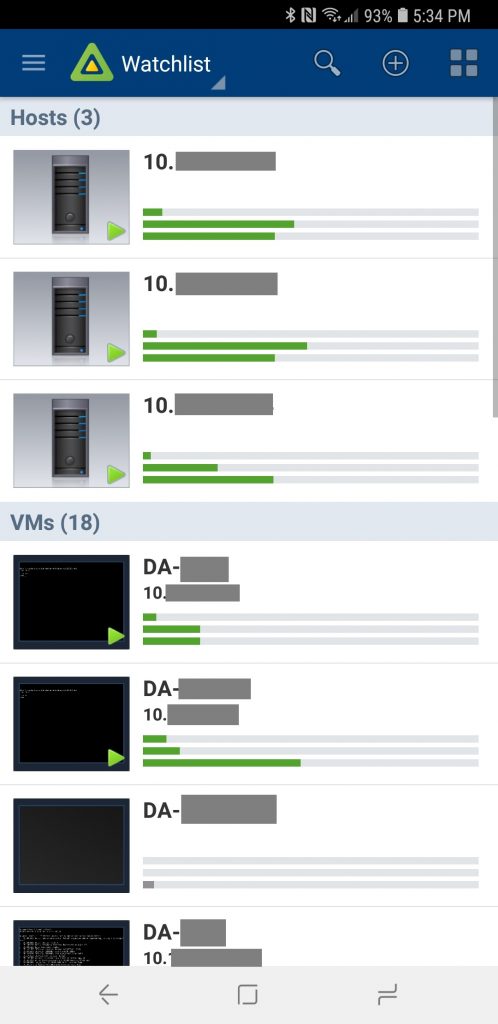
vSphere Mobile Watchlist Hosts and VM list

vSphere Mobile Watchlist Hosts and VMs

In the default view (shown above), you can view a brief summary of your ESXi hosts, as well as a list of virtual machines running.

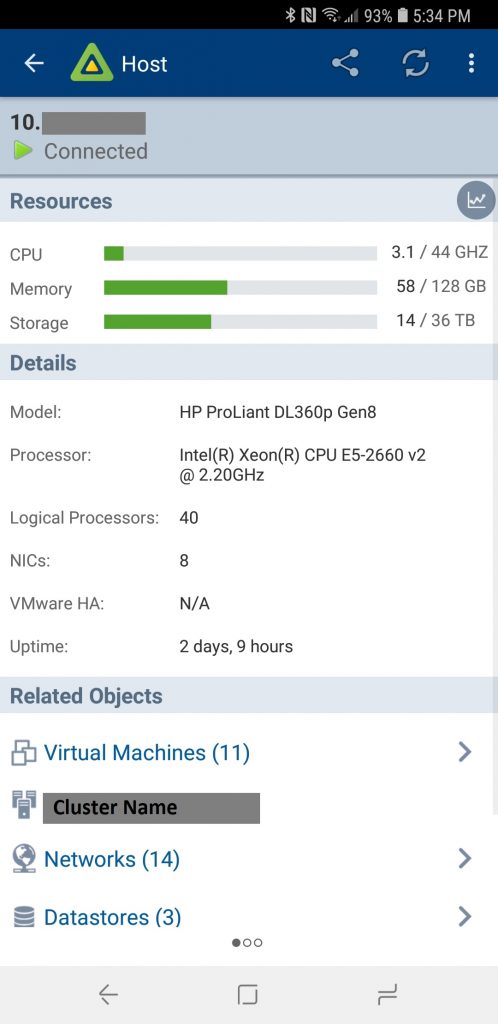
vSphere Mobile Watchlist Host Information

vSphere Mobile Watchlist Host Information

After selecting an ESXi host, you can view the hosts resources, details, related objects, as well as flip over to view host options.

vSphere Mobile Watchlist Host Options

vSphere Mobile Watchlist Host Options

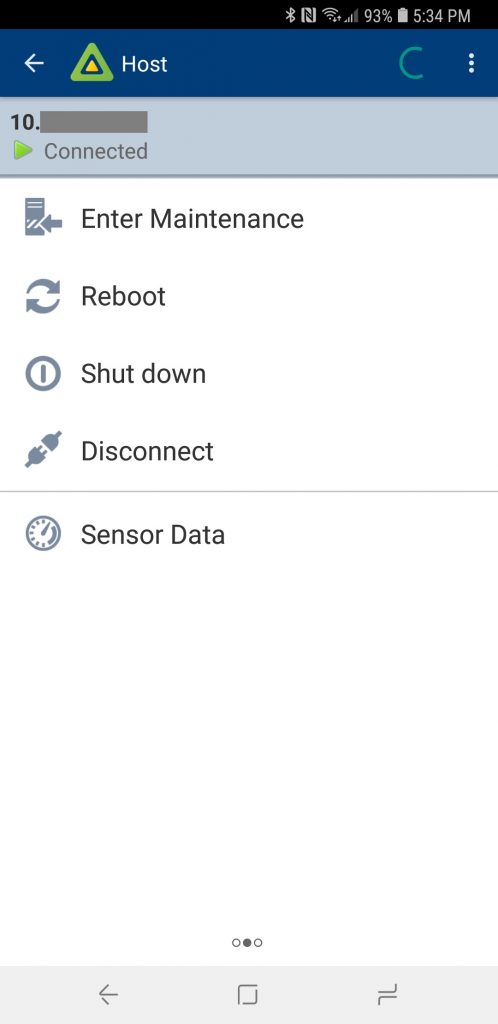
Under host options, you can Enter Maintenance mode, reboot the host, shutdown the host, disconnect the host, or view the hosts’ sensor data.

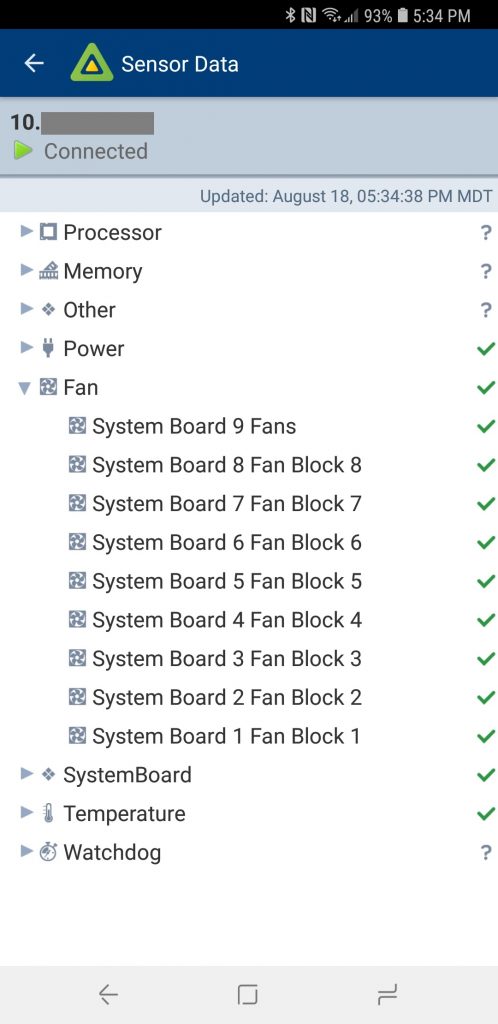
vSphere Mobile Watchlist Host Sensor List and Fan Data

vSphere Mobile Watchlist Host Sensor Data (Fans)

Checking the HPE Proliant DL360p Gen8 fan sensor data with VMware Watchlist.

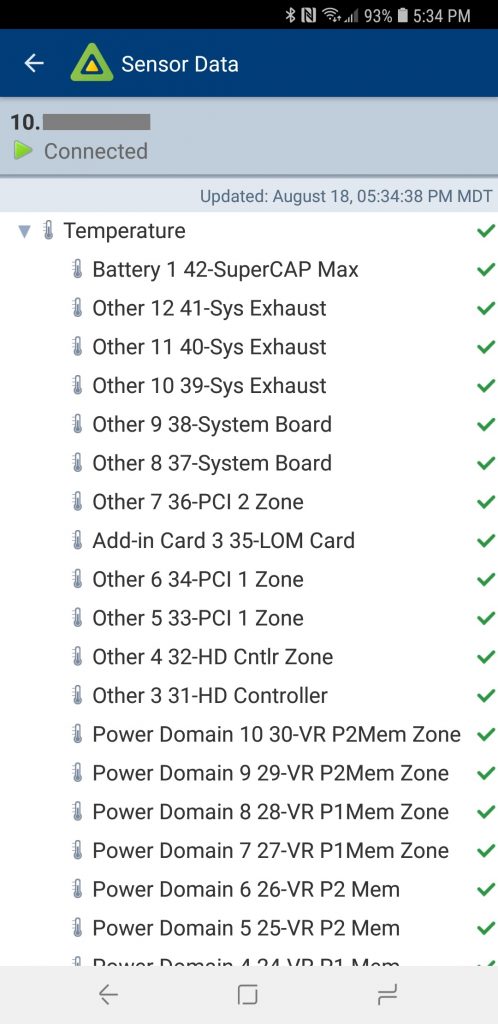
vSphere Mobile Watchlist Host Sensor Data (Temperature Sensor List)

vSphere Mobile Watchlist Host Sensor Data (Temperature)

Checking the HPE Proliant DL360p Gen8 temperature sensor data with VMware Watchlist. While not shown above, you can select individual items to pull the actual temperature values. Please Note that the temperature values are missing a decimal (Example: 2100 = 21.00 Celsius).

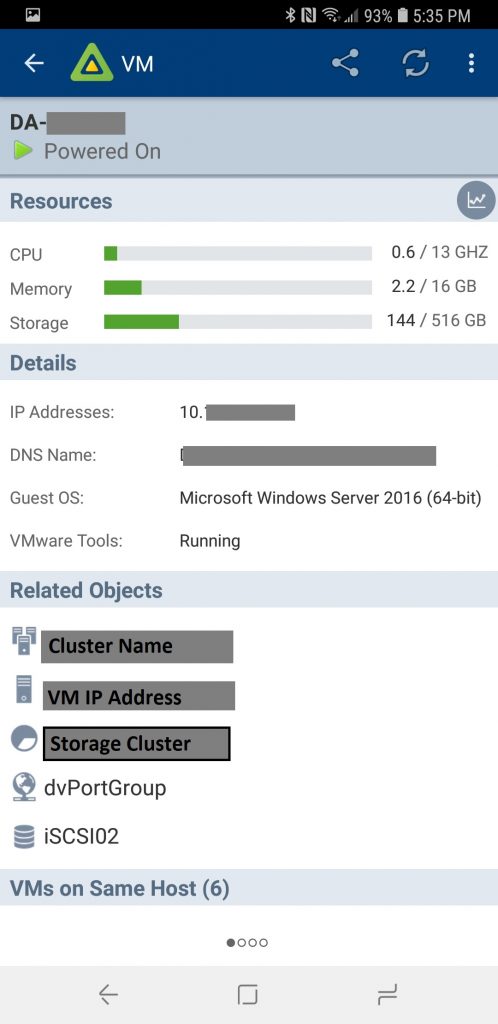
vSphere Mobile Watchlist VM Information

vSphere Mobile Watchlist VM Information View

When selecting a VM (Virtual Machine) from the default view, you can view the VM’s Resources (CPU, Memory, and Storage), Details (IP Addresses, DNS hostnames, Guest OS, VMWare Tools Status), related objects, and a list of other VMs running on the same host.

vSphere Mobile Watchlist VM Options

vSphere Mobile Watchlist VM Options

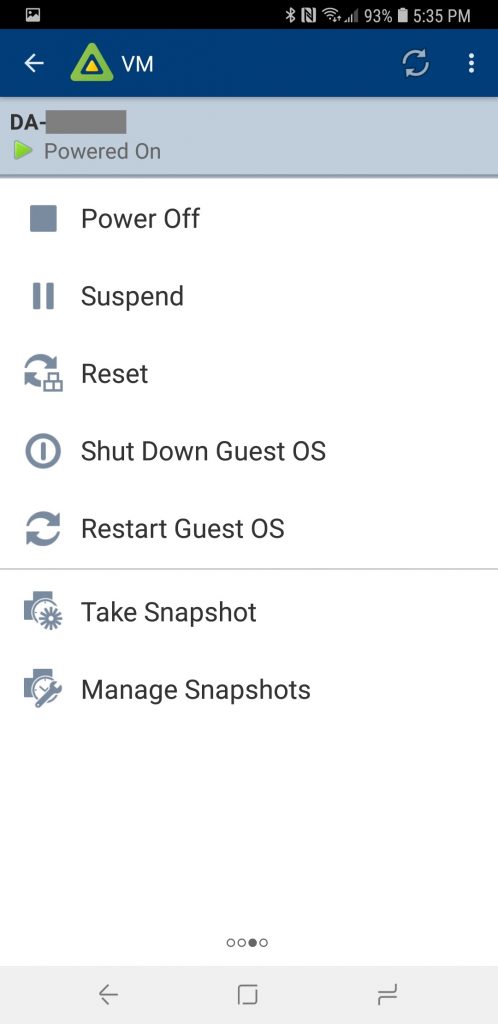
Flipping over to the VM options, we have the ability to power off, suspend, reset, shutdown, or gracefully restart the VM. We also have some snapshot functionality to take a snapshot, or manage VM snapshots.

Additional Notes

In my environment I have two HPE DL360p Gen8 Servers and the sensor data is fully supported (I used the HPE custom ESXi install image which includes host drivers).

Apr 292018
 
Directory Services Restore Mode

Running Veeam Backup and Replication, a Microsoft Windows Server Domain Controller may boot in to safe mode and directory services restore mode.

About a week ago, I loaded up Veeam Backup and Replication in to my test environment. It’s a fantastic product, and it’s working great, however today I had a little bit of an issue with a DC running Windows Server 2016 Server Core.

I woke up to a notification that the backup failed due to a VSS snapshot issue. Now I know that VSS can be a little picky at times, so I decided to restart the guest VM. Upon restarting, she came back up, was pingable, and appeared to be running fine, however the backup kept failing with new errors, the event log was looking very strange on the server, and numerous services that were set to automatic were not starting up.

This specific server was installed using Server Core mode, so it has no GUI and is administered via command prompt over RDP, or via remote management utilities. Once RDP’ing in to the server, I noticed the “Safe Mode” branding on each corner of the display, this was very odd. I restarted the server again, this time manually trying to start Active Directory Services manually via services.msc.

This presented:

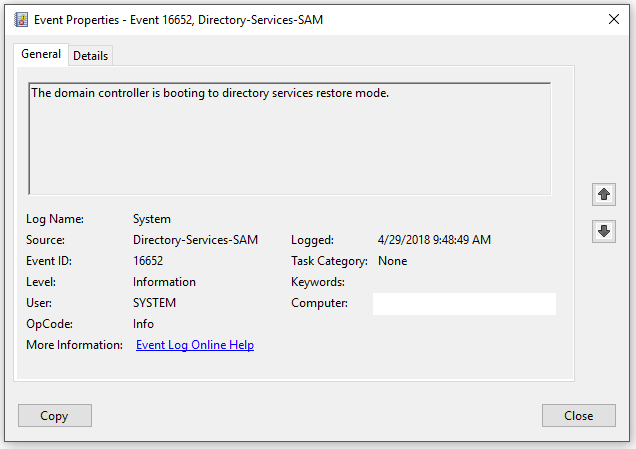
Event ID: 16652
Source: Directory-Services-SAM
General Description: The domain controller is booting to directory services restore mode.

Screenshot:

Directory Services Restore Mode

The domain controller is booting to directory services restore mode.


This surprised me (and scared me for that matter). I immediately started searching the internet to find out what would have caused this…

To my relief, I read numerous sites that advise that when an active backup is running on a guest VM which is a domain controller, Veeam activates directory services restore mode temporarily, so in the event of a restore, it will boot to this mode automatically. In my case, the switch was not changed back during the backup failure.

Running the following command in a command prompt, verifies that the safeboot switch is set to dsrepair enabled:

bcdedit /v

To disable directory services restore mode, type the following in a command prompt:

bcdedit /deletevalue safeboot

Restart the server and the issue should be resolved!

Apr 172018
 

With the news of VMware vSphere 6.7 being released today, a lot of you are looking for the download links for the 6.7 download (including vSphere 6.7, ESXi 6.7, etc…). I couldn’t find it myself, but after doing some scouring through alternative URLs, I came across the link.

VMware vSphere 6.7 DownloadVMware vSphere 6.7 Download Link

Here’s the link: https://my.vmware.com/web/vmware/info/slug/datacenter_cloud_infrastructure/vmware_vsphere/6_7

HPE Specific (HPE Customization for ESXi) Version 6.7 is available at: https://www.hpe.com/us/en/servers/hpe-esxi.html

Unfortunately the page is blank at the moment, however you can bet the download and product listing will be added shortly!

UPDATE 10:15AM MST: The Download link is now live!

More information on the release of vSphere 6.7 can be found here, here, here, here, here, and here.

An article on the upgrade can be found at: https://blogs.vmware.com/vsphere/2018/05/upgrading-vcenter-server-appliance-6-5-6-7.html

Happy Virtualizing!

Jan 202018
 
10ZiG 5948q Zero Client

As promised in my previous post which covered my first impressions, here are some pictures and video of the 10ZiG 5948q zero client in action! In the videos I demonstrate video playback as well as the USB redirection capabilities of the 10ZiG Zero Client and VMware Horizon View. Scroll down to the bottom for videos!

If you’re interesting in 10ZiG products and looking to buy, don’t hesitate to reach out to me for information and/or a quote! We can configure and sell 10ZiG Zero Clients (and thin clients), help with solution design and deployment, and provide consulting services! We sell and ship to Canada and the USA!

Pictures

10ZiG 5948q Zero Client
10ZiG 5948qv Zero Client VMware Horizon View
10ZiG 5900 Series Zero Client VMware Horizon View Login
10ZiG 5948q Series Zero Client Configuration Menu

Videos

In this video, I demonstrate the capability of the 10ZiG 5948q zero client connected to a VMware Horizon View server (via a Unified Access Gateway) playing a video from YouTube. Please note that the ESXi server does not have a GPU and 3D rendering is disabled for the test (this is as low performance as it gets).

In this video, I demonstrate the capability of the 10ZiG 5948q zero client using USB redirection on a live VDI session.

And finally, here’s a video of a 10ZiG zero client cold boot for those that are interested.

And remember, my company Digitally Accurate Inc. is a VMware Solutions Provider and 10ZiG Partner. I’m also regularly posting content on these on the corporate blog as well!