Unable to boot ESXi from USB or SD Card on HPE Proliant Server
After installing HPE iLO Amplifier on your network and updating iLO 4 firmware to 2.60 or 2.61, you may notice that your HPE Proliant Servers may fail to boot ESXi from a USB drive or SD-Card.
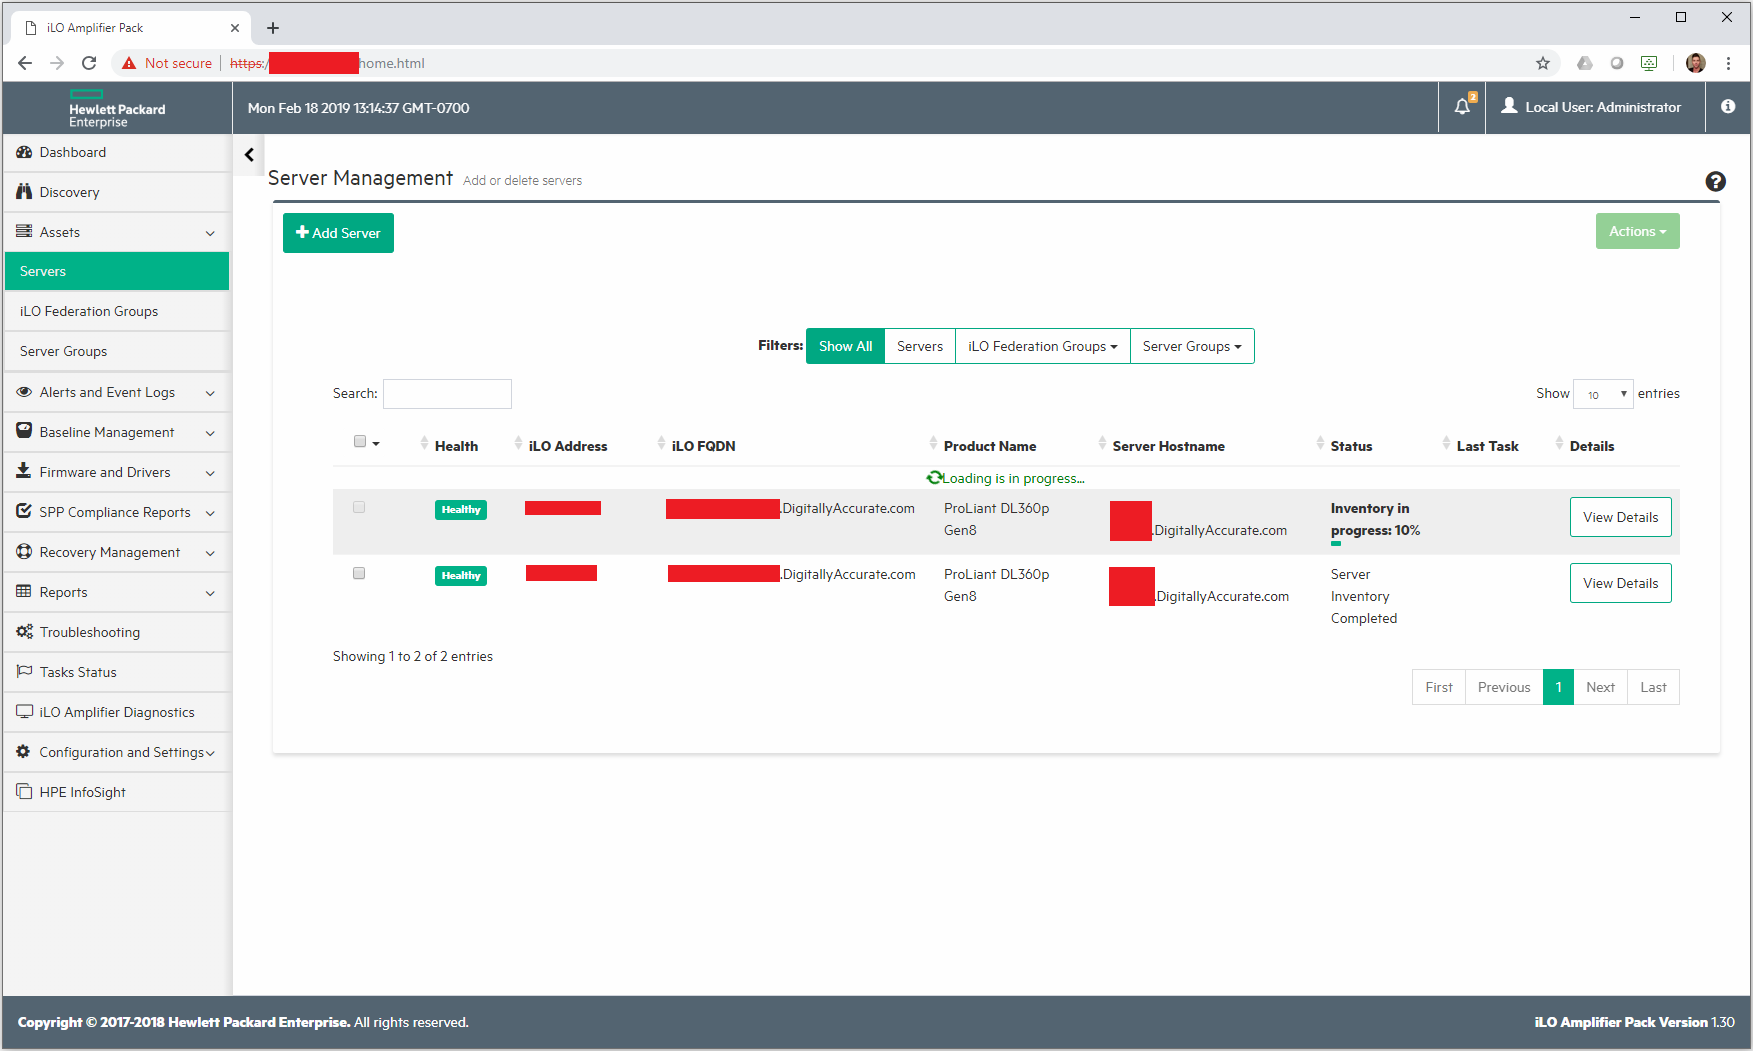
This was occuring on 2 ESXi Hosts. Both were HPE Proliant DL360p Gen8 Servers. One server was using an internal USB drive for ESXi, while the other was using an HPE branded SD Card.
The issue started occuring on both hosts after a planned InfoSight implementation. Both hosts iLO controllers firmware were upgraded to 2.61, iLO Amplifier was deployed (and the servers added), and the amplifier was connected to an HPE InfoSight account.
Update – May 24th 2019: As an HPE partner, I have been working with HPE, the product manager, and development team on this issue. HPE has provided me with a fix to test that I have been able to verify fully resolves this issue! Stay tuned for more information!
Update – June 5th 2019: Great news! As Bob Perugini (WW Product Manager at HPE) put it: “HPE is happy to announce that this issue has been fixed in latest version of iLO Amplifier Pack, v1.40. To download iLO Amplifier Pack v1.40, go to http://www.hpe.com/servers/iloamplifierpack and click “download”.” Scroll to the bottom of the post for more information!
Please see below for errors:
Errors
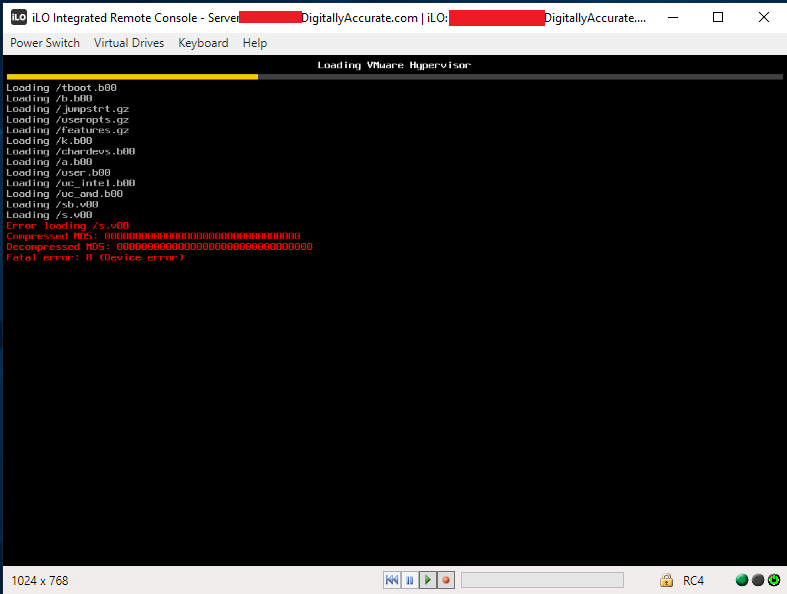
Error loading /s.v00
 Compressed MD5: 00000000000000000000000000
 Decompressed MD5: 00000000000000000000000000
 Fatal error: 8 (Device Error)
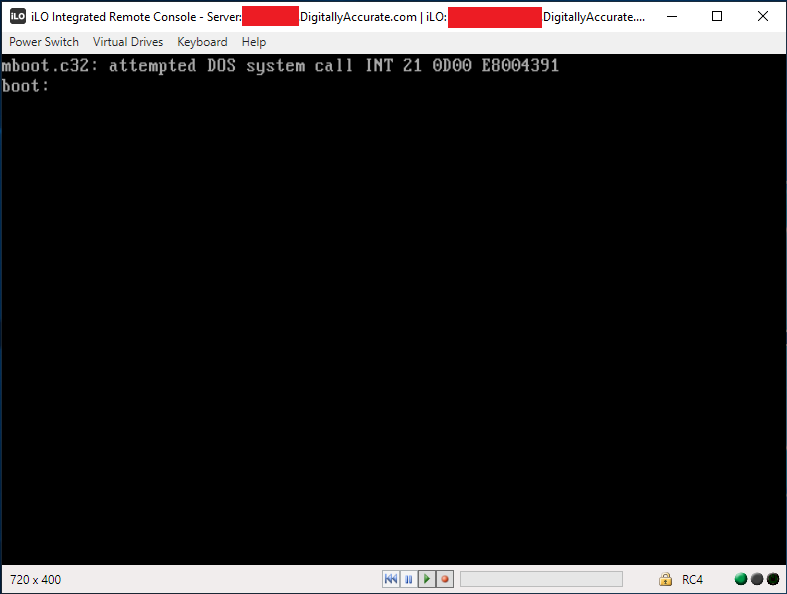
mboot.c32: attempted DOS system call INT 21 0d00 E8004391
 boot:
Symptoms
This issue may occur intermittently, on the majority of boots, or on all boots. Re-installing ESXi on the media, as well as replacing the USB/SD Card has no effect. Installation will be successful, however you the issue is still experiences on boot.
HPE technical support was unable to determine the root of the issue. We found the source of the issue and reported it to HPE technical support and are waiting for an update.
The Issue and Fix
This issue occurs because the HPE iLO Amplifier is running continuous server inventory scans while the hosts are booting. When one inventory completes, it restarts another scan.
The following can be noted:
- iLO Amplifier inventory percentage resets back to 0% and starts again numerous times during the server boot
- Inventory scan completes, only to restart again numerous times during the server boot
- Inventory scan resets back to 0% during numerous different phases of BIOS initialization and POST.
We noticed that once the HPE iLO Amplifier Virtual Machine was powered off, not only did the servers boot faster, but they also booted 100% succesfully each time. Powering on the iLO Amplifier would cause the ESXi hosts to fail to boot once again.
I’d also like to note that on the host using the SD-Card, the failed boot would actually completely lock up iLO, and would require physical intervention to disconnect and reconnect the power to the server. We were unable to restart the server once it froze (this did not happen to the host using the USB drive).
There are some settings on the HPE iLO amplifier to control performance and intervals of inventory scans, however we noticed that modifying these settings did not alter or stop the issue, and had no effect.
As a temporary workaround, make sure your iLO amplifier is powered off during any maintenance to avoid hosts freezing/failing to boot.
To fully resolve this issue, upgrade your iLO Amplifier to the latest version (1.40 as of the time of this update). The latest version can be downloaded at: http://www.hpe.com/servers/iloamplifierpack.
Update – April 10th 2019
I’ve attempted to try downgrading to the earliest supported iLo version 2.54, and the issue still occurs.
I also upgraded to the newest version 2.62 which presented some new issues.
On the first boot, the BIOS reported memory access issues on Processor 1 socket 1, then another error reporting memory access issues on Processor 1 socket 4.
I disconnected the power cables, reconnected, and restarted the server. This boot, the server didn’t even detect the bootable USB stick.
Again, after shutting down the iLo Amplifier, the server booted properly and the issue disappeared.
Update – May 24th 2019
As an HPE partner, I have been working with HPE, the product manager, and development team on this issue. HPE has provided me with a fix to test that I have been able to verify fully resolves this issue! Stay tuned for more information!
Update – June 5th 2019 – ITS FIXED!!!
Great news as the issue is now fixed! As Bob Perugini (WorldWide Product Manager at HPE) said it:
HPE is happy to announce that this issue has been fixed in latest version of iLO Amplifier Pack, v1.40.
To download iLO Amplifier Pack v1.40, go to http://www.hpe.com/servers/iloamplifierpack and click “download”.
Here’s what’s new in iLO Amplifier Pack v1.40:
─ Available as a VMware ESXi appliance and as a Hyper-V appliance (Hyper-V is new)
─ VMware tools have been added to the ESXi appliance
─ Ability to schedule the time of the daily transmission of Active Health System (AHS) data to InfoSight
─ Ability to opt-in and allow the IP address and hostname of the server to be transmitted to InfoSight and displayed
─ Test connectivity button to help verify iLO Amplifier Pack has successfully connected to InfoSight
─ Allow user authentication credentials for the proxy server when connecting to InfoSight
─ Added ability to specify IP address or hostname for the HPE RDA connection when connection to InfoSight
─ Ability to send updated AHS data “now” for an individual server
─ Ability to stage firmware and driver updates to the iLO Repository and then deploy the staged updates at a later date or time (HPE Gen10 servers only)
─ Allow the firmware and driver updates of servers whose iLO has been configured in CNSA (Commercial National Security Algorithm) mode (HPE Gen10 servers only)