When troubleshooting connectivity issues with your vMotion network (or vMotion VLAN), you may notice that you’re unable to ping using the ping or vmkping command on your ESXi and VMware hosts.
This occurs when you’re suing the vMotion TCP/IP stack on your vmkernel (vmk) adapters that are configured for vMotion.
This also applies if you’re using long distance vMotion (LDVM).
Why
The vMotion TCP/IP stack requires special syntax for ping and ICMP tests on the vmk adapters.
VMK using vMotion TCP/IP Stack
Above is an example where a vmk adapter (vmk3) is configured to use the vMotion TCP/IP stack.
How
To “ping” and test your vMotion network that uses the vMotion TCP/IP stack, you’ll need to use the special command below:
In the command above, change “vmk1” to the vmkernel adapter you want to send the pings from. Additionally, change “ip.add.re.ss” to the IP address of the host you want to ping.
Using this method, you can fully verify network connectivity between the vMotion vmks using the vMotion stack.
Today we’re going to be talking about Sabrent’s newest line of NVMe storage products, particularly the 2TB Rocket NVMe PCIe 4.0 M.2 2280 Internal SSD Solid State Drive or the Sabrent Rocket 4 2TB NVMe stick as I like to call it.
Last week I purchased a quantity of 4 of these for a total of 8TB of NVMe storage to use on an IOCrest IO-PEX40152 Quad NVMe PCIe Card. For the purpose of this review, we’re benchmarking one inside of an HP Z240 Workstation.
While these are targeted for users with a PCIe 4.0 interface, I’ll be using these on PCIe 3 as it’s backwards compatible. I purchased the PCIe 4 option to make sure the investment was future-proofed.
Keep reading for a bunch of pictures, specs, speed tests, benchmarks, information, and more!
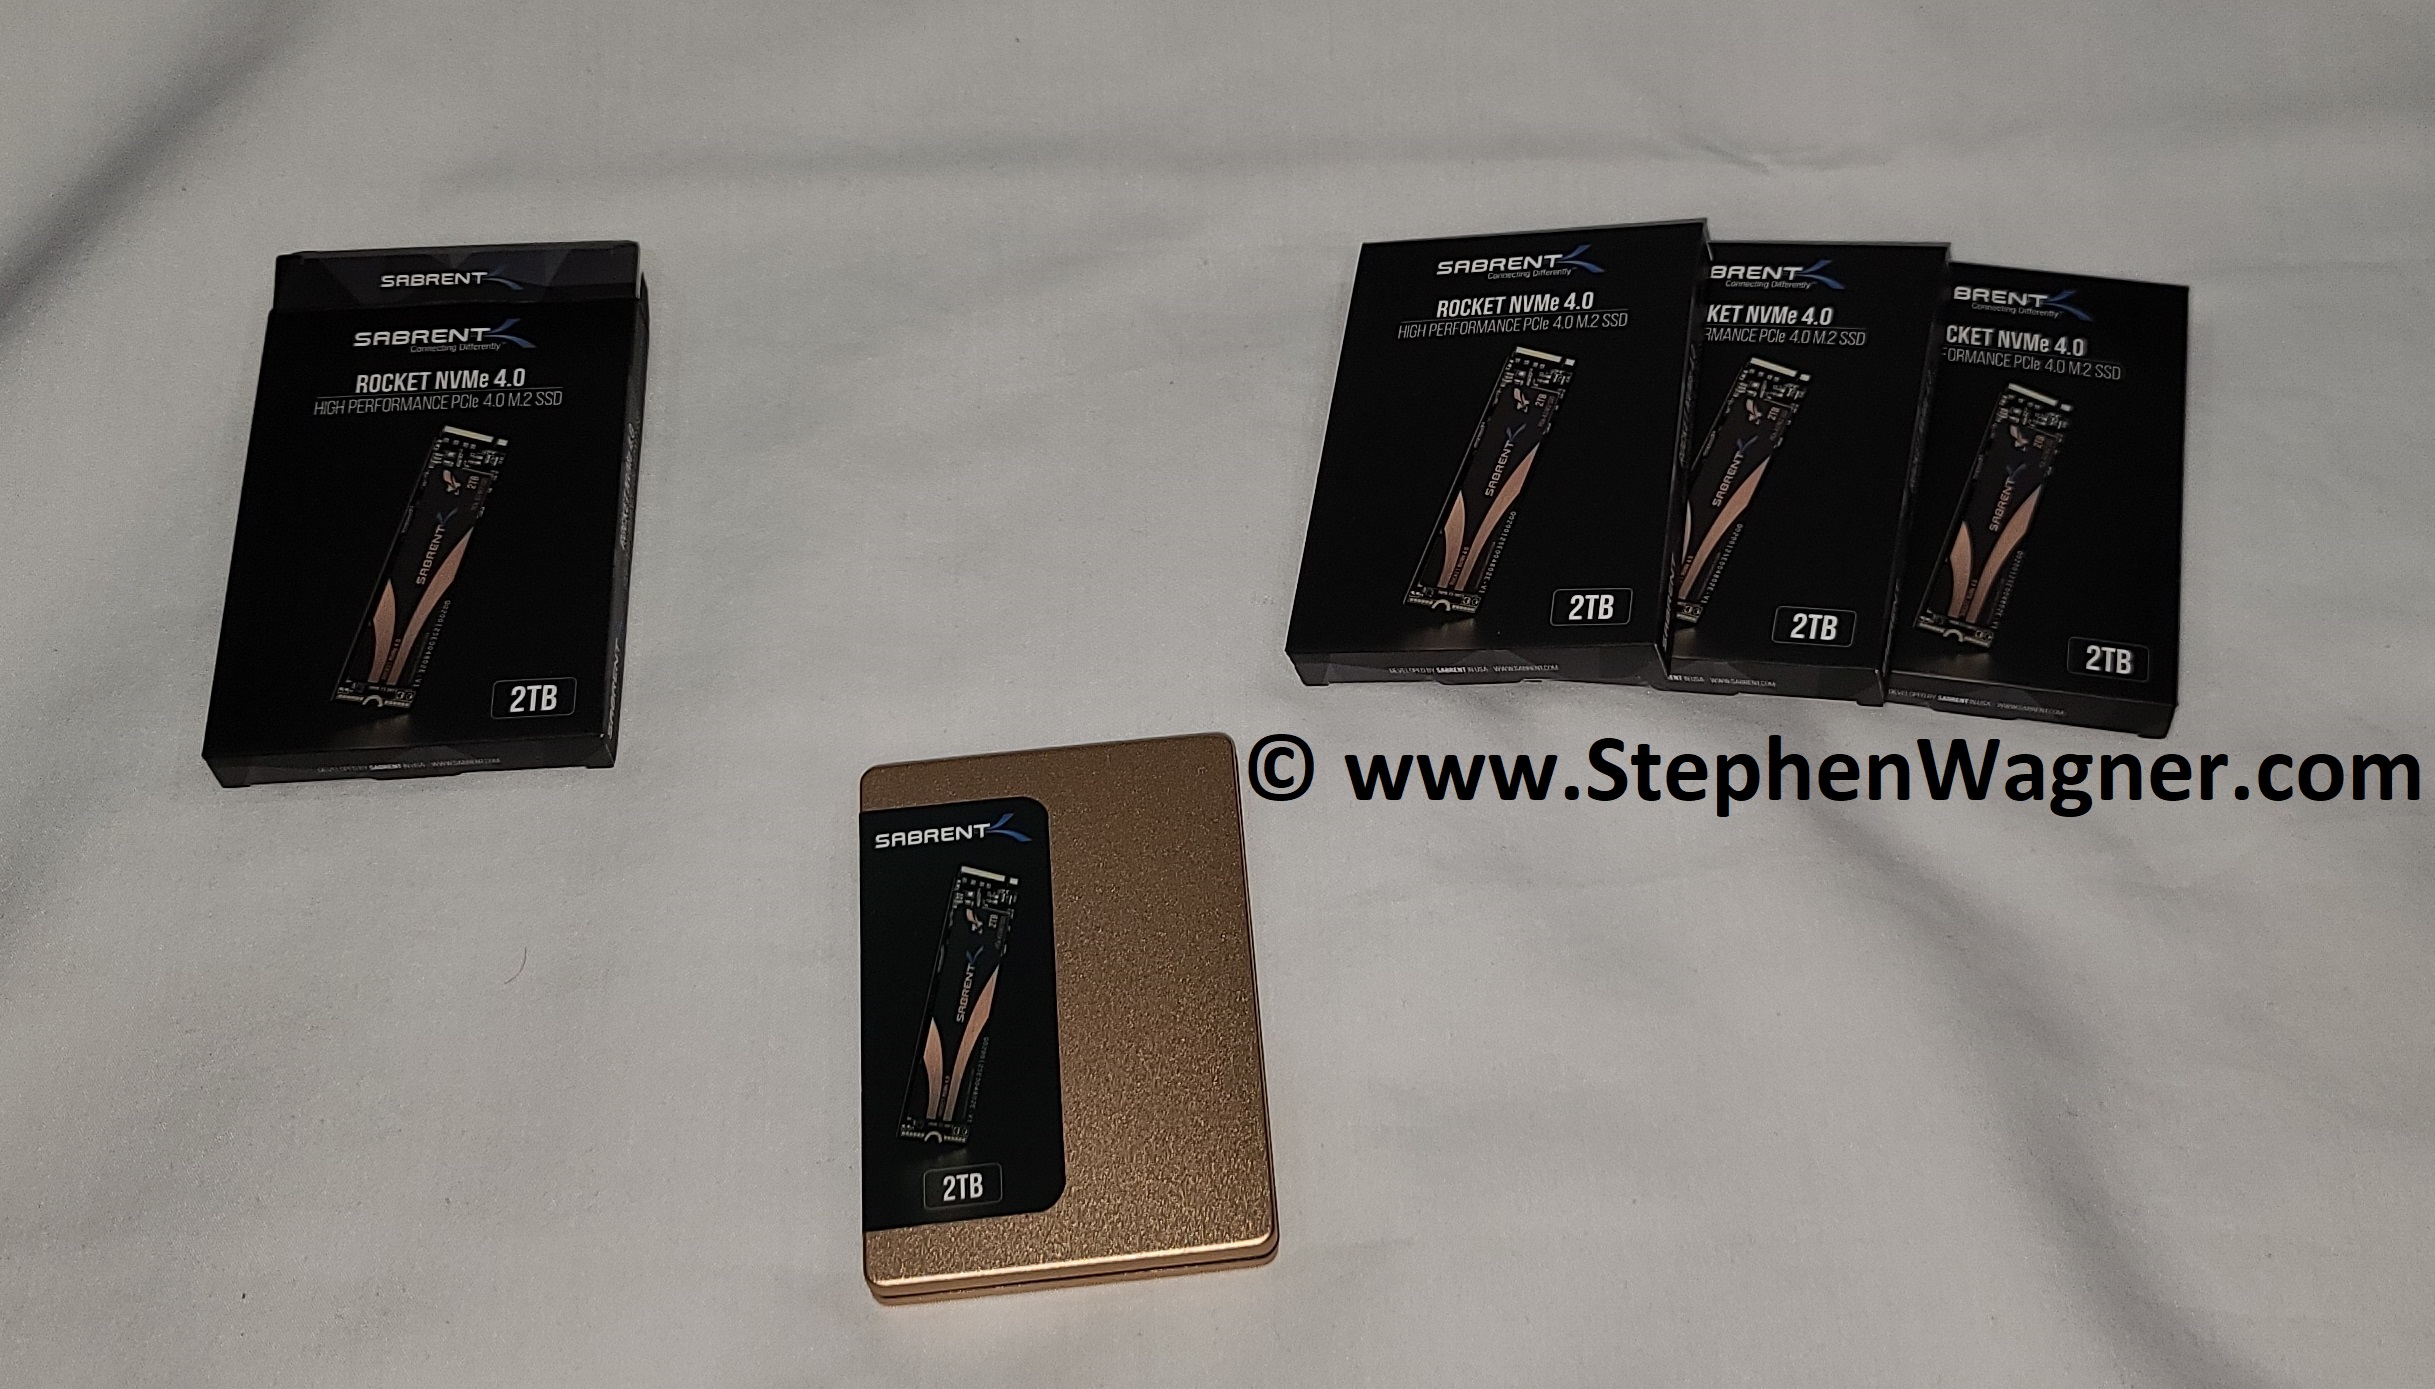
4 x 2TB Rocket Nvme PCIe 4.0 M.2 2280 Internal SSD Solid State Drive
Let’s get started with the review!
How and Why I purchased these
I’ve been working on a few special top-secret projects for the blog and YouTube channel, and needed some cost-effective yet high performing NVMe storage.
I needed at least 8TB of NVMe flash and I’m sure as all of you are aware, NVMe isn’t cheap.
After around a month of research I finally decided to pull the trigger and purchase a quantity of 4 x Sabrent Rocket 4 NVMe 2TB SSD. For future projects I’ll be using these in an IOCREST IO-PEX40152 NVME PCIe card.
These NVMe SSDs are targeted for consumers (normal users, gamers, power users, and IT professionals) and are a great fit! Just remember these do not have PLP (power loss protection), which is a feature that isn’t normally found in consumer SSDs.
Specifications
See below for the specifications and features included with the Sabrent Rocket 4 2TB NVMe SSD.
Endurance: 3,600TBW for 2TB, 1,800TBW for 1TB, 850TBW for 500TB
Available in 500GB, 1TB, 2TB
Made in Taiwan
Features:
NVMe M.2 2280 Interface for PCIe 4.0 (NVMe 1.3 Compliant)
APST, ASPM, L1.2 Power Management Support
Includes SMART and TRIM Support
ONFi 2.3, ONFi 3.0, ONFi 3.2 and ONFi 4.0 interface
Includes Advanced Wear Leveling, Bad Block Management, Error Correction Code, and Over-Provision
User Upgradeable Firmware
Software Tool to change Block Size
Where and how to buy
One of the perks of owning an IT company is that typically you can purchase all of your internal use product at cost or discount, unfortunately this was not the case.
I was unable to find the Sabrent products through any of the standard distribution channels and had to purchase through Amazon. This is unfortunate because I wouldn’t mind being able to sell these units to customers.
At the time of creation of this post, purchasing from Amazon Canada the 2TB model would set you back $699.99CAD for a single unit, however there was a sale going on for $529.99CAD per unit.
Additionally, at the time of creation of this post the 2TB model on Amazon USA would set you back $399.98 USD.
A total quantity of 4 set me back around $2,119.96CAD on sale versus $2,799.96 at regular price.
If you’re familiar with NVMe pricing, you’ll notice that this pricing is extremely attractive when comparing to other high performance NVMe SSDs.
Unboxing
I have to say I was very impressed with the packaging! Small, sleek, and impressive!
2TB Rocket Nvme PCIe 4.0 M.2 2280 Internal SSD Solid State Drive Metal Case Packaging
Initially I was surprised how small the boxes were as they fit in the palm of your hand, but then you realize how small the NVMe sticks are, so it makes sense.
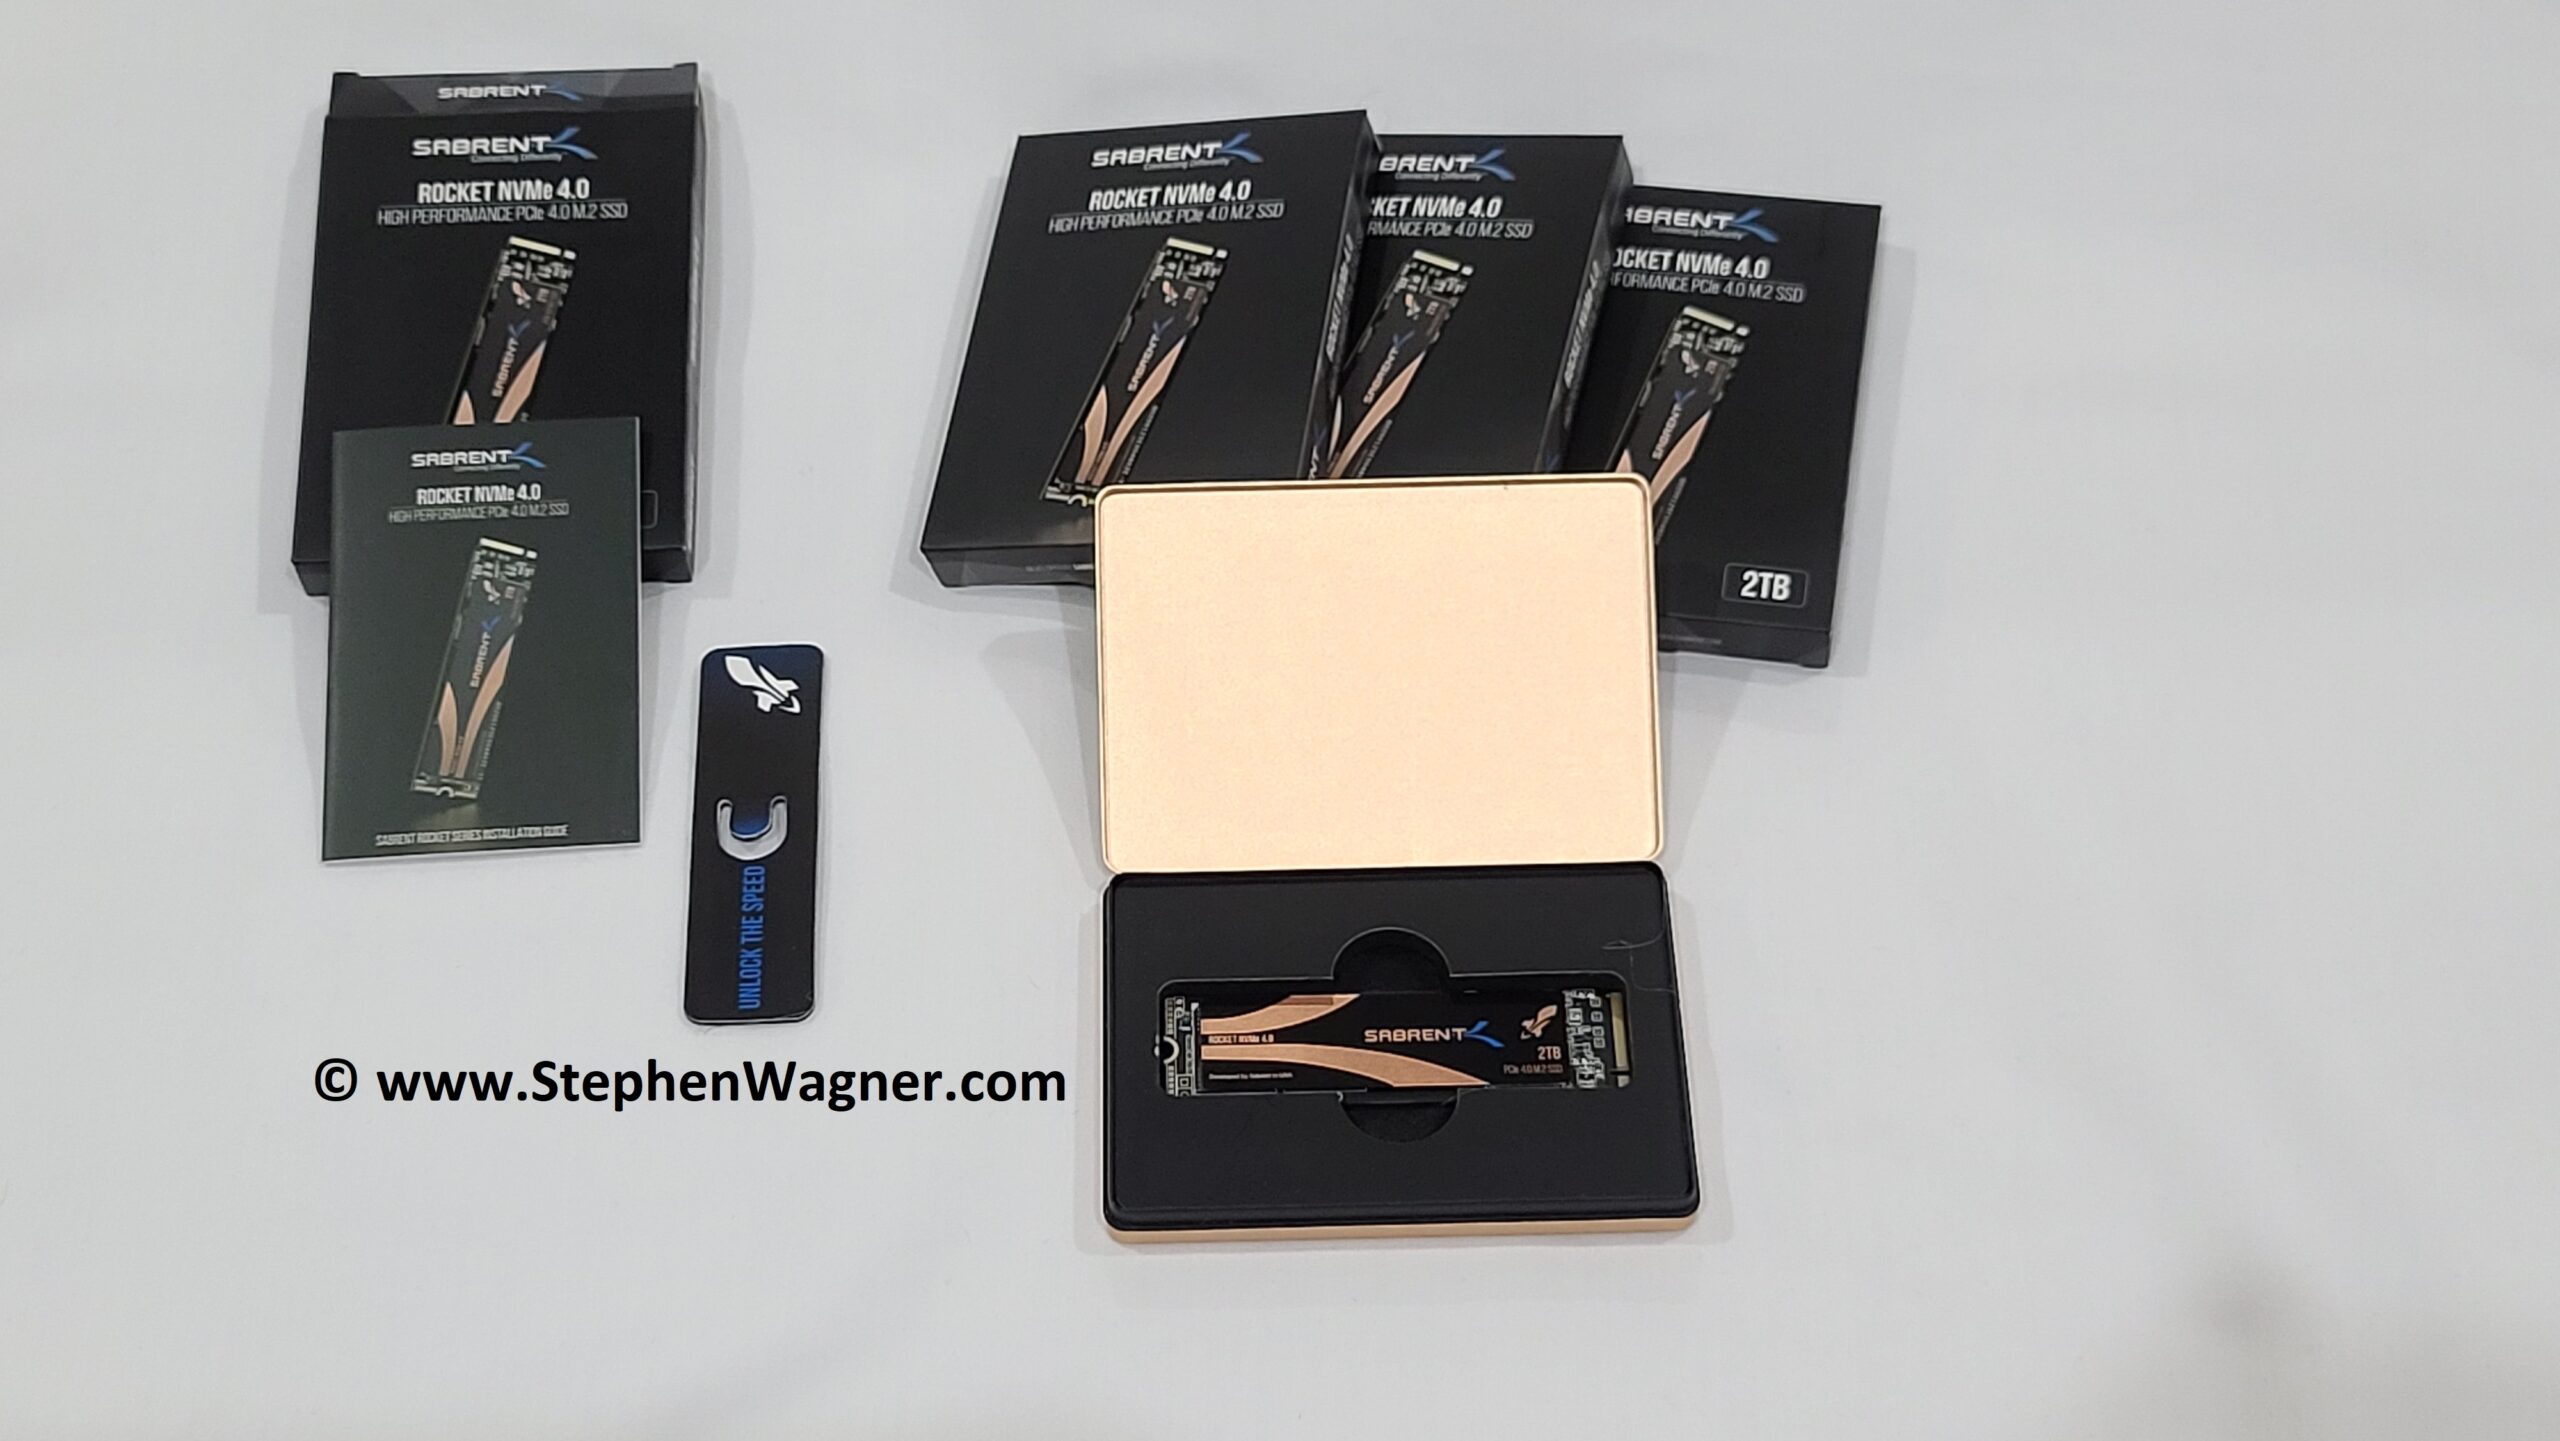
Opening the box you are presented with a beautiful metal case containing the instructions, information on the product warranty, and more.
2TB Rocket Nvme PCIe 4.0 M.2 2280 Internal SSD Solid State Drive in case
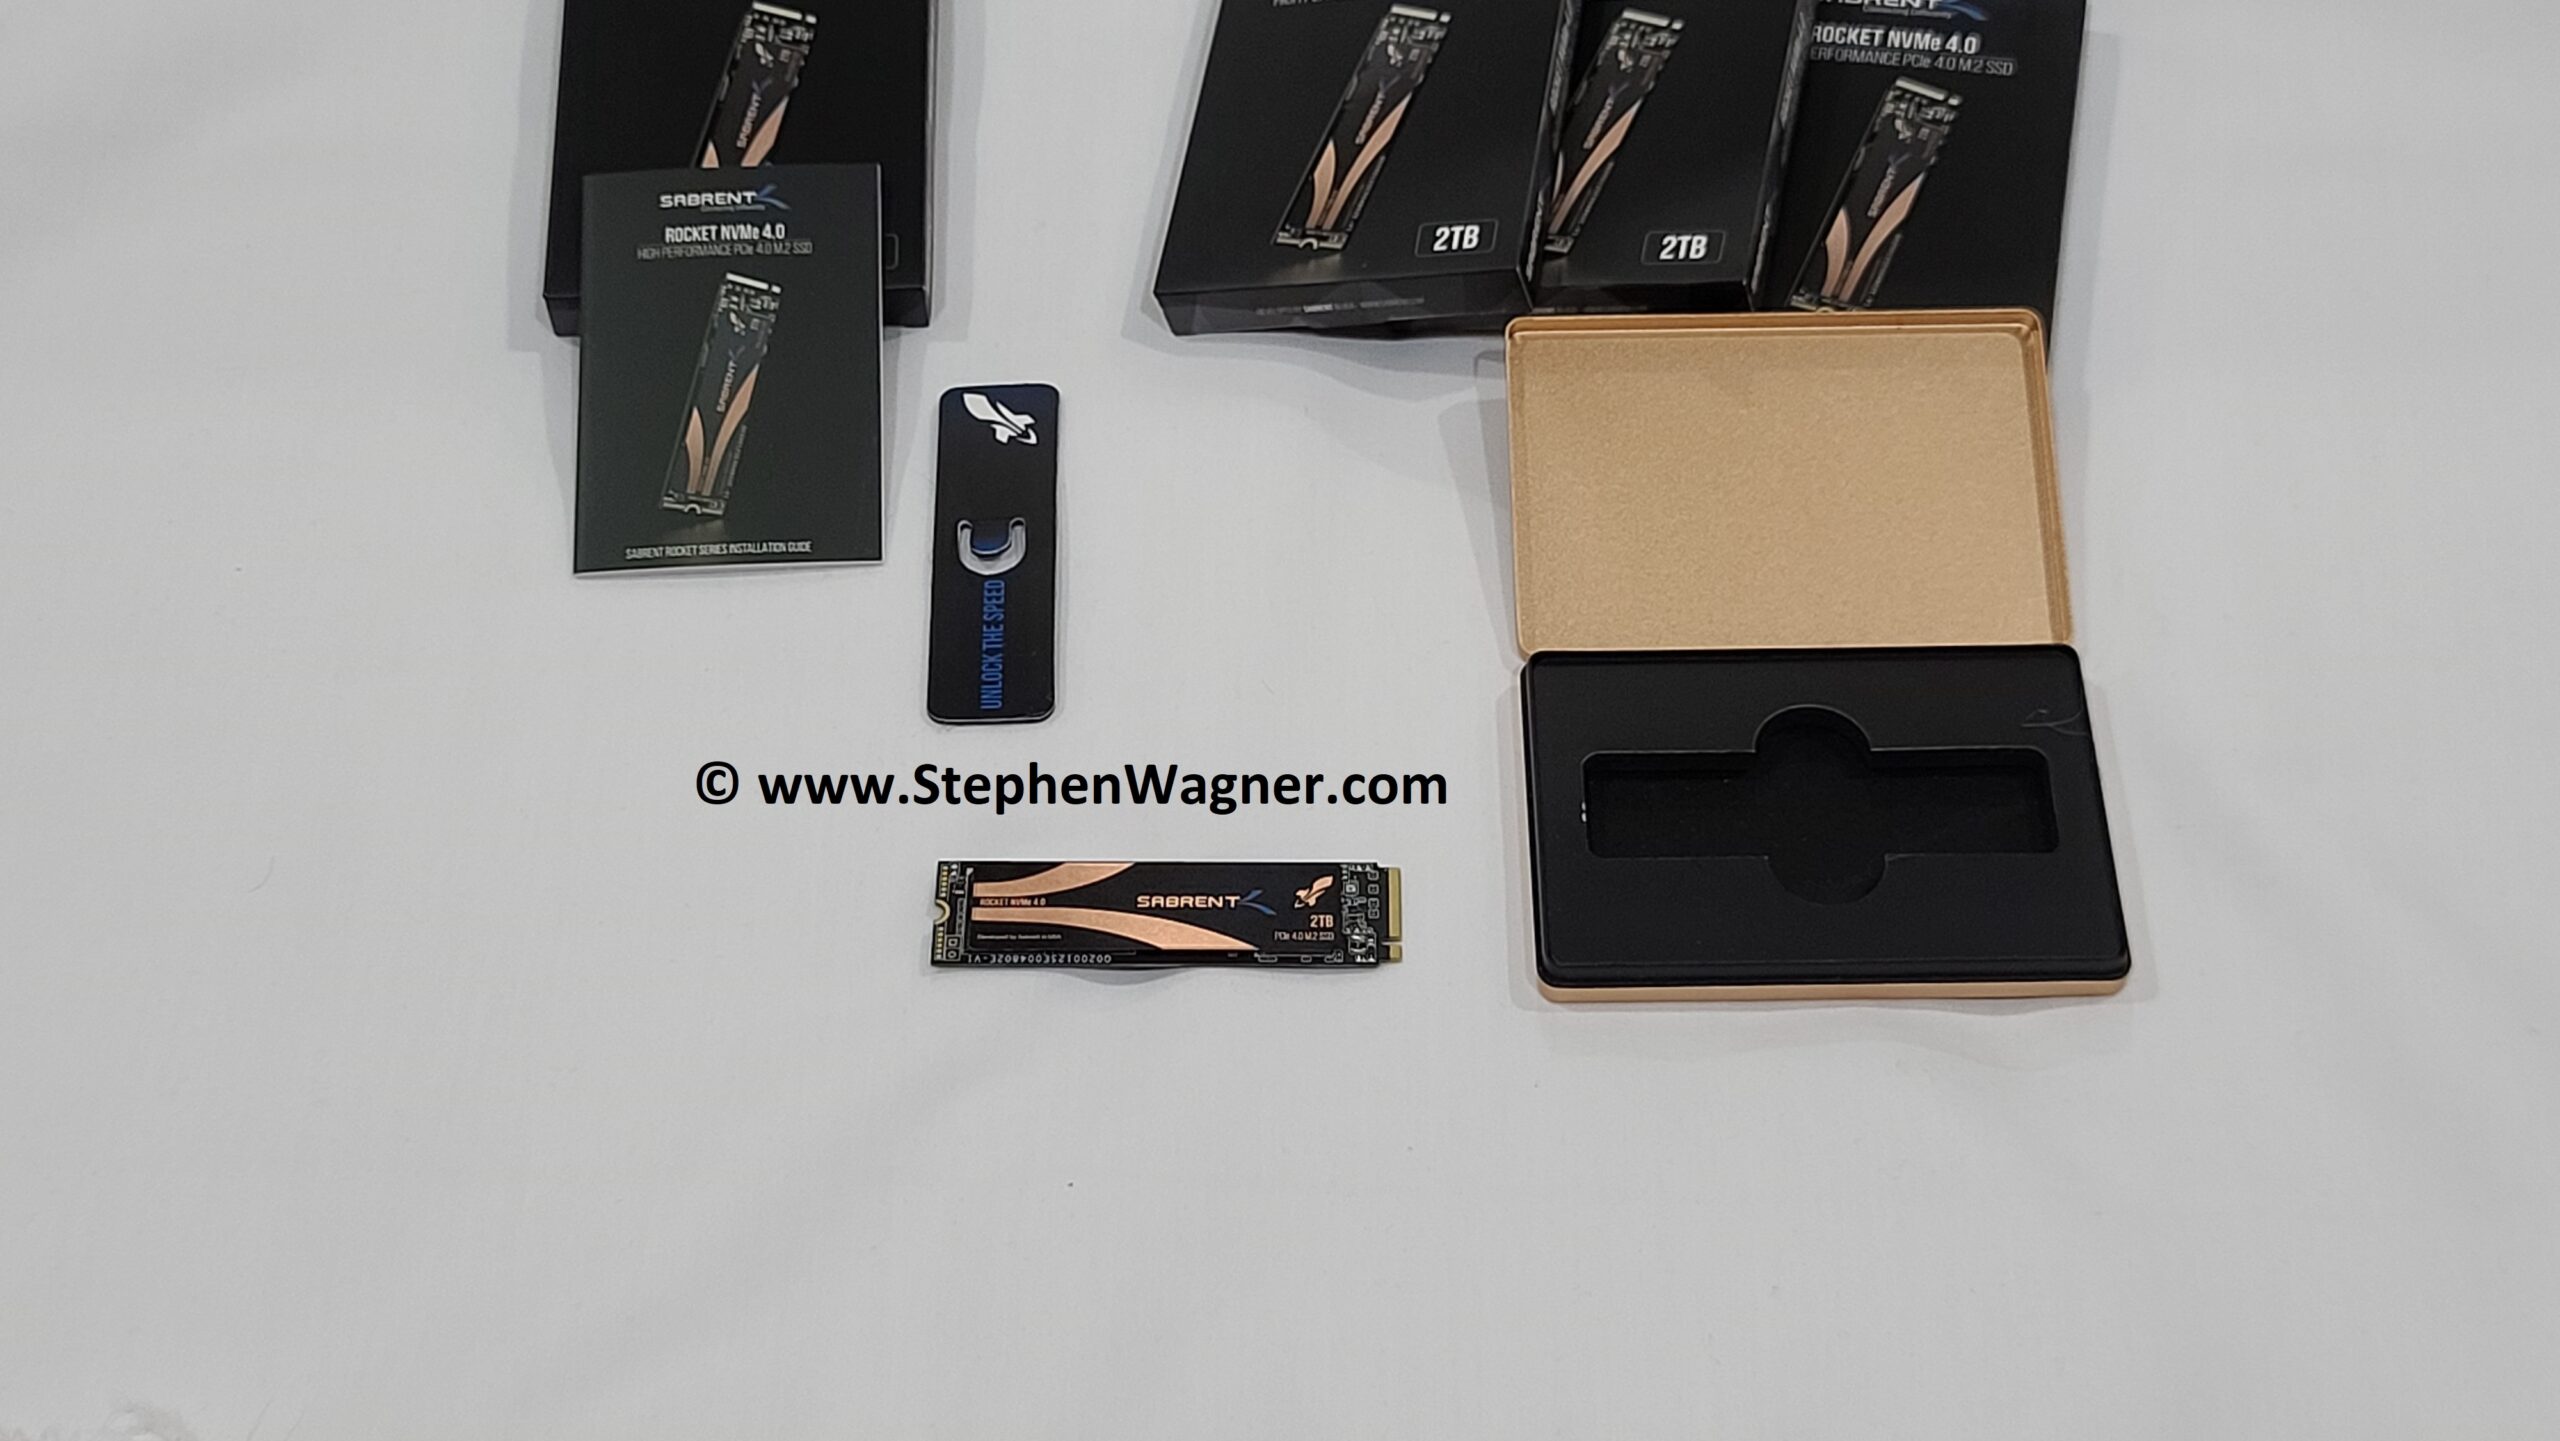
And the NVME stick removed from it’s case
2TB Rocket Nvme PCIe 4.0 M.2 2280 Internal SSD Solid State Drive removed from case
While some of the packaging may be unnecesary, after further thought I realized it’s great to have as you can re-use the packaging when storing NVMe drives to keep them safe and/or to put them in to storage.
And here’s a beautiful shot of 8TB of NVMe storage.
8TB Total NVMe storage across 4 x 2TB Rocket Nvme PCIe 4.0 M.2 2280 Internal SSD Solid State Drive
Now let’s move on to usage!
Installation, Setup, and Configuration
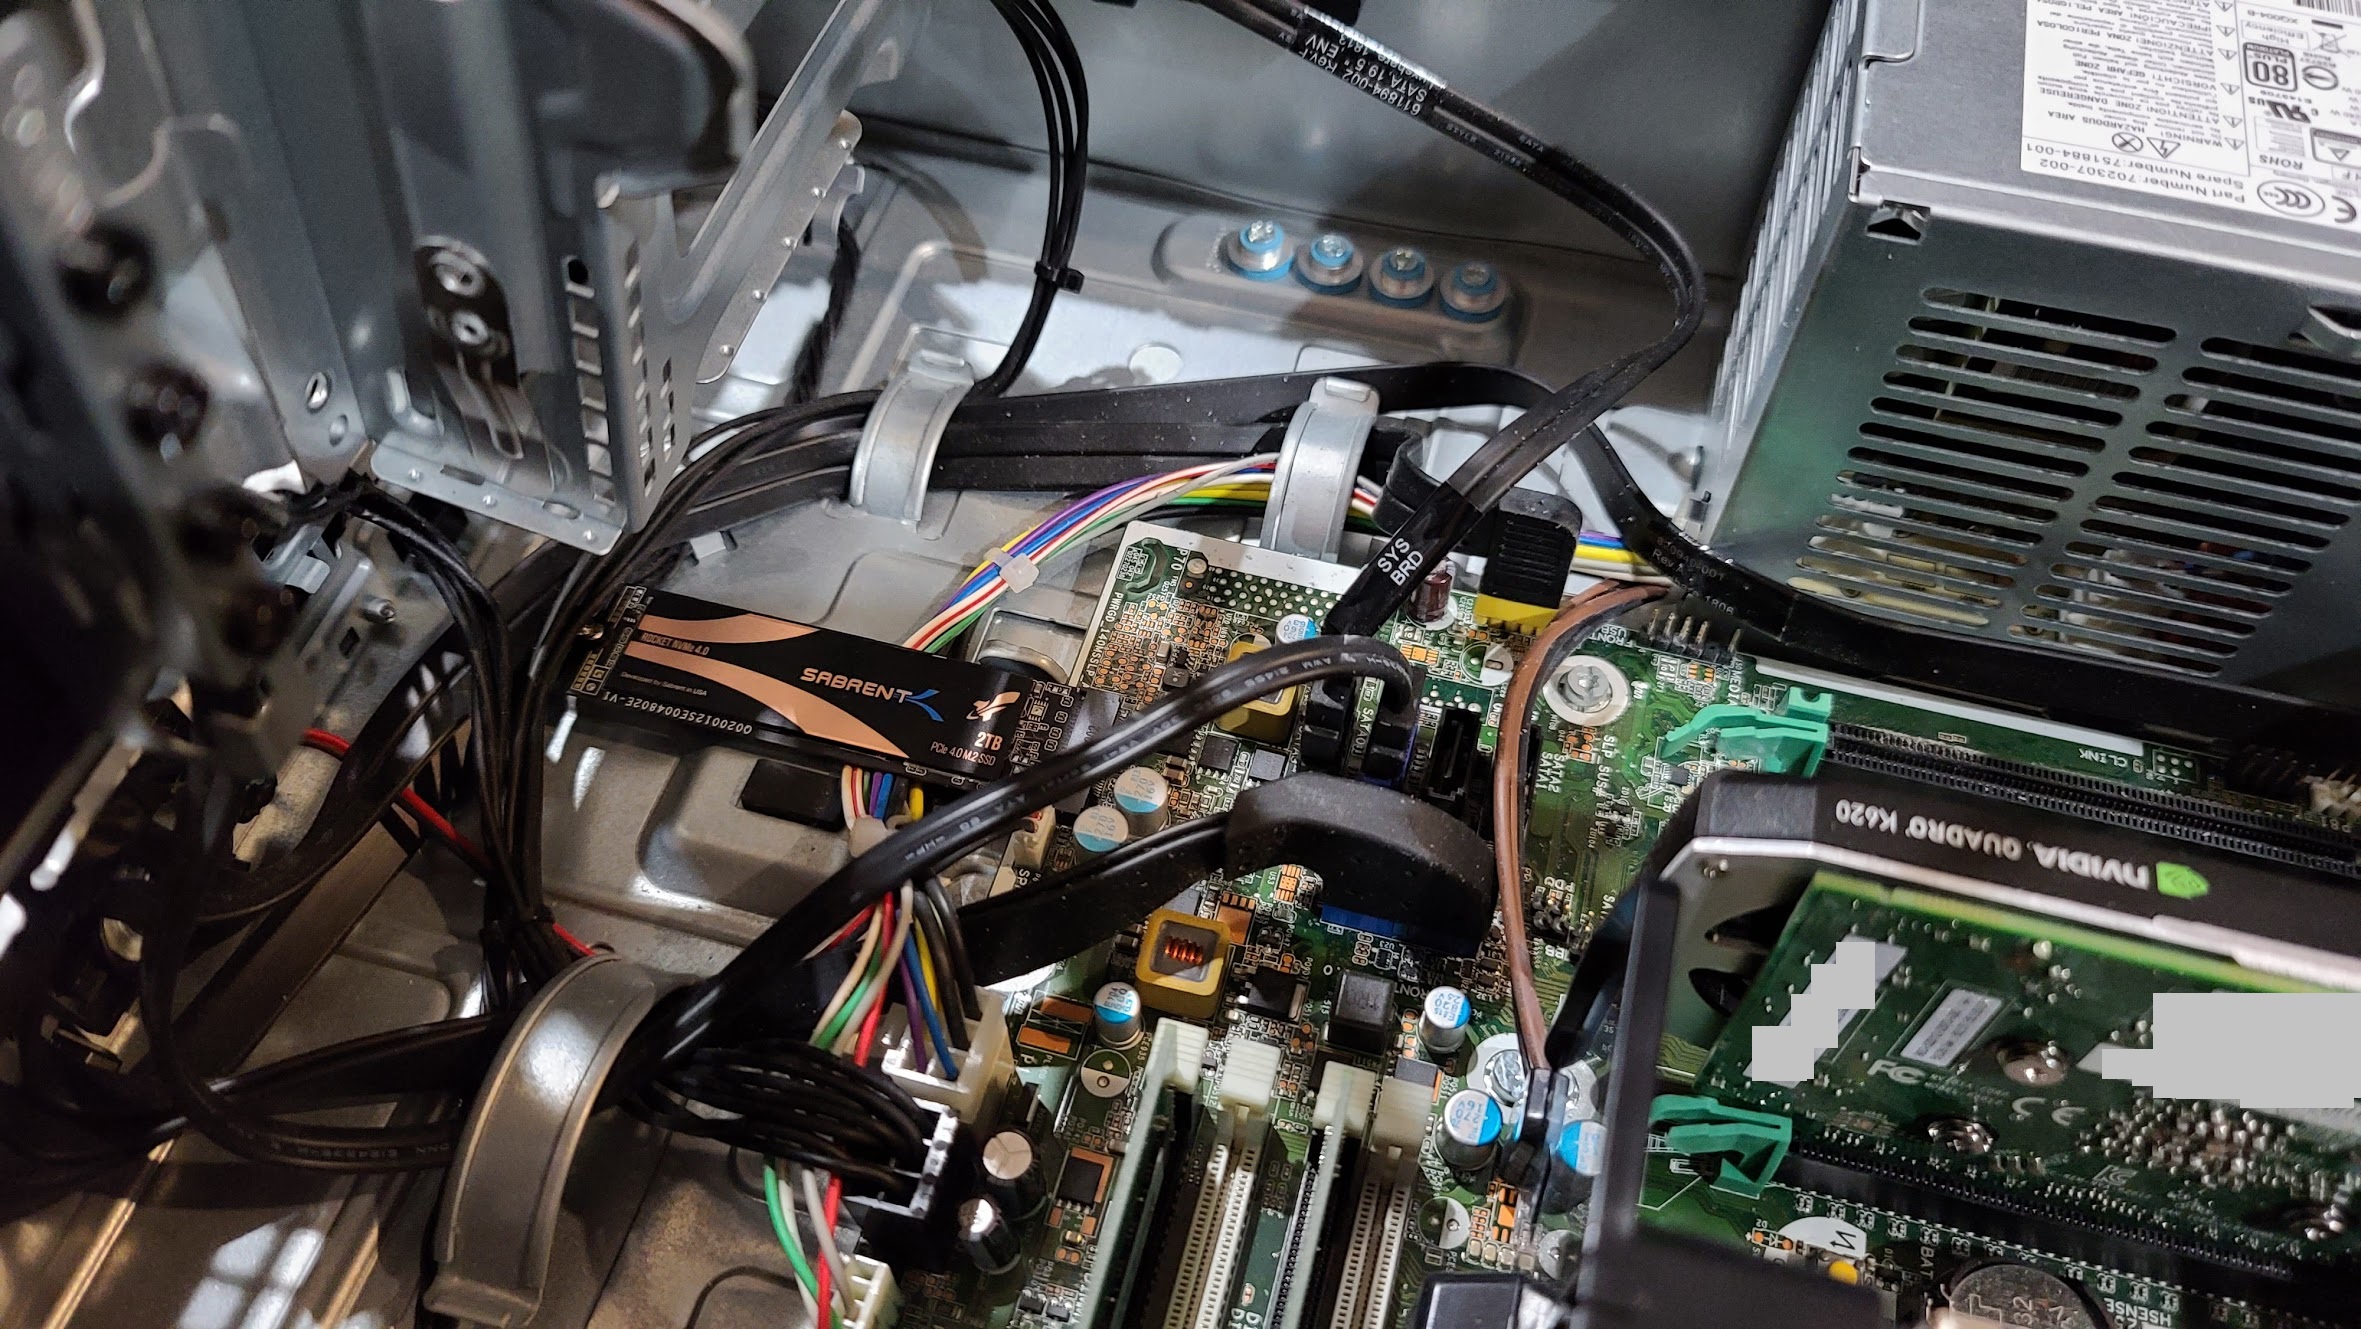
Setting one of these up in my HP Workstation was super easy. You simply populate the NVMe M.2 slot, install the screw, and boot up the system.
Sabrent Rocket 4 NVMe 2TB SSD in HP Z240 SFF Workstation
Upon booting, the Sabrent SSD was available inside of the Device Manager. I read on their website that they had some utilities so I wanted to see what configuration options I had access to before moving on to speed test benchmarks.
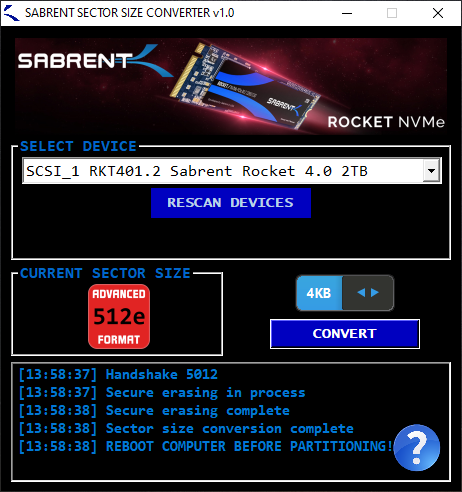
The Sabrent Sector Size Converter utility allows you to configure the sector size of your Sabrent Rocket SSD. Out of the box, I noticed mine was configured with a 512e sector format, which I promptly changed to 4K.
Sabrent Sector Size Converter v1.0
The change was easy, required a restart and I was good to go! You’ll notice it has a drop down to select which drive you want to modify, which is great if you have more than one SSD in your system.
I did notice one issue… When you have multiple (in my case 4) of these in one system, for some reason the sector size change utility had trouble changing one of them from 512e to 4K. It would appear to be succesful, but stay at 512e on reboot. Ultimately I removed all of the NVME sticks with the exception of the problematic one, ran the utility, and the issue was resolved.
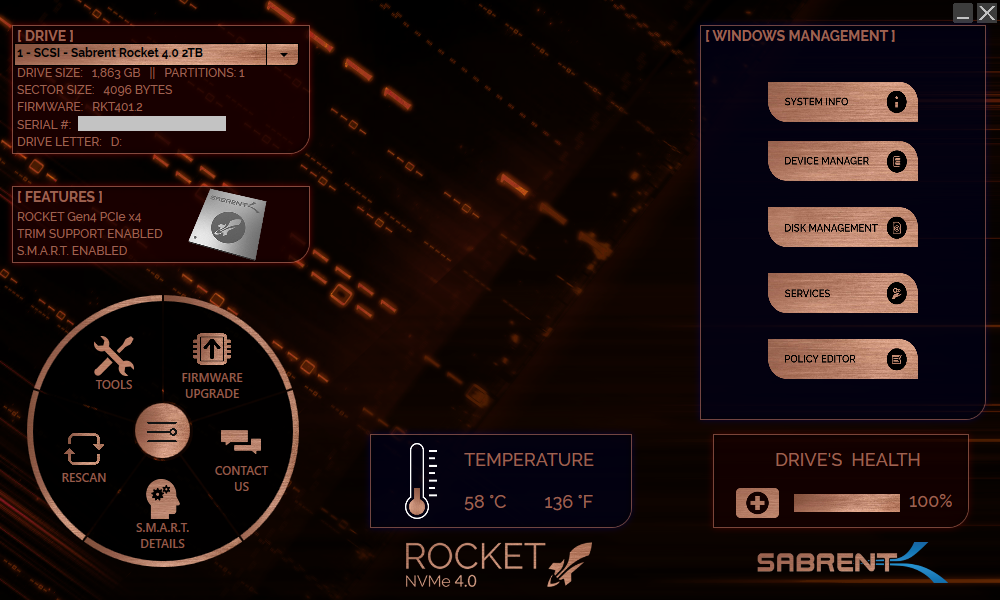
Sabrent Rocket Control Panel
Another useful utility that was available for download is the Sabrent Rocket Control Panel.
Sabrent Rocket Control Panel
The Sabrent Rocket Control Panel provides the following information:
Drive Size, Sector Size, Partition Count
Serial Number and Drive identifier
Feature status (TRIM Support, SMART, Product Name)
Drive Temperature
Drive Health (Lifespan)
You can also use this app to view S.M.A.R.T. information, flash updated Sabrent firmware, and more!
Now that we have this all configured, let’s move on to testing this SSD out!
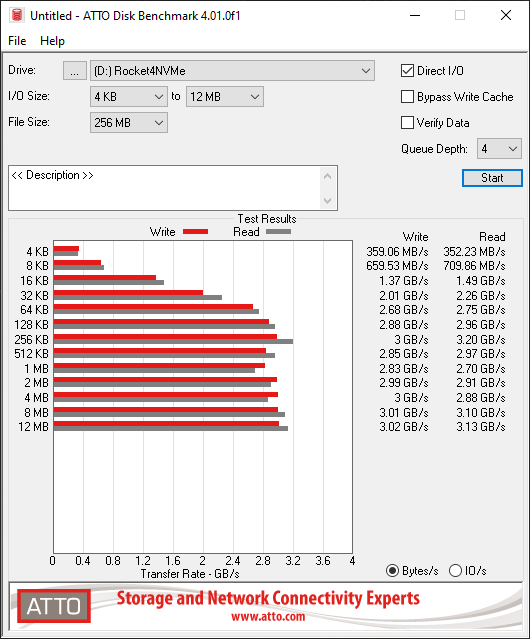
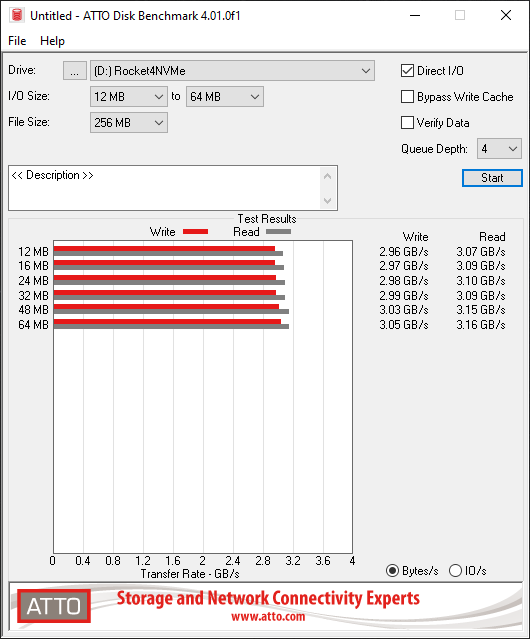
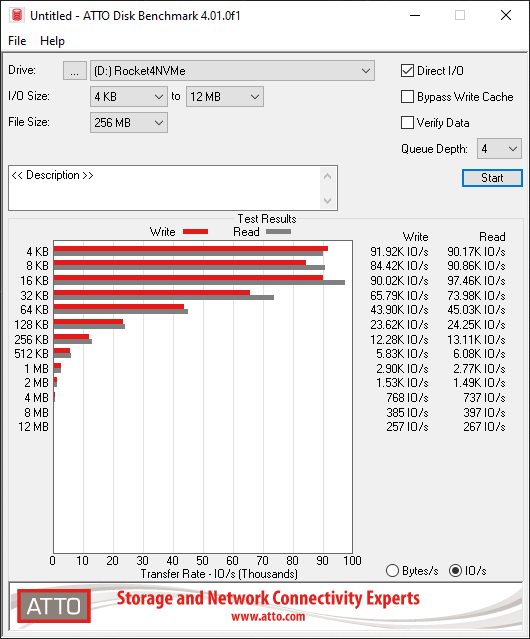
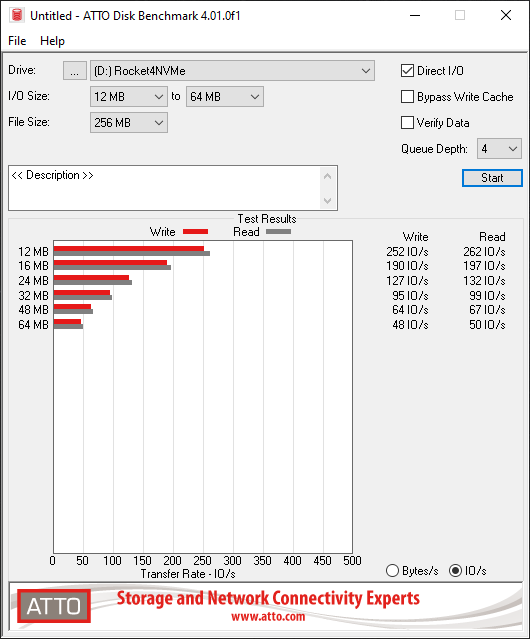
Speed Tests and Benchmarks
The system we used to benchmark the Sabrent Rocket 4 2TB NVMe SSD is an HP Z240 SFF (Small Form Factor) workstation.
The specs of the Z240 Workstation:
Intel Xeon E3-1240 v5 @ 3.5Ghz
16GB of RAM
Samsung EVO 500GB as OS Drive
Sabrent Rocket 4 NVMe 2TB SSD as Test Drive
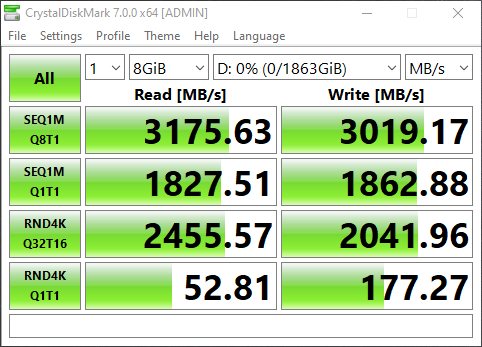
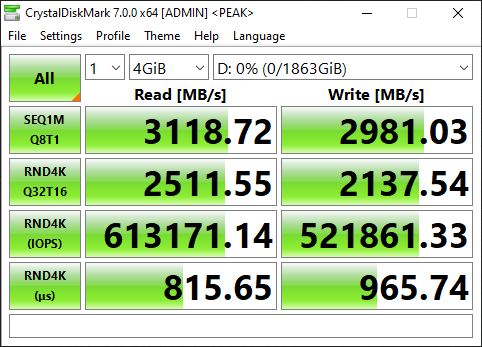
I ran a few tests using both CrystalDiskMark and ATTO Disk Benchmark, and the NVMe SSD performed flawlessly at extreme speeds!
CrystalDiskMark Results
Loading up and benching with CrystalDiskMark, we see the following results:
Sabrent Rocket PCIe 4 2TB CrystalDiskMark Results
As you can see, the Sabrent Rocket 4 2TB NVMe tested at a read speed of 3175.63MB/sec and write speed of 3019.17MB/sec.
When you purchase a new Sabrent Rocket 4 SSD it comes with a 1 year standard warranty, however if you register your product within 90 days of purchase, you can extend it to an awesome 5 year warranty.
The process is easy if you have one device, however it very repettitive and takes time if you have multiuple as the steps have to be repeated for each device you have. Sabrent, if you’re listening a batch registration tool would be nice! 🙂
Remember that after registering your product, you should record your “Registration Unique ID” for future reference and use.
Conclusion
All-in-all I’d definitely recommend the Sabrent Rocket 4 NVMe SSD! It provides extreme performance, is extremely cost-effective, and I wouldn’t see any reason not to buy them.
Just remember that these SSDs (like all consumer SSDs) do not provide power loss protection, meaning you should not use these in enterprise environments (or in a NAS or SAN).
I’m really looking forward to using these in my upcoming blog and YouTube projects.
Today we take it back to basics with a guide on how to create an Active Directory Domain on Windows Server 2019.
These instructions are also valid for previous versions of Microsoft Windows Server.
This video will demonstrate and explain the process of installing, configuring, and deploying a Windows Server 2019 instance as a Domain Controller, DNS Server, and DHCP Server and then setting up a standard user.
Check it out and feel free to leave a comment! Scroll down below for more information and details on the guide.
Windows Server 2019: How to Create an Active Directory Domain
Who’s this guide for
No matter if you’re an IT professional who’s just getting started or if you’re a small business owner (on a budget) setting up your first network, this guide is for you!
What’s included in the video
In this guide I will walk you through the following:
Installing Windows Server 2019
Documenting a new Server installation
Configuring Network Settings
Installation and configuration of Microsoft Active Directory
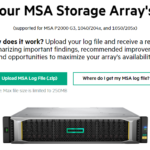
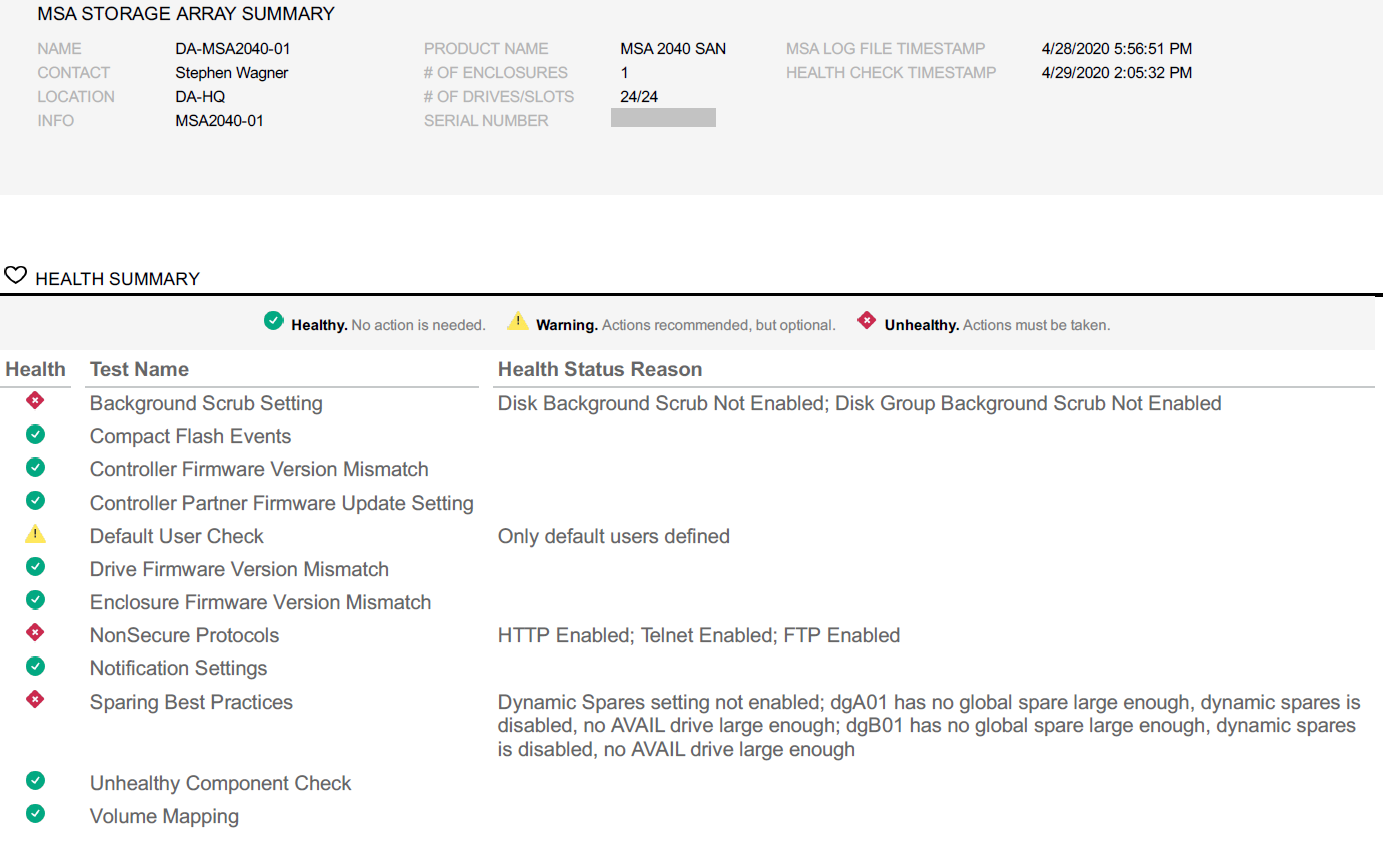
Are you having issues your HPE MSA SAN? Want to have more insight in to your storage array? Last week, HPE made available a new tool that allows you to check the health of your HPE MSA Storage Array!
While this tool was released to the public last week, rumor has it that this is the same tool that HPE uses internally when providing support to customers.
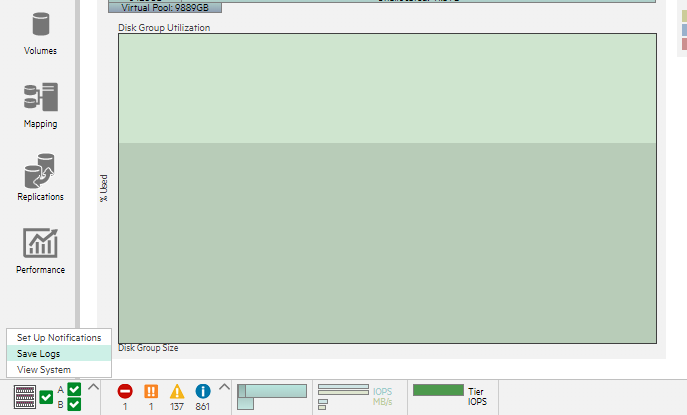
Log on to your MSA Array SMU (Storage Management Utility)
On the bottom left of the UI, click on the following up-arrow and select save logs
Wait for the logs to generate.
Download the logs to your computer
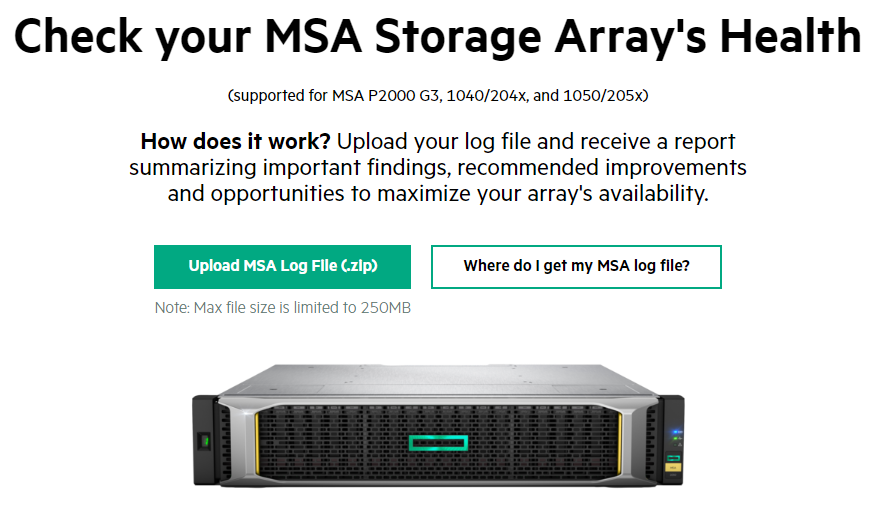
Open the MSA Storage Array Health Check
Click on the “Upload MSA Log File (.zip)” button, and then select your log dump zip file
Wait for the File to upload
View your health report, and optionally download a PDF copy
And that’s it!
Available Tests
When running a health check, the following tests and checks are made on the log files:
Background Scrub Setting
Compact Flash Events
Controller Firmware Version Mismatch
Controller Partner Firmware Update Setting
Default User Check
Drive Firmware Version Mismatch
Enclosure Firmware Version Mismatch
NonSecure Protocols
Notification Settings
Sparing Best Practices
Unhealthy Component Check
Volume Mapping
Conclusion
Even if your MSA array is healthy, I’d still recommend generating a log dump and loading it up in to the MSA Health Check. Any extra visibility, is good visibility!
If you’re worried about destroying your SD Cards, need some more space, or just want to learn something new, I’m going to show you how to use an NFS root for the Raspberry Pi 4.
When you use an NFS Root with your Raspberry Pi, it stores the entire root filesystem on a remote NFS export (think of it as a network filesystem share). This means you’ll have as much space as the NFS export, and you’ll probably see way faster performance since it’ll be running at 1Gb/sec instead of the speed of the SD Card.
This also protects your SD card, as the majority of the reading and writing is performed on the physical storage of the NFS export, instead of the SD card in the Pi which has limited reads and writes.
What you’ll need
To get started, you’ll need:
Raspberry Pi 4
Ubuntu or Raspbian for Raspberry Pi 4 Image
A small SD card for the Boot Partition (1-2GB)
SD card for the Raspberry Pi Linux image
Access to another Linux system (workstation, or a Raspberry Pi)
There are multiple ways to do this, but I’m providing instructions on the easiest way it was for me to do this with the resources I had immediately available.
Instructions
To boot your Raspberry Pi 4 from an NFS root, multiple steps are involved. Below you’ll find the summary, and further down you’ll find the full instructions. You can click on an item below to go directly to the section.
See below for the individual instructions for each step.
Write the Linux image to an SD Card
First, we need to write the SD Card Linux image to your SD card. You’ll need to know which device your SD card will appear to your computer. In my case it was /dev/sdb, make sure you verify the right device or you could damage your current Linux install.
Download Ubuntu or Raspbian for Raspberry Pi.
unzip or unxz depending on distribution to uncompress the image file.
Write the SD card image to SD card.
dd if=imagename.img of=/dev/sdb bs=4M
You now have an SD Card Linux install for your Raspberry Pi. We will later modify and then copy this to the NFS root and boot SD card.
Create boot SD Card for NFS Root
In this step, we’re going to create a bootable SD card that contains the Linux kernel and other needed files for the Raspberry Pi to boot.
This card will be installed in the Pi, load the kernel, and then kick off the boot process to load the NFS root.
After you do this, the Linux SD image may not boot again if directly installed in the Raspberry Pi, so make sure you’ve made the proper modifications before powering it down.
Create the NFS Export
In my case I used a Synology DS1813+ as an NFS server to host my Raspberry Pi NFS root images. But you can use any Linux server to host it.
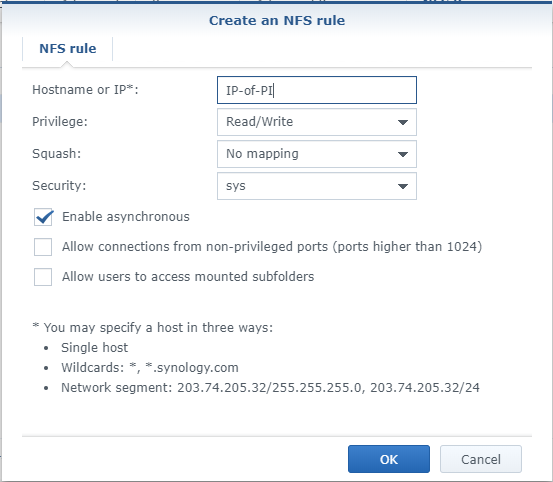
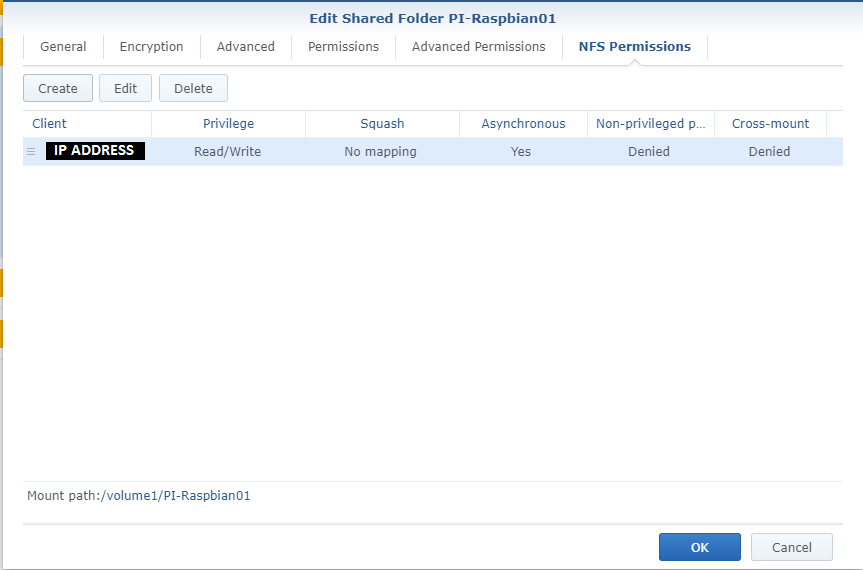
If you’re using a synology disk station, create a shared folder, disable the recycling bin, leave everything else default. Head over to the “NFS Permissions” tab and create an ACL entry for your PI and workstations. You can also add a network segment for your entire network (ex. 192.168.0.0/24″) instead of specifying individual IPs.
Create an NFS ACL Rule for Synology NFS Access
Once you create an entry, it’ll look like this. Note the “Mount path” in the lower part of the window.
NFS Permissions and Mount Path for NFS Export
Now, if you’re using a standard Linux server the steps are different.
Install the require NFS packages:
apt install nfs-kernel-server
Create a directory, we’ll call it “nfs-export” on your root fs on the server:
mkdir /nfs-export/
Then create a directory for the Raspberry Pi NFS Root:
mkdir /nfs-export/PI-ImageName
Now edit your /etc/exports file and add this line to the file to export the path:
Take note of the mount point and/or NFS export path, as this is the directory your Raspberry Pi will need to mount to access it’s NFS root. This is also the directory you will be copying your SD Card Linux install root FS to.
Copy the Linux install to the NFS Export
When you’re ready to copy your SD Card Linux install to your NFS Export, you’ll need to do the following. In my case I’ll be using an Ubuntu desktop computer to perform these steps.
When I insert the SD Card containing the Raspberry Pi Linux image, it appeared as /dev/sdb on my system. Please make sure you are using your proper device names to avoid using the wrong one to avoid writing or using the wrong disk.
Instructions to copy the root fs from the SD card to the NFS root export:
Mount the root partition of the SD Card Linux install to a directory. In my case I used directory called “old”.
mount /dev/sdb2 old/
Mount the NFS Export for the NFS Root to a directory. In my case I used a directory called “nfs”.
mount IPADDRESS:/nfs-export/PI-ImageName nfs/
Use the rsync command to transfer the SD card Linux install to the NFS Root Export.
Once this is complete, your OS root is now copied to the NFS root.
Copy and Modify the boot SD Card to use NFS Root
First we have to copy the boot partition from the SD Card Linux install to the boot SD card, then we need to modify the contents of the new boot SD card.
Top copy the boot files, follow these instructions.
Mount the boot partition of the SD Card Linux install to a directory. In my case I used directory called “old”.
mount /dev/sdb1 old/
Mount the new boot partition of the boot SD card to a new directory. In my case I used the directory called “new”.
mount /dev/sdc1 new/
Use the rsync command to transfer the SD card Linux install boot partition to the new boot SD card.
Once you make the modifications, save the file and unmount the SD card.
Your SD card is now ready to boot.
Boot using SD Card and test NFS Root
At this point, insert the boot SD Card in your Raspberry Pi and attempt to boot. All should be working now and it should boot and use the NFS root!
If you’re having issues, if the boot process stalls, or something doesn’t work right, look back and confirm you followed all the steps above properly.
You’re done!
You’re now complete and have a fully working NFS root for your Raspberry Pi. You’ll no longer worry about storage, have high speed access to it, and you’ll have some new skills!
This website uses cookies to improve your experience. We'll assume you're ok with this, but you can opt-out if you wish.
Do you accept the use of cookies and accept our privacy policy? AcceptRejectCookie and Privacy Policy
Privacy & Cookies Policy
Privacy Overview
This website uses cookies to improve your experience while you navigate through the website. Out of these cookies, the cookies that are categorized as necessary are stored on your browser as they are essential for the working of basic functionalities of the website. We also use third-party cookies that help us analyze and understand how you use this website. These cookies will be stored in your browser only with your consent. You also have the option to opt-out of these cookies. But opting out of some of these cookies may have an effect on your browsing experience.