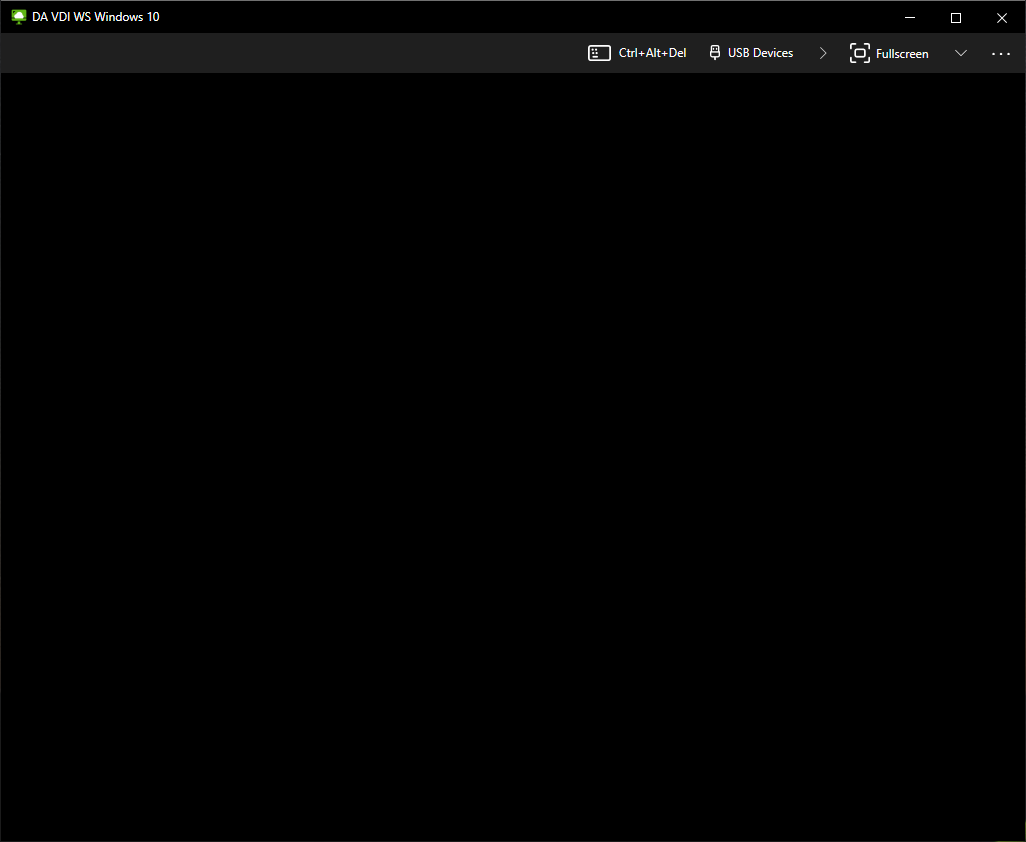
In all my years assisting and providing support with VMware Horizon, one of the most common problems that customers report with their VDI implementations, is the VMware Horizon Blank Screen.
When a user is presented with a blank or black screen when using the VMware Horizon Client, the problem can be caused by a number of different things. In this post, I will address and provide solutions for some of the common issues that cause the VMware Horizon blank screen.
This troubleshooting guide applies to VMware Horizon 8, VMware Horizon 7, as well as earlier versions of VMware Horizon.
VMware Horizon Blank Screen Causes
There’s a number of different causes of a blank or black screen when connecting and establishing a VDI session to Horizon View. Click on the item below to jump to that section of the post:
- VMware Tools and Horizon Agent Installation Order
- Network ports are blocked (Computer Firewall, Network Firewall)
- DNS Issues
- XDR, EDR, and AV Platform causing momentary blank screen at logon
- Incorrectly configured Unified Access Gateway
- GPU Driver Issue
- NVIDIA vGPU Issues
- VMware Tools
- Horizon Agent
- Video Settings (Video Memory (VRAM), Resolution, Number of Displays)
- Master Image Resolution
- Protocol
- HTTPS Proxy and redirection issues
- Login banner or disclaimer (PCoIP)
- Old version of Horizon View
- Blank Screen connecting to Physical PC running Horizon Agent
Now that we have a list, let’s dive in to each of these individually. Some of these will require you to do your own research and will only guide you, while other sections will include the full fix for the issue.
VMware Tools and Horizon Agent Installation Order
When deploying the VMware Horizon View agent, you are required to install the agent, along with VMware tools in a specific order. Failing to do so can cause problems, including a blank screen screen.
The installation order:
- Install GPU/vGPU drivers (if needed)
- Install VMware Tools Agent
- Install the VMware Horizon Agent
- Install the VMware User Environment Manager Agent (if needed)
- Install the VMware App Volumes Agent (if needed)
It is important to also consider this when upgrading the agents as well. When upgrading VMware Tools, it is recommended to re-install the Horizon agent in versions up to and including Horizon 8 2103. As of Horizon 2106 and later, you no longer need to re-install the Horizon Agent when performing a VMware Tools upgrade.
For more information on the agent installation order for VMware Horizon, please visit: https://kb.vmware.com/s/article/2118048.
Network ports are blocked (Computer Firewall, Network Firewall)
For the VMware Horizon agent to function properly, ports must be accessible through your firewall, whether it’s the firewall on the VM guest, client computer, or network firewall.
The following ports are required for the VMware Horizon Agent when connecting directly to a View Connection Server.
| Destination | Network Protocol | Destination Port | Details |
| Horizon Connection Server | TCP | 443 | Login, authentication, and connection to the VMware Connection Server. |
| Horizon Agent | TCP | 22443 | Blast Extreme |
| UDP | 22443 | Blast Extreme | |
| TCP | 4172 | PCoIP | |
| UDP | 4172 | PCoIP | |
| TCP | 3389 | RDP (Remote Desktop Protocol) | |
| TCP | 9427 | Client Shared Drive redirection (CDR) and Multi-media redirection (MMR). | |
| TCP | 32111 | USB Redirection (Optional), can be incorporated in to the Blast Extreme connection. |
The following ports are required for the VMware Horizon Agent when connecting through a VMware Unified Access Gateway (UAG).
| Destination | Network Protocol | Destination Port | Details |
| Unified Access Gateway | TCP | 443 | Login, authentication, and connection to the Unified Access Gateway. This port/connection can also carry tunneled RDP, client drive redirection, and USB redirection traffic. |
| TCP | 4172 | PCoIP via PCoIP Secure Gateway | |
| UDP | 4172 | PCoIP via PCoIP Secure Gateway | |
| UDP | 443 | Optional for Login traffic. Blast Extreme will attempt a UDP login if there are issues establishing a TCP connection. | |
| TCP | 8443 | Blast Extreme via Blast Secure Gateway (High Performance connection) | |
| UDP | 8443 | Blast Extreme via Blast Secure Gateway (Adaptive performance connection) | |
| TCP | 443 | Blast Extreme via UAG port sharing. |
You’ll notice the ports that are required for Blast Extreme and PCoIP. If these are not open you can experience a blank screen when connecting to the VMware Horizon VDI Guest VM.
For more information on VMware Horizon network ports, visit VMware’s Network Ports in VMware Horizon | VMware.
Certain types of IPS (Intrusion Prevention Service) can also intercept and block traffic. IPS may cause intermittent issues.
DNS Issues
While VMware Horizon View usually uses IP address for connectivity between the View Connection Server, guest VM, and client, I have seen times where DNS issues have stopped certain components from functioning properly.
It’s always a good idea to verify that DNS is functioning both internally and externally. DNS (forward and reverse) is required for VMware Horizon Linux guests VMs.
XDR, EDR, and AV Platform causing momentary blank screen at logon
When using an XDR (Extended Detection and Response), EDR (Endpoint Detection and Response), or special AV solution with non-persistent desktops, one may experience a momentary blank screen on user session logon. I have observed this with Sophos XDR as well as Cortex XDR, with blank screens varying from 10-30 seconds on user login.
Removal of the platform can reduce the momentary blank screen down to 1-5 seconds.
I highly recommend configuring and tweaking policies as much as possible to enhance and optimize your environment. There will always be a trade off of performance for security, and the decisions should be made by those in the organization who make cyber security related decisions.
Incorrectly configured Unified Access Gateway
A big offender when it comes to blank screens is an incorrectly configured VMWare Unified Access Gateway for VMware Horizon.
Sometimes, first-time UAG users will incorrectly configure the View Connection server and UAG.
When configuring a UAG, you must disable both “Blast Secure Gateway”, and “PCoIP Secure Gateway” on the View Connection Server, as the UAG will be handling this. See below.
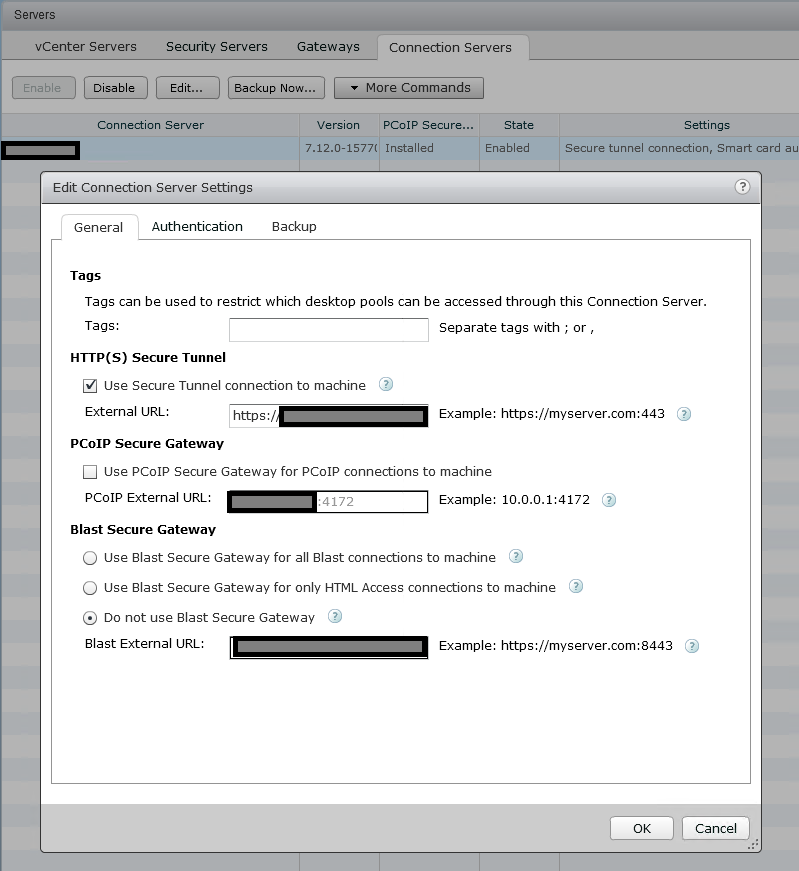
Another regular issue is when admins misconfigure the UAG itself. There are a number of key things that must be configured properly. These are the values that should be populated on the UAG under Horizon Settings.
| Connection Server URL | https://ConnectionServerIP:443 |
| Connection Server URL Thumbprint | sha1=SSLTHUMPRINT (Thumbprint of the SSL certificate your View Connection Server is using) |
| PCOIP External URL | UAG-EXTERNALIP:4172 |
| Blast External URL | UAG-InternetFQDN:443 |
| Tunnel External URL | UAG-InternetFQDN:443 |
You must also have a valid SSL certificate installed under “TLS Server Certificate Settings”. I’d recommend applying it to both the admin and internal interface. This is a certificate that must match the FQDN (internal and external) of your UAG appliance.
Once you’re good, you’re green!
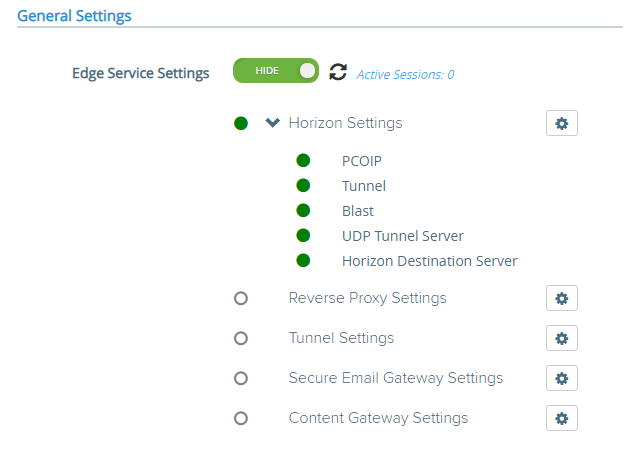
You should always see green lights, all protocols should work, and the connections should run smooth. If not, troubleshoot.
GPU Driver Issue
When using a GPU with your VM for 3D graphics, make sure you adhere to the requirements of the GPU vendor, along with the VMware requirements.
Some vendors have display count, resolution, and other limits that when reached, cause Blast Extreme to fail.
An incorrectly installed driver can also cause issues. Make sure that there are no issues with the drivers in the “Device Manager”.
VMware documents regarding 3D rendering:
- VMware – Best Practices for Configuring 3D Rendering for Full-Clone Virtual Machine Pools
- VMware – Configuring 3D Rendering for Full-Clone Virtual Machine Pools
- VMware – Configuring 3D Rendering for Automated Instant Clone Farms
- VMware – Configuring 3D Rendering for Instant-Clone Pools
- VMware – Preparing for NVIDIA GRID vGPU Capabilities for Full-Clone Virtual Machines
- VMware – Preparing for vDGA Capabilities for Full-Clone Virtual Machines
- VMware – Preparing for AMD MxGPU for Full-Clone Virtual Machines
Blast Extreme log files can be found on the guest VM in the following directory.
C:\ProgramData\VMware\VMware Blast\
Looking at these log files, you can find information that may pertain to the H.264 or display driver issues that will assist in troubleshooting.
When using GPUs such as Nvidia GRID and AMD MxGPU, it is recommended to disable the VMware SVGA 3D Driver and adapter inside of Device Manager after you install the applicable GPU drivers.
NVIDIA vGPU Issues
You may be experiencing issues related to the NVIDIA vGPU platform, either inside of the VM guest, or on the VMware ESXi host.
Please check out my NVIDIA vGPU Troubleshooting Guide – How to troubleshoot vGPU on VMware for more information on how to troubleshoot, as well as a list of common issues experienced with VMware Horizon and NVIDIA vGPU.
VMware Tools
A corrupt VMware tools install, whether software or drivers can cause display issues. Make sure that the drivers (including the display driver) are installed and functioning properly.
It may be a good idea to completely uninstall VMware Tools and re-install.
If you’re experiencing display driver issues (such as a blank screen), before re-installing VMware Tools try forcibly removing the display driver.
- Open “Device Manager”
- Right click on the VMware Display adapter and open “Properties”
- On the “Driver” tab, select “Uninstall”
- Check the box for “Delete the driver software for this device”.
This will fully remove the VMware driver. Now re-install VMware Tools.
Horizon Agent
Often, re-installing the Horizon Agent can resolve issues. Always make sure that VMware Tools are installed first before installing the Horizon Agent.
Make sure that if you are running 64-bit Windows in the VM then you install and use the 64-bit Horizon Agent.
You may experience issues with the “VMware Horizon Indirect Display Driver”. Some users have reported an error on this driver and issues loading it, resulting in a blank screen. To do this, I’d recommend forcibly uninstalling the driver and re-installing the Horizon Agent.
To forcibly remove the “VMware Horizon Indirect Display Driver”:
- Open “Device Manager”
- Right click on the “VMware Horizon Indirect Display Driver” and open “Properties”
- On the “Driver” tab, select “Uninstall”
- Check the box for “Delete the driver software for this device”.
Now proceed to uninstall and reinstall the Horizon View Agent.
When running the Horizon Agent on Horizon for Linux, make sure that forward and reverse DNS entries exist, and that DNS is functioning on the network where the Linux VM resides.
Also, as a reminder, it is recommended that you re-install the Horizon agent in versions up to and including Horizon 8 2103 after upgrading VMware Tools. As of Horizon 8 2106, you no longer need to re-install the Horizon Agent when performing a VMware Tools upgrade.
Video Settings (Video Memory (VRAM), Resolution, Number of Displays)
When experiencing video display issues or blank screens on VMware Horizon View, these could be associated with the guest VM’s memory, video memory (VRAM), display resolution, and number of displays.
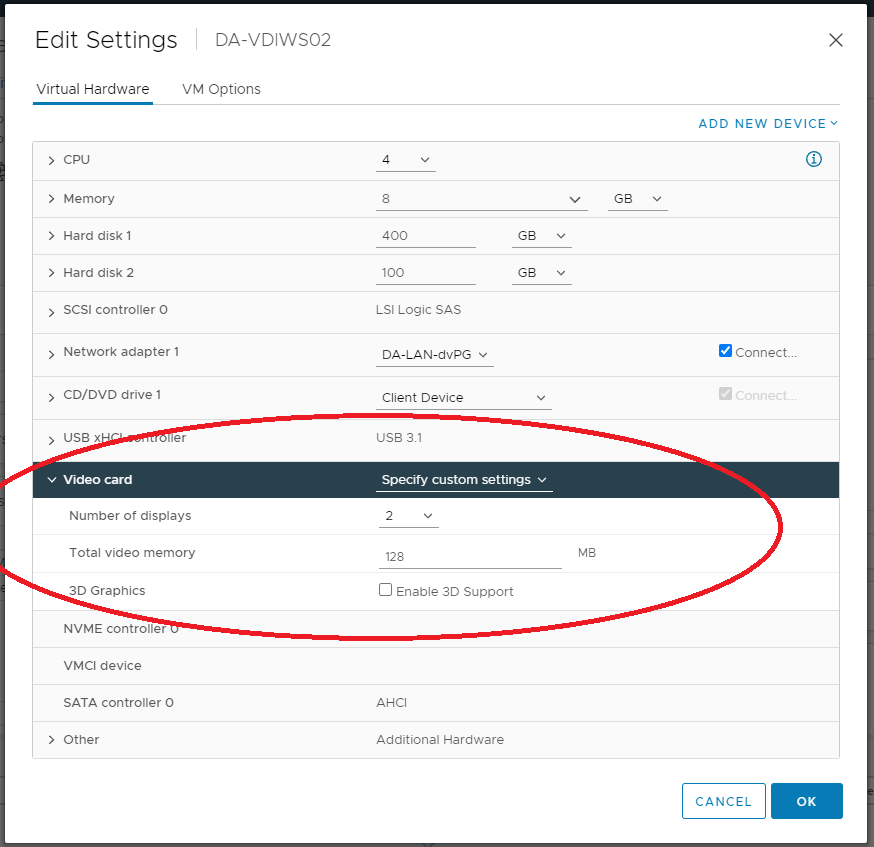
If you do not have enough Video RAM (VRAM) allocated to the virtual machine and/or you have too many displays (multi-monitor), then you can experience the blank screen with Horizon.
Make sure you are adhering to the specifications put forth by VMware. Please see the following links for more information.
- VMware – Monitors and Screen Resolution
- VMware – Estimating Memory Requirements for Virtual Machine Desktops
- VMware – 3D Renderer Options for Full-Clone Virtual Machine Pools
Master Image Resolution
While this isn’t likely to cause a blank screen issue (it can though), it’s always a good idea to set your image to a lower resolution before snapping or converting to a template for deployment.
It’s a lot easier for the VMs to start using lower resolution and VRAM (Video Memory) and then increase to what’s needed, instead of starting at a crazy high resolution and then getting adjusted down.
I consider it a good practice to reduce the graphics resolution before creating and deploying the image to the desktop pools.
Protocol
When troubleshooting blank screens with VMware Horizon, you need to try to identify whether it’s specific to the guest VM, or if it’s associated with the connection protocol you’re using (and the route it takes whether through a Connection Server, or UAG).
Always try different protocols to see if the issue is associated with all, or one. Then try establishing connections and find if it’s isolated direct to the Connection Server, or through the UAG.
If the issue is with a specific protocol, you can view the protocol log files. If the issue is with the UAG, you can troubleshoot the UAG.
Log files can be found in the following directory:
C:\ProgramData\VMware\
HTTPS Proxy and redirection issues
If you are connecting through a network that does passive and/or transparent HTTPS scanning or uses a proxy server, you may experience issues with inability to connect, or blank screens.
You’ll need to modify your firewall or proxy to allow the VMware connection and open the required ports for VMware Horizon and create an exception not to touch or manipulate the VMware Horizon related traffic.
Login banner or disclaimer (PCoIP)
I haven’t seen or heard of this one in some time, but when using VMware Horizon with PCoIP, sessions can fail or show a blank screen when the legal disclaimer login banner is used on the Windows instance (Windows 7, Windows 10, or Windows 11).
For more information on this issue, and how to resolve or workaround, visit https://kb.vmware.com/s/article/1016961.
Old version of VMware Horizon
It never stops surprising me how old some of the VMware Horizon View environments are that some businesses are running. VMware regularly updates, and releases new versions of VMware Horizon that resolve known issues and bugs in the software.
While it may be difficult, simply upgrading your VMware Horizon environment (VMware vSphere, View Connection Server, VMware Tools, VMware Horizon Agent) can often resolve many issues.
Blank Screen connecting to Physical PC running Horizon Agent
When you install the VMware Horizon Agent on a Physical PC, you may encounter issues with a blank screen.
This is usually caused by:
- Port blocking and/or firewall
- Running Windows 10 Pro instead of Windows 10 Enterprise (Enterprise edition is required on the Physical PC running the Horizon agent)
- DNS Issues
- Issues with the Horizon Agent and the “VMware Horizon Indirect Display driver”
After troubleshooting these issues, you should be able to resolve the issue.
Conclusion
As you can see there are a number of different things that can cause Horizon View to show a blank screen on login. It’s always best to try to understand how the technology works, and establish where the failure points are.
Let me know if this helped you out, or if you find other reasons and feel I should add them to the list!