If you’re like me and use a Synology NAS as an NFS or iSCSI datastore for your VMware environment, you want to optimize it as much as possible to reduce any hardware resource utilization.
Specifically we want to disable any services that we aren’t using which may use CPU or memory resources. On my DS1813+ I was having issues with a bug that was causing memory overflows (the post is here), and while dealing with that, I decided to take it a step further and optimize my unit.
Optimize the NAS
In my case, I don’t use any file services, and only use my Synology NAS (Synology DS1813+) as an NFS and iSCSI datastore. Specifically I use multipath for NFSv4.1 and iSCSI.
If you don’t use SMB (Samba / Windows File Shares), you can make some optimizations which will free up substantial system resources.
Disable and/or uninstall unneeded packages
First step, open up the “Package Center” in the web GUI and either disable, or uninstall all the packages that you don’t need, require, or use.
To disable a package, select the package in Package Center, then click on the arrow beside “Open”. A drop down will open up, and “Disable” or “Stop” will appear if you can turn off the service. This may or may not be persistent on a fresh boot.
To uninstall a package, select the packet in Package Center, then click on the arrow beside “Open”. A drop down will open up, and “Uninstall” will appear. Selecting this will uninstall the package.
Disable the indexing service
As mentioned here, the indexing service can consume quite a bit of RAM/memory and CPU on your Synology unit.
To stop this service, SSH in to the unit as admin, then us the command “sudo su” to get a root shell, and finally run this command.
synoservice --disable pkgctl-SynoFinder
The above command will probably not persist on boot, and needs to be ran each fresh boot. You can however uninstall the package with the command below to completely remove it.
synopkg uninstall SynoFinder
Doing this will free up substantial resources.
Disable SMB (Samba), and NMBD
I noticed that both smbd and nmbd (Samba/Windows File Share Services) were consuming quite a bit of CPU and memory as well. I don’t use these, so I can disable them.
To disable them, I ran the following command in an SSH session (remember to “sudo su” from admin to root).
Keep in mind that while this should be persistent on boot, it wasn’t on my system. Please see the section below on how to make it persistent on booth.
Disable thumbnail generation (thumbd)
When viewing processes on the Synology NAS and sorting by memory, there are numerous “thumbd” processes (sometimes over 10). These processes deal with thumbnail generation for the filestation viewer.
Since I’m not using this, I can disable it. To do this, we either have to rename or delete the following file. I do recommend making a backup of the file.
I’m going to rename it so that the service daemon can’t find it when it initializes, which causes the process not to start on boot.
cd /var/packages/FileStation/target/etc/conf/
mv thumbd.conf thumbd.conf.bak
Doing the above will stop it from running on boot.
Make the optimizations persistent on boot
In this section, I will show you how to make all the settings above persistent on boot. Even though I have removed the SynoFinder package, I still will create a startup script on the Synology NAS to “disable” it just to be safe.
First, SSH in to the unit, and run “sudo su” to get a root shell.
Run the following commands to change directory to the startup script, and open a text editor to create a startup script.
cd /usr/local/etc/rc.d/
vi speedup.sh
While in the vi file editor, press “i” to enter insert mode. Copy and paste the code below:
case "$1" in
start)
echo "Turning off memory garbage"
synoservice --disable nmbd
synoservice --disable samba
synoservice --disable pkgctl-SynoFinder
;;
stop)
echo "Pertend we care and are turning something on"
;;
*)
echo "Usage: $1 {start|stop}"
exit 1
esac
exit 0
Now press escape, then type “:wq” and hit enter to save and close the vi text editor. Run the following command to make the script executable.
chmod 755 speedup.sh
That’s it!
Conclusion
After making the above changes, you should see a substantial performance increase and reduction in system resources!
In the future I plan on digging deeper in to optimization as I still see other services I may be able to trim down, after confirming they aren’t essential to the function of the NAS.
Once I upgraded my Synology NAS to DSM 6.2 I started to experience frequent lockups and freezing on my DS1813+. The Synology DS1813+ would become unresponsive and I wouldn’t be able to SSH or use the web GUI to access it. In this state, NFS sometimes would become unresponsive.
When this occured, I would need to press and hold the power button to force it to shutdown, or pull the power. This is extremely risky as it can cause data corruption.
I’m currently running DSM 6.2.2-24922 Update 2.
The cause
This occurred for over a month until it started to interfere with ESXi hosts. I also noticed that the issue would occur when restarting any of my 3 ESXi hosts, and would definitely occur if I restarted more than one.
During the restarting, while logged in to the web GUI and SSH, I was able to see that the memory (RAM) usage would skyrocket. Finally the kernel would panic and attempt to reduce memory usage once the swap file had filled up (keep in mind my DS1813+ has 4GB of memory).
Analyzing “top” as well as looking at processes, I noticed the Synology index service was causing excessive memory and CPU usage. On a fresh boot of the NAS, it would consume over 500MB of memory.
The fix (Please scroll down and see updates)
In my case, I only use my Synology NAS for an NFS/iSCSI datastore for my ESXi environment, and do not use it for SMB (Samba/File Shares), so I don’t need the indexing service.
I went ahead and SSH’ed in to the unit, and ran the following commands to turn off the service. Please note, this needs to be run as root (use “sudo su” to elevate from admin to root).
synoservice --disable pkgctl-SynoFinder
While it did work, and the memory was instantly freed, the setting did not stay persistant on boot. To uninstalling the Indexing service, run the following command.
synopkg uninstall SynoFinder
Doing this resolved the issue and freed up tons of memory. The unit is now stable.
Update May 31st, 2020 – Increased Stability
After troubleshooting I noticed that the majority of stability issues would start occurring when ESXi hosts accessing NFS exports on the Synology diskstation are restarted.
I went ahead and stopped using NFS, started using iSCSI with MPIO, and the stability of the Synology NAS has greatly improved. I will continue to monitor this.
Update May 2nd, 2020 – It’s still crashing, and really frustrating me
Today I had to restart my 3 ESXi hosts that are connected to the NFS export on the Synology Disk Station. After restarting the hosts, the Synology device has gone in to a lock-up state once again. It appears the issue is still present.
The device is responding to pings, and still provides access to SMB and NFS, but the web GUI, SSH, and console access is unresponsive.
I’m officially going to start planning on either retiring this device as this is unacceptable, especially in addition to all the issues over the years, or I may try an attempt at hacking the Synology Diskstation to run my own OS.
Update April 21st, 2020 – What I thought was the fix
After a few more serious crashes and lockups, I finally decided to do something about this. I went ahead and backed up my data, deleted the arrays, performed a factory reset on the Synology Disk Station. I also zero’d the metadata and MBR off all the drives.
I then configured the Synology NAS from scratch, used Btrfs (instead of ext4), restored the backups.
The NAS now appears to be running great and has not suffered any lockups or crashses since. I’ve also been noticing that memory management is working a lot better.
I have a feeling that this issue was caused due to the long term chaining of updates (numerous updates installed over time), or the use of the ext4 filesystem.
Update March 20th, 2020
As of March 2020 this issue is still occurring on numerous new firmware updates and version. I’ve tried reaching out to Synology on twitter directly a few times about this issue as well as e-mail (indirectly regarding something else) and have still not received or heard a response. As of this time the issue is still occurring on a regular basis on DSM 6.2.2-24922 Update 4. I’ve taken production and important workloads of the device since I can’t have the device continuously crashing or freezing overnight.
Update – August 16th, 2019
My Synology NAS has been stable since I applied the fix, however after an uptime of a few weeks, I noticed that when restarting servers, the memory usage does hike up (example, from 6% to 46%). However, with the fixes applied above, the unit is stable and no longer crashes.
Sunday (July 14th, 2019) we had the opportunity to hike King Creek Ridge. I’d considering this hike a moderate hike, very steep, and can be completed in a short amount of time. Taking the traditional route to the summit, it took us around just under an hour. This hike is located in Kananaskis Country, and there is no cell reception anywhere on the trail.
There are other trails (and alternate trails) along this path. I do not recommend taking these or attempting these. Please read below to find out why.
King Creek Ridge is a steep ascent to an altitude of around 2,400m (7,874ft), so it’ll require some cardio. I completed this hike with my friend Elisha, and her step-dad Tim!
Stephen Wagner and Elisha on King Creek Ridge
King Creek Ridge Valley
On this hike, we met a nice group of other hikers who mentioned that they read in a book (that was 15 years old), about a loop on this trail. Once at the summit, they planned to go down the Mount Hood route to complete the loop. Using the map I had downloaded to my mobile, I actually had a copy of the Mount Hood route, so we figured we’d attempt it as well.
Mount Hood Route Detour
IMPORTANT: DO NOT ATTEMPT THE MOUNT HOOD ROUTE! IT IS AN OLD ROUTE AND THERE IS NO VISIBLE TRAIL. IT’S FULL OF DENSE BUSH, LIMITED VISIBILITY, AND HAS WILDLIFE (BEARS).
Once we had our time at the summit and relaxed (we flew up there pretty quick), we decided to try and locate the path down to the valley to complete the Mount Hood route. We located a small channel that was very steep and full of loose rocks (extremely dangerous). After navigating down, we noticed that an avalanche or weather related incident had damaged the path and it was simply a cliff. We proceeded to find a different way to go down in to the valley after doing a big of climbing down.
King Creek Ridge to Mount Hood Route
After the dangerous part, we found a steep path down (shown above) that we used to get in to the valley. Unfortunately this was short lived. Once getting in to the valley, we approached bush that was ~5 ft high, and numerous places to be ambushed by bears. We had to use boulders to throw in to the bushes ahead to make sure there were no bears further up (also using regular bursts of the air horn).
Finally once we made it to the creek, we realized using the GPS that the Mount Hood Route was extremely old and grown over. There was no visible trail for Mount Hood Route. We continued along the creek (walking in/over it) for some time until it became so difficult and dangerous that we decided we had to turn around and go back.
Back to King Creek Ridge from Mount Hood Route
The hike/climb back up to the summit of the King Creek Ridge hike was grueling. It was one of the steepest hikes I’ve done, and finished with sections that we actually had to climb (using our hands) to get back to the King Creek Ridge summit.
Back on to King Creek Ridge
So the detour, while extremely dangerous and unnerving, actually made the hike as long as we had originally wanted it, and as fun as we had hoped, so it turned out pretty good (after we realized we weren’t going to be stuck in the valley all night, lol).
We finally descended down the way we had originally came up, and all in all the day turned out to be amazing! The hiking trail actually was extremely busy later on in the afternoon by the time we went down.
King Creek Ridge Hike Pictures
Below are pictures from the hike, please click to enter the attachment page, and then click again to enlarge. The below are low quality thumbnails, when you click on the image it will open the high-resolution image.
Stay safe, be bear aware, and always verify trails exist before you head out on to them!
Last week (July 3rd, 2019), I hiked and climbed Mount Lawrence Grassi with my friend Elisha. It was a very aggressive hike, ascending very quickly to an altitude of 2,685 meters (8,809 feet).
It took us around 7 hours and 45 minutes, with a total moving time of 4 hours and 43 minutes. We completed a total elevation gain of 1,177m. My cardio has been horrible this year as I’ve been focusing on strength training so I slowed us down a little bit.
Picture gallery is below of the hike.
I’d only recommend this hike only for advanced hikers as the last 100 feet can be extremely dangerous (risk of slipping, sliding off cliff on both sides). Cell phone reception (for emergencies) is available for most of the hike.
Stephen Wagner on Mount Lawrence Grassi
We’ve had issues with weather this year, but fortunately for us we chose the perfect day. It was a bit chilly at the top, but it turned out perfectly! The views from the summit were amazing!
Other than the sketchy 100ft at the top, the only other issue we had was a bear encounter on the way back to the vehicle. Once we got back to the bottom of the mountain, starting our 2km walk to the vehicle, we crossed paths with a black bear. We immediately prepped our bear counter-measures (we always carry bear mace, bear bangers, air horn, etc), however two chirps of the air horn caused it to retreat in to the forest.
Below are pictures from the hike, please click to enlarge. The below are low quality thumbnails, when you click on the image it will open the high-resolution image.
The best photos are at the end of the album when we reached the summit!
Recently I had the pleasure of ordering, installing, and configuring some new Ubiquiti UniFi network products, including a switch, wireless access points, and more! Today, I will review the Ubiquiti UniFi line of products for you!
My company Digitally Accurate Inc. is an Ubiquiti reseller, and we have Ubiquiti product in inventory and stock in our Vancouver and Toronto warehouses. Contact us if you’re looking at purchasing any Ubiquiti gear in Canada!
There are plenty of pictures below! 🙂
Update – March 20th 2020
It’s been just over 8 months now and I’m still in love with and highly recommend the UniFi hardware! It’s been working great, I’ve had no issues with any firmware updates or UniFi Controller updates, and it’s been rock solid!
The only problem I’ve experienced is an issue auto-negotiating 10Gig links with the SFP+ to 10GBase-T module. Forcing 10G on the server resolved this issue permanently.
I’m excited to add even more UniFi equipment to my network! Please enjoy this Ubiquiti UniFi Review!
The back story
For some time I’ve been wanting to replace a bunch of aging networking equipment at my company. This includes switches and wireless access points, and I wanted to consolidate the number of pieces of networking equipment I used. No more daisy chaining switches!
Wireless
First off, up to date I have been re-purposing consumer grade wireless routers as access points. While this has worked by disabling the router functions, DHCP, and DNS, it’s still not ideal. I wanted a true managed wireless solution. I always wanted proper coverage and no dropped connections.
Switching
Secondly, I’ve also been using a number of cheap daisy chained 8-port network switches. The amount of cables I use is absolutely crazy, the power-bar space for the transformers is crazy, and this is just crazy dumb! I wanted a true business/enterprise class manageable network switch that could handle all the cabling requirements my business has with all it’s servers, SANs, NASs, and other equipment.
Multiple Networks
Third, I’ve been using the multiple switches to maintain 4 different isolated networks across my virtualization stack. It would be ideal to implement VLANs on VLAN capable hardware, to consolidate, and ease management of the environment.
10Gb Requirement
Fourth, I do require some 10Gb capabilities. While my servers are using multiple SFP+ DAC cables to direct-connect to the SAN, I still have numerous unused 10GBASET NICs and ports on my servers that I’d like to use. It would be fantastic if I could use this as a backhaul to a switch.
The Goal
Ultimately I wanted a business/enterprise class networking solution, that could handle all my wireless and networking needs, in an easy to manage way, and in an affordable way that wouldn’t break the bank.
After researching a number of vendors, weighing the pros/cons, I found the answer: Ubiquiti UniFi
Ubiquiti UniFi
Ubiquiti UniFi Hardware
Ubiquiti UniFi is a portfolio of enterprise grade products including wireless technologies, network switching, cloud management capabilities, and other hardware technology.
UniFi offers the latest technologies at affordable prices. They also allow you to integrate with the cloud, or keep everything separate and centrally managed on your own hardware and software.
The UniFi products support a number of enterprise technologies you’d normally find in enterprise gear, such as central management, VLANs, multi-SSID wireless, Guest WiFi access, Captive Portal, and way more!
They also have a beautiful switch line up consisting of numerous different port options, PoE options, and uplink options (SFP, SFP+, etc).
The Solution
So, after making the decision to switch to Ubiquiti UniFi, I spec’ed out the hardware I wanted to purchase. See below for the items I ordered:
I ordered the equipment from my Vancouver warehouse (as mentioned before, my company has stock in Vancouver/Toronto), and waited!
2 days later, the equipment arrived…
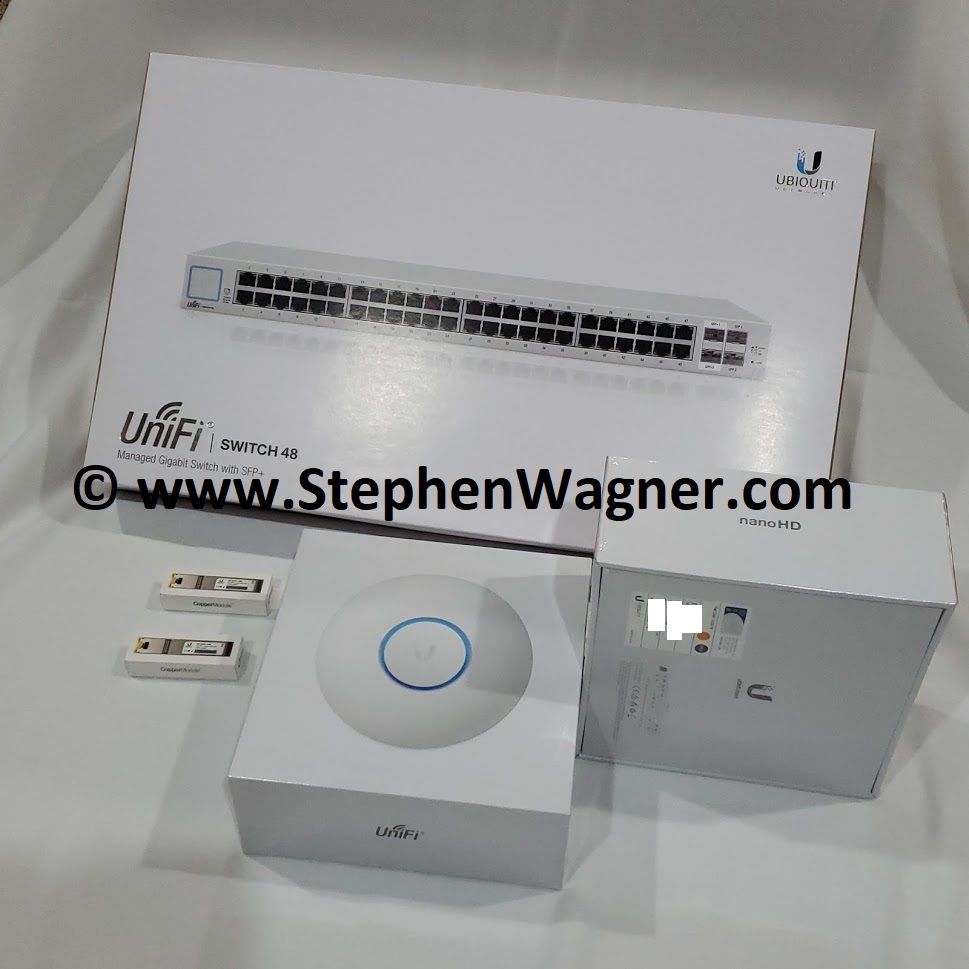
Ubiquiti UniFi Shipment
I was very impressed with the packaging! Even opening the products, you were actually “presented” with the products. Very nicely done Ubiquiti!
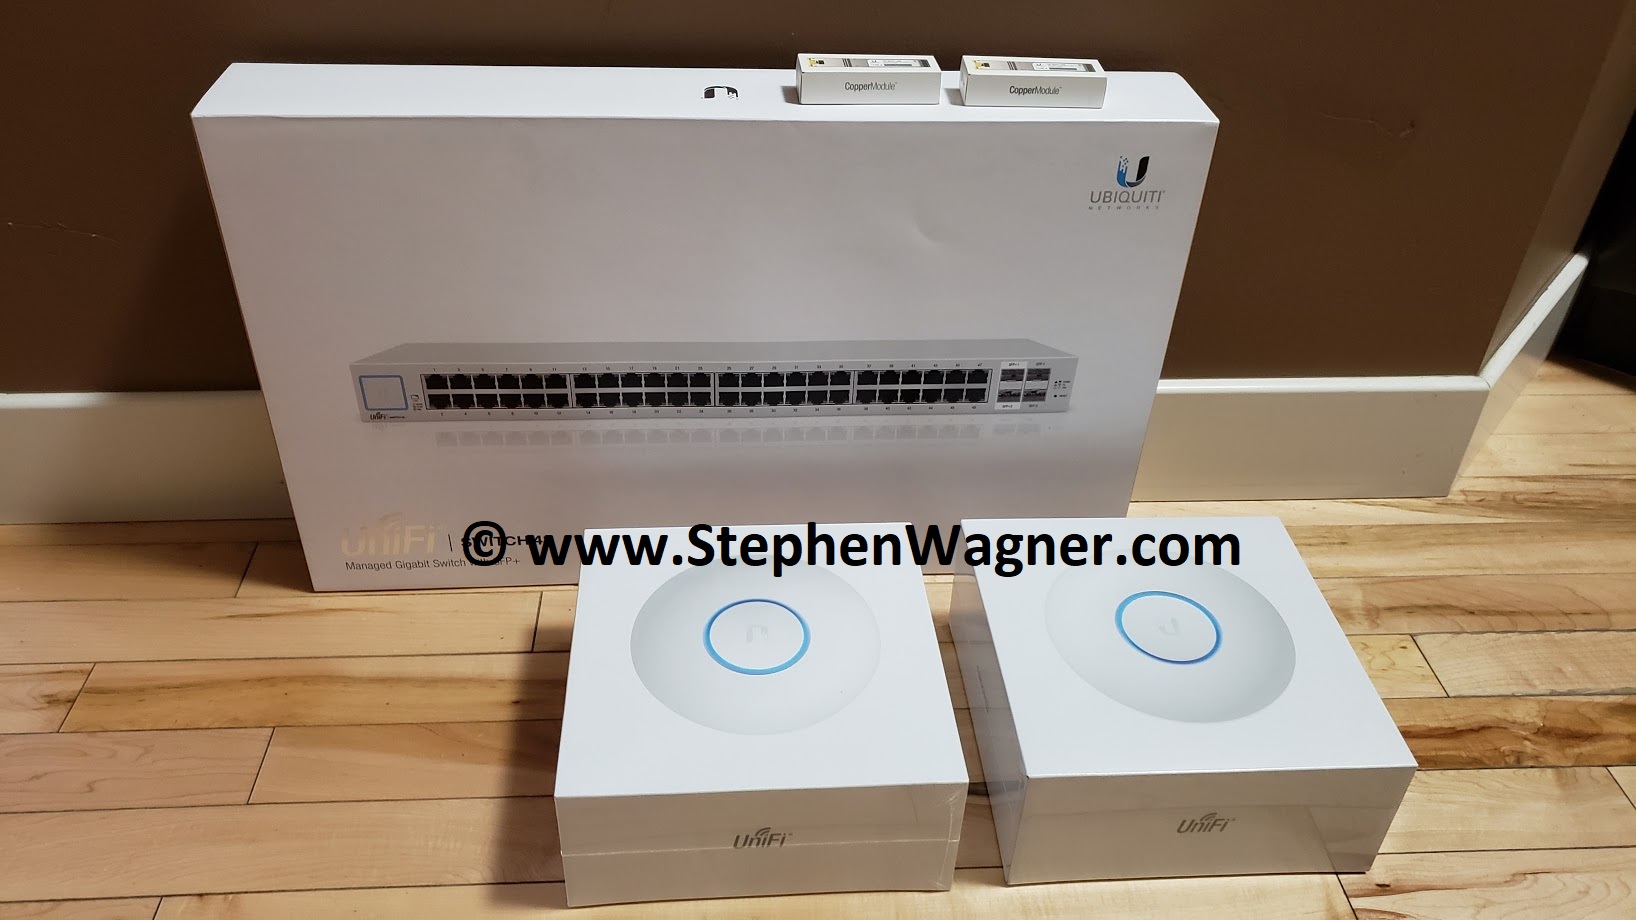
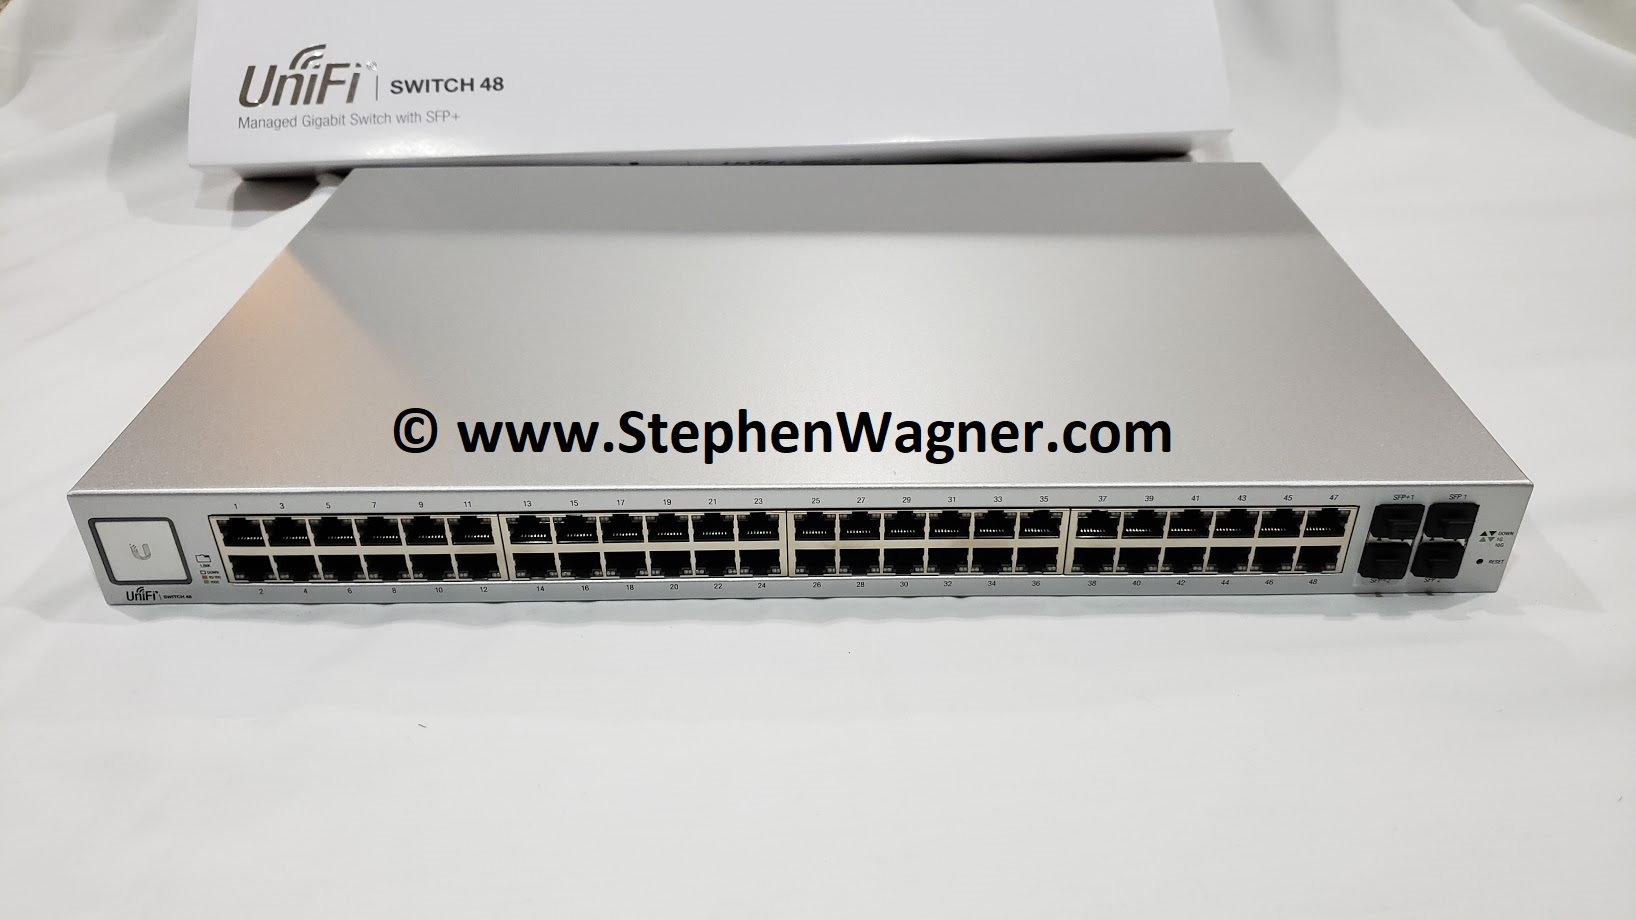
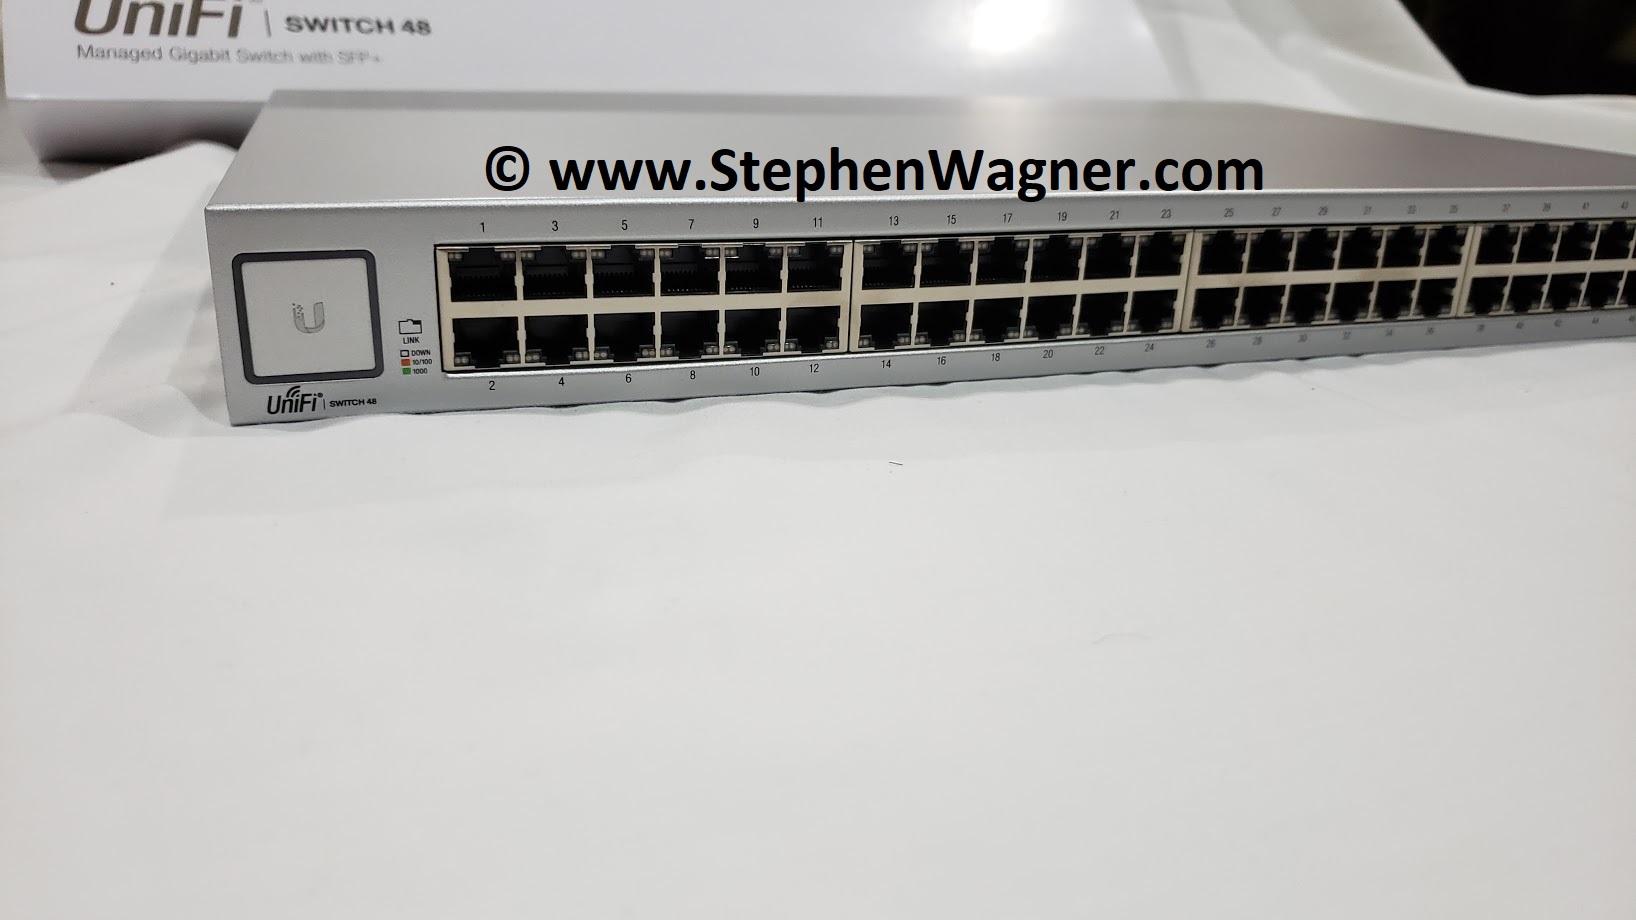
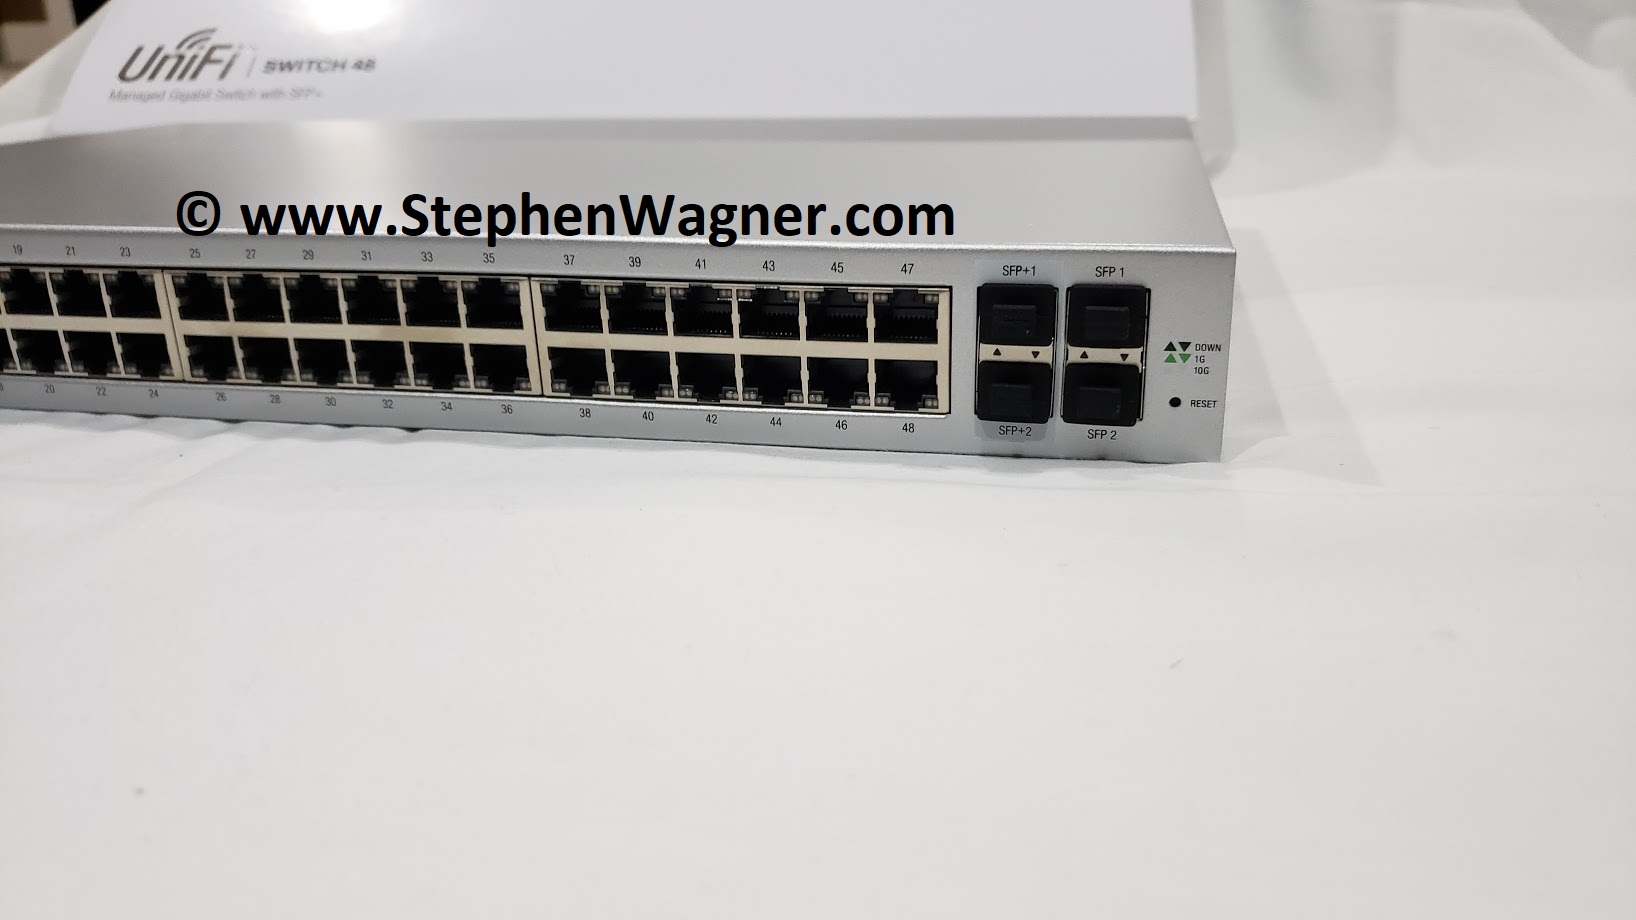
Ubiquiti UniFi Switch 48
Ubiquiti UniFi Switch 48
The UniFi Switch 48, provides 48 x 1Gb standard ports, along with 2 x 10Gb SFP+ ports, and 2 x 1Gb SFP ports.
You can order this switch with multiple PoE options, however I ordered the non-PoE version.
Ubiquiti UniFi Switch 48 Left Side
The switch has 70Gbps of non-blocking throughput, and 140Gbps of switching capacity.
The switch does have fans, however I haven’t heard them come on except for the initial power-up test.
Left view of Ubiquiti UniFi Switch 48
The SFP+ modules do run hot (hot to the touch), however after doing research I found out this is completely normal. There is a number of SFP+ and SFP module options that you can populate the ports with on the switch.
Ubiquiti UniFi nanoHD
Ubiquiti UniFi nanoHD Wireless Access Point
The UniFi nanoHD wireless access point is a compact (smaller than the other UniFi APs) 802.11ac Wave2 device with MU-MIMO technology.
The unit is powered via PoE and is designed for roof mounting, although works great on a wall, or sitting on a desk.
Ubiquiti UniFi nanoHD unboxing
The single quantity SKUs (like the one I ordered) include a PoE injector as seen above, however the multi-quantity SKUs do not. You can either use the PoE injector, or power it via your switch if your switch supports PoE.
The unit also ships with a roof mounting bracket and a getting started flyer.
On the 5Ghz band, the unit has a maximum throughput of 1733Mbps (1.73Gbps), and the 2.4Ghz band has a maximum throughput of 300Mbps.
The nanoHD supports a maximum of 8 seperate SSIDs per radio.
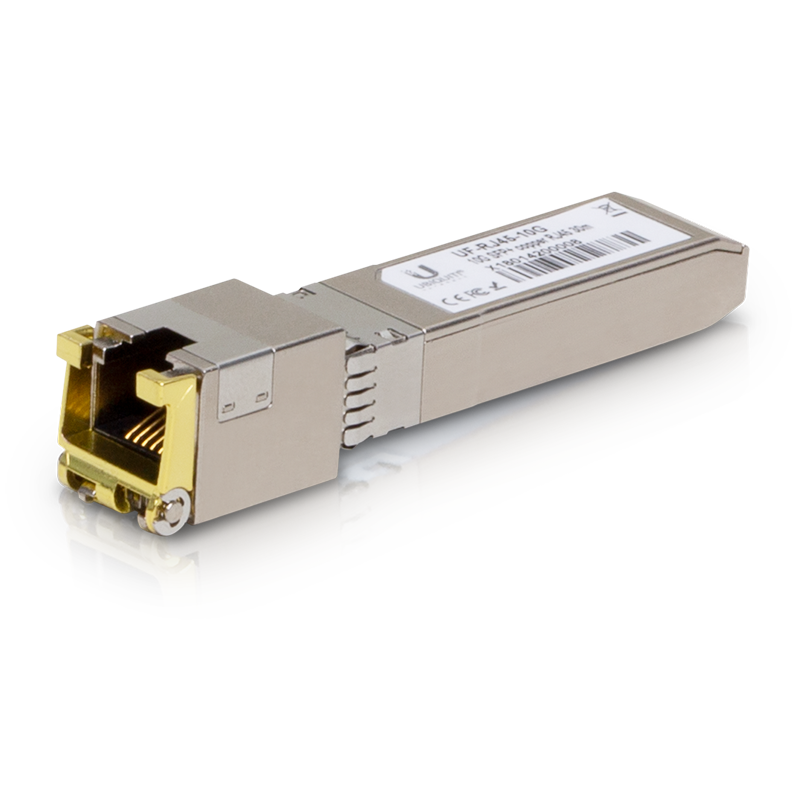
Ubiquiti 10GBASE-T SFP+ CopperModule
10GBASE-T CopperModule UF-RJ45-10G
The 10GBASE-T SFP+ CopperModule allows you to connect RJ45 10Gb copper ethernet to the SFP+ port on a switch. This allows you to connect devices or other switches that support 10Gb links over RJ45 ethernet.
Ubiquiti has a number of other SFP+ and SFP modules that you can use to populate your ports depending on your requirements.
UniFi Controller
The UniFi controller is the software (or hardware) that controls and centrally manages all the UniFi products. In my specific environment, I deployed a virtual machine running Ubuntu Linux, installed the apt repo’s for the UniFi Controller, installed the UniFi controller, and then configured it.
You can also purchase a UniFi Cloud key, which is a hardware device that runs the UniFi controller software. This removes the need to deploy a computer, VM, or additional hardware to install the controller on.
Inside of the UniFi controller, you create your wireless networks, network profiles, network switch port profiles, and other configuration, so that it can be easily provisioned to hardware as you add it and expand your network.
My Configuration, Notes, and Observations
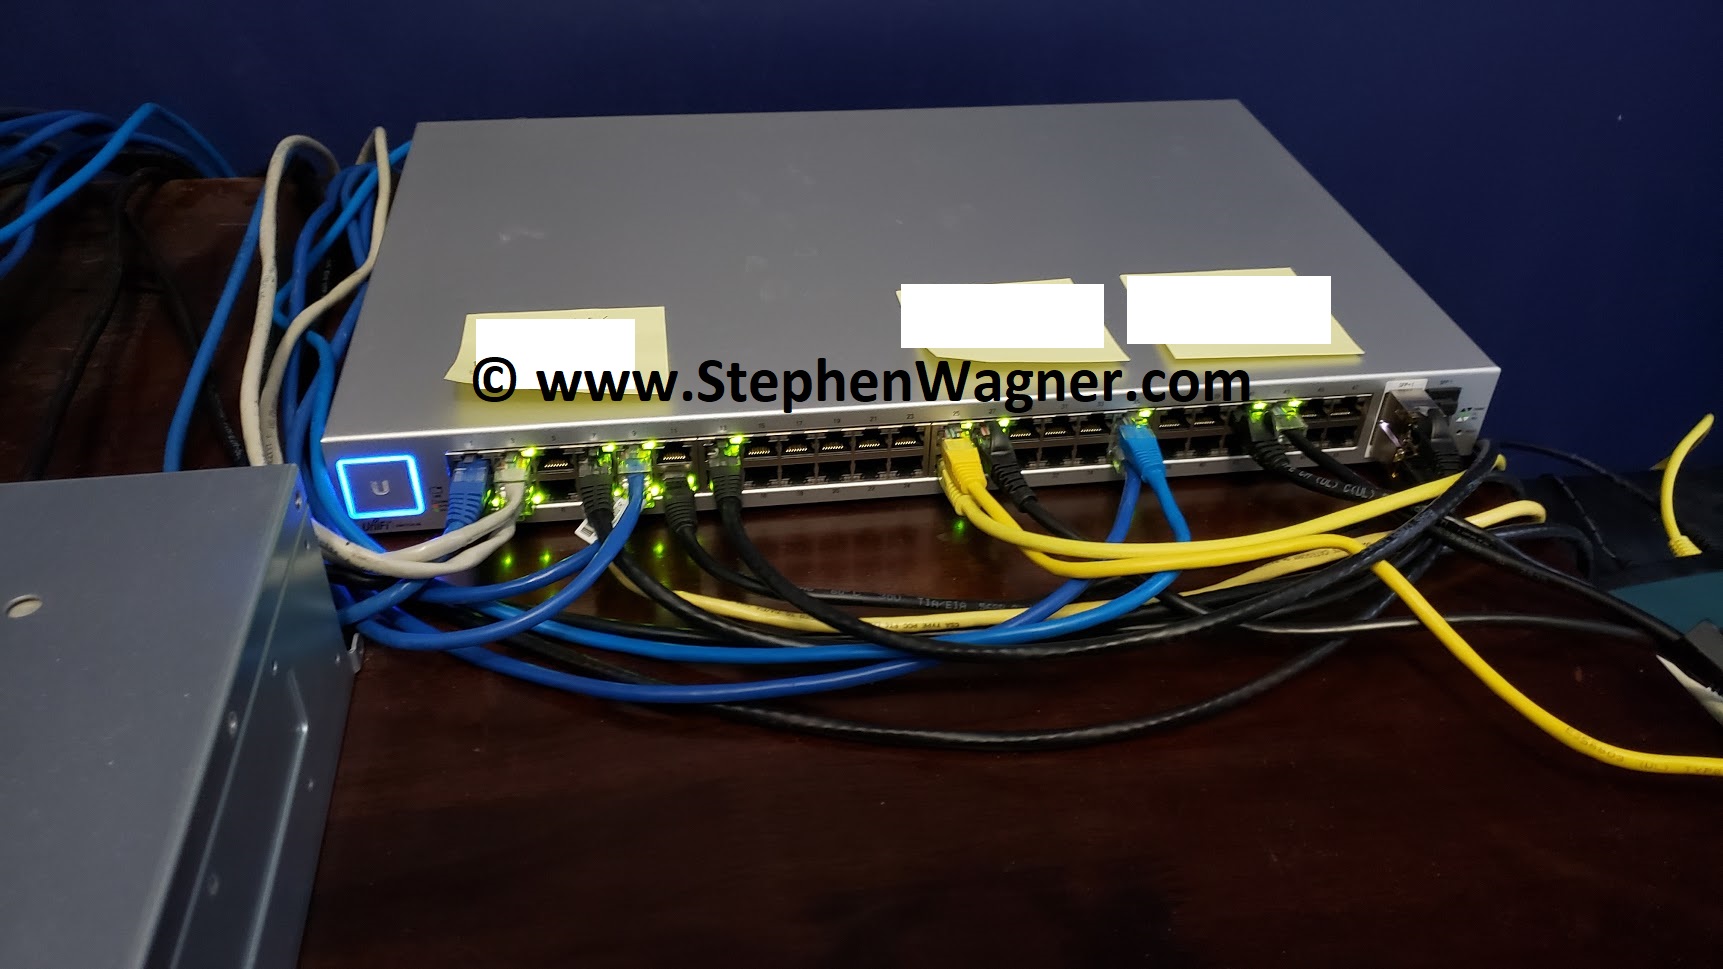
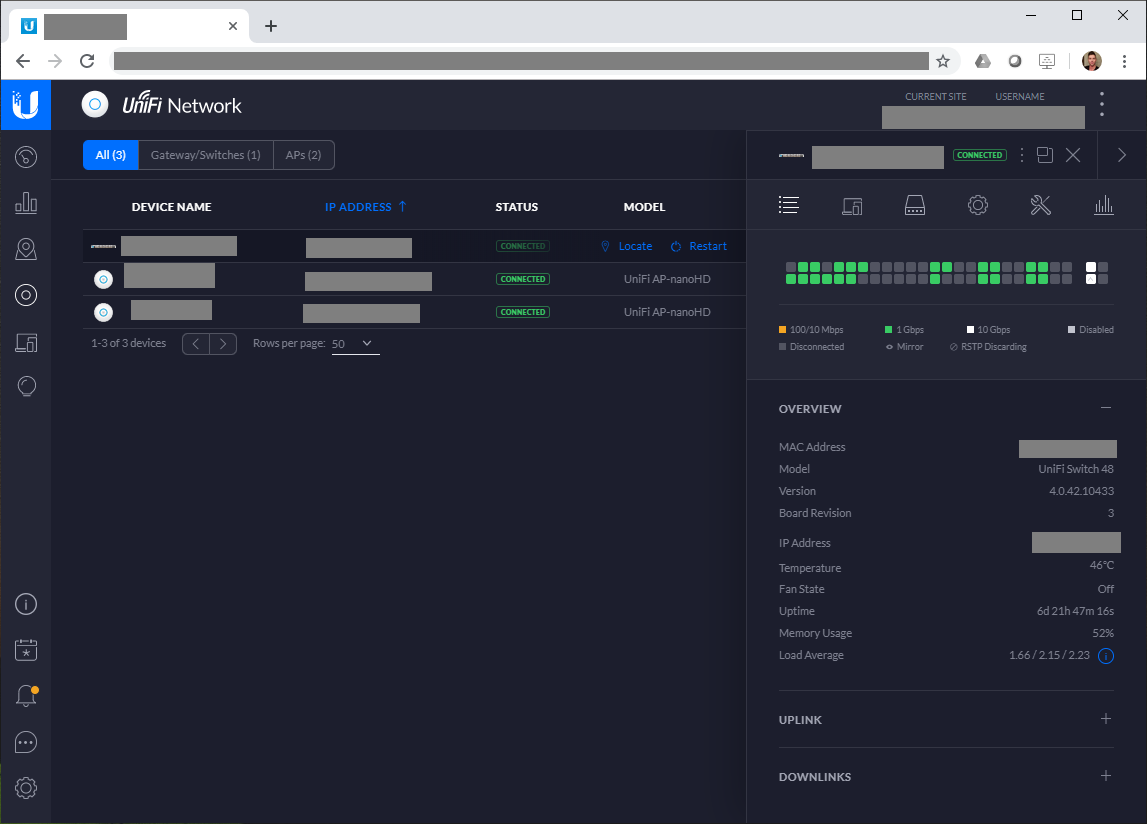
Ubiquiti UniFi Switch 48
For my configuration on the UniFi controller, I configured 9 VLANs, 4 SSID wireless networks, and numerous switch profiles for aggregation (via LACP).
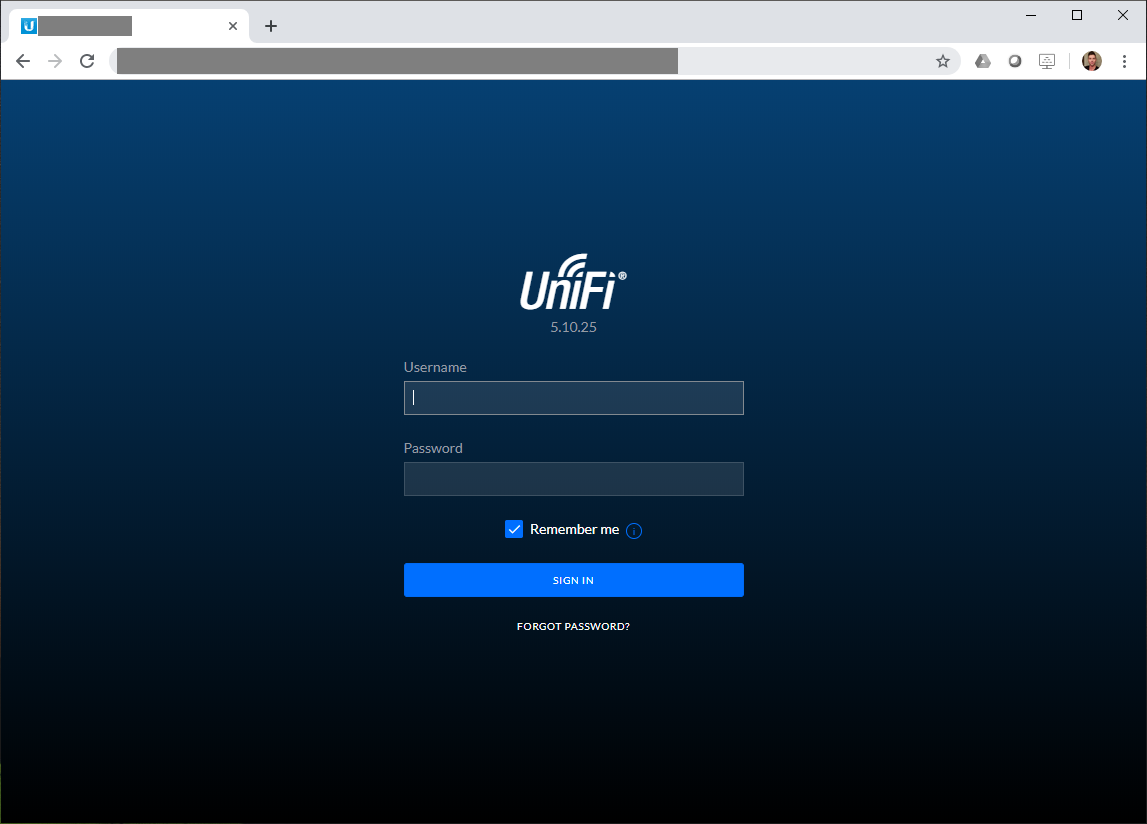
UniFi Controller Login
When bringing the switch online, the profiles were provisioned and I could attach the profiles to individual network ports, or groups of ports. I could also override these profiles and manually set aggregation, VLAN IDs, trunking, etc if need be.
UniFi Controller Switch Information
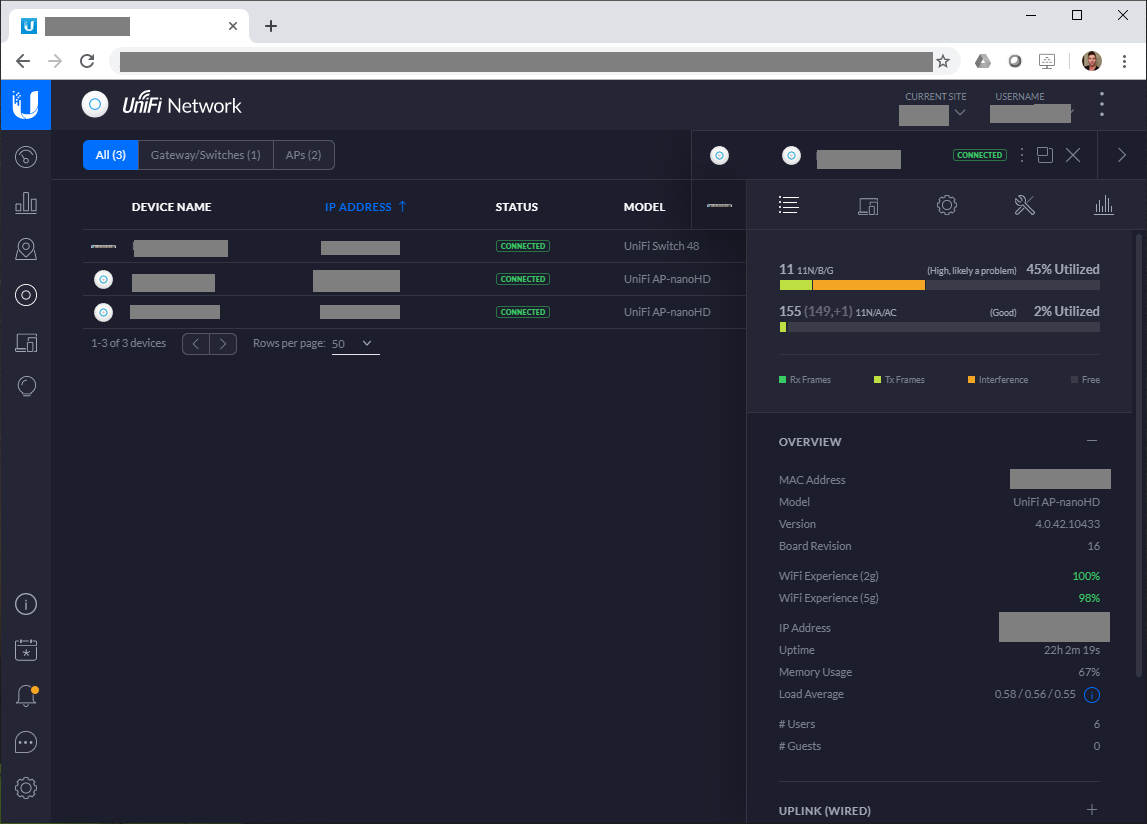
Since I’m using VLANs and want to configure multiple SSIDs, I need to have the wireless access points connected to a VLAN trunk, so that each network is available to be broadcast by the nanoHD APs. Since I configured the VLAN and network profiles earlier, this was instantly deployed automatically as I powered them on. If you had a simple network and didn’t use VLANs, none of this would be necessary and you’d be up and running in minutes.
UniFi Controller Wireless Access Point Information
Inserting the 10GBASE-T CopperModule in to the SFP+ ports on the switch, they were instantly detected. Connecting my 2 HPE DL360p Servers using Cat6, I was able to establish a 10Gb link with both servers instantly. The connection has been rock solid since for over 7 days. These connections are used as a VLAN trunks to my VMware vSphere instance. I also have a secondary connection from each server at 1Gb as failover (standby).
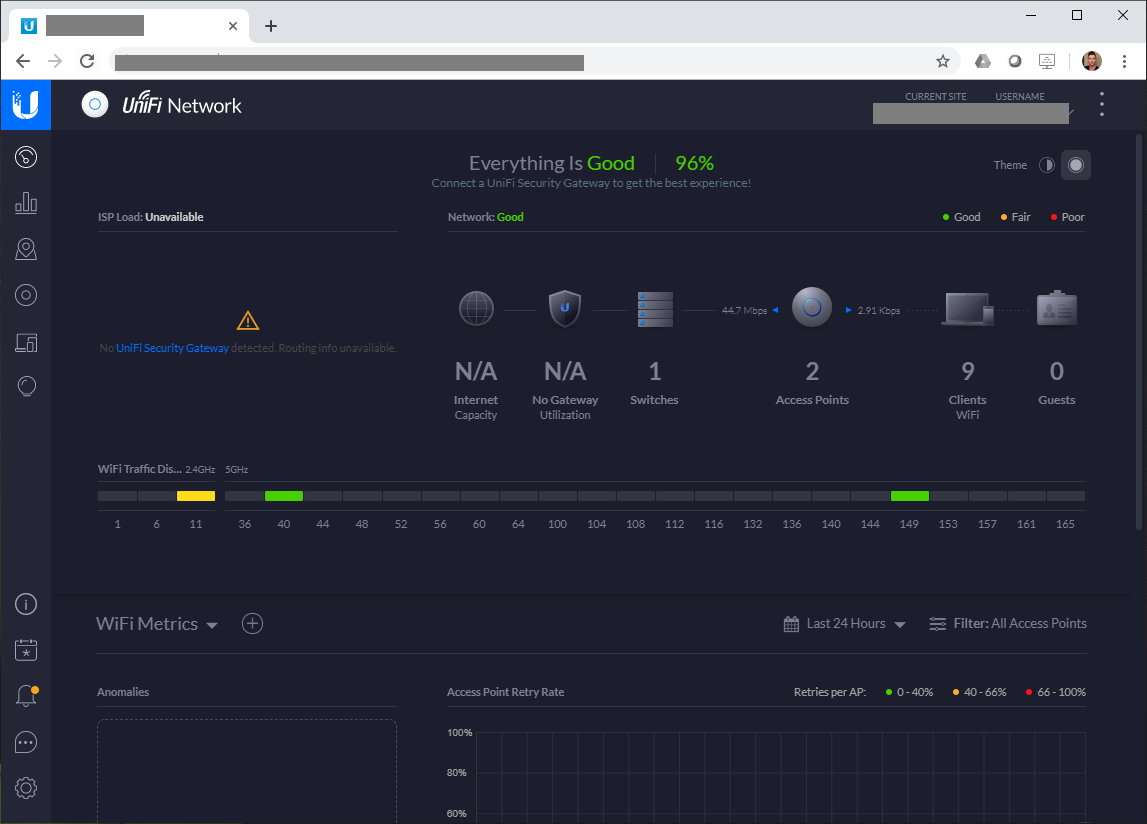
UniFi Controller Dashboard
Enabling Jumbo frames was easy, and Ubiquiti UniFi fully supports it. While I couldn’t find out the exact MTU, I do know it’s around 9000. I’m assuming they allotted slightly more to account for the extra bytes due to VLAN tagging.
Overall Review
Overall, I’m extremely happy and impressed with the product. I’d definitely recommend this to clients, as well as friends and family.
The features and functionality make this product perfect for any business. And with the price point and ease of management, this equipment would be suitable for home and power users as well!
Not only did I get up and running in no time with an extremely complicated configuration, but it’s been rock solid now for over 7 days. If you had a simple configuration, you could have the equipment deployed in minutes.
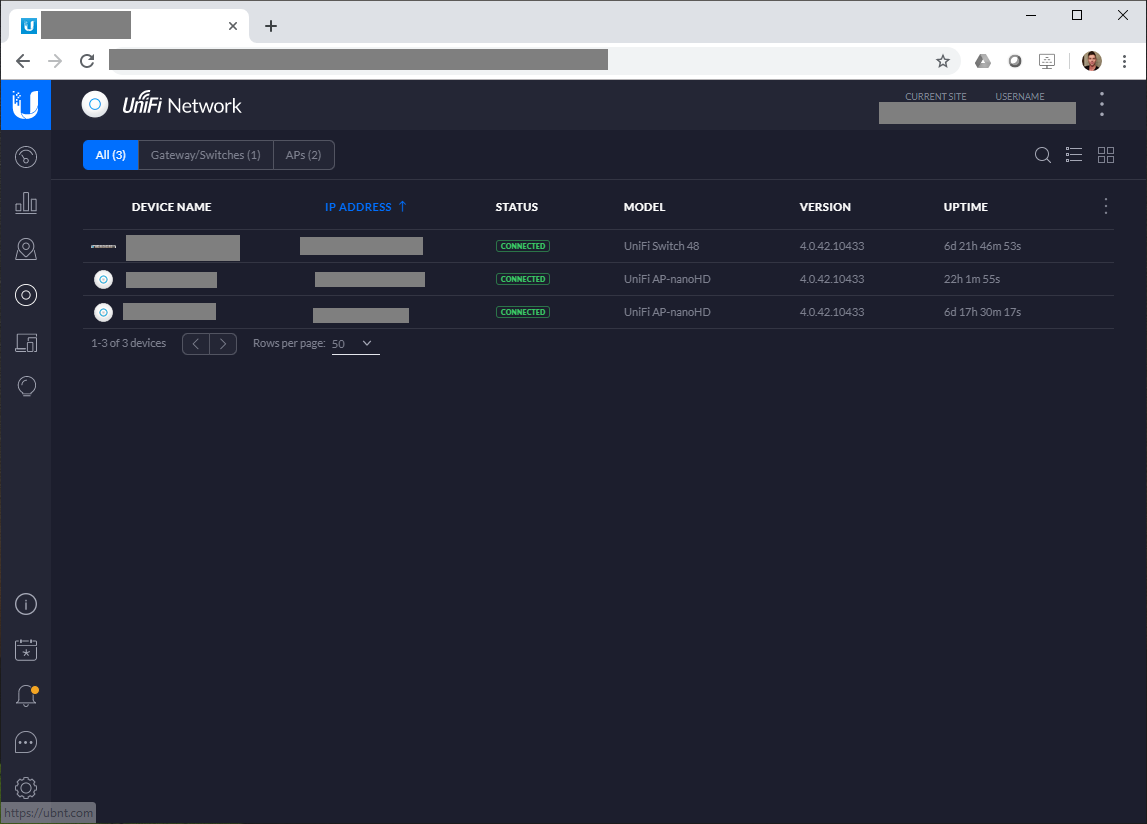
UniFi Controller Device List
What I liked the most:
Wireless Speed
Easy Switch Port Configuration
Easy Wireless/SSID Deployment and Configuration
Ease of Management (really easy yet extremely powerful)
Monitoring and Statistics inside of UniFi Controller
E-Mail notifications of rogue APs and other alerts
Visibly beautiful hardware
PoE injectors are included with single quantity AP SKUs
Product lineup available
Smartphone app for Android/iOS (Configure, Monitor, Deploy)
Reliable 10Gb on the CopperModule SFP+ 10GBASE-T Modules
Getting back to basics, the equipment has filled all the requirements I originally had and than some, I’m extremely happy!
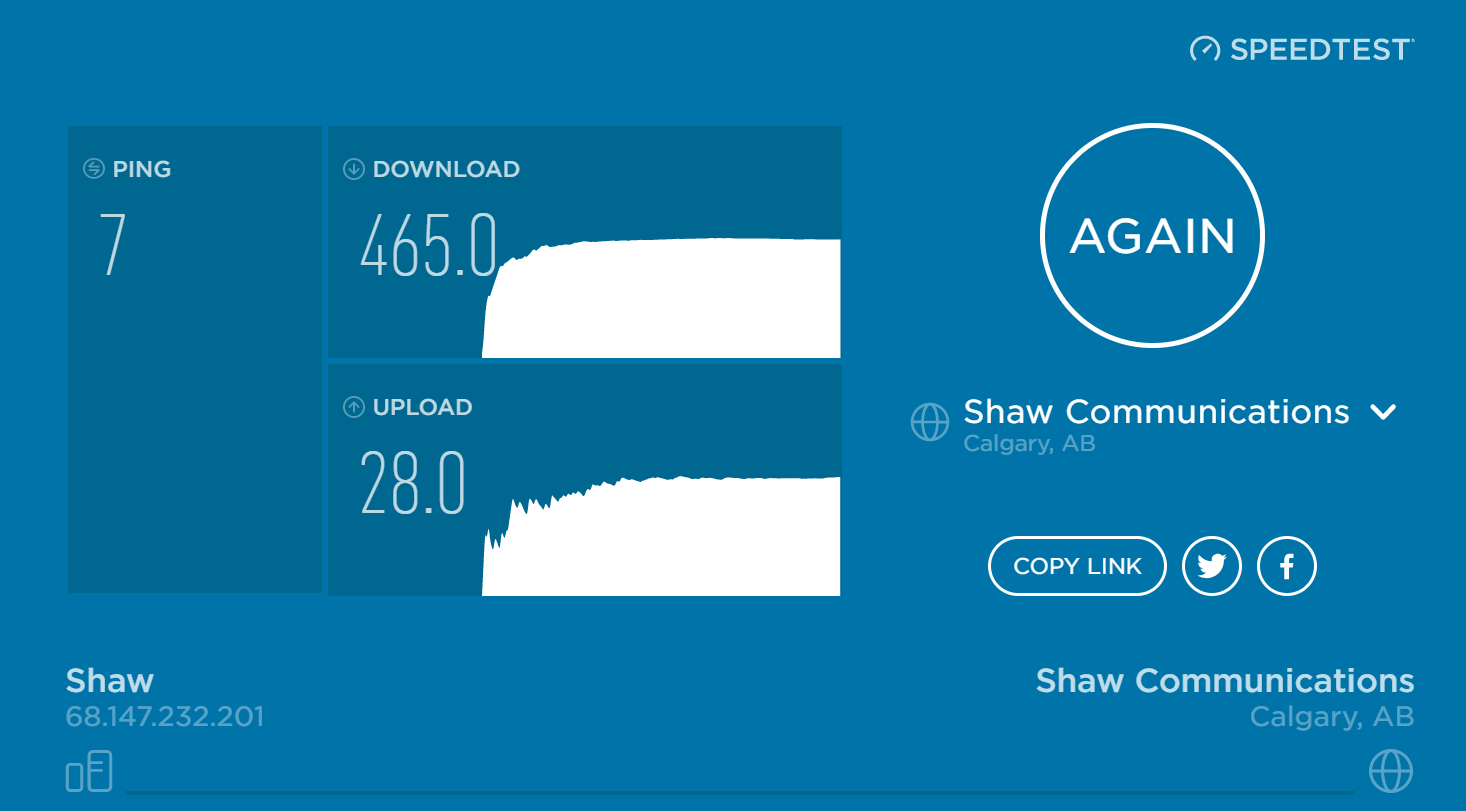
And I almost forgot to mention, the wireless is FAST! Absolutely no complaints. I’ve posted a speed test below, please note I’ve achieved way faster accessing content internally, however this was limited by my internet connection at the time.
SpeedTest
I’m actually looking forward to purchasing some more equipment, my shopping list includes:
More nanoHD APs for coverage
Possibly a couple UniFi HD In-Wall units for testing
2 x UniFi Switch 16 XG for SAN connectivity
4 x UniFi Switch 8 (150W) for remote cable drops and PoE
Hope this review helps if you’re considering Ubiquiti! And remember, I’m a re-seller so I can offer some very attractive pricing on this equipment!
This website uses cookies to improve your experience. We'll assume you're ok with this, but you can opt-out if you wish.
Do you accept the use of cookies and accept our privacy policy? AcceptRejectCookie and Privacy Policy
Privacy & Cookies Policy
Privacy Overview
This website uses cookies to improve your experience while you navigate through the website. Out of these cookies, the cookies that are categorized as necessary are stored on your browser as they are essential for the working of basic functionalities of the website. We also use third-party cookies that help us analyze and understand how you use this website. These cookies will be stored in your browser only with your consent. You also have the option to opt-out of these cookies. But opting out of some of these cookies may have an effect on your browsing experience.